eclipse+maven搭建springboot项目入门
一.下载jdk,例如(jdk1.8.171) 安装(注意仅仅安装jdk就可以了,不要安装jre,设置JAVA_HOME,配置jdk环境变量)
二.下载maven(apache-maven-3.5.3-bin.zip),解压后设置环境变量,修改配置文件。
1.D:\apache-maven-3.5.3\conf\settings.xml
<localRepository>E:/repo</localRepository> 本地文件存储位置,默认为Default: ${user.home}/.m2/repository,默认位置会占用C盘
2.修改远程仓库地址(默认仓库为mavne官方仓库,速度较慢)
在mirrors节点下添加以下信息(阿里云mavven镜像仓库,国内服务器,速度快,也可自己建立镜像仓库)
<mirror>

      <id>alimaven</id>

      <mirrorOf>central</mirrorOf>

      <name>aliyun maven</name>

      <url>http://maven.aliyun.com/nexus/content/groups/public/</url>

</mirror>
三.在eclipse配置maven工具
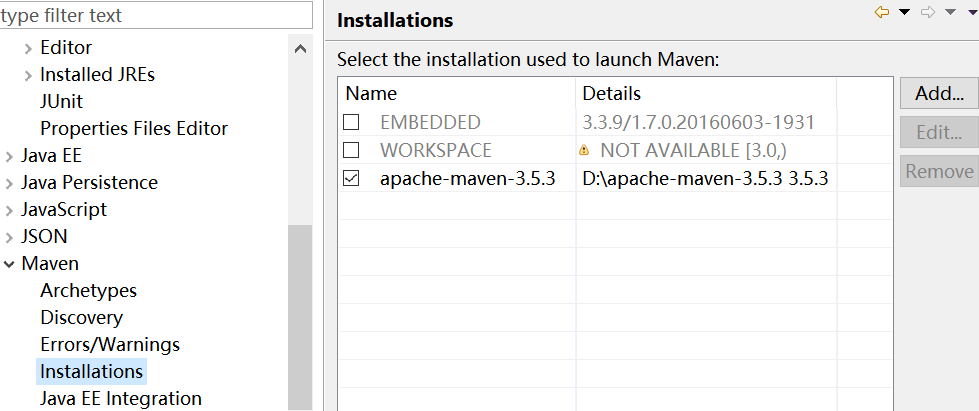
windows->Prefereces->Maven->Installations 添加maven工具

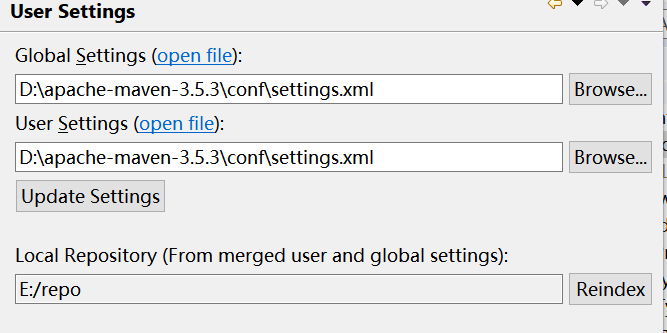
windows-->Prefereces->Maven->User Settings 将Global Settings和User settings选中为mavne中的settings.xml

四.开始创建maven项目
File->New->Mavne Project
GroupId 组织名(包名) 例如 com.svc.demo
ArtifactId 项目名 springboot-demo
最终pom.xml如下(mavne是通过pom.xml来维护管理项目的,最终只要维护pom .xml即可)
<project xmlns="http://maven.apache.org/POM/4.0.0" xmlns:xsi="http://www.w3.org/2001/XMLSchema-instance"

    xsi:schemaLocation="http://maven.apache.org/POM/4.0.0 http://maven.apache.org/xsd/maven-4.0.0.xsd">

    <modelVersion>4.0.0</modelVersion>

    <groupId>com.svc.demo</groupId>

    <artifactId>springboot-demo</artifactId>

    <version>0.0.1-SNAPSHOT</version>

    <packaging>jar</packaging>

    <!--

        <name>springboot-svc-demo</name>

        <url>http://maven.apache.org</url>

        -->

    <!-- 引入springboot parent-->

    <parent>

        <groupId>org.springframework.boot</groupId>

        <artifactId>spring-boot-starter-parent</artifactId>

        <version>1.5.10.RELEASE</version>

        <relativePath/>

    </parent>

    <!-- 引入springCloud,单独springboot不需要-->

    <!--

        <dependencyManagement>

            <dependencies>

                <dependency>

                    <groupId>org.springframework.cloud</groupId>

                    <artifactId>spring-cloud-starter-parent</artifactId>

                    <version>Edgware.SR3</version>

                    <type>pom</type>

                    <scope>import</scope>

                </dependency>

            </dependencies>

        </dependencyManagement>

        -->

    <properties>

        <project.build.sourceEncoding>UTF-8</project.build.sourceEncoding>

        <project.reporting.outputEncoding>UTF-8</project.reporting.outputEncoding>

        <java.version>1.8</java.version>

        <!--swagger2组件

            <springfox-swagger2.version>2.6.0</springfox-swagger2.version>

            -->

        <!--格式化mavne时间

            <maven.build.timestamp.format>yyyyMMddHHmmss</maven.build.timestamp.format>

            -->

    </properties>

    <!-- 依赖组件-->

    <dependencies>

        <dependency>

            <groupId>org.springframework.boot</groupId>

            <artifactId>spring-boot-starter-web</artifactId>

        </dependency>

        <!--thymeleaf 模板引擎-->

        <dependency>

            <groupId>org.springframework.boot</groupId>

            <artifactId>spring-boot-starter-thymeleaf</artifactId>

        </dependency>

        <!--测试组件-->

        <dependency>

            <groupId>org.springframework.boot</groupId>

            <artifactId>spring-boot-starter-test</artifactId>

            <scope>test</scope>

        </dependency>

        <!--添加html5支持-->

        <dependency>

            <groupId>net.sourceforge.nekohtml</groupId>

            <artifactId>nekohtml</artifactId>

        </dependency>

        <!-- 热启动,便于开发

            <dependency>

                <groupId>org.springframework.boot</groupId>

                <artifactId>spring-boot-devtools</artifactId>

                <optional>true</optional>

            </dependency>

            -->

        <!--注册中心eureka组件-->

        <!--

            <dependency>

                <groupId>org.springframework.cloud</groupId>

                <artifactId>spring-cloud-starter-eureka</artifactId>

            </dependency>

            -->

        <!-- 添加Swagger2依赖,用于生成接口文档

            <dependency>

                <groupId>io.springfox</groupId>

                <artifactId>springfox-swagger2</artifactId>

                <version>${springfox-swagger2.version}</version>

            </dependency>

            <dependency>

                <groupId>io.springfox</groupId>

                <artifactId>springfox-swagger-ui</artifactId>

                <version>${springfox-swagger2.version}</version>

            </dependency>

            -->

    </dependencies>

    <build>

        <plugins>

            <!--打包插件-->

            <plugin>

                <groupId>org.springframework.boot</groupId>

                <artifactId>spring-boot-maven-plugin</artifactId>

            </plugin>

            <!-- YUI Compressor Maven js,css压缩插件,一般不需要,可删除 -->

            <plugin>

                <groupId>net.alchim31.maven</groupId>

                <artifactId>yuicompressor-maven-plugin</artifactId>

                <version>1.5.1</version>

                <executions>

                    <execution>

                        <phase>prepare-package</phase>

                        <goals>

                            <goal>compress</goal>

                        </goals>

                    </execution>

                </executions>

                <configuration>

                    <!-- 读取js,css文件采用UTF-8编码默认就是utf-8 -->

                    <encoding>UTF-8</encoding>

                    <!-- 不显示js可能的错误 -->

                    <jswarn>false</jswarn>

                    <!-- 若存在已压缩的文件,会先对比源文件是否有改动  有改动便压缩,无改动就不压缩 -->

                    <force>true</force>

                    <!-- 在指定的列号后插入新行   -->

                    <linebreakpos>-1</linebreakpos>

                    <!-- 压缩之前先执行聚合文件操作  -->

                    <preProcessAggregates>true</preProcessAggregates>

                    <!-- 压缩后保存文件后缀 无后缀 -->

                    <nosuffix>true</nosuffix>

                    <!-- 源目录,即需压缩的根目录 -->

                    <sourceDirectory>src/main/static</sourceDirectory>

                    <outputDirectory>target/classes</outputDirectory>

                    <force>true</force>

                    <!-- 压缩js和css文件  -->

                    <includes>

                        <include>*/js/**/*.js</include>

                        <include>*/css/**/*.css</include>

                    </includes>

                    <excludes>

                        <exclude>**/*.min.js</exclude>

                        <exclude>**/*-min.js</exclude>

                        <exclude>**/index/carousel.js</exclude>

                        <exclude>**/3dprint/layer/**/*.js</exclude>

                    </excludes>

                </configuration>

            </plugin>

            <!-- html页面中的 css,js添加版本号插件 -->

            <!--plugin>

                <groupId>com.google.code.maven-replacer-plugin</groupId>

                <artifactId>replacer</artifactId>

                <version>1.5.3</version>

                <executions>

                    <execution>

                        <phase>prepare-package</phase>

                        <goals>

                            <goal>replace</goal>

                        </goals>

                    </execution>

                </executions>

                <configuration>

                    <includes>

                        <include>${basedir}/target/classes/templates/*.html</include>

                        <include>${basedir}/target/classes/templates/**/*.html</include>

                    </includes>

                    <replacements>

                        <replacement>

                            <token>\.css\"</token>

                            <value>.css?v=${maven.build.timestamp}\"</value>

                        </replacement>

                        <replacement>

                            <token>\.css\'</token>

                            <value>.css?v=${maven.build.timestamp}\'</value>

                        </replacement>

                        <replacement>

                            <token>\.js\"</token>

                            <value>.js?v=${maven.build.timestamp}\"</value>

                        </replacement>

                        <replacement>

                            <token>\.js\'</token>

                            <value>.js?v=${maven.build.timestamp}\'</value>

                        </replacement>

                    </replacements>

                </configuration>

                </plugin-->

        </plugins>

    </build>

</project>
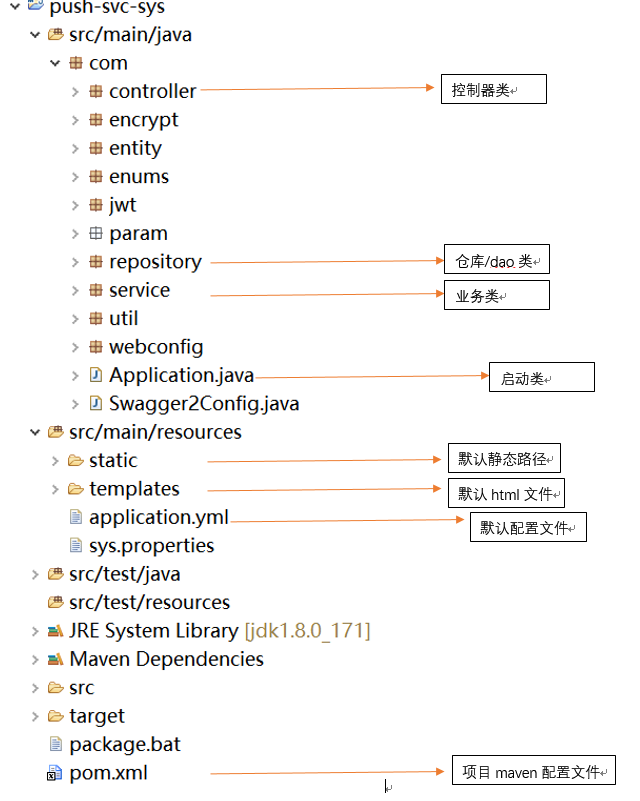
一般springboot项目目录结构如下
src
com
controller 控制器
entity/domain 实体层
repository/dao 仓库/数据库接口
service 业务服务层
Application.java 启动入口
创建启动入口以及项目结构
@SpringBootApplication

public class Application extends SpringBootServletInitializer

{

    public static void main(String[] args)

    {

        SpringApplication.run(Application.class, args);

    }

}
创建控制器
package com.controller;

import java.util.ArrayList;

import java.util.List;

import org.springframework.web.bind.annotation.DeleteMapping;

import org.springframework.web.bind.annotation.GetMapping;

import org.springframework.web.bind.annotation.PathVariable;

import org.springframework.web.bind.annotation.PostMapping;

import org.springframework.web.bind.annotation.PutMapping;

import org.springframework.web.bind.annotation.RequestBody;

import org.springframework.web.bind.annotation.RestController;

import com.model.UserInfo;

import io.swagger.annotations.Api;

@Api(tags = { "Restful API demo" })

@RestController

public class RestfulController {

    @PostMapping(value = "/v1/user")

    public void addUser(@RequestBody UserInfo userInfo) {

    }

    @DeleteMapping(value = "/v1/user/{id}")

    public void deleteUser(@PathVariable String id) {

    }

    @PutMapping(value = "/v1/user")

    public void updateUser(@RequestBody UserInfo userInfo) {

    }

    @GetMapping(value = "/v1/user")

    public List<UserInfo> getUsers() {

        List<UserInfo> users = new ArrayList<UserInfo>();

        users.add(new UserInfo("zhangsan", "123456"));

        users.add(new UserInfo("lisw", "123456"));

        users.add(new UserInfo("wangwu", "123456"));

        return users;

    }

}
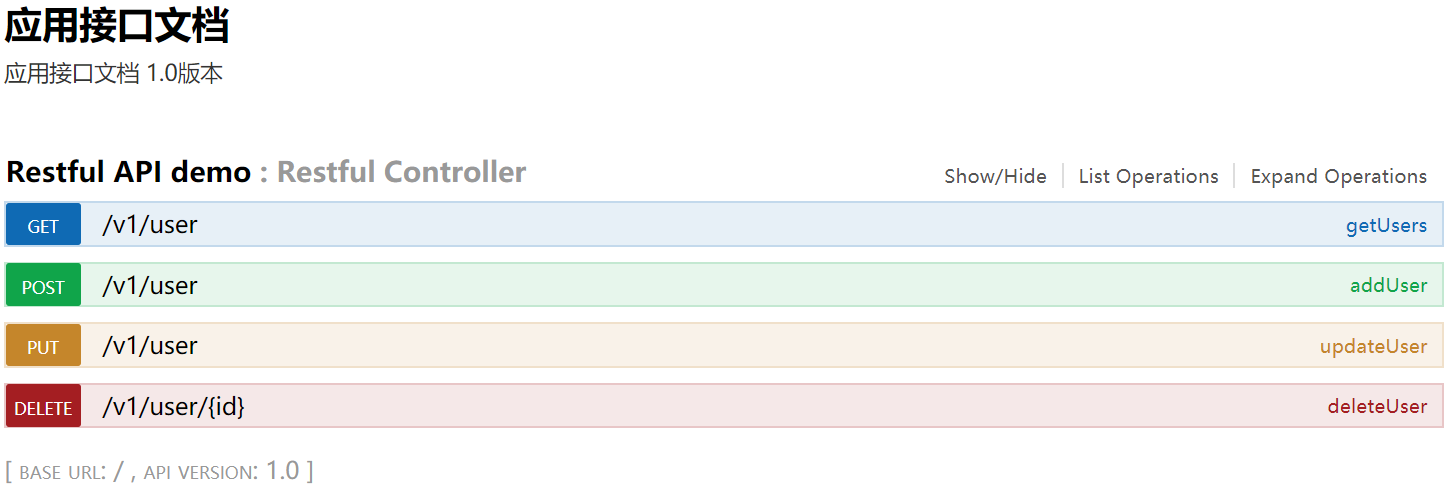
配置Swagger2后可看接口列表


application.yml关键配置
server:

  port: 8080              #tomcat启动端口

  tomcat:

    uri-encoding :  UTF-8 #tomcat编码

spring:

  application:

    name: springboot-demo #项目名称

  thymeleaf:              #thymeleaf引擎,解析html,非必配

    encoding: UTF-8

    cache: true           #是够缓存页面,开发时设置为false,否者修改页面客户端刷新后无法实时显示

    mode: LEGACYHTML5     #html5支持,默认配置不支持html5

  data:                   #mongoDB数据库配置,没有数据库可不配

    mongodb:

       host: 127.0.0.1

       port: 27017

       database: demo_db

debug: false
附一个简单的springboot restful api项目demo
https://gitee.com/zhangsike/springboot-learn/tree/master/springboot-restful
eclipse+maven搭建springboot项目入门的更多相关文章
- (A)eclipse搭建springboot项目入门
网上许多资料都是用idea的,但是我个人用eclipse习惯了,所以就在eclipse里面自己尝试着写了一个hello. 然而项目建好后却迟迟不能访问!!!网上搜了许多资料都不靠谱! 虽然最后能看到h ...
- idea:spring initializr无web勾选,maven方式搭建springboot项目。jdk7创建springboot项目的版本不兼容问题。
一.idea 使用spring initializr不选择web搭建springboot项目 1.file => new => project 2.直接next到finish结束. 3.完 ...
- SpringBoot从入门到精通一(idea优雅搭建SpringBoot项目)
前言 在没有SpringBoot之前,我们搭建的是SSM(SpingMVC+Spring+Mybatis)项目,在搭建SSM项目的时候,我们要经过一系列的繁琐配置,例如:application,web ...
- 小D课堂-SpringBoot 2.x微信支付在线教育网站项目实战_2-1.快速搭建SpringBoot项目,采用Eclipse
笔记 1.快速搭建SpringBoot项目,采用Eclipse 简介:使用SpringBoot start在线生成项目基本框架并导入到eclipse中 1.站点地址:http://start. ...
- 【Docker】Maven打包SpringBoot项目成Docker镜像并上传到Harbor仓库(Eclipse、STS、IDEA、Maven通用)
写在前面 最近,在研究如何使用Maven将SpringBoot项目打包成Docker镜像并发布到Harbor仓库,网上翻阅了很多博客和资料,发现大部分都是在复制粘贴别人的东西,没有经过实践的检验,根本 ...
- Eclipse+Maven创建webapp项目<一><二><三>
转-http://www.cnblogs.com/candle806/p/3439469.html Eclipse+Maven创建webapp项目<一> 1.开启eclipse,右键new ...
- 在线官网Spring Initializr 或 IntelliJ IDEA 快速搭建springboot项目
Spring Boot是由Pivotal团队提供的全新框架,设计目的是用来简化新Spring应用的初始搭建以及开发过程.它主要推崇的是'消灭配置’,实现零配置. 那么,如何快速新建一个一个spring ...
- 使用IDEA快速搭建Springboot项目
Spring Boot是由Pivotal团队提供的全新框架,设计目的是用来简化新Spring应用的初始搭建以及开发过程.它主要推崇的是'消灭配置’,实现零配置. 下面就介绍一下如何使用idea快速搭建 ...
- 利用Jenkins实现jdk11+Maven构建springboot项目
目录 原理图 前期准备 Jdk11安装 Jenkins安装 Maven安装 Jenkins的设置 插件安装 变量配置 搭建项目 1.通用配置 2.源码管理 3.构建触发 4.Maven的构建选项 5. ...
随机推荐
- 邻居子系统 之 邻居项查找neigh_lookup、___neigh_lookup_noref
概述 邻居项查找是通过neigh_lookup相关函数来进行的: ___neigh_lookup_noref,该函数根据输出设备和主键值(IPv4为下一跳ip地址)在邻居项hash表中查找,找到则返回 ...
- HearthBuddy Plugin编写遇到的问题
错误1 赋值问题 貌似编译器版本有点低,无法识别C#的高级语法糖 属性的初始值,必须是public bool IsEnabled { get{return true;} } 不能写成public bo ...
- DP&图论 DAY 1 下午
DP&图论 DAY 1 下午 区间和序列上的DP 序列上的DP >序列上的dp状态设计最基本的形式 F[i]表示以 i 结尾的最优值或方案数.◦ F[i][k]表示以 i 结尾附加 ...
- Javascript和JQuery获取浏览器窗口各种尺寸
原生JS 窗口尺寸: console.log('window.innerWidth = ' + window.innerWidth + '---window.innerHeight = ' + win ...
- C++中的各种容器实现原理
C++ 容器及选用总结 vector 拥有一段连续的内存空间 list 就是数据结构中的双向链表 deque 的动态数组首尾都开放 set 有序的容器,红黑树的平衡二叉检索树的数据结构 multise ...
- Oracle 基表 X$KSMLRU
Oracle 基表 X$KSMLRU 该表是Oracle的一个内部表.当SQL或者PL/SQL块向shared pool中请求一个大的连续的空间时,如果shared pool中连续的可用空间 不足,就 ...
- backspace 产生乱码的问题
1.要使用回删键(backspace)时,同时按住ctrl键(一般情况下会有用,如果没用使用下面的方法) 2.设定环境变量 在bash下:$ stty erase ^? 或者把 stty er ...
- UI的流畅度优化
Android中所有的界面绘制工作都是在UI线程中进行的,提高UI流畅度的最核心根本在于释放UI线程.即:不在主线程中做耗时的操作. 很多人都知道,耗时的操作要放到子线程中去做,比如访问网络,比如读写 ...
- DDNS是动态域名解析的意思
目前大部分家庭使用PPPOE拨号方式上网,每次上网获得的IP都是随机变换的,但是家里的网络监控.智能设备需要通过网络访问,每次使用都需要先知道IP非常麻烦. 有了DDNS动态域名解析,我们只要到花生壳 ...
- Appium移动自动化测试(四)之元素定位
做过UI自动化测试的童鞋都会发现, 在上一篇文章中居然没有万能定位方式Xpath. 是滴, 确实没有! ADT自带的uiautomatorviewer里面并没有属性xpath, 如果我们需要的话,还需 ...
