Eclipse中配置resin 4.x
开发web项目时,你还困扰在,反复启动web容器的痛苦中么?也许会有人说,用调试模式。但是如果涉及到配置文件或者service类,还是不得不重启web容器吧,而且偶尔会出现抽风情况,没生效的情况(这时候会让你觉得到底是没生效?还是代码有问题?是不是很纠结)。
下面介绍下resin在开发web项目时的方便之处
除非修改web.xml文件,其他的java文件修改,resin会自动刷新--类似于热部署 不再需要重启web容器就能得到最新代码环境---可谓为开发节约了大部分时间
平时的开发中建议resin和tomcat并用。做eclipse详细调试的时候用tomcat(当然也可以用resin做这个功能),做web调试的时候用resin比较方便,下面详细说说eclipse中resin配置吧
对于Resin的调试模式网上介绍的相当的少,几乎没有什么帖子或者文章介绍Eclipse和Resin的整合,大多都是简单的写了Eclipse无插件方式启动Resin,关于调试模式的启动都是简单的几个命令就结束了,并没有像Tomcat那样顺手!
花了很长时间寻找一个整合方法,最终还是发现了:

当然了,能看到界面就说明 --> 这个肯定是用了插件的 后面介绍 Resin官方主推的插件
之前你需要一个对应的 Resin版本,下载地址:http://www.caucho.com/download/
插件安装:http://caucho.com/eclipse

能看到这段文字就说明这个网址没有问题,可以作为 Eclipse插件源进行更新
打开Eclipse选择 Help -> Software Updates... 点击右边的 Add site...
在弹出来的对话框中输入 http://caucho.com/eclipse (注意删了空格)

不知什么原因我更新后显示的名字就变样了,这个自己摸索下也能弄懂的
添加站点后点开左边的树选择 Resin 然后右上角的 Install就会变亮(我的安装了所以暗着)

OK 后面就是联网下载更新插件了... (看到这里,如果你说你没有互联网,那我就什么都不说了,赶紧找榔头把电脑砸了吧...)
window - show view - servers 显示出来服务器框
然后在 servers框中点右键 new 一个服务器这时候就会出现最上面第一张图片的Resin,选择你自己需要的版本... 这里只管 3和4 用2的... 2就2吧 没办法 2的人已经被埋没了... 哈哈!
Resin 3.1 以及 temporary directory deploy 都是先将项目打包war然后复制到项目的发布文件夹中(位于你项目的workspace下面的.metadata\.plugins\org.eclipse.wst.server.core\tmp0\wtpwebapps 文件夹中)缺点,更换项目进行开发的时候原有的war文件不会被删除... 需要手动删除
另外一个(in space)就是不打包直接复制到发布目录中并将项目发布 (推荐)
安装的第二部需要选择jdk环境,这个自己选择了,或者选系统的 或者自己指定
第三步需要指定你解压缩后的 Resin 文件夹(上面说的下载的文件,建议解压到D盘下比如 D:\Resin)
我原来有一个Tomcat的服务器,后面又尝试了2个不同的 Resin

这里就显示了3个启动服务器,当然需要使用哪个版本运行就先选择 然后点右边的绿色运行按钮!
=============================华丽分割线============================================
1、注意eclipse需要3.6以上版本才能支持。
2、对于resin 4.x配置后 启动会报错
'default' is an unknown server in the configuration file.
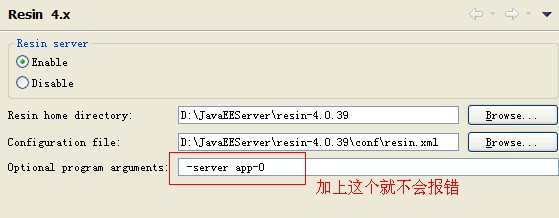
3、配置resin.xml文件
<!--

   - Resin 4.0 configuration file.

  -->

<resin xmlns="http://caucho.com/ns/resin"

       xmlns:resin="urn:java:com.caucho.resin">

  <!-- property-based Resin configuration -->

  <resin:properties path="${__DIR__}/resin.properties" optional="true"/>

  <resin:properties path="cloud:/resin.properties"

                    optional="true" recover="true"/>

  <resin:if test="${properties_import_url}">

     <resin:properties path="${properties_import_url}"

                    optional="true" recover="true"/>

  </resin:if>

  <!-- Logging configuration for the JDK logging API -->

  <log-handler name="" level="all" path="stdout:"

               timestamp="[%y-%m-%d %H:%M:%S.%s]"

               format=" {${thread}} ${log.message}"/>

  <!--

     - Alternative pseudo-TTCC log format

     -

     - <log-handler name="" level="all" path="stdout:"

     -           timestamp="%y-%m-%d %H:%M:%S.%s"

     -           format=" [${thread}] ${log.level} ${log.shortName} - ${log.message}"/>

    -->

  <!--

     - level='info' for production

     - 'fine' or 'finer' for development and troubleshooting

    -->

  <logger name="" level="${log_level?:'info'}"/>

  <logger name="com.caucho.java" level="config"/>

  <logger name="com.caucho.loader" level="config"/>

  <!--

     - Default configuration applied to all clusters, including

     - HTTP, HTTPS, and /resin-admin configuration.

    -->

  <resin:import path="${__DIR__}/cluster-default.xml"/>

  <!--

     - health configuration

    -->

  <resin:import path="${__DIR__}/health.xml"/>

  <!--

     - Remote management requires at least one enabled admin user.

    -->

  <resin:AdminAuthenticator>

    <user name="${admin_user}" password="${admin_password}"/>

    <resin:import path="${__DIR__}/admin-users.xml" optional="true"/>

    <resin:import path="cloud:/admin-users.xml" optional="true" recover="true"/>

  </resin:AdminAuthenticator>

  <!--

     - For clustered systems, create a password in as cluster_system_key

    -->

  <cluster-system-key>${cluster_system_key}</cluster-system-key>

  <!--

     - For production sites, change dependency-check-interval to something

     - like 600s, so it only checks for updates every 10 minutes.

    -->

  <dependency-check-interval>${dependency_check_interval?:'2s'}</dependency-check-interval>

  <!-- For resin.properties dynamic cluster joining -->

  <home-cluster>${home_cluster}</home-cluster>

  <home-server>${home_server}</home-server>

  <elastic-server>${elastic_server}</elastic-server>

  <elastic-dns>${elastic_dns}</elastic-dns>

  <!--

     - Configures the main application cluster.  Load-balancing configurations

     - will also have a web cluster.

    -->

  <cluster id="app">

    <!-- define the servers in the cluster -->

    <server-multi id-prefix="app-" address-list="${app_servers}" port="6800"/>

    <host-default>

      <!-- creates the webapps directory for .war expansion -->

      <web-app-deploy path="webapps"

                      expand-preserve-fileset="WEB-INF/work/**"

                      multiversion-routing="${webapp_multiversion_routing}"

                      path-suffix="${elastic_webapp?resin.id:''}"/>

    </host-default>

    <!-- auto virtual host deployment in hosts/foo.example.com/webapps -->

    <host-deploy path="hosts">

      <host-default>

        <resin:import path="host.xml" optional="true"/>

      </host-default>

    </host-deploy>

    <!-- the default host, matching any host name -->

    <!-- <host id="" root-directory=".">

      <web-app id="/" root-directory="webapps/ROOT"/>

      <resin:if test="${resin_doc}">

        <web-app id="/resin-doc" root-directory="${resin.root}/doc/resin-doc"/>

      </resin:if>

    </host> -->

    <!-- *******************************Site Start******************************* -->

    <!--

    <host id="test.com" root-directory="${resin.root}/webapps/test">

          <host-alias>test.com</host-alias>

          <web-app id="/"></web-app>

    </host>

-->

    <host id="www.xxxx.com" root-directory="${resin.root}/webapps/xxx-demo">

          <web-app id="/"></web-app>

    </host>

    <!-- *******************************Site End******************************* -->

  </cluster>

  <cluster id="web">

    <!-- define the servers in the cluster -->

    <server-multi id-prefix="web-" address-list="${web_servers}" port="6810"/>

    <host id="" root-directory="web">

      <web-app id="">

        <resin:LoadBalance regexp="" cluster="app"/>

      </web-app>

    </host>

  </cluster>

  <cluster id="memcached" xmlns:memcache="urn:java:com.caucho.memcached">

    <!-- define the servers in the cluster -->

    <server-multi id-prefix="memcached-" address-list="${memcached_servers}" port="6820">

      <!-- listen for the memcache protocol -->

      <listen port="${memcached_port?:11211}"

              keepalive-timeout="600s" socket-timeout="600s">

        <memcache:MemcachedProtocol/>

      </listen>

    </server-multi>

  </cluster>

</resin>
4、配置host文件
详细目录:C:\WINDOWS\system32\drivers\etc\hosts
在该文件后加
127.0.0.1 www.xxxx.com
5、直接可以在浏览器中输入
http://www.xxxx.com:8080/
Eclipse中配置resin 4.x的更多相关文章
- Maven学习(一) -- 安装Maven及Eclipse中配置Maven
标签(空格分隔): 学习笔记 本文环境:Windows7, JDK1.7.0_76 安装及配置Maven环境变量 需要电脑中已经有Java环境 在控制台中输入:echo %JAVA_HOME%看是否能 ...
- 在Eclipse中配置Tomcat时,出现Cannot create a server using the selected type错误
在eclipse中配置Tomcat时,出现Cannot create a server using the selected type错误 原因:Tomcat被删除或者是重新安装,并且安装目录改变了. ...
- 在Eclipse中配置Tomcat 创建和运行Servlet/JSP
在Eclipse中配置Tomcat 创建和运行Servlet/JSP 步骤一:在Eclipse中配置Tomcat(注意下载Eclipse IDE for Java EE Developers) (1) ...
- 【Java Web】Eclipse中配置Marven环境
1 Marven简介 Apache Maven,是一个软件(特别是Java软件)项目管理及自动构建工具,由Apache软件基金会所提供.基于项目对象模型(缩写:POM)概念,Maven利用一个中央信 ...
- eclipse中配置c++开发环境 Eclipse + CDT + MinGW
转自eclipse中配置c++开发环境 Eclipse + CDT + MinGW 基本框架:Eclipse + CDT + MinGW 背景知识: CDT:CDT 是完全用 Java 实现的开放源码 ...
- 如何在Eclipse中配置Tomcat(免安装版)
如何在Eclipse中配置Tomcat(免安装版) 2013-10-09 23:19wgelgrsh | 分类:JAVA相关 | 浏览642次 分享到: 2013-10-10 17:10提问者采纳 ...
- Eclipse中配置weka,以及添加算法
Eclipse中配置weka 1 找到weka的安装位置,寻找weka的压缩文件weka-src.jar,将压缩文件解压,解压出的文件夹weka-src. 2 打开Eclipse,新建Java pro ...
- 如何在Eclipse中配置python开发环境
考虑到网上关于Eclipse中配置Python开发环境的文章千篇一律,故写此文以总结. 本文主要内容是:三种Pydev配置方法和一种PyDev卸载方法. 本文的前提是你已经安装了Eclipse和pyt ...
- eclipse中配置spring环境
初识Spring框架 1.简单使用 eclipse中配置Spring环境,如果是初学的话,只需要在eclipse中引入几个jar包就可以用了, 在普通java project项目目录下,建一个lib文 ...
随机推荐
- 【Unity】2.5 场景视图(Scene)
分类:Unity.C#.VS2015 创建日期:2016-03-29 一.场景视图(Scene View)导航 场景视图 (Scene View) 是你的交互式沙箱.你可以使用场景视图 (Scene ...
- WebClient请求帮助类
/// <summary> /// 通过JSON方式发送POST请求 /// 将返回结果按JSON方式解析 /// </summary> public static class ...
- C++11 类型推导decltype
我们之前使用的typeid运算符来查询一个变量的类型,这种类型查询在运行时进行.RTTI机制为每一个类型产生一个type_info类型的数据,而typeid查询返回的变量相应type_info数据,通 ...
- Python 传值和传址 copy/deepcopy
传值:被调函数局部变量改变不会影响主调函数局部变量 传址:被调函数局部变量改变会影响主调函数局部变量 Python参数传递方式:传递对象引用(传值和传址的混合方式),如果是数字,字符串,元组则传值:如 ...
- Django入门(二)
这一节主要介绍django中的model,template模板. model是django自带的orm框架,下面我们来搭建一个博客网站,来看看是如何使用的. 1.新建应用blog python man ...
- HBase scan setBatch和setCaching的区别【转】
转自:http://blog.csdn.net/caoli98033/article/details/44650497 HBase的查询实现只提供两种方式: 1.按指定RowKey获取唯一一条记录,g ...
- ADB Fix error : insufficient permissions for device
Ubuntu 15中在使用中Android开发板时,命令行下输入adb devices.adb shell会提示insufficient permissions for device. 通常重启下ad ...
- 开源实时日志分析ELK
开源实时日志分析ELK 2018-01-04 转自:开源实时日志分析ELK平台部署 日志主要包括系统日志.应用程序日志和安全日志.系统运维和开发人员可以通过日志了解服务器软硬件信息.检查配置过程中的错 ...
- LOCAL_EXPORT_C_INCLUDES和LOCALC_INCLUDES 的差别
http://stackoverflow.com/questions/6595208/what-does-this-line-mean-local-export-c-includes LOCAL_EX ...
- AIX上打包排除某些文件/文件夹
Syntax X/Open Standards: tar {-c|-r|-t|-u|-x} [-B] [ -d ] [ -E ] [ -F ] [-h ] [ -i ] [ -l ] [ -m ] [ ...