python pytest测试框架介绍三
之前介绍了pytest以xUnit形式来写用例,下面来介绍pytest特有的方式来写用例
1、pytest fixture实例1
代码如下
from __future__ import print_function

import pytest

@pytest.fixture(scope='module')

def resource_a_setup(request):

    print('\nresources_a_setup()')

    def resource_a_teardown():

        print('\nresources_a_teardown()')

    request.addfinalizer(resource_a_teardown)

def test_1_that_needs_resource_a(resource_a_setup):

    print('test_1_that_needs_resource_a()')

def test_2_that_does_not():

    print('\ntest_2_that_does_not()')

def test_3_that_does(resource_a_setup):

    print('\ntest_3_that_does()')
使用-s -v运行查看详情如下
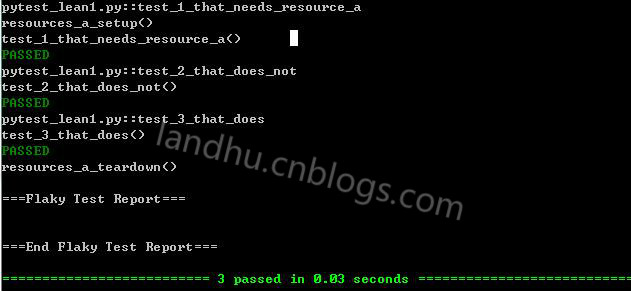
这里使用的了pytest的特有的模式来写用例,使用的方式是scope方式,scope支持多种,后面会介绍
这里还使用了pytest的addfinalizer内置功能,具体可参见官网,用处是:在最后一个测试项目中调用teardown
2、pytest fixture实例2
代码如下
from __future__ import print_function

import pytest

@pytest.fixture()

def resource_a():

    print('\nresources_a() "setup"')

def test_1_that_needs_resource_a(resource_a):

    print('test_1_that_needs_resource_a()')

def test_2_that_does_not():

    print('\ntest_2_that_does_not()')

def test_3_that_does(resource_a):

    print('test_3_that_does()')
这是最简单的一个例子,结果如下
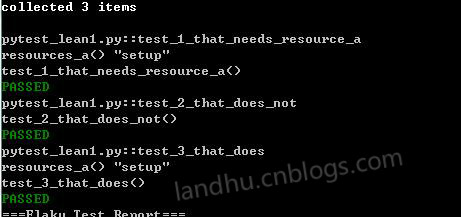
可以看出测试用例继承了用pytest.fixture的函数后,都执行了setup的功能,默认的pytest.fixture是function
3、使用pytest.fixture的几种方法
在写用例时,有几种方法使用pytest.fixture来形成框架,
方法一:
就是上面提到的这种方法,如下
pytest.fixture()

def before():

    print('\nbefore each test')

def test_1(before):

    print('test_1()')

def test_2(before):

    print('test_2()')
方法二:使用fixture修饰
@pytest.fixture()

def before():

    print('\nbefore each test')

@pytest.mark.usefixtures("before")

def test_1():

    print('test_1()')

@pytest.mark.usefixtures("before")

def test_2():

    print('test_2()')
标红的就是修饰器
4、fixture scope的范围参数
之前使用@pytest.fixture(scope='module')来定义框架,scope的参数有以下几种
- function 每一个用例都执行
- class 每个类执行
- module 每个模块执行(函数形式的用例)
- session 每个session只运行一次,在自动化测试时,登录步骤可以使用该session
如下一个用module例子
@pytest.fixture(scope='module')

def resource_a():

    print('\nresources_a() "setup"')

def test_1_that_needs_resource_a(resource_a):

    print('test_1_that_needs_resource_a()')

def test_2_that_does_not():

    print('\ntest_2_that_does_not()')

def test_3_that_does(resource_a):

    print('test_3_that_does()')
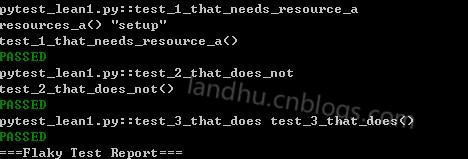
即使我们在每个用例都继承了resource_a,但在实际测试中,所有用例只执行了一次resource_a
这时,你可能会问,为什么只这setup功能,没有teardown功能,要teardown怎么写,方法如下:
def cheese_db(request):

    .....

    def teardown():

        print('\n[teardown] cheese_db finalizer, disconnect from db')

    request.addfinalizer(teardown)
这里使用的还是之前介绍的request.addfinalizer功能,函数名字可以任意取,不一定要teardown
5、带参数的fixture
这里就不介绍了,看官方文档吧
6、多种fixture scope结合使用
看代码,如下
@pytest.fixture(scope="module")
def foo(request):
print('\nfoo setup - module fixture')
def fin():
print('foo teardown - module fixture')
request.addfinalizer(fin) @pytest.fixture()
def bar(request):
print('bar setup - function fixture')
def fin():
print('bar teardown - function fixture')
request.addfinalizer(fin) @pytest.fixture()
def baz(request):
print('baz setup - function fixture')
def fin():
print('baz teardown - function fixture')
request.addfinalizer(fin) def test_one(foo, bar, baz):
print('in test_one()') def test_two(foo, bar, baz):
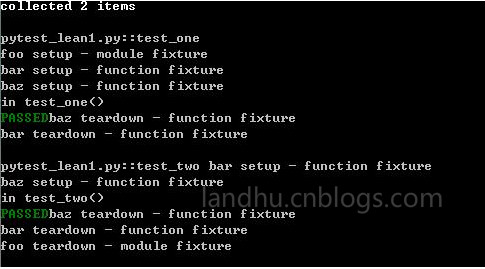
print('in test_two()')
测试结果如下
pytest还有很有用的yield功能,后续再介绍
python pytest测试框架介绍三的更多相关文章
- python pytest测试框架介绍二
在介绍一中简单介绍了pytest的安装和简单使用,接下来我们就要实际了解pytest了 一.pytest的用例发现规则 pytest可以在不同的函数.包中发现用例,发现的规则如下 文件名以test_开 ...
- python pytest测试框架介绍四----pytest-html插件html带错误截图及失败重测机制
一.html报告错误截图 这次介绍pytest第三方插件pytest-html 这里不介绍怎么使用,因为怎么使用网上已经很多了,这里给个地址给大家参考,pytest-html生成html报告 今天在这 ...
- python pytest测试框架介绍一
一.安装 pytest不是python默认的package,需要自动手工安装. pytest支持python 2.6--3.5之间的版本,同时可以在unix及windows上安装 安装方式: pip ...
- python pytest测试框架介绍五---日志实时输出
同样的,在使用pytest进行自动化测试时,需要将实时日志打印出来,而不是跑完后才在报告中出结果. 不过,好在pytest在3.3版本开始,就支持这一功能了,而不用再像nose一样,再去装第三方插件. ...
- Pytest测试框架(三):pytest fixture 用法
xUnit style 结构的 fixture用于初始化测试函数, pytest fixture是对传统的 xUnit 架构的setup/teardown功能的改进.pytest fixture为测试 ...
- 『德不孤』Pytest框架 — 1、Pytest测试框架介绍
目录 1.什么是单元测试框架 2.单元测试框架主要做什么 3.单元测试框架和自动化测试框架有什么关系 4.Pytest测试框架说明 5.Pytest框架和Unittest框架区别 (1)Unittes ...
- 【pytest系列】- pytest测试框架介绍与运行
如果想从头学起pytest,可以去看看这个系列的文章! https://www.cnblogs.com/miki-peng/category/1960108.html 前言 目前有两种纯测试的测 ...
- python nose测试框架全面介绍十---用例的跳过
又来写nose了,这次主要介绍nose中的用例跳过应用,之前也有介绍,见python nose测试框架全面介绍四,但介绍的不详细.下面详细解析下 nose自带的SkipTest 先看看nose自带的S ...
- python nose测试框架全面介绍七--日志相关
引: 之前使用nose框架时,一直使用--logging-config的log文件来生成日志,具体的log配置可见之前python nose测试框架全面介绍四. 但使用一段时间后,发出一个问题,生成的 ...
随机推荐
- PowerDesigner使用技巧(转载)
1.如何打开PowerDesigner 快捷工具栏 paletteTools(工具栏)--> customsize toolbars(自定义工具栏)-->勾选 palette(调色板) 2 ...
- adb 架构
adb是什么? adb就是Android调试桥,很形象啊. 先来看adb原理的逻辑图: ADB架构adb由两个物理文件组成:adb/adb.exe运行于PC端,包括Linux.Windows.Mac ...
- 【调研】在总体为n的情况下,多少样本有代表性?
见这里: http://www.raosoft.com/samplesize.html
- Android四大组件之——ContentProvider(一)
Android四大组件之--ContentProvider(一) 本人邮箱:JohnTsai.Work@gmail.com,欢迎交流讨论. 欢迎转载,转载请注明网址:http://www.cnblog ...
- 在ABBYY中如何修正倾斜的PDF页面
作为一名文案工作者,每天都要跟各种PDF文件打交道,合同.报价单.协议书等等等,通常提供给客户的都是扫描之后的PDF文档,虽说都是机器扫描,但毕竟是人为放置的,难免位置放置不齐,导致扫描出来的文档出现 ...
- 在jsp中使用jstl,不使用JS,实现递归,生成N级菜单
参考材料: http://blog.csdn.net/kimsoft/article/details/7801564 我的实现: 1.我的recursionMenu.jsp代码如下: <%@ ...
- Centos修改时间显示的时区,将UTC修改为CST
问题说明: 今天一同事反应,系统的时间不对和正常的时间差8个小时.就登录主机看了下时间 系统时间显示为: # date Fri Dec :: UTC # 备注:查看了下,正好和当前的时间差了8个小时. ...
- 微信公众号支付-Common
using System.Web; /// <summary> /// 公共帮助类 /// </summary> public class Common { private H ...
- Waf-Bypass-Learning
WAF Bypass 综合篇: WAF攻防研究之四个层次Bypass WAF Bypass WAF Cookbook - MayIKissYou My Waf Bypass Series Articl ...
- Ansible 使用 Playbook 管理 Nginx 配置文件
前面我们已经安装完 Nginx,但是在日常维护中经常需要修改配置文件,并重新加载配置文件,因此来写一个管理 Nginx 配置文件的 Playbook: [root@localhost ~]$ mkdi ...