Direct2D教程VI——转换(Transform)
目前博客园中成系列的Direct2D的教程有
1、万一的 Direct2D 系列,用的是Delphi 2009
2、zdd的 Direct2D 系列,用的是VS中的C++
3、本文所在的 Direct2D教程 系列,用的是VS2010的Visual Basic语言(可以很方便的转为C#),基于Windows API Code Pack 1.1。
还有官方的说明文档 Direct2D ,用的是C++。
本系列的前几篇文章:
Direct2D教程II——绘制基本图形和线型(StrokeStyle)的设置详解
Direct2D教程V——位图(Bitmap)和位图笔刷(BitmapBrush)
自GDI+开始,GDI+、WPF、Direct2D一路过来,转换(Transform)始终是一个重要的内容,通过转换(Transform)能实现一些特殊的效果。
转换(Transform):通过一定的运算,把一个平面坐标系的点变换为另一个坐标系的点。
目前变换主要有平移转换(TranslateTransform)、旋转转换(RotateTransform)、缩放转换(ScaleTransform)、倾斜转换(SkewTransform)
由于图形是由点组成的,因此转换也能把图形转换成另一个图形
转换(Transform)的矩阵知识
在.net中(包括GDI+、WPF、Direct2D),转换(Transform)是通过定义转换矩阵实现的。源点P(X,Y),通过转换(Transform)后得到目标点P1(X1,Y1),是通过转换矩阵M来实现的。把点的坐标扩成3个分量,前2个分量分别是X分量和Y分量,最后1个分量定义成1。则源点P(X,Y,1),目标点P1(X1,Y1,1)。
转换矩阵M是个3*3的矩阵,最后1列的3个数字自上而下分别是0、0、1。则M矩阵如下所示
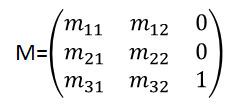
M矩阵中起到决定作用是第1、2列的6个数字
则转换的基本计算公式是
P1=P×M
X1=X*m11+Y*m21+m31
Y1=X*m12+Y*m22+m32
平移转换(TranslateTransform)
如下图所示,平移转换(TranslateTransform),把T1转换到T2。
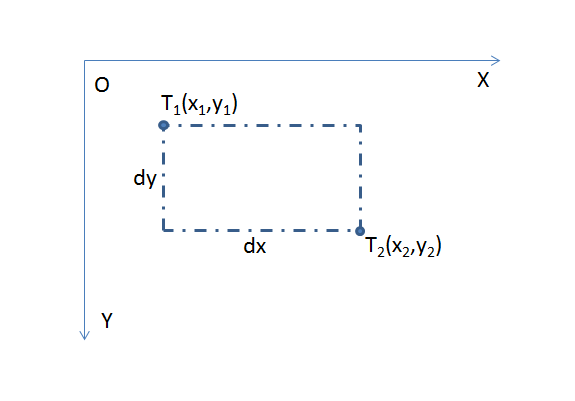
很容易的推导出,x2=x1+dx,y2=y1+dy。由上面的基本计算公式,可以推导出转换矩阵M


旋转转换(RotateTransform)
旋转转换(RotateTransform)如下图所示,T1绕着原点旋转Θ,转换到T2点
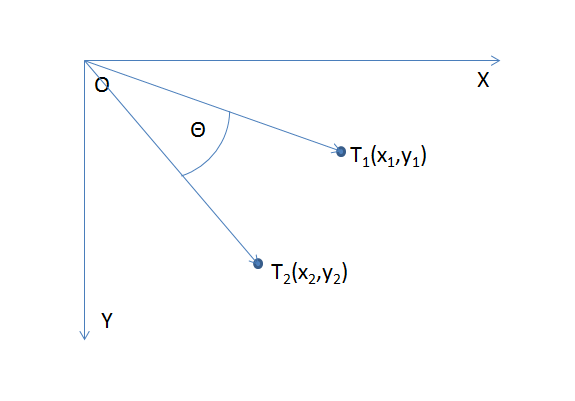
假设OT1的距离是R,T1和X轴的夹角是α。则x1和y1的公式为
x1=R·Cosα
y1=R·Sinα
同理的,x2和y2的公式为
x2=R·Cos(α+Θ)=R·Cosα·CosΘ-R·Sinα·SinΘ=x1·CosΘ-y1·SinΘ
y2=R·Sin(α+Θ)=R·Sinα·CosΘ+R·Cosα·SinΘ=y1·CosΘ+x1·SinΘ
由上面的基本计算公式,可以推导出转换矩阵M


缩放转换(ScaleTransform)
缩放转换(ScaleTransform)如下图所示,T1沿着X轴缩放dx倍、Y轴缩放dy倍,转换到T2点
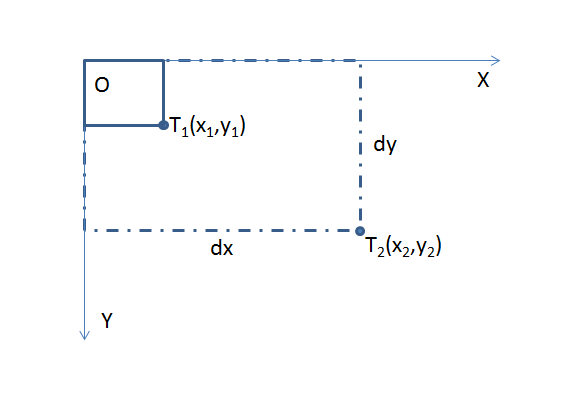
很容易的推导出,x2=x1·dx,y2=y1·dy。由上面的基本计算公式,可以推导出转换矩阵M


倾斜转换(SkewTransform)
倾斜转换(SkewTransform)如下图所示,Y轴向右旋转Θ1到Y',X轴向下旋转Θ2到X',T1转换到T2点
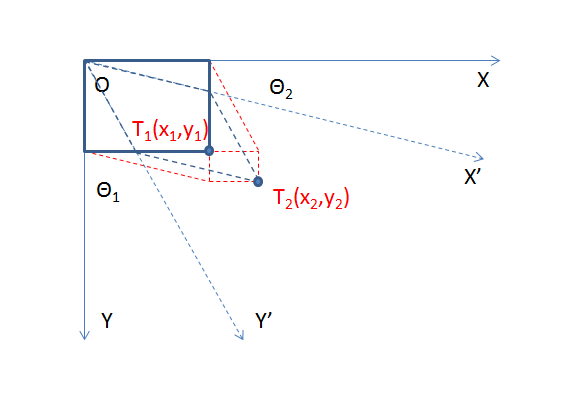
在上图中的红色辅助线的帮助下,可以推导出,x2=x1+y1·TanΘ1,y2=y1+x1·TanΘ2。由上面的基本计算公式,可以推导出转换矩阵M


在我们常见的四种转换(平移转换(TranslateTransform)、旋转转换(RotateTransform)、缩放转换(ScaleTransform)、倾斜转换(SkewTransform))都可以用转换矩阵M来表达。
但转换矩阵的优势不仅仅是四种转化。他还可以衍生出其他的转化
复合转换
上面介绍的四种转化都是转化基准点在原点。如果现在我有需求,绕着(2,1)这个点旋转30度的这个转换怎么办?
实际上,可以把这个转换分解成三个转换
1、先是平移转换,把(2,1)平移到(0,0)
2、再是旋转转换,绕着原点旋转30度
3、再是平移转换,把(0,0)平移到(2,1)
则这个转换矩阵M可以用三个转换的转换矩阵的连乘来表示


要注意的是矩阵的运算不满足交换率,即M1·M2和M2·M1不一定相等
Direct2D中的转换矩阵
在Direct2D中,也是用矩阵来表示转换。转换矩阵的结构是Matrix3x2F
在上面的说明中,矩阵的最后1列是固定的三个数字(0,0,1)。因此结构Matrix3x2F在内部的实现是通过6个变量来实现的(m11、m12、m21、m22、m31、m32)。
来看看结构Matrix3x2F的原型定义
Direct2D1.Matrix3x2F(m11 As Single, m12 As Single, m21 As Single, m22 As Single, m31 As Single, m32 As Single)
Public Shared ReadOnly Property Identity() As Direct2D1.Matrix3x2F
Public Shared Function Translation(x As Single, y As Single) As Direct2D1.Matrix3x2F
Public Shared Function Translation(size As Direct2D1.SizeF) As Direct2D1.Matrix3x2F
Public Shared Function Scale(x As Single, y As Single) As Direct2D1.Matrix3x2F
Public Shared Function Scale(x As Single, y As Single, center As Direct2D1.Point2F) As Direct2D1.Matrix3x2F
Public Shared Function Scale(size As Direct2D1.SizeF) As Direct2D1.Matrix3x2F
Public Shared Function Scale(size As Direct2D1.SizeF, center As Direct2D1.Point2F) As Direct2D1.Matrix3x2F
Public Shared Function Rotation(angle As Single) As Direct2D1.Matrix3x2F
Public Shared Function Rotation(angle As Single, center As Direct2D1.Point2F) As Direct2D1.Matrix3x2F
Public Shared Function Skew(angleX As Single, angleY As Single) As Direct2D1.Matrix3x2F
Public Shared Function Skew(angleX As Single, angleY As Single, center As Direct2D1.Point2F) As Direct2D1.Matrix3x2F
从上面的原型定义可以看出,结构Matrix3x2F以共享方法的形式提供了四种基本的转换。在旋转转换(RotateTransform)、缩放转换(ScaleTransform)、倾斜转换(SkewTransform)的共享方法中还提供了以不同基准点的转换的方法。这样,就免去了自己再额外计算的过程。
不过由于没有提供矩阵乘法的函数,也就是在其他的复合转换中,只能自己进行计算。这也是这个结构的局限性。(或者微软认为,只需要这几个转换就足够了。实际上在Direct2D的基本类库中是提供了矩阵的乘法。在封装成Windows API Code Pack 1.1后,反而是取消了矩阵乘法)
GDI+、WPF中的转换矩阵
除了Direct2D中的结构Matrix3x2F外。在System.Drawing.Drawing2D空间下也提供了结构Matrix,用于GDI+和WPF中的转换矩阵。这个结构提供了三个非常有用的方法
Public Sub Multiply(matrix As Drawing2D.Matrix)
Public ReadOnly Property IsInvertible() As Boolean
Public Sub Invert()
第一个方法将指定的矩阵和自身相乘(自身在后,可以用这个函数的另一个重载来实现矩阵的位置不同),提供了矩阵的乘法,实现了自定义的复合转换
第二个属性是判断该矩阵是否可逆
第三个方法是对该矩阵求逆矩阵。求逆矩阵的意义在于获得逆转换。(我觉得这个方法很实用,可惜在Direct2D中没有提供这个方法)
利用结构Matrix实现Direct2D中的Matrix3x2F的矩阵乘法和逆矩阵
我们可以利用结构Matrix来在Direct2D中实现矩阵乘法和逆矩阵,代码如下:
Public Function Multiply(M1 As Direct2D1.Matrix3x2F, M2 As Direct2D1.Matrix3x2F) As Direct2D1.Matrix3x2F
Dim S1 As New Drawing2D.Matrix(M1.M11, M1.M12, M1.M21, M1.M22, M1.M31, M1.M32)
Dim S2 As New Drawing2D.Matrix(M2.M11, M2.M12, M2.M21, M2.M22, M2.M31, M2.M32)
S1.Multiply(S2, Drawing2D.MatrixOrder.Append)
Dim S() As Single = S1.Elements
Return New Direct2D1.Matrix3x2F(S(0), S(1), S(2), S(3), S(4), S(5))
End Function
Public Function Invert(M1 As Direct2D1.Matrix3x2F) As Direct2D1.Matrix3x2F
Dim S1 As New Drawing2D.Matrix(M1.M11, M1.M12, M1.M21, M1.M22, M1.M31, M1.M32)
If S1.IsInvertible = True Then S1.Invert()
Dim S() As Single = S1.Elements
Return New Direct2D1.Matrix3x2F(S(0), S(1), S(2), S(3), S(4), S(5))
End Function
自定义的仿射转换(AffineTransform)
仿射转换(AffineTransform)和倾斜转换(SkewTransform)类似,都是通过旋转坐标轴来转换,具体的区别看下面的示意图
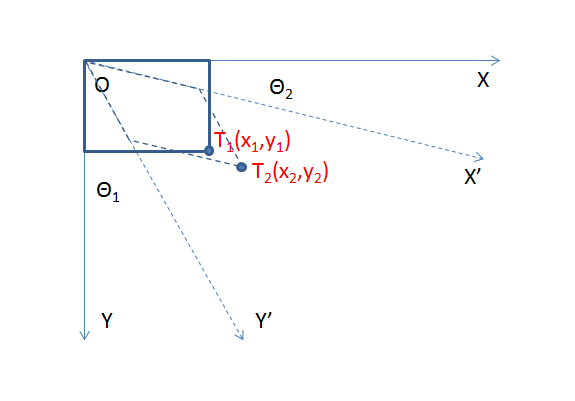
区别在于仿射转换(AffineTransform)在旋转坐标轴的时候,坐标轴上的单位长度没有发生变化(倾斜转换(SkewTransform)坐标轴的单位长度是发生变化的)。
个人觉得,仿射转换(AffineTransform)比倾斜转换(SkewTransform)更加接近于真实的视觉转换
可以推导出,x2=x1·CosΘ2+y1·SinΘ1,y2=x1·SinΘ2+y1·CosΘ1。由上面的基本计算公式,可以推导出转换矩阵M


由于在Direct2D中没有提供仿射转换(AffineTransform)的函数,因此自己编写一个仿射转换(AffineTransform)的矩阵函数。代码如下:
Public Function AffineMatrix(angelX As Single, angelY As Single) As Direct2D1.Matrix3x2F
Dim M As New Direct2D1.Matrix3x2F
M.M11 = Math.Cos(angelY * Math.PI / 180)
M.M12 = Math.Sin(angelY * Math.PI / 180)
M.M21 = Math.Sin(angelX * Math.PI / 180)
M.M22 = Math.Cos(angelX * Math.PI / 180)
M.M31 = 0
M.M32 = 0
Return M
End Function
转换(Transform)在Direct2D中运用的范围
在Direct2D中,什么对象能运用转换(Transform)?答案是很多,可以是画布(RenderTarget对象,相当于改变画布的坐标系)、笔刷(Brush对象,主要是用于位图笔刷(BitmapBrush),更改位图笔刷(BitmapBrush)的起始位置等)、形状(更改形状的外形、位置等)。几乎所有的对象都能运用转换
下面这个例子,是在画布(RenderTarget)上运用转换的例子。先看看准备的文件

这个是之前的216.png,现在加上一圈红边后,保存为218.png。
Public Class clsDirect2DSample14
Inherits clsDirect2DSample11
Public Shadows Sub Render()
If Not _renderTarget Is Nothing Then
With _renderTarget
.BeginDraw()
.Clear(New Direct2D1.ColorF(Color.Chocolate.ToArgb))
Dim B As Direct2D1.D2DBitmap = LoadBitmapFromFile("218.png")
Dim BB As Direct2D1.BitmapBrush = _renderTarget.CreateBitmapBrush(B)
BB.Transform = Direct2D1.Matrix3x2F.Scale(0.25, 0.25)
BB.ExtendModeX = Direct2D1.ExtendMode.Wrap
BB.ExtendModeY = Direct2D1.ExtendMode.Wrap
.Transform = AffineMatrix(60, -30)
Dim R As New Direct2D1.RectF(-195, 195, 65, 455)
Dim SB As Direct2D1.SolidColorBrush = _renderTarget.CreateSolidColorBrush(New Direct2D1.ColorF(0, 0, 0))
.DrawRectangle(R, SB, 3)
.FillRectangle(R, BB)
.EndDraw()
End With
End If
End Sub
Public Function AffineMatrix(angelX As Single, angelY As Single) As Direct2D1.Matrix3x2F
Dim M As New Direct2D1.Matrix3x2F
M.M11 = Math.Cos(angelY * Math.PI / 180)
M.M12 = Math.Sin(angelY * Math.PI / 180)
M.M21 = Math.Sin(angelX * Math.PI / 180)
M.M22 = Math.Cos(angelX * Math.PI / 180)
M.M31 = 0
M.M32 = 0
Return M
End Function
Public Function Multiply(M1 As Direct2D1.Matrix3x2F, M2 As Direct2D1.Matrix3x2F) As Direct2D1.Matrix3x2F
Dim S1 As New Drawing2D.Matrix(M1.M11, M1.M12, M1.M21, M1.M22, M1.M31, M1.M32)
Dim S2 As New Drawing2D.Matrix(M2.M11, M2.M12, M2.M21, M2.M22, M2.M31, M2.M32)
S1.Multiply(S2, Drawing2D.MatrixOrder.Append)
Dim S() As Single = S1.Elements
Return New Direct2D1.Matrix3x2F(S(0), S(1), S(2), S(3), S(4), S(5))
End Function
Public Function Invert(M1 As Direct2D1.Matrix3x2F) As Direct2D1.Matrix3x2F
Dim S1 As New Drawing2D.Matrix(M1.M11, M1.M12, M1.M21, M1.M22, M1.M31, M1.M32)
If S1.IsInvertible = True Then S1.Invert()
Dim S() As Single = S1.Elements
Return New Direct2D1.Matrix3x2F(S(0), S(1), S(2), S(3), S(4), S(5))
End Function
End Class
看看效果图吧
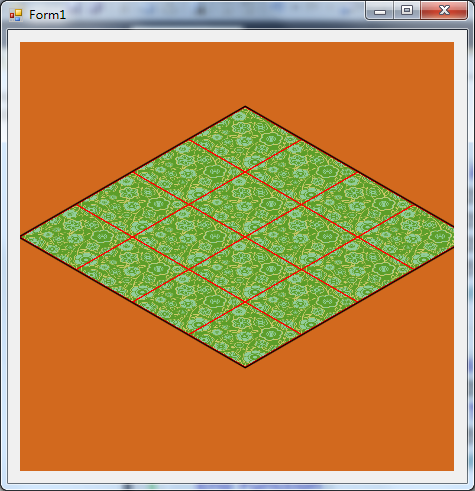
效果还是不错的吧。把原本正方形的图案转换成倾斜视角的图案。这个效果像不像一些游戏的效果?这个就是仿射转换(AffineTransform)的功劳。(倾斜转换(SkewTransform)达不到这样的效果)
下面再给这个画面添加一个人物,人物如下:

由于已经把坐标系改成仿射坐标,所以在绘制时,先要进行逆转换。于是用到之前的Invert(逆转换函数)和Multiply(矩阵乘法,实现复合转换)。代码如下:
Public Class clsDirect2DSample15
Inherits clsDirect2DSample14
Public Shadows Sub Render()
If Not _renderTarget Is Nothing Then
With _renderTarget
.BeginDraw()
.Clear(New Direct2D1.ColorF(Color.Chocolate.ToArgb))
Dim B As Direct2D1.D2DBitmap = LoadBitmapFromFile("218.png")
Dim Man As Direct2D1.D2DBitmap = LoadBitmapFromFile("219.png")
Dim BB As Direct2D1.BitmapBrush = _renderTarget.CreateBitmapBrush(B)
BB.Transform = Direct2D1.Matrix3x2F.Scale(0.25, 0.25)
BB.ExtendModeX = Direct2D1.ExtendMode.Wrap
BB.ExtendModeY = Direct2D1.ExtendMode.Wrap
.Transform = AffineMatrix(60, -30)
Dim R As New Direct2D1.RectF(-195, 195, 65, 455)
Dim SB As Direct2D1.SolidColorBrush = _renderTarget.CreateSolidColorBrush(New Direct2D1.ColorF(0, 0, 0))
.DrawRectangle(R, SB, 3)
.FillRectangle(R, BB)
PaintMan(Man, New Direct2D1.Point2F(40, 140), .Transform)
.EndDraw()
End With
End If
End Sub
Public Sub PaintMan(man As Direct2D1.D2DBitmap, point As Direct2D1.Point2F, T As Direct2D1.Matrix3x2F)
Dim F As New Direct2D1.RectF(point.X - 200, point.Y - 200, man.PixelSize.Width + point.X + 200, man.PixelSize.Height + point.Y + 200)
Dim B As Direct2D1.BitmapBrush = _renderTarget.CreateBitmapBrush(man)
B.Transform = Multiply(Invert(T), Direct2D1.Matrix3x2F.Translation(point.X, point.Y))
_renderTarget.FillRectangle(F, B)
End Sub
End Class
示例代码的效果如下:
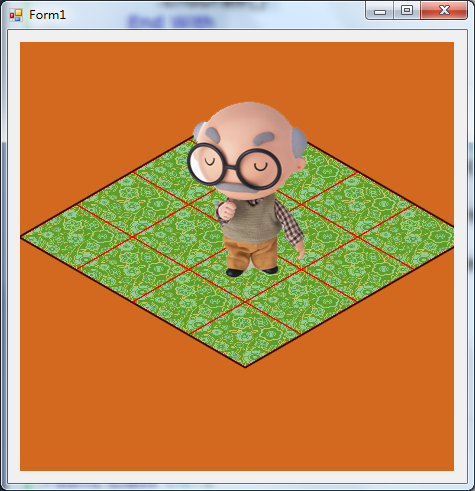
有点游戏画面的雏形了吧。
不过,这个代码仅仅是举例,来说明转换(Transform)的效果。实际上,背景和人物放在不同的图层里来显示,可能代码会简单一些。但是,绘制在一个图层里,可以做到坐标的统一,不需要进行坐标的转换。就看你的取舍了。
Direct2D教程VI——转换(Transform)的更多相关文章
- Direct2D教程VIII——几何(Geometry)对象的运算,本系列的终结篇
目前博客园中成系列的Direct2D的教程有 1.万一的 Direct2D 系列,用的是Delphi 2009 2.zdd的 Direct2D 系列,用的是VS中的C++ 3.本文所在的 Direct ...
- Direct2D教程VII——变换几何(TransformedGeometry)对象
目前博客园中成系列的Direct2D的教程有 1.万一的 Direct2D 系列,用的是Delphi 2009 2.zdd的 Direct2D 系列,用的是VS中的C++ 3.本文所在的 Direct ...
- Direct2D教程V——位图(Bitmap)和位图笔刷(BitmapBrush)
目前博客园中成系列的Direct2D的教程有 1.万一的 Direct2D 系列,用的是Delphi 2009 2.zdd的 Direct2D 系列,用的是VS中的C++ 3.本文所在的 Direct ...
- SharpDX之Direct2D教程II——加载位图文件和保存位图文件
本系列文章目录: SharpDX之Direct2D教程I——简单示例和Color(颜色) 绘制位图是绘制操作的不可缺少的一部分.在Direct2D中绘制位图,必须先利用WIC组件将位图加载到内存中,再 ...
- Direct2D教程IV——笔刷(Brush)对象
目前博客园中成系列的Direct2D的教程有 1.万一的 Direct2D 系列,用的是Delphi 2009 2.zdd的 Direct2D 系列,用的是VS中的C++ 3.本文所在的 Direct ...
- Direct2D教程III——几何(Geometry)对象
目前博客园中成系列的Direct2D的教程有 1.万一的 Direct2D 系列,用的是Delphi 2009 2.zdd的 Direct2D 系列,用的是VS中的C++ 3.本文所在的 Direct ...
- Direct2D教程(外篇)环境配置
2014年世界杯首场淘汰赛马上开始了,闲着没事,整理以前的博客草稿打发时间,意外的发现这篇文章,本来是打算加入到Direct2D那个系列的,不知道为什么把它给遗漏了.环境配置,对于熟手来说,不是什么重 ...
- SharpDX之Direct2D教程I——简单示例和Color(颜色)
研究Direct2D已经有一段时间了,也写了一个系列的文章 Direct2D ,是基于Windows API Code Pack 1.1.在前文 Direct2D教程VIII——几何(Geometry ...
- Direct2D教程II——绘制基本图形和线型(StrokeStyle)的设置详解
目前,在博客园上,相对写得比较好的两个关于Direct2D的教程系列,分别是万一的Direct2D系列和zdd的Direct2D系列.有兴趣的网友可以去看看.本系列也是介绍Direct2D的教程,是基 ...
随机推荐
- JTAG - General description of the TAP Controller states
A transition between the states only occurs on the rising edge of TCK, and each state has a differen ...
- IIS、Asp.net 编译时的临时文件路径
IIS上部署的ASP.NET站点都会在一个.Net Framework的特定目录下生成临时编译文件增加ASP.NET站点的访问性能,有时候需要手动去删除这些临时编译文件,特别是发布新版本代码到IIS后 ...
- [Go] panic 和 recover
通常情况下,函数向其调用方报告错误的方式都是返回一个 error 类型的值.但是,当遇到致命错误的时候,很可能会使程序无法继续运行.这时,上述错误处理方式就太不适合了,Go 推荐通过调用 panic ...
- 虫趣:BAD POOL CALLER (par1: 0x20)
[作者:张佩] [原文:http://www.yiiyee.cn/Blog/0x19-1/] 内核在管理内存的时候,为了提高内存使用效率,对于小片内存的申请(小于一个PAGE大小),都是通过内存池来操 ...
- Android论坛
APKBUS:http://www.apkbus.com/forum.php 看雪ANDROID:http://bbs.pediy.com http://www.52pojie.cn http://w ...
- WebLogic使用总结(七)——WebLogic部署Web应用并绑定域名
一.在WebLogic中创建一个虚拟主机 找到虚拟主机面板,如下图所示:
- 查看sqlserver2008数据库服务器实例名称
select @@SERVICENAME 安装SQLServer时,如果不另外设置数据库实例名称,那么默认的数据库实例名就是MSSQLSERVER
- ASP.NET Web API实践系列11,如何设计出优秀的API
本篇摘自:InfoQ的微信公众号 在设计API的时候考虑的问题包括:API所使用的传输协议.支持的消息格式.接口的控制.名称.关联.次序,等等.我们很难始终作出正确的决策,很可能是在多次犯错之后,并从 ...
- GDI+用PNG图片做半透明异型窗口
{*******************************************************} { ...
- Android 数据存储02之文件读写
Android文件读写 版本 修改内容 日期 修改人 V1.0 原始版本 2013/2/25 skywang Android文件读写的有两种方式.一种,是通过标准的JavaIO库去读写.另一种,是通过 ...
