WPF成长之路------帧动画(1)
最近公司的一个项目因为是WPF的,而自己已经很长一段时间没有接触过WPF了,再加上之前没有做过wpf的动画效果,因此在学习的过程中也顺便记录一下,说不定以后还会用上,同时也算是总结一下吧!刚开始写博客,写得不好的地方大家多多见谅!不喜勿喷!
这个效果主要是通过各种图形的组合进行绘图,然后通过贝塞尔曲线绘制主要的动画图形,从而实现帧动画!
先上效果图:
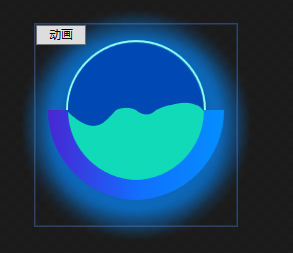

动态图效果不好,所以也放了一张静态图片。
首先是绘制图形部分,图形主要是五部分组成:背景的虚化效果、圆弧(由两部分组成,分别设置渐变色)、圆形边框、圆形内部颜色以及动画部分,代码如下:
- <Viewbox>
- <DockPanel>
- <Grid>
- <ed:Arc x:Name="shadowArc" StartAngle="" EndAngle="" Height="" Width="" ArcThickness="" Opacity="0.7">
- <ed:Arc.Fill>
- <SolidColorBrush x:Name="shadowColor" Color="#0689FF"></SolidColorBrush>
- </ed:Arc.Fill>
- <ed:Arc.Effect>
- <BlurEffect Radius="" KernelType="Box" RenderingBias="Quality"/>
- </ed:Arc.Effect>
- </ed:Arc>
- <ed:Arc StartAngle="" EndAngle="" ArcThickness="" Height="" Width="" Fill="#8BFCF4" Margin="0 0 0 30"></ed:Arc>
- <ed:Arc StartAngle="" EndAngle="" ArcThickness="" Height="" Width="" Fill="#0048B4" Margin="0 0 0 30"></ed:Arc>
- <ed:Arc Height="" Width="" Margin="0 0 0 30" StartAngle="" EndAngle=""></ed:Arc>
- <Path Height="" Width="" Margin="0 0 0 30" Fill="#11DAB9">
- <Path.Data>
- <PathGeometry>
- <PathFigure x:Name="pf_main" StartPoint="0,70">
- <BezierSegment x:Name="bs_main0" Point1="30,100" Point2="40,80" Point3="50,70"></BezierSegment>
- <BezierSegment x:Name="bs_main1" Point1="50,70" Point2="60,65" Point3="70,70"></BezierSegment>
- <BezierSegment x:Name="bs_main2" Point1="70,70" Point2="80,80" Point3="90,70"></BezierSegment>
- <BezierSegment x:Name="bs_main3" Point1="90,70" Point2="100,65" Point3="105,65"></BezierSegment>
- <BezierSegment x:Name="bs_main4" Point1="105,65" Point2="120,60" Point3="130,65"></BezierSegment>
- <BezierSegment x:Name="bs_main5" Point1="130,65" Point2="135,65" Point3="140,75"></BezierSegment>
- <PolyLineSegment Points="140,120 70,150 0,120"></PolyLineSegment>
- </PathFigure>
- </PathGeometry>
- </Path.Data>
- </Path>
- <ed:Arc StartAngle="" EndAngle="" Height="" Width="" ArcThickness="" Margin="85 60 0 0">
- <ed:Arc.Fill>
- <LinearGradientBrush StartPoint="1,0" EndPoint="0,0">
- <GradientStop Color="#038EFF" Offset=""></GradientStop>
- <GradientStop Color="#126DFF" Offset=""></GradientStop>
- </LinearGradientBrush>
- </ed:Arc.Fill>
- </ed:Arc>
- <ed:Arc StartAngle="" EndAngle="" Height="" Width="" ArcThickness="" Margin="-85 60 0 0">
- <ed:Arc.Fill>
- <LinearGradientBrush StartPoint="1,0" EndPoint="0,0">
- <GradientStop Color="#126DFF" Offset=""></GradientStop>
- <GradientStop Color="#4826D2" Offset=""></GradientStop>
- </LinearGradientBrush>
- </ed:Arc.Fill>
- </ed:Arc>
- <Button x:Name="button" Width="" Height="" VerticalAlignment="Top" HorizontalAlignment="Left">动画</Button>
- </Grid>
- </DockPanel>
- </Viewbox>
随后设置内部动画效果,设置的点位越多,动画效果也好,这里就由大家自己的琢磨了(帧动画):
- <UserControl.Resources>
- <ResourceDictionary>
- <Storyboard x:Key="stb">
- <PointAnimationUsingKeyFrames Storyboard.TargetName="bs_main0" Storyboard.TargetProperty="Point2" BeginTime="0:0:0.7" AutoReverse="True" RepeatBehavior="4x" FillBehavior="Stop">
- <EasingPointKeyFrame Value="45,70" KeyTime="0:0:0.8"></EasingPointKeyFrame>
- </PointAnimationUsingKeyFrames>
- <PointAnimationUsingKeyFrames Storyboard.TargetName="bs_main2" Storyboard.TargetProperty="Point3" BeginTime="0:0:0.7" AutoReverse="True" RepeatBehavior="4x" FillBehavior="Stop">
- <EasingPointKeyFrame Value="90,75" KeyTime="0:0:1.2"></EasingPointKeyFrame>
- </PointAnimationUsingKeyFrames>
- <PointAnimationUsingKeyFrames Storyboard.TargetName="bs_main3" Storyboard.TargetProperty="Point1" BeginTime="0:0:0.7" AutoReverse="True" RepeatBehavior="4x" FillBehavior="Stop">
- <EasingPointKeyFrame Value="90,75" KeyTime="0:0:1.2"></EasingPointKeyFrame>
- </PointAnimationUsingKeyFrames>
- <PointAnimationUsingKeyFrames Storyboard.TargetName="bs_main3" Storyboard.TargetProperty="Point2" BeginTime="0:0:0.7" AutoReverse="True" RepeatBehavior="4x" FillBehavior="Stop">
- <EasingPointKeyFrame Value="100,70" KeyTime="0:0:1.2"></EasingPointKeyFrame>
- </PointAnimationUsingKeyFrames>
- <PointAnimationUsingKeyFrames Storyboard.TargetName="bs_main3" Storyboard.TargetProperty="Point3" BeginTime="0:0:0.7" AutoReverse="True" RepeatBehavior="5x" FillBehavior="Stop">
- <EasingPointKeyFrame Value="105,68" KeyTime="0:0:1.2"></EasingPointKeyFrame>
- </PointAnimationUsingKeyFrames>
- <PointAnimationUsingKeyFrames Storyboard.TargetName="bs_main4" Storyboard.TargetProperty="Point1" BeginTime="0:0:0.7" AutoReverse="True" RepeatBehavior="5x" FillBehavior="Stop">
- <EasingPointKeyFrame Value="105,68" KeyTime="0:0:0.8"></EasingPointKeyFrame>
- </PointAnimationUsingKeyFrames>
- <PointAnimationUsingKeyFrames Storyboard.TargetName="bs_main4" Storyboard.TargetProperty="Point2" BeginTime="0:0:0.7" AutoReverse="True" RepeatBehavior="5x" FillBehavior="Stop">
- <EasingPointKeyFrame Value="120,65" KeyTime="0:0:0.8"></EasingPointKeyFrame>
- </PointAnimationUsingKeyFrames>
- </Storyboard>
- </ResourceDictionary>
- </UserControl.Resources>
- <UserControl.Triggers>
- <EventTrigger RoutedEvent="FrameworkElement.Loaded">
- <BeginStoryboard Storyboard="{StaticResource stb}"></BeginStoryboard>
- </EventTrigger>
- <EventTrigger SourceName="button" RoutedEvent="Button.Click">
- <BeginStoryboard Storyboard="{StaticResource stb}"></BeginStoryboard>
- </EventTrigger>
- </UserControl.Triggers>
参考链接:https://www.cnblogs.com/tsliwei/p/5770546.html
WPF成长之路------帧动画(1)的更多相关文章
- WPF成长之路------翻转动画
先介绍一下RenderTransform类,该类成员如下: TranslateTransform:能够让某对象的位置发生平移变化. RotateTransform:能够让某对象产生旋转变化,根据中心点 ...
- WPF成长之路------视频
今天偶然看到一篇博文,发现WPF原来还可以直接播放视频!于是在这里记录一下,以后方便使用: <MediaElement Source="C:\WINDOWS\system32\oobe ...
- wpf 帧动画
帧动画实现很简单 <ImageBrush x:Key="speed_s" Stretch="Fill" ImageSource="/images ...
- android 帧动画的实现及图片过多时OOM解决方案(一)
一,animation_list.xml中静态配置帧动画的顺序,如下: <?xml version="1.0" encoding="utf-8"?> ...
- WPF学习之绘图和动画
如今的软件市场,竞争已经进入白热化阶段,功能强.运算快.界面友好.Bug少.价格低都已经成为了必备条件.这还不算完,随着计算机的多媒体功能越来越强,软件的界面是否色彩亮丽.是否能通过动画.3D等效果是 ...
- Android动画总结#补间动画(Tween Animation/View Animation) #帧动画(Frame Animation/Drawable Animation)#属性动画(PropertyAnimation)
1.共有三种动画,英文名字多种叫法如下 第一种动画:补间动画(Tween Animation/View Animation) 四个:RotateAnimation旋转. AlphaAnimation透 ...
- WPF学习之路初识
WPF学习之路初识 WPF 介绍 .NET Framework 4 .NET Framework 3.5 .NET Framework 3.0 Windows Presentation Found ...
- 利用css3-animation来制作逐帧动画
前言 趁着还没有元旦之前先码一篇文章,不然到时候估计又被各种虐了,所以趁现在还有力气先来一篇.今天来聊聊css3中的动画属性animation,对这个属性懵懂是在很早的时候有前辈用这个 animati ...
- WPF学习之绘图和动画--DarrenF
Blend作为专门的设计工具让WPF如虎添翼,即能够帮助不了解编程的设计师快速上手,又能够帮助资深开发者快速建立图形或者动画的原型. 1.1 WPF绘图 与传统的.net开发使用GDI+进行绘图不 ...
随机推荐
- nginx实现多个域名共享80端口
server { listen 80; server_name server8085.duchong.cn; location / { proxy_pass http://127.0.0.1:8085 ...
- SQL 语句中的in、find_in_set、like的区别
1.in查询相当于多个or条件的叠加,例如: select * from user where user_id in (1,2,3);等效于select * from user where user_ ...
- iOS 布局之 Springs and Struts
“springs and struts” 模式,就是代码中的autosizing masks布局控制. autosizing mask决定了一个view会发生什么当它的superview 改变大小的时 ...
- 验证码及密码加密在java中使用
package com.huawei.filter; import java.io.IOException; import javax.servlet.Filter;import javax.serv ...
- java 蓝桥杯算法提高 字串统计
思路:这道题用HashMap来保存枚举的字串,key值保存字串-value值保存字串所出现的次数: 通过for循环并使用subString()方法枚举所有符合要求的子串maxStr记录 ...
- Simple Cubemap Reflection
[Simple Cubemap Reflection] Cubemap加在MainTex上,所以Property需要按如下定义: 注意_Cubemap的类型是CUBE. 使用Cubemap,需要计算反 ...
- 用 GDB 调试程序
Linux 包含了一个叫 gdb 的 GNU 调试程序. gdb 是一个用来调试 C 和 C++ 程序的强力调试器. 它使你能在程序运行时观察程序的内部结构和内存的使用情况. 以下是 gdb 所提供的 ...
- 13-Oulipo(kmp裸题)
http://acm.hdu.edu.cn/showproblem.php?pid=1686 Oulipo Time Limit: 3000/1000 MS (Java/Others) Memo ...
- jsp页面数据分页模仿百度分页效果
<%@page import="web09.shop.DBUtil"%> <%@page import="java.sql.ResultSet" ...
- ubuntu下搭建android开发环境之超顺畅模拟器
如果说android系统的卡,像耳边蚊子让人抓狂,那么android模拟器的卡,那就像午睡时的苍蝇.大概就是一样的恶心~~ 那么,这样的问题对于开发者肯定忍无可忍,我也一样,虽然我还没有入门,但我也一 ...