gdb运行时结合汇编堆栈分析
一、从源代码文件到可执行文件

- #define MYINT int
- short addend1 = 1;
- static int addend2 = 2;
- const static long addend3 = 3;
- static MYINT g(MYINT x)
- {
- return x + addend1;
- }
- static const MYINT f(MYINT x)
- {
- return g(x + addend2);
- }
- MYINT main(void)
- {
- return f(8) + addend3;
- }

第一步: 预处理,进行宏替换等工作。执行gcc -E -o example.cpp example.c,得到example.cpp如下:

- # 1 "example.c"
- # 1 "<built-in>"
- # 1 "<命令行>"
- # 1 "example.c"
- short addend1 = 1;
- static int addend2 = 2;
- const static long addend3 = 3;
- static int g(int x)
- {
- return x + addend1;
- }
- static const int f(int x)
- {
- return g(x + addend2);
- }
- int main(void)
- {
- return f(8) + addend3;
- }

第二步:将预处理文件编译成汇编文件。执行 gcc -x cpp-output -S -fno-asynchronous-unwind-tables -o example.s example.cpp,加入 -fno-asynchronous-unwind-tables是为了禁止生成.cfi代码。生成的汇编代码如下:

- .file "example.c" ; C文件的文件名
- .globl addend1 ; 全局变量
- .data ; 数据段
- ; short addend1 = 1;开始
- .align 2 ; 地址对齐,按2的整数倍对齐
- .type addend1, @object ; 类型是对象
- .size addend1, 2 ; 占两个字节
- addend1: ; 起始地址
- .value 1 ; 初始值
- ; static int addend2 = 2;开始
- .align 4
- .type addend2, @object
- .size addend2, 4
- addend2:
- .long 2
- .section .rodata ; 常量存储区开始
- .align 4
- .type addend3, @object
- .size addend3, 4
- addend3:
- .long 3
- .text ; 代码段开始
- .type g, @function ; 函数g
- g: ; g的起始地址
- pushl %ebp ; %ebp入栈
- movl %esp, %ebp ; 当前函数栈从%esp开始
- movzwl addend1, %eax ; 把short放入%eax
- cwtl
- addl 8(%ebp), %eax ; int + short
- popl %ebp
- ret
- .size g, .-g
- .type f, @function
- f:
- pushl %ebp
- movl %esp, %ebp
- subl $4, %esp ; 为调用g时传递参数准备空间
- movl addend2, %eax ; 在%eax中计算实参
- addl 8(%ebp), %eax
- movl %eax, (%esp) ; 实参入栈
- call g
- leave
- ret
- .size f, .-f
- .globl main ; main未加static,是全局可见的
- .type main, @function
- main:
- pushl %ebp
- movl %esp, %ebp
- subl $4, %esp
- movl $8, (%esp)
- call f
- movl addend3, %edx
- addl %edx, %eax
- leave
- ret
- .size main, .-main
- .ident "GCC: (Ubuntu/Linaro 4.6.3-1ubuntu5) 4.6.3"
- .section .note.GNU-stack,"",@progbits


- example.o: file format elf32-i386
- Disassembly of section .text:
- 00000000 <g>:
- 0: 55 push %ebp
- 1: 89 e5 mov %esp,%ebp
- 3: 0f b7 05 00 00 00 00 movzwl 0x0,%eax
- a: 98 cwtl
- b: 03 45 08 add 0x8(%ebp),%eax
- e: 5d pop %ebp
- f: c3 ret
- 00000010 <f>:
- 10: 55 push %ebp
- 11: 89 e5 mov %esp,%ebp
- 13: 83 ec 04 sub $0x4,%esp
- 16: a1 04 00 00 00 mov 0x4,%eax
- 1b: 03 45 08 add 0x8(%ebp),%eax
- 1e: 89 04 24 mov %eax,(%esp)
- 21: e8 da ff ff ff call 0 <g>
- 26: c9 leave
- 27: c3 ret
- 00000028 <main>:
- 28: 55 push %ebp
- 29: 89 e5 mov %esp,%ebp
- 2b: 83 ec 04 sub $0x4,%esp
- 2e: c7 04 24 08 00 00 00 movl $0x8,(%esp)
- 35: e8 d6 ff ff ff call 10 <f>
- 3a: 8b 15 00 00 00 00 mov 0x0,%edx
- 40: 01 d0 add %edx,%eax
- 42: c9 leave
- 43: c3 ret
- Disassembly of section .data:
- 00000000 <addend1>:
- 0: 01 00 add %eax,(%eax)
- ...
- 00000004 <addend2>:
- 4: 02 00 add (%eax),%al
- ...
- Disassembly of section .rodata:
- 00000000 <addend3>:
- 0: 03 00 add (%eax),%eax
- ...
- Disassembly of section .comment:
- 00000000 <.comment>:
- 0: 00 47 43 add %al,0x43(%edi)
- 3: 43 inc %ebx
- 4: 3a 20 cmp (%eax),%ah
- 6: 28 55 62 sub %dl,0x62(%ebp)
- 9: 75 6e jne 79 <main+0x51>
- b: 74 75 je 82 <main+0x5a>
- d: 2f das
- e: 4c dec %esp
- f: 69 6e 61 72 6f 20 34 imul $0x34206f72,0x61(%esi),%ebp
- 16: 2e 36 2e 33 2d 31 75 cs ss xor %cs:%ss:0x75627531,%ebp
- 1d: 62 75
- 1f: 6e outsb %ds:(%esi),(%dx)
- 20: 74 75 je 97 <main+0x6f>
- 22: 35 29 20 34 2e xor $0x2e342029,%eax
- 27: 36 2e 33 00 ss xor %cs:%ss:(%eax),%eax

第四步,将目标代码编译成可执行文件, gcc -o example example.o。此时可以继续用objdump -D example > example.objdump察看,可见example.objdump文件有728行,已经加入了大量的代码,其中我们自己写的部分是:

- 080483b4 <g>:
- 80483b4: 55 push %ebp
- 80483b5: 89 e5 mov %esp,%ebp
- 80483b7: 0f b7 05 10 a0 04 08 movzwl 0x804a010,%eax
- 80483be: 98 cwtl
- 80483bf: 03 45 08 add 0x8(%ebp),%eax
- 80483c2: 5d pop %ebp
- 80483c3: c3 ret
- 080483c4 <f>:
- 80483c4: 55 push %ebp
- 80483c5: 89 e5 mov %esp,%ebp
- 80483c7: 83 ec 04 sub $0x4,%esp
- 80483ca: a1 14 a0 04 08 mov 0x804a014,%eax
- 80483cf: 03 45 08 add 0x8(%ebp),%eax
- 80483d2: 89 04 24 mov %eax,(%esp)
- 80483d5: e8 da ff ff ff call 80483b4 <g>
- 80483da: c9 leave
- 80483db: c3 ret
- 080483dc <main>:
- 80483dc: 55 push %ebp
- 80483dd: 89 e5 mov %esp,%ebp
- 80483df: 83 ec 04 sub $0x4,%esp
- 80483e2: c7 04 24 08 00 00 00 movl $0x8,(%esp)
- 80483e9: e8 d6 ff ff ff call 80483c4 <f>
- 80483ee: 8b 15 d0 84 04 08 mov 0x80484d0,%edx
- 80483f4: 01 d0 add %edx,%eax
- 80483f6: c9 leave
- 80483f7: c3 ret
- 80483f8: 90 nop
- 80483f9: 90 nop
- 80483fa: 90 nop
- 80483fb: 90 nop
- 80483fc: 90 nop
- 80483fd: 90 nop
- 80483fe: 90 nop
- 80483ff: 90 nop
- ...
- ...
- ...
- Disassembly of section .data:
- 0804a008 <__data_start>:
- 804a008: 00 00 add %al,(%eax)
- ...
- 0804a00c <__dso_handle>:
- 804a00c: 00 00 add %al,(%eax)
- ...
- 0804a010 <addend1>:
- 804a010: 01 00 add %eax,(%eax)
- ...
- 0804a014 <addend2>:
- 804a014: 02 00 add (%eax),%al
- ...
- Disassembly of section .bss:
- 0804a018 <completed.6159>:
- 804a018: 00 00 add %al,(%eax)
- ...
- 0804a01c <dtor_idx.6161>:
- 804a01c: 00 00 add %al,(%eax)
- ...


- ELF Header:
- Magic: 7f 45 4c 46 01 01 01 00 00 00 00 00 00 00 00 00
- Class: ELF32
- Data: 2's complement, little endian
- Version: 1 (current)
- OS/ABI: UNIX - System V
- ABI Version: 0
- Type: EXEC (Executable file)
- Machine: Intel 80386
- Version: 0x1
- Entry point address: 0x8048300
- Start of program headers: 52 (bytes into file)
- Start of section headers: 4416 (bytes into file)
- Flags: 0x0
- Size of this header: 52 (bytes)
- Size of program headers: 32 (bytes)
- Number of program headers: 9
- Size of section headers: 40 (bytes)
- Number of section headers: 30
- Section header string table index: 27
- Section Headers:
- [Nr] Name Type Addr Off Size ES Flg Lk Inf Al
- [ 0] NULL 00000000 000000 000000 00 0 0 0
- [ 1] .interp PROGBITS 08048154 000154 000013 00 A 0 0 1
- [ 2] .note.ABI-tag NOTE 08048168 000168 000020 00 A 0 0 4
- [ 3] .note.gnu.build-i NOTE 08048188 000188 000024 00 A 0 0 4
- [ 4] .gnu.hash GNU_HASH 080481ac 0001ac 000020 04 A 5 0 4
- [ 5] .dynsym DYNSYM 080481cc 0001cc 000040 10 A 6 1 4
- [ 6] .dynstr STRTAB 0804820c 00020c 000045 00 A 0 0 1
- [ 7] .gnu.version VERSYM 08048252 000252 000008 02 A 5 0 2
- [ 8] .gnu.version_r VERNEED 0804825c 00025c 000020 00 A 6 1 4
- [ 9] .rel.dyn REL 0804827c 00027c 000008 08 A 5 0 4
- [10] .rel.plt REL 08048284 000284 000010 08 A 5 12 4
- [11] .init PROGBITS 08048294 000294 00002e 00 AX 0 0 4
- [12] .plt PROGBITS 080482d0 0002d0 000030 04 AX 0 0 16
- [13] .text PROGBITS 08048300 000300 0001ac 00 AX 0 0 16
- [14] .fini PROGBITS 080484ac 0004ac 00001a 00 AX 0 0 4
- [15] .rodata PROGBITS 080484c8 0004c8 00000c 00 A 0 0 4
- [16] .eh_frame_hdr PROGBITS 080484d4 0004d4 00002c 00 A 0 0 4
- [17] .eh_frame PROGBITS 08048500 000500 0000a4 00 A 0 0 4
- [18] .ctors PROGBITS 08049f14 000f14 000008 00 WA 0 0 4
- [19] .dtors PROGBITS 08049f1c 000f1c 000008 00 WA 0 0 4
- [20] .jcr PROGBITS 08049f24 000f24 000004 00 WA 0 0 4
- [21] .dynamic DYNAMIC 08049f28 000f28 0000c8 08 WA 6 0 4
- [22] .got PROGBITS 08049ff0 000ff0 000004 04 WA 0 0 4
- [23] .got.plt PROGBITS 08049ff4 000ff4 000014 04 WA 0 0 4
- [24] .data PROGBITS 0804a008 001008 000010 00 WA 0 0 4
- [25] .bss NOBITS 0804a018 001018 000008 00 WA 0 0 4
- [26] .comment PROGBITS 00000000 001018 00002a 01 MS 0 0 1
- [27] .shstrtab STRTAB 00000000 001042 0000fc 00 0 0 1
- [28] .symtab SYMTAB 00000000 0015f0 000450 10 29 49 4
- [29] .strtab STRTAB 00000000 001a40 000209 00 0 0 1
- Key to Flags:
- W (write), A (alloc), X (execute), M (merge), S (strings)
- I (info), L (link order), G (group), T (TLS), E (exclude), x (unknown)
- O (extra OS processing required) o (OS specific), p (processor specific)

二、运行时堆栈分析
为了使用gdb进行调试,用gcc - g example.c -o example重新编译代码,然后gdb example进入gdb调试。
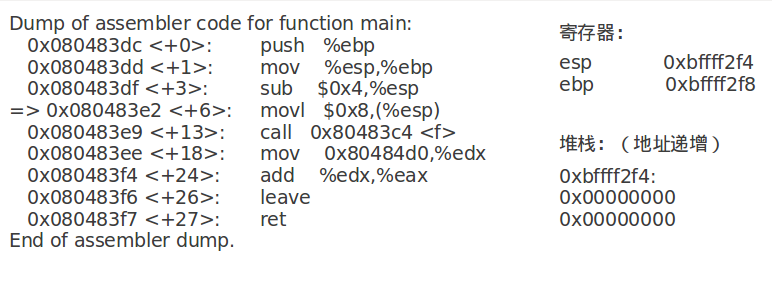
在main函数入口处设置断点,运行程序,然后察看运行到的汇编指令、此时的寄存器数据和堆栈:

- (gdb) b 17
- Breakpoint 1 at 0x80483e2: file example.c, line 17.
- (gdb) r
- Starting program: /home/qpx/操作系统/example
- Breakpoint 1, main () at example.c:19
- 19 return f(8) + addend3;
- (gdb) disassemble
- Dump of assembler code for function main:
- 0x080483dc <+0>: push %ebp
- 0x080483dd <+1>: mov %esp,%ebp
- 0x080483df <+3>: sub $0x4,%esp
- => 0x080483e2 <+6>: movl $0x8,(%esp)
- 0x080483e9 <+13>: call 0x80483c4 <f>
- 0x080483ee <+18>: mov 0x80484d0,%edx
- 0x080483f4 <+24>: add %edx,%eax
- 0x080483f6 <+26>: leave
- 0x080483f7 <+27>: ret
- End of assembler dump.
- (gdb) info registers
- eax 0x1 1
- ecx 0xbffff394 -1073745004
- edx 0xbffff324 -1073745116
- ebx 0xb7fc2ff4 -1208209420
- esp 0xbffff2f4 0xbffff2f4
- ebp 0xbffff2f8 0xbffff2f8
- esi 0x0 0
- edi 0x0 0
- eip 0x80483e2 0x80483e2 <main+6>
- eflags 0x200282 [ SF IF ID ]
- cs 0x73 115
- ss 0x7b 123
- ds 0x7b 123
- es 0x7b 123
- fs 0x0 0
- gs 0x33 51
(gdb) x/2 0xbffff2f4
0xbffff2f4: 0x000000000 x00000000

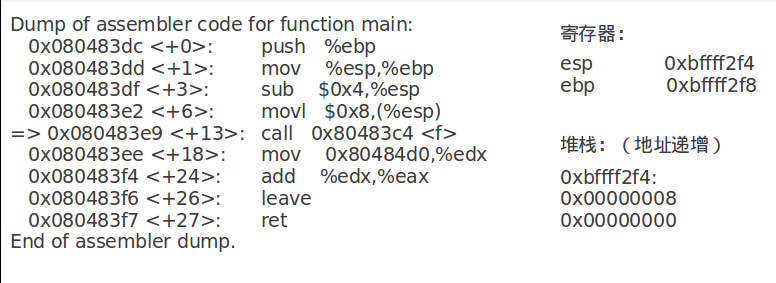
可见此时主函数的栈基址为0xbffff2f8,而%esp已经下移4字节准备为函数 f 传递参数8,但目前%esp所指堆栈内容为0,%ebp所指内容也为0。下面展示每一步时%esp、%ebp和堆栈内容的变化:


call指令将下一条指令的地址入栈:

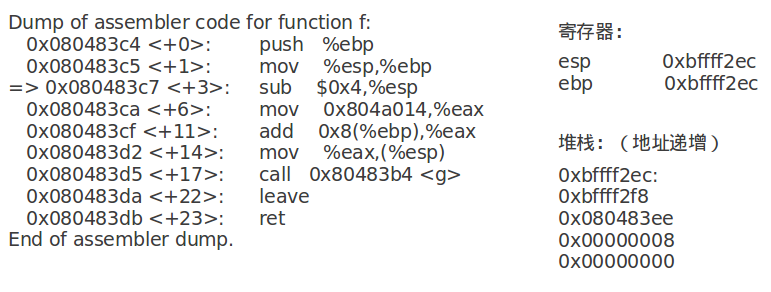
将上一个函数的基址入栈,从当前%esp开始作为新基址:

先为传参做准备:

实参的计算在%eax中进行:

实参入栈:


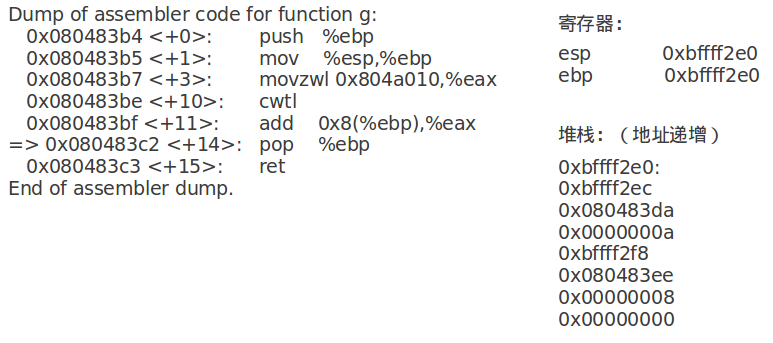
call指令将下一条指令的地址入栈:


计算short+int:


pop %ebp指令将栈顶弹到%ebp中,同时%esp增加4字节:

ret指令将栈顶弹给%eip

因为函数 f 修改了%esp,所以用leave指令恢复。leave指令先将%esp对其到%ebp,然后把栈顶弹给%ebp:


程序最终结束。
gdb运行时结合汇编堆栈分析的更多相关文章
- GDB调试32位汇编堆栈分析
GDB调试32位汇编堆栈分析 测试源代码 #include <stdio.h> int g(int x){ return x+5; } int f(int x){ return g(x)+ ...
- 20145314郑凯杰《信息安全系统设计基础》GDB调试32位汇编堆栈分析
20145314郑凯杰<信息安全系统设计基础>GDB调试32位汇编堆栈分析 本篇博客将对第五周博客中的GDB调试32位汇编堆栈进行分析 首先放上以前环境配置的图: 图1: 测试代码: #i ...
- 20145219 gdb调试汇编堆栈分析
20145219 gdb调试汇编堆栈分析 代码gdbdemo.c int g(int x) { return x+19; } int f(int x) { return g(x); } int mai ...
- 20145318 GDB调试汇编堆栈分析
20145318 GDB调试汇编堆栈分析 代码 #include<stdio.h> short addend1 = 1; static int addend2 = 2; const sta ...
- 20145310 GDB调试汇编堆栈分析
GDB调试汇编堆栈分析 由于老师说要逐条分析汇编代码,所以我学习卢肖明同学的方法,重新写了一篇博客. 代码: #include<stdio.h> short addend1 = 1; st ...
- JavaScript 对引擎、运行时、调用堆栈的概述理解
JavaScript 对引擎.运行时.调用堆栈的概述理解 随着JavaScript越来越流行,越来越多的团队广泛的把JavaScript应用到前端.后台.hybrid 应用.嵌入式等等领域. 这篇文 ...
- JavaScript是如何工作的:引擎,运行时和调用堆栈的概述!
摘要: 理解JS执行原理. 原文:JavaScript是如何工作的:引擎,运行时和调用堆栈的概述! 作者:前端小智 Fundebug经授权转载,版权归原作者所有. 本文是旨在深入研究JavaScrip ...
- gdb调试汇编堆栈分析
代码(src/05/gdb.c) int g(int x) { return x + 4; } int f(int x) { return g(x); } int main(void) { retur ...
- JavaScript是如何工作的01:引擎,运行时和调用堆栈的概述!
概述 几乎每个人都已经听说过 V8 引擎,大多数人都知道 JavaScript 是单线程的,或者它使用的是回调队列. 在本文中,我们将详细介绍这些概念,并解释 JavaScrip 实际如何运行.通过了 ...
随机推荐
- div 居中CSS实现
.login-box { position: absolute; border: solid #E3EAE7 1px; top: 50%; left: 50%; margin: -100px 0 0 ...
- 百用随身系统 Veket Linux
Veket Linux 是一个随身的可装在U盘的Linux操作系统. 特点:1,随身系统,装在U盘可走遍天下,它几乎支持“所有”的电脑,就我所接触得到的电脑它都支持并成功驱动,就这十多年的安装的电脑都 ...
- Delphi通过调用COM对象实现更改桌面壁纸
从前我也是用SystemParametersInfo这API来改桌面壁纸的,问题多多,也不知道哪错了,就没深究下去.看了CSDN的帖子后,大彻大悟~~ 在XP下,SystemParam ...
- css案例学习之盒子模型
定义:每个盒子都有:边界.边框.填充.内容四个属性: 每个属性都包括四个部分:上.右.下.左:这四部分可同时设置,也可分别设置:里的抗震辅料厚度,而边框有大小和颜色之分,我们又可以理解为生活中所见盒子 ...
- poj3094---对字符串的处理
#include <stdio.h> #include <stdlib.h> #include<string.h> int main() { ]; int len, ...
- javascript第十一课,string对象
length: //字符串长度,索引从0开始 var str='说东方闪电方式的'; alert(str.length); charAt(index); var n='阿斯顿发生打算'; n.cha ...
- DevExpress控件之:ChartControl 动态绑定数据
private void BindData(ViewType vt) { chartControl1.Series.Clear(); //Series series1 = new Series(&qu ...
- Mvc里删除Cooki
/// <summary> /// 删除Cookie /// </summary> /// <param name="skuID">从购物车选择 ...
- 20151226--easyUI
<%@ page language="java" contentType="text/html; charset=UTF-8" pageEncoding= ...
- jQuery EasyUI combobox多选和赋值
定义select <select id="ID" name=empVO.acunid class="easyui-combobox" required=& ...
