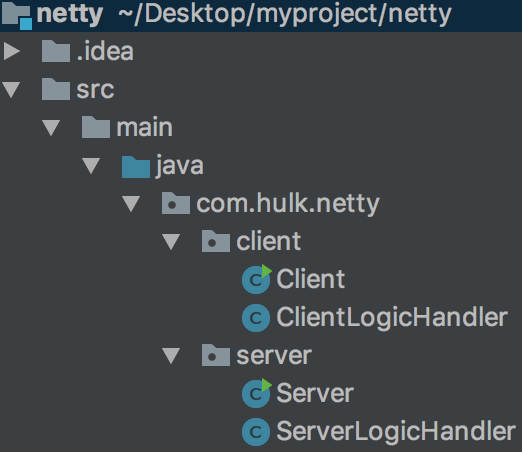
7.3 netty3基本使用
由于dubbo默认使用的是netty3进行通信的,这里简单的列出一个netty3通信的例子。

一 server端
1 Server
 package com.hulk.netty.server;

 import org.jboss.netty.bootstrap.ServerBootstrap;

 import org.jboss.netty.channel.*;

 import org.jboss.netty.channel.socket.nio.NioServerSocketChannelFactory;

 import org.jboss.netty.handler.codec.string.StringDecoder;

 import org.jboss.netty.handler.codec.string.StringEncoder;

 import java.net.InetSocketAddress;

 import java.util.concurrent.Executors;

 public class Server {

     public void start(){

         ChannelFactory factory = new NioServerSocketChannelFactory(

                 Executors.newCachedThreadPool(),//boss线程池

                 Executors.newCachedThreadPool(),//worker线程池

                 8//worker线程数

         );

         ServerBootstrap bootstrap = new ServerBootstrap(factory);

         /**

          * 对于每一个连接channel, server都会调用PipelineFactory为该连接创建一个ChannelPipline

          */

         bootstrap.setPipelineFactory(new ChannelPipelineFactory() {

             public ChannelPipeline getPipeline() throws Exception {

                 ChannelPipeline pipeline = Channels.pipeline();

                 pipeline.addLast("decoder", new StringDecoder());

                 pipeline.addLast("encoder", new StringEncoder());

                 pipeline.addLast("handler", new ServerLogicHandler());

                 return pipeline;

             }

         });

         Channel channel = bootstrap.bind(new InetSocketAddress("127.0.0.1", 8080));

         System.out.println("server start success!");

     }

     public static void main(String[] args) throws InterruptedException {

         Server server = new Server();

         server.start();

         Thread.sleep(Integer.MAX_VALUE);

     }

 }
步骤:
- 首先创建了NioServerSocketChannelFactory:创建boss线程池,创建worker线程池以及worker线程数。(boss线程数默认为1个)
- 创建ServerBootstrap server端启动辅助类
- 为ServerBootstrap设置ChannelPipelineFactory工厂,并为ChannelPipelineFactory将来创建出的ChannelPipeline设置编码器/解码器/事件处理器
- 使用ServerBootstrap绑定监听地址和端口
2 事件处理器ServerLogicHandler
 package com.hulk.netty.server;

 import org.jboss.netty.channel.Channel;

 import org.jboss.netty.channel.ChannelHandlerContext;

 import org.jboss.netty.channel.ChannelStateEvent;

 import org.jboss.netty.channel.ExceptionEvent;

 import org.jboss.netty.channel.MessageEvent;

 import org.jboss.netty.channel.SimpleChannelHandler;

 public class ServerLogicHandler extends SimpleChannelHandler {

     @Override

     public void channelConnected(ChannelHandlerContext ctx, ChannelStateEvent e) throws Exception {

         System.out.println("连接成功, channel: " + e.getChannel().toString());

     }

     @Override

     public void messageReceived(ChannelHandlerContext ctx, MessageEvent e) throws Exception {

         String msg = (String) e.getMessage();

         System.out.println("接收到了client的消息, msg: " + msg);

         Channel channel = e.getChannel();

         String str = "hi, client";

         channel.write(str);//写消息发给client端

         System.out.println("服务端发送数据: " + str + "完成");

     }

     @Override

     public void exceptionCaught(ChannelHandlerContext ctx, ExceptionEvent e) throws Exception {

         e.getCause().printStackTrace();

         e.getChannel().close();

     }

 }
说明:
- 监听与客户端连接成功事件
- 监听接收到来自客户端的消息,之后写回给客户端消息
- 捕捉异常事件
二 client端
1 Client
 package com.hulk.netty.client;

 import org.jboss.netty.bootstrap.ClientBootstrap;

 import org.jboss.netty.channel.ChannelFactory;

 import org.jboss.netty.channel.ChannelPipeline;

 import org.jboss.netty.channel.ChannelPipelineFactory;

 import org.jboss.netty.channel.Channels;

 import org.jboss.netty.channel.socket.nio.NioClientSocketChannelFactory;

 import org.jboss.netty.handler.codec.string.StringDecoder;

 import org.jboss.netty.handler.codec.string.StringEncoder;

 import java.net.InetSocketAddress;

 import java.util.concurrent.Executors;

 public class Client {

     public static void main(String[] args) {

         ChannelFactory factory = new NioClientSocketChannelFactory(

                 Executors.newCachedThreadPool(),

                 Executors.newCachedThreadPool(),

                 8

         );

         ClientBootstrap bootstrap = new ClientBootstrap(factory);

         bootstrap.setPipelineFactory(new ChannelPipelineFactory() {

             public ChannelPipeline getPipeline() throws Exception {

                 ChannelPipeline pipeline = Channels.pipeline();

                 pipeline.addLast("decoder", new StringDecoder());

                 pipeline.addLast("encoder", new StringEncoder());

                 pipeline.addLast("handler", new ClientLogicHandler());

                 return pipeline;

             }

         });

         bootstrap.connect(new InetSocketAddress("127.0.0.1", 8080));

         System.out.println("client start success!");

     }

 }
步骤:(与Server几乎相同)
- 首先创建了NioClientSocketChannelFactory:创建boss线程池,创建worker线程池以及worker线程数。(boss线程数默认为1个)
- 创建ClientBootstrap client端启动辅助类
- 为ClientBootstrap设置ChannelPipelineFactory工厂,并为ChannelPipelineFactory将来创建出的ChannelPipeline设置编码器/解码器/事件处理器
- 使用ClientBootstrap连接Server端监听的地址和端口
2 ClientLogicHandler
 package com.hulk.netty.client;

 import org.jboss.netty.channel.ChannelHandlerContext;

 import org.jboss.netty.channel.ChannelStateEvent;

 import org.jboss.netty.channel.ExceptionEvent;

 import org.jboss.netty.channel.MessageEvent;

 import org.jboss.netty.channel.SimpleChannelHandler;

 import org.jboss.netty.channel.WriteCompletionEvent;

 public class ClientLogicHandler extends SimpleChannelHandler {

     @Override

     public void channelConnected(ChannelHandlerContext ctx, ChannelStateEvent e) throws Exception {

         System.out.println("客户端连接成功!");

         String str = "hi server!";

         e.getChannel().write(str);//异步

     }

     @Override

     public void writeComplete(ChannelHandlerContext ctx, WriteCompletionEvent e) throws Exception {

         System.out.println("客户端写消息完成");

     }

     @Override

     public void messageReceived(ChannelHandlerContext ctx, MessageEvent e) throws Exception {

         String msg = (String) e.getMessage();

         System.out.println("客户端接收到消息, msg: " + msg);

     }

     @Override

     public void exceptionCaught(ChannelHandlerContext ctx, ExceptionEvent e) throws Exception {

         e.getCause().printStackTrace();

         e.getChannel().close();

     }

 }
说明:
- 监听与服务端连接成功事件,连接成功后,写消息给服务端
- 监听向服务端写消息完成的事件
- 监听接收到来自服务端的消息
- 捕捉异常事件
这就是一个简单的netty3通信的例子,关于netty,后续会读源码。
7.3 netty3基本使用的更多相关文章
- netty3升netty4一失眼成千古恨
老项目是netty3的,本来想直接改到netty5,但是netty5居然是只支持jdk1.7,很奇怪jdk1.6和jdk1.8都不行..为了兼容jdk1.6加上netty4本来和netty5就差别不大 ...
- 使用Netty3或Netty4发布Http协议服务
现在是2018年1月11日18:12分,已经是下班时间了,小Alan今天给大家简单的介绍一下Netty,让大家以后在使用到Netty的时候能够有一定的了解和基础,这样深入学习Netty以及以后灵活应用 ...
- nio之netty3的应用
1.netty3是nio的封装版本.在使用上面比nio的直接使用更好.nio简单使用都是单线程的方式(比如:一个服务员服务很多客户),但是netty3的方式不一样的是,引入线程池的方式来实现服务的通信 ...
- 蓝萝卜blu netty3升netty4
老项目是netty3的,本来想直接改到netty5,但是netty5居然是只支持jdk1.7,很奇怪jdk1.6和jdk1.8都不行..为了兼容jdk1.6加上netty4本来和netty5就差别不大 ...
- 以http server为例简要分析netty3实现
概要 最近看了点netty3实现.从webbit项目作为口子.webbit项目是一个基于netty3做的http与websocket server.后面还会继续看下netty4,netty4有很多改进 ...
- Netty3 源代码分析 - NIO server绑定过程分析
Netty3 源代码分析 - NIO server绑定过程分析 一个框架封装的越好,越利于我们高速的coding.可是却掩盖了非常多的细节和原理.可是源代码可以揭示一切. 服务器端代码在指定 ...
- Netty3:分隔符和定长解码器
回顾TCP粘包/拆包问题解决方案 上文详细说了TCP粘包/拆包问题产生的原因及解决方式,并以LineBasedFrameDecoder为例演示了粘包/拆包问题的实际解决方案,本文再介绍两种粘包/拆包问 ...
- 在netty3.x中存在两种线程:boss线程和worker线程。
在netty 3.x 中存在两种线程:boss线程和worker线程.
- netty-3.客户端与服务端通信
(原) 第三篇,客户端与服务端通信 以下例子逻辑: 如果客户端连上服务端,服务端控制台就显示,XXX个客户端地址连接上线. 第一个客户端连接成功后,客户端控制台不显示信息,再有其它客户端再连接上线,则 ...
随机推荐
- mongodb for windows安装
1,下载mongodb for windwos 下载地址:https://www.mongodb.com/download-center#community 2,创建db和log的文件夹 D:\dat ...
- 一个关于react-native的demo,详细请转GitHub
react native 0 介绍 支持ios和android两个平台 下载:git clone https://github.com/chunlei36/react-native-full-exam ...
- GRYZ 模 拟 赛 系 列 之 迷 宫(不就是个洪水)
- 迷 宫 (maze.cpp/c/pas) Description Karles 和朋友到迷宫玩耍,没想到遇上了 10000000 年一次的大洪水,好在 Karles 是一个喜 欢思考的人,他发现迷 ...
- BZOJ3772精神污染
参见http://blog.csdn.net/popoqqq/article/details/43122821 #include<bits/stdc++.h> using namespac ...
- 实现常用的配置文件/初始化文件读取的一个C程序
在编程中,我们经常会遇到一些配置文件或初始化文件.这些文件通常后缀名为.ini或者.conf,可以直接用记事本打开.里面会存储一些程序参数,在程序中直接读取使用.例如,计算机与服务器通信,服务器的ip ...
- vs 2010 :类型化数据集DataSet应用
1.启动服务器资源管理器,建立数据库连接 2.在项目中创建数据集 3.为数据集添加表对象 4.为表适配器tableAdapter添加参数化查询 5.修改表适配器的主查询,或添加其他查询 Update: ...
- phpexcel错误 You tried to set a sheet active by the out of bounds index: 1解决办法
$objPHPExcel->createSheet($k);
- 简单的抖动运动 主要利用offset left 和 setTimeout
<!DOCTYPE html><html lang="en"><head> <meta charset="UTF-8" ...
- scrum vs devops vs sre
DevOps&SRE 超越传统运维之道[北京站] IT大咖说 - 大咖干货,不再错过 http://www.itdks.com/eventlist/detail/908
- HDU 4815 Little Tiger vs. Deep Monkey(2013长春现场赛C题)
题目链接:http://acm.hdu.edu.cn/showproblem.php?pid=4815 简单的DP题. #include <stdio.h> #include <st ...
