TMS320VC5509驱动AT24C02
1. 刚开始的波形不太对,比如如下代码
        i2c_status = I2C_write( at24c02_write_buf,          //pointer to data array

                                ,                //length of data to be transmitted

                                ,                //master or slaver

                                0x78,        //slave address to transmit to

                                ,                //transfer mode of operation

                                            //time out for bus busy

                                );
但是实际的波形是,把0x78左移了一位,我估计是DSP5509会自动在最后一位加上读写位

所以本次AT24C02的地址是0XA0,那么实际写的应该是0x50
        i2c_status = I2C_write( at24c02_write_buf,          //pointer to data array

                                ,                //length of data to be transmitted

                                ,                //master or slaver

                                0x50,        //slave address to transmit to

                                ,                //transfer mode of operation

                                            //time out for bus busy

                                );
2. 最后的综合代码如下
#include <csl.h>

#include <csl_i2c.h>

#include <stdio.h>

#include <csl_pll.h>

#include <csl_gpio.h>

#define BUF_LEN 20

#define AT24C02_WRITE_ADDR  0x50

#define AT24C02_READ_ADDR  0X50

Uint16 i2c_status;

/*锁相环的设置*/

PLL_Config  myConfig      = {

  ,    //IAI: the PLL locks using the same process that was underway

                //before the idle mode was entered

  ,    //IOB: If the PLL indicates a break in the phase lock,

                //it switches to its bypass mode and restarts the PLL phase-locking

                //sequence

  ,    //PLL multiply value; multiply 24 times

               //Divide by 2 PLL divide value; it can be either PLL divide value

                //(when PLL is enabled), or Bypass-mode divide value

                //(PLL in bypass mode, if PLL multiply value is set to 1)

};

/* This next struct shows how to use the I2C API */

/* Create and initialize an I2C initialization structure */

I2C_Setup I2Cinit = {

        ,              /* 7 bit address mode */

        ,         /* own address - don't care if master */

        ,            /* clkout value (Mhz)  */

        ,            /* a number between 10 and 400*/

        ,              /* number of bits/byte to be received or transmitted (8)*/

        ,              /* DLB mode on*/

                       /* FREE mode of operation on*/

};

Uint16 at24c02_write_buf[] ={0x00,0x00,0x00};

Uint16 test_write_buf[BUF_LEN+] = {};

I2C_Config testI2C;

void delay(Uint32 k)

{

   while(k--);

}

void main(void)

{

    unsigned char i= ;

    i2c_status = ;

    /*初始化CSL库*/

    CSL_init();

    /*设置系统的运行速度为140MHz*/

    PLL_config(&myConfig);

    /*确定方向为输出*/

    GPIO_RSET(IODIR,0xFF);

    GPIO_RSET(IODATA,0x00);

    /*I2C is undet reset*/

    I2C_RSET(I2CMDR,);

    /*设置预分频寄存器,I2C的mode clock is 10MHz*/

    delay();

    I2C_RSET(I2CSAR,0x001A);

    I2C_RSET(I2CMDR,0x0620);

    I2C_setup(&I2Cinit);

    /*设置I2C的Mater clock*/

    I2C_RSET(I2CCLKL,);

    I2C_RSET(I2CCLKH,);

    I2C_getConfig(&testI2C);

    //

    for(i=;i<BUF_LEN;i++)

    {

        at24c02_write_buf[] = i;

        at24c02_write_buf[] = +i;

        i2c_status = I2C_write( at24c02_write_buf,          //pointer to data array

                                ,                //length of data to be transmitted

                                ,                //master or slaver

                                AT24C02_WRITE_ADDR,        //slave address to transmit to

                                ,                //transfer mode of operation

                                            //time out for bus busy

                                );

        delay();

    }

    for(i=;i<BUF_LEN;i++)

    {

        at24c02_write_buf[] = i;

        at24c02_write_buf[] = ;

        test_write_buf[i] = ;

        i2c_status = I2C_write( at24c02_write_buf,          //pointer to data array

                                ,                //length of data to be transmitted

                                ,                //master or slaver

                                AT24C02_WRITE_ADDR,        //slave address to transmit to

                                ,                //transfer mode of operation

                                            //time out for bus busy

                                );

        i2c_status = I2C_read( &(test_write_buf[i]),          //pointer to data array

                                ,                //length of data to be transmitted

                                ,                //master or slaver

                                AT24C02_READ_ADDR,        //slave address to transmit to

                                ,                //transfer mode of operation

                                ,            //time out for bus busy

                                );

        delay();

    }

    while();

}
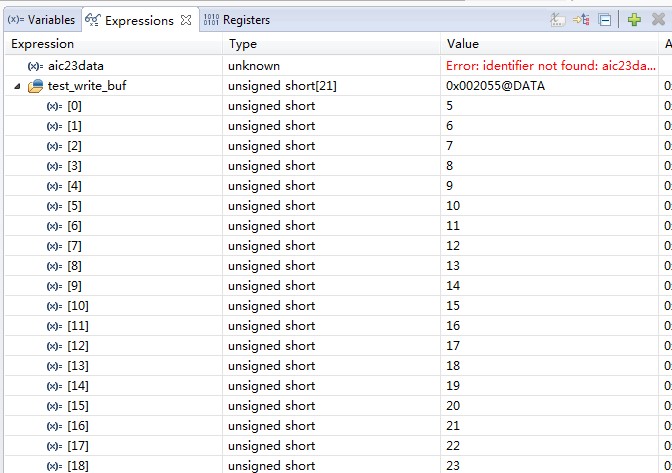
3. 看下仿真的结果
4. 看下写数据的波形

读数据的波形


TMS320VC5509驱动AT24C02的更多相关文章
- 单片机驱动AT24C02存储芯片
AT24C02是一个2K位串行CMOS E2PROM, 内部含有256个8位字节,CATALYST公司的先进CMOS技术实质上减少了器件的功耗.AT24C02有一个8字节页写缓冲器.该器件通过IIC总 ...
- TMS320VC5509驱动LCD1602
1. 本次使用5509芯片的EMIF接口,先看下硬件的接口 LCD1602接口 RS(高电平1数据寄存器,低电平0指令寄存器) 接A2接口 LCD1602接口 RW(高电平读,低电平写) 接 AW ...
- TMS320VC5509驱动LCD1602之奇怪问题和时序图
1. 最近调试自己板子上LCD1602的时候,看下测试的时序图,因为下面的时序图导致LCD1602无法显示,下面的时序图是有问题的,E的上升沿和下降沿的时候,RW需要低电平 对比下淘宝上买的可以显示的 ...
- TMS320VC5509驱动74HC595芯片
1. 5509A有3个MCBSP模块,其中模块MCBSP可以配置成SPI模式,不过实际使用的时候需要把CLKX1和CLKR1接在一起,暂时没搞明白原因 MCBSP有6个引脚,DR0 RX0 作为数据的 ...
- TMS320VC5509驱动TLV32AIC23
1. 本次使用LINE_IN作为输入,LINE_OUT作为输出(可以插耳机),代码如下,代码经过测试,没问题,不过发现了一个很奇怪的问题没搞明白 /************************** ...
- Linux I2C核心、总线和设备驱动
目录 更新记录 一.Linux I2C 体系结构 1.1 Linux I2C 体系结构的组成部分 1.2 内核源码文件 1.3 重要的数据结构 二.Linux I2C 核心 2.1 流程 2.2 主要 ...
- I.MX6 AT24Cxx eeprom Linux i2c-gpio
/************************************************************************** * I.MX6 AT24Cxx eeprom L ...
- AM335x kernel 4.4.12 i2c eeprom AT24c02驱动移植
kernel 4.4.12 i2c eeprom AT24c02驱动移植 在kernel make menuconfig ARCH=ARM 中打开: Device Drivers ---> Mi ...
- TMS320VC5509总线驱动LED灯
1. 重新建立的工程,需要添加宏定义才行 CHIP_5509 2. 驱动LED用的是74LVC573锁存器,LE高电平时,Q1=D0,LE低电平时,Q1=之前的状态,下面是数据总线 看下地址总线 看下 ...
随机推荐
- [WPF 知识总结系列] —— 基本控件的简单样式集合
一.ScrollBar <ResourceDictionary xmlns="http://schemas.microsoft.com/winfx/2006/xaml/presenta ...
- Gson解析复杂JSON字符串的两种方式
JSON解析可以使用的库: JSONObject(源自Android官方). Gson(源自Google). Jackson(第三方开源库). FastJSON(第三方开源库). 本文例子使用Goog ...
- Azure 元数据服务:适用于 Windows VM 的计划事件(预览)
计划事件是 Azure 元数据服务中的其中一个子服务. 它负责显示有关即将发生的事件(例如,重新启动)的信息,使应用程序可以为其做准备并限制中断. 它可用于所有 Azure 虚拟机类型(包括 PaaS ...
- SharePoint读取配置文件
配置文件存放目录 C:\inetpub\wwwroot\wss\VirtualDirectories\80\web.config 读取配置 string Name=Configuration.WebC ...
- Linux 修改root密码(忘记密码后)
重置密码(一) 背景: 本文基于虚拟机的RHEL6.6版本 RHEL7与此略有不同 重新启动Linux系统 进入如下后界面,再按e键 3. 进入如下界面后,使用键盘上的上下键,选中第二项以kerne ...
- MySQL基础之 日期时间函数
基础日期函数和时间函数 1.CURDATE()函数:返回当前只带有年月日格式的日期 2.CURTIME()函数:返回当前只带有时分秒格式的时间 3.NOW()函数:返回当前日期和时间 4.UNIX_T ...
- 乘风破浪:LeetCode真题_032_Longest Valid Parentheses
乘风破浪:LeetCode真题_032_Longest Valid Parentheses 一.前言 这也是非常有意思的一个题目,我们之前已经遇到过两个这种括号的题目了,基本上都要用到堆栈来解决,这次 ...
- Alpha 任务状态总览(持续更新)
Alpha 任务状态总览(持续更新) Part 0 · 简 要 目 录 Part 1 · 流 程 Part 2 · 总 任 务 量 安 排 Part 3 · 爬 虫 任 务 Part 4 · 接 口 ...
- ab参数详解 – 压力测试
命令参数: -n requests Number of requests to perform //在测试会话中所执行的请求个数.默认时,仅执行一个请求 -c concurr ...
- Vmware Vcenter6.5 全新安装及群集配置介绍
转 Vmware Vcenter6.5 全新安装及群集配置介绍 2016年12月31日 14:27:12 ccitzy01 阅读数:97772 标签: vmware [摘要] VMwarevCen ...