翻译:GLSL的顶点位移贴图
翻译:GLSL的顶点位移贴图
翻译自: Vertex Displacement Mapping using GLSL
- 译者: FreeBlues
说明: 之所以选择这篇文档, 是因为现在但凡提到位移贴图(Displacement Mapping), 都要求设备支持镶嵌细分(tessellates), 但是目前大多数的移动设备都不支持这个特性, 而本文的年代比较久远(2006~2008), 那时的设备更不可能支持镶嵌细分了, 说明位移贴图并非必需镶嵌细分这个特性, 也意味着本文的实现方法可以在大多数设备上运行.
介绍
顶点位移贴图(Vertex Displacement Mapping)或者简单点儿位移贴图(Displacement Mapping) 是一种技术, 它允许用一个纹理贴图(位移图-displacement map)对一个多边形网格(mesh)进行变形, 以便增加表面细节. 它的原理并不新鲜. 它甚至是一些地形生成算法的基础(请参考 Terrain Generator GLUT 项目). 新鲜的是使用 GPU 来实现实时网格变形.
- 2006.11.5 更新
位移贴图需要显卡允许在顶点着色器中访问至少一个纹理贴图单元. 在顶点着色器中访问纹理贴图被称为 顶点纹理存取(Vertex Texture Fetching). 着色器模型 3.0 强制实现在顶点着色器内至少有 4 个纹理单元能被访问. 现在, 只有基于 nVidia 的 Geforce 6, Geforce 7 以及更高版本支持 顶点纹理存取. ATI 显卡不支持 顶点纹理存取, 甚至连最新的高端型号比如 X1950XTX 也不支持(更多解释请看这里 ATI X1900XTX and VTF)
- 2006.11.22 更新
看起来 Forceware 显卡驱动 91.xx 和 91.xx 有点问题. 老一点的驱动 (84.xx) 或者最新的 (96.xx) 都能正确地工作(这篇文章中有更多细节)
- 2008.9.30 更新
顶点纹理存取 现在在 radeon 也可用了: ATI Catalyst 8.10 Fixes the Displacement Mapping Bug in OpenGL @ Geeks3D.
GPU Caps Viewer 工具允许你快速知道在顶点着色器中可访问纹理单元数:
截图:

这个信息能通过 OpenGL 的常量 GL_MAX_VERTEX_TEXTURE_IMAGE_UNITS_ARB 获得.
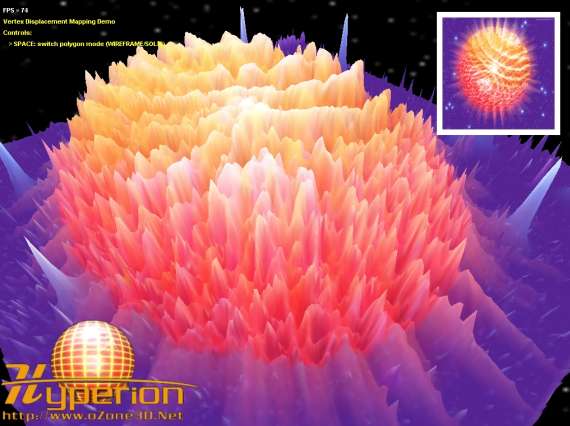
下面的截图展示了对本教程使用项目的渲染. 我们将会使用 Demoniak3D 平台以便快速编写位移贴图示例.
例程截图:
不同的例程使用了 GLSL (OpenGL Shading Language) 进行着色器编程.
位移原理
用于变形的基本元素是从位移图中查询到的向量. 这个向量通常要么保存一个 RGBA 的颜色, 要么保存一个标量颜色(用灰度表示的高度图). 我们将会使用这个向量以及更精确的它的一些部件的总额, 作为一个因子, 用来改变顶点的位置. 最常见的一种方法是按前一个因子的比例沿着顶点的法线移动顶点的位置.
截图:

上图可以总结为如下的关系:
P1 = P0 + (N * df * uf)
P0是顶点原始的位置P1是位移之后的顶点位置N是顶点的法线向量df是被规范化的位移因子(如[0.0; 1.0])uf是一个用户选择的缩放因子
df 能从下面的关系中获得, 它把一个 RGB 值转换成一个灰度值:
df = 0.30*dv.x + 0.59*dv.y + 0.11*dv.z
dv 就是当前被处理的顶点从位移图中获取的向量.
现在理论已经齐备, 只欠实践了...
位移顶点着色器
一旦所需的良好的工作条件准备妥当, 顶点着色器是相当简单的. 就像任何一种世界上的 3D 显卡的技术发展一样, 顶点位移贴图 有一些少许的限制, 如果它们不在考虑在内,将会把你的 Ultra-Boosted 7800 GTX 变成一个古老的 S3 trio (你还记得......).
为了完成 顶点位移贴图, 这里有两个主要限制:
- 位移图必须是浮点格式. 在
OpenGL的条款中, 它意味着内部像素格式被设置为GL_RGBA_FLOAT32_ATI(ATI和nVidia都能用). - 位移图必须不能被过滤: 没有线性(linear)或三线性(trilinear)过滤,
Nearest模式是唯一被接受的.
因此一旦位移图被以 nearest 模式过滤的浮点格式加载, 位移贴图实际上变得简单了, 如下面的顶点/像素着色器:
[Vertex_Shader]

uniform sampler2D displacementMap;

void main(void)

{

	vec4 newVertexPos;

	vec4 dv;

	float df;

	gl_TexCoord[0].xy = gl_MultiTexCoord0.xy;

	dv = texture2D( displacementMap, gl_MultiTexCoord0.xy );

	df = 0.30*dv.x + 0.59*dv.y + 0.11*dv.z;

	newVertexPos = vec4(gl_Normal * df * 100.0, 0.0) + gl_Vertex;

	gl_Position = gl_ModelViewProjectionMatrix * newVertexPos;

}

[Pixel_Shader]

uniform sampler2D colorMap;

void main(void)

{

   gl_FragColor = texture2D(colorMap, gl_TexCoord[0].xy);

}
在顶点着色器中获取位移图跟我们在像素着色器中获取纹理贴图一样: 使用 GLSL 的 texture2D() 函数.
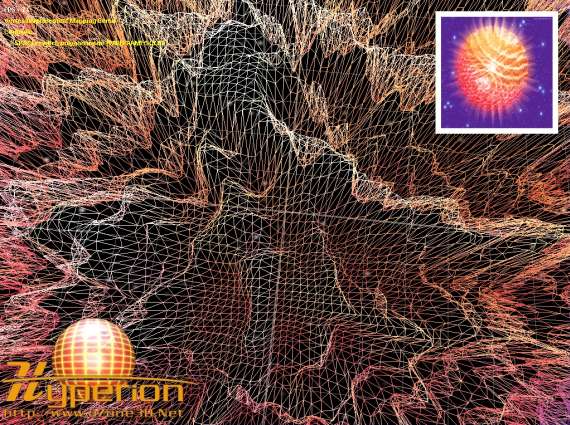
Demoniak3D 的示例展示了一个 80000 个多边形网格用一个简单 BMP 图像的变形:
截图:
nearest 过滤模式是今天硬件的顶点着色器里唯一可用的模式. 但是没有什么能够阻止我们实现我们自己的 bilinear 过滤模式. 这里是这个函数(改编自 nVidia 的 Cg 代码)做了这个工作:
#define textureSize 256.0

#define texelSize 1.0 / 256.0

vec4 texture2D_bilinear( uniform sampler2D tex, vec2 uv )

{

	vec2 f = fract( uv.xy * textureSize );

	vec4 t00 = texture2D( tex, uv );

	vec4 t10 = texture2D( tex, uv + vec2( texelSize, 0.0 ));

	vec4 tA = mix( t00, t10, f.x );

	vec4 t01 = texture2D( tex, uv + vec2( 0.0, texelSize ) );

	vec4 t11 = texture2D( tex, uv + vec2( texelSize, texelSize ) );

	vec4 tB = mix( t01, t11, f.x );

	return mix( tA, tB, f.y );

}
这个函数的使用很简单, 只要把 texture2D() 替换成 texture2D_bilinear() 就行了:
dv = texture2D_bilinear( displacementMap, gl_MultiTexCoord0.xy );
这段代码在顶点着色器和像素着色器里都运行得很好.
法线的问题
顶点位移贴图 最大的一个缺点是面对法线的顶点被破坏了因为对于未变形网格来说它们是有效的. 因为我们在一个顶点着色器中, 我们不能访问其他两个来自当前被处理的面的顶点, 然后我们无法重新计算法线.
不过有两种方式来解决这个棘手的问题: 第一个就是简单地不使用......法线! 使用静态光线(就像光线贴图-lightmapping), 法线就没用了, 因为光线来自光线图-light-map.
第二个方法是为像素着色器提供法线. 一个简单的方法是从位移图创建一个法线图. 法线图保存法线向量, 被指向模拟位移图的起伏. 这个技巧工作得非常好, 如果我们忘掉一些小缺点, 比如一些区域不应该被照亮.
下面这幅图展示了一个 凹凸位移贴图(BumpDisplacementMapping) 着色器的结果. 位移图和法线图都被根据基本图(石头的纹理贴图)创建了. 这个项目也可以在下载存档中可用.
截图:

结论
顶点位移贴图 能被用于创造很酷的效果并且允许发挥顶点处理器的威力, 它常常被遗忘于像素处理器的好处. 然而, 我们必须考虑到一些限制, 比如完成顶点纹理存取的硬件能力(ATI/Radeon 的 GPU 不支持 顶点位移映射 ),法线的问题变成错误, 甚至不可能像 shadow-volumes 一样使用一些算法 (或者是你的 3D 引擎的一部分),因为这些算法处理的顶点存储在系统内存中, 而不是存储在 GPU 的图形内存中......
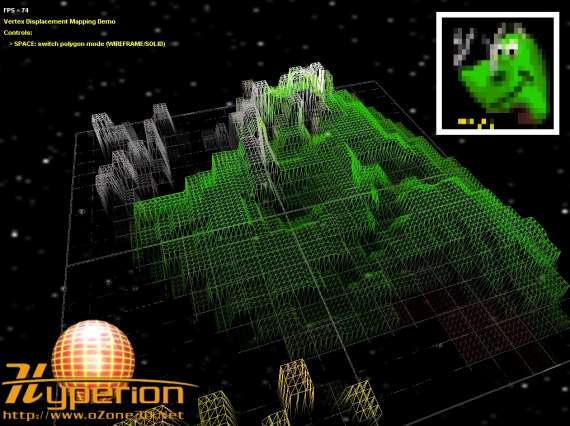
记着这些约束, 顶点位移贴图 允许实现, 例如,极其逼真的水呈现模拟(见更多资源部分中的链接)或甚至互动顶点位移, 如下示例所示: 顶点位移是由一个 AVI 视频控制 (视频来源于 K-Meleon web 浏览器目录)
截图:
更多资源
nVidia - Vertex Texture Fetch
Using Vertex Texture Displacement for Realistic Water Rendering
OpenGL Setup for GLSL
例程下载
例程下载: 例程
例程代码需要 Demoniak3D 才能正常运行.
Demoniak3D 可以从这里下载: Demoniak3D Demo-System.
附录:教程提供的完整例程代码
完整例程中给出了详细的参数设置和如何使用那些图像资源作为纹理, 只要稍微修改一下就可以在我们自己的 OpenGL ES 框架下直接使用.
顶点位移贴图例程
<?xml version="1.0" encoding="Windows-1252" standalone="yes"?>

<!--

==============================================================================

AUTHOR:		JeGX - jegx@ozone3d.net

DATE:		10.03.2006

PURPOSE:	Vertex Displacement Mapping Demo.

TUTORIAL:	http://www.ozone3d.net/tutorials/vertex_displacement_mapping.php

====================================

 \==:: http://www.oZone3D.Net ::==/

  ===============================

==============================================================================

-->

<hyperion version_major="1" version_minor="2" >

<!--

The Scene!

-->

<scene name="displacement_mapping_demo"

       display_fps="TRUE"

       show_ref_grid="TRUE"

       vsync="TRUE" >

	<infos_color r="1.0" g="1.0" b="1.0" />

	<window_size width="1024" height="768" />

	<background_color r="0.3" g="0.0" b="0.0" />

	<background_image image="data/stars.gif" />

	<!--

	Check the GLSL support and the number of vertex shader texture units we need in this demo.

	-->

	<check_hardware_caps glsl="TRUE" vs_tex_samplers="1"

	                     error_message="Sorry, this demo requires a Shader Model 3.0 (for vertex texture fetching) complient graphics controller. Demo startup failed. Bye..." />

</scene>

<!--

Setup an EXAMINE camera.

-->

<camera name="myCamera" fov="60.0" navigation_mode="EXAMINE"  >

	<position x="-143.41" y="218.55" z="241.49" />

	<orientation pitch="30.0" yaw="120.0" />

</camera>

<!--

The base map (or color map)

-->

<texture name="colorMap" filename="data/supernova.bmp" pixel_format="RGB" />

<!--

The displacement map.

Note the RGBA_32F pixel format and the filtering mode (NONE==nearest).

This is mandatory for vertex texture fetching on today's hardware.

-->

<texture name="displacementMap"

		 filename="data/supernova.bmp"

		 pixel_format="RGBA_32F" filtering_mode="NONE"

		 num_mipmaps="0" />

<!--

The mesh plane's material. We have to create it in order to attach the displacement shader.

-->

<material name="plane_mat" shader_program_name="displacementShader" />

<!--

The mesh plane: 200*200*2 = 80000 polys.

In order to get decent frame rate, do not forget to set the VBO state...

-->

<mesh render="TRUE" name="mesh_plane" shape_type="PLANE" texturing="TRUE" lighting="FALSE"

      polygon_mode="SOLID" use_vbo="TRUE" back_face_culling="FALSE" >

	<plane	x_size="400.0" z_size="400.0" num_segs_x="200" num_segs_z="200" />

	<position x="0.0" y="0.0" z="0.0" />

	<orientation pitch="0.0"  />

	<attach_material name="plane_mat" />

	<!--

	The displacement map on texture unit 0.

	-->

	<texture texture_name="displacementMap"

	         material_name="plane_mat"

	         texture_unit="0"

	         u_tile="1.0" v_tile="1.0" />

	<!--

	The color map on texture unit 1.

	-->

	<texture texture_name="colorMap"

	         material_name="plane_mat"

	         texture_unit="1"

	         u_tile="1.0" v_tile="1.0" />

</mesh>

<!--

The displacement shader.

-->

<shader_program name="displacementShader"  >

	<constant_1i name="displacementMap" value="0" />

	<constant_1i name="colorMap" value="1" />

	<raw_data><![CDATA[

	[Vertex_Shader]

	uniform float time;

	uniform sampler2D displacementMap;

	#define textureSize 256.0

	#define texelSize 1.0 / 256.0

	vec4 tex2D_bilinear( uniform sampler2D tex, vec2 t )

	{

		vec2 f = fract( t.xy * textureSize );

		vec4 t00 = texture2D( tex, t );

		vec4 t10 = texture2D( tex, t + vec2( texelSize, 0.0 ));

		vec4 tA = mix( t00, t10, f.x );

		vec4 t01 = texture2D( tex, t + vec2( 0.0, texelSize ) );

		vec4 t11 = texture2D( tex, t + vec2( texelSize, texelSize ) );

		vec4 tB = mix( t01, t11, f.x );

		return mix( tA, tB, f.y );

	}

	void main(void)

	{

		vec4 newVertexPos;

		vec4 dv;

		float df;

		gl_TexCoord[0].xy = gl_MultiTexCoord0.xy;

		dv = tex2D_bilinear( displacementMap, gl_MultiTexCoord0.xy );

		//dv = texture2D( displacementMap, gl_MultiTexCoord0.xy );

		df = 0.30*dv.x + 0.59*dv.y + 0.11*dv.z;

		newVertexPos = vec4(gl_Normal * df * 100.0, 0.0) + gl_Vertex;

		gl_Position = gl_ModelViewProjectionMatrix * newVertexPos;

	}

	[Pixel_Shader]

	uniform sampler2D colorMap;

	void main(void)

	{

	   gl_FragColor = texture2D(colorMap, gl_TexCoord[0].xy);

	}

   	]]></raw_data>

</shader_program>

<!--

A little bit of interactivity: swap the mesh plane polygon rendering mode.

-->

<script name="switch_polygon_mode" run_mode="ASYNCHRONOUS" >

	<raw_data><![CDATA[

	if( g_mode==NIL ) then

		g_mode=0;

	end

	WIREFRAME = 1;

	SOLID = 2;

	if( g_mode==1 ) then

		HYP_Object.SetPolygonMode( "mesh_plane", SOLID );

		g_mode=0;

	else

		HYP_Object.SetPolygonMode( "mesh_plane", WIREFRAME );

		g_mode=1;

	end

   	]]></raw_data>

</script>

<hotkey	name="space_key" script="switch_polygon_mode" key="KEY_SPACE" />

<!--

The white rectangle under the supernova hud.

-->

<hud name="under_nova" texturing="FALSE" >

	<size width="220" height="220" />

	<position x="380" y="250" />

</hud>

<!--

The hud that displays the small supernova image.

-->

<hud name="nova" >

	<texture texture_name="colorMap" texture_unit="0" />

	<size width="200" height="200" />

	<position x="380" y="250" />

</hud>

<!--

Display some information / commands

-->

<font name="myFontArial12" render="TRUE" ttf_name="Arial" size="14" >

	<text_2d>

		<color r="1.0" g="1.0" b="0.0" />

		<position x="10" y="30" />

		<text text="Vertex Displacement Mapping Demo" />

	</text_2d>

	<text_2d>

		<color r="1.0" g="1.0" b="0.0" />

		<position x="10" y="50" />

		<text text="Controls:" />

	</text_2d>

	<text_2d>

		<color r="1.0" g="1.0" b="0.0" />

		<position x="20" y="70" />

		<text text="> SPACE: switch polygon mode (WIREFRAME/SOLID)" />

	</text_2d>

</font>

</hyperion>
位移贴图+凹凸贴图
<?xml version="1.0" encoding="Windows-1252" standalone="yes"?>

<!--

==============================================================================

AUTHOR:		JeGX - jegx@ozone3d.net

DATE:		10.03.2006

PURPOSE:	Vertex Displacement Mapping Demo.

TUTORIAL:	http://www.ozone3d.net/tutorials/vertex_displacement_mapping.php

====================================

 \==:: http://www.oZone3D.Net ::==/

  ===============================

==============================================================================

-->

<hyperion version_major="1" version_minor="2" >

<!--

The Scene!

-->

<scene name="displacement_mapping_demo"

       display_fps="TRUE"

       show_ref_grid="TRUE"

       vsync="TRUE" >

	<infos_color r="1.0" g="1.0" b="1.0" />

	<window_size width="1024" height="768" />

	<background_color r="0.3" g="0.0" b="0.0" />

	<!--

	Check the GLSL support and the number of vertex shader texture units we need in this demo.

	-->

	<check_hardware_caps glsl="TRUE" vs_tex_samplers="1"

	                     error_message="Sorry, this demo requires a Shader Model 3.0 (for vertex texture fetching) complient graphics controller. Demo startup failed. Bye..." />

</scene>

<!--

Setup an EXAMINE camera.

-->

<camera name="myCamera" fov="60.0" navigation_mode="EXAMINE"  >

	<position x="-143.41" y="218.55" z="241.49" />

	<orientation pitch="30.0" yaw="120.0" />

</camera>

<light name="myLight" render="TRUE" type="OMNI" >

	<position x="10.0" y="100.0" z="45.0" />

	<ambient r="0.4" g="0.4" b="0.4" />

	<diffuse r="0.9" g="0.9" b="0.9" />

	<specular r="0.9" g="0.9" b="0.9" />

</light>

<!--

The base map (or color map)

-->

<texture name="colorMap" filename="data/wall002_512x512.jpg" />

<!--

The displacement map.

Note the RGBA_32F pixel format and the filtering mode (NONE==nearest).

This is mandatory for vertex texture fetching on today's hardware.

-->

<texture name="displacementMap"

		 filename="data/wall002_hmap2_512x512.jpg"

		 pixel_format="RGBA_32F" filtering_mode="NONE"

		 num_mipmaps="0" />

<!--

The normal map (or bump map)

-->

<texture name="normalMap"

		 filename="data/wall002_nmap2_512x512.jpg"  />

<!--

The mesh plane's material. We have to create it in order to attach the displacement shader.

-->

<material name="plane_mat" shader_program_name="displaceBumpMappingShader" >

	<ambient r="0.6" g="0.6" b="0.6" />

	<diffuse r="0.9" g="0.9" b="0.9" />

	<specular r="0.6" g="0.6" b="0.6" />

</material>

<!--

The mesh plane: 200*200*2 = 80000 polys.

In order to get decent frame rate, do not forget to set the VBO state...

-->

<mesh render="TRUE" name="mesh_plane" shape_type="PLANE" texturing="TRUE" lighting="FALSE"

      polygon_mode="SOLID" use_vbo="TRUE" back_face_culling="TRUE" >

	<plane	x_size="400.0" z_size="400.0" num_segs_x="200" num_segs_z="200" />

	<position x="0.0" y="10.0" z="0.0" />

	<orientation pitch="0.0"  />

	<attach_material name="plane_mat" />

	<!--

	The displacement map on texture unit 0.

	-->

	<texture texture_name="displacementMap"

	         material_name="plane_mat"

	         texture_unit="0"

	         u_tile="1.0" v_tile="1.0" />

	<!--

	The normal map on texture unit 1.

	-->

	<texture texture_name="normalMap"

	         material_name="plane_mat"

	         texture_unit="1"

	         u_tile="1.0" v_tile="1.0" />

	<!--

	The color map on texture unit 2.

	-->

	<texture texture_name="colorMap"

	         material_name="plane_mat"

	         texture_unit="2"

	         u_tile="1.0" v_tile="1.0" />

</mesh>

<!--

The displacement shader.

-->

<shader_program name="displaceBumpMappingShader"  >

	<constant_1i name="displacementMap" value="0" />

	<constant_1i name="normalMap" value="1" />

	<constant_1i name="colorMap" value="2" />

	<vertex_attrib name="tangent" value="1" />

	<constant_1f name="invRadius" value="0.001" />

	<raw_data><![CDATA[

	[Vertex_Shader]

	varying vec3 lightVec;

	varying vec3 eyeVec;

	varying vec2 texCoord;

	attribute vec3 tangent;

	uniform sampler2D displacementMap;

	#define textureSize 1024.0

	#define texelSize 1.0 / 1024.0

	vec4 tex2D_bilinear( uniform sampler2D tex, vec2 t )

	{

		vec2 f = fract( t.xy * textureSize );

		vec4 t00 = texture2D( tex, t );

		vec4 t10 = texture2D( tex, t + vec2( texelSize, 0.0 ));

		vec4 tA = mix( t00, t10, f.x );

		vec4 t01 = texture2D( tex, t + vec2( 0.0, texelSize ) );

		vec4 t11 = texture2D( tex, t + vec2( texelSize, texelSize ) );

		vec4 tB = mix( t01, t11, f.x );

		return mix( tA, tB, f.y );

	}

	void main(void)

	{

		vec4 displacedVertexPos;

		vec4 displacementVec;

		float f;

		texCoord = gl_MultiTexCoord0.xy;

		displacementVec = tex2D_bilinear(displacementMap, gl_MultiTexCoord0.xy );

		//f = (0.30*displacementVec.x + 0.59*displacementVec.y + 0.11*displacementVec.z);

		f = displacementVec.x;

		displacedVertexPos = vec4(gl_Normal * f * 10.0, 0.0) + gl_Vertex;

		gl_Position = gl_ModelViewProjectionMatrix * displacedVertexPos;

		vec3 n = normalize(gl_NormalMatrix * gl_Normal);

		vec3 t = normalize(gl_NormalMatrix * tangent);

		vec3 b = cross(n, t);

	   	vec3 vVertex = vec3(gl_ModelViewMatrix * displacedVertexPos);

		vec3 tmpVec = gl_LightSource[0].position.xyz - vVertex;

		lightVec.x = dot(tmpVec, t);

		lightVec.y = dot(tmpVec, b);

		lightVec.z = dot(tmpVec, n);

		tmpVec = -vVertex;

		eyeVec.x = dot(tmpVec, t);

		eyeVec.y = dot(tmpVec, b);

		eyeVec.z = dot(tmpVec, n);

	}

	[Pixel_Shader]

	varying vec3 lightVec;

	varying vec3 eyeVec;

	varying vec2 texCoord;

	uniform sampler2D colorMap;

	uniform sampler2D normalMap;

	uniform float invRadius;

	void main (void)

	{

		float distSqr = dot(lightVec, lightVec);

		float att = clamp(1.0 - invRadius * sqrt(distSqr), 0.0, 1.0);

		vec3 lVec = lightVec * inversesqrt(distSqr);

		vec3 vVec = normalize(eyeVec);

		vec4 base = texture2D(colorMap, texCoord);

		vec3 bump = normalize(texture2D(normalMap, texCoord).xyz * 2.0 - 1.0);

		vec4 vAmbient = gl_LightSource[0].ambient * gl_FrontMaterial.ambient;

		vec4 final_color = vAmbient*base;

		float diffuse = dot(lVec, bump);

		if(diffuse>0.0)

		{

			vec4 vDiffuse = gl_LightSource[0].diffuse * gl_FrontMaterial.diffuse * diffuse;

			float specular = pow(clamp(dot(reflect(-lVec, bump), vVec), 0.0, 1.0), gl_FrontMaterial.shininess );

			//float specular = 0.0;

			vec4 vSpecular = gl_LightSource[0].specular * gl_FrontMaterial.specular *specular;

			final_color += (vDiffuse*base + vSpecular) * att;

		}

		gl_FragColor = final_color;

	}

   	]]></raw_data>

</shader_program>

<!--

A little bit of interactivity: swap the mesh plane polygon rendering mode.

-->

<script name="switch_polygon_mode" run_mode="ASYNCHRONOUS" >

	<raw_data><![CDATA[

	if( g_mode==NIL ) then

		g_mode=0;

	end

	WIREFRAME = 1;

	SOLID = 2;

	if( g_mode==1 ) then

		HYP_Object.SetPolygonMode( "mesh_plane", SOLID );

		g_mode=0;

	else

		HYP_Object.SetPolygonMode( "mesh_plane", WIREFRAME );

		g_mode=1;

	end

   	]]></raw_data>

</script>

<hotkey	name="space_key" script="switch_polygon_mode" key="KEY_SPACE" />

<!--

Display some information / commands

-->

<font name="myFontArial12" render="TRUE" ttf_name="Arial" size="14" >

	<text_2d>

		<color r="1.0" g="1.0" b="0.0" />

		<position x="10" y="30" />

		<text text="Vertex Displacement Mapping Demo" />

	</text_2d>

	<text_2d>

		<color r="1.0" g="1.0" b="0.0" />

		<position x="10" y="50" />

		<text text="Controls:" />

	</text_2d>

	<text_2d>

		<color r="1.0" g="1.0" b="0.0" />

		<position x="20" y="70" />

		<text text="> SPACE: switch polygon mode (WIREFRAME/SOLID)" />

	</text_2d>

</font>

</hyperion>
位移贴图视频
- 译者注: 这个功能可能只能在教程提供的
3D演示平台上使用.
<?xml version="1.0" encoding="Windows-1252" standalone="yes"?>

<!--

==============================================================================

AUTHOR:		JeGX - jegx@ozone3d.net

DATE:		10.03.2006

PURPOSE:	Vertex Displacement Mapping Demo.

TUTORIAL:	http://www.ozone3d.net/tutorials/vertex_displacement_mapping.php

====================================

 \==:: http://www.oZone3D.Net ::==/

  ===============================

==============================================================================

-->

<hyperion version_major="1" version_minor="2" >

<!--

The Scene!

-->

<scene name="displacement_mapping_demo"

       display_fps="TRUE"

       show_ref_grid="TRUE"

       vsync="TRUE" >

	<infos_color r="1.0" g="1.0" b="1.0" />

	<window_size width="1024" height="768" />

	<background_color r="0.3" g="0.0" b="0.0" />

	<background_image image="data/stars.gif" />

	<!--

	Check the GLSL support and the number of vertex shader texture units we need in this demo.

	-->

	<check_hardware_caps glsl="TRUE" vs_tex_samplers="1"

	                     error_message="Sorry, this demo requires a Shader Model 3.0 (for vertex texture fetching) complient graphics controller. Demo startup failed. Bye..." />

</scene>

<!--

Setup an EXAMINE camera.

-->

<camera name="myCamera" fov="60.0" navigation_mode="EXAMINE"  >

	<position x="-143.41" y="218.55" z="241.49" />

	<orientation pitch="30.0" yaw="120.0" />

</camera>

<!--

The base map (or color map)

-->

<texture name="colorMap" filename="data/throbber.avi" pixel_format="RGB" >

	<size width="256" height="256" />

</texture>

<!--

The displacement map.

Note the RGBA_32F pixel format and the filtering mode (NONE==nearest).

This is mandatory for vertex texture fetching on today's hardware.

-->

<texture name="displacementMap" type="TEXTURE_2D"

		 filename="data/throbber.avi"

		 pixel_format="RGBA_32F" filtering_mode="NONE" addressing_mode="CLAMP"

		 num_mipmaps="0" >

	<size width="256" height="256" />

</texture>

<!--

The mesh plane's material. We have to create it in order to attach the displacement shader.

-->

<material name="plane_mat" shader_program_name="displacementShader" />

<!--

The mesh plane: 100*100*2 = 20000 polys.

In order to get decent frame rate, do not forget to set the VBO state...

-->

<mesh render="TRUE" name="mesh_plane" shape_type="PLANE" texturing="TRUE" lighting="FALSE"

      polygon_mode="SOLID" use_vbo="TRUE" back_face_culling="FALSE" >

	<plane	x_size="400.0" z_size="400.0" num_segs_x="100" num_segs_z="100" />

	<position x="0.0" y="0.0" z="0.0" />

	<orientation pitch="0.0"  />

	<attach_material name="plane_mat" />

	<!--

	The displacement map on texture unit 0.

	-->

	<texture texture_name="displacementMap"

	         material_name="plane_mat"

	         texture_unit="0"

	         u_tile="1.0" v_tile="1.0" />

	<!--

	The color map on texture unit 1.

	-->

	<texture texture_name="colorMap"

	         material_name="plane_mat"

	         texture_unit="1"

	         u_tile="1.0" v_tile="1.0" />

</mesh>

<!--

The displacement shader.

-->

<shader_program name="displacementShader"  >

	<constant_1i name="displacementMap" value="0" />

	<constant_1i name="colorMap" value="1" />

	<constant_1f name="time" value="0.0" />

	<raw_data><![CDATA[

	[Vertex_Shader]

	uniform sampler2D displacementMap;

	#define textureSize 256.0

	#define texelSize 1.0 / 256.0

	vec4 tex2D_bilinear( uniform sampler2D tex, vec2 t )

	{

		vec2 f = fract( t.xy * textureSize );

		vec4 t00 = texture2D( tex, t );

		vec4 t10 = texture2D( tex, t + vec2( texelSize, 0.0 ));

		vec4 tA = mix( t00, t10, f.x );

		vec4 t01 = texture2D( tex, t + vec2( 0.0, texelSize ) );

		vec4 t11 = texture2D( tex, t + vec2( texelSize, texelSize ) );

		vec4 tB = mix( t01, t11, f.x );

		return mix( tA, tB, f.y );

	}

	void main(void)

	{

		vec4 displacedVertexPos;

		vec4 displacementVec;

		float f;

		gl_TexCoord[0].xy = gl_MultiTexCoord0.xy;

		//displacementVec = texture2D(displacementMap, gl_MultiTexCoord1.xy);

		displacementVec = tex2D_bilinear(displacementMap, gl_MultiTexCoord1.xy);

		f = (0.30*displacementVec.x + 0.59*displacementVec.y + 0.11*displacementVec.z);

		displacedVertexPos = vec4(gl_Normal * f * 100.0, 0.0) + gl_Vertex;

		gl_Position = gl_ModelViewProjectionMatrix * displacedVertexPos;

	}

	[Pixel_Shader]

	uniform sampler2D colorMap;

	void main(void)

	{

	   gl_FragColor = texture2D(colorMap, gl_TexCoord[0].xy);

	}

   	]]></raw_data>

</shader_program>

<!--

Update time uniform variable for the displacement shader.

-->

<script name="update_scene" run_mode="EXECUTE_EACH_FRAME" >

	<raw_data><![CDATA[

	elapsed_time = HYP_GetElapsedTime() * 0.001;

	HYP_GPUShader.SetConstant_1f( "displacementShader", "time", elapsed_time );

   	]]></raw_data>

</script>

<!--

A little bit of interactivity: swap the mesh plane polygon rendering mode.

-->

<script name="switch_polygon_mode" run_mode="ASYNCHRONOUS" >

	<raw_data><![CDATA[

	if( g_mode==NIL ) then

		g_mode=0;

	end

	WIREFRAME = 1;

	SOLID = 2;

	if( g_mode==1 ) then

		HYP_Object.SetPolygonMode( "mesh_plane", SOLID );

		g_mode=0;

	else

		HYP_Object.SetPolygonMode( "mesh_plane", WIREFRAME );

		g_mode=1;

	end

   	]]></raw_data>

</script>

<hotkey	name="space_key" script="switch_polygon_mode" key="KEY_SPACE" />

<!--

The white rectangle under the hud.

-->

<hud name="under_nova" texturing="FALSE" >

	<size width="220" height="220" />

	<position x="380" y="250" />

</hud>

<!--

The hud that displays the small image.

-->

<hud name="nova" >

	<texture texture_name="colorMap" texture_unit="0" />

	<size width="200" height="200" />

	<position x="380" y="250" />

</hud>

<!--

Display some information / commands

-->

<font name="myFontArial12" render="TRUE" ttf_name="Arial" size="14" >

	<text_2d>

		<color r="1.0" g="1.0" b="0.0" />

		<position x="10" y="30" />

		<text text="Vertex Displacement Mapping Demo" />

	</text_2d>

	<text_2d>

		<color r="1.0" g="1.0" b="0.0" />

		<position x="10" y="50" />

		<text text="Controls:" />

	</text_2d>

	<text_2d>

		<color r="1.0" g="1.0" b="0.0" />

		<position x="20" y="70" />

		<text text="> SPACE: switch polygon mode (WIREFRAME/SOLID)" />

	</text_2d>

</font>

</hyperion>
翻译:GLSL的顶点位移贴图的更多相关文章
- [翻译]利用顶点位移的VR畸变校正
文章英文原网址: http://www.gamasutra.com/blogs/BrianKehrer/20160125/264161/VR_Distortion_Correction_using_V ...
- 【ZZ】 DShader之位移贴图(Displacement Mapping)
http://www.myexception.cn/other/1397638.html DShader之位移贴图(Displacement Mapping) www.MyException.Cn ...
- DirectX11 With Windows SDK--34 位移贴图
前言 在前面的章节中,我们学到了法线贴图和曲面细分.现在我们可以将这两者进行结合以改善效果,因为法线贴图仅仅只是改善了光照的细节,但它并没有从根本上改善几何体的细节.从某种意义上来说,法线贴图只是一个 ...
- 利用顶点位移进行VR畸变校正
VR开发的最大挑战之一是对高帧率与高分辨率结合的要求.我们通过把顶点转化为“镜头空间”,删除了需要全屏渲染的纹理,这样就可以大规模提高手机性能. 下面的技术使用谷歌的Cardboard Unity S ...
- GLSL逐顶点光照[转]
转载:http://blog.csdn.net/hgl868/article/details/7872350 引言 在OpenGL中有三种类型的光:方向光(directional).点光(point) ...
- firefox浏览器 插件--【维基百科+谷歌翻译】高级应用之 带图翻译
[维基词典+谷歌翻译]插件地址: https://addons.mozilla.org/zh-CN/firefox/addon/google-dictionary-and-google-t/?src= ...
- java数据结构_附12_图、顶点和边的定义(双链存储)
图--双链式存储结构 顶点 和 边 的定义 1.Vertex.java 2.Edge.java 3.AbstractGraph.java 1. public class Vertex {private ...
- 在 OpenGL ES 2.0 上实现视差贴图(Parallax Mapping)
在 OpenGL ES 2.0 上实现视差贴图(Parallax Mapping) 视差贴图 最近一直在研究如何在我的 iPad 2(只支持 OpenGL ES 2.0, 不支持 3.0) 上实现 视 ...
- 翻译:探索GLSL-用几何着色器(着色器库)实现法线可视化
翻译:探索GLSL-用几何着色器(着色器库)实现法线可视化 翻译自: Exploring GLSL – Normal Visualizer with Geometry Shaders (Shader ...
随机推荐
- ACM的fflush(stdin)的问题
在最近的刷题过程中,因为用到了很多字符串的操作,有时需要多次清空缓冲区,所以用了fflush(stdin);的语句,确实很好用,但是发现在OJ上提交后会出现runtime error的问题.当时并没有 ...
- typedef struct bit0 : 1
这句话定义了一个位域,bit0是该位域的域名,而且bit0只占用一个位.位域是指信息在存储时,并不需要占用一个完整的字节, 而只需占几个或一个二进制位.为了节省存储空间,并使处理简便,C语言提供了一种 ...
- python基础(五)函数
一.函数概念 函数一词来源于数学,但编程中的「函数」概念,与数学中的函数是有很大不同的,编程中的函数在英文中也有很多不同的叫法.在BASIC中叫做subroutine(子过程或子程序),在Pascal ...
- Linux adduser
- 官方下拉刷新控件SwipeRefreshLayout的使用
今天看博客,发现有了这个下拉刷新的控件,效果看上去还蛮好的,于是我也想研究的是使用一下,写个demo.其实使用很简单的,但就是为了能使用这个新组建我下了好久的更新,后来还是直接去官网下载最新的ADT得 ...
- Thread start()方法和run()方法的区别
转自:http://www.cnblogs.com/skywang12345/p/3479083.html start():作用一个新的线程,新线程会执行相应的run()方法,start()不能被重复 ...
- NOIP2017 心路历程
虽然没能去考试,但是在学弟们考试前后也发生了很多事情. 周四晚上.学弟们出发前最后一天.单独找几个人谈了谈.面对退役他们还是有点慌啊.这个时候给他们调整心态或许有点迟了. 21:45.最后一分钟.为他 ...
- 再谈MySql索引
一.索引简介 MySQL索引的建立对于MySQL的高效运行是很重要的,索引可以大大提高MySQL的检索速度. 索引分单列索引(主键索引.唯一索引.普通索引)和组合索引.单列索引,即一个索引只包含单个列 ...
- IbatisNet连接oracle 报错
提示什么 connect oracle 1.5.0.xxxx 将你本机的oracle 客户端版本重装换成32位即可
- 【题解】洛谷P4707重返现世
在跨年的晚上玩手机被妈妈骂了赶来写题……呜呜呜……但是A题了还是很开心啦,起码没有把去年的题目留到明年去做ヾ(◍°∇°◍)ノ゙也祝大家2019快乐! 这题显然的 kth min-max 容斥就不说了, ...