GlusterFS分布式存储集群-2. 使用
参考文档:
- Quick Start Guide:http://gluster.readthedocs.io/en/latest/Quick-Start-Guide/Quickstart/
- Install-Guide:https://docs.gluster.org/en/latest/Install-Guide/Install/
- CentOS gluster-Quickstart:https://wiki.centos.org/SpecialInterestGroup/Storage/gluster-Quickstart
- Type of Volumes:https://docs.gluster.org/en/latest/Quick-Start-Guide/Architecture/#types-of-volumes
- Setting up GlusterFS Volumes:https://docs.gluster.org/en/latest/Administrator%20Guide/Setting%20Up%20Volumes/
- 脑裂:https://docs.gluster.org/en/latest/Administrator%20Guide/Split%20brain%20and%20ways%20to%20deal%20with%20it/
四.Glusterfs逻辑卷创建与使用
volume是brick的组合,并且大部分glusterfs文件系统的操作都在volume上。
glusterfs支持4种基本卷,并可以根据需求对4种基本卷进行组合形成多种扩展卷(得益于glusterfs的模块化堆栈架构设计)。
以下主要展示各类型逻辑卷的功能性,未对性能做测试验证。
1. 分布式卷
分布式卷(Distributed Glusterfs Volume,又称DHT),glusterfs创建volume不指定卷类型时,默认即分布式卷,特点如下:
- 根据hash算法,将多个文件分布到卷中的多个brick server上,类似(不是)raid0,但文件无分片;
- 方便扩展空间,但无冗余保护;
- 由于使用本地文件系统进行存储(brick server 的本地文件系统),存取效率不高;
- 受限于本地文件系统对单文件容量的限制,支持超大型文件系统有问题。

1)创建存储目录(optional)
# 在brick server节点创建存储目录,即brick所在;

# 以glusterfs01节点为例,注意各brick server挂载磁盘的目录名的不同

[root@glusterfs01 ~]# mkdir -p /brick1/dis_volume
2)创建分布式卷
# 命令:gluster volume create NEW-VOLNAME [transport [tcp | rdma | tcp,rdma]] NEW-BRICK...

# 以上命令在任意server节点操作均可,以glusterfs01节点为例;

# 演示分布式卷的创建,两个server节点即可,创建名为”distributed-volume”的逻辑卷

[root@glusterfs01 ~]# gluster volume create distributed-volume glusterfs01:/brick1/dis_volume glusterfs02:/brick2/dis_volume

3)卷信息/状态
# 命令”gluster volume list”可列出已创建的卷;

# 命令”gluster volume info”可不指定具体的卷,即列出所有卷信息;

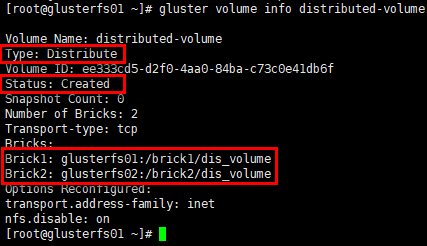
# info中给出除卷名外,还有卷类型,状态,brick组成等信息;

# 其中状态为“Created”,需要通过命令启动后才可被挂载使用,在创建成功后的提示信息中有提到”please start the volume to access data”

[root@glusterfs01 ~]# gluster volume info distributed-volume
# 查看卷状态;

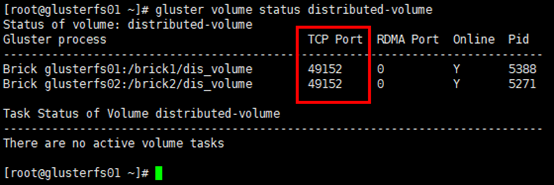
# 展示卷中每个brick的状态,以及每个brick服务的监听端口

[root@glusterfs01 ~]# gluster volume status distributed-volume
4)启动卷
[root@glusterfs01 ~]# gluster volume start distributed-volume

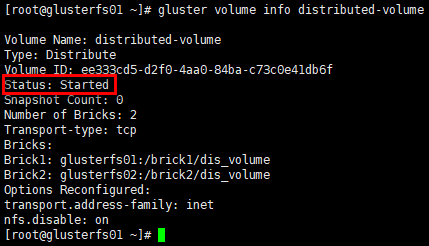
# 再次查看卷信息,状态变为"Started"

[root@glusterfs01 ~]# gluster volume info distributed-volume
5)client挂载
# 在客户端创建挂载目录

[root@glusterfs-client ~]# mkdir /mnt/distributed

# 挂载时,可使用任意1台已加入可信存储池并已创建对应卷类型的server节点;

# brick以”SERVER:EXPORT”的形式标识

[root@glusterfs-client ~]# mount.glusterfs 172.30.200.51:distributed-volume /mnt/distributed/
6)查看挂载情况
# 通过“df -Th”命令可查看被挂载的volume,被挂载的文件系统,已经挂载卷的容量是2个brick容量之和

[root@glusterfs-client ~]# df -Th

7)查看brick的监听端口
# server节点上每启动1个brick,即启动1个brick服务,具备相应的服务监听端口,起始端口号是tcp49152

[root@glusterfs01 ~]# netstat -tunlp | grep gluster

# 另外,client连接的即brick服务的监听端口

[root@glusterfs01 ~]# netstat -nt

8)存储测试
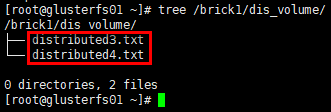
# 在client的挂载目录下创建若干文件

[root@glusterfs-client ~]# cd /mnt/distributed/

[root@glusterfs-client distributed]# touch distributed{1..4}.txt

# glusterfs01节点

[root@glusterfs01 ~]# tree /brick1/dis_volume/
# glusterfs02节点

[root@glusterfs02 ~]# tree /brick2/dis_volume/
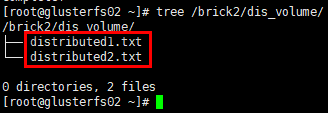
结论:分布式卷将多个文件分布存储在多个brick server,但并无副本。
2. 条带卷(Deprecated)
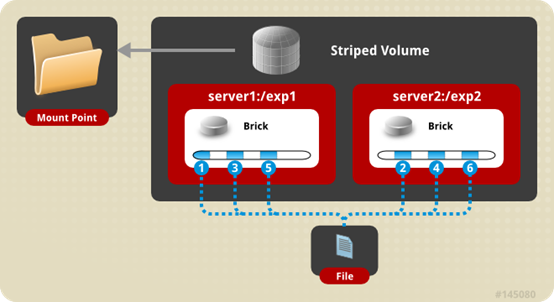
条带卷(Striped Glusterfs Volume),特点如下:
- 每个文件被分片成等同于brick数量的chunks,然后以round robin的方式将每个chunk存储到1个brick,相当于raid0;
- 单一超大容量文件可被分片,不受brick server本地文件系统的限制;
- 文件分片后,并发粒度是chunks,分布式读写性能较高,但分片随机读写可能会导致硬盘iops较高;
- 无冗余,1个server节点故障会导致所有数据丢失。
1)创建条带卷
# 命令:gluster volume create NEW-VOLNAME [stripe COUNT] [transport [tcp | dma | tcp,rdma]] NEW-BRICK...

# 以上命令在任意server节点操作均可,以glusterfs01节点为例;

# 创建名为”strsipe-volume”的逻辑卷;

# 必须指定卷类型(默认为分布式卷)与对应的条带数量,数量需要与后续使用brick server数量对等;

# “transport tcp”指定集群通信方式

[root@glusterfs01 ~]# gluster volume create stripe-volume stripe 3 transport tcp glusterfs01:/brick1/str_volume glusterfs02:/brick2/str_volume glusterfs03:/brick3/str_volume

2)启动卷
[root@glusterfs01 ~]# gluster volume start stripe-volume

3)client挂载
[root@glusterfs-client ~]# mkdir /mnt/stripe

[root@glusterfs-client ~]# mount.glusterfs 172.30.200.51:stripe-volume /mnt/stripe/
4)查看挂载情况
# 已挂载卷的容量是3个brick容量之和

[root@glusterfs-client ~]# df -Th

5)存储测试
# 在client的挂载目录下创建若干文件

[root@glusterfs-client ~]# cd /mnt/stripe/

[root@glusterfs-client stripe]# touch stripe{1..6}.txt

# 向strip1.txt文件写入内容

[root@glusterfs-client stripe]# echo "this is stripe1.txt" >> strip1.txt

# glusterfs01节点

[root@glusterfs01 ~]# tree /brick1/str_volume/

[root@glusterfs01 ~]# cat /brick1/str_volume/strip1.txt

# glusterfs02节点

[root@glusterfs02 ~]# tree /brick2/str_volume/

[root@glusterfs02 ~]# cat /brick2/str_volume/strip1.txt
# glusterfs03节点

[root@glusterfs03 ~]# tree /brick3/str_volume/

[root@glusterfs03 ~]# cat /brick3/str_volume/strip1.txt

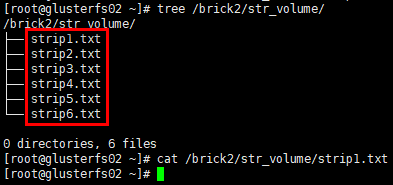
结论:条带卷将1个文件分片存储在多个brick server,但并无副本。
3. 复制卷
复制卷(Replicated Glusterfs Volume,又称AFR(Auto File Replication)),特点如下:
- 每个文件同步复制镜像到多个brick,相当于文件级raid1;
- 副本数量通常设置为2或3,设置的副本数量需要是brick数量(至少为2)的倍数(如2台brick server,可设置副本数为2/4/6/…;如3台brick server,可设置副本数为3/6/9/…;依次类推),且每个brick的容量相等;
- 读性能提升,写性能下降,因为glusterfs的复制是同步事务操作,即写文件时,先把这个文件锁住,然后同时写两个或多个副本,写完后解锁,操作结束(ceph采用异步写副本,即写到一个主OSD便返回,这个OSD再通过内部网络异步写到其余OSD);
- 通常与分布式卷或条带卷组合使用,解决前两者的冗余问题;
- 提升数据可靠性,但磁盘利用率低;
- 副本数设置为2时,可能会有脑裂(Split-brain)的风险(风险提示,但可配置),主要因在两个副本不一致时,无法仲裁以哪个副本为准,解决方案是加入仲裁或者设置3副本。

1)创建复制卷
# 命令:gluster volume create NEW-VOLNAME [replica COUNT] [transport [tcp | rdma | tcp,rdma]] NEW-BRICK...

# 以上命令在任意server节点操作均可,以glusterfs01节点为例;

# 创建名为”replica-volume”的逻辑卷;

# 必须指定卷类型(默认为分布式卷)与对应的副本数量,数量需要与后续使用brick server数量对等;

# “transport tcp”指定集群通信方式;

# 副本数为2时,有脑裂风险提示,提示采用3副本或仲裁机制,验证环境略过即可

[root@glusterfs01 ~]# gluster volume create replica-volume replica 2 transport tcp glusterfs01:/brick1/repl_volume glusterfs02:/brick2/repl_volume

2)启动卷
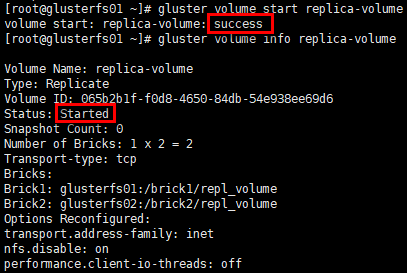
[root@glusterfs01 ~]# gluster volume start replica-volume

[root@glusterfs01 ~]# gluster volume info replica-volume
3)client挂载
[root@glusterfs-client ~]# mkdir /mnt/replica

[root@glusterfs-client ~]# mount.glusterfs 172.30.200.51:replica-volume /mnt/replica/
4)查看挂载情况
# 已挂载卷的容量是1个brick的容量

[root@glusterfs-client ~]# df -Th

5)存储测试
# 在client的挂载目录下创建若干文件

[root@glusterfs-client ~]# cd /mnt/replica/

[root@glusterfs-client replica]# touch replica{1..4}.txt

# 向replica1.txt文件写入内容

[root@glusterfs-client replica]# echo "this is replica1.txt" >> replica1.txt

# glusterfs01节点

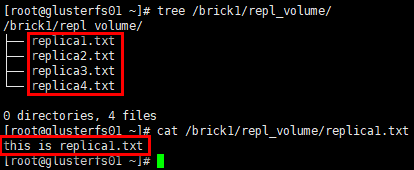
[root@glusterfs01 ~]# tree /brick1/repl_volume/

[root@glusterfs01 ~]# cat /brick1/repl_volume/replica1.txt
# glusterfs02节点

[root@glusterfs02 ~]# tree /brick2/repl_volume/

[root@glusterfs02 ~]# cat /brick2/repl_volume/replica1.txt

结论:复制卷将1个文件同步镜像到多个brick server,数据有冗余备份。
6)AFR恢复原理
数据恢复只针对复制卷,AFR数据修复主要涉及三个方面:ENTRY,META,DATA。
记录描述副本状态的称之为ChangeLog,记录在每个副本文件扩展属性里,读入内存后以矩阵形式判断是否需要修复以及要以哪个副本为Source进行修复;初始值以及正常值为0(注:ENTRY和META,DATA分布对应着一个数值)。
以冗余度为2,即含有2个副本A和B的DATA修复为例,write的步骤分解为:
- 下发Write操作;
- 加锁Lock;
- 向A,B副本的ChangeLog分别加1,记录到各副本的扩展属性中;
- 对A,B副本进行写操作;
- 若副本写成功则ChangeLog减1,若该副本写失败则ChangLog值不变,记录到各个副本的扩展属性中;
- 解锁UnLock;
- 向上层返回,只要有一个副本写成功就返回成功。
上述操作在AFR中是完整的一个transaction动作,根据两个副本记录的ChangeLog的数值确定了副本的几种状态:
- WISE:智慧的,即该副本的ChangeLog中对应的值是0,而另一副本对应的数值大于0;
- INNOCENT:无辜的,即两副本的ChangeLog对应的值都是0;
- FOOL:愚蠢的,即该副本的ChangeLog对应的值大于是0,而另一副本对应的数值是0;
- IGNORANT,忽略的,即该副本的ChangeLog丢失。
恢复分以下场景:
- 1个节点changelog状态为WISE,其余节点为FOOL或其他非WISE状态,以WISE节点去恢复其他节点;
- 所有节点是IGNORANT状态,手动触发heal,通过命令以UID最小的文件作为source,去恢复大小为0的其他文件;
- 多个状态是WISE时,即出现脑裂状态,脑裂的文件通常读不出来,报"Input/Output error",可查看日志/var/log/glusterfs/glustershd.log。
# 通过命令查看副本文件的扩展属性:getfattr -m . -d -e hex [filename]

# “trusted.afr.xxx”部分即扩展属性,值是24bit,分3部分,依次标识DATA ,META, ENTRY 3者的changelog

[root@glusterfs01 ~]# getfattr -m . -d -e hex /brick1/repl_volume/replica1.txt

4. 分布式复制卷
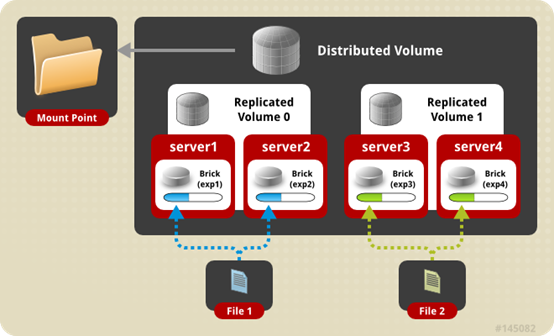
分布式复制卷(Distributed Replicated Glusterfs Volume),是分布式卷与复制卷的组合,兼具两者的功能,特点如下:
- 若干brick组成1个复制卷,另外若干brick组成其他复制卷;单个文件在复制卷内数据保持副本,不同文件在不同复制卷之间进行哈希分布;即分布式卷跨复制卷集(replicated sets );
- brick server数量是副本数量的倍数,且>=2倍,即最少需要4台brick server,同时组建复制卷集的brick容量相等。
1)创建分布式复制卷
# 命令:gluster volume create NEW-VOLNAME [replica COUNT] [transport [tcp | rdma | tcp,rdma]] NEW-BRICK...

# 以上命令在任意server节点操作均可,以glusterfs01节点为例;

# 创建名为”distributed-replica-volume”的逻辑卷;

# 必须指定卷类型(默认为分布式卷)与对应的副本数量,brick server数量是副本数量的倍数,且>=2倍;

# 不需要指出分布式卷类型,只要副本数量与brick server数量不等且符合倍数关系,即是分布式复制卷;

# “transport tcp”指定集群通信方式;

# 副本数为2时,有脑裂风险提示,提示采用3副本或仲裁机制,验证环境略过即可

[root@glusterfs01 ~]# gluster volume create distributed-replica-volume replica 2 transport tcp \

 glusterfs01:/brick1/dis_repl_volume \

 glusterfs02:/brick2/dis_repl_volume \

 glusterfs03:/brick3/dis_repl_volume \

 glusterfs04:/brick4/dis_repl_volume

2)启动卷
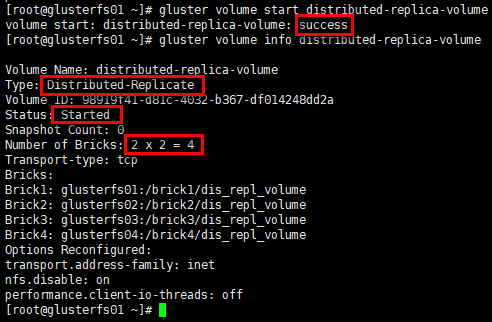
# 卷类型:分布式复制卷

# “Number of Bricks”:2副本,2个副本集(replicated sets ),4个brick server

[root@glusterfs01 ~]# gluster volume start distributed-replica-volume

[root@glusterfs01 ~]# gluster volume info distributed-replica-volume
3)client挂载
[root@glusterfs-client ~]# mkdir /mnt/distributed-replica

[root@glusterfs-client ~]# mount.glusterfs 172.30.200.51:distributed-replica-volume /mnt/distributed-replica/
4)查看挂载情况
# 已挂载卷的容量是2个副本集(replicated sets )容量之和

[root@glusterfs-client ~]# df -Th

5)存储测试
# 在client的挂载目录下创建若干文件

[root@glusterfs-client ~]# cd /mnt/distributed-replica/

[root@glusterfs-client distributed-replica]# touch distributed-replica{1..6}.txt

# 向distributed-replica1.txt文件写入内容

[root@glusterfs-client distributed-replica]# echo "this is distributed-replica1.txt" >> distributed-replica1.txt

# glusterfs01节点

[root@glusterfs01 ~]# tree /brick1/dis_repl_volume/

# glusterfs02节点

[root@glusterfs02 ~]# tree /brick2/dis_repl_volume/

# glusterfs03节点

[root@glusterfs03 ~]# tree /brick3/dis_repl_volume/

[root@glusterfs03 ~]# cat /brick3/dis_repl_volume/distributed-replica1.txt

# glusterfs04节点

[root@glusterfs04 ~]# tree /brick4/dis_repl_volume/

[root@glusterfs04 ~]# cat /brick4/dis_repl_volume/distributed-replica1.txt

结论:分布式复制卷将数据文件分布在多个复制集(replicated sets )中,每个复制集中数据有镜像冗余。
5. 分布式条带卷(Deprecated)
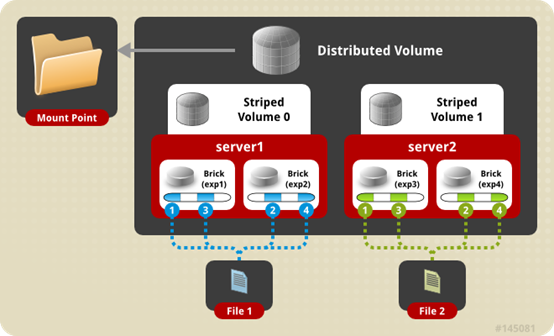
分布式条带卷(Distributed Striped Glusterfs Volume),是分布式卷与条带卷的组合,兼具两者的功能,特点如下:
- 若干brick组成1个条带卷,另外若干brick组成其他条带卷;单个文件在条带卷内数据以条带的形式存储,不同文件在不同条带卷之间进行哈希分布;即分布式卷跨条带卷;
- brick server数量是条带数的倍数,且>=2倍,即最少需要4台brick server。
1)创建分布式条带卷
# 命令:gluster volume create NEW-VOLNAME [stripe COUNT] [transport [tcp | rdma | tcp,rdma]] NEW-BRICK...

# 以上命令在任意server节点操作均可,以glusterfs01节点为例;

# 创建名为”distributed-stripe-volume”的逻辑卷;

# 必须指定卷类型(默认为分布式卷)与对应的条带数,brick server数量是条带数量的倍数,且>=2倍;

# 不需要指出分布式卷类型,只要条带数量与brick server数量不等且符合倍数关系,即是分布式复制卷;

# “transport tcp”指定集群通信方式;

[root@glusterfs01 ~]# gluster volume create distributed-stripe-volume stripe 2 transport tcp \

 glusterfs01:/brick1/dis_str_volume \

 glusterfs02:/brick2/dis_str_volume \

 glusterfs03:/brick3/dis_str_volume \

 glusterfs04:/brick4/dis_str_volume

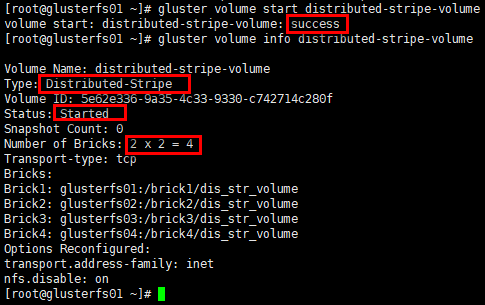
2)启动卷
# 卷类型:分布式条带卷

# “Number of Bricks”:2分布集,2条带集(replicated sets ),4个brick server

[root@glusterfs01 ~]# gluster volume start distributed-stripe-volume

[root@glusterfs01 ~]# gluster volume info distributed-stripe-volume
3)client挂载
[root@glusterfs-client ~]# mkdir /mnt/distributed-stripe

[root@glusterfs-client ~]# mount.glusterfs 172.30.200.51:distributed-stripe-volume /mnt/distributed-stripe/
4)查看挂载情况
# 已挂载卷的容量是4个brick容量之和

[root@glusterfs-client ~]# df -Th

5)存储测试
# 在client的挂载目录下创建若干文件

[root@glusterfs-client ~]# cd /mnt/distributed-stripe/

[root@glusterfs-client distributed-stripe]# touch distributed-stripe{1..6}.txt

# 向distributed-stripe1.txt文件写入内容

[root@glusterfs-client distributed-stripe]# echo "this is distributed-stripe1.txt" >> distributed-stripe1.txt

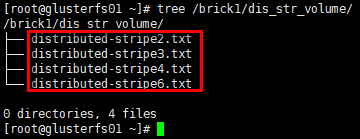
# glusterfs01节点

[root@glusterfs01 ~]# tree /brick1/dis_str_volume/
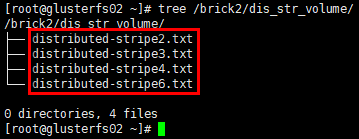
# glusterfs02节点

[root@glusterfs02 ~]# tree /brick2/dis_str_volume/
# glusterfs03节点

[root@glusterfs03 ~]# tree /brick3/dis_str_volume/

[root@glusterfs03 ~]# cat /brick3/dis_str_volume/distributed-stripe1.txt

# glusterfs04节点

[root@glusterfs04 ~]# tree /brick4/dis_str_volume/

[root@glusterfs04 ~]# cat /brick4/dis_str_volume/distributed-stripe1.txt

结论:分布式条带卷将数据文件分布在多个条带集中,每个条带集中数据再以条带的形式存储在对应条带集中的全部brick上,数据无冗余备份。
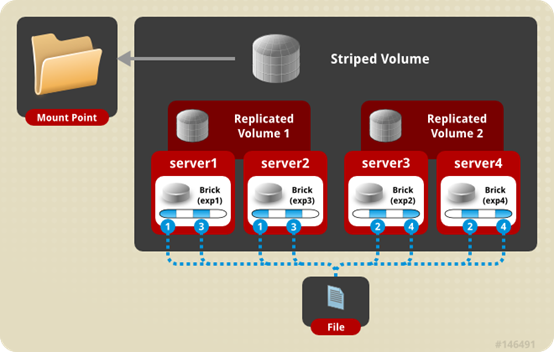
6. 条带镜像卷(Deprecated)
条带复制卷(STRIPE REPLICA Volume),是条带与复制卷的组合,兼具两者的功能,特点如下:
- 若干brick组成1个复制卷,另外若干brick组成其他复制卷;单个文件以条带的形式存储在2个或多个复制集(replicated sets ),复制集内文件分片以副本的形式保存;相当于文件级raid01;
- brick server数量是副本数的倍数,且>=2倍,即最少需要4台brick server。
7. 分布式条带镜像卷(Deprecated)
分布式条带复制卷(DISTRIBUTE STRIPE REPLICA VOLUME),是分布式卷,条带与复制卷的组合,兼具三者的功能,特点如下:
- 多个文件哈希分布到到多个条带集中,单个文件在条带集中以条带的形式存储在2个或多个复制集(replicated sets ),复制集内文件分片以副本的形式保存;
- brick server数量是副本数的倍数,且>=2倍,即最少需要4台brick server。

8. 纠删卷
纠删卷(Dispersed Volumes)是v3.6版本后发布的一种volume特点如下:
- 基于纠删码(erasure codes, EC)实现,类似于raid5/6(取决于redundancy等级);
- 通过配置redundancy(冗余)级别提高可靠性,在保证较高的可靠性同时,可以提升物理存储空间的利用率;
- 文件被分割成大小相同的chunk(块),每个chunk又被分割成fragment,冗余信息的fragment随之生成,且同一个fragment只会保存一个brick上;
- redundancy均匀分布存储在所有的brick,逻辑卷的有效空间是<usable size> = <brick size> * (#bricks - redundancy);
- 在数据恢复时,只要(#bricks - redundancy)个fragment(数据或冗余信息)可用,就能正常恢复数据;
- 卷中所有brick容量需要相同,否则最小的brick满容量时,数据无法写入;
- 实际部署时,redundancy < #bricks / 2 (or equivalently, redundancy * 2 < #bricks),即brick至少是3个;redundancy设置为0时,DispersedVolume等同于分布式卷;若redundancy设置为brick/2时,DispersedVolume等同于复制卷。
1)创建纠删卷
# 命令:gluster volume create [disperse [<count>]] [redundancy <count>] [transport tcp | rdma | tcp,rdma]

# 以上命令在任意server节点操作均可,以glusterfs01节点为例;

# 创建名为”disperse-volume”的逻辑卷;

# 必须指定卷类型(默认为分布式卷)与对应的brick server数量;

# 冗余等级”redundancy”需要根据使用brick server数量(“disperse conunt”),并结合期望的冗余度数综合考量;

# 也可不设置冗余等级”redundancy”,系统会根据brick server数量(“disperse conunt”)自动计算最优值,确认即可;如disperse conunt=3,则redundancy=1(无“warning message”);disperse conunt=6,则redundancy=2(有“warning message”);但disperse conunt=4,则无最优值,此时使用默认redundancy=1(有“warning message”);

# “transport tcp”指定集群通信方式,默认即tcp;

[root@glusterfs01 ~]# gluster volume create disperse-volume disperse 3 transport tcp \

 glusterfs01:/brick1/disperse_volume \

 glusterfs02:/brick2/disperse_volume \

 glusterfs03:/brick3/disperse_volume

2)启动卷
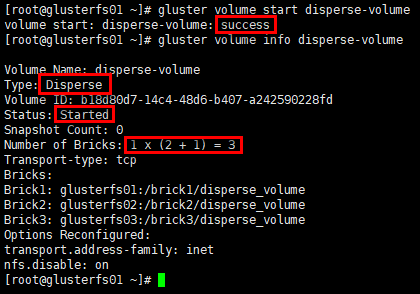
# 卷类型:disperse卷

# “Number of Bricks”:rudundancy=1,3个brick server

[root@glusterfs01 ~]# gluster volume start disperse-volume

[root@glusterfs01 ~]# gluster volume info disperse-volume
3)client挂载
[root@glusterfs-client ~]# mkdir /mnt/disperse

[root@glusterfs-client ~]# mount.glusterfs 172.30.200.51:disperse-volume /mnt/disperse/
4)查看挂载情况
# 已挂载卷的容量是2个brick容量之和,<usable size> = <brick size> * (#bricks - redundancy)

[root@glusterfs-client ~]# df -Th

5)存储测试
# 在client的挂载目录下创建若干文件

[root@glusterfs-client ~]# cd /mnt/disperse/

[root@glusterfs-client disperse]# touch disperse{1..4}.txt

# 向distributed-replica1.txt文件写入内容

[root@glusterfs-client disperse]# echo "this is disperse1.txt" >> disperse1.txt

# glusterfs01节点

[root@glusterfs01 ~]# tree /brick1/disperse_volume/

[root@glusterfs01 ~]# cat /brick1/disperse_volume/disperse1.txt

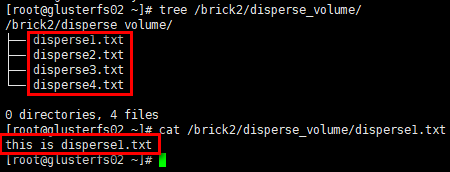
# glusterfs02节点

[root@glusterfs02 ~]# tree /brick2/disperse_volume/

[root@glusterfs02 ~]# cat /brick2/disperse_volume/disperse1.txt
# glusterfs03节点

[root@glusterfs03 ~]# tree /brick3/disperse_volume/

[root@glusterfs03 ~]# cat /brick3/disperse_volume/disperse1.txt
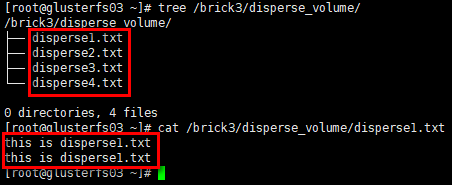
结论:纠删卷将数据文件(含冗余信息)分布在多个brick中,数据有冗余。
9. 分布式纠删卷
分布式纠删卷(Distributed Dispersed Volumes)等效于分布式复制卷,但使用的是纠删子卷,而非复制子卷。
五.Glusterfs管理
1. 均衡卷
# 不迁移数据

gluster volume VOLNAME rebalance [fix-layout start | start | startforce | status | stop]

# 修复卷(只针对复制卷)

gluster volume heal REPLICATE-VOLNAME/DISPERSE-VOLNAME       #只修复有问题的文件

gluster volume heal REPLICATE-VOLNAME/DISPERSE-VOLNAME full    #修复所有文件

gluster volume heal REPLICATE-VOLNAME/DISPERSE-VOLNAME info    #查看自愈详情

gluster volume heal REPLICATE-VOLNAME/DISPERSE-VOLNAME info healed|heal-failed|split-brain

# 设置卷

gluster volume set options
2. 删除卷
# 删除卷操作,必须先停用卷;

# 最后可清空brick server节点对应目录下的内容

gluster volume stop distributed-volume

gluster volume delete distributed-volume

rm -f /brick1/dis_volume
3. brick管理
# 添加brick

gluster volume add-brick VOLNAME NEW-BRICK

# 移除brick

gluster volume remove-brick VOLNAME BRICK [start | status | commit]

# 替换brick

gluster volume replace-brick VOLNAME BRICKNEW-BRICK [start | pause | sbortstatus | commit]
4. 日志
相关日志,在/var/log/glusterfs/目录下,可根据需要查看;
如/var/log/glusterfs/brick/下是各brick创建的日志;
如/var/log/glusterfs/cmd_history.log是命令执行记录日志;
如/var/log/glusterfs/glusterd.log是glusterd守护进程日志。
GlusterFS分布式存储集群-2. 使用的更多相关文章
- Centos7下GlusterFS分布式存储集群环境部署记录
0)环境准备 GlusterFS至少需要两台服务器搭建,服务器配置最好相同,每个服务器两块磁盘,一块是用于安装系统,一块是用于GlusterFS. 192.168.10.239 GlusterFS-m ...
- GlusterFS分布式存储集群部署记录-相关补充
接着上一篇Centos7下GlusterFS分布式存储集群环境部署记录文档,继续做一些补充记录,希望能加深对GlusterFS存储操作的理解和熟悉度. ======================== ...
- GlusterFS分布式存储集群-1. 部署
参考文档: Quick Start Guide:http://gluster.readthedocs.io/en/latest/Quick-Start-Guide/Quickstart/ Instal ...
- Ceph分布式存储集群-硬件选择
在规划Ceph分布式存储集群环境的时候,对硬件的选择很重要,这关乎整个Ceph集群的性能,下面梳理到一些硬件的选择标准,可供参考: 1)CPU选择Ceph metadata server会动态的重新分 ...
- 简单介绍Ceph分布式存储集群
在规划Ceph分布式存储集群环境的时候,对硬件的选择很重要,这关乎整个Ceph集群的性能,下面梳理到一些硬件的选择标准,可供参考: 1)CPU选择 Ceph metadata server会动态的重新 ...
- docker部署Ceph分布式存储集群
1.环境准备 3台virtualbox虚拟机,用来安装ceph集群,已用docker-machine安装上了docker,每台虚拟机虚拟创建一个5G的硬盘,用于存储osd数据,例如:/dev/sdb ...
- 一步一步安装配置Ceph分布式存储集群
Ceph可以说是当今最流行的分布式存储系统了,本文记录一下安装和配置Ceph的详细步骤. 提前配置工作 从第一个集群节点开始的,然后逐渐加入其它的节点.对于Ceph,我们加入的第一个节点应该是Moni ...
- K8s 上的分布式存储集群搭建(Rook/ceph)
转载自:https://mp.weixin.qq.com/s/CdLioTzU4oWI688lqYKXUQ 1 环境准备 1.1 基础环境 3台配置一致的虚拟机 虚拟机配置:4c 8g 虚拟机操作系统 ...
- GlusterFS分布式存储学习笔记
分布式文件系统 分布式文件系统(Distributed File System)是指文件系统管理的物理存储资源并不直接与本地节点相连,而是分布于计算网络中的一个或者多个节点的计算机上.目前意义上的分布 ...
随机推荐
- 【bzoj 3252】攻略
题意 我们想到一个贪心,就是每次找到根路径前缀和最大的一个点,取走这条路径,同时把这条路径上的点权变成\(0\) 正确性显然 进一步发现我们需要从树上选择\(m\)条链使得链的总和最大 于是我们考虑换 ...
- --provider=docker时出现的问题
Vagrantfile类似: Vagrant.configure(") do |config| config.vm.box = "hashicorp/precise64" ...
- kendo ui - MultiSelect 多选系列
kendo-ui 官网:https://www.telerik.com/documentation 初始化 grid: 引入文件: <link rel="stylesheet" ...
- 多线程之Timer和TimerTask
Timer是一种线程设施,用于安排以后在后台线程中执行的任务.可安排任务执行一次,或者定期重复执行,可以看成一个定时器,可以调度TimerTask.TimerTask是一个抽象类,实现了Runnabl ...
- 安装vue
node.js环境(npm包管理器) vue-cli 脚手架构建工具 cnpm npm的淘宝镜像 1) 安装node.js 从node.js官网下载并安装node,安装过程很简单,一直点下一步就ok了 ...
- expdp导出时报错ora-16000
一.问题现象:在对数据库进行expdp导出时发生报错ora-16000,脚本如下: nohup expdp "'/ as sysdba'" schemas=shp DIRECTOR ...
- 我的react学习
基础部分 创建一个react的项目 创建一个react的项目 全局安装 react 指令 // 全局安装react (根据需要安装,不是必须的) npm i -g react // 或者 yarn - ...
- 如何在Windows版本的VMware虚拟机上安装苹果系统
有时我想玩玩苹果系统,但自己有没有mac,只能在虚拟机上装一个苹果玩玩,但又由于某些原因虚拟机软件VMware不支持安装苹果系统,还在有大佬出于不明目的,在网上散布了适用于Windows版本的VMwa ...
- VIM - visual selection 模式下的简单操作
1. 概述 vim 的 visual selection 模式下的简单操作 2. visual selection 模式 概述 可视化选择 可视化选择 vim 的一种专门用来选择的模式 可以提供相对于 ...
- 开发自己的DataSet查看器
记得在vs2002不是2003上没有DataSet调试器,断点时查看DataSet内容非常麻烦,最后有人开发了第三方工具解决了此问题. 后续的vs版本内部都自带的此工具可查看DataSet/DataT ...
