快速设置UITableView不同section对应于不同种类的cell
快速设置UITableView不同section对应于不同种类的cell

本文主要是为了写明如何在UITableView中,一个section对应于一种类型的cell,写起来不凌乱.
在不封装任何类的前提下提供如下源码:
请自行创建出3种类型的cell,创建好了就行,你需要创建出ModelOneCell,ModelTwoCell,ModelThreeCell,内容为空
//

//  RootViewController.m

//  Sections

//

//  Copyright (c) 2014年 Y.X. All rights reserved.

//

#import "RootViewController.h"

#import "ModelOneCell.h"

#import "ModelTwoCell.h"

#import "ModelThreeCell.h"

@interface RootViewController ()<UITableViewDelegate, UITableViewDataSource>

@property (nonatomic, strong) UITableView      *tableView;  // tableView

@property (nonatomic, strong) NSMutableArray   *dataArray;  // 数据数组

@property (nonatomic, strong) NSMutableArray   *nameList;   // 数组名字

@end

@implementation RootViewController

#pragma mark - 只初始化一次

#define REUESED_SIZE  100

static NSString *reUsedStr[REUESED_SIZE] = {nil}; // 重用标示

#define REUESED_FLAG  reUsedStr[0]

+ (void)initialize

{

    if (self == [RootViewController class])

    {

        for (int i = ; i < REUESED_SIZE; i++)

        {

            reUsedStr[i] = [NSString stringWithFormat:@"GoodBoy_%d", i];

        }

    }

}

- (void)viewDidLoad

{

    [super viewDidLoad];

    // 初始化tableView

    _tableView         = [[UITableView alloc] initWithFrame:self.view.bounds

                                                      style:UITableViewStylePlain];

    [self.view addSubview:_tableView];

    _tableView.delegate       = self;

    _tableView.dataSource     = self;

    // 模拟三种类型的数据源

    NSArray *type1 = @[@"", @"", @""];

    NSArray *type2 = @[@"一", @"二", @"三"];

    NSArray *type3 = @[@"one", @"two", @"three"];

    // 添加数据源 + 数据源标签名字

    _dataArray = [NSMutableArray new];

    _nameList  = [NSMutableArray new];

    [_dataArray addObject:type1]; [_nameList addObject:@"ModelOneCell"];

    [_dataArray addObject:type2]; [_nameList addObject:@"ModelTwoCell"];

    [_dataArray addObject:type3]; [_nameList addObject:@"ModelThreeCell"];

}

#pragma mark - UITableView'delegate & dataSource

// 每个区有几个cell

- (NSInteger)tableView:(UITableView *)tableView numberOfRowsInSection:(NSInteger)section

{

    return [_dataArray[section] count];

}

// 设定tableView有几个区域

- (NSInteger)numberOfSectionsInTableView:(UITableView *)tableView

{

    return [_nameList count];

}

// cell的初始化以及重用设置

-(UITableViewCell *)tableView:(UITableView *)tableView

        cellForRowAtIndexPath:(NSIndexPath *)indexPath

{

    // 根据section区域获取几种cell的公共父类

    UITableViewCell *cell = [tableView dequeueReusableCellWithIdentifier:reUsedStr[indexPath.section]];

    // 根据不同的区域对应创建出该区域的cell

    if (cell == nil)

    {

        if ([_nameList[indexPath.section] isEqualToString:@"ModelOneCell"])

        {

            cell = [[ModelOneCell alloc] initWithStyle:UITableViewCellStyleDefault

                                       reuseIdentifier:reUsedStr[indexPath.section]];

        }

        else if ([_nameList[indexPath.section] isEqualToString:@"ModelTwoCell"])

        {

            cell = [[ModelTwoCell alloc] initWithStyle:UITableViewCellStyleDefault

                                       reuseIdentifier:reUsedStr[indexPath.section]];

        }

        else if ([_nameList[indexPath.section] isEqualToString:@"ModelThreeCell"])

        {

            cell = [[ModelThreeCell alloc] initWithStyle:UITableViewCellStyleDefault

                                         reuseIdentifier:reUsedStr[indexPath.section]];

        }

    }

    // 对cell进行设置

    if ([_nameList[indexPath.section] isEqualToString:@"ModelOneCell"])

    {

        cell = [[ModelOneCell alloc] initWithStyle:UITableViewCellStyleDefault

                                   reuseIdentifier:reUsedStr[indexPath.section]];

        cell.textLabel.text = _dataArray[indexPath.section][indexPath.row];

    }

    else if ([_nameList[indexPath.section] isEqualToString:@"ModelTwoCell"])

    {

        cell = [[ModelTwoCell alloc] initWithStyle:UITableViewCellStyleDefault

                                   reuseIdentifier:reUsedStr[indexPath.section]];

        cell.textLabel.text = _dataArray[indexPath.section][indexPath.row];

    }

    else if ([_nameList[indexPath.section] isEqualToString:@"ModelThreeCell"])

    {

        cell = [[ModelThreeCell alloc] initWithStyle:UITableViewCellStyleDefault

                                     reuseIdentifier:reUsedStr[indexPath.section]];

        cell.textLabel.text = _dataArray[indexPath.section][indexPath.row];

    }

    return cell;

}

// 点击cell获取数据

- (void)tableView:(UITableView *)tableView didSelectRowAtIndexPath:(NSIndexPath *)indexPath

{

    if ([_nameList[indexPath.section] isEqualToString:@"ModelOneCell"])

    {

        NSLog(@"%@", _dataArray[indexPath.section][indexPath.row]);

    }

    else if ([_nameList[indexPath.section] isEqualToString:@"ModelTwoCell"])

    {

        NSLog(@"%@", _dataArray[indexPath.section][indexPath.row]);

    }

    else if ([_nameList[indexPath.section] isEqualToString:@"ModelThreeCell"])

    {

        NSLog(@"%@", _dataArray[indexPath.section][indexPath.row]);

    }

}

// 设定不同种类cell的高度

- (CGFloat)tableView:(UITableView *)tableView heightForRowAtIndexPath:(NSIndexPath *)indexPath

{

    if ([_nameList[indexPath.section] isEqualToString:@"ModelOneCell"])

    {

        return ;

    }

    else if ([_nameList[indexPath.section] isEqualToString:@"ModelTwoCell"])

    {

        return ;

    }

    else if ([_nameList[indexPath.section] isEqualToString:@"ModelThreeCell"])

    {

        return ;

    }

    else

    {

        return ;

    }

}

@end
运行时候的效果如下:

核心思想:

接下来,我们就要来进行封装,达到好用的目的:)
我们把数据源以及数据源标签抽象成一个对象就可以很好的管理这些东西了,以下给出源码:
//

//  TableVewData.h

//  Sections

//

//  Copyright (c) 2014年 Y.X. All rights reserved.

//

#import <Foundation/Foundation.h>

@interface TableViewData : NSObject

// 添加数据源 + 数据源标签

- (void)addDataArray:(NSArray *)array arrayFlag:(NSString *)flag;

// 对应区域中的row的个数

- (NSInteger)numberOfRowsInSection:(NSInteger)section;

// 有几个section

- (NSInteger)numberOfSections;

// 对应于Section上的flag值标签

- (NSString *)flagInSection:(NSIndexPath *)indexPath;

// 对应于indexPath中的数据

- (id)dataInIndexPath:(NSIndexPath *)indexPath;

@end
//

//  TableVewData.m

//  Sections

//

//  Copyright (c) 2014年 Y.X. All rights reserved.

//

#import "TableViewData.h"

@interface TableViewData ()

@property (nonatomic, strong) NSMutableArray  *dataArray;

@property (nonatomic, strong) NSMutableArray  *nameList;

@end

@implementation TableViewData

- (instancetype)init

{

    self = [super init];

    if (self)

    {

        _dataArray = [NSMutableArray new];

        _nameList  = [NSMutableArray new];

    }

    return self;

}

- (void)addDataArray:(NSArray *)array arrayFlag:(NSString *)flag

{

    [_dataArray addObject:array];

    [_nameList  addObject:flag];

}

- (NSInteger)numberOfRowsInSection:(NSInteger)section

{

    return [_dataArray[section] count];

}

- (NSInteger)numberOfSections

{

    return [_dataArray count];

}

- (NSString *)flagInSection:(NSIndexPath *)indexPath

{

    return _nameList[indexPath.section];

}

- (id)dataInIndexPath:(NSIndexPath *)indexPath

{

    return _dataArray[indexPath.section][indexPath.row];

}

@end
主函数使用情形如下:
//
// RootViewController.m
// Sections
//
// Copyright (c) 2014年 Y.X. All rights reserved.
// #import "RootViewController.h"
#import "ModelOneCell.h"
#import "ModelTwoCell.h"
#import "ModelThreeCell.h" #import "TableViewData.h" @interface RootViewController ()<UITableViewDelegate, UITableViewDataSource> @property (nonatomic, strong) UITableView *tableView; // tableView @property (nonatomic, strong) TableViewData *tableData; @end @implementation RootViewController #pragma mark - 只初始化一次
#define REUESED_SIZE 100
static NSString *reUsedStr[REUESED_SIZE] = {nil}; // 重用标示
#define REUESED_FLAG reUsedStr[0]
+ (void)initialize
{
if (self == [RootViewController class])
{
for (int i = ; i < REUESED_SIZE; i++)
{
reUsedStr[i] = [NSString stringWithFormat:@"GoodBoy_%d", i];
}
}
} - (void)viewDidLoad
{
[super viewDidLoad]; // 初始化tableView
_tableView = [[UITableView alloc] initWithFrame:self.view.bounds
style:UITableViewStylePlain];
[self.view addSubview:_tableView];
_tableView.delegate = self;
_tableView.dataSource = self; // 模拟三种类型的数据源
NSArray *type1 = @[@"", @"", @""];
NSArray *type2 = @[@"一", @"二", @"三"];
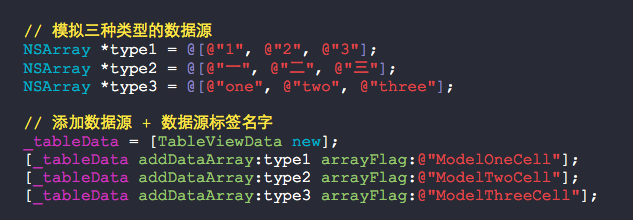
NSArray *type3 = @[@"one", @"two", @"three"]; // 添加数据源 + 数据源标签名字
_tableData = [TableViewData new];
[_tableData addDataArray:type1 arrayFlag:@"ModelOneCell"];
[_tableData addDataArray:type2 arrayFlag:@"ModelTwoCell"];
[_tableData addDataArray:type3 arrayFlag:@"ModelThreeCell"];
} #pragma mark - UITableView'delegate & dataSource
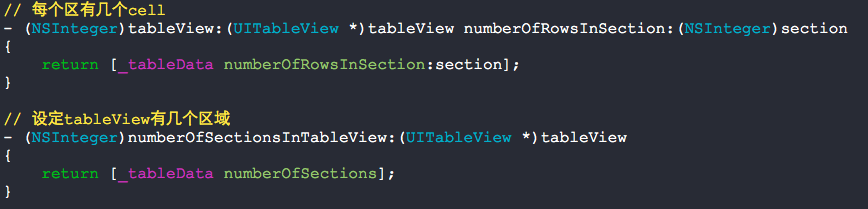
// 每个区有几个cell
- (NSInteger)tableView:(UITableView *)tableView numberOfRowsInSection:(NSInteger)section
{
return [_tableData numberOfRowsInSection:section];
} // 设定tableView有几个区域
- (NSInteger)numberOfSectionsInTableView:(UITableView *)tableView
{
return [_tableData numberOfSections];
} // cell的初始化以及重用设置
-(UITableViewCell *)tableView:(UITableView *)tableView
cellForRowAtIndexPath:(NSIndexPath *)indexPath
{
// 根据section区域获取几种cell的公共父类
UITableViewCell *cell = [tableView dequeueReusableCellWithIdentifier:reUsedStr[indexPath.section]]; // 根据不同的区域对应创建出该区域的cell
if (cell == nil)
{
if ([[_tableData flagInSection:indexPath] isEqualToString:@"ModelOneCell"])
{
cell = [[ModelOneCell alloc] initWithStyle:UITableViewCellStyleDefault
reuseIdentifier:reUsedStr[indexPath.section]];
}
else if ([[_tableData flagInSection:indexPath] isEqualToString:@"ModelTwoCell"])
{
cell = [[ModelTwoCell alloc] initWithStyle:UITableViewCellStyleDefault
reuseIdentifier:reUsedStr[indexPath.section]];
} else if ([[_tableData flagInSection:indexPath] isEqualToString:@"ModelThreeCell"])
{
cell = [[ModelThreeCell alloc] initWithStyle:UITableViewCellStyleDefault
reuseIdentifier:reUsedStr[indexPath.section]];
}
} // 对cell进行设置
if ([[_tableData flagInSection:indexPath] isEqualToString:@"ModelOneCell"])
{
cell = [[ModelOneCell alloc] initWithStyle:UITableViewCellStyleDefault
reuseIdentifier:reUsedStr[indexPath.section]];
cell.textLabel.text = [_tableData dataInIndexPath:indexPath];
}
else if ([[_tableData flagInSection:indexPath] isEqualToString:@"ModelTwoCell"])
{
cell = [[ModelTwoCell alloc] initWithStyle:UITableViewCellStyleDefault
reuseIdentifier:reUsedStr[indexPath.section]];
cell.textLabel.text = [_tableData dataInIndexPath:indexPath];
} else if ([[_tableData flagInSection:indexPath] isEqualToString:@"ModelThreeCell"])
{
cell = [[ModelThreeCell alloc] initWithStyle:UITableViewCellStyleDefault
reuseIdentifier:reUsedStr[indexPath.section]];
cell.textLabel.text = [_tableData dataInIndexPath:indexPath];
} return cell;
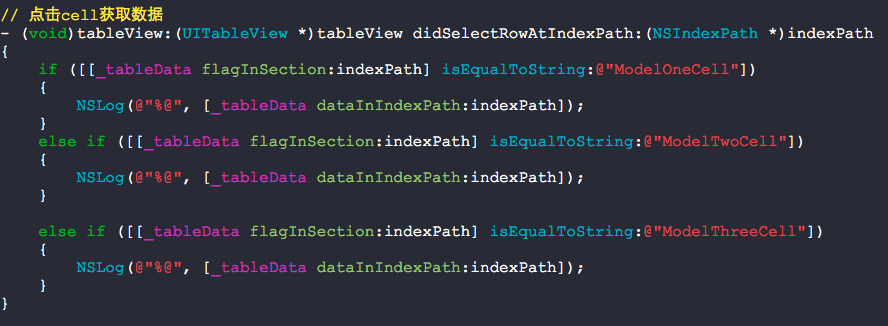
} // 点击cell获取数据
- (void)tableView:(UITableView *)tableView didSelectRowAtIndexPath:(NSIndexPath *)indexPath
{
if ([[_tableData flagInSection:indexPath] isEqualToString:@"ModelOneCell"])
{
NSLog(@"%@", [_tableData dataInIndexPath:indexPath]);
}
else if ([[_tableData flagInSection:indexPath] isEqualToString:@"ModelTwoCell"])
{
NSLog(@"%@", [_tableData dataInIndexPath:indexPath]);
} else if ([[_tableData flagInSection:indexPath] isEqualToString:@"ModelThreeCell"])
{
NSLog(@"%@", [_tableData dataInIndexPath:indexPath]);
}
} // 设定不同种类cell的高度
- (CGFloat)tableView:(UITableView *)tableView heightForRowAtIndexPath:(NSIndexPath *)indexPath
{
if ([[_tableData flagInSection:indexPath] isEqualToString:@"ModelOneCell"])
{
return ;
}
else if ([[_tableData flagInSection:indexPath] isEqualToString:@"ModelTwoCell"])
{
return ;
} else if ([[_tableData flagInSection:indexPath] isEqualToString:@"ModelThreeCell"])
{
return ;
}
else
{
return ;
}
} @end
添加数据源:
见名知意:
使用很便利:

快速设置UITableView不同section对应于不同种类的cell的更多相关文章
- collectionView代理方法快速设置cell大小上下左右间隔
#define JianGe 25 #define GeShu 4 #define ScreenWidth ([UIScreen mainScreen].bounds.size.width) #def ...
- [Xcode 实际操作]五、使用表格-(5)设置UITableView的单元格背景颜色
目录:[Swift]Xcode实际操作 本文将演示单元格背景颜色的设置 在项目导航区,打开视图控制器的代码文件[ViewController.swift] import UIKit //首先添加两个协 ...
- [Xcode 实际操作]五、使用表格-(4)设置UITableView单元格数据库源
目录:[Swift]Xcode实际操作 本文将演示如何自定义表格的数据来源. 在项目导航区,打开视图控制器的代码文件[ViewController.swift] import UIKit //首先添加 ...
- [Xcode 实际操作]五、使用表格-(3)设置UITableView单元格图标
目录:[Swift]Xcode实际操作 本文将演示如何给表格行设置图标. 打开资源文件夹[Assets.xcassets], 在资源文件夹中导入两张图片:一张彩色,一张灰色,作为单元格的图标. [+] ...
- [Xcode 实际操作]五、使用表格-(2)设置UITableView单元格高度
目录:[Swift]Xcode实际操作 本文将演示如何制作一个自定义行高的表格视图 在项目导航区,打开视图控制器的代码文件[ViewController.swift] import UIKit //首 ...
- 设置UITableView的separatorInset值为UIEdgeInsetsZero,分隔线不最左端显示的问题
一.问题描述 UITableView分割线要显示到最左端 查看UITableView的属性,发现设置separatorInset的值可以自定义分割线的位置. @property (nonatomic) ...
- 分享一个快速设置背景的js 自动获取背景图的长宽
我来分享一个快速设置背景的js (需要jq支持!) 快速切图铺页面用---就是不需要手动输入背景图的长宽 自动获取背景图的长宽 : <div class="wrap"> ...
- 设置UITableView背景透明/监听cell左边的删除按钮的点击事件
_tableView = [[UITableView alloc] init]; _tableView.delegate = self; _tableView.dataSource = self; _ ...
- 【大盛】HTC one/M7 ROM 最新本地化OrDroid8.2.6 高级、快速设置 永久root 更多自定义 稳定 流畅
了解更多:点击下载ROM和学习更多 ROM版本 HTC-one_OrDroid8.2.6 ROM作者 雪狼团队·大盛 http://weibo.com/DaShengdd Android版本 Andr ...
随机推荐
- 利用编辑器漏洞ewebeditor-fckeditor-southidceditor
ewebeditor 默认数据库路径:[PATH]/db/ewebeditor.mdb [PATH]/db/db.mdb [PATH]/db/%23ewebeditor.mdb 默认密码:admin/ ...
- Tomcat源码分析——请求原理分析(下)
前言 本文继续讲解TOMCAT的请求原理分析,建议朋友们阅读本文时首先阅读过<TOMCAT源码分析——请求原理分析(上)>和<TOMCAT源码分析——请求原理分析(中)>.在& ...
- ViewPager(视图滑动切换工具)
<?xml version="1.0" encoding="utf-8"?> <android.support.constraint.Cons ...
- windows 10安装gensim、nltk
一.安装gensim 1.什么事gensim gensim是一个python的科学库,gensim包含了TF-IDF.随机投影.word2vec和document2vec算法的实现,分层Dirchle ...
- ado.net中的 sqlconnection sqlcommand datareader dataset SqlDataAdapter之间的关系
Connection: 和数据库交互,必须连接它.连接帮助指明数据库服务器.数据库名字.用户名.密码,和连接数据库所需要的其它参数.Connection对象会被Command对象使用,这样就能够知道是 ...
- 搭建jdk环境
jdk(java develop toolkit)主要包括:编译程序的javac,运行程序的java,javaAPI类库. 主要步骤: 下载jdk安装包 设置环境变量(JAVA_HOME,Path,C ...
- jquery对象与dom对象之间互相转换的方法
本文主要讲述jquery对象和js里的dom对象之间互相转换的方法,使jquery对象可以直接使用js里的方法,或js里的dom对象使用jquery里的方法. jquery对象和dom对象是不一样的, ...
- 【SSH网上商城项目实战21】从Demo中看易宝支付的流程
转自: https://blog.csdn.net/eson_15/article/details/51447492 这一节我们先写一个简单点的Demo来测试易宝支付的流程,熟悉这个流程后, ...
- 02.php面向对象——构造方法&析构方法
<?php //自己写的构造方法 class Computer{ public function Computer(){ echo '构造方法'; } } new Computer();//这样 ...
- along.js
平时写代码用到的方法,就给封装了一下.需要的拿走不谢... 1.数组去重 并判断一个元素出现的次数 handle(str){ let arr=str.split('') var newarr=[]; ...