GlusterFS学习之路(二)GlusterFS部署及卷类型使用
一、环境说明
| 主机名 | IP地址 | 角色 | 磁盘 |
| gluster-node1 | 192.168.56.11 | Server、Client | /dev/sdb、/dev/sdc、/dev/sdd |
| gluster-node2 | 192.168.56.12 | Server、Client | /dev/sdb、/dev/sdc、/dev/sdd |
| gluster-node3 | 192.168.56.13 | Server、Client | /dev/sdb、/dev/sdc、/dev/sdd |
二、GlusterFS安装
(1)修改主机名
[root@localhost ~]# hostnamectl set-hostname gluster-node1

[root@localhost ~]# bash

[root@localhost ~]# hostnamectl set-hostname gluster-node2

[root@localhost ~]# bash

[root@localhost ~]# hostnamectl set-hostname gluster-node3

[root@localhost ~]# bash
(2)添加host解析,实现集群主机之间相互解析
[root@gluster-node1 ~]# cat /etc/hosts

127.0.0.1   localhost localhost.localdomain localhost4 localhost4.localdomain4

::         localhost localhost.localdomain localhost6 localhost6.localdomain6

192.168.56.11 gluster-node1

192.168.56.12 gluster-node2

192.168.56.13 gluster-node3

[root@gluster-node1 ~]# scp /etc/hosts root@gluster-node2:/etc/hosts

[root@gluster-node1 ~]# scp /etc/hosts root@gluster-node3:/etc/hosts
(3)关闭SElinux和防火墙
[root@gluster-node1 ~]# setenforce

[root@gluster-node1 ~]# sed -i 's#SELINUX=enforcing#SELINUX=disabled#g' /etc/sysconfig/selinux

[root@gluster-node2 ~]# setenforce

[root@gluster-node2 ~]# sed -i 's#SELINUX=enforcing#SELINUX=disabled#g' /etc/sysconfig/selinux

[root@gluster-node3 ~]# setenforce

[root@gluster-node3 ~]# sed -i 's#SELINUX=enforcing#SELINUX=disabled#g' /etc/sysconfig/selinux

[root@gluster-node1 ~]# systemctl stop firewalld.service

[root@gluster-node1 ~]# systemctl disable firewalld.service

[root@gluster-node2 ~]# systemctl stop firewalld.service

[root@gluster-node2 ~]# systemctl disable firewalld.service

[root@gluster-node3 ~]# systemctl stop firewalld.service

[root@gluster-node3 ~]# systemctl disable firewalld.service
(4)安装epel源
[root@gluster-node1 ~]# yum install -y epel-release

[root@gluster-node2 ~]# yum install -y epel-release

[root@gluster-node3 ~]# yum install -y epel-release
(5)安装glusterfs源
[root@gluster-node1 ~]#  yum install -y centos-release-gluster

[root@gluster-node2 ~]#  yum install -y centos-release-gluster

[root@gluster-node3 ~]#  yum install -y centos-release-gluster
(6)安装glusterfs
[root@gluster-node1 ~]# yum install glusterfs-server -y

[root@gluster-node2 ~]# yum install glusterfs-server -y

[root@gluster-node3 ~]# yum install glusterfs-server -y
三、GlusterFS配置
(1)查看gluster版本信息

[root@gluster-node1 ~]# glusterfs -V

glusterfs 4.1.

Repository revision: git://git.gluster.org/glusterfs.git

Copyright (c) - Red Hat, Inc. <https://www.gluster.org/>

GlusterFS comes with ABSOLUTELY NO WARRANTY.

It is licensed to you under your choice of the GNU Lesser

General Public License, version  or any later version (LGPLv3

or later), or the GNU General Public License, version  (GPLv2),

in all cases as published by the Free Software Foundation.

()启动glusterd服务

[root@gluster-node1 ~]# systemctl start glusterd

[root@gluster-node2 ~]# systemctl start glusterd

[root@gluster-node3 ~]# systemctl start glusterd
在开始创建ClusterFS卷之前,需要创建一个称之为Trusted Storage的池,是一个可信的网络存储服务器,可以理解为集群。为卷提供bricks。
gluster peer probe<主机名或者IP地址>,建议是IP地址,或者内网用DNS做主机名解析,或者在/etc/hosts做好绑定。
- 1、增加server到pool
[root@gluster-node1 ~]#  gluster peer probe gluster-node2

peer probe: success.

[root@gluster-node1 ~]#  gluster peer probe gluster-node3

peer probe: success.

注意不要添加本地的服务器。这里在gluster-node1上操作,所以不需要添加gluster-node1
- 2、从Pool中删除Server
[root@gluster-node1 ~]# gluster peer detach gluster-node2

peer detach: success.
- 3、查看Pool状态
[root@gluster-node1 ~]# gluster status

unrecognized word: status (position )

[root@gluster-node1 ~]# gluster peer status

Number of Peers:

Hostname: gluster-node2

Uuid: 5faada9a--4a4d-bbb2-decf5b63990e

State: Peer in Cluster (Connected)

Hostname: gluster-node3

Uuid: 0ba4f9f4-4cc5--ac41-4941285cedbb

State: Peer in Cluster (Connected)

#在glutser-node2上查看

[root@gluster-node2 ~]# gluster peer status

Number of Peers:

Hostname: gluster-node1

Uuid: 6899d47f-1ce0-4c37-a6cb-fcd0defbb85f

State: Peer in Cluster (Connected)

Hostname: gluster-node3

Uuid: 0ba4f9f4-4cc5--ac41-4941285cedbb

State: Peer in Cluster (Connected)
- 4、配置前的准备工作
在各个节点上增加磁盘/dev/sdb,在gluster-node2和gluster-node3上都执行以下步骤
[root@gluster-node1 ~]# mkfs.xfs -f /dev/sdb

meta-data=/dev/sdb               isize=    agcount=, agsize= blks

         =                       sectsz=   attr=, projid32bit=

         =                       crc=        finobt=, sparse=

data     =                       bsize=   blocks=, imaxpct=

         =                       sunit=      swidth= blks

naming   =version               bsize=   ascii-ci= ftype=

log      =internal log           bsize=   blocks=, version=

         =                       sectsz=   sunit= blks, lazy-count=

realtime =none                   extsz=   blocks=, rtextents=

[root@gluster-node1 ~]# mkdir -p /storage/brick1

[root@gluster-node1 ~]# mount /dev/sdb /storage/brick1

[root@gluster-node1 ~]# df -h

Filesystem      Size  Used Avail Use% Mounted on

/dev/sda2        20G  .5G   19G   % /

devtmpfs        483M       483M   % /dev

tmpfs           493M       493M   % /dev/shm

tmpfs           493M  6.8M  486M   % /run

tmpfs           493M       493M   % /sys/fs/cgroup

/dev/sda1       197M   97M  100M  % /boot

tmpfs            99M        99M   % /run/user/

/dev/sdb       1014M   33M  982M   % /storage/brick1

[root@gluster-node1 ~]# echo "/dev/sdb /storage/brick1 xfs default 0 0" >> /etc/fstab
- 5、创建volume及其他操作
Distributed:分布式卷,文件通过hash算法随机的分不到bricks组成的卷上。
Replicated:复制卷,类似raid1,replica数必须等于volume中brick所包含的存储服务器数,可用性高。
striped:条带式卷,类似raid0,stripe数必须等于volume中brick所包含的存储服务器数,文件会被分成数据块,以Round Robin的方式存储在bricks中,并发粒度是数据块,大文件性能好。
Distributed striped:分布式条带卷,volume中brick所包含的存储服务器必须是stripe的倍数(>=2倍),兼顾分布式和条带式的功能。
Distributed Replicated:分布式的复制卷,volume中brick所包含的存储服务器数必须是replica的倍数(>=2倍),兼顾分布式和复制式的功能。
Stripe Replicated:条带复制卷,volume中brick所包含的存储服务器数必须是stripe和replica的倍数(>=2倍),兼顾条带式和复制式的功能。
Distributed Stripe Replicated:分布式条带复制卷,按需存储服务器数量必须是2*2*2=8共8台,兼顾分布式,条带式和复制式的功能,此处使用了3台服务器,8块硬盘,不尽完美!
创建各种卷语法格式:
volume create <NEW-VOLNAME> [stripe <COUNT>] [replica <COUNT> [arbiter <COUNT>]] [disperse [<COUNT>]] [disperse-data <COUNT>] [redundancy <COUNT>] [transport <tcp|rdma|tcp,rdma>] <NEW-BRICK>?<vg_name>... [force]
下面逐一演示7种卷的使用:
- (1)创建分布式卷
分布式卷架构示意图:
默认模式,既DHT, 也叫 分布卷: 将文件已hash算法随机分布到 一台服务器节点中存储。如:
gluster volume create test-volume server1:/exp1 server2:/exp2
()查看创建命令的帮助

[root@gluster-node1 ~]# gluster volume create -h

Usage:

volume create <NEW-VOLNAME> [stripe <COUNT>] [replica <COUNT> [arbiter <COUNT>]] [disperse [<COUNT>]] [disperse-data <COUNT>] [redundancy <COUNT>] [transport <tcp|rdma|tcp,rdma>] <NEW-BRICK>?<vg_name>... [force]

()创建卷gv1

[root@gluster-node1 ~]# gluster volume create gv1 gluster-node1:/storage/brick1 gluster-node2:/storage/brick1 force  #创建卷gv1,并将gluster-node1和gluster-node2上的/dev/sdb合并空间

volume create: gv1: success: please start the volume to access data

[root@gluster-node1 ~]# gluster volume start gv1  #启动gv1卷

volume start: gv1: success

[root@gluster-node3 ~]# gluster volume info  #在glutser-node3上查看volume信息

Volume Name: gv1

Type: Distribute

Volume ID: 5773c33b--419a-a753-de89063f4e23

Status: Started

Snapshot Count:

Number of Bricks:

Transport-type: tcp

Bricks:

Brick1: gluster-node1:/storage/brick1

Brick2: gluster-node2:/storage/brick1

Options Reconfigured:

transport.address-family: inet

nfs.disable: on

()挂载数据卷

[root@gluster-node1 ~]# mkdir /gv1  #创建挂载目录

[root@gluster-node1 ~]# mount -t glusterfs 127.0.0.1:/gv1 /gv1  #挂载gv1卷

[root@gluster-node1 ~]# df -h  #查看挂载信息

Filesystem      Size  Used Avail Use% Mounted on

/dev/sda2        20G  .5G   19G   % /

devtmpfs        483M       483M   % /dev

tmpfs           493M       493M   % /dev/shm

tmpfs           493M  6.8M  486M   % /run

tmpfs           493M       493M   % /sys/fs/cgroup

/dev/sda1       197M   97M  100M  % /boot

tmpfs            99M        99M   % /run/user/

/dev/sdb       1014M   33M  982M   % /storage/brick1

127.0.0.1:/gv1  .0G   85M  .9G   % /gv1  #可以看到挂载在gv1目录下的gv1卷磁盘大小为2个G,是gluster-node1和gluster-node2合并一起的磁盘大小

[root@gluster-node2 ~]# mkdir /gv1  #在gluster-node2上同样创建挂载目录

[root@gluster-node2 ~]# mount -t glusterfs 127.0.0.1:/gv1 /gv1  #在gluster-node2上挂载gv1卷

[root@gluster-node2 ~]# df -h

Filesystem      Size  Used Avail Use% Mounted on

/dev/sda2        20G  .3G   19G   % /

devtmpfs        483M       483M   % /dev

tmpfs           493M       493M   % /dev/shm

tmpfs           493M  6.8M  486M   % /run

tmpfs           493M       493M   % /sys/fs/cgroup

/dev/sda1       197M   97M  100M  % /boot

tmpfs            99M        99M   % /run/user/

/dev/sdb       1014M   33M  982M   % /storage/brick1

127.0.0.1:/gv1  .0G   85M  .9G   % /gv1

[root@gluster-node3 ~]# mkdir /gv1

[root@gluster-node3 ~]# mount -t glusterfs 127.0.0.1:/gv1 /gv1

[root@gluster-node3 ~]# df -h

Filesystem      Size  Used Avail Use% Mounted on

/dev/sda3        28G  .6G   27G   % /

devtmpfs        483M       483M   % /dev

tmpfs           493M       493M   % /dev/shm

tmpfs           493M  6.8M  486M   % /run

tmpfs           493M       493M   % /sys/fs/cgroup

/dev/sda1       197M   97M  100M  % /boot

tmpfs            99M        99M   % /run/user/

/dev/sdb       1014M   33M  982M   % /storage/brick1

127.0.0.1:/gv1  .0G   85M  .9G   % /gv1

()测试在gluster-node1上写入数据,看挂载在gluster-node2和gluster-node3是否有同样的数据

[root@gluster-node1 gv1]# touch .txt .txt .txt

[root@gluster-node1 gv1]# ll

total

-rw-r--r--.  root root  Aug   : .txt

-rw-r--r--.  root root  Aug   : .txt

-rw-r--r--.  root root  Aug   : .txt

[root@gluster-node2 ~]# ll /gv1/

total

-rw-r--r--  root root  Aug     .txt

-rw-r--r--  root root  Aug     .txt

-rw-r--r--  root root  Aug     .txt

[root@gluster-node3 ~]# ll /gv1/

total

-rw-r--r--  root root  Aug   : .txt

-rw-r--r--  root root  Aug   : .txt

-rw-r--r--  root root  Aug   : .txt
- (2)创建复制卷
复制卷的架构示意图:
复制模式,既AFR, 创建volume 时带 replica x 数量: 将文件复制到 replica x 个节点中。如:
gluster volume create test-volume replica 2 transport tcp server1:/exp1 server2:/exp2
()将gluster-node1和gluster-node2上的/dev/sdc格式化并挂载到/storage/brick2

[root@gluster-node1 ~]# mkfs.xfs -f /dev/sdc

meta-data=/dev/sdc               isize=    agcount=, agsize= blks

         =                       sectsz=   attr=, projid32bit=

         =                       crc=        finobt=, sparse=

data     =                       bsize=   blocks=, imaxpct=

         =                       sunit=      swidth= blks

naming   =version               bsize=   ascii-ci= ftype=

log      =internal log           bsize=   blocks=, version=

         =                       sectsz=   sunit= blks, lazy-count=

realtime =none                   extsz=   blocks=, rtextents=

[root@gluster-node1 ~]#

[root@gluster-node1 ~]# mkdir -p /storage/brick2

[root@gluster-node1 ~]# mount /dev/sdc /storage/brick2

[root@gluster-node1 ~]# df -h

Filesystem      Size  Used Avail Use% Mounted on

/dev/sda2        20G  .5G   19G   % /

devtmpfs        483M       483M   % /dev

tmpfs           493M       493M   % /dev/shm

tmpfs           493M  6.8M  486M   % /run

tmpfs           493M       493M   % /sys/fs/cgroup

/dev/sda1       197M   97M  100M  % /boot

tmpfs            99M        99M   % /run/user/

/dev/sdb       1014M   33M  982M   % /storage/brick1

127.0.0.1:/gv1  .0G   85M  .9G   % /gv1

/dev/sdc       1014M   33M  982M   % /storage/brick2

[root@gluster-node1 ~]# echo "/dev/sdc /storage/brick2 xfs defaults 0 0" >> /etc/fstab

()创建复制卷

[root@gluster-node1 ~]# gluster volume create gv2 replica  gluster-node1:/storage/brick2 gluster-node2:/storage/brick2 force

volume create: gv2: success: please start the volume to access data

[root@gluster-node1 ~]# gluster volume start gv2    #启动volume gv2

volume start: gv2: success

[root@gluster-node1 ~]# gluster volume info

Volume Name: gv1

Type: Distribute    #gv1为分布卷

Volume ID: 5773c33b--419a-a753-de89063f4e23

Status: Started

Snapshot Count:

Number of Bricks:

Transport-type: tcp

Bricks:

Brick1: gluster-node1:/storage/brick1

Brick2: gluster-node2:/storage/brick1

Options Reconfigured:

transport.address-family: inet

nfs.disable: off

Volume Name: gv2

Type: Replicate        #可以看到gv2为复制卷

Volume ID: aee56c69-2c33-455d-8da0-aa4591a25065

Status: Started

Snapshot Count:

Number of Bricks:  x  =

Transport-type: tcp

Bricks:

Brick1: gluster-node1:/storage/brick2

Brick2: gluster-node2:/storage/brick2

Options Reconfigured:

transport.address-family: inet

nfs.disable: on

performance.client-io-threads: off

()创建挂载目录/gv2并将gv2卷挂载

[root@gluster-node1 ~]# mkdir /gv2

[root@gluster-node1 ~]# mount -t glusterfs 127.0.0.1:/gv2 /gv2

[root@gluster-node1 ~]# df -h    #查看挂载信息,可以看到gv2的磁盘空间大小为1G,为2块磁盘空间的一般,这就是复制卷,可用空间只有一半

Filesystem      Size  Used Avail Use% Mounted on

/dev/sda2        20G  .5G   19G   % /

devtmpfs        483M       483M   % /dev

tmpfs           493M       493M   % /dev/shm

tmpfs           493M  6.9M  486M   % /run

tmpfs           493M       493M   % /sys/fs/cgroup

/dev/sda1       197M   97M  100M  % /boot

tmpfs            99M        99M   % /run/user/

/dev/sdb       1014M   33M  982M   % /storage/brick1

127.0.0.1:/gv1  .0G   85M  .9G   % /gv1

/dev/sdc       1014M   33M  982M   % /storage/brick2

127.0.0.1:/gv2 1014M   43M  972M   % /gv2

()在挂载目录/gv2下创建文件测试

[root@gluster-node1 ~]# cd /gv2/

[root@gluster-node1 gv2]# touch file1 file2 file3

[root@gluster-node1 gv2]# ls

file1  file2  file3

[root@gluster-node1 gv2]# ls /storage/brick2/

file1  file2  file3

[root@gluster-node2 ~]# ls /storage/brick2/

file1  file2  file3

可以看到创建的文件在gluster-node1和gluster-node2上磁盘挂载目录/storage/brick2目录中的文件是一样的,那么在gluster-node3上挂载后再创建测试

[root@gluster-node3 ~]# mkdir /gv2

[root@gluster-node3 ~]# mount -t glusterfs 127.0.0.1:/gv2 /gv2

[root@gluster-node3 ~]# df -h

Filesystem      Size  Used Avail Use% Mounted on

/dev/sda3        28G  .6G   27G   % /

devtmpfs        483M       483M   % /dev

tmpfs           493M       493M   % /dev/shm

tmpfs           493M  6.8M  486M   % /run

tmpfs           493M       493M   % /sys/fs/cgroup

/dev/sda1       197M   97M  100M  % /boot

tmpfs            99M        99M   % /run/user/

/dev/sdb       1014M   33M  982M   % /storage/brick1

127.0.0.1:/gv2 1014M   43M  972M   % /gv2

[root@gluster-node3 ~]# cd /gv2/

[root@gluster-node3 gv2]# touch file4

[root@gluster-node2 ~]# ls /storage/brick2/

file1  file2  file3  file4

[root@gluster-node1 gv2]# ls

file1  file2  file3  file4

[root@gluster-node1 gv2]# ls /storage/brick2/

file1  file2  file3  file4

也可以看到gluster-node1和gluster-node2磁盘挂载目录/storage/brick2的文件是一样的
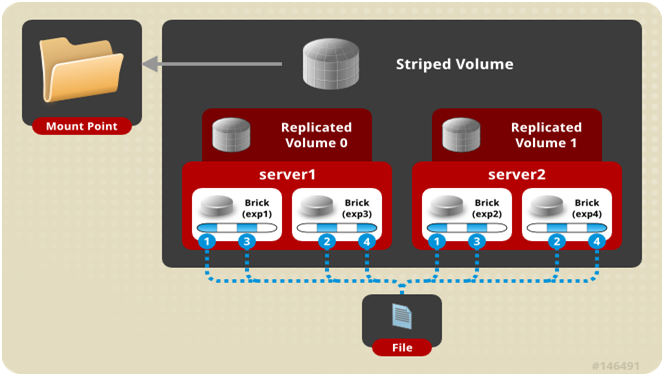
- (3)创建条带卷
条带卷架构示意图:
条带模式,既Striped, 创建volume 时带 stripe x 数量: 将文件切割成数据块,分别存储到 stripe x 个节点中 ( 类似raid 0 )。如:
gluster volume create test-volume stripe 2 transport tcp server1:/exp1 server2:/exp2
()格式化gluster-node1和gluster-node2上的磁盘/dev/sdd并挂载到/storage/brick3

[root@gluster-node1 ~]# mkfs.xfs -f /dev/sdd

meta-data=/dev/sdd               isize=    agcount=, agsize= blks

         =                       sectsz=   attr=, projid32bit=

         =                       crc=        finobt=, sparse=

data     =                       bsize=   blocks=, imaxpct=

         =                       sunit=      swidth= blks

naming   =version               bsize=   ascii-ci= ftype=

log      =internal log           bsize=   blocks=, version=

         =                       sectsz=   sunit= blks, lazy-count=

realtime =none                   extsz=   blocks=, rtextents=

[root@gluster-node1 ~]# mkdir -p /storage/brick3

[root@gluster-node1 ~]# mount /dev/sdd /storage/brick3

[root@gluster-node1 ~]# echo "/dev/sdd /storage/brick3 xfs defaults 0 0" >> /etc/fstab

()创建条带卷

[root@gluster-node1 ~]# gluster volume create gv3 stripe  gluster-node1:/storage/brick3 gluster-node2:/storage/brick3 force

volume create: gv3: success: please start the volume to access data

[root@gluster-node1 ~]# gluster volume info

Volume Name: gv1

Type: Distribute

Volume ID: 5773c33b--419a-a753-de89063f4e23

Status: Started

Snapshot Count:

Number of Bricks:

Transport-type: tcp

Bricks:

Brick1: gluster-node1:/storage/brick1

Brick2: gluster-node2:/storage/brick1

Options Reconfigured:

transport.address-family: inet

nfs.disable: off

Volume Name: gv2

Type: Replicate

Volume ID: aee56c69-2c33-455d-8da0-aa4591a25065

Status: Started

Snapshot Count:

Number of Bricks:  x  =

Transport-type: tcp

Bricks:

Brick1: gluster-node1:/storage/brick2

Brick2: gluster-node2:/storage/brick2

Options Reconfigured:

transport.address-family: inet

nfs.disable: on

performance.client-io-threads: off

Volume Name: gv3

Type: Stripe

Volume ID: 4d3c3a88-0c3f-4b6f-a2ef-25ab599cb015

Status: Created

Snapshot Count:

Number of Bricks:  x  =

Transport-type: tcp

Bricks:

Brick1: gluster-node1:/storage/brick3

Brick2: gluster-node2:/storage/brick3

Options Reconfigured:

transport.address-family: inet

nfs.disable: on

[root@gluster-node1 ~]# gluster volume start gv3

volume start: gv3: success

()创建挂载目录,并挂载

[root@gluster-node1 ~]# mkdir /gv3

[root@gluster-node1 ~]# mount -t glusterfs 127.0.0.1:/gv3 /gv3

[root@gluster-node1 ~]# df -h

Filesystem      Size  Used Avail Use% Mounted on

/dev/sda2        20G  .5G   19G   % /

devtmpfs        483M       483M   % /dev

tmpfs           493M       493M   % /dev/shm

tmpfs           493M  6.8M  486M   % /run

tmpfs           493M       493M   % /sys/fs/cgroup

/dev/sda1       197M   97M  100M  % /boot

tmpfs            99M        99M   % /run/user/

/dev/sdb       1014M   33M  982M   % /storage/brick1

127.0.0.1:/gv1  .0G   85M  .9G   % /gv1

/dev/sdc       1014M   33M  982M   % /storage/brick2

127.0.0.1:/gv2 1014M   43M  972M   % /gv2

/dev/sdd       1014M   33M  982M   % /storage/brick3

127.0.0.1:/gv3  .0G   85M  .9G   % /gv3

()创建文件测试

[root@gluster-node1 ~]# cd /gv3/

[root@gluster-node1 gv3]# dd if=/dev/zero bs= count= of=/gv3/10M.file

+ records in

+ records out

 bytes ( MB) copied, 2.46812 s, 4.1 MB/s

[root@gluster-node1 gv3]# ll

total

-rw-r--r--.  root root  Aug   : 10M.file

[root@gluster-node1 gv3]# ll -h

total 9.8M

-rw-r--r--.  root root 9.8M Aug   : 10M.file

[root@gluster-node1 gv3]# ll /storage/brick3/    #在gluster-node1实际存储目录中文件大小只有4.9M

total

-rw-r--r--.  root root  Aug   : 10M.file

[root@gluster-node1 gv3]# ll -h /storage/brick3/    #在gluster-node1实际存储目录中文件大小只有4.9M

total 4.9M

-rw-r--r--.  root root 4.9M Aug   : 10M.file
- (4)创建分布式+条带卷
分布式条带卷架构示意图:
分布式条带模式(组合型),最少需要4台服务器或者4块磁盘才能创建。 创建volume 时 stripe 2 server = 4 个节点: 是DHT 与 Striped 的组合型。如:
gluster volume create test-volume stripe 2 transport tcp server1:/exp1 server2:/exp2 server3:/exp3 server4:/exp4
()停止前面的所有卷

[root@gluster-node1 ~]# gluster volume stop gv1

Stopping volume will make its data inaccessible. Do you want to continue? (y/n) y

volume stop: gv1: success

[root@gluster-node1 ~]# gluster volume stop gv2

Stopping volume will make its data inaccessible. Do you want to continue? (y/n) y

volume stop: gv2: success

[root@gluster-node1 ~]# gluster volume stop gv3

Stopping volume will make its data inaccessible. Do you want to continue? (y/n) y

volume stop: gv3: success

()删除前面的所有卷

[root@gluster-node1 ~]# gluster volume delete gv1

Deleting volume will erase all information about the volume. Do you want to continue? (y/n) y

volume delete: gv1: success

[root@gluster-node1 ~]# gluster volume delete gv2

Deleting volume will erase all information about the volume. Do you want to continue? (y/n) y

volume delete: gv2: success

[root@gluster-node1 ~]# gluster volume delete gv3

Deleting volume will erase all information about the volume. Do you want to continue? (y/n) y

volume delete: gv3: success

()创建分布式条带卷

[root@gluster-node1 ~]# gluster volume create gv1 stripe  gluster-node1:/storage/brick1 gluster-node1:/storage/brick2 gluster-node2:/storage/brick1 gluster-node2:/storage/brick2 force

volume create: gv1: success: please start the volume to access data

[root@gluster-node1 ~]# gluster volume info

Volume Name: gv1

Type: Distributed-Stripe   #类型为分布式条带卷

Volume ID: 4e6a8ddd--4eb7-bd28-9365164755e3

Status: Created

Snapshot Count:

Number of Bricks:  x  =

Transport-type: tcp

Bricks:

Brick1: gluster-node1:/storage/brick1

Brick2: gluster-node1:/storage/brick2

Brick3: gluster-node2:/storage/brick1

Brick4: gluster-node2:/storage/brick2

Options Reconfigured:

transport.address-family: inet

nfs.disable: on

()启动gv1卷,并挂载到/gv1

[root@gluster-node1 ~]# gluster volume start gv1

volume start: gv1: success

[root@gluster-node1 ~]# mount -t glusterfs 127.0.0.1:/gv1 /gv1

[root@gluster-node1 ~]# df -h

Filesystem      Size  Used Avail Use% Mounted on

/dev/sda2        20G  .5G   19G   % /

devtmpfs        483M       483M   % /dev

tmpfs           493M       493M   % /dev/shm

tmpfs           493M  6.8M  486M   % /run

tmpfs           493M       493M   % /sys/fs/cgroup

/dev/sda1       197M   97M  100M  % /boot

tmpfs            99M        99M   % /run/user/

/dev/sdb       1014M   33M  982M   % /storage/brick1

/dev/sdc       1014M   33M  982M   % /storage/brick2

/dev/sdd       1014M   38M  977M   % /storage/brick3

127.0.0.1:/gv1  .0G  170M  .8G   % /gv1

()测试创建文件,并查看实际存储信息

[root@gluster-node1 ~]# cd /gv1/

[root@gluster-node1 gv1]# dd if=/dev/zero bs= count= of=/gv1/10M.file

+ records in

+ records out

 bytes ( MB) copied, 1.94059 s, 5.3 MB/s

[root@gluster-node1 gv1]# ll -h

total 9.8M

-rw-r--r--.  root root 9.8M Aug   : 10M.file

[root@gluster-node1 gv1]# ll -h /storage/brick1/

total 4.9M

-rw-r--r--.  root root 4.9M Aug   : 10M.file

[root@gluster-node1 gv1]# ll -h /storage/brick2/

total 4.9M

-rw-r--r--.  root root 4.9M Aug   : 10M.file
- (5)创建分布式+复制卷
分布式复制卷架构示意图:
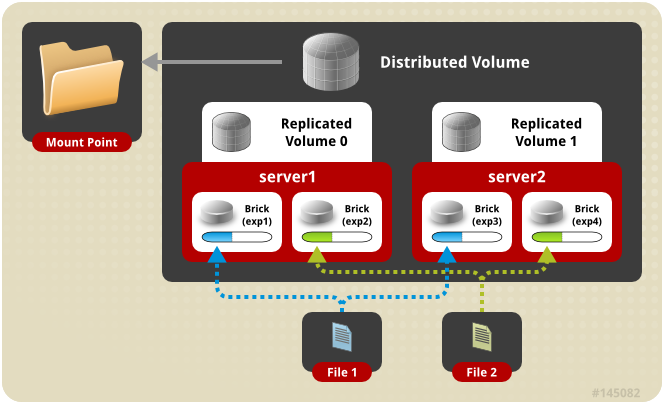
分布式复制模式(组合型), 最少需要4台服务器或者2台服务器4块磁盘才能创建。 创建volume 时 replica 2 server = 4 个节点:是DHT 与 AFR 的组合型。
gluster volume create test-volume replica 2 transport tcp server1:/exp1 server2:/exp2 server3:/exp3 server4:/exp4
()卸载前面的分布式条带卷并删除

[root@gluster-node1 ~]# umount /gv1/

[root@gluster-node1 ~]# gluster volume stop gv1

Stopping volume will make its data inaccessible. Do you want to continue? (y/n) y

volume stop: gv1: success

[root@gluster-node1 ~]# gluster volume delete gv1

Deleting volume will erase all information about the volume. Do you want to continue? (y/n) y

volume delete: gv1: success

()创建分布式复制卷

[root@gluster-node1 ~]# gluster volume create gv1 replica  gluster-node1:/storage/brick1/ gluster-node1:/storage/brick2 gluster-node2:/storage/brick1/ gluster-node2:/storage/brick2 force

volume create: gv1: success: please start the volume to access data

[root@gluster-node1 ~]# gluster volume info

Volume Name: gv1

Type: Distributed-Replicate

Volume ID: 86f110cb--493e-b49a-d7458b3def79

Status: Created

Snapshot Count:

Number of Bricks:  x  =

Transport-type: tcp

Bricks:

Brick1: gluster-node1:/storage/brick1

Brick2: gluster-node1:/storage/brick2

Brick3: gluster-node2:/storage/brick1

Brick4: gluster-node2:/storage/brick2

Options Reconfigured:

transport.address-family: inet

nfs.disable: on

performance.client-io-threads: off

[root@gluster-node1 ~]# gluster volume start gv1

volume start: gv1: success

()挂载分布式复制卷/gv1

[root@gluster-node3 ~]# mount  -t glusterfs 127.0.0.1:/gv1 /gv1

[root@gluster-node3 ~]# df -h

Filesystem      Size  Used Avail Use% Mounted on

/dev/sda3        28G  .7G   27G   % /

devtmpfs        483M       483M   % /dev

tmpfs           493M       493M   % /dev/shm

tmpfs           493M  6.8M  486M   % /run

tmpfs           493M       493M   % /sys/fs/cgroup

/dev/sda1       197M   97M  100M  % /boot

tmpfs            99M        99M   % /run/user/

/dev/sdb       1014M   33M  982M   % /storage/brick1

127.0.0.1:/gv1  .0G  120M  .9G   % /gv1

()创建文件测试

[root@gluster-node3 gv1]# touch file1 file2 file3

[root@gluster-node3 gv1]# ls

file1  file2  file3

[root@gluster-node1 ~]# ll /storage/brick1/

total

-rw-r--r--.  root root  Aug     file3

[root@gluster-node1 ~]# ll /storage/brick2/

total

-rw-r--r--.  root root  Aug     file3

[root@gluster-node2 ~]# ll /storage/brick1/

total

-rw-r--r--  root root  Aug     file1

-rw-r--r--  root root  Aug     file2

[root@gluster-node2 ~]# ll /storage/brick2/

total

-rw-r--r--  root root  Aug     file1

-rw-r--r--  root root  Aug     file2

在gluster-node3上挂载并创建文件,查看在gluster-node1和gluster-node2的实际存储位置/storage/brick1、/storage/brick2可以看到在gluster-node1上存储了file1文件并且在其存储位置brick1和brick2都有该文件,实现了复制功能。同理在gluster-node2上也可以看到file2、file3的存储情况。
- (6)创建条带+复制卷
条带+复制卷架构示意图:
条带复制卷模式(组合型), 最少需要4台服务器才能创建。 创建volume 时 stripe 2 replica 2 server = 4 个节点: 是 Striped 与 AFR 的组合型。
gluster volume create test-volume stripe 2 replica 2 transport tcp server1:/exp1 server2:/exp2 server3:/exp3 server4:/exp4
①卸载前面的分布式复制卷并删除
[root@gluster-node3 ~]# umount /gv1

[root@gluster-node1 ~]# gluster volume stop gv1

Stopping volume will make its data inaccessible. Do you want to continue? (y/n) y

volume stop: gv1: success

[root@gluster-node1 ~]# gluster volume delete gv1

Deleting volume will erase all information about the volume. Do you want to continue? (y/n) y

volume delete: gv1: success
②创建条带复制卷并启动
root@gluster-node1 ~]# gluster volume create gv1 stripe  replica  gluster-node1:/storage/brick1/ gluster-node1:/storage/brick2 gluster-node2:/storage/brick1/ gluster-node2:/storage/brick2 force

volume create: gv1: success: please start the volume to access data

[root@gluster-node1 ~]# gluster volume info

Volume Name: gv1

Type: Striped-Replicate

Volume ID: b65aa061-044d-4a54-ac16-725077c2a0b8

Status: Created

Snapshot Count:

Number of Bricks:  x  x  =

Transport-type: tcp

Bricks:

Brick1: gluster-node1:/storage/brick1

Brick2: gluster-node1:/storage/brick2

Brick3: gluster-node2:/storage/brick1

Brick4: gluster-node2:/storage/brick2

Options Reconfigured:

transport.address-family: inet

nfs.disable: on

performance.client-io-threads: off

[root@gluster-node1 ~]# gluster volume start gv1

volume start: gv1: success
③挂载条带复制卷
[root@gluster-node3 ~]# mount  -t glusterfs 127.0.0.1:/gv1 /gv1

[root@gluster-node3 ~]# df -h

Filesystem      Size  Used Avail Use% Mounted on

/dev/sda3        28G  .7G   27G   % /

devtmpfs        483M       483M   % /dev

tmpfs           493M       493M   % /dev/shm

tmpfs           493M  6.8M  486M   % /run

tmpfs           493M       493M   % /sys/fs/cgroup

/dev/sda1       197M   97M  100M  % /boot

tmpfs            99M        99M   % /run/user/

/dev/sdb       1014M   33M  982M   % /storage/brick1

127.0.0.1:/gv1  .0G   85M  .9G   % /gv1
④touch创建文件测试
[root@gluster-node3 ~]# cd /gv1/

[root@gluster-node3 gv1]# touch file1 file2 file3

[root@gluster-node3 gv1]# ll

total

-rw-r--r--  root root  Aug   : file1

-rw-r--r--  root root  Aug   : file2

-rw-r--r--  root root  Aug   : file3

[root@gluster-node1 ~]# ll /storage/brick1/

total

-rw-r--r--.  root root  Aug     file1

-rw-r--r--.  root root  Aug     file2

-rw-r--r--.  root root  Aug     file3

[root@gluster-node1 ~]# ll /storage/brick2/

total

-rw-r--r--.  root root  Aug     file1

-rw-r--r--.  root root  Aug     file2

-rw-r--r--.  root root  Aug     file3

[root@gluster-node2 ~]# ll /storage/brick1/

total

-rw-r--r--  root root  Aug     file1

-rw-r--r--  root root  Aug     file2

-rw-r--r--  root root  Aug     file3

[root@gluster-node2 ~]# ll /storage/brick2/

total

-rw-r--r--  root root  Aug     file1

-rw-r--r--  root root  Aug     file2

-rw-r--r--  root root  Aug     file3
从touch创建文件可以看到创建的文件,分别在gluster-node1和gluster-node2上的实际存储位置/storage/brick1、/storage/brick2上都存在这些文件,实现了复制功能
⑤dd创建文件测试
[root@gluster-node3 gv1]# dd if=/dev/zero bs= count= of=/gv1/20M.file

+ records in

+ records out

 bytes ( MB) copied, 1.08174 s, 18.9 MB/s

[root@gluster-node1 ~]# ll /storage/brick1/ -h

total 9.8M

-rw-r--r--.  root root 9.8M Aug   : 20M.file

-rw-r--r--.  root root     Aug     file1

-rw-r--r--.  root root     Aug     file2

-rw-r--r--.  root root     Aug     file3

[root@gluster-node1 ~]# ll /storage/brick2/ -h

total 9.8M

-rw-r--r--.  root root 9.8M Aug   : 20M.file

-rw-r--r--.  root root     Aug     file1

-rw-r--r--.  root root     Aug     file2

-rw-r--r--.  root root     Aug     file3

[root@gluster-node2 ~]# ll /storage/brick1/ -h

total 9.8M

-rw-r--r--  root root 9.8M Aug   : 20M.file

-rw-r--r--  root root     Aug     file1

-rw-r--r--  root root     Aug     file2

-rw-r--r--  root root     Aug     file3

[root@gluster-node2 ~]# ll /storage/brick2/ -h

total 9.8M

-rw-r--r--  root root 9.8M Aug   : 20M.file

-rw-r--r--  root root     Aug     file1

-rw-r--r--  root root     Aug     file2

-rw-r--r--  root root     Aug     file3
从dd创建的20M文件,在gluster-node1上可以看到20M的文件被切割成10M一份进行存储,并且在gluster-node2上也有这样的一份数据,实现了条带功能,也实现了复制功能。
- (7)创建分布式+条带+复制卷
分布式+条带+复制卷架构示意图:
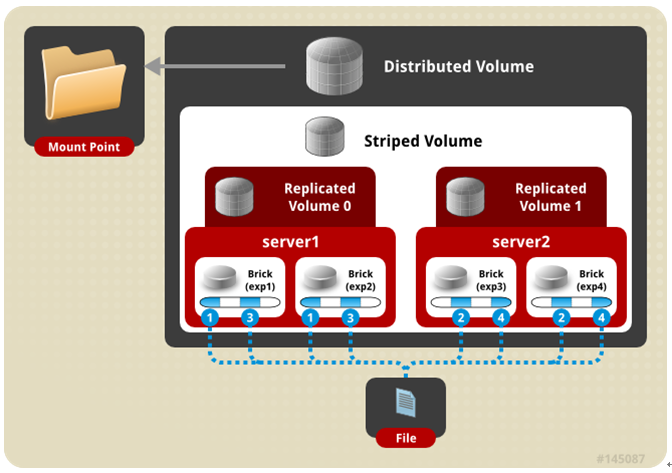
三种模式混合, 至少需要8台 服务器或者2台服务器8块磁盘才能创建。 stripe 2 replica 2 , 每4个节点 组成一个 组。
gluster volume create test-volume stripe 2 replica 2 transport tcp server1:/exp1 server2:/exp2 server3:/exp3 server4:/exp4 server5:/exp5 server6:/exp6 server7:/exp7 server8:/exp8
①卸载前面的条带复制卷并删除
[root@gluster-node1 ~]# umount /gv1

[root@gluster-node1 ~]# gluster volume stop gv1

Stopping volume will make its data inaccessible. Do you want to continue? (y/n) y

volume stop: gv1: success

[root@gluster-node1 ~]# gluster volume delete gv1

Deleting volume will erase all information about the volume. Do you want to continue? (y/n) y

volume delete: gv1: success
②创建分布式条带复制卷
[root@gluster-node1 ~]# gluster volume create gv1 stripe  replica  gluster-node1:/storage/brick1 gluster-node1:/storage/brick2 gluster-node1:/storage/brick3 gluster-node2:/storage/brick1 gluster-node2:/storage/brick2 gluster-node2:/storage/brick3 gluster-node3:/storage/brick1 gluster-node3:/storage/brick2 force

volume create: gv1: success: please start the volume to access data

[root@gluster-node1 ~]# gluster volume info

Volume Name: gv1

Type: Distributed-Striped-Replicate

Volume ID: fc16d0f2-52ec--a21e-4226afc79ddf

Status: Created

Snapshot Count:

Number of Bricks:  x  x  =

Transport-type: tcp

Bricks:

Brick1: gluster-node1:/storage/brick1

Brick2: gluster-node1:/storage/brick2

Brick3: gluster-node1:/storage/brick3

Brick4: gluster-node2:/storage/brick1

Brick5: gluster-node2:/storage/brick2

Brick6: gluster-node2:/storage/brick3

Brick7: gluster-node3:/storage/brick1

Brick8: gluster-node3:/storage/brick2

Options Reconfigured:

transport.address-family: inet

nfs.disable: on

performance.client-io-threads: off
③启动条带复制卷并挂载
[root@gluster-node1 ~]# gluster volume start gv1

volume start: gv1: success

[root@gluster-node1 ~]# mount -t glusterfs 127.0.0.1:/gv1 /gv1

[root@gluster-node1 ~]# df -h

Filesystem      Size  Used Avail Use% Mounted on

/dev/sda2        20G  .5G   19G   % /

devtmpfs        483M       483M   % /dev

tmpfs           493M       493M   % /dev/shm

tmpfs           493M  6.8M  486M   % /run

tmpfs           493M       493M   % /sys/fs/cgroup

/dev/sda1       197M   97M  100M  % /boot

tmpfs            99M        99M   % /run/user/

/dev/sdd       1014M   38M  977M   % /storage/brick3

/dev/sdb       1014M   33M  982M   % /storage/brick1

/dev/sdc       1014M   43M  972M   % /storage/brick2

127.0.0.1:/gv1  .0G  200M  .8G   % /gv1

观察存储容量,一共有4个G,原来的8块磁盘一共是8G大小。使用了分布式条带复制卷,存储空间会减半
④dd创建文件查看
[root@gluster-node1 ~]# cd /gv1/

[root@gluster-node1 gv1]# dd if=/dev/zero bs= count= of=/gv1/100M.file

+ records in

+ records out

 bytes ( MB) copied, 29.2668 s, 3.5 MB/s

[root@gluster-node1 gv1]# ll -h

total 98M

-rw-r--r--.  root root 98M Aug   : 100M.file

[root@gluster-node1 gv1]# ll -h /storage/brick1/

total 64M

-rw-r--r--.  root root 49M Aug   : 100M.file

[root@gluster-node1 gv1]# ll -h /storage/brick2/

total 64M

-rw-r--r--.  root root 49M Aug   : 100M.file

[root@gluster-node1 gv1]# ll -h /storage/brick3/

total 64M

-rw-r--r--.  root root 49M Aug   : 100M.file

[root@gluster-node2 ~]# ll /storage/brick1/ -h

total 49M

-rw-r--r--  root root 49M Aug   : 100M.file
从创建的文件上看,创建了100M的文件,会进行分割49M文件作为一份数据进行存储,并通过hash算法随即存储到8块磁盘中的其中2块磁盘,并在另外2块磁盘中作了复制,以保证数据的备份。
本次的部署实验,使用了3台主机,8块磁盘,并不是生产使用方案,而是机子抗不住。在实际生产中,可以独立使用多台服务器进行磁盘整合,实现分布式文件系统。
GlusterFS学习之路(二)GlusterFS部署及卷类型使用的更多相关文章
- 【SpringCloud之pigx框架学习之路 】2.部署环境
[SpringCloud之pigx框架学习之路 ]1.基础环境安装 [SpringCloud之pigx框架学习之路 ]2.部署环境 1.下载代码 git clone https://git.pig4c ...
- GlusterFS学习之路(三)客户端挂载和管理GlusterFS卷
一.客户端挂载 可以使用Gluster Native Client方法在GNU / Linux客户端中实现高并发性,性能和透明故障转移.可以使用NFS v3访问gluster卷.已经对GNU / Li ...
- Redis——学习之路二(初识redis服务器命令)
上一章我们已经知道了如果启动redis服务器,现在我们来学习一下,以及如何用客户端连接服务器.接下来我们来学习一下查看操作服务器的命令. 服务器命令: 1.info——当前redis服务器信息 s ...
- GlusterFS学习之路(一)GlusterFS初识
一.GlusterFS简介 GlusterFS是Scale-Out存储解决方案Gluster的核心,它是一个开源的分布式文件系统,具有强大的横向扩展能力,通过扩展能够支持数PB存储容量和处理数千客户端 ...
- zigbee学习之路(二)点亮LED
一.前言 今天,我来教大家如何点亮led,这也是学习开发板最基础的步骤了. 二.原理分析 cc2530芯片跟虽然是51的内核,但是它跟51单片机还是有区别的,51单片机不需要对IO口进行配置,而cc2 ...
- kubernetes学习笔记(二)——部署服务
文章目录 (1)创建app (2)创建app的docker镜像 (3)部署app到k8s (4)参考资料 前面一篇文章部署好了minikube环境,这次学习下怎么部署app到kubernetes环境当 ...
- Android开发学习之路-二维码学习
这个月装逼有点少了,为什么呢,因为去考软件射鸡师了,快到儿童节了,赶紧写篇博纪念一下逝去的青春,唔,请忽略这句话. 二维码其实有很多种,但是我们常见的微信使用的是一种叫做QRCode的二维码,像下面这 ...
- Python学习之路二
今天主要学习了列表,python的列表真的事太强大了,由于内容比较多,今天就先简单的介绍一下新学的几个成员函数吧. 首先我们要了解list是一种序列类型,其构造方式有四种形式: (1)空列表 [] ( ...
- Spring学习之路二——概念上理解Spring
一.概念. Spring是一个开源框架,Spring是于2003 年兴起的一个轻量级的Java 开发框架,由Rod Johnson 在其著作Expert One-On-One J2EE Develop ...
随机推荐
- Nginx学习.md
正常运行的必备配置 user Syntax: user user [group]; Default: user nobody nobody; Context: main 指定运行worker进程的用户 ...
- HTTP协议实体的基本讲解
http://blog.csdn.net/diyagoanyhacker/article/details/6685305 HTTP协议运作方式 HTTP协议是基于请求/响应范式的.一个客户机与服务器建 ...
- socket的双重属性
1)api属性: 2)通信链路的端点属性.
- sprintf格式化字符串安全问题
先看sprintf用法: 定义和用法 sprintf() 函数把格式化的字符串写入变量中. arg1.arg2.++ 参数将被插入到主字符串中的百分号(%)符号处.该函数是逐步执行的.在第一个 % 符 ...
- CSS块级元素与行内元素
CSS块级元素与行内元素 行内元素与块状元素 1.块级元素:可以设置 width, height属性. 行内元素:设置width和height无效,其宽度随其元素的内容(文字或者图片等)的宽度而变化 ...
- 理解Web应用程序的代码结构和运行原理(3)
1.理解Web应用程序的运行原理和机制 Web应用程序是基于浏览器/服务器模式(也称B/S架构)的应用程序,它开发完成后,需要部署到Web服务器上才能正常运行,与用户交互的客户端是网页浏览器. 浏览器 ...
- 03_Docker入门(上)之容器创建、容器使用、容器删除
运维架构服务docker:docker入门 一.确保docker就绪 查看docker程序是否存在,功能是否正常 Docker可执行程序的info命令,该命令会返回所有容器和镜像的数量.Docker使 ...
- 洛谷P1501 [国家集训队]Tree II(LCT)
题目描述 一棵n个点的树,每个点的初始权值为1.对于这棵树有q个操作,每个操作为以下四种操作之一: + u v c:将u到v的路径上的点的权值都加上自然数c: - u1 v1 u2 v2:将树中原有的 ...
- docker tar 镜像 容器相互转换
学习 使用 docker 也有一段时间了 但是在基础去上面有些东西总是容易忘记 整理之前看到的文档,看到一个问题 怎么将一个容器导出成为tar,我本以为是首先 保存成为镜像 再 save 进行保存 查 ...
- linux 学习第十五天(vsftpd配置)
一.vstapd配置 vsftpd 服务(a.匿名公开 b.系统本地账户验证c.虚拟专用用户验证) iptables -F (清空防火墙) service iptables save (保存防火墙 ...