Android UI编程(1)——九宫格(GridView)
(转自:http://blog.csdn.net/Thanksgining/article/details/42968847)
参考博客:http://blog.csdn.net/xyz_lmn/article/details/6906255
总结:
1、GridView(网格视图)按照行列来显示内容,每个网格可以用已有的布局或自定义的布局来填充,并且GridView每行可以显示多个网格,即有列数之说。
2、GridView需要结合适配器(Adapter)一起使用,使用GridView类的实例对象中的setAdapter方法初始化网格视图,即gridView.setAdapter(myAdapter)。
3、将GridView中的每一个网格需要是数据打包成一个集合,将此集合作为参数来初始化适配器(Adapter)实例对象,在适配器(Adapter)的getView方法中来获取集合中的数据,将此数据来初始化对应网格中的控件。
4、适配器(Adapter)中的getView方法在设置适配器和更新适配器数据时被调用,即gridView.setAdapter(myAdapter)和myAdapter.notifyDataSetChanged()时被调用
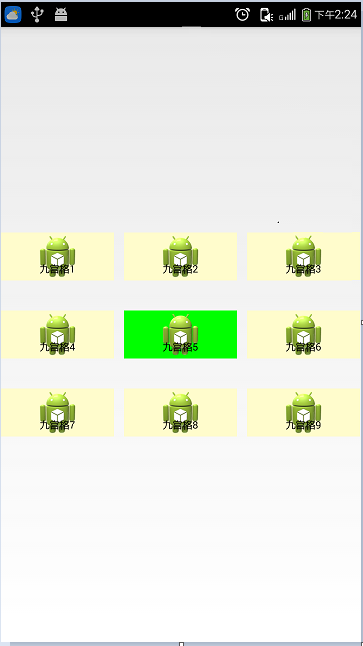
5、要实现网格之间隔离开来的,首先需要设置用于填充网格的布局背景与网格所在的布局的背景颜色不一致,即mylayout.xml布局的背景与activity_main.xml布局的背景色不一致,而且还需要设置设置网格与网格之间的间距,这样看起来网格才是分离的。
5、若要实现被选中(点击)的网格呈现不同的颜色,就需要知道被点击的网格的Item号,并调用myAdapter.notifyDataSetChanged()去更新适配器数据,最后在适配器中的getView方法中来判断网格的Item号,如果相等就设置自己所需呈现的背景色(指的是视图的背景色)。
6、Android实现全屏显示方法,我们都知道在Android中某些功能的实现往往有两种方法:一种是在xml文件中设置相应的属性,另一种是用代码实现。同样Android实现全屏也可以通过以下两种方法实现
(1)、在AndroidManifest.xml的配置文件里的<activity>标签添加属性
android:theme="@android:style/Theme.NoTitleBar.Fullscreen"
(2)、在Activity的onCreate()方法中的super()和setContentView()两个方法之间加入下面两条语句
 this.requestWindowFeature(Window.FEATURE_NO_TITLE);//去掉标题栏

 this.getWindow().setFlags(WindowManager.LayoutParams.FLAG_FULLSCREEN, WindowManager.LayoutParams.FLAG_FULLSCREEN);//去掉信息栏
7、GridView的一些特殊属性
android:numColumns=”auto_fit” //GridView的列数设置为自动
android:columnWidth=”90dp " //每列的宽度,也就是Item的宽度
android:stretchMode=”columnWidth"//缩放与列宽大小同步
android:verticalSpacing=”10dp” //两行之间的边距
android:horizontalSpacing=”10dp” //两列之间的边距
android:cacheColorHint="#00000000" //去除拖动时默认的黑色背景
android:listSelector="#00000000" //去除选中时的黄色底色
android:scrollbars="none" //隐藏GridView的滚动条
android:fadeScrollbars="true" //设置为true就可以实现滚动条的自动隐藏和显示
android:fastScrollEnabled="true" //GridView出现快速滚动的按钮(至少滚动4页才会显示)
android:fadingEdge="none" //GridView衰落(褪去)边缘颜色为空,缺省值是vertical。(可以理解为上下边缘的提示色)
android:fadingEdgeLength="10dip" //定义的衰落(褪去)边缘的长度
android:stackFromBottom="true" //设置为true时,你做好的列表就会显示你列表的最下面
android:transcriptMode="alwaysScroll" //当你动态添加数据时,列表将自动往下滚动最新的条目可以自动滚动到可视范围内
android:drawSelectorOnTop="false" //点击某条记录不放,颜色会在记录的后面成为背景色,内容的文字可见(缺省为false)
AndroidManifest.xml——没有做任何修改,创建工程默认的
 <?xml version="1.0" encoding="utf-8"?>

 <manifest xmlns:android="http://schemas.android.com/apk/res/android"

     package="com.wxl.ninebox"

     android:versionCode="1"

     android:versionName="1.0" >

     <uses-sdk

         android:minSdkVersion="8"

         android:targetSdkVersion="19" />

     <application

         android:allowBackup="true"

         android:icon="@drawable/ic_launcher"

         android:label="@string/app_name"

         android:theme="@style/AppTheme" >

         <activity

             android:name="com.wxl.ninebox.MainActivity"

             android:label="@string/app_name" >

             <intent-filter>

                 <action android:name="android.intent.action.MAIN" />

                 <category android:name="android.intent.category.LAUNCHER" />

             </intent-filter>

         </activity>

     </application>

 </manifest>
mylayout.xml
 <?xml version="1.0" encoding="utf-8"?>

 <FrameLayout xmlns:android="http://schemas.android.com/apk/res/android"

     android:layout_width="match_parent"

     android:layout_height="match_parent"

     android:background="#fffccc"

     android:id="@+id/mylayout" >

     <ImageView

         android:id="@+id/imageView"

         android:layout_width="wrap_content"

         android:layout_height="wrap_content"

         android:scaleType="centerCrop"

         android:layout_gravity="center_horizontal"

         android:background="@drawable/ic_launcher"/>

     <TextView

         android:id="@+id/textView"

         android:layout_width="wrap_content"

         android:layout_height="wrap_content"

         android:layout_gravity="bottom|center_horizontal"

         android:layout_marginBottom="5dp"

         android:textColor="#000000"

         android:textSize="12sp"/>

 </FrameLayout>
activity_main.xml
 <LinearLayout xmlns:android="http://schemas.android.com/apk/res/android"

     xmlns:tools="http://schemas.android.com/tools"

     android:layout_width="match_parent"

     android:layout_height="match_parent"

     android:gravity="center"

     tools:context=".MainActivity" >

     <GridView

         android:id="@+id/gridView"

         android:layout_width="wrap_content"

         android:layout_height="wrap_content"

         android:numColumns="3"

         android:verticalSpacing="30dip"

         android:horizontalSpacing="10dip"

         android:layout_gravity="center"

         >

     </GridView>

 </LinearLayout>
MainActivity.java
 package com.wxl.ninebox;

 import java.util.ArrayList;

 import java.util.HashMap;

 import android.os.Bundle;

 import android.view.LayoutInflater;

 import android.view.View;

 import android.view.ViewGroup;

 import android.view.Window;

 import android.widget.AdapterView;

 import android.widget.AdapterView.OnItemClickListener;

 import android.widget.BaseAdapter;

 import android.widget.GridView;

 import android.widget.ImageView;

 import android.widget.TextView;

 import android.app.Activity;

 import android.content.Context;

 import android.graphics.Color;

 public class MainActivity extends Activity {

     GridView gridView;

     View view;

     MyAdapter myAdapter;

     ArrayList<HashMap<String, Object>> arrayList;

     @Override

     protected void onCreate(Bundle savedInstanceState) {

         super.onCreate(savedInstanceState);

         this.requestWindowFeature(Window.FEATURE_NO_TITLE);

         setContentView(R.layout.activity_main);

         gridView = (GridView)this.findViewById(R.id.gridView);

         arrayList = new ArrayList<HashMap<String,Object>>();

         for (int i = 1; i < 10; i++)

         {

             HashMap<String, Object> hashMap = new HashMap<String, Object>();

             hashMap.put("image", R.drawable.ic_launcher);

             hashMap.put("text", "九宫格"+i);

             arrayList.add(hashMap);

         }

         myAdapter = new MyAdapter(arrayList, this);

         gridView.setAdapter(myAdapter);

         gridView.setOnItemClickListener(new OnItemClickListener() {

             @Override

             public void onItemClick(AdapterView<?> arg0, View arg1, int arg2,

                     long arg3) {

                 // TODO Auto-generated method stub

                 myAdapter.setSelection(arg2);

                 myAdapter.notifyDataSetChanged();

             }

         });

     }

     public class MyAdapter extends BaseAdapter

     {

         ArrayList<HashMap<String, Object>> arrayList;

         Context context;

         HashMap<String, Object> hashMap;

         int selectItem = -1;

         public MyAdapter(ArrayList<HashMap<String, Object>> arrayList,Context context) {

             // TODO Auto-generated constructor stub

             this.arrayList = arrayList;

             this.context = context;

         }

         public void setSelection(int position)

         {

             selectItem = position;

         }

         @Override

         public int getCount() {

             // TODO Auto-generated method stub

             if (null == arrayList)

             {

                 return 0;

             }

             else

             {

                 return arrayList.size();

             }

         }

         @Override

         public Object getItem(int arg0) {

             // TODO Auto-generated method stub

             return arrayList.get(arg0);

         }

         @Override

         public long getItemId(int arg0) {

             // TODO Auto-generated method stub

             return arg0;

         }

         @SuppressWarnings("unchecked")

         @Override

         public View getView(int arg0, View arg1, ViewGroup arg2) {

             // TODO Auto-generated method stub

             view = LayoutInflater.from(context).inflate(R.layout.mylayout, arg2,false);

             ImageView imageView = (ImageView)view.findViewById(R.id.imageView);

             TextView textView = (TextView)view.findViewById(R.id.textView);

             hashMap = (HashMap<String, Object>) getItem(arg0);

             imageView.setImageResource((Integer) hashMap.get("image"));

             textView.setText((CharSequence) hashMap.get("text"));

             if (selectItem == arg0) {

                 view.setBackgroundColor(Color.GREEN);

             }

             return view;

         }//设置适配器或更新适配器调用

     }

 }
Android UI编程(1)——九宫格(GridView)的更多相关文章
- Android UI编程之自定义控件初步——ImageButton
我想我们在使用一些App的时候,应该不会出现一些“裸控件”的吧.除非是一些系统中的软件,那是为了保持风格的一致性,做出的一些权衡.我这里并非是在指责Android原生的控件不好看,说实在的,我很喜欢A ...
- Android全新UI编程 - Jetpack Compose 超详细教程
1. 简介 Jetpack Compose是在2019Google i/O大会上发布的新的库.Compose库是用响应式编程的方式对View进行构建,可以用更少更直观的代码,更强大的功能,能提高开发速 ...
- GitHub上受欢迎的Android UI Library
GitHub上受欢迎的Android UI Library 内容 抽屉菜单 ListView WebView SwitchButton 按钮 点赞按钮 进度条 TabLayout 图标 下拉刷新 Vi ...
- Android UI相关开源项目库汇总
最近做了一个Android UI相关开源项目库汇总,里面集合了OpenDigg 上的优质的Android开源项目库,方便移动开发人员便捷的找到自己需要的项目工具等,感兴趣的可以到GitHub上给个st ...
- 各种Android UI开源框架 开源库
各种Android UI开源框架 开源库 转 https://blog.csdn.net/zhangdi_gdk2016/article/details/84643668 自己总结的Android开源 ...
- (转载)Android UI设计之AlertDialog弹窗控件
Android UI设计之AlertDialog弹窗控件 作者:qq_27630169 字体:[增加 减小] 类型:转载 时间:2016-08-18我要评论 这篇文章主要为大家详细介绍了Android ...
- Qt on Android 核心编程
Qt on Android 核心编程(最好看的Qt编程书!CSDN博主foruok倾力奉献!) 安晓辉 著 ISBN 978-7-121-24457-5 2015年1月出版 定价:65.00元 4 ...
- android: 多线程编程基础
9.1 服务是什么 服务(Service)是 Android 中实现程序后台运行的解决方案,它非常适合用于去执行那 些不需要和用户交互而且还要求长期运行的任务.服务的运行不依赖于任何用户界面,即使 ...
- Android 网络编程 Socket
1.服务端开发 创建一个Java程序 public class MyServer { // 定义保存所有的Socket,与客户端建立连接得到一个Socket public static List< ...
随机推荐
- MOSOS基础(转自树人云)
发现 话题 · · · 登录 注册 MesosDocker 回顾Java 发展,看 Docker 与Mesos 演讲嘉宾数人云COO 谢乐冰在德国工作十年,回国后加入惠普电信运营商部门,拥有多年项 ...
- Java一步一步构建web系统 在IDEA下用Maven搭建多模块项目
1.需求 做一个项目会有很多模块,主要是方便复用,通过各个模块之间聚合.模块也可以独立出来,如公用类库,也可以在做其它项目中使用.该文的实例会有两个模块:分别为dallin-web模块,dallin- ...
- 初识windows程序需要了解的知识点
初识一件事物我们会有陌生,我们慢慢地去了解它就会懂,让我带你们一起了解吧. 一.Form是.Net Framework 定义好的一个最基本的窗体类,具有窗体基本属性和方法 属性 ...
- OData – the best way to REST–实例讲解ASP.NET WebAPI OData (V4) Service & Client
一.概念介绍 1.1,什么是OData? 还是看OData官网的简单说明: An open protocol to allow the creation and consumption of quer ...
- 通过 imagick 让 PHP 生成 PSD 文件缩略图
第一步.安装ImageMagick 首先需要安装 ImageMagick ,因为 imagick 是一个可以供 PHP 调用 ImageMagick 功能的PHP扩展.(目前最新版本是:ImageMa ...
- jQ函数after、append、appendTo的区别
1.after函数定义和用法:after() 方法在被选元素后插入指定的内容.参考:http://keleyi.com/a/bjac/cfyxd60g.htm 语法:$(selector).after ...
- 基于Eclipse搭建STM32开源开发环境
最近项目不忙,想着没事看看简单的嵌入式,弄弄物联网什么的.于是就从廉价的STM32开刀了.因为一直是做PC软件开发的,那VS的智能感知那叫一个爽啊,相比之下,觉得这个Keil简直就像文本编辑器一样lo ...
- 在SSRS 里实现 SUMIF
最近在做报表时,要实现Excel中的SUMIF的功能, 示例:SUMIF($B$2:$B$465,"East",$G$2:$G$465),即汇总B列值等于East的G列值. 在SS ...
- 应用代理 socket TCP协议 的资料
http://blog.csdn.net/guowake/article/details/6615728 Linux下高并发socket最大连接数所受的各种限制 http://stackoverflo ...
- [android]亲自破解Flappy Bird(去广告+永生)
以下内容为原创,欢迎转载,转载请注明 来自天天博客:http://www.cnblogs.com/tiantianbyconan/p/3544785.html 听说最近Flappy Bird很火,但 ...