在eclipse中使用maven创建springMVC项目
一、在eclipse中创建maven-archetype-webapp项目:
1.新建项目选择maven项目
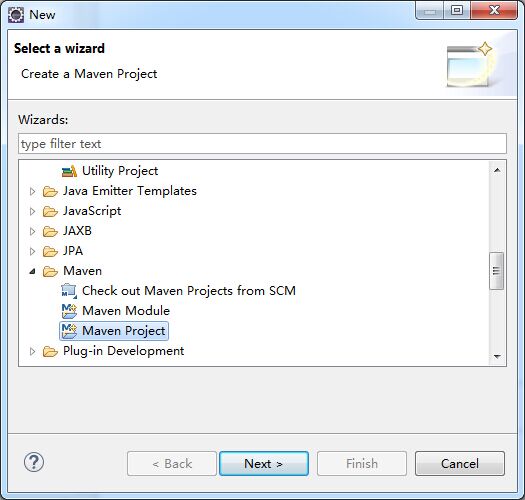
2.默认,下一步

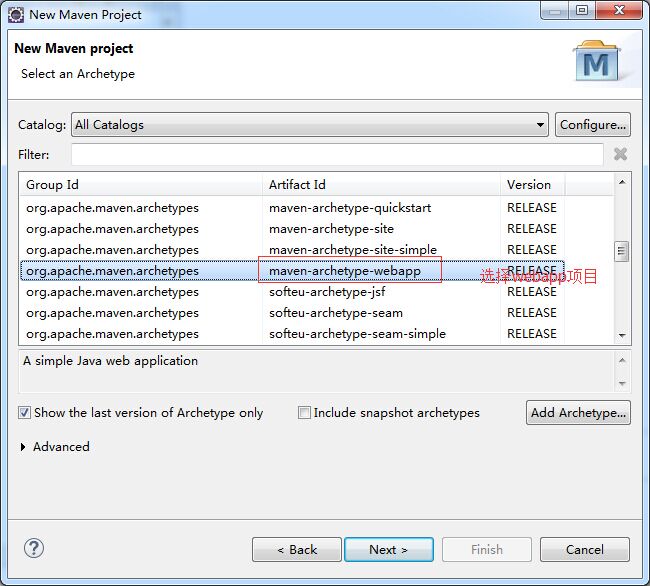
3.选择maven-archetype-webapp,其他保持默认即可
4.如下填写完成后,点击完成即可

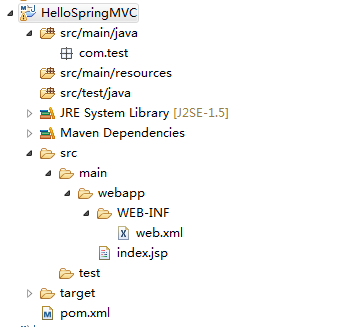
5.创建完成后的maven项目结构如下

其中index.jsp报错,错误信息:Multiple annotations found at this line: - The superclass "javax.servlet.http.HttpServlet" was not found on the Java
意思是缺少servlet包,我们可以导入javax.servlet-api-3.1.0.jar包,我们可以用两种方式来处理:
1> 在pom.xml中的dependencies中加入依赖包
     <dependency>

         <groupId>javax.servlet</groupId>

         <artifactId>javax.servlet-api</artifactId>

         <version>3.1.0</version>

     </dependency>
2> 可以在build path中添加tomcat 库,如下
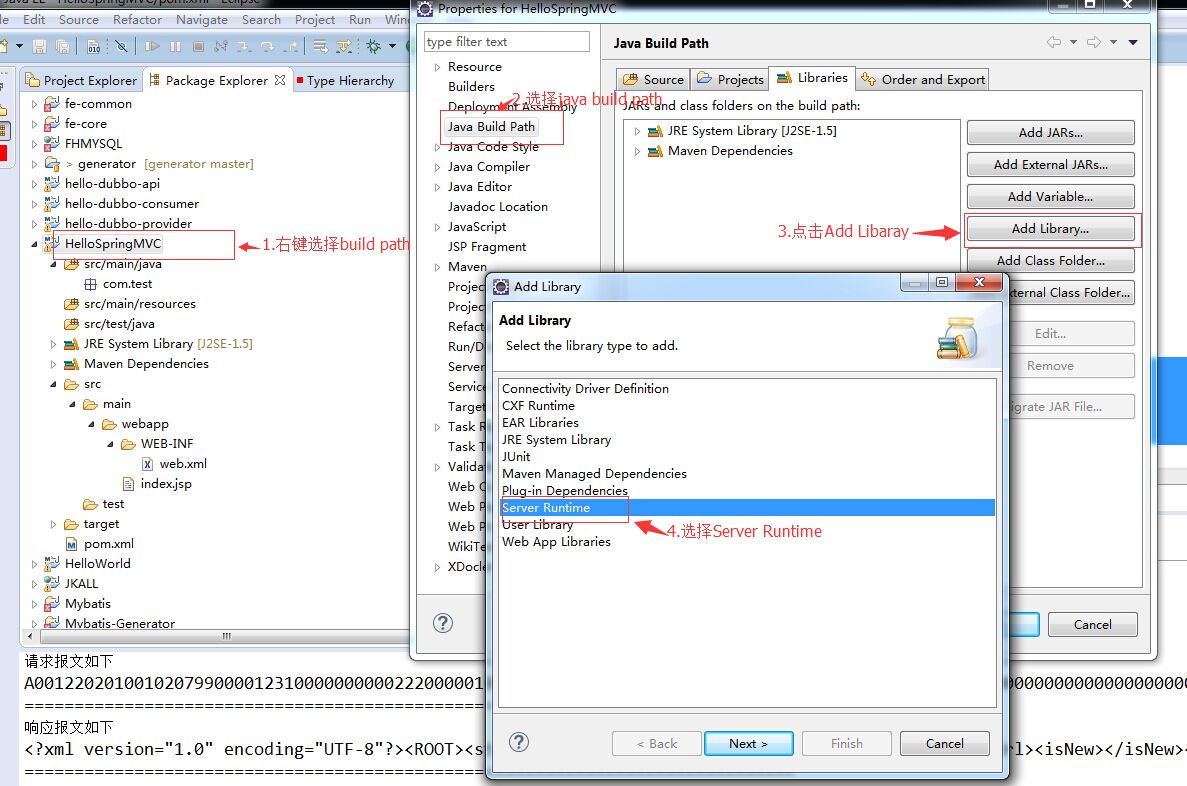
点击next出现下面界面,如下操作

至此,一个正常的maven web项目已经建好,如下:
二、配置springMVC
1.在pom.xml中添加对spring的依赖
pom.xml
<project xmlns="http://maven.apache.org/POM/4.0.0" xmlns:xsi="http://www.w3.org/2001/XMLSchema-instance"

  xsi:schemaLocation="http://maven.apache.org/POM/4.0.0 http://maven.apache.org/maven-v4_0_0.xsd">

  <modelVersion>4.0.0</modelVersion>

  <groupId>com.test</groupId>

  <artifactId>HelloSpringMVC</artifactId>

  <packaging>war</packaging>

  <version>0.0.1-SNAPSHOT</version>

  <name>HelloSpringMVC Maven Webapp</name>

  <url>http://maven.apache.org</url>

  <properties>

      <spring.version>4.1.1.RELEASE</spring.version>

  </properties>

  <dependencies>

    <dependency>

      <groupId>junit</groupId>

      <artifactId>junit</artifactId>

      <version>3.8.1</version>

      <scope>test</scope>

    </dependency>

    <dependency>

        <groupId>org.springframework</groupId>

        <artifactId>spring-core</artifactId>

        <version>${spring.version}</version>

    </dependency>

    <dependency>

        <groupId>org.springframework</groupId>

        <artifactId>spring-web</artifactId>

        <version>${spring.version}</version>

    </dependency>

    <dependency>

        <groupId>org.springframework</groupId>

        <artifactId>spring-webmvc</artifactId>

        <version>${spring.version}</version>

    </dependency>

    <dependency>

        <groupId>javax.servlet</groupId>

        <artifactId>javax.servlet-api</artifactId>

        <version>3.1.0</version>

    </dependency>

  </dependencies>

  <build>

    <finalName>HelloSpringMVC</finalName>

  </build>

</project>
保存后会下载对应的jar文件
2.编辑web.xml文件
web.xml内容
<web-app version="3.0" xmlns="http://java.sun.com/xml/ns/javaee"

    xmlns:xsi="http://www.w3.org/2001/XMLSchema-instance"

    xsi:schemaLocation="http://java.sun.com/xml/ns/javaee

    http://java.sun.com/xml/ns/javaee/web-app_3_0.xsd">

  <display-name>Archetype Created Web Application</display-name>

  <servlet>

      <servlet-name>dispatcher</servlet-name>

      <servlet-class>org.springframework.web.servlet.DispatcherServlet</servlet-class>

          <init-param>

             <param-name>contextConfigLocation</param-name>

          <param-value>classpath:springContext.xml</param-value>

      </init-param>

      <load-on-startup>1</load-on-startup>

  </servlet>

  <servlet-mapping>

      <servlet-name>dispatcher</servlet-name>

      <url-pattern>/</url-pattern>

  </servlet-mapping>

  <context-param>

      <param-name>contextConfigLocation</param-name>

      <param-value>classpath:springContext.xml</param-value>

  </context-param>

  <listener>

      <listener-class>org.springframework.web.context.ContextLoaderListener</listener-class>

  </listener>

</web-app>
3.创建springContext.xml文件,在src/main/resources包中创建springContext.xml文件,如图:

springContxt.xml内容
<?xml version="1.0" encoding="UTF-8"?>

<beans xmlns="http://www.springframework.org/schema/beans"

    xmlns:context="http://www.springframework.org/schema/context"

    xmlns:xsi="http://www.w3.org/2001/XMLSchema-instance"

    xsi:schemaLocation="

http://www.springframework.org/schema/beans

http://www.springframework.org/schema/beans/spring-beans-3.0.xsd

http://www.springframework.org/schema/context

http://www.springframework.org/schema/context/spring-context-3.0.xsd">

    <!-- 搜索spring控件 -->

    <context:component-scan base-package="com.test"></context:component-scan>

    <!-- 视图页面配置 -->

    <bean class="org.springframework.web.servlet.view.InternalResourceViewResolver">

        <property name="prefix">

            <value>/WEB-INF/views/</value>

        </property>

        <property name="suffix">

            <value>.jsp</value>

        </property>

    </bean>

</beans>
在springContext.xml中,base-package是指定spring控制器控件的包,前缀指定的是视图目录,被设置为/WEB-INF/views,即视图目录被放到WEB-INF下。后缀指定的是视图的扩展名。例如,"hellospring"视图,将被放到/WEB-INF/views/hellospring.jsp。
4. 创建Spring控制器和视图
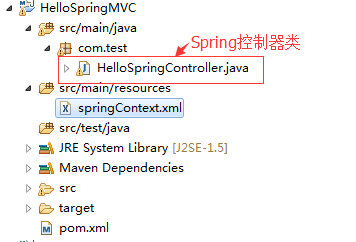
创建HelloSpringController.java类,在src/main/java包中,如下图:
HelloSpringController.java
package com.test;

import org.springframework.stereotype.Controller;

import org.springframework.web.bind.annotation.RequestMapping;

import org.springframework.web.bind.annotation.RequestParam;

import org.springframework.web.servlet.ModelAndView;

@Controller

public class HelloSpringController {

    String message = "Welcome to Spring MVC!";

    @RequestMapping("/hello")

    public ModelAndView showMessage(@RequestParam(value = "name", required = false, defaultValue = "Spring") String name) {

        ModelAndView mv = new ModelAndView("hellospring");//指定视图
     //向视图中添加所要展示或使用的内容,将在页面中使用

        mv.addObject("message", message);

        mv.addObject("name", name);

        return mv;

    }

}
在上面的代码中,@Controller注解为Spring标注前置控制器的方式,@RequestMapping注解映射web请求到具体要操作的类或者方法上面,@RequestMapping注解既可以用到类上,也可以用到方法上,在此不再详述,如有疑问,可以百度。@RequestParam注解为请求指定参数。这种方式提供了一个一致 的编程风格。
另外上述代码中ModelAndView类指定具体的视图,这里是"hellospring",由于我们在springContext.xml配置了视图的前后缀,所以在这里只需要写出视图的具体名称即可,其具体指定的就是:前缀+视图名称+后缀,即完整的视图路径/WEB-INF/views/hellospring.jsp,也就是所要展示的视图的位置。
项目首页index.jsp内容
<%@ page language="java" contentType="text/html; charset=UTF-8"
pageEncoding="UTF-8"%>
<!DOCTYPE html PUBLIC "-//W3C//DTD HTML 4.01 Transitional//EN" "http://www.w3.org/TR/html4/loose.dtd">
<html>
<head>
<meta http-equiv="Content-Type" content="text/html; charset=UTF-8">
<title>Spring 4 MVC - HelloWorld Index Page</title>
</head>
<body> <center>
<h2>Hello World</h2>
<h3>
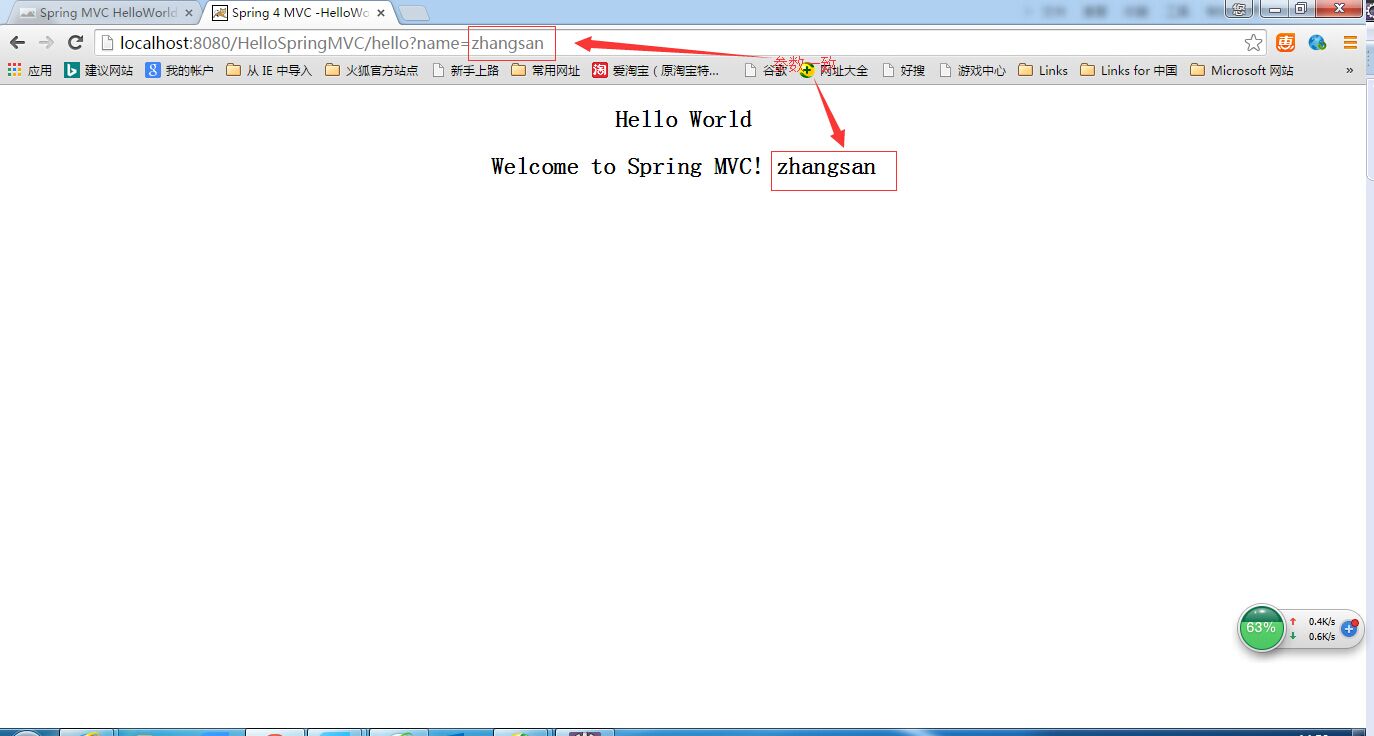
<a href="hello?name=zhangsan">点击跳转</a>
</h3>
</center>
</body>
</html>
上述代码中,点击跳转 的链接其实就是我们HelloSpringController.java中定义的控制器的一个@RequestMapping注解方法,name=zhangsan为showMessage接受的参数。
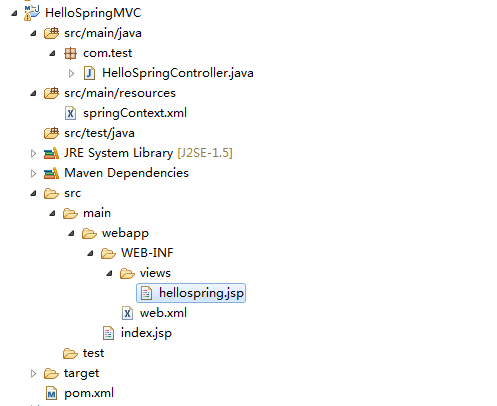
在/WEB-INF/views/下创建hellospring.jsp视图,如图:

hellospring.jsp
<%@ page language="java" contentType="text/html; charset=UTF-8" pageEncoding="UTF-8"%>

<!DOCTYPE html PUBLIC "-//W3C//DTD HTML 4.01 Transitional//EN" "http://www.w3.org/TR/html4/loose.dtd">

<html>

<head>

<meta http-equiv="Content-Type" content="text/html; charset=UTF-8">

<title>Spring 4 MVC -HelloWorld</title>

</head>

<body>

    <center>

        <h2>Hello World</h2>

        <h2>

            ${message} ${name}     </h2>

    </center>

</body>

</html>
上述代码中显示我们在HelloSpringController.java的showMessage方法中添加的两个参数message和name,如图:
好,至此我们使用maven搭建springMVC的操作已经全部完成,完成后整个项目的结构如下图:
三、将项目部署到tomcat服务器运行
首页 http://localhost:8080/HelloSpringMVC/ ,其中也可以使用 http://localhost:8080/HelloSpringMVC/index.jsp 两个效果是一样的

点击跳转 页
注意:若是跳转后页面直接显示${message} ${name}说明jstl表达式不起作用,我们可以在pom.xml中添加如下依赖:
     <dependency>

           <groupId>javax.servlet</groupId>

            <artifactId>jstl</artifactId>

            <version>1.2</version>

            <scope>runtime</scope>

        </dependency>

        <dependency>

            <groupId>taglibs</groupId>

            <artifactId>standard</artifactId>

            <version>1.1.2</version>

        </dependency>
在eclipse中使用maven创建springMVC项目的更多相关文章
- SpringMVC教程--eclipse中使用maven创建springMVC项目
一.在eclipse中创建maven-archetype-webapp项目: 1.新建项目选择maven项目 2.默认,下一步 3.选择maven-archetype-webapp,其他保持默认即可 ...
- (转)Maven学习总结(七)——eclipse中使用Maven创建Web项目
孤傲苍狼只为成功找方法,不为失败找借口! Maven学习总结(七)——eclipse中使用Maven创建Web项目 一.创建Web项目 1.1 选择建立Maven Project 选择File -&g ...
- Maven学习总结(7)——eclipse中使用Maven创建Web项目
Maven学习总结(七)--eclipse中使用Maven创建Web项目 一.创建Web项目 1.1 选择建立Maven Project 选择File -> New ->Project,如 ...
- Maven学习总结(七)——eclipse中使用Maven创建Web项目
一.创建Web项目 1.1 选择建立Maven Project 选择File -> New ->Project,如下图所示:
- Maven——eclipse中使用Maven创建Web项目
原文:http://www.cnblogs.com/xdp-gacl/p/4054814.html 一.创建Web项目 1.1 选择建立Maven Project 选择File -> New - ...
- 转】Maven学习总结(七)——eclipse中使用Maven创建Web项目
原博文出自于: http://www.cnblogs.com/xdp-gacl/p/4054814.html 感谢! 一.创建Web项目 1.1 选择建立Maven Project 选择File -& ...
- maven学习(十五)——在eclipse中使用maven创建javaweb项目
一.创建Web项目 1.1 选择建立Maven Project 选择File -> New ->Project,如下图所示:
- JavaWeb之Eclipse中使用Maven构建SpringMVC项目
为了学习spring和maven我这也是拼了老命了,光使用maven配置springmvc我花了上周一周的时间,下班回来就搞,一直有bug,一个bug接着一个,昨天一整天都在解决配置的问题,让大学同学 ...
- SpringMVC教程--Idea中使用Maven创建SpringMVC项目
1.新建项目 参照idea教程中的创建maven项目https://www.cnblogs.com/daxiang2008/p/9061653.html 2.POM中加入依赖包 (1)指定版本 (2) ...
随机推荐
- Oracle 数据库基础学习 (三) Oracle 四个表结构
Oracle 四个表的 emp dept salgrade bunus 的结构,记住有利于后期SQL语句的学习 雇员表(emp) No. 字段 类型 描述 1 empno NUMBER(4) 表示 ...
- php学习5-时间和日期
如果时间时区不对,使用时间是要先设定时区,使用date_default_timezone_set() 设置新时区 date_default_timezone_set('Asia/Shanghai'); ...
- Java final自变量
Java 1.1 允许我们将自变量设成final 属性,方法是在自变量列表中对它们进行适当的声明.这意味着在一个方法的内部,我们不能改变自变量句柄指向的东西.如下所示: /** * Created b ...
- 项目中应用eventbus解决的问题
在项目开发过程中,往往有些功能表面看起来简单,但实际开发的结果非常复杂,仔细分析下原因发现很多都是因为附加了许多的额外功能. 真的简单吗? 比如我们对一个电商平台的商品数据做修改的功能来讲,其实非常简 ...
- el captain设置环境变量
这里说的不是设置变量给bash/shell来用, 而是给程序使用, 比如, chromium自36版以后, 就不再内置google api keys, 官方文档(http://www.chromium ...
- cssSlidy.js 响应式手机图片轮播
cssSlidy是一款支持手机移动端的焦点图轮播插件,支持标题设置,滑动动画,间隔时间等. 在线实例 实例演示 使用方法 <div id="slidy-container"& ...
- Ionic - 先进的 HTML5 移动开发框架和 SDK
Ionic 是开源的 HTML5 移动开发框架,基于 HTML.JavaScript.CSS 构建漂亮的,跨平台的混合模式 App,能够和 AngularJS 很好的集成.目前最佳支持的平台是 iOS ...
- user profile services提示“BAIL: MMS(7116): sql.cpp(8490): 0x80231334 (The sql connection string has unsupported values.)”解决办法
user profile services的2个服务Forefront Identity Manager Service 和 Forefront Identity Manager Synchroniz ...
- SharePoint 2013 PowerShell命令备份还原报错
错误截图: 文字描述: Restore-SPSite : <nativehr>0x80070003</nativehr><nativestack></nati ...
- Office 365 - SharePoint 2013 Online 之应用程序开发
1.给站点添加完Napa后,在网站内容里点击Napa,如下图: 2.创建一个新的app,如下图: 3.可以在Napa里添加新的项目,如下图: 4.添加新的文件,可以添加web页面.样式表.脚本,如下图 ...