Java1.8的HashMap源码解析
java1.8是现在用的最多的版本,hashmap是现在用的最多的map,今天我们试图分析一下源码。
数据结构
首先我们注意到数据是存放在一个Node数组里面
transient Node<K,V>[] table;
接着我们看一下Node<K,V>的结构
	static class Node<K,V> implements Map.Entry<K,V> {

        final int hash;

        final K key;

        V value;

        Node<K,V> next;

        Node(int hash, K key, V value, Node<K,V> next) {

            this.hash = hash;

            this.key = key;

            this.value = value;

            this.next = next;

        }

        public final K getKey()        { return key; }

        public final V getValue()      { return value; }

        public final String toString() { return key + "=" + value; }

        public final int hashCode() {

            return Objects.hashCode(key) ^ Objects.hashCode(value);

        }

        public final V setValue(V newValue) {

            V oldValue = value;

            value = newValue;

            return oldValue;

        }

        public final boolean equals(Object o) {

            if (o == this)

                return true;

            if (o instanceof Map.Entry) {

                Map.Entry<?,?> e = (Map.Entry<?,?>)o;

                if (Objects.equals(key, e.getKey()) &&

                    Objects.equals(value, e.getValue()))

                    return true;

            }

            return false;

        }

    }
我们注意到这是一个单链表,next指向下一个节点。
get方法
接着我们看一下get(Object key)方法
    public V get(Object key) {

        Node<K,V> e;

        return (e = getNode(hash(key), key)) == null ? null : e.value;

    }
    final Node<K,V> getNode(int hash, Object key) {

        Node<K,V>[] tab; Node<K,V> first, e; int n; K k;

        if ((tab = table) != null && (n = tab.length) > 0 &&

            (first = tab[(n - 1) & hash]) != null) {

            if (first.hash == hash && // always check first node

                ((k = first.key) == key || (key != null && key.equals(k))))

                return first;

            if ((e = first.next) != null) {

                if (first instanceof TreeNode)

                    return ((TreeNode<K,V>)first).getTreeNode(hash, key);

                do {

                    if (e.hash == hash &&

                        ((k = e.key) == key || (key != null && key.equals(k))))

                        return e;

                } while ((e = e.next) != null);

            }

        }

        return null;

    }
首先定位到数据在数组的下标: (n - 1) & hash
找到数组的第一个node:first,如果first为null直接返回
如果first的key和get里面的key相等,则返回first的value
如果first的key和get里面的key不相等,判断first是不是TreeNode,如果不是,则一直找next,直到key和所传的key相等
如果first的key和get里面的key不相等,判断first是不是TreeNode,如果是,则调用getTreeNode方法查找
我们看一下TreeNode的数据结构
static final class TreeNode<K,V> extends LinkedHashMap.Entry<K,V> {

        TreeNode<K,V> parent;  // red-black tree links

        TreeNode<K,V> left;

        TreeNode<K,V> right;

        TreeNode<K,V> prev;    // needed to unlink next upon deletion

        boolean red;

        TreeNode(int hash, K key, V val, Node<K,V> next) {

            super(hash, key, val, next);

        }

	......

	......

}
再看下LinkedHashMap.Entry<K,V>
    static class Entry<K,V> extends HashMap.Node<K,V> {

        Entry<K,V> before, after;

        Entry(int hash, K key, V value, Node<K,V> next) {

            super(hash, key, value, next);

        }

    }
我们注意到LinkedHashMap.Entry把单链表扩展成了双向链表
TreeNode把双向链表扩张成了红黑树
我们在来看一下getTreeNode方法
        final TreeNode<K,V> getTreeNode(int h, Object k) {

            return ((parent != null) ? root() : this).find(h, k, null);

        }
root()是查询根节点,接着看一下find方法
final TreeNode<K,V> find(int h, Object k, Class<?> kc) {

            TreeNode<K,V> p = this;

            do {

                int ph, dir; K pk;

                TreeNode<K,V> pl = p.left, pr = p.right, q;

                if ((ph = p.hash) > h)

                    p = pl;

                else if (ph < h)

                    p = pr;

                else if ((pk = p.key) == k || (k != null && k.equals(pk)))

                    return p;

                else if (pl == null)

                    p = pr;

                else if (pr == null)

                    p = pl;

                else if ((kc != null ||

                          (kc = comparableClassFor(k)) != null) &&

                         (dir = compareComparables(kc, k, pk)) != 0)

                    p = (dir < 0) ? pl : pr;

                else if ((q = pr.find(h, k, kc)) != null)

                    return q;

                else

                    p = pl;

            } while (p != null);

            return null;

        }
如上,要查询的key的hash为h,依次遍历节点,如果节点的hash>h,则把节点的左节点赋值给节点,如果节点的hash<h,则把节点的右节点赋值给节点,知道节点的hash和h相等。
put方法
接着我们看一下put方法
    public V put(K key, V value) {

        return putVal(hash(key), key, value, false, true);

    }
    final V putVal(int hash, K key, V value, boolean onlyIfAbsent,

                   boolean evict) {

        Node<K,V>[] tab; Node<K,V> p; int n, i;

        if ((tab = table) == null || (n = tab.length) == 0)

            n = (tab = resize()).length;

        if ((p = tab[i = (n - 1) & hash]) == null)

            tab[i] = newNode(hash, key, value, null);

        else {

            Node<K,V> e; K k;

            if (p.hash == hash &&

                ((k = p.key) == key || (key != null && key.equals(k))))

                e = p;

            else if (p instanceof TreeNode)

                e = ((TreeNode<K,V>)p).putTreeVal(this, tab, hash, key, value);

            else {

                for (int binCount = 0; ; ++binCount) {

                    if ((e = p.next) == null) {

                        p.next = newNode(hash, key, value, null);

                        if (binCount >= TREEIFY_THRESHOLD - 1) // -1 for 1st

                            treeifyBin(tab, hash);

                        break;

                    }

                    if (e.hash == hash &&

                        ((k = e.key) == key || (key != null && key.equals(k))))

                        break;

                    p = e;

                }

            }

            if (e != null) { // existing mapping for key

                V oldValue = e.value;

                if (!onlyIfAbsent || oldValue == null)

                    e.value = value;

                afterNodeAccess(e);

                return oldValue;

            }

        }

        ++modCount;

        if (++size > threshold)

            resize();

        afterNodeInsertion(evict);

        return null;

    }
我们一行行分析
先是拿到数组的长度:n = (tab = resize()).length;
取到数据在数组的下标:i = (n - 1) & hash
取到下标i对应的节点p = tab[i]
如果p为null,则新建一个node: tab[i] = newNode(hash, key, value, null);
    Node<K,V> newNode(int hash, K key, V value, Node<K,V> next) {

        return new Node<>(hash, key, value, next);

    }
如果p不为null,判断p的key和传的key是否相等,相等则返回p
如果p不为null,判断p的key和传的key是否相等,不相等,如果是TreeNode则放入红黑树里面
如果p不为null,判断p的key和传的key是否相等,不相等,如果不是TreeNode,则一直遍历next节点,知道节点的key和传的key相等
如果一直遍历到最后也没找到,则新建一个节点,并把它放在链表的末尾
最后新建节点的时候有一个树化 的判断
if (binCount >= TREEIFY_THRESHOLD - 1) // -1 for 1st

                            treeifyBin(tab, hash);
TREEIFY_THRESHOLD的值为8,超过8个则由链表转换成红黑树
我们来看一个这个方法
	final void treeifyBin(Node<K,V>[] tab, int hash) {

        int n, index; Node<K,V> e;

        if (tab == null || (n = tab.length) < MIN_TREEIFY_CAPACITY)

            resize();

        else if ((e = tab[index = (n - 1) & hash]) != null) {

            TreeNode<K,V> hd = null, tl = null;

            do {

                TreeNode<K,V> p = replacementTreeNode(e, null);

                if (tl == null)

                    hd = p;

                else {

                    p.prev = tl;

                    tl.next = p;

                }

                tl = p;

            } while ((e = e.next) != null);

            if ((tab[index] = hd) != null)

                hd.treeify(tab);

        }

    }
取到链表的首节点:e = tab[index = (n - 1) & hash]
replacementTreeNode方法实际是new一个TreeNode
    TreeNode<K,V> replacementTreeNode(Node<K,V> p, Node<K,V> next) {

        return new TreeNode<>(p.hash, p.key, p.value, next);

    }
do while操作是做了一个转换,转换成双向链表
最后一句hd.treeify(tab);是调用树化的方法,我们看一下这个方法
        final void treeify(Node<K,V>[] tab) {

            TreeNode<K,V> root = null;

            for (TreeNode<K,V> x = this, next; x != null; x = next) {

                next = (TreeNode<K,V>)x.next;

                x.left = x.right = null;

                if (root == null) {

                    x.parent = null;

                    x.red = false;

                    root = x;

                }

                else {

                    K k = x.key;

                    int h = x.hash;

                    Class<?> kc = null;

                    for (TreeNode<K,V> p = root;;) {

                        int dir, ph;

                        K pk = p.key;

                        if ((ph = p.hash) > h)

                            dir = -1;

                        else if (ph < h)

                            dir = 1;

                        else if ((kc == null &&

                                  (kc = comparableClassFor(k)) == null) ||

                                 (dir = compareComparables(kc, k, pk)) == 0)

                            dir = tieBreakOrder(k, pk);

                        TreeNode<K,V> xp = p;

                        if ((p = (dir <= 0) ? p.left : p.right) == null) {

                            x.parent = xp;

                            if (dir <= 0)

                                xp.left = x;

                            else

                                xp.right = x;

                            root = balanceInsertion(root, x);

                            break;

                        }

                    }

                }

            }

            moveRootToFront(tab, root);

        }
注意这个方法的this是下标为i的数组的首节点
如果root为空,初始化root,根节点是黑色
	if (root == null) {

		x.parent = null;

		x.red = false;

		root = x;

	}
外面的for循环,遍历next节点,把所有的节点插入进树里面
里面的For循环,通过hash对比判断左节点还是右节点,从根节点找左右节点,并把左右节点当成根节点往下找,直到左节点或者右节点为空,把它安装在这里
我们先看一下红黑树的特性,在看下面的balanceInsertion(root, x)方法
红黑树的特性:
(1)每个节点或者是黑色,或者是红色。
(2)根节点是黑色。
(3)每个叶子节点(NIL)是黑色。 [注意:这里叶子节点,是指为空(NIL或NULL)的叶子节点!]
(4)如果一个节点是红色的,则它的子节点必须是黑色的。
(5)从一个节点到该节点的子孙节点的所有路径上包含相同数目的黑节点。
        static <K,V> TreeNode<K,V> balanceInsertion(TreeNode<K,V> root,

                                                    TreeNode<K,V> x) {

            x.red = true;

            for (TreeNode<K,V> xp, xpp, xppl, xppr;;) {

                if ((xp = x.parent) == null) {

                    x.red = false;

                    return x;

                }

                else if (!xp.red || (xpp = xp.parent) == null)

                    return root;

                if (xp == (xppl = xpp.left)) {

                    if ((xppr = xpp.right) != null && xppr.red) {

                        xppr.red = false;

                        xp.red = false;

                        xpp.red = true;

                        x = xpp;

                    }

                    else { !!

                        if (x == xp.right) {

                            root = rotateLeft(root, x = xp);

                            xpp = (xp = x.parent) == null ? null : xp.parent;

                        }

                        if (xp != null) {

                            xp.red = false;

                            if (xpp != null) {

                                xpp.red = true;

                                root = rotateRight(root, xpp);

                            }

                        }

                    }

                }

                else {

                    if (xppl != null && xppl.red) {

                        xppl.red = false;

                        xp.red = false;

                        xpp.red = true;

                        x = xpp;

                    }

                    else {

                        if (x == xp.left) {

                            root = rotateRight(root, x = xp);

                            xpp = (xp = x.parent) == null ? null : xp.parent;

                        }

                        if (xp != null) {

                            xp.red = false;

                            if (xpp != null) {

                                xpp.red = true;

                                root = rotateLeft(root, xpp);

                            }

                        }

                    }

                }

            }

        }
通过判断决定是左旋转还是右旋转,如上标两个感叹号的地方,是右节点没有,树不平衡了,此时x等于xp.right,这时候就左旋,否则就右旋
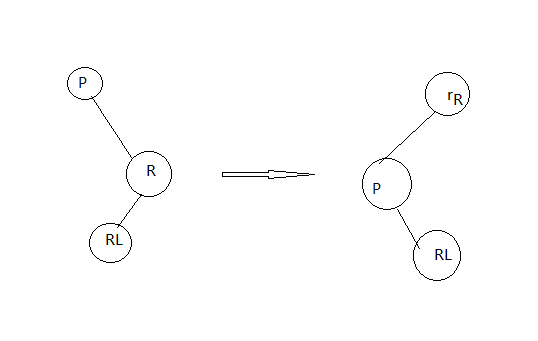
左旋转
        static <K,V> TreeNode<K,V> rotateLeft(TreeNode<K,V> root,

                                              TreeNode<K,V> p) {

            TreeNode<K,V> r, pp, rl;

            if (p != null && (r = p.right) != null) {

                if ((rl = p.right = r.left) != null)

                    rl.parent = p;

                if ((pp = r.parent = p.parent) == null)

                    (root = r).red = false;

                else if (pp.left == p)

                    pp.left = r;

                else

                    pp.right = r;

                r.left = p;

                p.parent = r;

            }

            return root;

        }

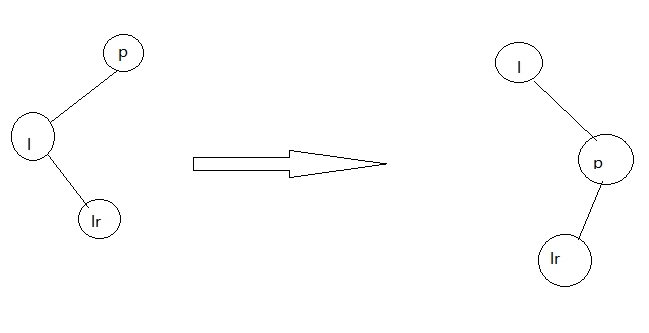
右旋转
        static <K,V> TreeNode<K,V> rotateRight(TreeNode<K,V> root,

                                               TreeNode<K,V> p) {

            TreeNode<K,V> l, pp, lr;

            if (p != null && (l = p.left) != null) {

                if ((lr = p.left = l.right) != null)

                    lr.parent = p;

                if ((pp = l.parent = p.parent) == null)

                    (root = l).red = false;

                else if (pp.right == p)

                    pp.right = l;

                else

                    pp.left = l;

                l.right = p;

                p.parent = l;

            }

            return root;

        }

最后,把根节点设置在第一位
        /**

         * Ensures that the given root is the first node of its bin.

         */

        static <K,V> void moveRootToFront(Node<K,V>[] tab, TreeNode<K,V> root) {

            int n;

            if (root != null && tab != null && (n = tab.length) > 0) {

                int index = (n - 1) & root.hash;

                TreeNode<K,V> first = (TreeNode<K,V>)tab[index];

                if (root != first) {

                    Node<K,V> rn;

                    tab[index] = root;

                    TreeNode<K,V> rp = root.prev;

                    if ((rn = root.next) != null)

                        ((TreeNode<K,V>)rn).prev = rp;

                    if (rp != null)

                        rp.next = rn;

                    if (first != null)

                        first.prev = root;

                    root.next = first;

                    root.prev = null;

                }

                assert checkInvariants(root);

            }

        }
如果已经是红黑树了,插入进节点的方法
        /**

         * Tree version of putVal.

         */

        final TreeNode<K,V> putTreeVal(HashMap<K,V> map, Node<K,V>[] tab,

                                       int h, K k, V v) {

            Class<?> kc = null;

            boolean searched = false;

            TreeNode<K,V> root = (parent != null) ? root() : this;

            for (TreeNode<K,V> p = root;;) {

                int dir, ph; K pk;

                if ((ph = p.hash) > h)

                    dir = -1;

                else if (ph < h)

                    dir = 1;

                else if ((pk = p.key) == k || (k != null && k.equals(pk)))

                    return p;

                else if ((kc == null &&

                          (kc = comparableClassFor(k)) == null) ||

                         (dir = compareComparables(kc, k, pk)) == 0) {

                    if (!searched) {

                        TreeNode<K,V> q, ch;

                        searched = true;

                        if (((ch = p.left) != null &&

                             (q = ch.find(h, k, kc)) != null) ||

                            ((ch = p.right) != null &&

                             (q = ch.find(h, k, kc)) != null))

                            return q;

                    }

                    dir = tieBreakOrder(k, pk);

                }

                TreeNode<K,V> xp = p;

                if ((p = (dir <= 0) ? p.left : p.right) == null) {

                    Node<K,V> xpn = xp.next;

                    TreeNode<K,V> x = map.newTreeNode(h, k, v, xpn);

                    if (dir <= 0)

                        xp.left = x;

                    else

                        xp.right = x;

                    xp.next = x;

                    x.parent = x.prev = xp;

                    if (xpn != null)

                        ((TreeNode<K,V>)xpn).prev = x;

                    moveRootToFront(tab, balanceInsertion(root, x));

                    return null;

                }

            }

        }
和上面基本差不多,也是平衡,旋转,把root置为first。
Java1.8的HashMap源码解析的更多相关文章
- 【转】Java HashMap 源码解析(好文章)
.fluid-width-video-wrapper { width: 100%; position: relative; padding: 0; } .fluid-width-video-wra ...
- HashMap源码解析 非原创
Stack过时的类,使用Deque重新实现. HashCode和equals的关系 HashCode为hash码,用于散列数组中的存储时HashMap进行散列映射. equals方法适用于比较两个对象 ...
- Java中的容器(集合)之HashMap源码解析
1.HashMap源码解析(JDK8) 基础原理: 对比上一篇<Java中的容器(集合)之ArrayList源码解析>而言,本篇只解析HashMap常用的核心方法的源码. HashMap是 ...
- 最全的HashMap源码解析!
HashMap源码解析 HashMap采用键值对形式的存储结构,每个key对应唯一的value,查询和修改的速度很快,能到到O(1)的平均复杂度.他是非线程安全的,且不能保证元素的存储顺序. 他的关系 ...
- HashMap源码解析和设计解读
HashMap源码解析 想要理解HashMap底层数据的存储形式,底层原理,最好的形式就是读它的源码,但是说实话,源码的注释说明全是英文,英文不是非常好的朋友读起来真的非常吃力,我基本上看了差不多 ...
- 详解HashMap源码解析(下)
上文详解HashMap源码解析(上)介绍了HashMap整体介绍了一下数据结构,主要属性字段,获取数组的索引下标,以及几个构造方法.本文重点讲解元素的添加.查找.扩容等主要方法. 添加元素 put(K ...
- HashMap 源码解析
HashMap简介: HashMap在日常的开发中应用的非常之广泛,它是基于Hash表,实现了Map接口,以键值对(key-value)形式进行数据存储,HashMap在数据结构上使用的是数组+链表. ...
- 给jdk写注释系列之jdk1.6容器(4)-HashMap源码解析
前面了解了jdk容器中的两种List,回忆一下怎么从list中取值(也就是做查询),是通过index索引位置对不对,由于存入list的元素时安装插入顺序存储的,所以index索引也就是插入的次序. M ...
- 【Java深入研究】9、HashMap源码解析(jdk 1.8)
一.HashMap概述 HashMap是常用的Java集合之一,是基于哈希表的Map接口的实现.与HashTable主要区别为不支持同步和允许null作为key和value.由于HashMap不是线程 ...
随机推荐
- el-upload配合vue-cropper实现上传图片前裁剪
需求背景 上传一个封面图,在上传之前需要对图片进行裁剪,上传裁剪之后的图片,类似微信的上传头像. 技术方案 上传肯定是用element的 el-upload 组件实现上传,非常方便,各种钩子函数. 裁 ...
- WPF 学习(一)
一.WPF介绍 WPF全称 Windows Presentation Foundation,干啥用的? 主要是用来制作Windows桌面客户端软件的. .Net平台下制作Windows桌面客户端软件主 ...
- TCP最简单的服务程序
#include <time.h>#include <stdio.h>#include <stdlib.h>#include <stdarg.h>#in ...
- x memory pool c语言 内存池
#ifndef X_MEMORY_H #define X_MEMORY_H #include <stdlib.h> #include <stdio.h> #include &l ...
- IE6、IE7兼容querySelectorAll和querySelector方法
querySelector 和 querySelectorAll 方法是 W3C Selectors API 规范中定义的.他们的作用是根据 CSS 选择器规范,便捷定位文档中指定元素. 目前几乎主流 ...
- 【分区】使用 GPT 分区表分区并格式化 (非 FreeBSD 系统)
新购买的 Linux 云服务器,由于数据盘未做分区和格式化,无法使用. 注意: 数据盘中的数据在格式化后将全部被清空.请在格式化之前,确保数据盘中没有数据或已对重要数据进行备份.为避免服务发生异常,格 ...
- STL容器操作
目录 1. 数组 2. Vector 3. List 3.1. std::forward_list 4. Tuple 4.1. 运行期索引 4.2. 元组合并 4.3. 元祖遍历 5. Pair 6. ...
- centos7 hive 单机模式安装配置
前言:由于只是在自己的虚拟机上进行学习,所以对hive只是进行最简单的配置,其他复杂的配置文件没有配置. 1.前提 1.1 安装配置jdk1.8 1.2 安装hadoop2.x hadoop单机模式安 ...
- mysql HAVING用法
原文链接:https://www.cnblogs.com/mr-wuxiansheng/p/11188733.html having字句可以让我们筛选分组之后的各种数据,where字句在聚合前先筛选记 ...
- .Net Core踩坑记:读取txt中文乱码
迁移.net framework的项目,有块读取txt中文转码的问题,普通的不能再普通的代码,想都没想直接copy过去,也没测,结果今天就被坑了.Core是3.1版本,这是原来的代码: string ...
