[Songqw.Net 基础]WPF插件化中同步Style
原文:[Songqw.Net 基础]WPF插件化中同步Style
之前将WPF Client中的各个页面拆分为一个个插件,进行开发,界面是原生的还好说,一旦统一样式,每个插件模块都来一份资源文件,就不合理了喽.
先从Style入手,做一下同步.
思路是直接将Style拆离出来,即不再主框架中,也不再插件中实现.
新建项目 :Songqw.Net.WPF.CommonStyle
新建xaml文件, 不需要xaml.cs 删掉即可~
<ResourceDictionary

    xmlns="http://schemas.microsoft.com/winfx/2006/xaml/presentation"

    xmlns:x="http://schemas.microsoft.com/winfx/2006/xaml">

    <Style x:Key="Title" TargetType="TextBlock">

        <Setter Property="FontFamily" Value="微软雅黑" />

        <Setter Property="FontSize" Value="23"/>

        <Setter Property="TextOptions.TextFormattingMode" Value="Ideal" />

    </Style>

    <Style x:Key="Heading1" TargetType="TextBlock">

        <Setter Property="FontFamily" Value="微软雅黑" />

        <Setter Property="FontSize" Value="30" />

        <Setter Property="TextOptions.TextFormattingMode" Value="Ideal" />

    </Style>

    <Style x:Key="Heading2" TargetType="TextBlock">

        <Setter Property="FontFamily" Value="微软雅黑" />

        <Setter Property="FontSize" Value="16" />

        <Setter Property="FontWeight" Value="Bold" />

        <Setter Property="TextOptions.TextFormattingMode" Value="Display" />

    </Style>

</ResourceDictionary>
新建CommonUI.xaml
<ResourceDictionary xmlns="http://schemas.microsoft.com/winfx/2006/xaml/presentation"

                    xmlns:x="http://schemas.microsoft.com/winfx/2006/xaml">

    <ResourceDictionary.MergedDictionaries>

        <ResourceDictionary Source="TextBlock.xaml" />

        <!--

        <ResourceDictionary Source="More.xaml" />

        <ResourceDictionary Source="More.xaml" />

        <ResourceDictionary Source="More.xaml" />

        <ResourceDictionary Source="More.xaml" />

        <ResourceDictionary Source="More.xaml" />

        -->

    </ResourceDictionary.MergedDictionaries>

    <Thickness x:Key="ContentMargin">3,3,3,3</Thickness>

    <Style x:Key="ContentRoot" TargetType="FrameworkElement">

        <Setter Property="Margin" Value="{StaticResource ContentMargin}" />

    </Style>

</ResourceDictionary>
ResourceDictionary : 资源字典出现的初衷就在于可以实现多个项目之间的共享资源,资源字典只是一个简单的XAML文档,该文档除了存储希望使用的资源之外,不做任何其它的事情。
详细介绍:http://www.cnblogs.com/tianyou/archive/2012/12/07/2806835.html
到这里,资源项目完成.下面进行调用~
在主程序添加如下代码:
using System;

using System.Windows;

namespace Songqw.Net.WPF.Application

{

    /// <summary>

    /// App.xaml 的交互逻辑

    /// </summary>

    public partial class App

    {

        private void Application_Startup(object sender, StartupEventArgs e)

        {

            var r = new ResourceDictionary();

            r.MergedDictionaries.Add(new ResourceDictionary()

            {

                Source =

                new Uri("/Songqw.Net.WPF.CommonStyle;component/CommonUI.xaml",

                    UriKind.RelativeOrAbsolute)

            });

            Resources = r;

        }

    }

}
这里要注意,确定dll文件复制到的运行目录

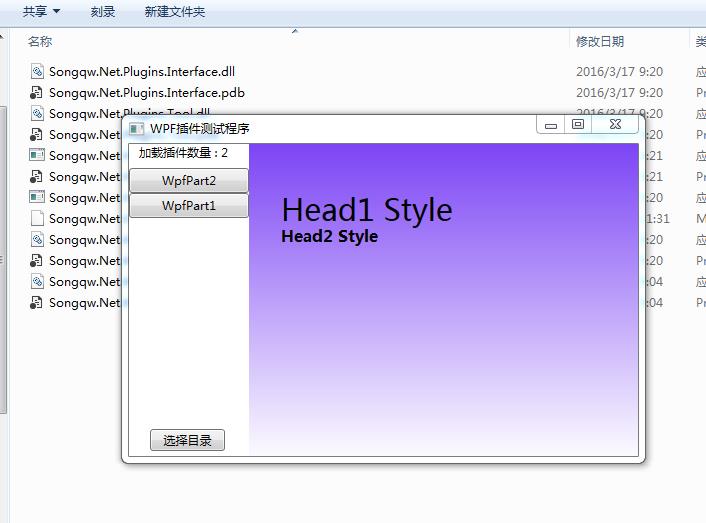
最后,在各个插件模块中直接输入key 即可使用
<UserControl x:Class="Songqw.Net.WPF.Plugins.WpfPart1"

             xmlns="http://schemas.microsoft.com/winfx/2006/xaml/presentation"

             xmlns:x="http://schemas.microsoft.com/winfx/2006/xaml"

             xmlns:mc="http://schemas.openxmlformats.org/markup-compatibility/2006"

             xmlns:d="http://schemas.microsoft.com/expression/blend/2008"

             mc:Ignorable="d"

             d:DesignHeight="300" d:DesignWidth="300">

    <Grid>

        <Grid.Background>

            <LinearGradientBrush EndPoint="0.5,1" StartPoint="0.5,0">

                <GradientStop Color="#FF7C44F5" Offset="0"/>

                <GradientStop Color="White" Offset="1"/>

            </LinearGradientBrush>

        </Grid.Background>

        <TextBlock Style="{StaticResource Heading1}" HorizontalAlignment="Left" Margin="32,45,0,0" TextWrapping="Wrap" Text="Head1 Style" VerticalAlignment="Top" Width="193"/>

        <TextBlock Style="{StaticResource Heading2}"  HorizontalAlignment="Left" Margin="32,81,0,0" TextWrapping="Wrap" Text="Head2 Style" VerticalAlignment="Top" Width="193"/>

    </Grid>

</UserControl>
最开始以为每个插件都需要加载资源字典才可以运行,实际上不是的,主需要主程序加载了资源字典,各个加载模块的插件是可以访问到主程序中的样式的.
换句话说,即时不把样式从主程序中分离出来,也是可以的.
既然能分离,还是就分离了吧,也为自动更新铺一下路.主程序尽量不更新了被.
呵呵
[Songqw.Net 基础]WPF插件化中同步Style的更多相关文章
- [Songqw.Net 基础]WPF实现简单的插件化开发
原文:[Songqw.Net 基础]WPF实现简单的插件化开发 版权声明:本文为博主原创文章,未经博主允许可以随意转载 https://blog.csdn.net/songqingwei1988/ar ...
- 《Android插件化开发指南》面世
本书在京东购买地址:https://item.jd.com/31178047689.html 本书Q群:389329264 (一)这是一本什么书 如果只把本书当作纯粹介绍Android插件化技术的书籍 ...
- 自己动手写Android插件化框架,让老板对你刮目相看
欢迎大家前往腾讯云+社区,获取更多腾讯海量技术实践干货哦~ 本文由达文西发表于云+社区专栏 最近在工作中接触到了Android插件内的开发,发现自己这种技术还缺乏最基本的了解,以至于在一些基本问题上浪 ...
- 自己动手写Android插件化框架
自己动手写Android插件化框架 转 http://www.imooc.com/article/details/id/252238 最近在工作中接触到了Android插件内的开发,发现自己这种技 ...
- 又一开源项目爆火于GitHub,Android高级插件化强化实战
一.插件化起源 插件化技术最初源于免安装运行 Apk的想法,这个免安装的 Apk 就可以理解为插件,而支持插件的 app 我们一般叫 宿主. 想必大家都知道,在 Android 系统中,应用是以 Ap ...
- Android 插件化开发(四):插件化实现方案
在经过上面铺垫后,我们可以尝试整体实现一下插件化了.这里我们先介绍一下最简单的实现插件化的方案. 一.最简单的插件化实现方案 最简单的插件化实现方案,对四大组件都是适用的,技术面涉及如下: 1). 合 ...
- 热门前沿知识相关面试问题-android插件化面试问题讲解
插件化由来: 65536/64K[技术层面上]随着代码越来越大,业务逻辑越来繁杂,所以很容易达到一个65536的天花板,其65536指的是整个项目中的方法总数如果达到这个数量时则不无法创建新的方法了, ...
- 在WPF中使用Caliburn.Micro搭建MEF插件化开发框架
原文:在WPF中使用Caliburn.Micro搭建MEF插件化开发框架 版权声明:原创内容转载必须注明出处,否则追究相关责任. https://blog.csdn.net/qq_36663276/a ...
- 插件化技术在安卓sdk开发中实际应用
笔者从 2016 年初就因为公司业务需求转战 android sdk 开发, 应用插件化技术将公司 android sdk 重新翻版.先来说说需求. 由于笔者所在一家创业公司, android sdk ...
随机推荐
- 小米笔记本(13.3 I7) ubuntu14.04下网卡驱动安装
ubuntu 内核升级到4.6.4(更高版本可能造成系统无法启动) kernel debian包下载地址 http://kernel.ubuntu.com/~kernel-ppa/mainline/v ...
- [RxJS] Hot Observable, by .share()
.share() is an alias for .publish().refCount(). So if the source is not yet completed, no matter how ...
- [Angular2 Form] Validation message for Reactive form
<div class="form-field"> <label>Confirm Password: </label> <input typ ...
- [Angular2 Form] Angular 2 Template Driven Form Custom Validator
In this tutorial we are going to learn how we can also implement custom form field validation in Ang ...
- jquery-12 jquery中的工具方法有哪些
jquery-12 jquery中的工具方法有哪些 一.总结 一句话总结:四个较常用方法.1.isArray();2.isFunction();3.isEmptyObejct();4.trim(); ...
- gdb查看线程堆栈信息
查看堆栈:gdb -quiet -batch -ex='thread apply all bt' -p pid查看运行位置:gdb -quiet -batch -ex='thread apply al ...
- php 修改文件内容,替换指定内容
$f='./test.txt'; file_put_contents($f,str_replace('{{modulename}}','Hospital',file_get_contents($f)) ...
- 【MySQL】15个有用的MySQL/MariaDB性能调整和优化技巧
MySQL 是一个强大的开源关系数据库管理系统(简称 RDBMS).它发布于 1995 年(20年前).它采用结构化查询语言(SQL),这可能是数据库内容管理中最流行的选择.最新的 MySQL 版本是 ...
- JavaScript中的一些细节 分类: C1_HTML/JS/JQUERY 2014-08-05 16:45 384人阅读 评论(0) 收藏
1.设置id / class等属性 用 setAttribute 设置一些常规属性如 id ,className 的时候经常不起作用,只能用 object.id = value 这样来设置 news_ ...
- 在TMemo上画一条线(超级简单,举一反三)
var C:TControlCanvas; begin C := TControlCanvas.Create; C.Pen.Color := clRed; C.Pen.Width := ; C.Con ...