PostgreSQL+pgpooll+Keepalived双机HA方案
PostgreSQL+pgpooll+Keepalived双机HA方案
(注:本文档中的所有操作在没有说明的情况下都应该使用postgres用户进行操作,postgres用户没有权限的操作方可采用root用户进行操作,可以在本方案中使用postgres用户及该用户的密码替换replcia及replica用户的密码)

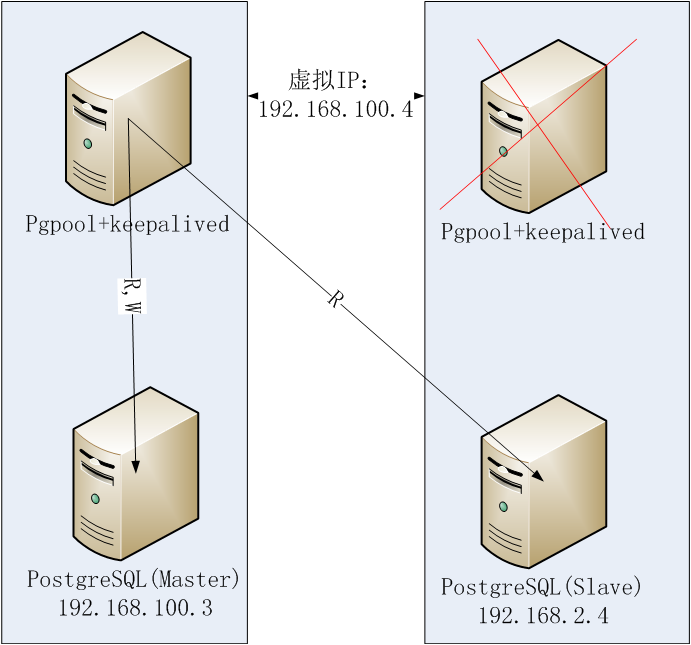
方案逻辑图

192.168.100.3的pgpool故障图
192.168.100.4的pgpool故障图

192.168.100.3的Master故障图
一、环境信息
操作系统:CentOS6.6
数据库:PostgreSQL9.3.5
物理机两台:node1,node2
Keepalived:keepalived-1.2.15
pgpool:pgpool-II-3.3.3
一、 安装Linux操作系统CentOS6.6(两台物理机操作)
主节点:node1:IP:192.168.100.3
备节点:node2:IP:192.168.2.4
VIP:192.168.100.4
二、 安装完Linux操作系统之后的系统调整(两台物理机操作)
2.1主备节点时钟同步:
/usr/sbin/ntpdate asia.pool.ntp.org && /sbin/hwclock –systohc
2.2给两个机器分别命名:node1,node2
第一台机器命名为node1
2.2.1 修改/etc/sysconfig/network中的hostname
vi /etc/sysconfig/network
HOSTNAME=node1 #修改localhost.localdomain为node1
2.2.2 修改/etc/hosts文件
vi /etc/hosts
127.0.0.1 node1 localhost #修改localhost.localdomain为node1
shutdown -r now #最后,重启服务器即可
第二台机器命名为node2
2.2.3 修改/etc/sysconfig/network中的hostname
vi /etc/sysconfig/network
HOSTNAME=node2 #修改localhost.localdomain为node2
2.2.4 修改/etc/hosts文件
vi /etc/hosts
127.0.0.1 node2 localhost #修改localhost.localdomain为node2
shutdown -r now #最后,重启服务器即可。
2.3.OS资源调整
时区调整: (如果已经调好同步不需要做)
vi
/etc/sysconfig/clock
ZONE="Asia/Shanghai"
UTC=false
ARC=false
vi
/etc/sysconfig/i18n
LANG="en_US.UTF-8"
vi /etc/sysctl.conf
kernel.shmmni =
4096
kernel.sem = 50100
64128000 50100 1280
fs.file-max =
7672460
net.ipv4.ip_local_port_range
= 9000 65000
net.core.rmem_default
= 1048576
net.core.rmem_max =
4194304
net.core.wmem_default
= 262144
net.core.wmem_max =
1048576
net.ipv4.tcp_tw_recycle = 1
net.ipv4.tcp_max_syn_backlog
= 4096
net.core.netdev_max_backlog
= 10000
vm.overcommit_memory
= 0
net.ipv4.ip_conntrack_max
= 655360
fs.aio-max-nr =
1048576
net.ipv4.tcp_timestamps = 0
使文件修改生效
sysctl –p
vi
/etc/security/limits.conf
* soft nofile
131072
* hard nofile
131072
* soft nproc 131072
* hard nproc 131072
* soft core
unlimited
* hard core
unlimited
* soft memlock
50000000
* hard memlock 50000000
vi
/etc/sysconfig/selinux
SELINUX=disabled
setenforce 0
防火墙根据需要配置
vi
/etc/sysconfig/iptables
-A INPUT -s
192.168.0.0/16 -j ACCEPT
-A INPUT -s
10.0.0.0/8 -j ACCEPT
-A INPUT -s
172.16.0.0/16 -j ACCEPT
# or
-A INPUT -m state --state NEW -m tcp -p tcp --dport 5432
-j ACCEPT
service iptables restart
2.4.给两个节点分别创建postgres用户并设置密码
useradd postgres
password:postgres
2.5.配置两台机器的ssh免密钥登录
[postgres@node1]$
ssh-keygen -t rsa
Generating
public/private rsa key pair.
Enter
file in which to save the key (/var/lib/pgsql/.ssh/id_rsa):
Enter
passphrase (empty for no passphrase):
Enter
same passphrase again:
Your
identification has been saved in /var/lib/pgsql/.ssh/id_rsa.
Your
public key has been saved in /var/lib/pgsql/.ssh/id_rsa.pub.
The key
fingerprint is:
[postgres@node1]$
cat ~/.ssh/id_rsa.pub >> ~/.ssh/authorized_keys
[postgres@node1]$
chmod go-rwx ~/.ssh/*
[postgres@node2$
ssh-keygen -t rsa
Generating
public/private rsa key pair.
Enter
file in which to save the key (/var/lib/pgsql/.ssh/id_rsa):
Enter
passphrase (empty for no passphrase):
Enter
same passphrase again:
Your
identification has been saved in /var/lib/pgsql/.ssh/id_rsa.
Your
public key has been saved in /var/lib/pgsql/.ssh/id_rsa.pub.
The key
fingerprint is:
[postgres@node2$
cat ~/.ssh/id_rsa.pub >> ~/.ssh/authorized_keys
[postgres@node2$
chmod go-rwx ~/.ssh/*
[postgres@node1]$
cd ~/.ssh
[postgres@node1]$
scp id_rsa.pub postgres@node2:/home/postgres/.ssh/id_rsa.pub1
[postgres@node2]
cd ~/.ssh
[postgres@node2]
cat id_rsa.pub1 | authorized_keys
[postgres@node2]scp
id_rsa.pub postgres@node1:/home/postgres/.ssh/id_rsa.pub2
[postgres@node1]
cat id_rsa.pub2| authorized_keys
2.6.创建源码包存储目录
在两个节点的/opt/目录下分别创建soft_bak目录用于存放软件安装包如:postgresql-9.3.5.tar.gz
mkdir /opt/soft_bak
设置相关目录的所属主
postgresql必须用postgres
用户安装,安装之前先改变postgresql的将要安装的目录的权限
chown –R postgres:postgres /opt/soft_bak
chown –R postgres:postgres /usr/local/
三、安装PG的依赖软件包:
yum -y install lrzsz sysstat e4fsprogs ntp readline-devel zlib zlib-devel
openssl openssl-devel pam-devel libxml2-devel libxslt-devel python-devel
tcl-devel gcc make flex bison
四、下载PostgreSQL 9.3.5 pgpool-II-3.3.3.tar.gz keepalived-1.2.15
在安装PG之前
/opt/soft_bak文件夹下应该有postgresql-9.3.5.tar.gz pgpool-II-3.4.0.tar.gz 等
五、安装PostgreSQL
主库(postgres用户安装)
cd
/opt/soft_bak/
tar zxvf
postgresql-9.3.5.tar.gz
cd
/opt/soft_bak/postgresql-9.3.5
./configure
--with-pgport=5432 --with-perl
--with-tcl --with-python --with-openssl --with-pam --without-ldap --with-libxml
--with-libxslt --with-blocksize=8
gmake
world
gmake
install-world
备库(postgres用户安装 备节点只需要安装软件,不需要init数据库)
cd
/opt/soft_bak/
tar zxvf
postgresql-9.3.5.tar.gz
cd
/opt/soft_bak/postgresql-9.3.5
./configure
--with-pgport=5432 --with-perl
--with-tcl --with-python --with-openssl --with-pam --without-ldap --with-libxml
--with-libxslt --with-blocksize=8
gmake
world
gmake
install-world
六、主备节点设置相关环境变量(主备节点应该一致)
vi
/home/postgres/.bash_profile
export PGPORT=5432
export
PGDATA=/file/data
export
LANG=en_US.utf8
export
PGHOME=/usr/local/pgsql
export
LD_LIBRARY_PATH=$PGHOME/lib:/lib64:/usr/lib64:/usr/local/lib64:/lib:/usr/lib:/usr/local/lib:$LD_LIBRARY_PATH
export DATE=`date
+"%Y%m%d%H%M"`
export
PATH=$PGHOME/bin:$PATH:.
export
MANPATH=$PGHOME/share/man:$MANPATH
export
PGUSER=postgres
export
PGHOST=$PGDATA
export
PGDATABASE=postgres
alias rm='rm -i'
alias ll='ls -lh'
在/home/postgres/目录下创建.pgpass(用于主备之间数据传输的流复制用户)
格式:
IP:端口:replication:用户:密码
(master)(在不创建replica用户的情况下可以使用postgres用户和postgres用户的密码)
192.168.100.3:5432:replication:replica:replica
192.168.2.4:5432:replication:replica:replica
(standby) (在不创建replica用户的情况下可以使用postgres用户和postgres用户的密码)
192.168.100.3:5432:replication:replica:replica
192.168.2.4:5432:replication:replica:replica
七、主节点初始化postgreSQL实例
su - postgres
initdb -D $PGDATA -E UTF8 --locale=C -U postgres -W
八、PostgreSQL配置文件调整
cd $PGDATA
vi postgresql.conf
listen_addresses = '0.0.0.0'
max_connections = 1000
superuser_reserved_connections = 13
unix_socket_directory = '$PGDATA'
unix_socket_permissions = 0700
tcp_keepalives_idle = 60
tcp_keepalives_interval = 10
tcp_keepalives_count = 10
shared_buffers = 2GB
maintenance_work_mem = 512MB
max_stack_depth = 8MB
vacuum_cost_delay = 10ms
vacuum_cost_limit = 10000
bgwriter_delay = 10ms
wal_level = hot_standby
wal_buffers = 16384kB
checkpoint_segments = 64
checkpoint_timeout = 5min
archive_mode = on
archive_command = '/bin/date'
max_wal_senders = 32
hot_standby = on
random_page_cost = 2.0
effective_cache_size = 12000MB
log_destination = 'csvlog'
logging_collector = on
log_directory = 'pg_log'
log_truncate_on_rotation = on
log_rotation_age = 1d
log_rotation_size = 10MB
log_min_duration_statement = 1s
log_checkpoints = on
log_lock_waits = on
deadlock_timeout = 1s
log_connections = on
log_disconnections = on
log_error_verbosity = verbose
log_statement = 'ddl'
track_activity_query_size = 2048
autovacuum = on
log_autovacuum_min_duration = 0
log_timezone = 'PRC'
datestyle = 'iso, mdy'
timezone = 'PRC'
lc_messages = 'C'
lc_monetary = 'C'
lc_numeric = 'C'
lc_time = 'C'
default_text_search_config =
'pg_catalog.english'
shared_preload_libraries =
'pg_stat_statements,auto_explain'
pg_stat_statements.max = 1000
pg_stat_statements.track = all
pg_stat_statements.track_utility = off
track_io_timing = off
custom_variable_class
= ‘pg_stat_statements,auto_explain’
pg_stat_statements.max
= 1000
pg_stat_statements.track
= all
auto_explain.log_min_duration
= 10ms
auto_explain.log_analyze
= false
auto_explain.log_verbose
= false
auto_explain.log_nested_statements
= false
九、使系统具有监控SQL功能
su -
postgres
pg_clt
–D $PGDATA start
psql –h
node1 –p 5432 –U postgres –d postgres
postgres=#create
extention pg_stat_statements;
postgres=#select
pg_stat_statements_reset();
//select
* from pg_stat_statements;
十、主备方案postgresql.conf pg_hba.conf的配置
vim postgres.conf
listen_addresses='*'
wal_level = 'hot_standby'
archive_mode = on
archive_command = 'cd ./' # we can also use exit 0
max_wal_senders = 10
wal_keep_segments = 5000 # 80 GB required on pg_xlog
hot_standby = on
vim pg_hba.conf
host all all 192.168.2.4/32 trust
host postgres postgres 192.168.2.4/32 trust
host replication replica
192.168.2.4/32 trust
host all all 192.168.100.3/32 trust
host postgres postgres 192.168.100.3/32 trust
host replica replica 192.168.100.3/32 trust
十一 主备节点标志文件的配置
su –
postgres
cp
/usr/local/pgsql/share/recovery.conf.sample
/file/data/recovery.done
standby_mode
= on
recovery_target_timeline =’latest’时间线
primary_conninfo = ‘host=node2 port=5432 user=postgres’主节点信息
trigger_file = ‘/file/data/trigger_file’
十二、生成备库实例(node2上执行)
su –
postgres
pg_basebackup –D $PGDATA –Fp –Xs –v –P –h node1
–p主库端口号 –U replica(postgres)
十三、修改备库实例的备库标识文件
cd
/file/data
mv
recovery.done recovery.conf
vim
recovery.conf
standby_mode
= on
recovery_target_timeline =’latest’时间线
primary_conninfo = ‘host=node1 port=5432
user=postgres’主节点信息
trigger_file = ‘/file/data/trigger_file’
启动备库
chmod 0700 /file/data
pg_ctl –D $PGDATA
查看备库进程
ps –ef|grep postgres
查看主库进程
ps –ef|grep postgres
十四、安装pgpool-II3.3.3(两个节点操作)
将pgpool-II3.3.3下载到/opt/soft_bak
创建pgpool的安装目录
mkdir
/opt/pgpool
su -
postgres
tar zxvf pgpool-II-3.3.3.tar.gz
cd pgpool-II-3.3.3
mkdir -p /opt/pgpool
./configure --prefix=/opt/pgpool/ --with-pgsql=/usr/local/pgsql/ --with-pgsql-libdir=/opt/pgsql/lib/ --with-pgsql-includedir=/opt/pgsql/include/
make
make install
cd src/sql
[postgres@node1 sql]$ cd pgpool_adm/
[postgres@node1 pgpool_adm]$ make
[postgres@node1 pgpool_adm]$ make install
[postgres@node1 pgpool_adm]$ cd ..
[postgres@node1 sql]$ cd pgpool-recovery/
[postgres@node1 pgpool-recovery]$ make
[postgres@node1 pgpool-recovery]$ make install
[postgres@node1 pgpool-recovery]$ cd ..
[postgres@node1 sql]$ cd pgpool-regclass/
[postgres@node1 pgpool-regclass]$ make
[postgres@node1 pgpool-regclass]$ make install
十五、安装 pgpool 相关函数
su –
postgres
cd pgpool-II-3.3.3/sql
make
make
install
cd
pgpool-recovery
make
install
cd
pgpool-regclass
make
install
echo “export PATH=\” \$PATH:/opt/pgpool/bin\”
" >>/home/postgres/.bashrc
source /home/postgres/.bashrc
安装完以后/usr/local/pgsql/share/extension/目录下应该有如下文件
pgpool_recovery--1.0.sql
pgpool_recovery.control
pgpool-recovery.sql
pgpool_regclass--1.0.sql
pgpool_regclass.control
pgpool-regclass.sql
su - postgres
psql
template1 (备节点不需要创建pgpool_regclass,pgpool_recovery)
template1=# create extension
pgpool_regclass;
CREATE EXTENSION
template1=# CREATE EXTENSION pgpool_recovery;
CREATE EXTENSION
查看新增加的 recovery 管理函数
template1=# \df
List of functions
Schema |
Name | Result data type
|
Argument data
types
| Type
--------+---------------------+------------------+----------------------------------------------------------------+--------
public | pgpool_pgctl | boolean
| action text, stop_mode
text
| normal
public | pgpool_recovery |
boolean | script_name
text, remote_host text, remote_data_directory text | normal
public | pgpool_remote_start |
boolean | remote_host
text, remote_data_directory
text
| normal
public | pgpool_switch_xlog |
text |
arcive_dir
text
| normal
(4 rows)
十六、配置 pgpool-II ( 两节点操作)
--配置 pcp.conf
cd /opt/pgpool/etc
cp pcp.conf.sample pcp.conf
pg_md5 -u postgres -p
password: postgres
ba777e4c2f15c11ea8ac3be7e0440aa0
vim pcp.conf
--编写 pcp.conf 文件,写入以下
#
USERID:MD5PASSWD
postgres:ba777e4c2f15c11ea8ac3be7e0440aa0
--配置 ifconfig, arping 执行权限(由root用户执行)
# chmod u+s /sbin/ifconfig
# chmod u+s /usr/sbin/
--配置 pgpool.conf
cd /opt/pgpool/etc
cp pgpool.conf.sample pgpool.conf
--主节点的 pgpool.conf(配置文件中的用户名和配置能用postgres用户就用postgres用户,尽量减少用户)
listen_addresses = '*'
port = 9999
socket_dir = '/opt/pgpool'
pcp_port = 9898
pcp_socket_dir = '/opt/pgpool'
backend_hostname0 = 'node1' ##配置数据节点 node1
backend_port0 = 5432
backend_weight0 = 1
backend_flag0 = 'ALLOW_TO_FAILOVER'
backend_hostname1 = 'node2' ##配置数据节点 node2
backend_port1 = 5432
backend_weight1 = 1
backend_flag1 = 'ALLOW_TO_FAILOVER'
enable_pool_hba = on
pool_passwd = 'pool_passwd'
authentication_timeout = 60
ssl = off
num_init_children = 32
max_pool = 4
child_life_time = 300
child_max_connections = 0
connection_life_time = 0
client_idle_limit = 0
log_destination = 'syslog'
print_timestamp = on
log_connections = on
log_hostname = on
log_statement = on
log_per_node_statement = off
log_standby_delay = 'none'
syslog_facility = 'LOCAL0'
syslog_ident = 'pgpool'
debug_level = 0
pid_file_name = '/opt/pgpool/pgpool.pid'
logdir = '/tmp'
connection_cache = on
reset_query_list = 'ABORT; DISCARD ALL'
replication_mode = off
replicate_select = off
insert_lock = on
lobj_lock_table = ''
replication_stop_on_mismatch = off
failover_if_affected_tuples_mismatch = off
load_balance_mode = on
ignore_leading_white_space = on
white_function_list = ''
black_function_list = 'nextval,setval'
master_slave_mode = on # 设置流复制模式
master_slave_sub_mode = 'stream' # 设置流复制模式
sr_check_period = 5
sr_check_user = 'replica'
sr_check_password = 'replica'
delay_threshold = 16000
follow_master_command = ''
parallel_mode = off
pgpool2_hostname = ''
system_db_hostname = 'localhost'
system_db_port = 5432
system_db_dbname = 'pgpool'
system_db_schema = 'pgpool_catalog'
system_db_user = 'pgpool'
system_db_password = ''
health_check_period = 5
health_check_timeout = 20
health_check_user = 'replica'
health_check_password = 'replcia'
health_check_max_retries = 3
health_check_retry_delay = 1
failover_command = '/opt/pgpool/failover_stream.sh %d %H /file/data/trigger_file'
failback_command = ''
fail_over_on_backend_error = on
search_primary_node_timeout = 10
recovery_user = 'nobody'
recovery_password = ''
recovery_1st_stage_command = ''
recovery_2nd_stage_command = ''
recovery_timeout = 90
client_idle_limit_in_recovery = 0
use_watchdog = on
trusted_servers = ''
ping_path = '/bin'
wd_hostname = 'node1'
wd_port = 9000
wd_authkey = ''
delegate_IP = ''
ifconfig_path = '/sbin'
if_up_cmd = 'ifconfig eth0:0 inet $_IP_$ netmask 255.255.255.0'
if_down_cmd = 'ifconfig eth0:0 down'
arping_path =
'/usr/sbin' #
arping command path
arping_cmd = 'arping -U $_IP_$ -w 1'
clear_memqcache_on_escalation = on
wd_escalation_command = ''
wd_lifecheck_method = 'heartbeat'
wd_interval = 10
wd_heartbeat_port = 9694
wd_heartbeat_keepalive = 2
wd_heartbeat_deadtime = 30
heartbeat_destination0 = 'node2' # 配置对端的 hostname
heartbeat_destination_port0 = 9694
heartbeat_device0 = 'eth0'
wd_life_point = 3
wd_lifecheck_query = 'SELECT 1'
wd_lifecheck_dbname = 'template1'
wd_lifecheck_user = 'nobody'
wd_lifecheck_password = ''
other_pgpool_hostname0 = 'node2' ## 配置对端的 pgpool
other_pgpool_port0 = 9999
other_wd_port0 = 9000
relcache_expire = 0
relcache_size = 256
check_temp_table = on
memory_cache_enabled = off
memqcache_method = 'shmem'
memqcache_memcached_host = 'localhost'
memqcache_memcached_port = 11211
memqcache_total_size = 67108864
memqcache_max_num_cache = 1000000
memqcache_expire = 0
memqcache_auto_cache_invalidation = on
memqcache_maxcache = 409600
memqcache_cache_block_size = 1048576
memqcache_oiddir = '/opt/pgpool/oiddir'(需要现在/opt/pgpool目录下创建oiddr)
white_memqcache_table_list = ''
black_memqcache_table_list = ''
--备节点的 pgpool.conf
pgpool.conf
listen_addresses = '*'
port = 9999
socket_dir = '/opt/pgpool'
pcp_port = 9898
pcp_socket_dir = '/opt/pgpool'
backend_hostname0 = 'node1'
backend_port0 = 5432
backend_weight0 = 1
backend_flag0 = 'ALLOW_TO_FAILOVER'
backend_hostname1 = 'node2'
backend_port1 = 5432
backend_weight1 = 1
backend_flag1 = 'ALLOW_TO_FAILOVER'
enable_pool_hba = on
pool_passwd = 'pool_passwd'
authentication_timeout = 60
ssl = off
num_init_children = 32
max_pool = 4
child_life_time = 300
child_max_connections = 0
connection_life_time = 0
client_idle_limit = 0
log_destination = 'syslog'
print_timestamp = on
log_connections = on
log_hostname = on
log_statement = on
log_per_node_statement = off
log_standby_delay = 'none'
syslog_facility = 'LOCAL0'
syslog_ident = 'pgpool'
debug_level = 0
pid_file_name = '/opt/pgpool/pgpool.pid'
logdir = '/tmp'
connection_cache = on
reset_query_list = 'ABORT; DISCARD ALL'
replication_mode = off
replicate_select = off
insert_lock = on
lobj_lock_table = ''
replication_stop_on_mismatch = off
failover_if_affected_tuples_mismatch = off
load_balance_mode = on
ignore_leading_white_space = on
white_function_list = ''
black_function_list = 'nextval,setval'
master_slave_mode = on
master_slave_sub_mode = 'stream'
sr_check_period = 0
sr_check_user = 'replica'
sr_check_password = 'replica'
delay_threshold = 16000
follow_master_command = ''
parallel_mode = off
pgpool2_hostname = ''
system_db_hostname = 'localhost'
system_db_port = 5432
system_db_dbname = 'pgpool'
system_db_schema = 'pgpool_catalog'
system_db_user = 'pgpool'
system_db_password = ''
health_check_period = 0
health_check_timeout = 20
health_check_user = 'nobody'
health_check_password = ''
health_check_max_retries = 0
health_check_retry_delay = 1
failover_command = '/opt/pgpool/failover_stream.sh %d %H /file/data/trigger/file'
failback_command = ''
fail_over_on_backend_error = on
search_primary_node_timeout = 10
recovery_user = 'nobody'
recovery_password = ''
recovery_1st_stage_command = ''
recovery_2nd_stage_command = ''
recovery_timeout = 90
client_idle_limit_in_recovery = 0
use_watchdog = off
trusted_servers = ''
ping_path = '/bin'
wd_hostname = ' '
wd_port = 9000
wd_authkey = ''
delegate_IP = ' '
ifconfig_path = '/sbin'
if_up_cmd = 'ifconfig eth0:0 inet $_IP_$ netmask 255.255.255.0'
if_down_cmd = 'ifconfig eth0:0 down'
arping_path = '/usr/sbin'
# arping command path
arping_cmd = 'arping -U $_IP_$ -w 1'
clear_memqcache_on_escalation = on
wd_escalation_command = ''
wd_lifecheck_method = 'heartbeat'
wd_interval = 10
wd_heartbeat_port = 9694
wd_heartbeat_keepalive = 2
wd_heartbeat_deadtime = 30
heartbeat_destination0 = 'node1'
heartbeat_destination_port0 = 9694
heartbeat_device0 = 'eth0'
wd_life_point = 3
wd_lifecheck_query = 'SELECT 1'
wd_lifecheck_dbname = 'template1'
wd_lifecheck_user = 'nobody'
wd_lifecheck_password = ''
other_pgpool_hostname0 = 'node1'
other_pgpool_port0 = 9999
other_wd_port0 = 9000
relcache_expire = 0
relcache_size = 256
check_temp_table = on
memory_cache_enabled = off
memqcache_method = 'shmem'
memqcache_memcached_host = 'localhost'
memqcache_memcached_port = 11211
memqcache_total_size = 67108864
memqcache_max_num_cache = 1000000
memqcache_expire = 0
memqcache_auto_cache_invalidation = on
memqcache_maxcache = 409600
memqcache_cache_block_size = 1048576
memqcache_oiddir = '/var/log/pgpool/oiddir'
white_memqcache_table_list = ''
black_memqcache_table_list = ''
failover_stream.sh文件内容
#! /bin/sh
# Failover command for streaming
replication.
# This script assumes that DB node 0
is primary, and 1 is standby.
#
# If standby goes down, do nothing.
If primary goes down, create a
# trigger file so that standby takes
over primary node.
#
# Arguments: $1: failed node id. $2:
new master hostname. $3: path to
# trigger file.
failed_node=$1
new_master=$2
trigger_file=$3
# Do nothing if standby goes down.
#if [ $failed_node = 1 ]; then
# exit 0;
#fi
/usr/bin/ssh -T $new_master
/bin/touch $trigger_file
exit 0;
主节点配置
cd /opt/pgpool/etc
cp pool_hba.conf.sample pool_hba.conf
vim pool_hba.conf
host
all all 192.168.2.4/32 trust
host
replication replica 192.168.2.4/32 trust
host
postgres postgres 192.168.2.4/32 trust
host
all all 192.168.100.3/32 trust
host
replication replica 192.168.100.3/32 trust
host
postgres postgres 192.168.100.3/32 trust
host
postgres postgres 192.168.100.3/32 trust
host
all all 192.168.100.4/32 trust
host
replication replica 192.168.100.4/32 trust
host
postgres postgres 192.168.100.4/32 trust
host
postgres postgres 192.168.100.4/32 trust
备节点配置
cd /opt/pgpool/etc
cp pool_hba.conf.sample pool_hba.conf
vim pool_hba.conf
host all all 192.168.2.4/32 trust
host replication replica 192.168.2.4/32 trust
host postgres postgres 192.168.2.4/32 trust
host all all 192.168.100.3/32 trust
host replication replica 192.168.100.3/32 trust
host postgres postgres 192.168.100.3/32 trust
host postgres postgres 192.168.100.3/32 trust
host all all 192.168.100.4/32 trust
host replication replica 192.168.100.4/32 trust
host postgres postgres 192.168.100.4/32 trust
host postgres postgres 192.168.100.4/32 trust
配置密码文件(两节点操作)
su – postgres
psql
select rolname,rolpassword from
pg_authid;
vim pool_passwd
postgres:postgres的md5密码
rolname:rolpassword
pgpool启动:pgpool –n &
pgpool关闭:pgpool –m fast
stop
连接pgpool:psql –h node (or IP) –p 9999 –U postgres –d postgres
查看pgpool集群中nodes的状态
show pool_nodes;
十七、安装keepalived-1.2.15(主备两节点操作)
下载keepalived-1.2.15到/opt/sotf_bak
tar zxvf keepalived-1.2.15.tar.gz
cd keepalived-1.2.15
./configure
make
make install
node1 keepalived.conf 文件内容
global_defs {
notification_email {
acassen@firewall.loc
failover@firewall.loc
sysadmin@firewall.loc
}
notification_email_from Alexandre.Cassen@firewall.loc
smtp_server 127.0.0.1
smtp_connect_timeout 30
router_id LVS_DEVEL
}
vrrp_script chk_pgpool {
script "killall -0 pgpool"
interval 3
weight 2
}
vrrp_instance VI_1 {
state MASTER
interface eth0
virtual_router_id 51
priority 100
advert_int 1
authentication {
auth_type PASS
auth_pass 1111
}
virtual_ipaddress {
192.168.100.4
}
track_script
{
chk_pgpool
}
}
node2 keepalived.conf 文件内容
global_defs {
notification_email {
acassen@firewall.loc
failover@firewall.loc
sysadmin@firewall.loc
}
notification_email_from Alexandre.Cassen@firewall.loc
smtp_server 127.0.0.1
smtp_connect_timeout 30
router_id LVS_DEVEL
}
vrrp_script chk_pgpool {
script "killall -0 pgpool"
interval 3
weight 2
}
vrrp_instance VI_1 {
state BACKUP
interface eth0
virtual_router_id 51
priority 99
advert_int 1
authentication {
auth_type PASS
auth_pass 1111
}
virtual_ipaddress {
192.168.100.4
}
track_script {
chk_pgpool
}
}
搜索
复制
PostgreSQL+pgpooll+Keepalived双机HA方案的更多相关文章
- MySQL HA方案之MySQL半复制+MHA+Keepalived+Atlas+LVS[转]
MySQL HA方案之MySQL半复制+MHA+Keepalived+Atlas+LVS 简介 目前Mysql高可用的方案有好多,比如MMM,heartbeat+drbd,Cluster等,还有per ...
- 【Nginx】如何基于主从模式搭建Nginx+Keepalived双机热备环境?这是最全的一篇了!!
写在前面 最近出版了<海量数据处理与大数据技术实战>,详情可以关注 冰河技术 微信公众号,查看<我的<海量数据处理与大数据技术实战>出版啦!>一文. 也有不少小伙伴 ...
- Zabbix 6.0:原生高可用(HA)方案部署
Blog:博客园 个人 本部署文档适用于CentOS 8.X/RHEL 8.X/Anolis OS 8.X/AlmaLinux 8.X/Rockey Linux 8.X. 原生的HA方案终于来了 相比 ...
- nginx+keepalived 高可用方案
nginx+keepalived 高可用方案 准备工作 192.168.157.11 192.168.157.12 安装nginx 跟新yum源文件 rpm -ivh http://nginx.org ...
- 这应该是最适合国内用户的K3s HA方案
前 言 在面向生产环境的实践中,高可用是我们无法避免的问题,K3s本身也历经多个版本的迭代,HA方案也进行了不断优化,形成了目前的比较稳定的HA方案. 目前官方提供两种HA方案: 嵌入式DB的高可用( ...
- ActiveMQ笔记(3):基于Networks of Brokers的HA方案
上一篇介绍了基于ZK的ActiveMQ HA方案,虽然理解起来比较容易,但是有二个不足: 1) 占用的节点数过多,1个zk集群至少3个节点,1个activemq集群也至少得3个节点,但其实正常运行时 ...
- ActiveMQ笔记(2):基于ZooKeeper的HA方案
activemq官网给出了3种master/slave的HA方案,详见:http://activemq.apache.org/masterslave.html,基于共享文件目录,db,zookeepe ...
- Keepalived双机热备
一,Keepalived双机热备的应用场景 1,网站流量不高,压力不大,但是对服务器的可靠性要求极其高,例如实时在线OA系统,政府部门网站系统,医院实时报医系统,公安局在线报案系统,股市后台网站系统等 ...
- Nginx+keepalived双机热备(主主模式)
之前已经介绍了Nginx+Keepalived双机热备的主从模式,今天在此基础上说下主主模式的配置. 由之前的配置信息可知:master机器(master-node):103.110.98.14/19 ...
随机推荐
- 归并排序(Python)
一.采用分治策略:将原问题划分成n个规模较小的但结构和原问题相同的子问题,递归解决这些子问题后合并各个结果从而得到原问题的解. 二.分治策略的步骤: 分解:将原问题分解成一系列子问题 解决:子问题粒度 ...
- node--20 moogose demo2
db.js /** * Created by Danny on 2015/9/28 16:44. */ //引包 var mongoose = require('mongoose'); //创建数据库 ...
- scanf使用与运算符
scanf接收输入 #include <stdio.h> #include <stdlib.h> // 接收用户输入的小写字母,输出大写字母 int main() { char ...
- hdoj--2094--产生冠军(集合函数)
产生冠军 Time Limit: 1000/1000 MS (Java/Others) Memory Limit: 32768/32768 K (Java/Others) Total Submi ...
- RBAC介绍
基于角色的权限访问控制(Role-Based Access Control)作为传统访问控制(自主访问,强制访问)的有前景的代替受到广泛的关注.在RBAC中,权限与角色相关联,用户通过成为适当角色的成 ...
- HDU 1175 连连看【BFS】
题意:给出起点和终点的棋子,不能经过别的棋子,而且转弯的次数不能超过2次,问能否消除 和逃离迷宫一样,每个节点记录下来它的当前的方向和转弯的次数,再搜 注意特判起点的棋子和终点的棋子为0或者不一样的情 ...
- The Structure of an App-ios应用架构-MVC
During startup, the UIApplicationMain function sets up several key objects and starts the app runnin ...
- 3ds Max制作一面飘扬的旗帜效果图
在大家平时建模过程中肯定会遇到很多力学作用的模型,它们有很多的不确定性,通过人工拖拽的手段很难达到理想的自然效果,这时我们就需要一些特殊的命令来完成我们模拟自然状态的效果.下面我们就一面飘扬的国旗来探 ...
- (52)KeyError错误
当出现:22KeyError: 'xxxxxx'这样的错误,可以肯定依赖出问题了,一般是你引用某个字段,但没有定义,又没有指定依赖的模块,最后找不到对应字段 解决方法:开发工具,把 xxxxxx 去搜 ...
- unity 调用 .dll 或 .so时遇到的问题
1.32位的 .dll 无法在64位的unity编辑器下运行. System.DllNotFoundException: xxx , 64位的程序运行32位的dll是会报这种错 2.Failed t ...