【Vue】 签名组件
一、需求背景:
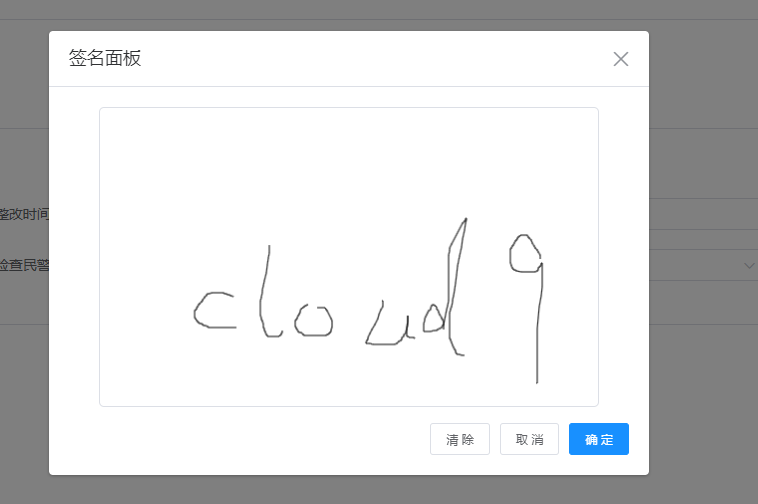
检查业务,检查完成后,执行人需要签字证明检查完成
二、实现效果:
三、技术实现
通过canvas转换成blob对象,可以上传到文件服务,或者是下载另存为到本地磁盘
注意重点,canvas的样式的宽高和dom对象宽高一定要一致才可以,否则无法在面板绘制线条!
<template>

  <el-dialog title="签名面板" :close-on-click-modal="false" append-to-body :visible.sync="visible" class="JNPF-dialog JNPF-dialog_center" lock-scroll width="600px">

    <canvas id="signatureCanvas" style="width: 500px; height: 300px;"></canvas>

    <span slot="footer" class="dialog-footer">

      <el-button @click="clearCanvas"> 清 除</el-button>

      <el-button @click="visible = false"> 取 消</el-button>

      <el-button type="primary" @click="dataFormSubmit()" :loading="btnLoading"> 确 定</el-button>

    </span>

  </el-dialog>

</template>

<script>

import request from '@/utils/request'

export default {

  name: 'SignPanel',

  components: {},

  props: {

    pathType: {

      type: String,

      require: true,

      default: 'annexpic'

    },

    apiData: {

      type: Object,

      require: true,

      default: () => {}

    }

  },

  data() {

    return {

      visible: false,

      btnLoading: false,

      canvasInstance: null,

      canvasContext: null,

      drawing: false,

      lastX: false,

      lastY: false

    }

  },

  mounted() {

  },

  methods: {

    init() {

      this.visible = true

      this.$nextTick(() => {

        this.initialCanvas()

      })

    },

    initialCanvas() {

      // 获取画布元素和上下文对象

      const canvas = document.getElementById('signatureCanvas')

      const ctx = canvas.getContext('2d');

      this.canvasInstance = canvas

      this.canvasContext = ctx

// 设置 canvas 的宽度和高度

      canvas.width = 500; // 根据需要设置

      canvas.height = 300; // 根据需要设置

      // // 初始化变量

      this.drawing = false

      this.lastX = 0

      this.lastY = 0

      const _that = this;

      // 处理鼠标按下事件

      canvas.addEventListener('mousedown', (e) => {

        _that.lastX = e.offsetX

        _that.lastY = e.offsetY

        _that.drawing=true;

      })

      // 处理鼠标移动事件

      canvas.addEventListener('mousemove', (e) => {

        if (!_that.drawing) return

        ctx.beginPath()

        ctx.moveTo(_that.lastX, _that.lastY)

        ctx.lineTo(e.offsetX , e.offsetY)

        ctx.stroke()

        ctx.closePath()

        _that.lastX = e.offsetX

        _that.lastY = e.offsetY

      })

      // 处理鼠标松开事件

      canvas.addEventListener('mouseup', (e) => {

        _that.drawing = false

      })

      // 处理鼠标离开事件

      canvas.addEventListener('mouseout', () => {

        _that.drawing = false

      })

    },

    dataFormSubmit() {

      this.toUploadSignPic()

    },

    dataURLtoBlob(dataUrl) {

      const arr = dataUrl.split(','), mime = arr[0].match(/:(.*?)/)[1]

      const bstr = atob(arr[1])

      let n = bstr.length

      const u8arr = new Uint8Array(n)

      while(n--){

        u8arr[n] = bstr.charCodeAt(n)

      }

      return new Blob([u8arr], {type:mime})

    },

    toUploadSignPic() {

      const dataUrl = this.canvasInstance.toDataURL('image/png')

      const blobData = this.dataURLtoBlob(dataUrl)

      // 创建 File 对象

      const fileName = 'image.png'

      const file = new File([blobData], fileName, {type: 'image/png'})

      const formData = new FormData()

      formData.append('file', file)

      this.uploadSignApi(formData).then(res => {

        if (res.code !== 200) return

        this.$emit('whenSuccess', res, file)

        this.visible = false

      }).catch(err => {

        this.$emit('whenError', err, file)

        this.visible = false

      })

    },

    toDownloadSignPic() {

      const dataUrl = this.canvasInstance.toDataURL('image/png')

      const link = document.createElement('a')

      link.href = dataUrl

      link.download = 'signature.png'

      link.click()

    },

    clearCanvas() {

      this.canvasContext.clearRect(0, 0,  this.canvasInstance.width,  this.canvasInstance.height)

    },

    uploadSignApi(formData) {

      const apiPath = `/api/file/Uploader/${this.pathType}`

      const param = this.apiData

      Object.keys(param).forEach(key => ( formData.append(key, param[key]) ))

      return request({

        url: apiPath,

        method: 'POST',

        headers: { 'Content-Type': 'multipart/form-data' },

        data: formData

      })

    }

  }

}

</script>

<style scoped lang="scss">

canvas {

  border: 1px solid #DCDFE6;

  cursor: crosshair;

  border-radius: 5px;

}

</style>
因为兼容现有系统的组件,我而外将框架自带的图片上传改造成签名上传组件
图片上传组件点击时一定会选取本地文件,为了解决这个问题我是选择直接隐藏了上传组件
改为追加了一个签名面板按钮,面板确认时,发射器回调到组件上传成功的回调
因为签名只存在一份,所以文件数量限制1即可,通过上传成功的回调就能拦截处理
<template>

  <div class="UploadFile-container">

    <el-button @click="openSignPanel" style="margin-right: 5px;">打开签名</el-button>

    <template v-if="fileList.length">

      <transition-group class="el-upload-list el-upload-list--picture-card" tag="ul" name="el-list">

        <li class="el-upload-list__item is-success" v-for="(file,index) in fileList"

            :key="file.fileId">

          <el-image :src="define.comUrl+file.url" class="el-upload-list__item-thumbnail" :preview-src-list="getImgList(fileList)" :z-index="10000" :ref="'image'+index">

          </el-image>

          <span class="el-upload-list__item-actions">

            <span class="el-upload-list__item-preview" @click="handlePictureCardPreview(index)">

              <i class="el-icon-zoom-in"></i>

            </span>

            <span v-if="!disabled" class="el-upload-list__item-delete" @click="handleRemove(index)">

              <i class="el-icon-delete"></i>

            </span>

          </span>

        </li>

      </transition-group>

    </template>

    <template v-if="!detailed">

      <el-upload

        v-show="false"

        :action="define.comUploadUrl+'/'+type"

        :headers="uploadHeaders" :data="params"

        ref="elUpload"

        :on-success="handleSuccess"

        :multiple="limit!==1"

        :show-file-list="false"

        accept="image/*"

        :before-upload="beforeUpload"

        :disabled="disabled"

        list-type="picture-card"

        :auto-upload="false"

        class="upload-btn">

        <i slot="default" class="el-icon-plus" disabled></i>

      </el-upload>

    </template>

    <template>

      <div class="el-upload__tip" slot="tip" v-if="tipText">{{ tipText }}</div>

    </template>

    <sign-panel

      :visible.sync="signPaneVisible"

      :path-type="type"

      :api-data="params"

      ref="signForm"

      @whenSuccess="signUploadSuccess"

      @whenError="signUploadError"

    />

  </div>

</template>

<script>

import emitter from 'element-ui/src/mixins/emitter'

import SignPanel from '@/components/Generator/components/Upload/SignPanel.vue'

import BigForm from '@/views/dp-mng/scr-se-check/big-form.vue'

let { methods: { dispatch } } = emitter

const units = {

  KB: 1024,

  MB: 1024 * 1024,

  GB: 1024 * 1024 * 1024

}

export default {

  name: 'UploadSign',

  components: { BigForm, SignPanel },

  props: {

    value: {

      type: Array,

      default: () => []

    },

    type: {

      type: String,

      default: 'annexpic'

    },

    disabled: {

      type: Boolean,

      default: false

    },

    detailed: {

      type: Boolean,

      default: false

    },

    showTip: {

      type: Boolean,

      default: false

    },

    limit: {

      type: Number,

      default: 0

    },

    accept: {

      type: String,

      default: 'image/*'

    },

    sizeUnit: {

      type: String,

      default: 'MB'

    },

    pathType: {

      type: String,

      default: 'defaultPath'

    },

    isAccount: {

      type: Number,

      default: 0

    },

    folder: {

      type: String,

      default: ''

    },

    fileSize: {

      default: 10

    },

    tipText: {

      type: String,

      default: ''

    }

  },

  data() {

    return {

      signPaneVisible: false,

      fileList: [],

      uploadHeaders: { Authorization: this.$store.getters.token },

    }

  },

  watch: {

    value: {

      immediate: true,

      handler(val) {

        this.fileList = Array.isArray(val) ? val : []

      }

    }

  },

  computed: {

    params() {

      return {

        pathType: this.pathType,

        isAccount: this.isAccount,

        folder: this.folder

      }

    }

  },

  methods: {

    signUploadSuccess(result, file) {

      this.handleSuccess(result, file, this.$refs.elUpload.fileList)

    },

    signUploadError() {

      console.log(result)

    },

    openSignPanel() {

      this.signPaneVisible = true

      this.$refs.signForm.init()

    },

    beforeUpload(file) {

      if (this.fileList.length >= this.limit) {

        this.handleExceed()

        return false

      }

      const unitNum = units[this.sizeUnit];

      if (!this.fileSize) return true

      let isRightSize = file.size / unitNum < this.fileSize

      if (!isRightSize) {

        this.$message.error(`图片大小超过${this.fileSize}${this.sizeUnit}`)

        return isRightSize;

      }

      let isAccept = new RegExp('image/*').test(file.type)

      if (!isAccept) {

        this.$message.error(`请上传图片`)

        return isAccept;

      }

      return isRightSize && isAccept;

    },

    handleSuccess(res, file, fileList) {

      if (this.fileList.length >= this.limit) return this.handleExceed()

      if (res.code == 200) {

        this.fileList.push({

          name: file.name,

          fileId: res.data.name,

          url: res.data.url

        })

        this.$emit('input', this.fileList)

        this.$emit('change', this.fileList)

        dispatch.call(this, 'ElFormItem', 'el.form.change', this.fileList)

      } else {

        this.$refs.elUpload.uploadFiles.splice(fileList.length - 1, 1)

        fileList.filter(o => o.uid != file.uid)

        this.$emit('input', this.fileList)

        this.$emit('change', this.fileList)

        dispatch.call(this, 'ElFormItem', 'el.form.change', this.fileList)

        this.$message({ message: res.msg, type: 'error', duration: 1500 })

      }

    },

    handleExceed(files, fileList) {

      this.$message.warning(`当前限制最多可以上传${this.limit}张图片`)

    },

    handlePictureCardPreview(index) {

      this.$refs['image' + index][0].clickHandler()

    },

    handleRemove(index) {

      this.fileList.splice(index, 1)

      this.$refs.elUpload.uploadFiles.splice(index, 1)

      this.$emit("input", this.fileList)

      this.$emit('change', this.fileList)

      dispatch.call(this, 'ElFormItem', 'el.form.change', this.fileList)

    },

    getImgList(list) {

      const newList = list.map(o => this.define.comUrl + o.url)

      return newList

    }

  }

}

</script>

<style lang="scss" scoped>

>>> .el-upload-list--picture-card .el-upload-list__item {

  width: 120px;

  height: 120px;

}

>>> .el-upload--picture-card {

  width: 120px;

  height: 120px;

  line-height: 120px;

}

.upload-btn {

  display: inline-block;

}

.el-upload__tip {

  color: #a5a5a5;

  word-break: break-all;

  line-height: 1.3;

  margin-top: 5px;

}

// .el-upload-list--picture-card {

//   display: inline-block;

//   height: 0;

// }

</style>
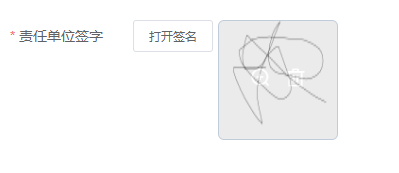
表单效果:
四、2024年04月02日更新:
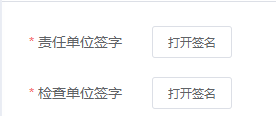
发现复用签名组件时,第一个签名完成后,第二个签名无法绘制了
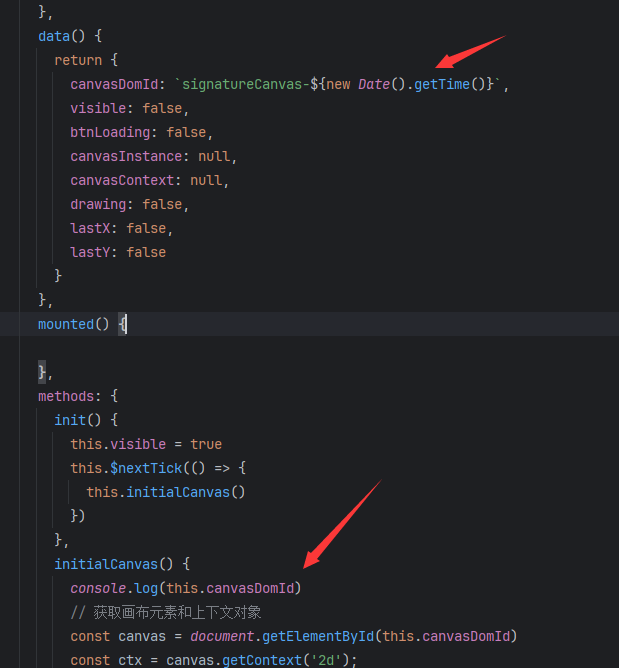
猜测是引用丢失问题,id唯一,第一次使用后,第二次就还是指向这个id的对象
绘制时的dom元素还是之前那个对象
所以解决办法是每次签名都用新的dom元素
五、关于H5和小程序版本的签名组件
直接使用uniapp的API就可以实现效果,在uniapp里面不能再通过dom元素抓取了
详细API说明见:
https://uniapp.dcloud.net.cn/component/canvas.html#canvas
组件代码:check-sign.vue
<template>

	<view>

		 <van-overlay :show="initialCanvasFlag" z-index="999999">

		  <div class="wrapper">

			<van-loading class="loading-icon" type="spinner" size="32px" text-size="18px" color="#1989fa">加载中...</van-loading>

		  </div>

		</van-overlay>

		<view v-show="!initialCanvasFlag">

			<view class="canvas-tank">

				<canvas canvas-id="signatureCanvas" id="signatureCanvas" @touchstart="startDrawing" @touchmove="draw" @touchend="stopDrawing"></canvas>

			</view>

			<view class="form-footer">

				<van-row style="width: 100%;" justify="space-around" gutter="10">

					<van-col span="8" class="form-footer-btn">

						<van-button round block type="default" @click="cancelSignature">取消</van-button>

					</van-col>

					<van-col span="8" class="form-footer-btn">

						<van-button round block type="default" @click="clearSignature">清空</van-button>

					</van-col>

					<van-col span="8" class="form-footer-btn">

						<van-button round block type="primary" :loading="uploadLoading" @click="saveSignature">确定</van-button>

					</van-col>

				</van-row>

			</view>

		</view>

	</view>

</template>

<script>

import { uploadPic } from '@/api/jnpf/file'

export default {

	data() {

		return {

			uploadLoading: false,

			initialCanvasFlag: false,

			canvasIsDrawing: false,

			canvasInstance: null,

			canvasContext: null,

			canvasWidth: 0,

			canvasHeight: 0,

			lastX: 0, // 上一个点的 X 坐标

			lastY: 0, // 上一个点的 Y 坐标

			flag: '',

			flagMap: {

				'1': 'whenSignConfirm',

				'2': 'whenSign2Confirm'

			},

			flagCancelMap: {

				'1': 'whenSignCancel',

				'2': 'whenSign2Cancel'

			}

		}

	},

	onReady() {

		this.initialCanvas()

	},

	onLoad(options) {

		this.flag = options.flag

	},

	methods: {

		/* ------------- canvasEvent start ---------------- */

		startDrawing(event) {

			this.canvasIsDrawing = true

			const { x, y } = event.touches[0]

			this.lastX = x

			this.lastY = y

		},

		draw(event) {

			if (!this.canvasIsDrawing) return

			const { x, y } = event.touches[0]

			const currentX = x

			const currentY = y

			this.canvasContext.beginPath()

			this.canvasContext.moveTo(this.lastX, this.lastY)

			this.canvasContext.lineTo(currentX, currentY)

			this.canvasContext.setStrokeStyle('black')

			this.canvasContext.setLineWidth(5)

			this.canvasContext.stroke()

			this.canvasContext.draw(true)

			this.lastX = currentX

			this.lastY = currentY

		},

		stopDrawing(event) {

			if (!this.canvasIsDrawing) return

			this.canvasIsDrawing = false

			this.canvasContext.draw(true) // 刷新画布

		},

		/* ------------- canvasEvent end ---------------- */

		initialCanvas() {

			this.initialCanvasFlag = true

			/* 动态获取canvas画布的宽高 */

			const { windowWidth, windowHeight } = uni.getSystemInfoSync()

			this.canvasWidth = windowWidth

			this.canvasHeight = windowHeight - 110

			console.log(`sys ${windowWidth}, ${windowHeight}`)

			console.log(`canvas ${this.canvasWidth}, ${this.canvasHeight}`)

			/* 对象绑定 */

			// const ctx = canvas.getContext('2d')

			// this.canvasInstance = canvas

			this.canvasContext = uni.createCanvasContext('signatureCanvas')

			this.initialCanvasFlag = false

		},

		clearSignature() {

			this.canvasContext.clearRect(0, 0, this.canvasWidth, this.canvasHeight)

			this.canvasContext.draw(true)

		},

		cancelSignature() {

			uni.navigateBack()

		},

		saveSignature() {

			this.uploadLoading = true

			const timestamp = new Date().getTime()

			uni.canvasToTempFilePath({

				canvasId: 'signatureCanvas',

				fileType: 'jpg', // 输出的图片格式

				quality: 1, // 图片的质量,范围0~1,默认值为1

				success: (res) => {

					// 这里可以将 tempFilePath 保存到本地或者上传到服务器

					const dataUrl = res.tempFilePath

					// 创建 File 对象

					const fileName = `sign-${timestamp}.png`

					uploadPic(dataUrl,fileName).then(res => {

						uni.showToast({ title: '签名已保存', icon: 'success' })

						this.uploadLoading = false

					}).catch(err => {

						// console.error(err)

						uni.showToast({ title: '保存签名成功', icon: 'none' })

						this.uploadLoading = false

						/* 给上一页传递数据  */

						let pages = getCurrentPages()

						let prevPage = pages[pages.length - 2]

						const callBackMethodName = this.flagMap[this.flag]

						prevPage.$vm[callBackMethodName](err, fileName)

						uni.navigateBack()

					})

				},

				fail: (err) => {

					console.error(err)

					uni.showToast({ title: '保存签名失败', icon: 'none' })

					this.uploadLoading = false

					/* 给上一页传递数据  */

					let pages = getCurrentPages()

					let prevPage = pages[pages.length - 2]

					const cancelCallBackMethodName = this.flagCancelMap[this.flag]

					prevPage.$vm[cancelCallBackMethodName](err)

					uni.navigateBack()

				}

			})

		},

		dataURLtoBlob(dataUrl) {

			const arr = dataUrl.split(','), mime = arr[0].match(/:(.*?)/)[1]

			const bstr = atob(arr[1])

			let n = bstr.length

			const u8arr = new Uint8Array(n)

			while(n--) u8arr[n] = bstr.charCodeAt(n)

			return new Blob([u8arr], { type: mime })

		},

	}

}

</script>

<style scoped>

.form-footer {

	position: fixed;

	width: 100vw;

	padding: 10px 5px 10px 5px;

	bottom: 0;

	background-color: #fff;

}

.canvas-tank {

	width: 100vw;

	height: calc(100vh - 110px);

	background-color: #fff;

	/* border: 1px solid black; */

}

#signatureCanvas {

	width: 100vw;

	height: calc(100vh - 110px);

}

.wrapper {

    display: flex;

    align-items: center;

    justify-content: center;

    height: 100vh;

	width: 100vw;

}

.loading-icon {

    width: 120px;

    height: 120px;

}

</style>
实现效果:
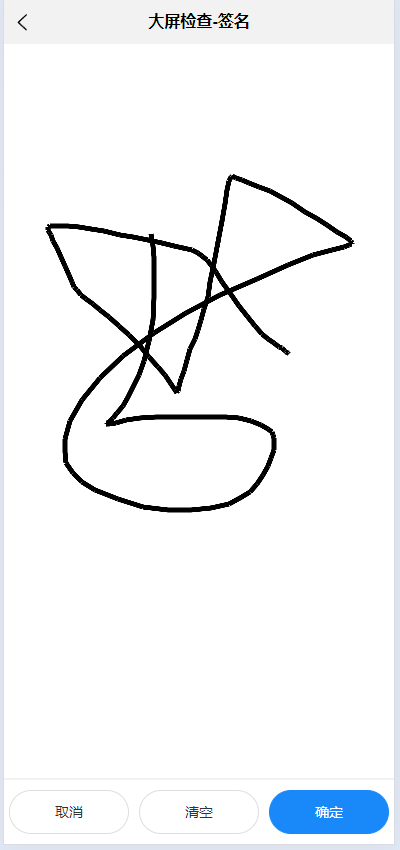
先上传到后台服务,响应文件存储信息
接口不是uni原生的,用的是Alova接口请求,有做Uni的适配参数
/* 图片上传接口 */

export const uploadPic = (filePath,fileName) => {

	const type = 'annexpic'

	const defaultPara = {

		pathType: 'defaultPath',

		isAccount: 0,

		folder: ''

	}

	return requestJnpf.Post(

			`${uploadPath}/${type}`,

			{ filePath, fileName, ... defaultPara },

			{ requestType: 'upload', fileType: 'image' })

			.send();

}
关于Alova的一些文档
1、默认会开启响应缓存,要配置禁用缓存
https://alova.js.org/zh-CN/tutorial/cache/mode
2、文件上传有uni适配
https://alova.js.org/zh-CN/tutorial/request-adapter/alova-adapter-uniapp/
结合Vant上传组件的方式:
重写上传组件的上传事件
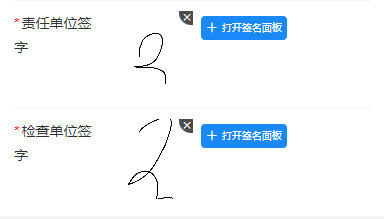
<van-field name="signPicList" label="责任单位签字" readonly :rules="rules.signPicList" required>

  <template #input>

    <van-uploader v-model="dataForm.signPicList" @delete="whenSignDelete" @click-upload="whenOpenSignUpload">

      <van-button icon="plus" type="primary" size="mini">打开签名面板</van-button>

    </van-uploader>

  </template>

</van-field>

<van-field name="signPic2List" label="检查单位签字" readonly :rules="rules.signPic2List" required>

  <template #input>

    <van-uploader v-model="dataForm.signPic2List" @delete="whenSign2Delete" @click-upload="whenOpenSign2Upload">

      <van-button icon="plus" type="primary" size="mini">打开签名面板</van-button>

    </van-uploader>

  </template>

</van-field>
vant-upload的选取文件事件可以被阻止,这样可以跳转到签名组件了
whenSignDelete(val) {

  this.dataForm.signPic = []

  this.dataForm.signPicList = []

},

whenOpenSignUpload(event) {

  /* 阻止默认的选取文件事件 */

  event.preventDefault()

  /* 跳转到签字页面进行签字处理 */

  uni.navigateTo({

    url: `${this.signUrl}?flag=1`,

    animationType: 'slide-in-right',

    animationDuration: 200

  })

},
表单样式:
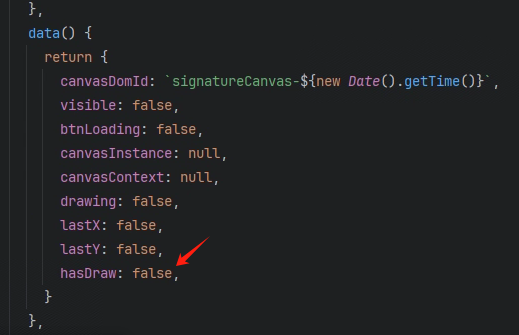
六、是否签名的校验处理:
我的猜想和别人组件里的是差不多的,追加了一个是否绘制了的判断
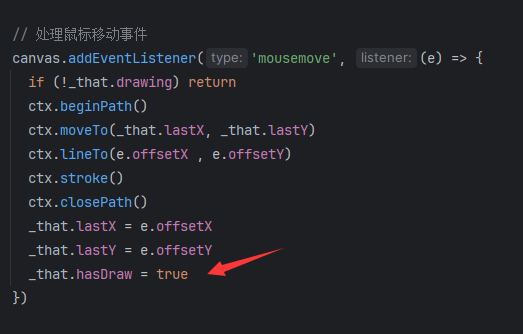
uniApp 的api同理
七、签名回显处理
Web端通过canvasContext的drawImage绘制,入参需要提供Image元素对象,src声明图像来源
要设置图片对象的跨域属性,否则在重新提交签名的时候,canvas转换报错 图像被污染....
然后绘制方法要放到onload中才会触发
initialCanvasEcho() {

  if (!this.echoSrc) return

  const image = new Image()

  image.src = this.echoSrc

  image.setAttribute("crossOrigin",'anonymous')  /* canvas跨域报错 */

  image.onload = () => {

    this.canvasContext.drawImage(image, 0, 0)

    this.hasDraw = true

  }

}
uniapp的canvas做好了一层封装,直接提供图片url即可:
initialCanvasEcho() {

	if (!this.signSrc) return

	this.canvasContext.drawImage(this.signSrc, 0, 0, this.canvasWidth, this.canvasHeight)

	this.canvasContext.draw(true)

	this.canvasHasDrawing = true

}
但是这里发现的问题是回显只作用最开始的一次,后续不能回显了,问题暂定中....
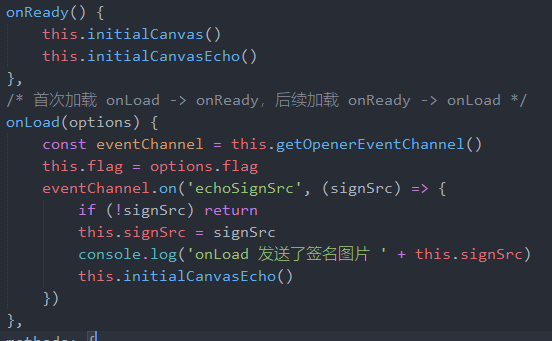
签名回显处理的问题解决:
首次加载 onLoad -> onReady,后续加载 onReady -> onLoad
onLoad 先走就会收到图片地址,然后再调用echo方法回显是正常的
但是后续重复调用的时候,是onReady先触发的,echo方法在前,没判断到图片存在
所以解决办法是再onLoad事件频道收到回显事件后,补加一个回调处理的
【Vue】 签名组件的更多相关文章
- vue.js组件化开发实践
前言 公司目前制作一个H5活动,特别是有一定统一结构的活动,都要码一个重复的轮子.后来接到一个基于模板的活动设计系统的需求,便有了下面的内容.借油开车. 组件化 需求一到,接就是怎么实现,技术选型自然 ...
- 如何理解vue.js组件的作用域是独立的
vue.js组件的作用域是独立,可以从以下三个方面理解: 1.父组件模板在父组件作用域内编译,父组件模板的数据用父组件内data数据:2.子组件模板在子组件作用域内编译,子组件模板的数据用子组件内da ...
- Vue 子组件向父组件传参
直接上代码 <body> <div id="counter-event-example"> <p>{{ total }}</p> & ...
- VUE.JS组件化
VUE.JS组件化 前言 公司目前制作一个H5活动,特别是有一定统一结构的活动,都要码一个重复的轮子.后来接到一个基于模板的活动设计系统的需求,便有了下面的内容.借油开车. 组件化 需求一到,接就是怎 ...
- Vue动态组件
前面的话 让多个组件使用同一个挂载点,并动态切换,这就是动态组件.本文将详细介绍Vue动态组件 概述 通过使用保留的 <component> 元素,动态地绑定到它的 is 特性,可以实现动 ...
- vue中组件的四种方法总结
希望对大家有用 全局组件的第一种写法 html: <div id = "app"> <show></show></div> js: ...
- 如何抽象一个 Vue 公共组件
之前一直想写一篇关于抽象 Vue 组件的随笔,无奈一直没想到好的例子.恰巧最近为公司项目做了一个数字键盘的组件,于是就以这个为例聊聊如何抽象 Vue 的组件. 先上 Demo 与 源码.(demo最好 ...
- vue的组件和生命周期
Vue里组件的通信 通信:传参.控制.数据共享(A操控B做一个事件) 模式:父子组件间.非父子组件 父组件可以将一条数据传递给子组件,这条数据可以是动态的,父组件的数据更改的时候,子组件接收的也会变化 ...
- 为什么VUE注册组件命名时不能用大写的?
这段时间一直在弄vue,当然也遇到很多问题,这里就来跟大家分享一些注册自定义模板组件的心得 首先"VUE注册组件命名时不能用大写"其实这句话是不对的,但我们很多人开始都觉得是对的, ...
- vue的组件化运用(数据在两个组件互传,小问题总结)
一.vue的组件化应用 首先,知道有哪些相关的属性需要用到,再慢慢去理解,运用. 1.两个vue页面 2. slot占位符(可用可不用) 3.props内置属性 4.watch监听函数 5.impor ...
随机推荐
- uniapp SyntaxError: Unexpected token u in JSON at position 0 解决方案
今天在做页面跳转传值的时候,一直出现下面的报错: 后来查看了下文档,说如果你的JSON数据是在上一个页面传值过来的话, 这时候在接收数据页解析JSON也会报该错误,因为此时并没有相关的JSON数据从上 ...
- python-使用pyecharts绘制各省份985学校数量图
1.环境 代码运行环境:python3.7 相关的库:pyecharts 1.7.1 代码编辑器:visual studio code 2.目的 通过使用pyecharts库,来绘制全国各省985高校 ...
- 使用线程池实现为多个客户端提供Echo服务
import java.io.*; import java.net.ServerSocket; import java.net.Socket; import java.util.Scanner; im ...
- .net程序反编译教程(附反编译工具)
一.以windows服务和winform项目为例,此处用的是winform,发布后的程序都会生成.exe文件,如果有其它关联的程序集,会打包成.dll的动态库文件,一般打包后exe和dll都会带.pd ...
- [flask]统一API响应格式
前言 在设计API返回内容时,通常需要与前端约定好API返回响应体内容的格式.这样方便前端进行数据反序列化时相应的解析处理,也方便其它服务调用.不同公司有不同的响应内容规范要求,这里以常见的JSON响 ...
- java多线程-3-使用多线程的时机
许多人对于计算机的运行原理不了解,甚至根本不了解. 不幸的是,此类中的一部分人也参与了计算机的编码工作.可想而知,编写的效率和结果.听者伤心,闻者流泪. 此类同学的常见的误解: 并发就能加快任务完成 ...
- win10系统常用命令(netstat、ping、telnet、sc、netsh命令)
netstat命令 1. 查找端口占用 netstat -ano netstat -ano | findstr 5000 ping命令 ping 192.168.1.1 ping baidu.com ...
- unp.h的安装以及第一个程序的运行
unp.h的安装以及第一个程序的运行 源代码下载以及编译 点击此处下载源代码 解压到本地文件夹,如果访问不了GitHub的话就用我搬到gitee的仓库吧 git clone https://gitee ...
- 开发板测试手册——USB 4G 模块、GPS 定位功能操作步骤详解(3)
目录 4 USB 4G 模块测试 41 4.1 网络功能测试 42 4.2 短信功能测试 43 4.3 GPS 定位功能测试 44 4.4 通话功能测试 45 4.5 测试程序编译 46 5 USB ...
- 深度长文解析SpringWebFlux响应式框架15个核心组件源码
Spring WebFlux 介绍 Spring WebFlux 是 Spring Framework 5.0 版本引入的一个响应式 Web 框架,它与 Spring MVC 并存,提供了一种全新的编 ...
