Springboot Actuator之七:actuator 中原生endpoint源码解析1
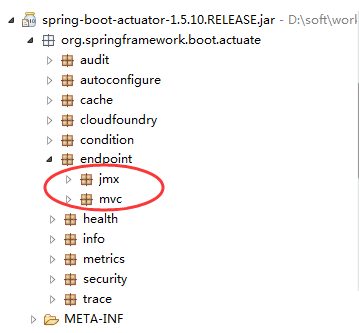
看actuator项目的包结构,如下:
本文中的介绍Endpoints。
Endpoints(端点)介绍
Endpoints 是 Actuator 的核心部分,它用来监视应用程序及交互,spring-boot-actuator中已经内置了非常多的Endpoints(health、info、beans、httptrace、shutdown等等),同时也允许我们扩展自己的端点。
Endpoints 分成两类:原生端点和用户自定义端点:
- 原生端点是在应用程序里提供的众多 restful api 接口,通过它们可以监控应用程序运行时的内部状况。原生端点又可以分成三类:
- 应用配置类:可以查看应用在运行期间的静态信息:例如自动配置信息、加载的spring bean信息、yml文件配置信息、环境信息、请求映射信息;
- 度量指标类:主要是运行期间的动态信息,例如堆栈、请求连、一些健康指标、metrics信息等;
- 操作控制类:主要是指shutdown,用户可以发送一个请求将应用的监控功能关闭。
- 自定义端点主要是指扩展性,用户可以根据自己的实际应用,定义一些比较关心的指标,在运行期进行监控。
我们这里详细说明org.springframework.boot.actuate.endpoint中原生端点的实现.通过如下几个维度来进行分析:
- xxxEndpoint的作用
- xxxEndpoint的字段,构造器
- xxxEndpoint核心方法invoke 实现分析
- xxxEndpoint如何进行配置
- xxxEndpoint如何自动化装配
在org.springframework.boot.actuate.endpoint 中还有2个子包-jmx(可通过jmx协议访问),mvc(通过spring mvc 暴露,可通过接口进行访问,在下篇文章进行分析).这里我们不关注这些,这看org.springframework.boot.actuate.endpoint 包下的类,类比较多,先看个类图吧,如下:
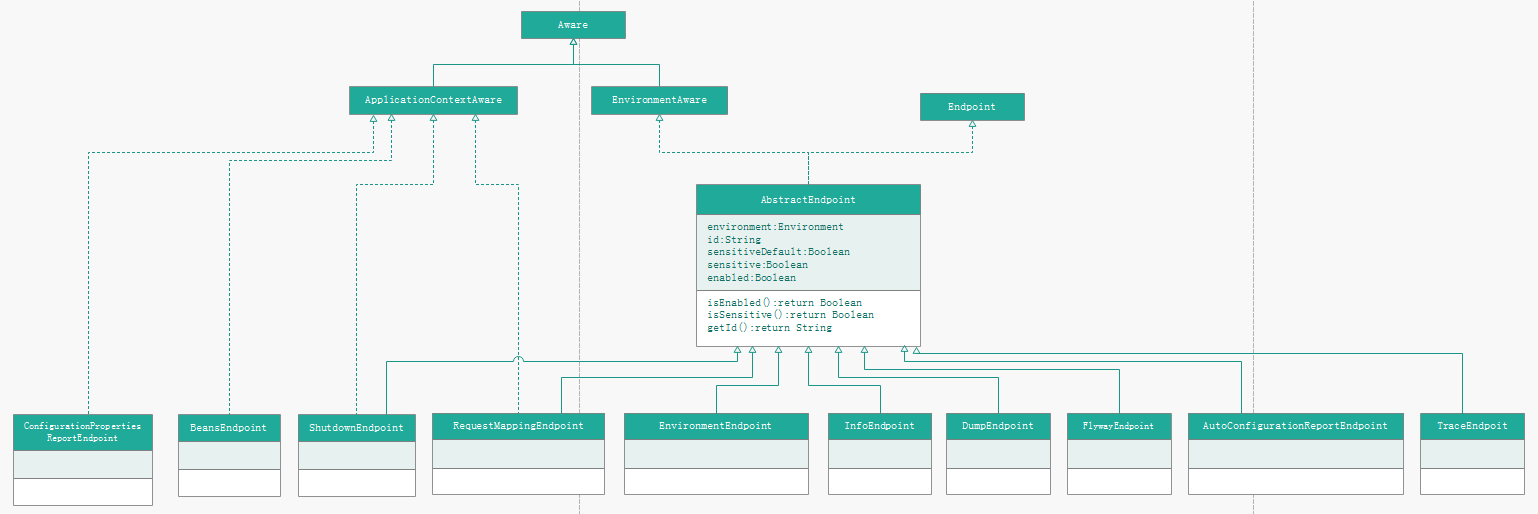
Endpoint接口:org.springframework.boot.actuate.endpoint.Endpoint.java
Endpoint接口:一个端点可以用于暴露(系统信息、操作入口等)信息。通常暴露方式是通过spring mvc的,如继承AbstractEndpoint的方式实现自己的endpoint。
- public interface Endpoint<T> {
- // 端点的逻辑标识(字母、数字和下划线('_') 组成)
- String getId();
- // 端点是否启用
- boolean isEnabled();
- // 端点是否输出敏感数据
- boolean isSensitive();
- // 调用端点,并返回调用结果
- T invoke();
- }
其中泛型参数T为暴露的数据类型.方法的作用已经注释。
AbstractEndpoint抽象类
Endpoint的一个抽象子类:AbstractEndpoint(Endpoint接口实现的抽象基类),该类实现了EnvironmentAware,因此, AbstractEndpoint也就持有了Environment。
1、AbstractEndpoint 有如下属性:
- // 匹配包括下划线的任何单词字符。类似但不等价于“[A-Za-z0-9_]”
- private static final Pattern ID_PATTERN = Pattern.compile("\\w+");
- // 通过EnvironmentAware接口注入
- private Environment environment;
- // 端点标识符
- private String id;
- // 是否默认敏感
- private final boolean sensitiveDefault;
- // 标识该端点是否暴露敏感信息
- private Boolean sensitive;
- // 是否端点可用
- private Boolean enabled;
2、AbstractEndpoint方法
AbstractEndpoint方法实现了Endpoint接口中的getId, isEnabled, isSensitive,其中, getId只需返回AbstractEndpoint中的id属性即可,我们分别来看下其他方法的实现:
2.1、isEnabled,代码如下:
- @Override
- public boolean isEnabled() {
- return EndpointProperties.isEnabled(this.environment, this.enabled);
- }
- @ConfigurationProperties(prefix = "endpoints")
- public class EndpointProperties {
- private static final String ENDPOINTS_ENABLED_PROPERTY = "endpoints.enabled";
- private static final String ENDPOINTS_SENSITIVE_PROPERTY = "endpoints.sensitive";
- public static boolean isEnabled(Environment environment, Boolean enabled) {
- //1、如果AbstractEndpoint#enabled属性有值,则使用AbstractEndpoint的配置
- if (enabled != null) {
- return enabled;
- }
- //如果Environment 不等于null 并且Environment 配置有endpoints.enabled的属性,则返回其配置的值
- if (environment != null
- && environment.containsProperty(ENDPOINTS_ENABLED_PROPERTY)) {
- return environment.getProperty(ENDPOINTS_ENABLED_PROPERTY, Boolean.class);
- }
- //3、如果1和2没有值,则返回默认值true
- return true;
- }
2.2、isSensitive和isEnabled实现差不多,如下:
- @Override
- public boolean isSensitive() {
- return EndpointProperties.isSensitive(this.environment, this.sensitive,
- this.sensitiveDefault);
- }
- @ConfigurationProperties(prefix = "endpoints")
- public class EndpointProperties {
- private static final String ENDPOINTS_ENABLED_PROPERTY = "endpoints.enabled";
- private static final String ENDPOINTS_SENSITIVE_PROPERTY = "endpoints.sensitive";
- public static boolean isSensitive(Environment environment, Boolean sensitive,
- boolean sensitiveDefault) {
- //1、如果abstractEndpoint的sensitive有值,则使用这个配置
- if (sensitive != null) {
- return sensitive;
- }
- //2、如果environment 不等于null 并且 environment中配置有endpoints.sensitive的属性,则返回其配置值
- if (environment != null
- && environment.containsProperty(ENDPOINTS_SENSITIVE_PROPERTY)) {
- return environment.getProperty(ENDPOINTS_SENSITIVE_PROPERTY, Boolean.class);
- }
- //3、返回指定的默认值(默认为false)
- return sensitiveDefault;
- }
EnvironmentEndpoint
AbstractEndpoint的实现类之EnvironmentEndpoint--敏感数据
1、构造函数
- @ConfigurationProperties(prefix = "endpoints.env")
- public class EnvironmentEndpoint extends AbstractEndpoint<Map<String, Object>> {
- public EnvironmentEndpoint() {
- super("env");
- }
- //调用AbstractEndpoint的构造函数
- public AbstractEndpoint(String id) {
- this(id, true);
- }
最终,设置id为env,标识为敏感数据。
2、实现的invoke(),代码如下:
- public Map<String, Object> invoke() {
- // 1. 先定义空的map返回值
- Map<String, Object> result = new LinkedHashMap<String, Object>();
- // 2. 将spring boot 中激活的profile 放入result中,key --> profile
- result.put("profiles", getEnvironment().getActiveProfiles());
- // 3. 获得PlaceholderSanitizingPropertyResolver --> 处理占位符,处理敏感数据
- PropertyResolver resolver = getResolver();
- // 4. 遍历environment 配置的PropertySource,依次处理之
- for (Entry<String, PropertySource<?>> entry : getPropertySourcesAsMap()
- .entrySet()) {
- PropertySource<?> source = entry.getValue();
- String sourceName = entry.getKey();
- if (source instanceof EnumerablePropertySource) {
- // 4.1 只针对EnumerablePropertySource 类型的PropertySource 进行处理--> 依次将属性添加到properties中,
- // 如果属性值为string,则在添加前进行占位符,数据脱敏的处理
- EnumerablePropertySource<?> enumerable = (EnumerablePropertySource<?>) source;
- Map<String, Object> properties = new LinkedHashMap<String, Object>();
- for (String name : enumerable.getPropertyNames()) {
- Object property = source.getProperty(name);
- Object resolved = property instanceof String
- ? resolver.resolvePlaceholders((String) property) : property;
- //调用Sanitizer类进行脱敏
- properties.put(name, sanitize(name, resolved));
- }
- // 4.2 后置处理,该方法的实现是直接返回原始值,可以通过覆写的方式进行扩展
- properties = postProcessSourceProperties(sourceName, properties);
- if (properties != null) {
- // 4.3 如果不为空,则添加到result中
- result.put(sourceName, properties);
- }
- }
- }
- return result;
- }
处理占位符,处理敏感数据:PlaceholderSanitizingPropertyResolver.java是EnvironmentEndpoint的内部类
- public PropertyResolver getResolver() {
- // 1. 实例化PlaceholderSanitizingPropertyResolver --> 处理占位符,处理敏感数据
- PlaceholderSanitizingPropertyResolver resolver = new PlaceholderSanitizingPropertyResolver(
- getPropertySources(), this.sanitizer);
- // 2. 设置ignoreUnresolvableNestedPlaceholders 为true
- resolver.setIgnoreUnresolvableNestedPlaceholders(true);
- return resolver;
- }
PlaceholderSanitizingPropertyResolver继承了PropertySourcesPropertyResolver,这样就能对占位符进行处理了,又因为其内部持有Sanitizer(用于敏感数据脱敏),复写了getPropertyAsRawString,这样就能处理占位符,敏感数据了.代码如下:
- @Override
- protected String getPropertyAsRawString(String key) {
- String value = super.getPropertyAsRawString(key);
- return (String) this.sanitizer.sanitize(key, value);
- }
3、EnvironmentEndpoint的属性配置,由于EnvironmentEndpoint被@ConfigurationProperties(prefix = “endpoints.env”)注解,因此可通过如下配置进行个性化配置:
- endpoints.env.id=env
- endpoints.env.sensitive=true
- endpoints.env.enabled=true
同时,又因为其声明了如下方法:
- public void setKeysToSanitize(String... keysToSanitize) {
- this.sanitizer.setKeysToSanitize(keysToSanitize);
- }
因此可以通过endpoints.env.keys-to-sanitize=xx,xx 来配置对指定的数据进行脱敏。脱敏配置
4、EnvironmentEndpoint的自动化装配
EnvironmentEndpoint的自动化装配是在EndpointAutoConfiguration中,代码如下:
- @Configuration
- @AutoConfigureAfter({ FlywayAutoConfiguration.class, LiquibaseAutoConfiguration.class })
- @EnableConfigurationProperties(EndpointProperties.class)
- public class EndpointAutoConfiguration {
- @Bean
- @ConditionalOnMissingBean
- public EnvironmentEndpoint environmentEndpoint() {
- return new EnvironmentEndpoint();
- }
- @Bean注解:注册1个id为environmentEndpoint,类型为EnvironmentEndpoint的bean
- @ConditionalOnMissingBean注解:当beanFactory中不存在EnvironmentEndpoint类型的bean时注册
InfoEndpoint
AbstractEndpoint的实现类之InfoEndpoint,用于暴露应用信息。
其字段和构造器如下:
- private final List<InfoContributor> infoContributors;
- public InfoEndpoint(List<InfoContributor> infoContributors) {
- super("info", false);
- Assert.notNull(infoContributors, "Info contributors must not be null");
- this.infoContributors = infoContributors;
- }
其内部持有了BeanFactory中所有InfoContributor类型的bean,其通过构造器注入。
2、invoke 实现如下:
- public Map<String, Object> invoke() {
- Info.Builder builder = new Info.Builder();
- for (InfoContributor contributor : this.infoContributors) {
- contributor.contribute(builder);
- }
- Info build = builder.build();
- return build.getDetails();
- }
通过遍历其内部的持有infoContributors,因此调用其contribute将info的数据添加到Info.Builder中,最后通过Info.Builder构建出Info,返回Info持有的details(建造者模式). Info中的details为Map.
InfoContributor接口用于向Info$Builder添加信息,关于这部分的内容,我们后续文章有分析.这里就不在赘述了.
3、InfoEndpoint的属性配置
- @ConfigurationProperties(prefix = "endpoints.info")
- public class InfoEndpoint extends AbstractEndpoint<Map<String, Object>> {
因此可通过如下进行配置:
- endpoints.info.id=info
- endpoints.info.sensitive=true
- endpoints.info.enabled=true
4、InfoEndpoint的自动化装配–>在EndpointAutoConfiguration中,代码如下:
- @Bean
- @ConditionalOnMissingBean
- public InfoEndpoint infoEndpoint() throws Exception {
- return new InfoEndpoint(this.infoContributors == null
- ? Collections.<InfoContributor>emptyList() : this.infoContributors);
- }
和EnvironmentEndpoint一样。
RequestMappingEndpoint:
AbstractEndpoint的实现类之RequestMappingEndpoint,由于RequestMappingEndpoint同时也实现了ApplicationContextAware接口,因此,在初始化该类时会注入applicationContext。这个类的作用是打印Spring MVC 映射信息。
1、构造函数
- public RequestMappingEndpoint() {
- super("mappings");
- }
因此, RequestMappingEndpoint的id为 mappings,默认为敏感。
2、invoke 实现如下:
- public Map<String, Object> invoke() {
- Map<String, Object> result = new LinkedHashMap<String, Object>();
- // 1. 从handlerMappings中获取HandlerMapping,默认情况下handlerMappings是不存在数据的
- extractHandlerMappings(this.handlerMappings, result);
- // 2. 从applicationContext中获取AbstractUrlHandlerMapping类型的bean,依次将其注册的handler 添加进去.
- extractHandlerMappings(this.applicationContext, result);
- // 3. 从methodMappings中获取HandlerMapping,默认情况下methodMappings是不存在数据的
- extractMethodMappings(this.methodMappings, result);
- // 3. 从applicationContext中获取AbstractUrlHandlerMapping类型的bean,依次获得其持有的HandlerMethods,进行处理.
- extractMethodMappings(this.applicationContext, result);
- return result;
- }
从applicationContext中获取
- protected void extractHandlerMappings(ApplicationContext applicationContext,
- Map<String, Object> result) {
- if (applicationContext != null) {
- Map<String, AbstractUrlHandlerMapping> mappings = applicationContext
- .getBeansOfType(AbstractUrlHandlerMapping.class);
- for (Entry<String, AbstractUrlHandlerMapping> mapping : mappings.entrySet()) {
- Map<String, Object> handlers = getHandlerMap(mapping.getValue());
- for (Entry<String, Object> handler : handlers.entrySet()) {
- result.put(handler.getKey(),
- Collections.singletonMap("bean", mapping.getKey()));
- }
- }
- }
- }
获得AbstractUrlHandlerMapping类型的bean,此时有4个:
beanNameHandlerMapping=org.springframework.web.servlet.handler.BeanNameUrlHandlerMapping
resourceHandlerMapping=org.springframework.web.servlet.handler.SimpleUrlHandlerMapping
faviconHandlerMapping=org.springframework.web.servlet.handler.SimpleUrlHandlerMapping
welcomePageHandlerMapping=org.springframework.boot.autoconfigure.web.WebMvcAutoConfiguration$WelcomePageHandlerMapping
依次遍历mappings:
获得AbstractUrlHandlerMapping中注册的handler,key–> path,value–>handler
依次遍历handlerss,存入结果集中,存入的key–>AbstractUrlHandlerMapping的id,value={bean=AbstractUrlHandlerMapping中注册的handler的路径}
从methodMappings中获取HandlerMapping,默认情况下methodMappings是不存在数据的
从applicationContext中获取AbstractUrlHandlerMapping类型的bean,依次获得其持有的HandlerMethods,进行处理.代码如下:
- protected void extractMethodMappings(
- Collection<AbstractHandlerMethodMapping<?>> methodMappings,
- Map<String, Object> result) {
- for (AbstractHandlerMethodMapping<?> mapping : methodMappings) {
- Map<?, HandlerMethod> methods = mapping.getHandlerMethods();
- for (Map.Entry<?, HandlerMethod> entry : methods.entrySet()) {
- result.put(String.valueOf(entry.getKey()), Collections
- .singletonMap("method", String.valueOf(entry.getValue())));
- }
- }
- }
获得AbstractUrlHandlerMapping类型的bean
依次遍历AbstractUrlHandlerMapping中注册的handler,添加至结果集中,key–> Handler 映射路径 ,value = {bean = AbstractHandlerMethodMapping的id,method=HandlerMethod}
3、RequestMappingEndpoint的配置
- @ConfigurationProperties(prefix = "endpoints.mappings")
- public class RequestMappingEndpoint extends AbstractEndpoint<Map<String, Object>>
- implements ApplicationContextAware {
从类上的配置注解,可知:
- endpoints.mappings.enabled= # Enable the endpoint.
- endpoints.mappings.id= # Endpoint identifier.
- endpoints.mappings.sensitive= # Mark if the endpoint exposes sensitive information.
4、RequestMappingEndpoint的自动装配
- @Configuration
- @ConditionalOnClass(AbstractHandlerMethodMapping.class)
- protected static class RequestMappingEndpointConfiguration {
- @Bean
- @ConditionalOnMissingBean
- public RequestMappingEndpoint requestMappingEndpoint() {
- RequestMappingEndpoint endpoint = new RequestMappingEndpoint();
- return endpoint;
- }
- }
当满足如下两个条件时创建requestMappingEndpoint,即注册1个id为requestMappingEndpoint,类型为RequestMappingEndpoint的bean:
@ConditionalOnClass(AbstractHandlerMethodMapping.class) –> 在beanFactory中存在AbstractHandlerMethodMapping类型的bean时生效
@ConditionalOnMissingBean–>在beanFactory中不存在RequestMappingEndpoint类型的bean时生效
DumpEndpoint
AbstractEndpoint的实现类之DumpEndpoint,这个类的作用是打印线程信息,为敏感。
1、构造函数
- public DumpEndpoint() {
- super("dump");
- }
2、invoke()方法实现
- @Override
- public List<ThreadInfo> invoke() {
- return Arrays
- .asList(ManagementFactory.getThreadMXBean().dumpAllThreads(true, true));
- }
调用了ThreadMXBean的dumpAllThreads来返回所有活动线程的线程信息,并带有堆栈跟踪和同步信息。 当此方法返回时,返回数组中包含的一些线程可能已经终止。其中两个参数指的意义如下:
第1个–>如果为 true,则转储所有锁定的监视器。
第2个–>如果为 true,则转储所有锁定的可拥有同步器。
ThreadMXBean怎么读取Thread信息见《JMX学习一》
3、DumpEndpoint的配置
- @ConfigurationProperties(prefix = "endpoints.dump")
- public class DumpEndpoint extends AbstractEndpoint<List<ThreadInfo>> {
可知:
- endpoints.dump.enabled= # Enable the endpoint.
- endpoints.dump.id= # Endpoint identifier.
- endpoints.dump.sensitive= # Mark if the endpoint exposes sensitive information.
4、DumpEndpoint自动化装配:
- @Bean
- @ConditionalOnMissingBean
- public DumpEndpoint dumpEndpoint() {
- return new DumpEndpoint();
- }
FlywayEndpoint
AbstractEndpoint的实现类之FlywayEndpoint,Flyway是一款开源的数据库版本管理工具。
ShutdownEndpoint
AbstractEndpoint的实现类之ShutdownEndpoint,作用是关闭应用。这个类继承了ApplicationAware,得到applicationContext,关闭spring容器调用applicationContext.close()方法。
1、构造函数
- public ShutdownEndpoint() {
- super("shutdown", true, false);
- }
id为shutdown,为敏感,关闭应用的endpoin默认是关闭的,不启用的。
2、invoke()方法实现
- @Override
- public Map<String, Object> invoke() {
- //如果context为null,直接返回
- if (this.context == null) {
- return NO_CONTEXT_MESSAGE;
- }
- //context不为null,先返回,再启动一个线程,在该线程中,先sleep 5秒后,然后调用了ShutdownEndpoint中持有的context的close方法进行关闭.
- try {
- return SHUTDOWN_MESSAGE;
- }
- finally {
- Thread thread = new Thread(new Runnable() {
- @Override
- public void run() {
- try {
- Thread.sleep(500L);
- }
- catch (InterruptedException ex) {
- Thread.currentThread().interrupt();
- }
- ShutdownEndpoint.this.context.close();
- }
- });
- thread.setContextClassLoader(getClass().getClassLoader());
- thread.start();
- }
- }
在返回后,还希望做点啥,用try--finally。
3、ShutdownEndpoint的配置
- @ConfigurationProperties(prefix = "endpoints.shutdown")
- public class ShutdownEndpoint extends AbstractEndpoint<Map<String, Object>>
- implements ApplicationContextAware {
可知配置有:
- endpoints.shutdown.enabled= # Enable the endpoint.
- endpoints.shutdown.id= # Endpoint identifier.
- endpoints.shutdown.sensitive= # Mark if the endpoint exposes sensitive information.
4、ShutdownEndpoint自动化装配:
- @Bean
- @ConditionalOnMissingBean
- public ShutdownEndpoint shutdownEndpoint() {
- return new ShutdownEndpoint();
- }
AutoConfigurationReportEndpoint
AbstractEndpoint的实现类之AutoConfigurationReportEndpoint,作用是暴露ConditionEvaluationReport.。
1、构造函数
- public AutoConfigurationReportEndpoint() {
- super("autoconfig");
- }
id为autoconfig,为敏感。
2、invoke()方法实现
- @Override
- public Report invoke() {
- return new Report(this.autoConfigurationReport);
- }
Report为其内部类
- @JsonPropertyOrder({ "positiveMatches", "negativeMatches", "exclusions" })
- @JsonInclude(Include.NON_EMPTY)
- public static class Report {
- @JsonPropertyOrder–>作用在类上,被用来指明当序列化时需要对属性做排序,它有2个属性:一个是alphabetic:布尔类型,表示是否采用字母拼音顺序排序,默认是为false,即不排序
- @JsonInclude–> Report中的属性值为空集合则不进行展示
Report 有如下字段:
- // 匹配的
- private final MultiValueMap<String, MessageAndCondition> positiveMatches;
- // 不匹配的
- private final Map<String, MessageAndConditions> negativeMatches;
- // 去除的
- private final List<String> exclusions;
- // 一般为null
- private final Report parent;
其中MessageAndCondition封装了ConditionAndOutcome中的condition,message以进行更好的展示(json友好).其类上声明了如下注解:
- @JsonPropertyOrder({ "condition", "message" })
因此在进行输出的时候,先输出condition,再输出message.
构造器如下:
- public MessageAndCondition(ConditionAndOutcome conditionAndOutcome) {
- Condition condition = conditionAndOutcome.getCondition();
- ConditionOutcome outcome = conditionAndOutcome.getOutcome();
- this.condition = ClassUtils.getShortName(condition.getClass());
- if (StringUtils.hasLength(outcome.getMessage())) {
- this.message = outcome.getMessage();
- }
- else {
- this.message = (outcome.isMatch() ? "matched" : "did not match");
- }
- }
赋值condition为ConditionAndOutcome中的Condition的短类名.
赋值message:如果ConditionAndOutcome中的Message有值则直接赋值,否则,如果对应的Condition匹配,则赋值为matched,否则赋值为did not match。
回到report,构造器如下:
- public Report(ConditionEvaluationReport report) {
- this.positiveMatches = new LinkedMultiValueMap<String, MessageAndCondition>();
- this.negativeMatches = new LinkedHashMap<String, MessageAndConditions>();
- // 1. 通过report#getExclusions 获得不进行加载的bean
- this.exclusions = report.getExclusions();
- // 2.
- for (Map.Entry<String, ConditionAndOutcomes> entry : report
- .getConditionAndOutcomesBySource().entrySet()) {
- // 2.1 如果该配置生效条件都匹配,则加入到positiveMatches,否则,加入到negativeMatches
- if (entry.getValue().isFullMatch()) {
- add(this.positiveMatches, entry.getKey(), entry.getValue());
- }
- else {
- add(this.negativeMatches, entry.getKey(), entry.getValue());
- }
- }
- // 3. 如果report存在父report,则进行初始化Report 赋值为当前类的parent 属性
- boolean hasParent = report.getParent() != null;
- this.parent = (hasParent ? new Report(report.getParent()) : null);
- }
通过ConditionEvaluationReport#getExclusions 获得不进行加载的bean,赋值为exclusions
调用ConditionEvaluationReport#getConditionAndOutcomesBySource 获得ConditionEvaluationReport中持有匹配信息,返回的map中,key–> 匹配类名,ConditionAndOutcomes–> 匹配结果.
依次遍历第2步的返回值–>如果该配置生效条件都匹配,则加入到positiveMatches,否则,加入到negativeMatches.其中add 代码如下:
- private void add(MultiValueMap<String, MessageAndCondition> map, String source,
- ConditionAndOutcomes conditionAndOutcomes) {
- String name = ClassUtils.getShortName(source);
- for (ConditionAndOutcome conditionAndOutcome : conditionAndOutcomes) {
- map.add(name, new MessageAndCondition(conditionAndOutcome));
- }
- }
因此positiveMatches,negativeMatches 中的key为配置类的简单类名.
如果report存在父report,则进行初始化Report 赋值为当前类的parent 属性.一般来说,是不存在父report的
属性配置(因为有@ConfigurationProperties(prefix = “endpoints.autoconfig”) 注解):
- endpoints.autoconfig.enabled= # Enable the endpoint.
- endpoints.autoconfig.id= # Endpoint identifier.
- endpoints.autoconfig.sensitive= # Mark if the endpoint exposes sensitive information.
自动装配:
同样还是在EndpointAutoConfiguration中,代码如下:
- @Bean
- @ConditionalOnBean(ConditionEvaluationReport.class)
- @ConditionalOnMissingBean(search = SearchStrategy.CURRENT)
- public AutoConfigurationReportEndpoint autoConfigurationReportEndpoint() {
- return new AutoConfigurationReportEndpoint();
- }
@Bean –> 注册1个id为autoConfigurationReportEndpoint,类型为AutoConfigurationReportEndpoint的bean
@ConditionalOnBean(ConditionEvaluationReport.class)–>beanFactory中存在ConditionEvaluationReport类型的bean时生效
@ConditionalOnMissingBean(search = SearchStrategy.CURRENT)–> 在当前上下文中不存在AutoConfigurationReportEndpoint类型的bean时生效
ConditionEvaluationReport
AutoConfigurationReportEndpoint 是通过ConditionEvaluationReport 来进行暴露信息.
ConditionEvaluationReport 字段如下:
- private static final String BEAN_NAME = "autoConfigurationReport";
- // 如果一个配置类中内部配置类不匹配,则在其外部类的所对应的ConditionAndOutcomes中添加1个AncestorsMatchedCondition
- private static final AncestorsMatchedCondition ANCESTOR_CONDITION = new AncestorsMatchedCondition();
- // key-->配置类类名,ConditionAndOutcomes-->匹配条件结果的封装
- private final SortedMap<String, ConditionAndOutcomes> outcomes = new TreeMap<String, ConditionAndOutcomes>();
- // 是否添加AncestorsMatchedCondition,默认为false
- private boolean addedAncestorOutcomes;
- // 父ConditionEvaluationReport,一般为null
- private ConditionEvaluationReport parent;
- // 去除加载的配置
- private List<String> exclusions = Collections.emptyList();
- // 在ConditionEvaluationReportAutoConfigurationImportListener#onAutoConfigurationImportEvent 添加,用于保存还没有
- // 执行判断的class
- private Set<String> unconditionalClasses = new HashSet<String>();
ConditionEvaluationReport 实例化过程如下:
在SpringApplication#run中会调用AbstractApplicationContext#refresh,在refresh会调用PostProcessorRegistrationDelegate#invokeBeanFactoryPostProcessors,在该方法中最终会调用到AutoConfigurationImportSelector#selectImports方法.在该方法中会调用fireAutoConfigurationImportEvents,代码如下:AutoConfigurationImportSelector.fireAutoConfigurationImportEvents()
- private void fireAutoConfigurationImportEvents(List<String> configurations,
- Set<String> exclusions) {
- List<AutoConfigurationImportListener> listeners = getAutoConfigurationImportListeners();
- if (!listeners.isEmpty()) {
- AutoConfigurationImportEvent event = new AutoConfigurationImportEvent(this,
- configurations, exclusions);
- for (AutoConfigurationImportListener listener : listeners) {
- invokeAwareMethods(listener);
- listener.onAutoConfigurationImportEvent(event);
- }
- }
- }
会加载/META-INF/spring.factories 中配置的org.springframework.boot.autoconfigure.AutoConfigurationImportListener,实例化后,依次调用其onAutoConfigurationImportEvent 方法. spring.factories 配置如下:
- org.springframework.boot.autoconfigure.AutoConfigurationImportListener=\
- org.springframework.boot.autoconfigure.condition.ConditionEvaluationReportAutoConfigurationImportListener
因此此处会调用ConditionEvaluationReportAutoConfigurationImportListener#onAutoConfigurationImportEvent.代码如下:
- @Override
- public void onAutoConfigurationImportEvent(AutoConfigurationImportEvent event) {
- if (this.beanFactory != null) {
- ConditionEvaluationReport report = ConditionEvaluationReport
- .get(this.beanFactory);
- report.recordEvaluationCandidates(event.getCandidateConfigurations());
- report.recordExclusions(event.getExclusions());
- }
- }
A、实例化ConditionEvaluationReport,代码如下:
- public static ConditionEvaluationReport get(
- ConfigurableListableBeanFactory beanFactory) {
- synchronized (beanFactory) {
- ConditionEvaluationReport report;
- // 1. 如果当前beanFactory包含autoConfigurationReport定义的话,就从beanFactory中获取,
- if (beanFactory.containsSingleton(BEAN_NAME)) {
- report = beanFactory.getBean(BEAN_NAME, ConditionEvaluationReport.class);
- }
- else {
- // 否则就实例化一个,然后进行注册
- report = new ConditionEvaluationReport();
- beanFactory.registerSingleton(BEAN_NAME, report);
- }
- // 2. 如果存在父容器的话,就从父容器中获取。
- locateParent(beanFactory.getParentBeanFactory(), report);
- return report;
- }
- }
如果当前beanFactory包含autoConfigurationReport定义的话,就从beanFactory中获取,否则就实例化一个,然后进行注册
如果存在父容器的话,就从父容器中获取,并将其赋值为当前context中获得的ConditionEvaluationReport的父ConditionEvaluationReport.代码如下:
- private static void locateParent(BeanFactory beanFactory,
- ConditionEvaluationReport report) {
- if (beanFactory != null && report.parent == null
- && beanFactory.containsBean(BEAN_NAME)) {
- report.parent = beanFactory.getBean(BEAN_NAME,
- ConditionEvaluationReport.class);
- }
- }
一般都是null,不会执行的。
B、设置unconditionalClasses为event#getCandidateConfigurations的返回值。
C、设置exclusions为event#getExclusions的返回值。
在AutoConfigurationReportEndpoint中是通过Report来进行暴露信息的,而在其构造器中,调用了ConditionEvaluationReport#getConditionAndOutcomesBySource方法,代码如下:
- public Map<String, ConditionAndOutcomes> getConditionAndOutcomesBySource() {
- if (!this.addedAncestorOutcomes) {
- // 1. 如果addedAncestorOutcomes 设为false,则依次遍历outcomes,如果一个配置类中内部配置类不匹配,则在其外部类的所对应的ConditionAndOutcomes中添加1个AncestorsMatchedCondition
- for (Map.Entry<String, ConditionAndOutcomes> entry : this.outcomes.entrySet()) {
- if (!entry.getValue().isFullMatch()) {
- addNoMatchOutcomeToAncestors(entry.getKey());
- }
- }
- this.addedAncestorOutcomes = true;
- }
- return Collections.unmodifiableMap(this.outcomes);
- }
如果addedAncestorOutcomes 设为false,则依次遍历outcomes,如果一个配置类中内部配置类不匹配,则在其外部类的所对应的ConditionAndOutcomes中添加1个AncestorsMatchedCondition
返回outcomes.
问题来了, outcomes 中的数据是如何添加的?
答案: 有2处.
还是在AutoConfigurationImportSelector#selectImports中,会调用其filter方法.代码如下
- private List<String> filter(List<String> configurations,
- AutoConfigurationMetadata autoConfigurationMetadata) {
- long startTime = System.nanoTime();
- String[] candidates = configurations.toArray(new String[configurations.size()]);
- boolean[] skip = new boolean[candidates.length];
- boolean skipped = false;
- // 1. 获取META-INFspring.factories/中配置的org.springframework.boot.autoconfigure.AutoConfigurationImportFilter,.OnClassCondition.依次进行遍历之
- // 此时获得的是org.springframework.boot.autoconfigure.condition
- for (AutoConfigurationImportFilter filter : getAutoConfigurationImportFilters()) {
- // 1.1 进行属性注入
- invokeAwareMethods(filter);
- // 1.2 调用AutoConfigurationImportFilter#match 进行判断,依次遍历其返回值,如果返回的是false,则说明该配置为跳过,并将skipped设置为true
- // 获得AutoConfigurationMetadata中配置的 ConditionalOnClass,如果不会空,则依次遍历之,看是否在当前类路径下存在
- // 如果不匹配的话,则调用 ConditionEvaluationReport.#ecordConditionEvaluation 进行记录
- // 由于此时AutoConfigurationMetadata 什么都没有配置,因此此步骤相当于空操作,最终会在第2步返回
- boolean[] match = filter.match(candidates, autoConfigurationMetadata);
- for (int i = 0; i < match.length; i++) {
- if (!match[i]) {
- skip[i] = true;
- skipped = true;
- }
- }
- }
- // 2. 如果skipped 等于false,则直接返回configurations,说明没有配置是需要跳过的
- if (!skipped) {
- return configurations;
- }
- // 3. 依次遍历candidates,如果该配置是不进行跳过的,则添加至result中进行返回
- List<String> result = new ArrayList<String>(candidates.length);
- for (int i = 0; i < candidates.length; i++) {
- if (!skip[i]) {
- result.add(candidates[i]);
- }
- }
- return new ArrayList<String>(result);
- }
获取META-INFspring.factories/中配置的org.springframework.boot.autoconfigure.AutoConfigurationImportFilter,.OnClassCondition.依次进行遍历之.此时获得的是org.springframework.boot.autoconfigure.condition
进行属性注入
调用AutoConfigurationImportFilter#match 进行判断,依次遍历其返回值,如果返回的是false,则说明该配置为跳过,并将skipped设置为true.由于此时调用的是OnClassCondition,其判断逻辑为获得AutoConfigurationMetadata中配置的ConditionalOnClass,如果不会空,则依次遍历之,看是否在当前类路径下存在.如果不匹配的话,则调用ConditionEvaluationReport#ecordConditionEvaluation 进行记录.由于此时AutoConfigurationMetadata 什么都没有配置,因此此步骤相当于空操作,最终会在第2步返回
如果skipped 等于false,则直接返回configurations,说明没有配置是需要跳过的
依次遍历candidates,如果该配置是不进行跳过的,则添加至result中进行返回
在ConfigurationClassParser#processConfigurationClass进行解析加载配置类时,会调用ConditionEvaluator#shouldSkip,在该方法中,会因此遍历配置类配置的@Conditional所对应的处理类.此时,如果处理类是SpringBootCondition的子类的话,就会调用ConditionEvaluationReport进行记录匹配结果. 代码如下:
- private void recordEvaluation(ConditionContext context, String classOrMethodName,
- ConditionOutcome outcome) {
- if (context.getBeanFactory() != null) {
- ConditionEvaluationReport.get(context.getBeanFactory())
- .recordConditionEvaluation(classOrMethodName, this, outcome);
- }
- }
LiquibaseEndpoint
默认不生效,这里就不进行分析了
BeansEndpoint
BeansEndpoint的作用 –> 暴露关于beans的json视图.如果Environment 中设置了spring.liveBeansView.mbeanDomain,则所有spring 上下文的bean都会展示.否则只会展示当前的上下文中的bean.默认是没有配置的
BeansEndpoint,构造器如下:
- public BeansEndpoint() {
- super("beans");
- }
id为beans,默认为敏感
BeansEndpoint的字段如下:
- // 继承自LiveBeansView,用于生成json格式的数据
- private final HierarchyAwareLiveBeansView liveBeansView = new HierarchyAwareLiveBeansView();
- // json 解析器对象
- private final JsonParser parser = JsonParserFactory.getJsonParser();
由于BeansEndpoint实现了ApplicationContextAware接口,因此当前初始化时,会调用其setApplicationContext方法,代码如下:
- @Override
- public void setApplicationContext(ApplicationContext context) throws BeansException {
- if (context.getEnvironment()
- .getProperty(LiveBeansView.MBEAN_DOMAIN_PROPERTY_NAME) == null) {
- this.liveBeansView.setLeafContext(context);
- }
- }
如果没有设置spring.liveBeansView.mbeanDomain的属性,则将HierarchyAwareLiveBeansView中的leafContext设置为传入的ApplicationContext(通常是当前应用所对应的上下文)
invoke实现如下:
- @Override
- public List<Object> invoke() {
- return this.parser.parseList(this.liveBeansView.getSnapshotAsJson());
- }
调用HierarchyAwareLiveBeansView#getSnapshotAsJson 生成json串.代码如下:
- public String getSnapshotAsJson() {
- if (this.leafContext == null) {
- return super.getSnapshotAsJson();
- }
- // 2. 将leafContext的整个继承关系都添加到contexts中,即:如果给定的leafContext 存在父context,则一直递归的添加至contexts
- // 直至顶级容器,然后调用LiveBeansView#generateJson 来生成json串
- return generateJson(getContextHierarchy());
- }
如果leafContext 等于null,则调用LiveBeansView#getSnapshotAsJson来生成json串.一般都会执行第2步
将leafContext的整个继承关系都添加到contexts中,即:如果给定的leafContext 存在父context,则一直递归的添加至contexts.代码如下:
- private Set<ConfigurableApplicationContext> getContextHierarchy() {
- Set<ConfigurableApplicationContext> contexts = new LinkedHashSet<ConfigurableApplicationContext>();
- ApplicationContext context = this.leafContext;
- while (context != null) {
- contexts.add(asConfigurableContext(context));
- context = context.getParent();
- }
- return contexts;
- }
将leafContext的整个继承关系都添加到contexts中,即:如果给定的leafContext 存在父context,则一直递归的添加至contexts直至顶级容器。
调用LiveBeansView#generateJson 来生成json串.在该方法中没有使用第3方的json解析库的目的是为了避免对其进行依赖.返回的格式为数组格式.代码如下:
由于BeansEndpoint声明了@ConfigurationProperties(prefix = “endpoints.beans”),因此可以通过如下属性来配置:
- endpoints.beans.id
- endpoints.beans.sensitive
- endpoints.beans.enabled
自动化配置:
beansEndpoint 是在EndpointAutoConfiguration 中进行配置的,代码如下:
- @Bean
- @ConditionalOnMissingBean
- public BeansEndpoint beansEndpoint() {
- return new BeansEndpoint();
- }
@Bean –> 注册1个id为 beansEndpoint,类型为BeansEndpoint的bean
@ConditionalOnMissingBean–> 当beanFactory中不存在BeansEndpoint类型的bean时生效
ConfigurationPropertiesReportEndpoint
作用:–>暴露被@ConfigurationProperties 注解的bean的属性.为了保护数据,将敏感数据进行了脱敏
字段:
- private static final String CONFIGURATION_PROPERTIES_FILTER_ID = "configurationPropertiesFilter";
- // 数据脱敏
- private final Sanitizer sanitizer = new Sanitizer();
- // 通过实现ApplicationContextAware 进行自动注入
- private ApplicationContext context;
- public ConfigurationPropertiesReportEndpoint() {
- super("configprops");
- }
invoke 实现:
- public Map<String, Object> invoke() {
- return extract(this.context);
- }
调用:
- protected Map<String, Object> extract(ApplicationContext context) {
- // Serialize beans into map structure and sanitize values
- ObjectMapper mapper = new ObjectMapper();
- // 1. 配置ObjectMapper的属性
- configureObjectMapper(mapper);
- // 2. 抽取数据
- return extract(context, mapper);
- }
对ObjectMapper 进行配置:
代码如下:
- protected void configureObjectMapper(ObjectMapper mapper) {
- mapper.configure(SerializationFeature.FAIL_ON_EMPTY_BEANS, false);
- mapper.configure(SerializationFeature.WRITE_NULL_MAP_VALUES, false);
- applyConfigurationPropertiesFilter(mapper);
- applySerializationModifier(mapper);
- }
SerializationFeature.FAIL_ON_EMPTY_BEANS –> 设置当对于给定的类型无法访问时如何处理,true–> 抛出异常,false–> 返回null
SerializationFeature.WRITE_NULL_MAP_VALUES –> 设置当map对于的value为null时如何处理,treu–>序列化,false–> 跳过
applyConfigurationPropertiesFilter 代码如下:
- private void applyConfigurationPropertiesFilter(ObjectMapper mapper) {
- mapper.setAnnotationIntrospector(
- new ConfigurationPropertiesAnnotationIntrospector());
- mapper.setFilterProvider(new SimpleFilterProvider()
- .setDefaultFilter(new ConfigurationPropertiesPropertyFilter()));
- }
设置AnnotationIntrospector为ConfigurationPropertiesAnnotationIntrospector.该类的作用是:获得@JsonFilter注解的值,如果获取不到,则返回configurationPropertiesFilter.代码如下:
- private static class ConfigurationPropertiesAnnotationIntrospector
- extends JacksonAnnotationIntrospector {
- @Override
- public Object findFilterId(Annotated a) {
- // 1. 获得@JsonFilter注解的值,如果获取不到,则返回 configurationPropertiesFilter
- Object id = super.findFilterId(a);
- if (id == null) {
- id = CONFIGURATION_PROPERTIES_FILTER_ID;
- }
- return id;
- }
- }
设置默认的过滤器为ConfigurationPropertiesPropertyFilter,该类的作用是进行如下规则的过滤:
类名以$$开头的被过滤掉
自我引用的字段被过滤掉
当在序列化时抛出异常时过滤掉
代码如下:
- public void serializeAsField(Object pojo, JsonGenerator jgen,
- SerializerProvider provider, PropertyWriter writer) throws Exception {
- if (writer instanceof BeanPropertyWriter) {
- try {
- // 1. 自我引用的字段被过滤掉
- if (pojo == ((BeanPropertyWriter) writer).get(pojo)) {
- if (logger.isDebugEnabled()) {
- logger.debug("Skipping '" + writer.getFullName() + "' on '"
- + pojo.getClass().getName()
- + "' as it is self-referential");
- }
- return;
- }
- }
- catch (Exception ex) {
- // 2. 当在序列化时抛出异常时过滤掉
- if (logger.isDebugEnabled()) {
- logger.debug("Skipping '" + writer.getFullName() + "' on '"
- + pojo.getClass().getName() + "' as an exception "
- + "was thrown when retrieving its value", ex);
- }
- return;
- }
- }
- // 3. 序列化字段
- super.serializeAsField(pojo, jgen, provider, writer);
- }
设置序列化工厂中的方法序列化器为GenericSerializerModifier.代码如下:
- public List<BeanPropertyWriter> changeProperties(SerializationConfig config,
- BeanDescription beanDesc, List<BeanPropertyWriter> beanProperties) {
- List<BeanPropertyWriter> result = new ArrayList<BeanPropertyWriter>();
- for (BeanPropertyWriter writer : beanProperties) {
- boolean readable = isReadable(beanDesc, writer);
- if (readable) {
- result.add(writer);
- }
- }
- return result;
- }
依次遍历beanProperties,如果可读的话,则添加至result中.可读的判断逻辑如下:
根据bean 的类型和属性的类型 找出对应的set方法
如果set方法 存在或者是同一包下的类或者是map或者集合的子类,则返回true
调用extract方法抽取数据.代码如下:
- private Map<String, Object> extract(ApplicationContext context, ObjectMapper mapper) {
- Map<String, Object> result = new HashMap<String, Object>();
- // 1. 获得beanFactory中ConfigurationBeanFactoryMetaData类型的bean
- ConfigurationBeanFactoryMetaData beanFactoryMetaData = getBeanFactoryMetaData(
- context);
- // 2. 获得被@ConfigurationProperties注解的bean,key--> bean的id,value --> bean
- Map<String, Object> beans = getConfigurationPropertiesBeans(context,
- beanFactoryMetaData);
- // 3. 依次遍历beans
- for (Map.Entry<String, Object> entry : beans.entrySet()) {
- String beanName = entry.getKey();
- Object bean = entry.getValue();
- Map<String, Object> root = new HashMap<String, Object>();
- String prefix = extractPrefix(context, beanFactoryMetaData, beanName, bean);
- // 3.1 获得@ConfigurationProperties注解的前缀,添加至root中,key-->prefix,value-->@ConfigurationProperties注解的前缀
- root.put("prefix", prefix);
- // 3.2
- root.put("properties", sanitize(prefix, safeSerialize(mapper, bean, prefix)));
- // 3.3 添加至result中,key--> bean id,value-->map{prefix=xx,properties=xx}
- result.put(beanName, root);
- }
- // 4. 如果ApplicationContext存在父容器的,则递归调用extract提取数据,key为parent.
- if (context.getParent() != null) {
- result.put("parent", extract(context.getParent(), mapper));
- }
- return result;
- }
获得beanFactory中ConfigurationBeanFactoryMetaData类型的bean
获得被@ConfigurationProperties注解的bean,key–> bean的id,value –> bean
依次遍历beans
获得@ConfigurationProperties注解的前缀,添加至root中,key–>prefix,value–>@ConfigurationProperties注解的前缀
对数据进行脱敏.代码如下:
- private Map<String, Object> sanitize(String prefix, Map<String, Object> map) {
- for (Map.Entry<String, Object> entry : map.entrySet()) {
- String key = entry.getKey();
- String qualifiedKey = (prefix.isEmpty() ? prefix : prefix + ".") + key;
- Object value = entry.getValue();
- if (value instanceof Map) {
- // 1. 如果对应的属性值为Map,List 则递归调用sanitize 进行数据脱敏
- map.put(key, sanitize(qualifiedKey, (Map<String, Object>) value));
- }
- else if (value instanceof List) {
- map.put(key, sanitize(qualifiedKey, (List<Object>) value));
- }
- else {
- // 2. 如果属性名包含password", "secret", "key", "token", ".*credentials.*", "vcap_services,则将其替换为******
- value = this.sanitizer.sanitize(key, value);
- value = this.sanitizer.sanitize(qualifiedKey, value);
- map.put(key, value);
- }
- }
- return map;
- }
如果对应的属性值为Map,List 则递归调用sanitize 进行数据脱敏
否则如果属性名包含password, secret, key, token, .*credentials.*, vcap_services,则将其替换为**
添加至result中,key–> bean id,value–>map{prefix=xx,properties=xx}
如果ApplicationContext存在父容器的,则递归调用extract提取数据,key为parent.
由于ConfigurationPropertiesReportEndpoint 被@ConfigurationProperties(prefix = “endpoints.configprops”)注解,因此可通过如下属性配置:
- endpoints.configprops.id=configprops
- endpoints.configprops.sensitive=true
- endpoints.configprops.enabled=true
- endpoints.configprops.keys-to-sanitize=password,secret
之所以可以通过 endpoints.configprops.keys-to-sanitize 进行配置,是因为ConfigurationPropertiesReportEndpoint声明了如下方法:
- public void setKeysToSanitize(String... keysToSanitize) {
- this.sanitizer.setKeysToSanitize(keysToSanitize);
- }
自动化配置(在EndpointAutoConfiguration中配置):
代码如下:
- @Bean
- @ConditionalOnMissingBean
- public ConfigurationPropertiesReportEndpoint configurationPropertiesReportEndpoint() {
- return new ConfigurationPropertiesReportEndpoint();
- }
@Bean –> 注册1个id为configurationPropertiesReportEndpoint,类型为ConfigurationPropertiesReportEndpoint的Bean
@ConditionalOnMissingBean –> beanFactory中不存在ConfigurationPropertiesReportEndpoint类型的bean时生效
TraceEndpoint
作用:–> 该端点用来返回基本的HTTP跟踪信息。默认情况下,跟踪信息的存储采用org.springframework.boot.actuate.trace.InMemoryTraceRepository实现的内存方式,始终保留最近的100条请求记录.其中,返回的Trace定义如下:
- public final class Trace {
- // 时间戳
- private final Date timestamp;
- // 保存用于分析上下文信息,例如HTTP头
- private final Map<String, Object> info;
- public Trace(Date timestamp, Map<String, Object> info) {
- super();
- Assert.notNull(timestamp, "Timestamp must not be null");
- Assert.notNull(info, "Info must not be null");
- this.timestamp = timestamp;
- this.info = info;
- }
- public Date getTimestamp() {
- return this.timestamp;
- }
- public Map<String, Object> getInfo() {
- return this.info;
- }
- }
字段:
private final TraceRepository repository;
这里我们有必要说明一下TraceRepository:
TraceRepository 是用来保存Trace的. 接口定义如下:
public interface TraceRepository {
// 返回保存的Trace
List<Trace> findAll();
// 进行添加
void add(Map<String, Object> traceInfo);
}
TraceRepository 只要1个实现–>InMemoryTraceRepository.其字段如下:
- // 容量为100
- private int capacity = 100;
- // 是否倒序展示,默认为false
- private boolean reverse = true;
- // 容器,用于保存Trace
- private final List<Trace> traces = new LinkedList<Trace>();
findAll只需简单的返回保存的traces即可.实现如下:
public List<Trace> findAll() {
synchronized (this.traces) {
return Collections.unmodifiableList(new ArrayList<Trace>(this.traces));
}
}
add,代码如下:
public void add(Map<String, Object> map) {
// 1. 实例化Trace,时间戳为当前时间
Trace trace = new Trace(new Date(), map);
synchronized (this.traces) {
// 2. 如果traces中的容量大于等于了阈值,则进行删除.如果reverse等于true 则删除最后1个,否则,删除第1个
while (this.traces.size() >= this.capacity) {
this.traces.remove(this.reverse ? this.capacity - 1 : 0);
}
// 3. 进行添加,如果reverse等于true 则添加至第1个,否则,添加至最后
if (this.reverse) {
this.traces.add(0, trace);
}
else {
this.traces.add(trace);
}
}
}
实例化Trace,时间戳为当前时间
如果traces中的容量大于等于了阈值,则进行删除.如果reverse等于true 则删除最后1个,否则,删除第1个
进行添加,如果reverse等于true 则添加至第1个,否则,添加至最后
TraceRepository 是在何处配置的呢?
在TraceRepositoryAutoConfiguration中,代码如下:
@ConditionalOnMissingBean(TraceRepository.class)
@Bean
public InMemoryTraceRepository traceRepository() {
return new InMemoryTraceRepository();
}
@Bean –> 注册1个id为traceRepository,类型为InMemoryTraceRepository的bean
@ConditionalOnMissingBean(TraceRepository.class)–> 当beanFactory中不存在TraceRepository类型的bean时生效
invoke 实现:
@Override
public List<Trace> invoke() {
return this.repository.findAll();
}
只需调用TraceRepository# findAll,返回保存的Trace即可.
属性配置,因此其被@ConfigurationProperties(prefix = “endpoints.trace”)注解,因此可以通过如下属性进行配置:
endpoints.trace.id=trace
endpoints.trace.sensitive=true
endpoints.trace.enabled=true
自动装配:
在EndpointAutoConfiguration中进行了装配,代码如下:
@Bean
@ConditionalOnMissingBean
public TraceEndpoint traceEndpoint() {
return new TraceEndpoint(this.traceRepository == null
? new InMemoryTraceRepository() : this.traceRepository);
}
@Bean–> 注册1个id为traceEndpoint,类型为TraceEndpoint的bean
@ConditionalOnMissingBean–> 当beanFactory中不存在TraceEndpoint类型的bean时生效
这里提1个问题,TraceEndpoint 是通过TraceRepository获取Trace,那么TraceRepository中的Trace是如何保存的呢?
答案:
通过WebRequestTraceFilter(Filter)来实现. WebRequestTraceFilter实现了Ordered接口,指定了其在过滤器链中的顺序,代码如下:
private int order = Ordered.LOWEST_PRECEDENCE - 10;
public int getOrder() {
return this.order;
}
WebRequestTraceFilter中的字段如下:
private static final Log logger = LogFactory.getLog(WebRequestTraceFilter.class);
// debug时使用.如果启用的话,并且log的trace级别可用的话,则打印请求头信息,默认为false
private boolean dumpRequests = false;
// Not LOWEST_PRECEDENCE, but near the end, so it has a good chance of catching all
// enriched headers, but users can add stuff after this if they want to
private int order = Ordered.LOWEST_PRECEDENCE - 10;
private final TraceRepository repository;
private ErrorAttributes errorAttributes;
private final TraceProperties properties;
其中TraceProperties的定义如下:
@ConfigurationProperties(prefix = "management.trace")
public class TraceProperties {
private static final Set<Include> DEFAULT_INCLUDES;
static {
Set<Include> defaultIncludes = new LinkedHashSet<Include>();
defaultIncludes.add(Include.REQUEST_HEADERS);
defaultIncludes.add(Include.RESPONSE_HEADERS);
defaultIncludes.add(Include.COOKIES);
defaultIncludes.add(Include.ERRORS);
defaultIncludes.add(Include.TIME_TAKEN);
DEFAULT_INCLUDES = Collections.unmodifiableSet(defaultIncludes);
}
private Set<Include> include = new HashSet<Include>(DEFAULT_INCLUDES);
public Set<Include> getInclude() {
return this.include;
}
public void setInclude(Set<Include> include) {
this.include = include;
}
}
默认配置的是Include.REQUEST_HEADERS, Include.RESPONSE_HEADERS, Include.COOKIES ,Include.ERRORS, Include.TIME_TAKEN. 可以通过如下进行配置
management.trace.include=REQUEST_HEADERS,RESPONSE_HEADERS
1
可选值为org.springframework.boot.actuate.trace.TraceProperties.Include.这里就不在贴出了
WebRequestTraceFilter 继承了OncePerRequestFilter,因此只需实现doFilterInternal即可,代码如下:
protected void doFilterInternal(HttpServletRequest request,
HttpServletResponse response, FilterChain filterChain)
throws ServletException, IOException {
long startTime = System.nanoTime();
// 1. 获得trace
Map<String, Object> trace = getTrace(request);
// 2. 打印日志-->如果log的trace级别可用的话并且dumpRequests等于true,则打印请求头信息,默认为false
logTrace(request, trace);
int status = HttpStatus.INTERNAL_SERVER_ERROR.value();
try {
// 3. 继续过滤器链的过滤,最后获得响应状态
filterChain.doFilter(request, response);
status = response.getStatus();
}
finally {
// 4. 添加Http请求耗时统计-->如果TraceProperties中配置了Include#TIME_TAKEN(默认配置了),则添加到trace中,key为timeTaken,value-->当前时间-开始时间的毫秒值
addTimeTaken(trace, startTime);
// 5. 添加响应头信息
enhanceTrace(trace, status == response.getStatus() ? response
: new CustomStatusResponseWrapper(response, status));
// 6. 添加至TraceRepository 中
this.repository.add(trace);
}
}
记录开始时间
获得trace.代码如下:
protected Map<String, Object> getTrace(HttpServletRequest request) {
// 1. 获得HttpSession
HttpSession session = request.getSession(false);
// 2. 获得javax.servlet.error.exception,所对应的异常--> 当spring mvc 出现异常时,会加入到javax.servlet.error.exception中
Throwable exception = (Throwable) request
.getAttribute("javax.servlet.error.exception");
// 3. 获得Principal,如果返回null,说明没有该请求没有进行验证
Principal userPrincipal = request.getUserPrincipal();
Map<String, Object> trace = new LinkedHashMap<String, Object>();
Map<String, Object> headers = new LinkedHashMap<String, Object>();
// 4. 添加请求方法,请求路径,请求头到trace中
trace.put("method", request.getMethod());
trace.put("path", request.getRequestURI());
trace.put("headers", headers);
if (isIncluded(Include.REQUEST_HEADERS)) {
headers.put("request", getRequestHeaders(request));
}
// 省略掉默认不执行的代码....
// 5. 如果有异常并且errorAttributes不等于null,则记录error
if (isIncluded(Include.ERRORS) && exception != null
&& this.errorAttributes != null) {
trace.put("error", this.errorAttributes
.getErrorAttributes(new ServletRequestAttributes(request), true));
}
return trace;
}
继续过滤器链的过滤,最后获得响应状态
添加Http请求耗时统计–>如果TraceProperties中配置了Include#TIME_TAKEN(默认配置了),则添加到trace中,key为timeTaken,value–>当前时间-开始时间的毫秒值.代码如下:
private void addTimeTaken(Map<String, Object> trace, long startTime) {
long timeTaken = System.nanoTime() - startTime;
add(trace, Include.TIME_TAKEN, "timeTaken",
"" + TimeUnit.NANOSECONDS.toMillis(timeTaken));
}
添加响应头信息.代码如下:
protected void enhanceTrace(Map<String, Object> trace, HttpServletResponse response) {
if (isIncluded(Include.RESPONSE_HEADERS)) {
Map<String, Object> headers = (Map<String, Object>) trace.get("headers");
headers.put("response", getResponseHeaders(response));
}
}
getResponseHeaders 代码如下:
private Map<String, String> getResponseHeaders(HttpServletResponse response) {
Map<String, String> headers = new LinkedHashMap<String, String>();
// 1. 依次遍历响应头,添加至headers 中,key--> 响应头名,value-->响应头对应的值
for (String header : response.getHeaderNames()) {
String value = response.getHeader(header);
headers.put(header, value);
}
// 2. 如果TraceProperties中没有配置Include#COOKIES,则在headers中删除key为Set-Cookie的值.默认是配置了的,因此不会删除
if (!isIncluded(Include.COOKIES)) {
headers.remove("Set-Cookie");
}
// 3. 向headers 中添加 key--> status,value-->响应状态码
headers.put("status", "" + response.getStatus());
return headers;
}
遍历响应头,添加至headers 中,key–> 响应头名,value–>响应头对应的值
如果TraceProperties中没有配置Include#COOKIES,则在headers中删除key为Set-Cookie的值.默认是配置了的,因此不会删除
向headers 中添加 key–> status,value–>响应状态码
添加至TraceRepository中
WebRequestTraceFilter 是如何配置的呢?
答案: 在TraceWebFilterAutoConfiguration中.代码如下:
@Bean
@ConditionalOnMissingBean
public WebRequestTraceFilter webRequestLoggingFilter(BeanFactory beanFactory) {
WebRequestTraceFilter filter = new WebRequestTraceFilter(this.traceRepository,
this.traceProperties);
if (this.errorAttributes != null) {
filter.setErrorAttributes(this.errorAttributes);
}
return filter;
}
@Bean–> 注册1个id为webRequestLoggingFilter,类型为WebRequestTraceFilter的bean
@ConditionalOnMissingBean–> 当beanFactory中不存在WebRequestTraceFilter类型的bean时生效
同时由于TraceWebFilterAutoConfiguration声明了如下注解:
@Configuration
@ConditionalOnClass({ Servlet.class, DispatcherServlet.class, ServletRegistration.class })
@AutoConfigureAfter(TraceRepositoryAutoConfiguration.class)
@ConditionalOnProperty(prefix = "endpoints.trace.filter", name = "enabled", matchIfMissing = true)
@EnableConfigurationProperties(TraceProperties.class)
@Configuration–> 配置类
@ConditionalOnClass({ Servlet.class, DispatcherServlet.class, ServletRegistration.class })–> 在当前的类路径下存在Servlet.class, DispatcherServlet.class, ServletRegistration.class时生效
@AutoConfigureAfter(TraceRepositoryAutoConfiguration.class)–> 在TraceRepositoryAutoConfiguration之后进行自动装配,这样就可以自动注入TraceRepository
@ConditionalOnProperty(prefix = “endpoints.trace.filter”, name = “enabled”, matchIfMissing = true)–> 当配置有endpoints.trace.filter.enabled 等于true时生效,如果没有配置,默认生效
@EnableConfigurationProperties(TraceProperties.class)–> 可以通过management.trace.include 进行配置.
转:https://blog.csdn.net/qq_26000415/article/details/79060258
Springboot Actuator之七:actuator 中原生endpoint源码解析1的更多相关文章
- SpringBoot Profile使用详解及配置源码解析
在实践的过程中我们经常会遇到不同的环境需要不同配置文件的情况,如果每换一个环境重新修改配置文件或重新打包一次会比较麻烦,Spring Boot为此提供了Profile配置来解决此问题. Profile ...
- Scala 深入浅出实战经典 第65讲:Scala中隐式转换内幕揭秘、最佳实践及其在Spark中的应用源码解析
王家林亲授<DT大数据梦工厂>大数据实战视频 Scala 深入浅出实战经典(1-87讲)完整视频.PPT.代码下载:百度云盘:http://pan.baidu.com/s/1c0noOt6 ...
- Scala 深入浅出实战经典 第61讲:Scala中隐式参数与隐式转换的联合使用实战详解及其在Spark中的应用源码解析
王家林亲授<DT大数据梦工厂>大数据实战视频 Scala 深入浅出实战经典(1-87讲)完整视频.PPT.代码下载: 百度云盘:http://pan.baidu.com/s/1c0noOt ...
- Scala 深入浅出实战经典 第60讲:Scala中隐式参数实战详解以及在Spark中的应用源码解析
王家林亲授<DT大数据梦工厂>大数据实战视频 Scala 深入浅出实战经典(1-87讲)完整视频.PPT.代码下载:百度云盘:http://pan.baidu.com/s/1c0noOt6 ...
- Scala 深入浅出实战经典 第48讲:Scala类型约束代码实战及其在Spark中的应用源码解析
王家林亲授<DT大数据梦工厂>大数据实战视频 Scala 深入浅出实战经典(1-64讲)完整视频.PPT.代码下载:百度云盘:http://pan.baidu.com/s/1c0noOt6 ...
- 解析jQuery中extend方法--源码解析以及递归的过程《二》
源码解析 在解析代码之前,首先要了解extend函数要解决什么问题,以及传入不同的参数,会达到怎样的效果.extend函数内部处理传入的不同参数,返回处理后的对象. extend函数用来扩展对象,增加 ...
- .Net Core中的配置文件源码解析
一.配置简述 之前在.Net Framework平台开发时,一般配置文件都是xml格式的Web.config,而需要配置其他格式的文件就需要自己去读取内容,加载配置了..而Net Core支持从命令行 ...
- Tomcat系列(二)- EndPoint源码解析
在上一节中我们描述了Tomcat的整体架构, 我们知道了Tomcat分为两个大组件,一个连接器和一个容器. 而我们这次要讲的 EndPoint的组件就是属于连接器里面的. 它是一个通信的端点,就是负责 ...
- flask 中 session的源码解析
1.首先请求上下文和应用上下文中已经知道session是一个LocalProxy()对象 2.然后需要了解整个请求流程, 3.客户端的请求进来时,会调用app.wsgi_app(),于此此时,会生成一 ...
随机推荐
- javascript字符串加密解密函数
代码如下: /** * 加密函数 * @param str 待加密字符串 * @returns {string} */ function str_encrypt(str) { var c = Stri ...
- QT绘制B样条曲线
² 贝塞尔曲线 贝塞尔曲线是通过一组多边折线的各顶点来定义.在各顶点中,曲线经过第一点和最后一点,其余各点则定义曲线的导数.阶次和形状.第一条和最后一条则表示曲线起点和终点的切线方向. ² B样条 ...
- 英语dialogite红纹石dialogite菱锰矿
红纹石又称菱锰矿(dialogite)属于三方晶系.晶体呈菱面体,通常呈粒状.块状或结核状.玫瑰色,容易氧化而转变成褐黑色.玻璃光泽.解理平行菱面体{1011}完全.硬度3.5-4.5.比重3.6-3 ...
- 记MacOS抹盘后--使用U盘安装MacOS实录
背景 纯属一时手贱,本想重装系统,结果直接把磁盘抹了,然后联网安装死活安不上.但这里仍然附上联网安装方法: 按键 描述 ⌘+R 重新安装您的 Mac 上装有的最新 macOS(建议操作). Optio ...
- NIO的整体认识
目录 1.Java NIO简介 2.java NIO和IO的主要区别 3.缓冲区buffer和通道channel 3.1.缓冲区buffer 3.2.channel 4.文件通道fileChannel ...
- 安装Docker报container-selinux >= 2.9错
Docker装了无数次,还是会遇到如此熟悉的问题,知道他是版本需要更新,但是就是找不到对应的,在网上找了差不多一个下午都没弄好.发现平时还是要多动脑子才行,既然知道是版本需要更新,那么到官网直接找版本 ...
- Spark源码执行逻辑分析【基于案例SparkPi】
一.案例SparkPi代码 package scala import org.apache.spark.sql.SparkSession import scala.math.random /** Co ...
- hadoop hdfs 有内网、公网ip后,本地调试访问不了集群解决
问题背景: 使用云上的虚拟环境搭建测试集群,导入一些数据,在本地idea做些debug调试,但是发现本地idea连接不上测试环境 集群内部配置hosts映射是内网映射(内网ip与主机名映射),本地只能 ...
- MySQL数据物理备份之tar打包备份
复制数据文件方式,可以使用cp或tar 1.停止服务 [root@localhost mysql]# systemctl stop mysqld [root@localhost mysql]# net ...
- MySQL索引(九)
一.索引介绍 1.1 什么是索引 索引就好比一本书的目录,它会让你更快的找到内容. 让获取的数据更有目的性,从而提高数据库检索数据的性能. 分为以下四种: BTREE:B+树索引(基本上都是使用此索引 ...