iptables和lvs
解压密码6Hai7Gf8
路由转发
0是不转发,1是转发
[root@m01 roles]# cat /proc/sys/net/ipv4/ip_forward
0
临时生效
[root@m01 roles]# echo "1" > /proc/sys/net/ipv4/ip_forward
从配置文件读取配置,临时生效
sysctl -p
sed -i '/net.ipv4.ip_forward = 0/ net.ipv4.ip_forward = 1/ /etc/sysctl.conf
sysctl -p
路由条目解释
有2个路由到20和10网段的路由
- Destination
- Gateway
- Genmask
- Flags 经过几个路由器
- Ref 路由索引
- Use 这个路由使用多少次
- Iface 连接的网卡接口
[root@route ~]# route -n
Kernel IP routing table
Destination Gateway Genmask Flags Metric Ref Use Iface
192.168.20.0 0.0.0.0 255.255.255.0 U 0 0 0 eth1
192.168.10.0 0.0.0.0 255.255.255.0 U 0 0 0 eth0
169.254.0.0 0.0.0.0 255.255.0.0 U 1002 0 0 eth0
169.254.0.0 0.0.0.0 255.255.0.0 U 1003 0 0 eth1
添加路由临时生效
route -add -net 192.168.80.0 netmask 255.255.255.0 gw 192.168.20.20
route del -net 192.168.80.0 netmask 255.255.255.0
永久生效
vim /etc/sysconfig/network-scripts/route-eth0
ADDERSS0=192.168.80.0
NETMASK0=255.255.255.0
GATEWAY0=192.168.20.20
systemctl restart network
iptables
韩立刚环境准备
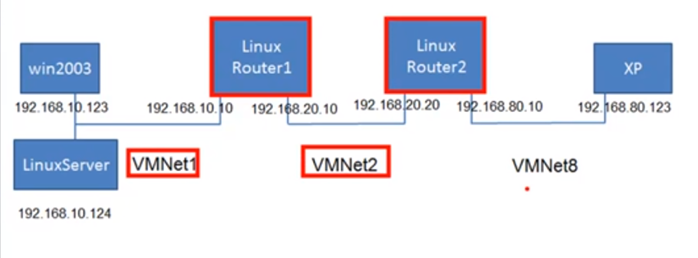
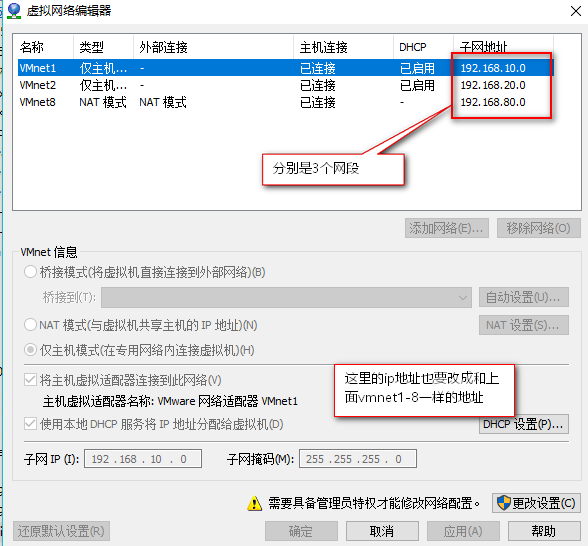
虚拟机网络设置
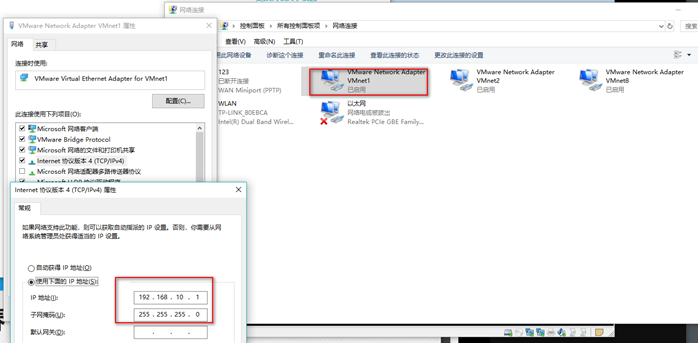
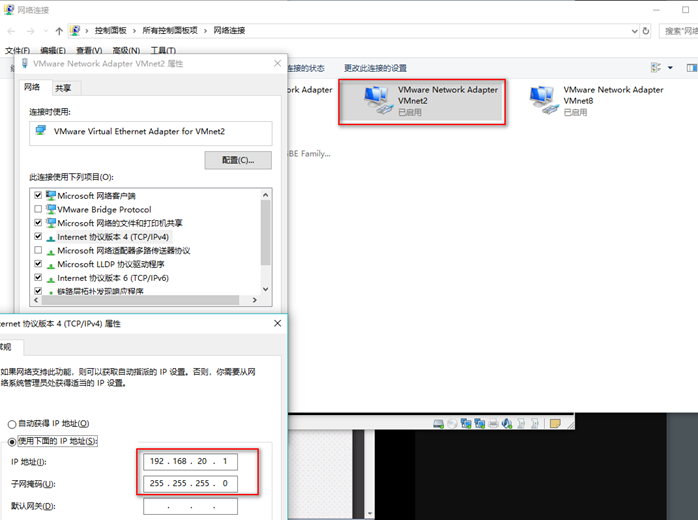
内网配置ip
[root@reoute-nei ~]# cat /etc/sysconfig/network-scripts/ifcfg-eth[10]
DEVICE=eth0
TYPE=Ethernet
ONBOOT=yes
BOOTPROTO=static
IPADDR=192.168.10.123
NETMASK=255.255.255.0
GATEWAY=192.168.10.10
有以下几条路由条目
[root@reoute-nei ~]# route -n
Kernel IP routing table
Destination Gateway Genmask Flags Metric Ref Use Iface
192.168.10.0 0.0.0.0 255.255.255.0 U 0 0 0 eth0
169.254.0.0 0.0.0.0 255.255.0.0 U 1002 0 0 eth0
0.0.0.0 192.168.10.10 0.0.0.0 UG 0 0 0 eth0
route1配置ip地址
[root@route ~]# cat /etc/sysconfig/network-scripts/ifcfg-eth[10]
DEVICE=eth0
TYPE=Ethernet
ONBOOT=yes
BOOTPROTO=static
IPADDR=192.168.10.10
NETMASK=255.255.255.0
DEVICE=eth1
TYPE=Ethernet
ONBOOT=yes
BOOTPROTO=static
IPADDR=192.168.20.10
NETMASK=255.255.255.0
添加路由
[root@route ~]# cat /etc/sysconfig/network-scripts/route-eth1
ADDRESS0=192.168.80.0
NETMASK0=255.255.255.0
GATEWAY0=192.168.20.20
开启路由转发
sed -i '/net.ipv4.ip_forward = 0/ net.ipv4.ip_forward = 1/ /etc/sysctl.conf
sysctl -p
查看路由条目
[root@route ~]# route -n
Kernel IP routing table
Destination Gateway Genmask Flags Metric Ref Use Iface
192.168.20.0 0.0.0.0 255.255.255.0 U 0 0 0 eth1
192.168.80.0 192.168.20.20 255.255.255.0 UG 0 0 0 eth1
192.168.10.0 0.0.0.0 255.255.255.0 U 0 0 0 eth0
169.254.0.0 0.0.0.0 255.255.0.0 U 1002 0 0 eth0
169.254.0.0 0.0.0.0 255.255.0.0 U 1003 0 0 eth1
route2配置ip
[root@route2 ~]# cat /etc/sysconfig/network-scripts/ifcfg-eth[10]
DEVICE=eth0
TYPE=Ethernet
ONBOOT=yes
BOOTPROTO=static
IPADDR=192.168.80.10
DEVICE=eth1
TYPE=Ethernet
ONBOOT=yes
BOOTPROTO=static
IPADDR=192.168.20.20
添加路由
[root@route2 ~]# cat /etc/sysconfig/network-scripts/route-eth1
ADDRESS0=192.168.10.0
NETMASK0=255.255.255.0
GATEWAY0=192.168.20.10
查看路由
[root@route2 ~]# route -n
Kernel IP routing table
Destination Gateway Genmask Flags Metric Ref Use Iface
192.168.20.0 0.0.0.0 255.255.255.0 U 0 0 0 eth1
192.168.80.0 0.0.0.0 255.255.255.0 U 0 0 0 eth0
192.168.10.0 192.168.20.10 255.255.255.0 UG 0 0 0 eth1
169.254.0.0 0.0.0.0 255.255.0.0 U 1002 0 0 eth0
169.254.0.0 0.0.0.0 255.255.0.0 U 1003 0 0 eth1
开启内核路由转发
sed -i '/net.ipv4.ip_forward = 0/ net.ipv4.ip_forward = 1/ /etc/sysctl.conf
sysctl -p
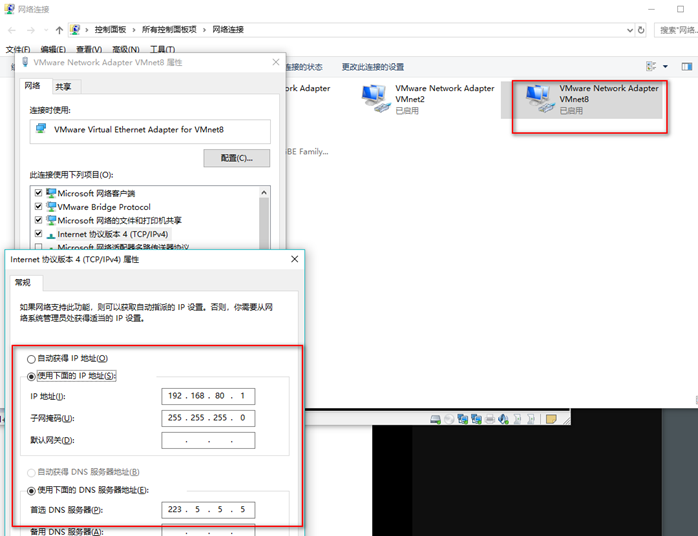
外网配置ip
[root@route-wai ~]# cat /etc/sysconfig/network-scripts/ifcfg-eth0
DEVICE=eth0
TYPE=Ethernet
ONBOOT=yes
BOOTPROTO=static
IPADDR=192.168.80.123
GATEWAY=192.168.80.10
NDS=223.5.5.5
NETMASK=255.255.255.0
查看路由
[root@route-wai ~]# route -n
Kernel IP routing table
Destination Gateway Genmask Flags Metric Ref Use Iface
192.168.80.0 0.0.0.0 255.255.255.0 U 0 0 0 eth0
169.254.0.0 0.0.0.0 255.255.0.0 U 1002 0 0 eth0
0.0.0.0 192.168.80.10 0.0.0.0 UG 0 0 0 eth0
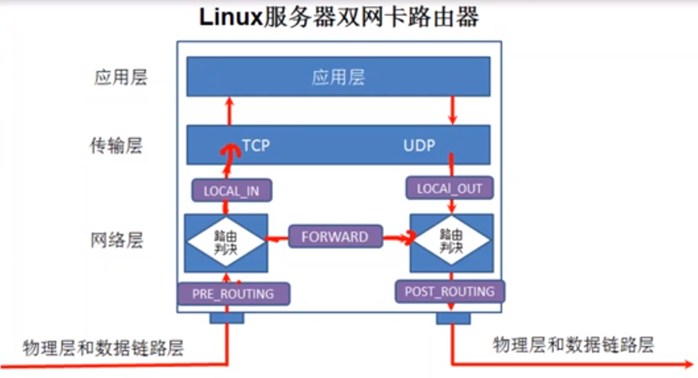
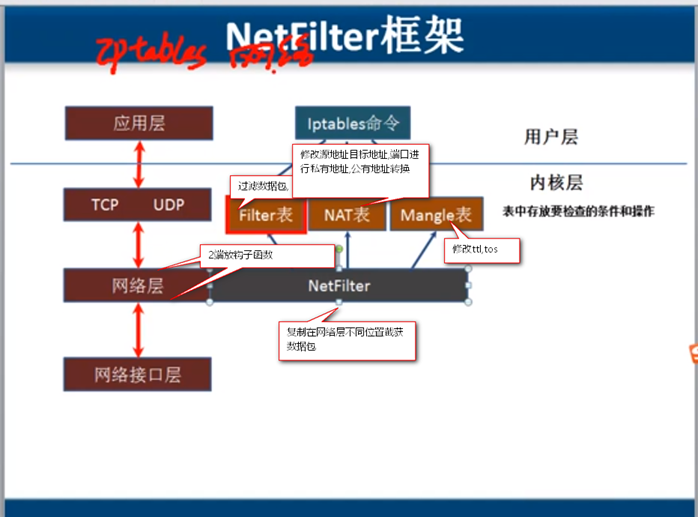
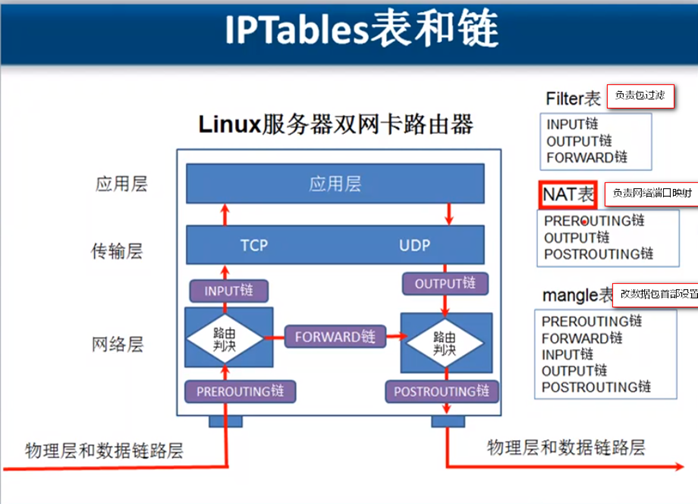
数据包通过网卡进入到应用层,要经过 prerouting loca_in
从linux系统出去要经过, local_out,post_routing
转发数据包要经过prerouting forward postrouting
数据包经过这些钩子干嘛呢?钩子函数会检查filter,nat,mangle表,安装表里面的规则进行过滤
iptalbes 查看规则
删除reject规则
临时生效
iptalbes -D FORWARD 1
永久生效
/etc/rc.d/init.d/iptables save
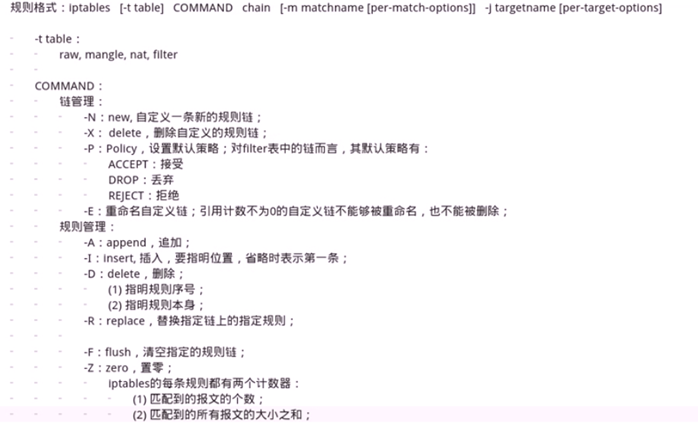
iptables 命令格式
格式
iptables -t table 命令 chian rules -j target
table
可以是filter nat mangle nat 默认是filter
命令
-P或--policy 用来定义默认策略,就是允许通不通过
-A或 --append 在规则列表的最后增加一条规则
-I 或insert 在指定的位置插入一条规则,不指定位置就是在最上面插入
-D 或 --delete 删除一个规则
-R或 --replace修改某条规则
-F或 --flush 删除表中的所有规则
举例
iptables -t filter -P FORWARD ACCEPT 设置filter表ACCEPT链默认接受数据包
iptables -t filter -I INPUT -p icmp -j DROP 在INPUT首插入1条规则
iptables -I INPUT 2 -p icmp -j DROP 在INPUT链第二行插入1条规则
iptables -D INPUT 2 删除INPUT链的第二条规则
iptables -R INPUT 2 -p icmp -j DROP 修改INPUT第二条规则,改成DROP
iptables -F INPUT 清除INPUT链中的所有规则
iptables -F 不指定链是清除所有
iptables 数据包匹配选项
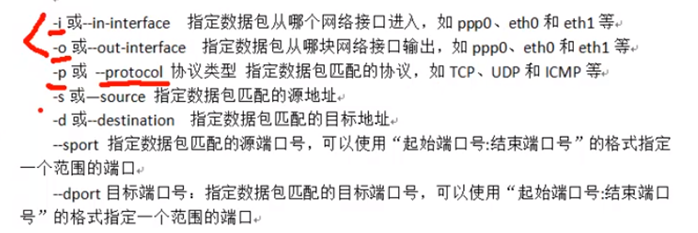
举例
禁止外网ping route 路由器,但是能ping通内网,所以,设置 filter参数,只是包过滤,
[root@route ~]# iptables -t filter -I INPUT -p icmp -i eth1 -j DROP
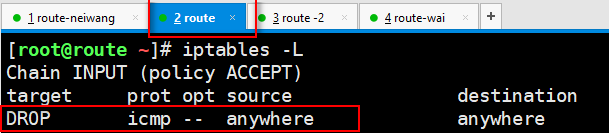
之后
wai网 ping eth1网卡就不通了

但是不影响外网ping10.123的机器

禁止 80.123这个机器ssh连接 10.123这台机器
为什么要用FORWARD 因为80.123通过route 连接10.123 对与FORWARD来说.route负责的是转发
iptables -t filter -I FORWARD -p tcp -s 192.168.80.123/32 -d 192.168.10.123/32 --dport 22 -j DROP
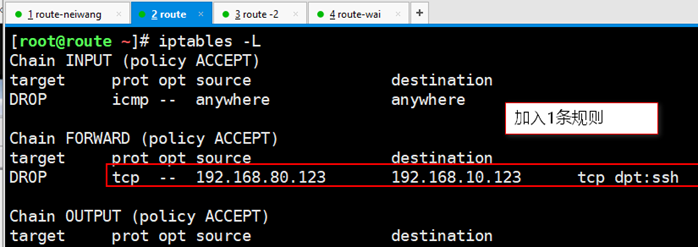
之后 SSH 连接不上了

再次添加 192.168.80.0网段对 192.168.10.0网段有所有权限
[root@route ~]# iptables -t filter -I FORWARD -s 192.168.80.0/24 -d 192.168.10.0/24 -j ACCEPT
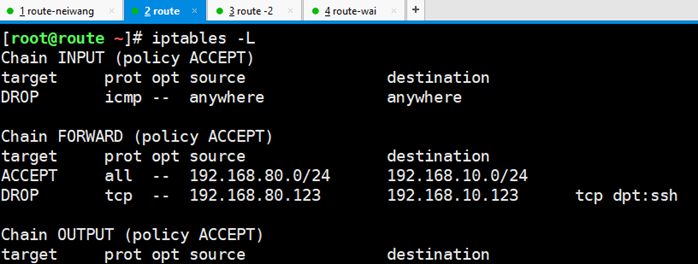
又能连接了,因为比较宽泛的规则在FORWARD最上面,匹配到了

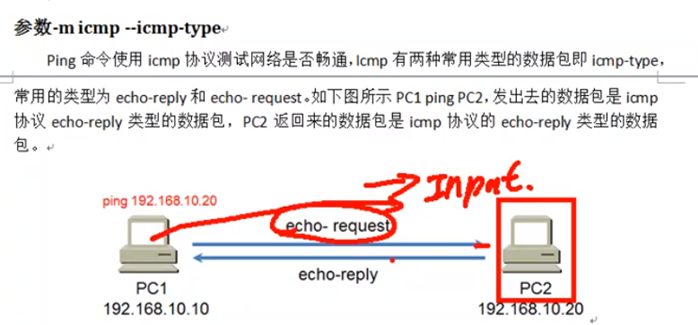
使用扩展选项实现单方向ping通
-m icmp --icmp-type
web服务器不主动和外面建立会话
iptables -t filter -I output -m state --state NEW -j DROP
示例
在linux作为路由器上设置规则
禁止192.168.10.0/24 ping通192.168.80.0/24
允许192.168.80.0/24 ping通192.168.10.0/24
[root@route ~]# iptables -t filter -I FORWARD -s 192.168.10.0/24 -d 192.168.80.0/24
-p icmp -m icmp --icmp-type echo-request -j DROP
iptables -t 表 -I链 -s 谁 到谁哪里 -p 协议 (类型是 -m icmp --icmp--type echo -request) -j 动作
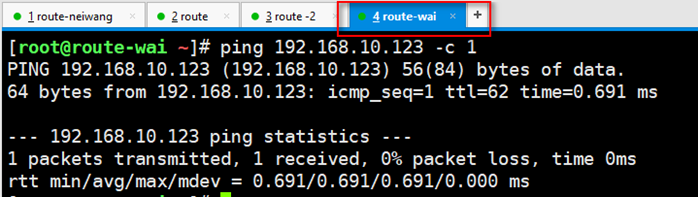
结果:
内网ping 不通外网


外网ping的通neiwang
 查看iptables表
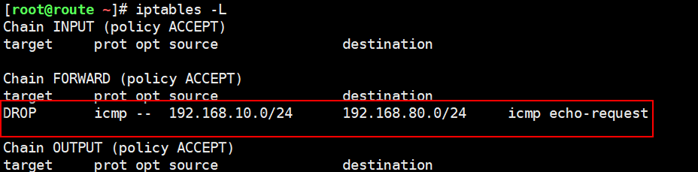
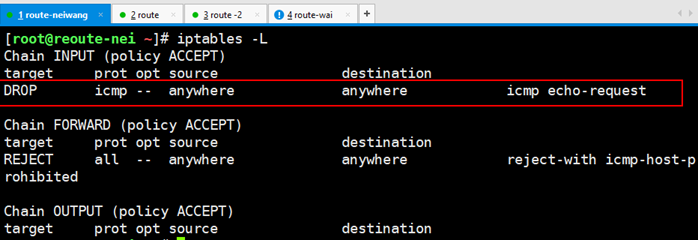
在linux住机上设置规则 :linux主机可用ping别人,别人不能ping我
示例
[root@reoute-nei ~]# iptables -t filter -I INPUT -p icmp -m icmp --icmp-type echo-re
quest -j DROP

linux ping别人通
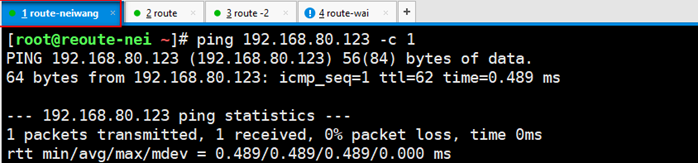 别人ping linxu不通
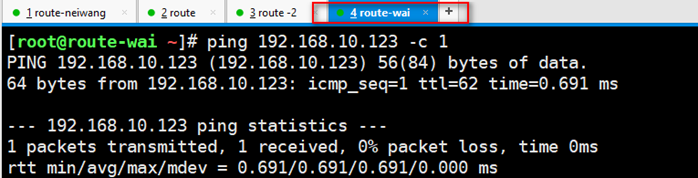
-m multiport
指定多端口号:
-m multiport
--sport 源端口
--port 目标端口
--ports 源和目标一起指
示例:
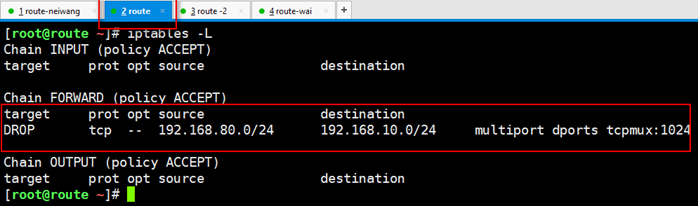
禁止192.168.80.0/24 访问 192.168.80.0/24 1-----1024端口
iptables -t filter -I FORWARD -p tcp -d 192.168.10.0/24 -s 192.168.80.0/24 -m multiport --dports 1:1024 -j DROP


指定IP段
-m iprange
--src-range ip-ip
--src-range ip-ip
示例:
禁止192.168.80.0/24地址段 访问 192.168.80.0/24
[root@route ~]# iptables -t filter -I FORWARD -m iprange --src-range 192.168.80.1-192.168.80.140 -j DROP 
不能连接不能ping 
-m connlimit 连接限制
--comlimit-above 限定大连接个数
-m limit --limit 限速
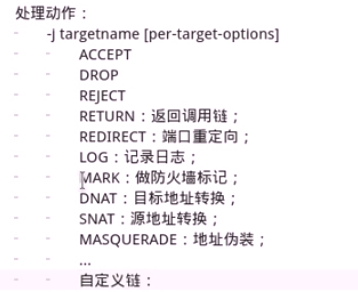
处理动作
REJECT 会显示目标端口不可达
路由器上设置
[root@route ~]# iptables -t filter -I FORWARD -s 192.168.10.0/24 -p icmp -j REJECT
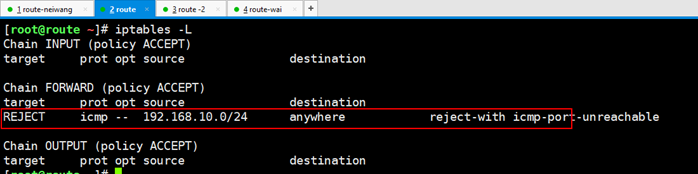 内网显示目标端口不可达
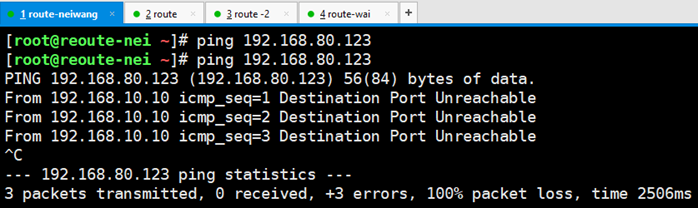
路由器再在REJECT前面添加DROP动作 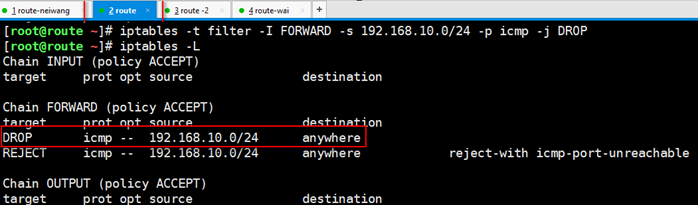
内外在次ping 显示超时

禁止windows远程桌面连接. 抓包显示
[root@route ~]# iptables -t filter -I FORWARD -s 192.168.10.0/24 -p tcp --dport 3380 -j REJECT
log 记录日志
举例 内网禁止ssh连接 把日志利用log记录日志
[root@route ~]# iptables -t filter -I FORWARD -s 192.168.10.123/24 -p tcp --dport 22 -j DROP
[root@route ~]# iptables -t filter -I FORWARD -s 192.168.10.123/24 -p tcp --dport 22 -j LOG --log-prefix "iptables-ssh"
先写禁止ssh连接,在写寄到日志,保证条目里日志在上面
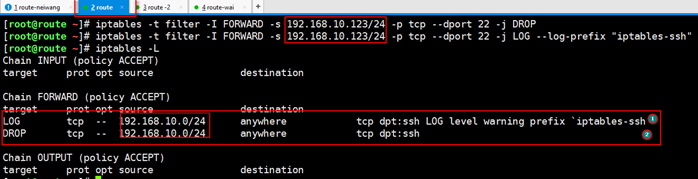
 在/var/log/messages里查看,就有iptables-ssh的日志
设置禁止ping并写到日志
iptables -t filter -I INPUT -p icmp -j LOG --log-prefix "iptables-icmp"
老王iptables

iptables的组成
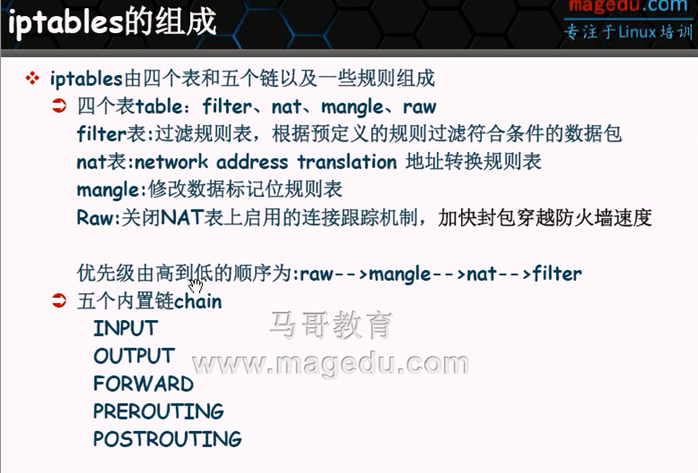
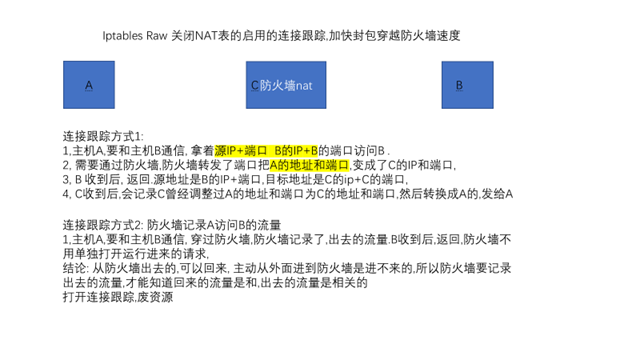
什么是Raw:iptables连接跟踪
数据包过滤匹配流程
数据包经过3个流向:
数据包通过网卡进入到应用层,要经过 prerouting loca_in
从linux系统出去要经过, local_out,post_routing
转发数据包穿过电脑(把电脑当作路由器)要经过prerouting forward postrouting
数据包经过这些钩子干嘛呢?钩子函数会检查filter,nat,mangle表,安装表里面的规则进行过滤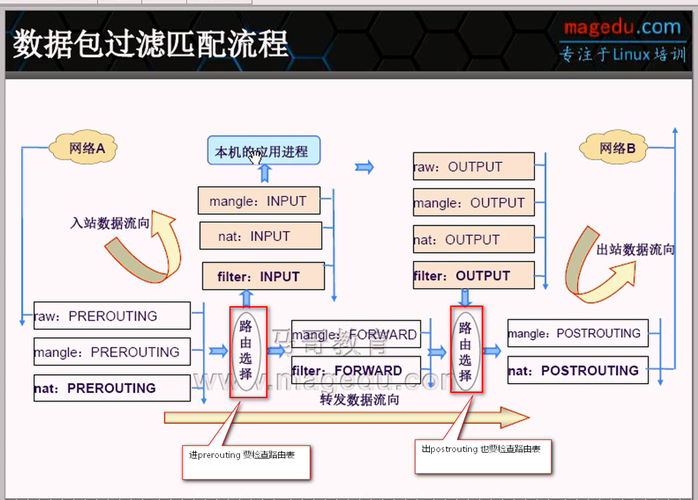
iptabels语法
table
可以是filter表 nat表 mangle表 nat表 默认是filter表
COMMAND
链管理:
-N: new 自定义1条新的规则链
-X:delete 删除自定义的空的规则链
-P : policy 设置默认策略,对filter表中的链而言,默认策略有
ACCEPT: 接受
DROP: 丢弃
REJECT: 拒绝
规则管理
-A或 --append 在规则列表的最后增加一条规则
-I 或insert 在指定的位置插入一条规则,不指定位置就是在最上面插入
-D 或 --delete 删除一个规则 -D input 2 或指名规则本身
-R或 --replace替换某条规则 -R INPUT 3
-F或 --flush 删除表中的所有规则
-Z:置零,iptables有2个计数器
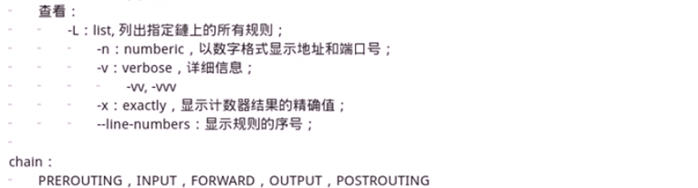
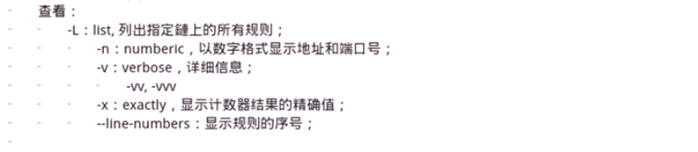
查看语法:
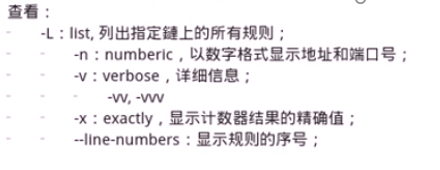

- -L :list 列出指定链的所有规则,此项必须写在最后
- -n: number 以数字方式显示地址和端口号
- -x: exactly 显示计数器结果的精确值,而不上单位转换后的易读值
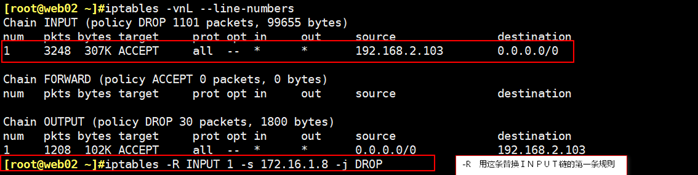
命令演示
[root@web02 ~]#iptables -vnL
Chain INPUT (policy DROP 10202 packets, 1085K bytes)
pkts bytes target prot opt in out source destination
2630 259K ACCEPT all -- * * 192.168.2.103 0.0.0.0/0
--line-numbers 显示行号
[root@web02 ~]#iptables -vnL --line-numbers
Chain INPUT (policy DROP 10212 packets, 1086K bytes)
num pkts bytes target prot opt in out source destination
1 2669 262K ACCEPT all -- * * 192.168.2.103 0.0.0.0/0
iptables -s 显示命令.可以复制下来放到脚本里
iptables -D INPUT 2 #删除INPUT2链的第二条规则
-R: 替换
清空表
iptables -F -t nat
清空计数器
- Z
[root@web02 ~]#iptables -vnL --line-numbers
Chain INPUT (policy DROP 3 packets, 285 bytes)
num pkts bytes target prot opt in out source destination
1 3524 330K ACCEPT all -- * * 192.168.2.103 0.0.0.0/0
清空INPUT的计数器
[root@web02 ~]#iptables -Z INPUT
[root@web02 ~]#iptables -vnL --line-numbers
Chain INPUT (policy DROP 2 packets, 168 bytes)
num pkts bytes target prot opt in out source destination
1 6 396 ACCEPT all -- * * 192.168.2.103 0.0.0.0/0
! 取反
iptables - I INPUT ! -s 192.168.2.103 - j DROP
除2.103地址以外的全都拒绝
查看支持什么表支持的链
[root@web02 ~]#iptables -vnL --line-numbers -t raw| filter | raw | nat
链管理:
-N: new 自定义1条新的规则链
-X:delete 删除自定义的空的规则链
-P : policy 设置默认策略,对filter表中的链而言,默认策略有
ACCEPT: 接受
DROP: 丢弃
REJECT: 拒绝
iptables的模块
大写的是动作.小写的是模块,支持很多
[root@web02 ~]#rpm -ql iptables
/etc/sysconfig/ip6tables-config
/etc/sysconfig/iptables-config
/usr/lib64/xtables/libip6t_REJECT.so
/usr/lib64/xtables/libip6t_SNAT.so
/usr/lib64/xtables/libip6t_hbh.so
/usr/lib64/xtables/libip6t_hl.so
/usr/lib64/xtables/libip6t_icmp6.so
查看内核编译配置文件iptables以模块方式编译进内核
[root@web02 ~]#grep -i iptables /boot/config-3.10.0-862.el7.x86_64
CONFIG_IP_NF_IPTABLES=m
CONFIG_IP6_NF_IPTABLES=m
# iptables trigger is under
链管理:
-N: new 自定义1条新的规则链
-X:delete 删除自定义的空的规则链
-P : policy 设置默认策略,对filter表中的链而言,默认策略有
ACCEPT: 接受
DROP: 丢弃
REJECT: 拒绝
防火墙默认规则


-P 修改默认规则
修改为DOOP
查看默认规则
[root@web02 ~]#iptables -vnL
Chain INPUT (policy ACCEPT 220 packets, 19696 bytes) 默认可以进入
pkts bytes target prot opt in out source destination
Chain FORWARD (policy ACCEPT 0 packets, 0 bytes) 默认可以转发
pkts bytes target prot opt in out source destination
Chain OUTPUT (policy ACCEPT 91 packets, 8412 bytes) 默认可以出去
pkts bytes target prot opt in out source destination
设置windows本机能连接linux 192.168.2.103
[root@web02 ~]#iptables -vnL
除了192.168.2.103 其他都不能连接我
[root@web02 ~]#iptables -A INPUT -s 192.168.2.103 -j ACCEPT 源地址2.103可以连接
[root@web02 ~]#iptables -A OUTPUT -d 192.168.2.103 -j ACCEPT 目标2.103可以连接
查看添加了规则
[root@web02 ~]#iptables -vnL
Chain INPUT (policy ACCEPT 2 packets, 168 bytes)
pkts bytes target prot opt in out source destination
62 4768 ACCEPT all -- * * 192.168.2.103 0.0.0.0/0
Chain FORWARD (policy ACCEPT 0 packets, 0 bytes)
pkts bytes target prot opt in out source destination
Chain OUTPUT (policy ACCEPT 2 packets, 168 bytes)
pkts bytes target prot opt in out source destination
6 840 ACCEPT all -- * * 0.0.0.0/0
192.168.2.103
改默认规则,至此,除了2.103可以连接机器,其他任何人都不能连接机器了
[root@web02 ~]#iptables -P INPUT DROP #改INPUT的默认规则
[root@web02 ~]#iptables -P OUTPUT DROP #改INPUT的默认规则
查看 policy drop 是拒绝的意思,下面的规则就是白名单,只有192.168.2.103 的可以连接
[root@web02 ~]#iptables -vnL
Chain INPUT (policy DROP 148 packets, 13224 bytes) # 除了192.168.2.103其他都拒绝
pkts bytes target prot opt in out source destination
195 13576 ACCEPT all -- * * 192.168.2.103 0.0.0.0/0
Chain FORWARD (policy ACCEPT 0 packets, 0 bytes)
pkts bytes target prot opt in out source destination
Chain OUTPUT (policy DROP 4 packets, 240 bytes)
pkts bytes target prot opt in out source destination
81 9528 ACCEPT all -- * * 0.0.0.0/0 192.168.2.103
iptables 匹配条件
基本匹配条件

允许192.168.2.7 访问 -A OUTPUT INPUT 保证可进可出
[root@web02 ~]#iptables -A INPUT
-d 192.168.2.7 -j ACCEPT 进
[root@web02 ~]#iptables -A OUTPUT
-s 192.168.2.7 -j ACCEPT 出
查看 有数据交互了
[root@web02 ~]#tcpdump -i eth0 -nn icmp
tcpdump: verbose output suppressed, use -v or -vv for full protocol decode
listening on eth0, link-type EN10MB (Ethernet), capture size 262144 bytes
00:41:58.482577 IP 192.168.2.7 > 192.168.2.8: ICMP echo request, id 2525, seq 174, length 64
00:41:58.482630 IP 192.168.2.8 > 192.168.2.7: ICMP echo reply, id 2525, seq 174, length 64
00:41:59.482914 IP 192.168.2.7 > 192.168.2.8: ICMP echo request, id 2525, seq 175, length 64
imcp协议应用
允许192.168.2.7 只可以ping
[root@web02 ~]#iptables -A INPUT -s 192.168.2.7
-p icmp -j ACCEPT
[root@web02 ~]#iptables -A OUTPUT -d 192.168.2.7
-p icmp -j ACCEPT
[root@web02 ~]#iptables -vnL
Chain INPUT (policy DROP 3 packets, 351 bytes)
pkts bytes target prot opt in out source destination
1847 719K ACCEPT all -- * * 192.168.2.103 0.0.0.0/0
26 2184 ACCEPT icmp -- * * 192.168.2.7 0.0.0.0/0
Chain FORWARD (policy ACCEPT 0 packets, 0 bytes)
pkts bytes target prot opt in out source destination
Chain OUTPUT (policy DROP 2 packets, 120 bytes)
pkts bytes target prot opt in out source destination
1204 133K ACCEPT all -- * * 0.0.0.0/0 192.168.2.103
16 1344 ACCEPT icmp -- * * 0.0.0.0/0 192.168.2.7
--icmp-type匹配条件细分
实验 允许ping但是不回可以分别定义
0是回应,8是请求
允许192.168.2.7ping我
分析: 192.168.2.7要ping我要进入网卡,请求,所以 icmp-type要写8,因为是别人请求我,
收到包后,我还要同意请求,所以output 要写0,回应对方以下,现在我们互通了
[root@web02 ~]#iptables -A -j ACCEPT
[root@web02 ~]#iptables -A OUTPUT -p icmp --icmp-type 0 -j ACCEPT
[root@web02 ~]#iptables -vnL --line-numbers
Chain INPUT (policy DROP 11 packets, 1287 bytes)
num pkts bytes target prot opt in out source destination
1 12276 1263K ACCEPT all -- * * 192.168.2.103 0.0.0.0/0
2 364 30576 ACCEPT icmp -- * * 0.0.0.0/0 0.0.0.0/0 icmptype 8
Chain FORWARD (policy ACCEPT 0 packets, 0 bytes)
num pkts bytes target prot opt in out source destination
Chain OUTPUT (policy DROP 0 packets, 0 bytes)
num pkts bytes target prot opt in out source destination
1 16264 3581K ACCEPT all -- * * 0.0.0.0/0 192.168.2.103
2 57 4788 ACCEPT icmp -- * * 0.0.0.0/0 0.0.0.0/0 icmptype 0
测试,数据有去有回
[root@web02 ~]#tcpdump -i eth0 -nn icmp
tcpdump: verbose output suppressed, use -v or -vv for full protocol decode
listening on eth0, link-type EN10MB (Ethernet), capture size 262144 bytes
03:37:28.997305 IP 192.168.2.7 > 192.168.2.8: ICMP echo request, id 2803, seq 304, length 64
03:37:28.997353 IP 192.168.2.8 > 192.168.2.7: ICMP echo reply, id 2803, seq 304, length 64
192.168.2.8可以ping别人
分析: 192.168.2.8 要ping别人,是请求别人,所以OUTPUT icmp-type 8,请求别人和我连接,
我的包发过去了,别人也给我回应了,还没完成,我要给别人回应,所以INPUT imcp-type 0
[root@web02 ~]#iptables -A -j ACCEPT
[root@web02 ~]#iptables -A INTPUT -p icmp --icmp-type 0 -j ACCEPT
[root@web02 ~]#iptables -vnL --line-numbers
Chain INPUT (policy DROP 13 packets, 1521 bytes)
num pkts bytes target prot opt in out source destination
1 12740 1297K ACCEPT all -- * * 192.168.2.103 0.0.0.0/0
2 684 57456 ACCEPT icmp -- * * 0.0.0.0/0 0.0.0.0/0 icmptype 8
3 1 84 ACCEPT icmp -- * * 0.0.0.0/0 0.0.0.0/0 icmptype 0
Chain FORWARD (policy ACCEPT 0 packets, 0 bytes)
num pkts bytes target prot opt in out source destination
Chain OUTPUT (policy DROP 2 packets, 120 bytes)
num pkts bytes target prot opt in out source destination
1 16574 3612K ACCEPT all -- * * 0.0.0.0/0 192.168.2.103
2 377 31668 ACCEPT icmp -- * * 0.0.0.0/0 0.0.0.0/0 icmptype 0
3 3 252 ACCEPT icmp -- * * 0.0.0.0/0 0.0.0.0/0 icmptype 8
测试有去有回
[root@web02 ~]#ping 192.168.2.7
PING 192.168.2.7 (192.168.2.7) 56(84) bytes of data.
64 bytes from 192.168.2.7: icmp_seq=1 ttl=64 time=0.228 ms
--- 192.168.2.7 ping statistics ---
1 packets transmitted, 1 received, 0% packet loss, time 0ms
rtt min/avg/max/mdev = 0.228/0.228/0.228/0.000 ms
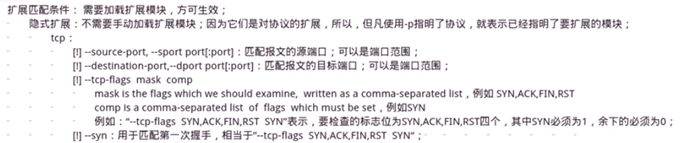
扩展匹配条件
隐式和显示
隐式扩展:
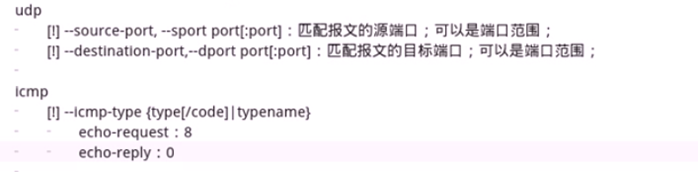
--dport --sport 指定端口
允许192.168.2.7ssh连接 web02
分析: web02 作为服务器,.2.7连接我是源地址 -s 是2.7的IP .目标端口是我,所以是--dport 22
OUTPUT出去的时候是从22端口回去是源地址,所以是--sport22 , 目标的ip是2.7 所以是 -d
打个比方,比如回去的端口是100,要写 --sport100
[root@web02 ~]#iptables -A INPUT -s 192.168.2.7 -p tcp --dport 22 -j ACCEPT
[root@web02 ~]#iptables -A OUTPUT -d 192.168.2.7 -p tcp --sport 22 -j ACCEPT
[root@web02 ~]#iptables -vnL
Chain INPUT (policy DROP 57 packets, 6099 bytes)
pkts bytes target prot opt in out source destination
9668 1078K ACCEPT all -- * * 192.168.2.103 0.0.0.0/0
144 12096 ACCEPT icmp -- * * 192.168.2.7 0.0.0.0/0
78 8874 ACCEPT tcp -- * * 192.168.2.7 0.0.0.0/0 tcp dpt:22
Chain FORWARD (policy ACCEPT 0 packets, 0 bytes)
pkts bytes target prot opt in out source destination
Chain OUTPUT (policy DROP 16 packets, 1040 bytes)
pkts bytes target prot opt in out source destination
14689 3346K ACCEPT all -- * * 0.0.0.0/0 192.168.2.103
134 11256 ACCEPT icmp -- * * 0.0.0.0/0 192.168.2.7
55 8126 ACCEPT tcp -- * * 0.0.0.0/0 192.168.2.7 tcp spt:22
允许192.168.2.7访问http
道理和上面的22端口一样,
[root@web02 wordpress]#iptables -A INPUT -s 192.168.2.7 -p tcp --dport 80 -j ACCEPT
[root@web02 wordpress]#iptables -A OUTPUT -d 192.168.2.7 -p tcp --sport 80 -j ACCEPT
[root@web02 wordpress]#iptables -vnL
Chain INPUT (policy DROP 5 packets, 585 bytes)
pkts bytes target prot opt in out source destination
10599 1143K ACCEPT all -- * * 192.168.2.103 0.0.0.0/0
144 12096 ACCEPT icmp -- * * 192.168.2.7 0.0.0.0/0
29 1848 ACCEPT tcp -- * * 192.168.2.7 0.0.0.0/0 tcp dpt:80
Chain FORWARD (policy ACCEPT 0 packets, 0 bytes)
pkts bytes target prot opt in out source destination
Chain OUTPUT (policy DROP 2 packets, 120 bytes)
pkts bytes target prot opt in out source destination
15234 3424K ACCEPT all -- * * 0.0.0.0/0 192.168.2.103
134 11256 ACCEPT icmp -- * * 0.0.0.0/0 192.168.2.7
20 2068 ACCEPT tcp -- * * 0.0.0.0/0 192.168.2.7 tcp spt:80
192.168.2.7测试访问成功
[root@web01 packages]# curl 192.168.2.8
fdasfdsafdasf
--connect-timeout 1|2|3|.... 快速cur 1秒...不通立刻显示结果
[root@web01 packages]# curl --connect-timeout 1 192.168.2.8
--tcp-falags

根据tcp的标记位,判断请求或者响应的握手,是第几次握手
用--tcp-flags要了解三次握手,四次挥手的标记位.我们复习一下,
A发的时候ack B回复ack+syn A回复ack
分手的时候多了个fin
还有 3种,
紧急标记位
psh如果=1数据就不会放到缓存,直接传到应用程序里
reset,发生故障,断开重连
格式写法:
实验 针对新发起的请求,拒绝(也就是拒绝第一次握手),旧的请求,不拒绝
[root@web01 packages]# ssh 192.168.2.8
root@192.168.2.8's password:
Last login: Tue Jan 22 01:19:16 2019 from 192.168.2.7
[root@web02 ~]#
--syn 第一次握手
[root@web02 ~]#iptables -I INPUT 2 -s 192.168.2.7 -p tcp --syn -j REJECT
[root@web02 wordpress]#iptables -vnL
Chain INPUT (policy DROP 10 packets, 1170 bytes)
pkts bytes target prot opt in out source destination
10982 1172K ACCEPT all -- * * 192.168.2.103 0.0.0.0/0
2 120 REJECT tcp -- * * 192.168.2.7 0.0.0.0/0 tcp flags:0x17/0x02 reject-with icmp-port-unreachable
144 12096 ACCEPT icmp -- * * 192.168.2.7 0.0.0.0/0
331 28595 ACCEPT tcp -- * * 192.168.2.7 0.0.0.0/0 tcp dpt:22
68 4384 ACCEPT tcp -- * * 192.168.2.7 0.0.0.0/0 tcp dpt:80
测试
连接不上.卡哪里了
[root@web01 packages]# curl 192.168.2.8/index.html
实验:新连接可以访问80.但是不能访问其他的任何端口
[root@web02 ~] iptables -I INPUT 2 -s 192.168.2.7 -p tcp --dport 80 --syn -j ACCEPT
[root@web02 ~] iptables -I INPUT 3 -s 192.168.2.7 -p tcp --syn -j REJECT
[root@web02 wordpress]#iptables -vnL --line-numbers
Chain INPUT (policy DROP 172 packets, 15636 bytes)
num pkts bytes target prot opt in out source destination
1 11836 1232K ACCEPT all -- * * 192.168.2.103 0.0.0.0/0
2 1 60 ACCEPT tcp -- * * 192.168.2.7 0.0.0.0/0 tcp dpt:80 flags:0x17/0x02
3 20 1200 REJECT tcp -- * * 192.168.2.7 0.0.0.0/0 tcp flags:0x17/0x02 reject-with icmp-port-unreachable
4 35 4557 ACCEPT tcp -- * * 192.168.2.7 0.0.0.0/0 tcp dpt:22
5 32 2111 ACCEPT tcp -- * * 192.168.2.7 0.0.0.0/0 tcp dpt:80
Chain FORWARD (policy ACCEPT 0 packets, 0 bytes)
num pkts bytes target prot opt in out source destination
Chain OUTPUT (policy DROP 4 packets, 240 bytes)
num pkts bytes target prot opt in out source destination
1 15989 3550K ACCEPT all -- * * 0.0.0.0/0 192.168.2.103
2 28 4701 ACCEPT tcp -- * * 0.0.0.0/0 192.168. 2.7 tcp spt:22
3 23 2232 ACCEPT tcp -- * * 0.0.0.0/0 192.168.2.7 tcp spt:80
测试,访问80成功, 随便个ping命令失败
[root@web01 packages]# curl 192.168.2.8/index.html
fdasfdsafdasf
[root@web01 packages]# ping 192.168.2.8
PING 192.168.2.8 (192.168.2.8) 56(84) bytes of data.
显示扩展需要用-m指定模块名

显示扩展要认为的指定调用的模块名:怎么查看模块名呢
centos7命令帮助man iptables-extensions
[root@web02 ~]#rpm -ql iptables
muliport模块
以离散方式定义多个端口.最多15个端口
-m multiport --sports 指定源端口
-m multiprot --dports 指定目标端口
--port:不分源目标端口
意思是: 进入本机的20,23,443,80都可以访问,
[root@web02 ~]#iptables -A OUTPUT -p tcp -m multiport --sports 20:23,443,80 -j ACCEPT
[root@web02 ~]#iptables -A INPUTP -p tcp -m multiport --dports 20:23,443,80 -j ACCEPT
[root@web02 ~]#iptables -nvL --line-numbers
Chain INPUT (policy DROP 0 packets, 0 bytes)
num pkts bytes target prot opt in out source destination
1 4978 362K ACCEPT all -- * * 192.168.2.105 0.0.0.0/0
2 0 0 ACCEPT tcp -- * * 0.0.0.0/0 0.0.0.0/0 multiport dports 20:23,443,80
Chain FORWARD (policy ACCEPT 0 packets, 0 bytes)
num pkts bytes target prot opt in out source destination
Chain OUTPUT (policy DROP 0 packets, 0 bytes)
num pkts bytes target prot opt in out source destination
1 2978 349K ACCEPT all -- * * 0.0.0.0/0 192.168.2.105
2 0 0 ACCEPT tcp -- * * 0.0.0.0/0 0.0.0.0/0 multiport sports 20:23,443,80
iprange定义IP地址范围
-m iprange --src-range 源ip
-m iprange --dst-range 目标ip
只允许,2.1- 2.100这个网段的机器的20...80等端口连接我
[root@web02 ~]#iptables -A INPUT -p tcp -m iprange --src-range 192.168.2.1-192.168.2.100 -m multiport --dports 20:23,443,80 -j ACCEPT
#注意: INPUT进来的是目标地址,源地址是1-100 所以是--src
--dport 指定应该是访问web02所有,web02 是目标端口
[root@web02 ~]#iptables -A OUTPUT -p tcp -m iprange --dst-range 192.168.2.1-192.168.2.100 -m multiport --sports 20:23,443,80 -j ACCEPT
#注意: OUTPUT ,出去的是源端口,所以是--sport src
[root@web02 ~]#iptables -vnL -line-numbers
[root@web02 ~]#iptables -vnL --line-numbers
Chain INPUT (policy DROP 0 packets, 0 bytes)
num pkts bytes target prot opt in out source destination
1 8302 622K ACCEPT all -- * * 192.168.2.105 0.0.0.0/0
2 74 9344 ACCEPT tcp -- * * 0.0.0.0/0 0.0.0.0/0 source IP range 192.168.2.1-192.168.2.100 multiport dports 20:23,443,80
Chain FORWARD (policy ACCEPT 0 packets, 0 bytes)
num pkts bytes target prot opt in out source destination
Chain OUTPUT (policy DROP 0 packets, 0 bytes)
num pkts bytes target prot opt in out source destination
1 5484 643K ACCEPT all -- * * 0.0.0.0/0 192.168.2.105
2 0 0 ACCEPT tcp -- * * 0.0.0.0/0 0.0.0.0/0 destination IP range 192.168.2.1-192.168.2.100 multiport dports 20:23,443,80
-m mac --mac-source 指定mac地址 - s 指定IP地址,
实现只有指定的IP地址对应的唯一的mac才可以访问本机,相同的IP地址都访问不了
[root@web02 ~]#iptables -A INPUT -s 192.168.2.17 -m mac --mac-source 00:0c:29:71:8c:5b -j ACCEPT
[root@web02 ~]#iptables -A OUTPUT -d 192.168.2.17 -j ACCEPT
[root@web02 ~]#iptables -vnL --line-numbers
Chain INPUT (policy DROP 21 packets, 2457 bytes)
num pkts bytes target prot opt in out source destination
1 10621 795K ACCEPT all -- * * 192.168.2.105 0.0.0.0/0
2 13 2741 ACCEPT all -- * * 192.168.2.17 0.0.0.0/0 MAC 00:0C:29:71:8C:5B
Chain FORWARD (policy ACCEPT 0 packets, 0 bytes)
num pkts bytes target prot opt in out source destination
Chain OUTPUT (policy DROP 7 packets, 464 bytes)
num pkts bytes target prot opt in out source destination
1 7068 810K ACCEPT all -- * * 0.0.0.0/0 192.168.2.105
2 12 2509 ACCEPT all -- * * 0.0.0.0/0 192.168.2.17
测试:
其他机器修改了ip地址和2.8不通,只有修改了IP地址和mac地址才行
[root@web01 ~]#tail /etc/sysconfig/network-scripts/ifcfg-eth0
NAME=eth0
DEVICE=eth0
IPADDR=192.168.2.17
DNS1=192.168.2.1
MACADDR=00:0C:29:71:8C:5B
[root@web01 ~]#ping 192.168.2.8
PING 192.168.2.8 (192.168.2.8) 56(84) bytes of data.
64 bytes from 192.168.2.8: icmp_seq=1 ttl=64 time=0.291 ms
--string 过滤应用层数据做字符串模式匹配,的关键字,无效,
iptables -A INPUT -s 192.168.2.17 -j ACCEPT
iptables -A OUTPUT -d 192.168.2.17 -j ACCEPT
[root@web02 wordpress]#iptables -vnL --line-numbers
Chain INPUT (policy DROP 9 packets, 1053 bytes)
num pkts bytes target prot opt in out source destination
1 6629 522K ACCEPT all -- * * 192.168.2.105 0.0.0.0/0
2 147 9606 ACCEPT all -- * * 192.168.2.17 0.0.0.0/0
Chain FORWARD (policy ACCEPT 0 packets, 0 bytes)
num pkts bytes target prot opt in out source destination
Chain OUTPUT (policy DROP 4 packets, 240 bytes)
num pkts bytes target prot opt in out source destination
1 3706 554K ACCEPT all -- * * 0.0.0.0/0 192.168.2.105
2 105 11064 ACCEPT all -- * * 0.0.0.0/0 192.168.2.17
[root@web02 wordpress]#iptables -I OUTPUT 2 -p tcp -m string --algo bm --string "google" -j REJECT
[root@web02 wordpress]#iptables -vnL --line-numbers
Chain INPUT (policy DROP 0 packets, 0 bytes)
num pkts bytes target prot opt in out source destination
1 6912 545K ACCEPT all -- * * 192.168.2.105 0.0.0.0/0
2 147 9606 ACCEPT all -- * * 192.168.2.17 0.0.0.0/0
Chain FORWARD (policy ACCEPT 0 packets, 0 bytes)
num pkts bytes target prot opt in out source destination
Chain OUTPUT (policy DROP 0 packets, 0 bytes)
num pkts bytes target prot opt in out source destination
1 3927 576K ACCEPT all -- * * 0.0.0.0/0 192.168.2.105
2 0 0 REJECT tcp -- * * 0.0.0.0/0 0.0.0.0/0 STRING match "google" ALGO name bm TO 65535 reject-with icmp-port-unreachable3
3 105 11064 ACCEPT all -- * * 0.0.0.0/0 192.168.2.17
[root@web02 ~]#echo "welcome to google" >> /code/wordpress/index2.html
curl还显示google有问题
[root@web03 ~]#curl 192.168.2.8/index2.html
google
安装httpd 测试
这个过滤google成功
[192.168.2.7-root@web01~]#cat index.html
fdafdsa
[192.168.2.7-root@web01~]#cat test.html
-s 本机是服务端,响应别人,所以源地址是本机的.2.7 -d是别人, -s 指定本机的端口
[192.168.2.7-root@web01~]#iptables -A OUTPUT -s 192.168.2.7 -d 192.168.2.17 -p tcp --sport 80 -m string --algo bm --string "google" -j REJECT
[192.168.2.7-root@web01~]#iptables -nvL
Chain INPUT (policy ACCEPT 415 packets, 57169 bytes)
pkts bytes target prot opt in out source destination
Chain FORWARD (policy ACCEPT 0 packets, 0 bytes)
pkts bytes target prot opt in out source destination
Chain OUTPUT (policy ACCEPT 190 packets, 35603 bytes)
pkts bytes target prot opt in out source destination
69 21429 REJECT tcp -- * * 192.168.2.7 192.168.2.17 tcp spt:80 STRING match "google" ALGO name bm TO 65535 reject-with icmp-port-unrea
chable
白名单--tring成功
[192.168.2.7-root@web01~]# iptables -A INPUT -s 192.168.2.105 -j ACCEPT
[192.168.2.7-root@web01~]#iptables -A OUTPUT -d 192.168.2.105 -j ACCEPT
[192.168.2.7-root@web01~]#iptables -P INPUT DROP
[192.168.2.7-root@web01~]#iptables -P OUTPUT DROP
[192.168.2.7-root@web01~]#iptables -A INPUT -s 192.168.2.17 -j ACCEPT
[192.168.2.7-root@web01~]#iptables -A OUTPUT -d 192.168.2.17 -j ACCEPT
[192.168.2.7-root@web01~]#iptables -I OUTPUT 2 -p tcp -m string --algo bm --string "google" -j REJECT添加的规则
[192.168.2.7-root@web01~]#iptables -vnL --line-numbers
Chain INPUT (policy DROP 109 packets, 12753 bytes)
num pkts bytes target prot opt in out source destination
1 717 48746 ACCEPT all -- * * 192.168.2.105 0.0.0.0/0
2 65 4068 ACCEPT all -- * * 192.168.2.17 0.0.0.0/0
Chain FORWARD (policy ACCEPT 0 packets, 0 bytes)
num pkts bytes target prot opt in out source destination
Chain OUTPUT (policy DROP 134 packets, 40388 bytes)
num pkts bytes target prot opt in out source destination
1 382 73328 ACCEPT all -- * * 0.0.0.0/0 192.168.2.105
2 116 36060 REJECT tcp -- * * 0.0.0.0/0 0.0.0.0/0 STRING match "google" ALGO name bm TO 65535 reject-with icmp-port-unreachable
3 27 2542 ACCEPT all -- * * 0.0.0.0/0 192.168.2.17
测试过滤成功
[192.168.2.17-root@web01~]#curl 192.168.2.7/index.html
fdafdsa
[192.168.2.17-root@web01~]#curl 192.168.2.7/test.html
time
在--string 过滤google基础上增加--time
[192.168.2.7-root@web01~]#iptables -I INPUT 2 -p tcp --dport 80 -m time --timestart 9:00 --timestop 22:00 --weekdays 1,3,5 -j REJECT
[192.168.2.7-root@web01~]#iptables -vnL
Chain INPUT (policy DROP 4 packets, 468 bytes)
pkts bytes target prot opt in out source destination
599 44244 ACCEPT all -- * * 192.168.2.105 0.0.0.0/0
2 120 REJECT tcp -- * * 0.0.0.0/0 0.0.0.0/0 tcp dpt:80 TIME from 09:00:00 to 22:00:00 on Mon,Wed,Fri UTC reject-with icmp-port-
unreachable 44 4724 ACCEPT all -- * * 192.168.2.17 0.0.0.0/0
Chain FORWARD (policy ACCEPT 0 packets, 0 bytes)
pkts bytes target prot opt in out source destination
Chain OUTPUT (policy DROP 4 packets, 284 bytes)
pkts bytes target prot opt in out source destination
408 45080 ACCEPT all -- * * 0.0.0.0/0 192.168.2.105
50 15558 REJECT tcp -- * * 0.0.0.0/0 0.0.0.0/0 STRING match "google" ALGO name bm TO 65535 reject-with icmp-port-unreachable
31 4483 ACCEPT all -- * * 0.0.0.0/0 192.168.2.17
time 根据时间进行检测
--datestart YYYY[-MM[-DD[Thh[:mm[:ss]]]]]
年 月 日 小时 分 秒
--datestop YYYY[-MM[-DD[Thh[:mm[:ss]]]]]
--timestart hh:mm[:ss]
--timestop hh:mm[:ss]
--kerneltz使用内核上的时区,而不是UTC时区
2.0网段每周1,3,5 9点到22点禁止访问2.7 80端口
[192.168.2.7-root@web01~]#iptables -A INPUT -s 192.168.2.0/24 -d 192.168.2.7 -p tcp --dport 80 -m time --timestart 9:00 --timestop 22:00 --weekdays 1,3,5 --kerneltz -j REJECT
[192.168.2.7-root@web01~]#iptables -vnL
Chain INPUT (policy ACCEPT 8 packets, 630 bytes)
pkts bytes target prot opt in out source destination
1 60 REJECT tcp -- * * 192.168.2.0/24 192.168.2.7 tcp dpt:80 TIME from 09:00:00 to 22:00:00 on Mon,Wed,Fri reject-with icmp-port-unreachable
connlimit扩展
根据每个客户端ip做并发来连接数量匹配
--connlimit-upto n: 连接数量小于n时匹配
--connlimit-above n: 连接数量小于n时匹配
其他客户端最多只能用ssh连接我2次,2次以上就拒绝
[192.168.2.7-root@web01~]#iptables -A INPUT -d 192.168.2.7 -p tcp --dport 22 -m connlimit --connlimit-above 2 -j REJECT
[192.168.2.7-root@web01~]#iptables -vnL
Chain INPUT (policy ACCEPT 6 packets, 396 bytes)
pkts bytes target prot opt in out source destination
2 104 REJECT tcp -- * * 0.0.0.0/0 192.168.2.7 tcp dpt:22 #conn src/32 > 2 reject-with icmp-port-unreachable
limit
--limit rate[/second|/minute|/hour|/day] 放行的速率 每秒/每分钟/每小时/每天
--limit-burst n : 峰值速率

实验: ping2.7主机,初始ping4次.超过4次后每分钟ping3次
[192.168.2.7-root@web01~]#iptables -A INPUT -p icmp -m limit --limit-burst 4 --limit 3/minute -j ACCEPT
注意这个类功能要加2条规则,因为 指定的时每分种3个 --limit 3/minute,也就是说每分钟3个以外的包哪里去呢,所以要加一条 icmp都拒绝的,也就是说 每分钟3个之外的包,用下面的icmp -j DROP的规则都给拒绝掉
[192.168.2.7-root@web01~]#iptables -A INPUT -p icmp -j DROP
[192.168.2.7-root@web01~]#iptables -vnL
Chain INPUT (policy ACCEPT 62 packets, 4255 bytes)
pkts bytes target prot opt in out source destination
2 104 REJECT tcp -- * * 0.0.0.0/0 192.168.2.7 tcp dpt:22 #conn src/32 > 2 reject-with icmp-port-unreachable
24 2020 ACCEPT icmp -- * * 0.0.0.0/0 0.0.0.0/0 limit: avg 3/min burst 4
12 1008 DROP icmp -- * * 0.0.0.0/0 0.0.0.0/0
测试结果
limit白名单实验:
允许windows连接 web02 ,其他人ping web02 ,峰值速率4,放行速率每分钟20个
[192.168.2.8-root@web02 ~]#iptables -A INPUT -p icmp -m limit --limit-burst 4 --limit 20/minute -j ACCEPT
[192.168.2.8-root@web02 ~]#iptables -A OUTPUT -p icmp -m limit --limit-burst 4 --limit 20/minute -j ACCEPT
[192.168.2.8-root@web02 ~]#iptables -vnL
Chain INPUT (policy DROP 8 packets, 771 bytes)
pkts bytes target prot opt in out source destination
59 4984 ACCEPT icmp -- * * 0.0.0.0/0 0.0.0.0/0 limit: avg 20/min burst 4
2062 146K ACCEPT all -- * * 192.168.2.105 0.0.0.0/0
Chain FORWARD (policy ACCEPT 0 packets, 0 bytes)
pkts bytes target prot opt in out source destination
Chain OUTPUT (policy DROP 2 packets, 120 bytes)
pkts bytes target prot opt in out source destination
9138 1078K ACCEPT all -- * * 0.0.0.0/0 192.168.2.105
8 672 ACCEPT icmp -- * * 0.0.0.0/0 0.0.0.0/0
state
作用:可以根据连接跟踪状态,检查每次发送的请求是新连接还是旧连接
state模块的几种状态:
NEW:是新的请求,第一次握手
ESTABLISHED: 是NEW状态之后,即3次握手之后,有来有回了,不是第一次连接了,
有1个请求发过来了,


连接追踪的文件
实验: 实现.外面可以通过NEW,ENTABLISHED的状态,也就是通过第一次握手,和建立连接,访问 web02 ,而web02 通过OUTPUT, ENTABLESHED ,外面通信,web02,
web02的OUTPUT上不能有NEW,也就是和外面主动建立连接,如果有和外面主动建立连接,这是不正常的,只有1种可能,web02中了病毒或木马,主动的发送信息,给黑客,下面就通过实验,不让这种事情发生
规则表
[192.168.2.8-root@web02 ~]#iptables -vnL
Chain INPUT (policy DROP 68 packets, 7956 bytes)
pkts bytes target prot opt in out source destination
4639 334K ACCEPT all -- * * 192.168.2.105 0.0.0.0/0
Chain FORWARD (policy ACCEPT 0 packets, 0 bytes)
pkts bytes target prot opt in out source destination
Chain OUTPUT (policy DROP 105 packets, 17704 bytes)
pkts bytes target prot opt in out source destination
10852 1257K ACCEPT all -- * * 0.0.0.0/0 192.168.2.105
编写规则
这种ESTABLISTED的状态都要写在防火墙规则最上面,因为都是要建立连接的,上来不用找,直接就走这个规则,如果放到后面,用户访问,还要一层层的向下找,如果放到下面的话,效率太低,还浪费资源
[192.168.2.8-root@web02 ~]#iptables -I INPUT 1 -s 192.168.2.17 -p tcp --dport 22 -m state --state NEW,ESTABLISHED -j ACCEPT
192.168.2.17可以主动连接web02
[192.168.2.8-root@web02 ~]#iptables -I OUTPUT 1 -d 192.168.2.17 -p tcp --sport 22 -m state --state ESTABLISHED -j ACCEPT
192.168.2.17 是主动连接web02的,web02只能通过,这个192.168.2.17主动连接的关系,通过ESTABLESHED响应192.168.2.17实现不主动连接外面
[192.168.2.8-root@web02 ~]#iptables -vnL
Chain INPUT (policy DROP 667 packets, 78039 bytes)
pkts bytes target prot opt in out source destination
160 22561 ACCEPT tcp -- * * 192.168.2.17 0.0.0.0/0 tcp dpt:22 state NEW,ESTABLISHED
2220 162K ACCEPT all -- * * 192.168.2.105 0.0.0.0/0
Chain FORWARD (policy ACCEPT 0 packets, 0 bytes)
pkts bytes target prot opt in out source destination
Chain OUTPUT (policy DROP 115 packets, 6988 bytes)
pkts bytes target prot opt in out source destination
13915 1597K ACCEPT all -- * * 0.0.0.0/0 192.168.2.105
102 17868 ACCEPT tcp -- * * 0.0.0.0/0 192.168.2.17 tcp spt:22 state ESTABLISHED
实验结果: 192.168.2.17能连 web02 ,web02 连接不了别人
[192.168.2.17-root@web03 ~]#ssh 192.168.2.8
root@192.168.2.8's password:
[192.168.2.8-root@web02 ~]#ssh 192.168.2.17
查看下 连接追踪的数据库文件,有记录了
[192.168.2.8-root@web02 ~]#cat /proc/net/nf_conntrack
ipv4 2 tcp 6 299 ESTABLISHED src=192.168.2.105 dst=192.168.2.8 sport=14216 dport=22 src=192.168.2.8 dst=192.168.2.105 sport=22 dport=14216 [ASSURED] mark=0 zone=0
use=2ipv4 2 tcp 6 428037 ESTABLISHED src=192.168.2.17 dst=192.168.2.8 sport=38610 dport=22 src=192.168.2.8 dst=192.168.2.17 sport=22 dport=38610 [ASSURED] mark=0 zone=0
use=2
处理动作


iptables命令总结
-N iptabels自定义链
[root@web02 ~]#iptables -N drop_invalid_packets
自定义一条链,叫drop_invalid_packets
[root@web02 ~]#iptables -vnL
Chain INPUT (policy DROP 2 packets, 234 bytes)
pkts bytes target prot opt in out source destination
1512 110K ACCEPT all -- * * 192.168.2.105 0.0.0.0/0
Chain FORWARD (policy ACCEPT 0 packets, 0 bytes)
pkts bytes target prot opt in out source destination
Chain OUTPUT (policy DROP 0 packets, 0 bytes)
pkts bytes target prot opt in out source destination
975 99681 ACCEPT all -- * * 0.0.0.0/0 192.168.2.105
Chain drop_invalid_packets (0 references)
pkts bytes target prot opt in out source destination
添加规则
添加tcp协议的数据包全是1 数据包,全是0的,都拒绝掉
[root@web02 ~]#iptables -A drop_invalid_packets -p tcp --tcp-flags ALL ALL -j REJECT
[root@web02 ~]#iptables -A drop_invalid_packets -p tcp --tcp-flags ALL NONE -j REJECT
[root@web02 ~]#iptables -vnL
Chain INPUT (policy DROP 2 packets, 234 bytes)
pkts bytes target prot opt in out source destination
1784 129K ACCEPT all -- * * 192.168.2.105 0.0.0.0/0
Chain FORWARD (policy ACCEPT 0 packets, 0 bytes)
pkts bytes target prot opt in out source destination
Chain OUTPUT (policy DROP 0 packets, 0 bytes)
pkts bytes target prot opt in out source destination
1120 115K ACCEPT all -- * * 0.0.0.0/0 192.168.2.105
Chain drop_invalid_packets (1 references)
pkts bytes target prot opt in out source destination
0 0 REJECT tcp -- * * 0.0.0.0/0 0.0.0.0/0 tcp flags:0x3F/0x3F reject-with icmp-port-unreachable
0 0 REJECT tcp -- * * 0.0.0.0/0 0.0.0.0/0 tcp flags:0x3F/0x00 reject-with icmp-port-unreachable
关联自定义链到系统的INPUT链上
自定义的链是孤立的需要关联到系统自带的链上,
[root@web02 ~]#iptables -A INPUT -s 192.168.2.17 -j drop_invalid_packets
来自192.168.2.17的 tcp包全是 1或者0的都走自定义链的规则 REJECT.强硬的拒绝掉
[root@web02 ~]#iptables -vnL
Chain INPUT (policy DROP 2 packets, 234 bytes)
pkts bytes target prot opt in out source destination
2214 160K ACCEPT all -- * * 192.168.2.105 0.0.0.0/0
2 168 drop_invalid_packets all -- * * 192.168.2.17 0.0.0.0/0
Chain FORWARD (policy ACCEPT 0 packets, 0 bytes)
pkts bytes target prot opt in out source destination
Chain OUTPUT (policy DROP 0 packets, 0 bytes)
pkts bytes target prot opt in out source destination
1383 140K ACCEPT all -- * * 0.0.0.0/0 192.168.2.105
Chain drop_invalid_packets (2 references)
pkts bytes target prot opt in out source destination
0 0 REJECT tcp -- * * 0.0.0.0/0 0.0.0.0/0 tcp flags:0x3F/0x3F reject-with icmp-port-unreachable
0 0 REJECT tcp -- * * 0.0.0.0/0 0.0.0.0/0 tcp flags:0x3F/0x00 reject-with icmp-port-unreachable
结论:链可以把同类的功能分组,方便管理,可以把重要的服务,规划到自定义链里,比如:80,22,53,443端口,放在一个链里,然后关联到主链
下面我们就 实验以下这样的用法
[root@web02 ~]#iptables -N INTERNETACCESS
[root@web02 ~]#iptables -A INTERNETACCESS -p tcp --dport 80 -j ACCEPT
[root@web02 ~]#iptables -A INTERNETACCESS -p tcp --dport 443 -j ACCEPT
[root@web02 ~]#iptables -A INTERNETACCESS -p tcp --dport 22 -j ACCEPT
[root@web02 ~]#iptables -A INTERNETACCESS -p tcp --dport 53 -j ACCEPT
[root@web02 ~]#iptables -A INTERNETACCESS -p udp --dport 53 -j ACCEPT
[root@web02 ~]#iptables -A INPUT -s 192.168.2.0/24 -j INTERNETACCESS
[root@web02 ~]#iptables -vnL --line-numbers
Chain INPUT (policy DROP 27 packets, 3159 bytes)
num pkts bytes target prot opt in out source destination
1 3151 229K ACCEPT all -- * * 192.168.2.105 0.0.0.0/0
2 2 168 drop_invalid_packets all -- * * 192.168.2.17 0.0.0.0/0
3 27 3159 INTERNETACCESS all -- * * 192.168.2.0/24 0.0.0.0/0
Chain FORWARD (policy ACCEPT 0 packets, 0 bytes)
num pkts bytes target prot opt in out source destination
Chain OUTPUT (policy DROP 6 packets, 360 bytes)
num pkts bytes target prot opt in out source destination
1 1921 192K ACCEPT all -- * * 0.0.0.0/0 192.168.2.105
Chain INTERNETACCESS (1 references)
num pkts bytes target prot opt in out source destination
1 0 0 ACCEPT tcp -- * * 0.0.0.0/0 0.0.0.0/0 tcp dpt:80
2 0 0 ACCEPT tcp -- * * 0.0.0.0/0 0.0.0.0/0 tcp dpt:443
3 0 0 ACCEPT tcp -- * * 0.0.0.0/0 0.0.0.0/0 tcp dpt:22
4 0 0 ACCEPT tcp -- * * 0.0.0.0/0 0.0.0.0/0 tcp dpt:53
5 0 0 ACCEPT udp -- * * 0.0.0.0/0 0.0.0.0/0 udp dpt:53
删除自定义关联步骤: 删除关联主链的自定义链 --> 清空自定义链 --> 删除自定义链名
删除关联主链的自定义链
[root@web02 ~]#iptables -D INPUT 3
查看已经删除了INPUT链里的INTENTERACCESS自定义链
[root@web02 ~]#iptables -vnL
Chain INPUT (policy DROP 2 packets, 234 bytes)
pkts bytes target prot opt in out source destination
3451 250K ACCEPT all -- * * 192.168.2.105 0.0.0.0/0
2 168 drop_invalid_packets all -- * * 192.168.2.17 0.0.0.0/0
清空自定义链.单独清空和一次性清空都行,看需要
[root@web02 ~]#iptables -D INTERNETACCESS 1
[root@web02 ~]#iptables -F INTERNETACCESS
查看已经把自定链都清空了
[root@web02 ~]#iptables -vnL --line-numbers
Chain INPUT (policy DROP 79 packets, 9243 bytes)
num pkts bytes target prot opt in out source destination
1 3510 254K ACCEPT all -- * * 192.168.2.105 0.0.0.0/0
2 2 168 drop_invalid_packets all -- * * 192.168.2.17 0.0.0.0/0
Chain FORWARD (policy ACCEPT 0 packets, 0 bytes)
num pkts bytes target prot opt in out source destination
Chain OUTPUT (policy DROP 14 packets, 840 bytes)
num pkts bytes target prot opt in out source destination
1 2136 217K ACCEPT all -- * * 0.0.0.0/0 192.168.2.105
Chain INTERNETACCESS (0 references) #下面没规则了,清空完成
num pkts bytes target prot opt in out source destination
Chain drop_invalid_packets (1 references)
num pkts bytes target prot opt in out source destination
1 0 0 REJECT tcp -- * * 0.0.0.0/0 0.0.0.0/0 tcp flags:0x3F/0x3F reject-with icmp-port-unreachable
2 0 0 REJECT tcp -- * * 0.0.0.0/0 0.0.0.0/0 tcp flags:0x3F/0x00 reject-with icmp-port-unreachable
删除自定义链名
INTERNETACCEPT 链已经删除
[root@web02 ~]#iptables -vnL --line-numbers
Chain drop_invalid_packets (1 references)
num pkts bytes target prot opt in out source destination
1 0 0 REJECT tcp -- * * 0.0.0.0/0 0.0.0.0/0 tcp flags:0x3F/0x3F reject-with icmp-port-unreachable
2 0 0 REJECT tcp -- * * 0.0.0.0/0 0.0.0.0/0 tcp flags:0x3F/0x00 reject-with icmp-port-unreachable
下面是扩展模块的使用示例

iptables规则保存,和开机加载策略
centos6保存规则
cat /etc/sysconfig/iptables
执行service iptables save 命令保存到 /etc/sysconfig/iptables里
centos7 保存规则
iptables-save把策略保存到文件
[192.168.2.8-root@web02 ~]#iptables-save
# Generated by iptables-save v1.4.21 on Sun Jan 27 16:16:57 2019
*filter
:INPUT DROP [1020:119340]
:FORWARD ACCEPT [0:0]
:OUTPUT DROP [183:10850]
-A INPUT -s 192.168.2.105/32 -j ACCEPT
-A INPUT -s 192.168.2.106/32 -j ACCEPT
-A OUTPUT -d 192.168.2.106/32 -j ACCEPT
-A OUTPUT -d 192.168.2.17/32 -p tcp -m tcp --sport 22 -m state --state ESTABLISHED -j ACCEPT
MMIT
把策略导出
iptables-save
[192.168.2.8-root@web02 ~]#iptables-save > /etc/sysconfig/iptables-test
把策略导入
iptables-restore
[192.168.2.8-root@web02 ~]#iptables-restore < /etc/sysconfig/iptables-test
-n | --noflush :不清除原有的规则
-t test : 测试
开机加载规则
[192.168.2.8-root@web02 ~]# cat /etc/rc.d/rc.locatl
iptables-save < /etc/sysconfig/iptables-test
iptables/nat 网络防火墙
SANT
DNAT
MASQUERADE
实验环境.3台机器,
内网: 内网网卡:eth0 ip:172.16.1.17 不能上外网
路由: 外网网卡:eth0 ip 192.168.2.8 内网:eth1 ip:172.16.1.8 eth0可以上外网,eth1不能上外网
外网: 外网网卡:eth1 ip 192.168.2.7 不能上外网
虚拟机仅主机网卡设置
windows 上的vmnet1 设置
内网机器 172.16.1.17添加仅主机模式的网卡
linux内网主机: ip地址和路由设置
ip地址代码
[172.16.2.17-root@web03 ~]#cat /etc/sysconfig/network-scripts/ifcfg-eth0
TYPE=Ethernet
BOOTPROTO=static
DEFROUTE=yes
NAME=eth0
DEVICE=eth0
ONBOOT=yes
IPADDR=172.16.1.17
GATEWAY=172.16.1.8
PREFIX=24
DNS1=223.5.5.5
route 虚拟机添加,桥接模式,和仅主机模式
route 机器: eth0外网.桥接模式
eth1内网.仅主机模式
IP地址代码
[root@route ~]# cat /etc/sysconfig/network-scripts/ifcfg-eth0
TYPE=Ethernet
BOOTPROTO=none
NAME=eth0
DEVICE=eth0
ONBOOT=yes
IPADDR=192.168.2.8
NETMASK=255.255.255.0
GATEWAY=192.168.2.1
DNS1=223.5.5.5
[root@route ~]# cat /etc/sysconfig/network-scripts/ifcfg-eth1
TYPE=Ethernet
BOOTPROTO=none
NAME=eth1
DEVICE=eth1
ONBOOT=yes
IPADDR=172.16.1.8
外网机器192.168.2.7添加桥接网卡
linux外网主机: ip地址和路由设置
ip地址代码
[192.168.2.7-root@web01~]#cat /etc/sysconfig/network-scripts/ifcfg-eth0
TYPE=Ethernet
DEFROUTE=yes
NAME=eth0
DEVICE=eth0
ONBOOT=yes
IPADDR=192.168.2.7
GATEWAY=192.168.2.8
PREFIX=24
DNS1=192.168.2.1
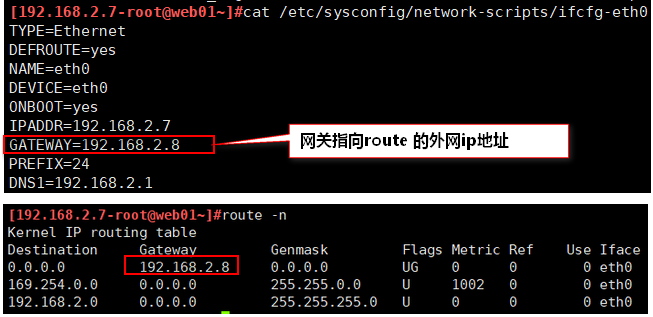
1, 充当网关
开启内核转发
[root@route ~]# iptables -A FORWARD -p icmp -d 192.168.2.7 -j REJECT
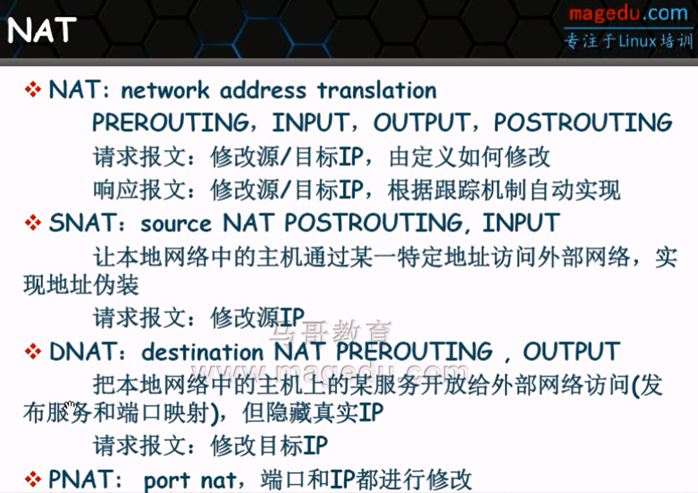
SNAT实现内网访问外网:
语法格式:
iptables -t nat -A POSTROUTING -s 172.16.1.0/24 -j SNAT --to-source 192.168.2.8-192.168.2.100
格式:-s 指定源地址, -j SNAT作源地址转换 --to-source指定由哪个外网ip地址转换
192.168.2.8-192.168.2.100 可以是多个地址 加"-"
route直接添加规则
[root@route ~]# iptables -t nat -A POSTROUTING -s 172.16.1.0/24 -j SNAT --to-source 192.168.2.8
[root@route ~]# iptables -vnL -t nat
Chain PREROUTING (policy ACCEPT 30 packets, 3088 bytes)
pkts bytes target prot opt in out source destination
Chain INPUT (policy ACCEPT 5 packets, 1090 bytes)
pkts bytes target prot opt in out source destination
Chain OUTPUT (policy ACCEPT 4 packets, 304 bytes)
pkts bytes target prot opt in out source destination
Chain POSTROUTING (policy ACCEPT 4 packets, 304 bytes)
pkts bytes target prot opt in out source destination
6 360 SNAT all -- * * 172.16.1.0/24 0.0.0.0/0 to:192.168.2.8
snat 转换的只是IP地址,不转换端口,我们可以证明一下
telnet 192.168.2.7 80端口
[172.16.2.17-root@web03 ~]#telnet 192.168.2.7 80
Trying 192.168.2.7...
Connected to 192.168.2.7.
Escape character is '^]'.
在内网机器上新开终端,ss 命令查看,端口是33352
[172.16.2.17-root@web03 ~]#ss -tn
State Recv-Q Send-Q Local Address:Port Peer Address:Port
ESTAB 0 0 172.16.1.17:33370 192.168.2.7:80
192.168.2.7机器查看 连接的ip地址是 防火墙的ip,证明了snat只转换ip不转换端口
[192.168.2.7-root@web01~]#ss -tn
[192.168.2.7-root@web01~]#ss -tn
State Recv-Q Send-Q Local Address:Port Peer Address:Port
ESTAB 0 0 192.168.2.7:80 192.168.2.8:33370
MASQUERADE 动态ip 适用于小型企业ADSL拨号,不固定的IP
[root@route ~]# iptables -t nat -A POSTROUTING -s 172.16.1.0/24 -j MASQUERADE
[root@route ~]# iptables -t nat -R POSTROUTING 1 -s 172.16.1.0/24 -j MASQUERADE
[root@route ~]# iptables -t nat -vnL
Chain PREROUTING (policy ACCEPT 0 packets, 0 bytes)
pkts bytes target prot opt in out source destination
Chain INPUT (policy ACCEPT 0 packets, 0 bytes)
pkts bytes target prot opt in out source destination
Chain OUTPUT (policy ACCEPT 0 packets, 0 bytes)
pkts bytes target prot opt in out source destination
Chain POSTROUTING (policy ACCEPT 0 packets, 0 bytes)
pkts bytes target prot opt in out source destination
0 0 MASQUERADE all -- * * 172.16.1.0/24 0.0.0.0/0
DNAT 外网访问内网
- 现在基于之前的环境, 访问不了.17,不可到达,根本没有路由
[192.168.2.7-root@web01~]#ping 172.16.1.17
connect: Network is unreachable
[192.168.2.7-root@web01~]#route -n
Kernel IP routing table
Destination Gateway Genmask Flags Metric Ref Use Iface
169.254.0.0 0.0.0.0 255.255.0.0 U 1002 0 0 eth0
192.168.2.0 0.0.0.0 255.255.255.0 U 0 0 0 eth0
- route上开启http服务,添加测试文件echo "防火墙的http" >> /var/www/html/index.html
192.168.2.7 curl route
[192.168.2.7-root@web01~]# curl 192.168.2.8
防火墙的http
- 我们添加DNAT规则
[root@route ~]# iptables -t nat -A PREROUTING -d 192.168.2.8 -p tcp --dport 80 -j DNAT --to-destination 172.16.1.17
还可以直接转换端口,把192.168.2.8的80端口,替换为 172.16.1.17的8080端口
[root@route ~]# iptables -t nat -A PREROUTING -d 192.168.2.8 -p tcp --dport 80 -j DNAT --to-destination 172.16.1.17:8080
[root@route ~]# iptables -t nat -vnL
Chain PREROUTING (policy ACCEPT 2 packets, 468 bytes)
pkts bytes target prot opt in out source destination
1 60 DNAT tcp -- * * 0.0.0.0/0 192.168.2.8 tcp dpt:80 to:172.16.1.17
Chain INPUT (policy ACCEPT 1 packets, 234 bytes)
pkts bytes target prot opt in out source destination
Chain OUTPUT (policy ACCEPT 3 packets, 228 bytes)
pkts bytes target prot opt in out source destination
Chain POSTROUTING (policy ACCEPT 4 packets, 288 bytes)
pkts bytes target prot opt in out source destination
- 在用 curl 命令192.168.2.8 显示了 172.16.1.17上的web站点信息,转换成功
[192.168.2.7-root@web01~]# curl 192.168.2.8
172.16.1.17
REDIRECT: 单机的端口转换只能用在单机上,和IP转发什么的没关系.
通过改变目标的IP和端口, 将接收的包转发到不同地址,
把别人访问我的80端口,转换成其他端口
实验:
- 把172.16.1.17的http端口改为8080
- curl 172.16.1.17 失败了
[192.168.2.7-root@web01~]# curl 192.168.2.8
curl: (7) Failed connect to 192.168.2.8:80; Connection refused
- 添加规则
[172.16.2.17-root@web03 ~]#iptables -t nat -A PREROUTING -d 172.16.1.17 -p tcp --dport 80 -j REDIRECT --to-ports 8080
[192.168.2.7-root@web01~]# curl 192.168.2.8
172.16.1.17
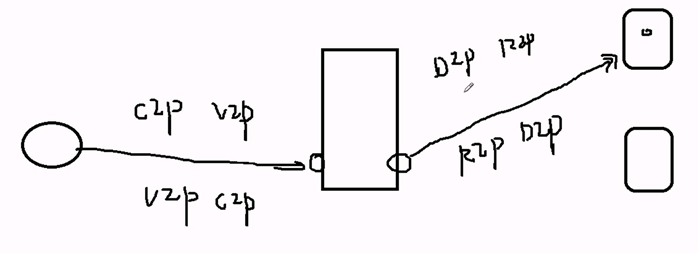
LVS
lvs分类
lvs主要是现实调度功能
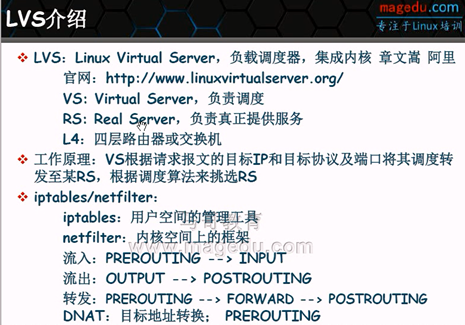
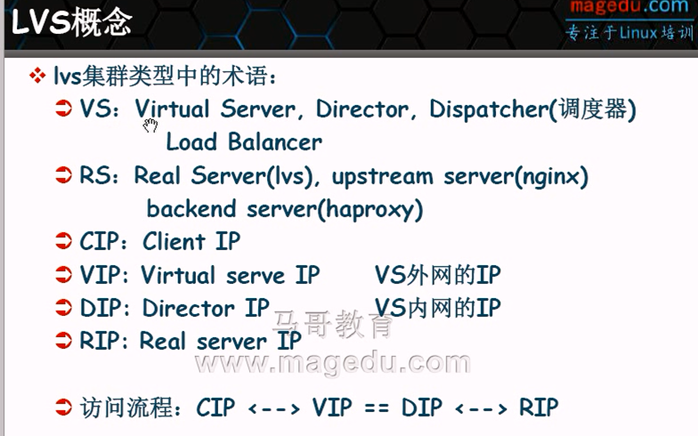
lvs术语
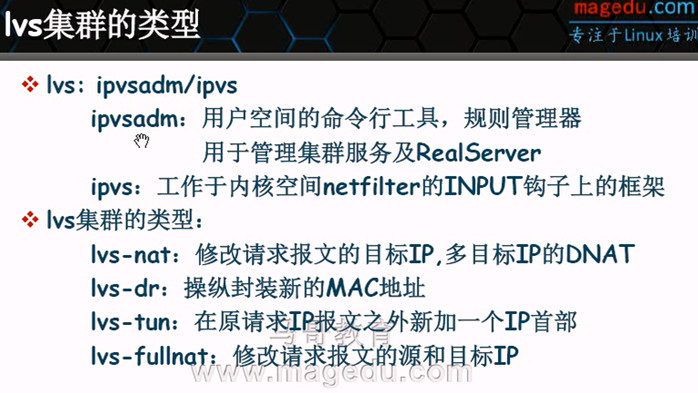
lvs的类型
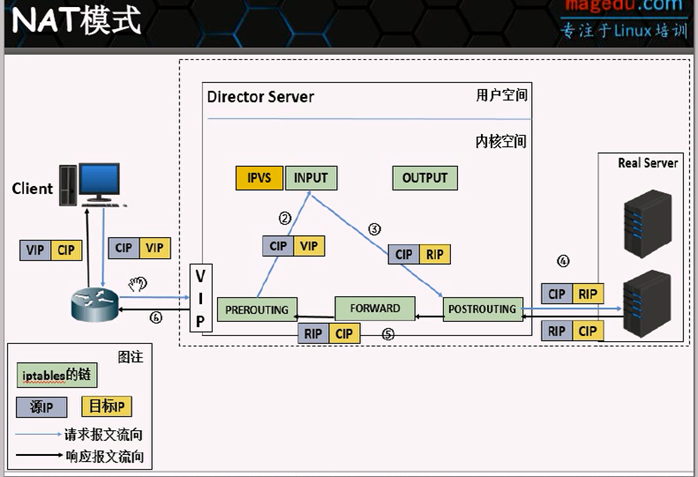
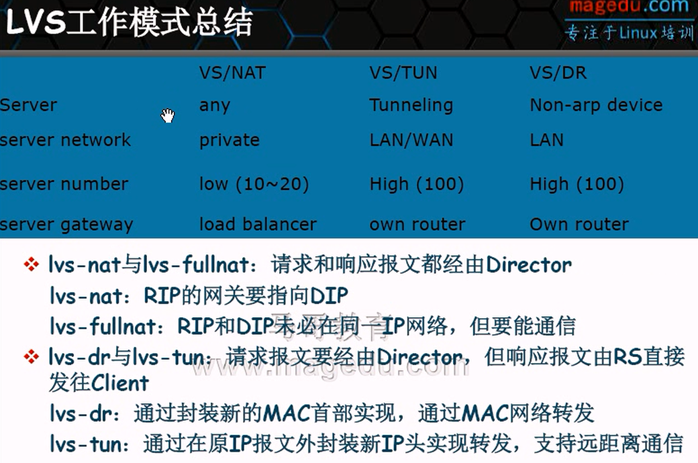
nat模式请求流程:
nat的特性

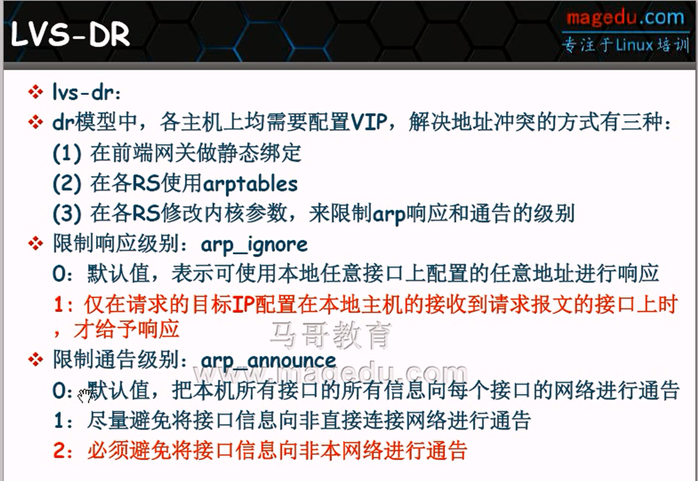
lvs DR模式
dR模式:ip冲突解决办法
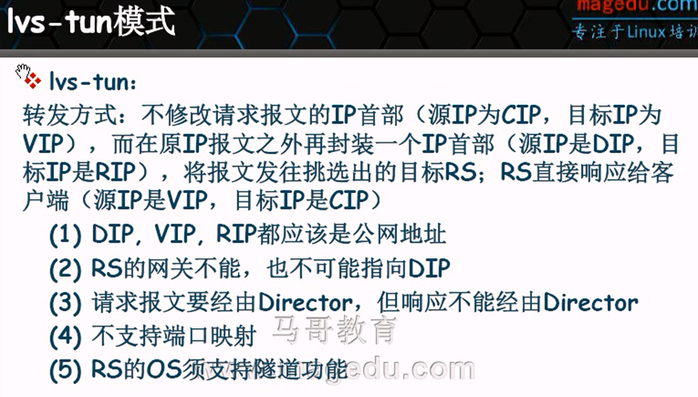
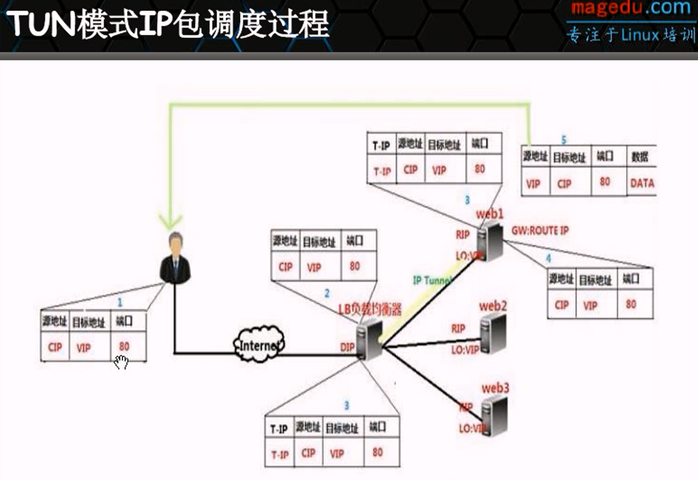
lvs tun模式
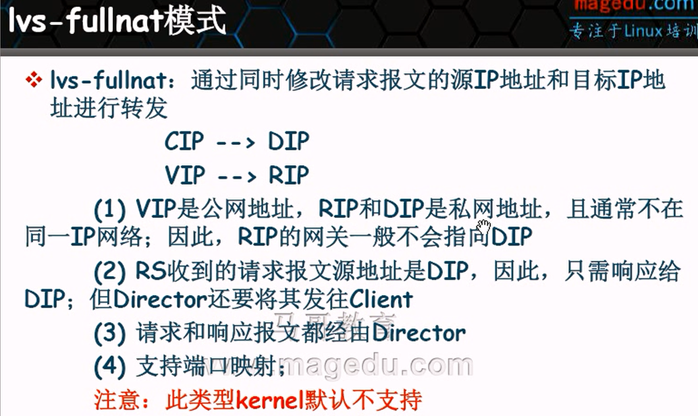
fullnat
lvs模式对比总结
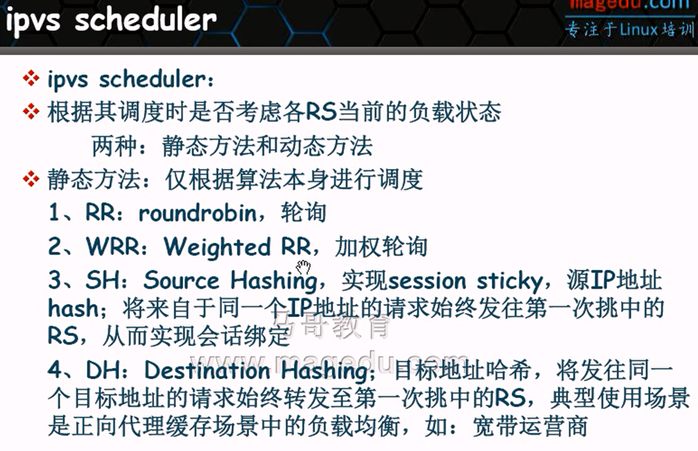
lvs静态调度算法
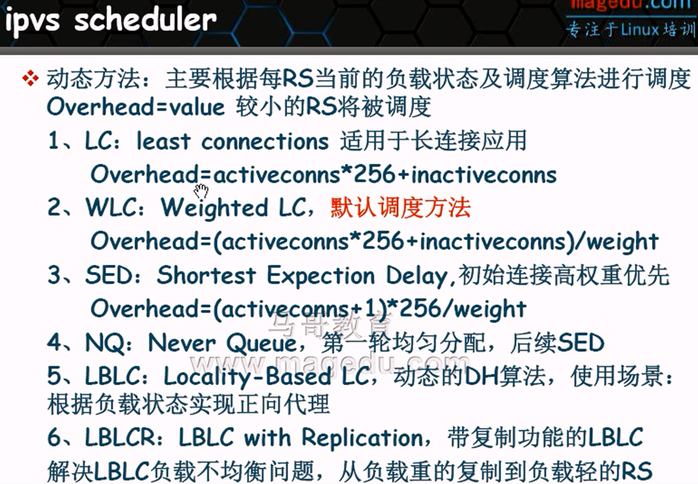
lvs动态调度算法
iptables和lvs的更多相关文章
- Iptables与LVS——从入门到放弃
防火墙什么是防火墙?防火墙其实就是一个隔离的工具,工作于主机或者网络的边缘,对于进出本主机或者网络的报文根据事先定义好的网络规则做匹配监测.防火墙可以简单地划分为两大类:主机防火墙 网络防火墙 ...
- 负载均衡LVS集群详解
一.LB--负载均衡 在负载均衡集群中需要一个分发器,我们将其称之为Director,它位于多台服务器的上面的中间层,根据内部锁定义的规则或调度方式从下面的服务器群中选择一个以此来进行响应请求,而其 ...
- Linux集群服务 LVS
linux虚拟服务器(LVS)项目在linux操作系统上提供了最常见的负载均衡软件. 集群定义: 集群(cluster)技术是一种较新的技术,通过集群技术,可以在付出较低成本的情况下获得在性能.可靠性 ...
- LVS (一) 原理
LVS原理概述 负载均衡就是,在多个提供相同服务主机的前段,增加一个分发器,根据用户请求,然后根据某种方式或者策略,将用户请求分发到提供服务的主机上.同时负载均衡应用还应该提供对后其后端服务健康检查的 ...
- LVS负载均衡模型及算法概述
集群类型 LB: Load Balancing,负载均衡 HA:High Availability, 高可用 HP:High Performance, 高性能 负载均衡 负载均衡设备 Hardwa ...
- Linux centosVMware 负载均衡集群介绍、LVS介绍、LVS调度算法、LVS NAT模式搭建
一.负载均衡集群介绍 主流开源软件LVS.keepalived.haproxy.nginx等 其中LVS属于4层(网络OSI 7层模型),nginx属于7层,haproxy既可以认为是4层,也可以当做 ...
- 高可用集群(HA)之DRBD原理和基础配置
目录 1.工作原理图 2.用户空间工具 3.工作模式 4.实现主备故障自动切换 5.所需软件 6.配置文件 7.详细配置 1.配置通用属性信息 2.定义一个资源 3.初始化资源 ...
- 基于Kubernetes构建企业容器云
前言 团队成员有DBA.运维.Python开发,由于需要跨部门向公司私有云团队申请虚拟机, 此时我在思考能否在现有已申请的虚拟机之上,再进行更加细粒度的资源隔离和划分,让本团队的成员使用, 也就是在私 ...
- 3-1 LVS-NAT集群
---- (整理)By 小甘丶 什么是集群: 集群是一组相互独立的.通过高速网络互联的计算机,它们构成了一个组,并以单一系统的模式加以管理.(Cluster就是一组计算机,它们作为一个整体向用户提供一 ...
随机推荐
- Jmeter-Critical Section Controller(临界区控制器)(还没看,是一个控制请求按顺序执行的东东)
The Critical Section Controller ensures that its children elements (samplers/controllers, etc.) will ...
- linux修改系统时间和时区
1.修改系统时间linux系统时钟有两个,一个是硬件时钟,即BIOS时间,就是我们进行CMOS设置时看到的时间,另一个是系统时钟,是linux系统Kernel时间.当Linux启动时,系统Kernel ...
- RSA 系统找不到指定的文件
未测试 System.Security.Cryptography.RSACryptoServiceProvider rsa = new RSACryptoServiceProvider(); 改为 C ...
- 西门子PLC1200内使用SCL实现简化版PID算法
西门子自带的PID效果很好,但是会比较吃性能,使用次数有限,很多地方需要PID但不需要这么精准的PID,所以网上找个简单的算法自己调用. 新建数据类型 前三个就是PID三个参数 新建FC块: #PID ...
- Quartus ii 设计中的差分信号在例化时的命名规则
在Quartus中做设计,如果使用了差分信号的,如DDR的IP中的mem_ck与mem_ck_n,mem_dqs与mem_dqs_n,将其引入输出端口时,对其命名有一定的规则,否则就会出现错误. 如下 ...
- ArrayPool数组池、Span<T>结构
数组(ArrayPool数组池.Span<T>结构) 目录 前言 简单的数组.多维数组.锯齿数组 Array类 ArrayPool数组池 Span Span介绍 Span切片 使用Span ...
- php将二维数组转换成我想要的一维数组
使用方法array_column($array,b,$arr): 参数说明:$array是我们原始的二维数组,B是我们想要的values,c是key 举个栗子:这是我原来的二维数组 这是我需要的一维数 ...
- js node md5模块使用问题
问题描述:md5(123456)得到的结果不是正确的. why? 问题查找: 1)安装路径问题: yarn add md5(md5模块在npmjs中显示每周download人数高达百万,有问题还这么多 ...
- [高清·非影印]Spring实战+SpringBoot实战+Spring微服务实战+SpringCloud微服务实战(全4本)
------ 郑重声明 --------- 资源来自网络,纯粹共享交流, 如果喜欢,请您务必支持正版!! --------------------------------------------- 下 ...
- 通俗易懂的join、left join、right join、full join、cross join
内连接:列出与连接条件匹配的数据行(join\inner join) 外连接:两表合并,如有不相同的列,另外一个表显示null(left join\right join\full outer join ...