在CNN中使用Tensorflow进行数据增强
开始之前,需要思考一些基本问题
1、为什么需要大量数据
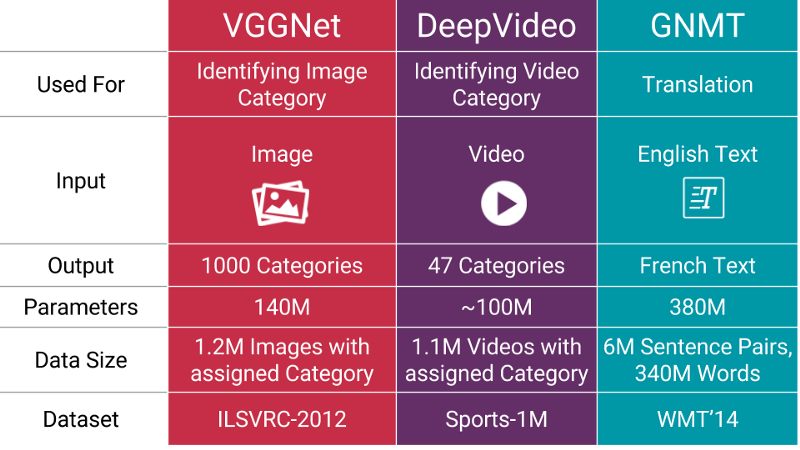
当您训练机器学习模型时,您真正在做的是调整其参数,以便它可以将特定输入(例如,图像)映射到某个输出(标签)。我们的优化目标是追逐我们模型损失较低的最佳位置,这种情况发生在您的参数以正确的方式调整时。
现在的神经网络通常具有数百万的参数,因此,你需要向您的机器学习模型喂入一定比例的示例,以获得良好的性能。此外,您需要的参数数量与模型送执行的任务的复杂程度成正比。
2、如果我没有“更多数据”,如何获得更多数据?


3、即使有我有大量的数据,扩充也可以提供帮助吗

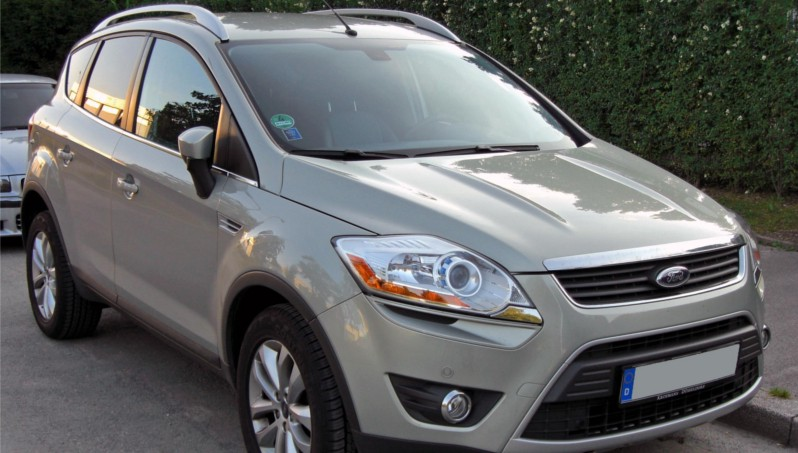
 福特汽车(品牌A),但面对正确。
流行的增强技术
让我们探讨几种最常用的图像增强技术,包括代码示例和增强后的图像可视化。从这里开始,数据将被称为图像。我们将在所有示例中使用用Python编写的Tensorflow或OpenCV。以下是我们将在文章中使用的技术索引:
在任何技术之前:图像大小调整
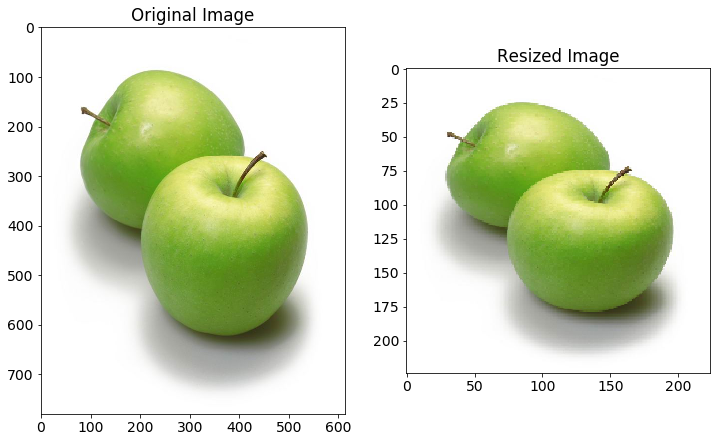
从互联网收集的图像将具有不同的大小。由于在大多数神经网络中存在完全连接的层,所以馈送到网络的图像将需要固定大小(除非您在传递到密集层之前使用空间金字塔池)。因此,在图像增强发生之前,让我们将图像预处理到我们网络所需的大小。使用固定大小的图像,我们可以获得批量处理它们的好处。
 import tensorflow as tf

 import matplotlib.image as mpimg

 import numpy as np

 IMAGE_SIZE = 224

 def tf_resize_images(X_img_file_paths):

     X_data = []

     tf.reset_default_graph()

     X = tf.placeholder(tf.float32, (None, None, 3))

     tf_img = tf.image.resize_images(X, (IMAGE_SIZE, IMAGE_SIZE),

                                     tf.image.ResizeMethod.NEAREST_NEIGHBOR)

     with tf.Session() as sess:

         sess.run(tf.global_variables_initializer())

         # Each image is resized individually as different image may be of different size.

         for index, file_path in enumerate(X_img_file_paths):

             img = mpimg.imread(file_path)[:, :, :3] # Do not read alpha channel.

             resized_img = sess.run(tf_img, feed_dict = {X: img})

             X_data.append(resized_img)

     X_data = np.array(X_data, dtype = np.float32) # Convert to numpy

     return X_data
Image Reszing
缩放
在图像中具有不同缩放的感兴趣对象是图像多样性的最重要方面。当您的网络掌握在真实用户手中时,图像中的对象可能很小或很大。此外,有时,物体可以覆盖整个图像,但不会完全存在于图像中(即在物体的边缘处被裁剪)。
def central_scale_images(X_imgs, scales):

    # Various settings needed for Tensorflow operation

    boxes = np.zeros((len(scales), 4), dtype = np.float32)

    for index, scale in enumerate(scales):

        x1 = y1 = 0.5 - 0.5 * scale # To scale centrally

        x2 = y2 = 0.5 + 0.5 * scale

        boxes[index] = np.array([y1, x1, y2, x2], dtype = np.float32)

    box_ind = np.zeros((len(scales)), dtype = np.int32)

    crop_size = np.array([IMAGE_SIZE, IMAGE_SIZE], dtype = np.int32)

    X_scale_data = []

    tf.reset_default_graph()

    X = tf.placeholder(tf.float32, shape = (1, IMAGE_SIZE, IMAGE_SIZE, 3))

    # Define Tensorflow operation for all scales but only one base image at a time

    tf_img = tf.image.crop_and_resize(X, boxes, box_ind, crop_size)

    with tf.Session() as sess:

        sess.run(tf.global_variables_initializer())

        for img_data in X_imgs:

            batch_img = np.expand_dims(img_data, axis = 0)

            scaled_imgs = sess.run(tf_img, feed_dict = {X: batch_img})

            X_scale_data.extend(scaled_imgs)

    X_scale_data = np.array(X_scale_data, dtype = np.float32)

    return X_scale_data

# Produce each image at scaling of 90%, 75% and 60% of original image.

scaled_imgs = central_scale_images(X_imgs, [0.90, 0.75, 0.60])
Scaling

翻译
from math import ceil, floor

def get_translate_parameters(index):

    if index == 0: # Translate left 20 percent

        offset = np.array([0.0, 0.2], dtype = np.float32)

        size = np.array([IMAGE_SIZE, ceil(0.8 * IMAGE_SIZE)], dtype = np.int32)

        w_start = 0

        w_end = int(ceil(0.8 * IMAGE_SIZE))

        h_start = 0

        h_end = IMAGE_SIZE

    elif index == 1: # Translate right 20 percent

        offset = np.array([0.0, -0.2], dtype = np.float32)

        size = np.array([IMAGE_SIZE, ceil(0.8 * IMAGE_SIZE)], dtype = np.int32)

        w_start = int(floor((1 - 0.8) * IMAGE_SIZE))

        w_end = IMAGE_SIZE

        h_start = 0

        h_end = IMAGE_SIZE

    elif index == 2: # Translate top 20 percent

        offset = np.array([0.2, 0.0], dtype = np.float32)

        size = np.array([ceil(0.8 * IMAGE_SIZE), IMAGE_SIZE], dtype = np.int32)

        w_start = 0

        w_end = IMAGE_SIZE

        h_start = 0

        h_end = int(ceil(0.8 * IMAGE_SIZE))

    else: # Translate bottom 20 percent

        offset = np.array([-0.2, 0.0], dtype = np.float32)

        size = np.array([ceil(0.8 * IMAGE_SIZE), IMAGE_SIZE], dtype = np.int32)

        w_start = 0

        w_end = IMAGE_SIZE

        h_start = int(floor((1 - 0.8) * IMAGE_SIZE))

        h_end = IMAGE_SIZE

    return offset, size, w_start, w_end, h_start, h_end

def translate_images(X_imgs):

    offsets = np.zeros((len(X_imgs), 2), dtype = np.float32)

    n_translations = 4

    X_translated_arr = []

    tf.reset_default_graph()

    with tf.Session() as sess:

        sess.run(tf.global_variables_initializer())

        for i in range(n_translations):

            X_translated = np.zeros((len(X_imgs), IMAGE_SIZE, IMAGE_SIZE, 3),

                    dtype = np.float32)

            X_translated.fill(1.0) # Filling background color

            base_offset, size, w_start, w_end, h_start, h_end = get_translate_parameters(i)

            offsets[:, :] = base_offset

            glimpses = tf.image.extract_glimpse(X_imgs, size, offsets)

            glimpses = sess.run(glimpses)

            X_translated[:, h_start: h_start + size[0], \

             w_start: w_start + size[1], :] = glimpses

            X_translated_arr.extend(X_translated)

    X_translated_arr = np.array(X_translated_arr, dtype = np.float32)

    return X_translated_arr

translated_imgs = translate_images(X_imgs)
Translation

旋转(90度)
def rotate_images(X_imgs):

    X_rotate = []

    tf.reset_default_graph()

    X = tf.placeholder(tf.float32, shape = (IMAGE_SIZE, IMAGE_SIZE, 3))

    k = tf.placeholder(tf.int32)

    tf_img = tf.image.rot90(X, k = k)

    with tf.Session() as sess:

        sess.run(tf.global_variables_initializer())

        for img in X_imgs:

            for i in range(3):  # Rotation at 90, 180 and 270 degrees

                rotated_img = sess.run(tf_img, feed_dict = {X: img, k: i + 1})

                X_rotate.append(rotated_img)

    X_rotate = np.array(X_rotate, dtype = np.float32)

    return X_rotate

rotated_imgs = rotate_images(X_imgs)
Rotate90

旋转(更精细的角度)
根据上面的需求,它可能是必要的对于各种角度。如果这图片的背景是一种固定的颜色,新加的颜色需要与背景融合,否则,神经网络不会将它作为一种特征来学习,而这种特征是不必要的。
from math import pi

def rotate_images(X_imgs, start_angle, end_angle, n_images):

    X_rotate = []

    iterate_at = (end_angle - start_angle) / (n_images - 1)

    tf.reset_default_graph()

    X = tf.placeholder(tf.float32, shape = (None, IMAGE_SIZE, IMAGE_SIZE, 3))

    radian = tf.placeholder(tf.float32, shape = (len(X_imgs)))

    tf_img = tf.contrib.image.rotate(X, radian)

    with tf.Session() as sess:

        sess.run(tf.global_variables_initializer())

        for index in range(n_images):

            degrees_angle = start_angle + index * iterate_at

            radian_value = degrees_angle * pi / 180  # Convert to radian

            radian_arr = [radian_value] * len(X_imgs)

            rotated_imgs = sess.run(tf_img, feed_dict = {X: X_imgs, radian: radian_arr})

            X_rotate.extend(rotated_imgs)

    X_rotate = np.array(X_rotate, dtype = np.float32)

    return X_rotate

# Start rotation at -90 degrees, end at 90 degrees and produce totally 14 images

rotated_imgs = rotate_images(X_imgs, -90, 90, 14)
rotate

翻转
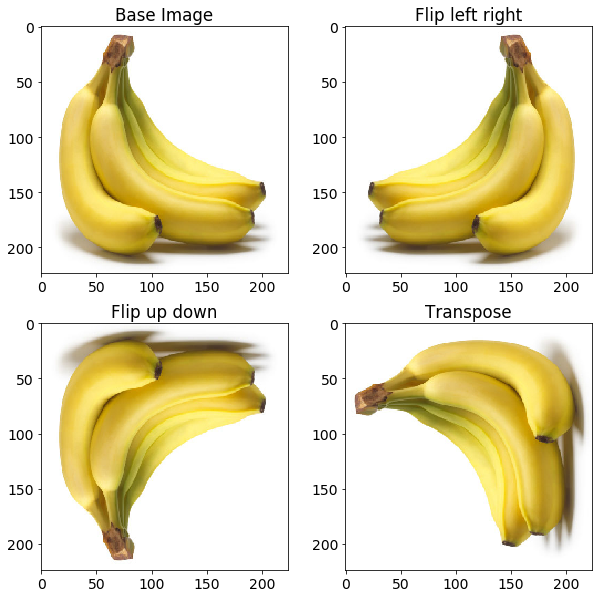
这种情况对于网络来说更重要的是消除假设对象的某些特征仅在特定方面可用的偏差。考虑图像示例中显示的情况。您不希望网络知道香蕉的倾斜仅发生在基本图像中观察到的右侧。
def flip_images(X_imgs):

    X_flip = []

    tf.reset_default_graph()

    X = tf.placeholder(tf.float32, shape = (IMAGE_SIZE, IMAGE_SIZE, 3))

    tf_img1 = tf.image.flip_left_right(X)

    tf_img2 = tf.image.flip_up_down(X)

    tf_img3 = tf.image.transpose_image(X)

    with tf.Session() as sess:

        sess.run(tf.global_variables_initializer())

        for img in X_imgs:

            flipped_imgs = sess.run([tf_img1, tf_img2, tf_img3], feed_dict = {X: img})

            X_flip.extend(flipped_imgs)

    X_flip = np.array(X_flip, dtype = np.float32)

    return X_flip

flipped_images = flip_images(X_imgs)
flip image
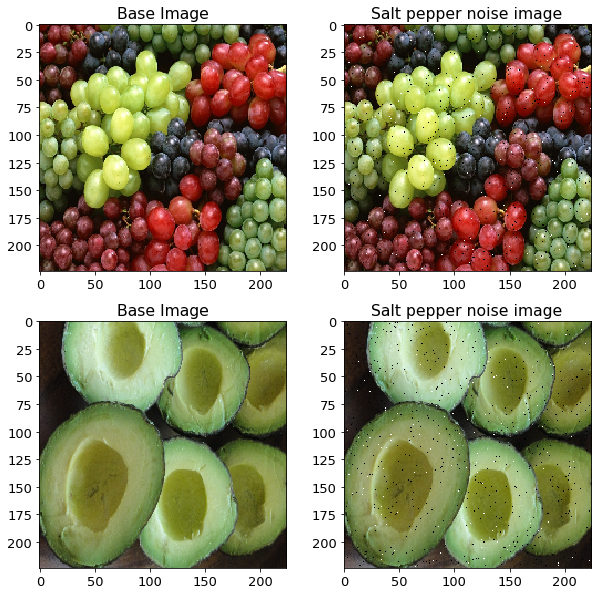
添加椒盐噪声
def add_salt_pepper_noise(X_imgs):

    # Need to produce a copy as to not modify the original image

    X_imgs_copy = X_imgs.copy()

    row, col, _ = X_imgs_copy[0].shape

    salt_vs_pepper = 0.2

    amount = 0.004

    num_salt = np.ceil(amount * X_imgs_copy[0].size * salt_vs_pepper)

    num_pepper = np.ceil(amount * X_imgs_copy[0].size * (1.0 - salt_vs_pepper))

    for X_img in X_imgs_copy:

        # Add Salt noise

        coords = [np.random.randint(0, i - 1, int(num_salt)) for i in X_img.shape]

        X_img[coords[0], coords[1], :] = 1

        # Add Pepper noise

        coords = [np.random.randint(0, i - 1, int(num_pepper)) for i in X_img.shape]

        X_img[coords[0], coords[1], :] = 0

    return X_imgs_copy

salt_pepper_noise_imgs = add_salt_pepper_noise(X_imgs)
salt_pepper_noise
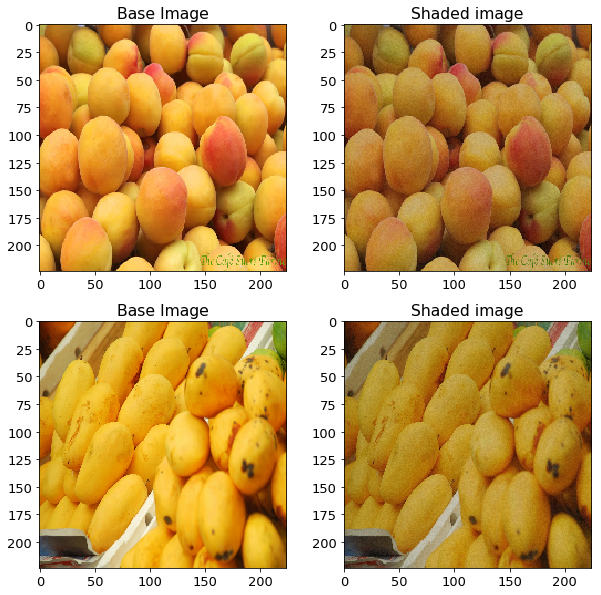
光照条件
import cv2

def add_gaussian_noise(X_imgs):

    gaussian_noise_imgs = []

    row, col, _ = X_imgs[0].shape

    # Gaussian distribution parameters

    mean = 0

    var = 0.1

    sigma = var ** 0.5

    for X_img in X_imgs:

        gaussian = np.random.random((row, col, 1)).astype(np.float32)

        gaussian = np.concatenate((gaussian, gaussian, gaussian), axis = 2)

        gaussian_img = cv2.addWeighted(X_img, 0.75, 0.25 * gaussian, 0.25, 0)

        gaussian_noise_imgs.append(gaussian_img)

    gaussian_noise_imgs = np.array(gaussian_noise_imgs, dtype = np.float32)

    return gaussian_noise_imgs

gaussian_noise_imgs = add_gaussian_noise(X_imgs)
gaussian_noise
 透视变换
透视变换
def get_mask_coord(imshape):

    vertices = np.array([[(0.09 * imshape[1], 0.99 * imshape[0]),

                          (0.43 * imshape[1], 0.32 * imshape[0]),

                          (0.56 * imshape[1], 0.32 * imshape[0]),

                          (0.85 * imshape[1], 0.99 * imshape[0])]], dtype = np.int32)

    return vertices

def get_perspective_matrices(X_img):

    offset = 15

    img_size = (X_img.shape[1], X_img.shape[0])

    # Estimate the coordinates of object of interest inside the image.

    src = np.float32(get_mask_coord(X_img.shape))

    dst = np.float32([[offset, img_size[1]], [offset, 0], [img_size[0] - offset, 0],

                      [img_size[0] - offset, img_size[1]]])

    perspective_matrix = cv2.getPerspectiveTransform(src, dst)

    return perspective_matrix

def perspective_transform(X_img):

    # Doing only for one type of example

    perspective_matrix = get_perspective_matrices(X_img)

    warped_img = cv2.warpPerspective(X_img, perspective_matrix,

                                     (X_img.shape[1], X_img.shape[0]),

                                     flags = cv2.INTER_LINEAR)

    return warped_img

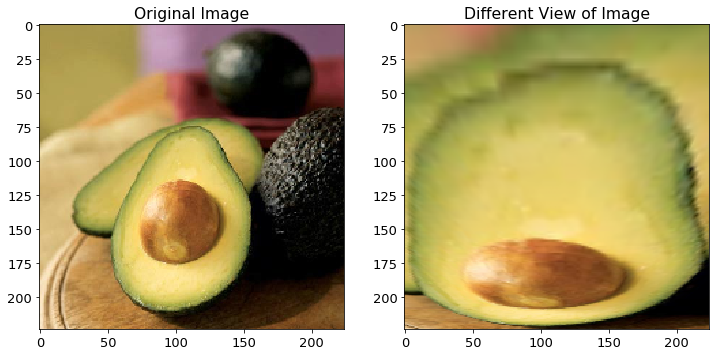
perspective_img = perspective_transform(X_img)
perspective_transform
总结
尽管上面的图像增强方法列表并非详尽无遗,但是包含了许多广泛使用的方法,您可以组合的使用这些扩充来生成更多的图像。您可以在Github中查看本文使用的代码。
在CNN中使用Tensorflow进行数据增强的更多相关文章
- 图像数据增强 (Data Augmentation in Computer Vision)
1.1 简介 深层神经网络一般都需要大量的训练数据才能获得比较理想的结果.在数据量有限的情况下,可以通过数据增强(Data Augmentation)来增加训练样本的多样性, 提高模型鲁棒性,避免过拟 ...
- CNN中的卷积核及TensorFlow中卷积的各种实现
声明: 1. 我和每一个应该看这篇博文的人一样,都是初学者,都是小菜鸟,我发布博文只是希望加深学习印象并与大家讨论. 2. 我不确定的地方用了"应该"二字 首先,通俗说一下,CNN ...
- TensorFlow之DNN(三):神经网络的正则化方法(Dropout、L2正则化、早停和数据增强)
这一篇博客整理用TensorFlow实现神经网络正则化的内容. 深层神经网络往往具有数十万乃至数百万的参数,可以进行非常复杂的特征变换,具有强大的学习能力,因此容易在训练集上过拟合.缓解神经网络的过拟 ...
- [开发技巧]·TensorFlow中numpy与tensor数据相互转化
[开发技巧]·TensorFlow中numpy与tensor数据相互转化 个人主页–> https://xiaosongshine.github.io/ - 问题描述 在我们使用TensorFl ...
- 大规模的I/O流中有效识别大数据并增强时间局部性
一篇热数据识别存储外文翻译,本文主要在讲思想 原文题目: HDCat: Effectively Identifying Hot Data in Large-scale I/O Streams ...
- NLP中的数据增强
相关方法合集见:https://github.com/quincyliang/nlp-data-augmentation 较为简单的数据增强的方法见论文:https://arxiv.org/pdf/1 ...
- ubuntu之路——day19.2 开源框架与迁移、CNN中的数据扩充
开源框架与迁移 上面介绍了一些已经取得很好成绩的CNN框架,我们可以直接从GitHub上下载这些神经网络的结构和已经在ImageNet等数据集上训练好的权重超参数. 在应用于我们自己的数据时. 1.如 ...
- 转《在浏览器中使用tensorflow.js进行人脸识别的JavaScript API》
作者 | Vincent Mühle 编译 | 姗姗 出品 | 人工智能头条(公众号ID:AI_Thinker) [导读]随着深度学习方法的应用,浏览器调用人脸识别技术已经得到了更广泛的应用与提升.在 ...
- (转)如何用TensorLayer做目标检测的数据增强
数据增强在机器学习中的作用不言而喻.和图片分类的数据增强不同,训练目标检测模型的数据增强在对图像做处理时,还需要对图片中每个目标的坐标做相应的处理.此外,位移.裁剪等操作还有可能使得一些目标在处理后只 ...
随机推荐
- POJ 2348 Euclid's Game (博弈)
题意:给定两个整数,两个人轮流操作,每次可以用较大数减去较小数的整数倍,当一个数变成0时,则结束,问谁会胜. 析:很明显如果 a == b 那么就可以直接结束了,那么如果 a > b我们可以交换 ...
- HTML5学习笔记(四)语义元素
语义元素能够清楚的描述其意义给浏览器和开发者. 无语义 元素实例: <div> 和 <span> - 无需考虑内容. 语义元素实例: <form>, <tab ...
- 通过ssh X11转发使用远程gui程序
ssh协议可以转发X11数据, 从而达到使用远程gui程序的功能, 假定现在有 客服端 C :192.168.0.13 服务器 S :192.168.0.200 首先确保在客服端C 上能够通过 ssh ...
- Bootstrap 栅栏布局中 col-xs-*、col-sm-*、col-md-*、col-lg-* 区别及使用方法
(1)概括 一句话概括:根据显示屏幕宽度的大小,自动的选用对应的类的样式. (2)关键字段 1.col是column简写:列: 2.xs是maxsmall简写:超小, ...
- pytest框架(二)
一.示例代码一 D:YOYO\ __init__.py test_class.py # content of test_class.py class TestClass: def test_one(s ...
- 剑指Offer的学习笔记(C#篇)-- 平衡二叉树(二叉树后序遍历递归详解版)
题目描述 输入一棵二叉树,判断该二叉树是否是平衡二叉树. 一 . 题目分析 首先要理解一个概念:什么是平衡二叉树,如果某二叉树中任意的左右子树深度相差不超过1,那么他就是一颗平衡二叉树.如下图: 所以 ...
- 基于ZFAKA二次开发,添加PayJS支付渠道
项目地址:https://github.com/hiyouli/payjs-for-zfaka 关于ZFAKA,请移步:ZFAKA 免费.安全.稳定.高效的发卡系统,值得拥有! 演示地址:http:/ ...
- 基于 Laravel Route 的 ThinkSNS+ Component
这里是传送门: <ThinkSNS+ 基于 Laravel master 分支,从 1 到 0,再到 0.1[ThinkSNS+研发日记系列一]> <基于 Laravel 开发 Th ...
- RabbitMQ下载安装教程 Windows10
https://blog.csdn.net/weixin_39735923/article/details/79288578
- Jmeter集成Jira提交缺陷
笔者曾在文章<Jmeter排忧解难—生成excel结果文件>聊到了一种提高接口测试效率的方法.今天,咱们接着对“提高接口测试效率”这个话题做更深入的探讨.作为一名接口测试人员,我们是否一直 ...
