软件测试自动化之- 基于反射的UI自动化测试框架 - UI Automation Test Framework
测试自动化程序的任务
基于反射的ui测试自动化程序,要完成的6项任务:
- 通过某种方式从测试套件程序中运行待测程序(AUT: Applicaton Under Test),以便于两个程序之间进行通信
- 操纵应用程序的窗体,从而模拟用户对窗体所实施的moving和resizing操作
- 检查应用程序窗体,确定应用程序的状态是否准确
- 操纵应用程序控件的属性,从而模拟用户的一些操作,比如模拟在一个TextBox控件里输入字符
- 检查应用程序控件的属性,确定应用程序的状态是否准确
- 调用应用程序的方法,从而模拟一些用户操作,比如模拟单击一个按钮
待测程序
AUT是一个剪刀、石头、布的猜拳软件,当点击button1时,会在listbox中显示谁是胜者。

图1 待测程序GUI
AUT代码如下:
using System;

using System.Collections.Generic;

using System.ComponentModel;

using System.Data;

using System.Drawing;

using System.Linq;

using System.Text;

using System.Windows.Forms;

namespace AUTForm

{

    public partial class Form1 : Form

    {

        public Form1()

        {

            InitializeComponent();

        }

        private void button1_Click(object sender, EventArgs e)

        {

            string tb = textBox1.Text;

            string cb = comboBox1.Text;

            if (tb == cb)

            {

                listBox1.Items.Add("Result is a tie");

            }

            else if (tb == "paper" && cb == "rock" ||

                tb == "rock" && cb == "scissors" ||

                tb == "scissors" && cb == "paper")

            {

                listBox1.Items.Add("The TextBox wins");

            }

            else

            {

                listBox1.Items.Add("The ComboBox wins");

            }

        }

        private void menuItem2_Click(object sender, EventArgs e)

        {

            Application.Exit();

        }

    }

}
测试程序
启动待测程序
要使用反射技术通过UI来测试Windows窗体,必须要在测试套件所在的进程内创建一个单独的线程来运行被测程序。这样,测试程序和被测程序就会在运行在同一进程里面,从而可以相互进行通信。
using System;
using System.Collections.Generic;
using System.Linq;
using System.Text;
using System.Windows.Forms;
using System.Reflection;
using System.Threading;
using System.Diagnostics;
using System.Drawing; namespace AUTFormTest
{
class Program
{
[STAThread]
static void Main(string[] args)
{
try
{
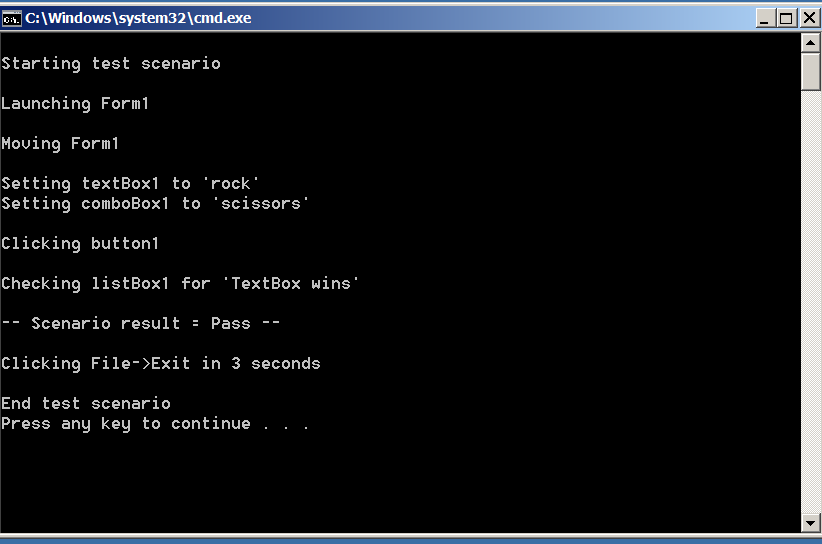
Console.WriteLine("\nStarting test scenario");
Console.WriteLine("\nLaunching Form1");
Form theForm = null;
string formName = "AUTForm.Form1";
string path = @"E:\wicresoft\Management\Knowledge\Learned\TestFramework\TestSampleLearn\AUTForm\bin\Debug\AUTForm.exe";
theForm = LaunchApp(path, formName); Console.WriteLine("\nMoving Form1");
Point pt = new Point(, );
Thread.Sleep();
SetFormProperty.SetFormPropertyValue(theForm, "Location", pt); Console.WriteLine("\nSetting textBox1 to 'rock'");
Thread.Sleep();
SetControlProperty.SetControlPropertyValue(theForm, "textBox1", "Text", "rock");
Console.WriteLine("Setting comboBox1 to 'scissors'");
Thread.Sleep();
SetControlProperty.SetControlPropertyValue(theForm, "comboBox1", "Text",
"scissors"); Console.WriteLine("\nClicking button1");
object[] parms = new object[] { null, EventArgs.Empty };
Thread.Sleep();
InvokeClickMethod.InvokeMethod(theForm, "button1_Click", parms); bool pass = true; Console.WriteLine("\nChecking listBox1 for 'TextBox wins'");
Thread.Sleep();
ListBox.ObjectCollection oc =
(ListBox.ObjectCollection)
GetControlProperty.GetControlPropertyValue(theForm, "listBox1",
"Items");
string s = oc[].ToString();
if (s.IndexOf("TextBox wins") == -)
pass = false; if (pass)
Console.WriteLine("\n-- Scenario result = Pass --");
else
Console.WriteLine("\n-- Scenario result = *FAIL* --"); Console.WriteLine("\nClicking File->Exit in 3 seconds");
Thread.Sleep();
InvokeClickMethod.InvokeMethod(theForm, "menuItem2_Click", parms); Console.WriteLine("\nEnd test scenario");
}
catch (Exception ex)
{
Console.WriteLine("Fatal error: " + ex.Message);
}
} /// <summary>
/// Lunch App
/// </summary>
/// <param name="path">The Application path</param>
/// <param name="formName">The Form name</param>
/// <returns>Form Instance</returns>
static Form LaunchApp(string path, string formName)
{
//1. Load assmebly
//2. Get the define type
//3. Create type instance
//通过assembly读取程序,然后程序获取窗体类型,通过程序创建窗体的实例.
Form result = null;
Assembly a = Assembly.LoadFrom(path);
Type t = a.GetType(formName);
result = (Form)a.CreateInstance(t.FullName); AppState aps = new AppState(result);
ThreadStart ts = new ThreadStart(aps.RunApp);
Thread thread = new Thread(ts);
//single thread
thread.SetApartmentState(ApartmentState.STA);
thread.IsBackground = true; thread.Start();
return result;
}
} public class AppState
{
public readonly Form formToRun;
public AppState(Form f)
{
this.formToRun = f;
} public void RunApp()
{
Application.Run(formToRun);
}
}
}
设置窗体的属性
    public static class SetFormProperty

    {

        delegate void SetFormPropertyValueHandler(Form f, string propertyName, object newValue);

        public static void SetFormPropertyValue(Form f, string propertyName, object newValue)

        {

            if (f.InvokeRequired)

            {

                Delegate d = new SetFormPropertyValueHandler(SetFormPropertyValue);

                object[] o = new object[] { f, propertyName, newValue };

                f.Invoke(d, o);

                return;

            }

            else

            {

                Type t = f.GetType();

                PropertyInfo pi = t.GetProperty(propertyName);

                pi.SetValue(f, newValue, null);

            }

        }

    }
问题1:如果在测试程序中直接调用PropertyInfo.SetValue()会抛错:"Exception has been thrown by the target of an invocation."。这是因为,不是在窗体的主线程里调用,而是在自动化测试程序所创建的一个线程里调用。因此,我们用Form.Invoke()方法以间接的方式调用SetValue。间接的方式调用,就是用delegate对象调用SetValue()。
获取窗体的属性
 public static class GetFormProperty

    {

        delegate object GetFormPropertyValueHandler(Form f, string propertyName);

        public static object GetFormPropertyValue(Form f, string propertyName)

        {

            if (f.InvokeRequired)

            {

                Delegate d = new GetFormPropertyValueHandler(GetFormPropertyValue);

                object[] o = new object[] { f, propertyName };

                object iresult = f.Invoke(d, o);

                return iresult;

            }

            else

            {

                Type t = f.GetType();

                PropertyInfo pi = t.GetProperty(propertyName);

                object result = pi.GetValue(f, null);

                return result;

            }

        }

    }
设置控件的属性
public static class SetControlProperty

    {

        delegate void SetControlPropertyValueHandler(Form f,

            string controlName, string propertyName, object newValue);

        public static void SetControlPropertyValue(Form f, string controlName,

            string PropertyName, object newValue)

        {

            if (f.InvokeRequired)

            {

                Delegate d = new SetControlPropertyValueHandler(SetControlPropertyValue);

                object[] o = new object[] { f, controlName, PropertyName, newValue };

                f.Invoke(d, o);

            }

            else

            {

                Type t1 = f.GetType();

                FieldInfo fi = t1.GetField(controlName, BindingFlagsList.Flags);

                object ctr1 = fi.GetValue(f);

                Type t2 = ctr1.GetType();

                PropertyInfo pi = t2.GetProperty(PropertyName);

                pi.SetValue(ctr1, newValue, null);

            }

        }

    }
BingFlags对象是用来过滤System.Reflection命名空间里许多不同类型的方法的。定义如下:
public static class BindingFlagsList

    {

        public static BindingFlags Flags = BindingFlags.Public |

            BindingFlags.NonPublic |

            BindingFlags.Static |

            BindingFlags.Instance;

    }
获取控件的属性
 public static class GetControlProperty

    {

        delegate object GetControlPropertyValueHandler(Form f,

            string controlName, string propertyName);

        public static object GetControlPropertyValue(Form f, string controlName, string propertyName)

        {

            if (f.InvokeRequired)

            {

                Delegate d = new GetControlPropertyValueHandler(GetControlPropertyValue);

                object[] o = new object[] { f, controlName, propertyName };

                object iResult = f.Invoke(d, o);

                return iResult;

            }

            else

            {

                Type t1 = f.GetType();

                FieldInfo fi = t1.GetField(controlName, BindingFlagsList.Flags);

                object ctr1 = fi.GetValue(f);

                Type t2 = ctr1.GetType();

                PropertyInfo pi = t2.GetProperty(propertyName);

                object gResult = pi.GetValue(ctr1, null);

                return gResult;

            }

        }

    }
方法调用
public static class InvokeClickMethod

    {

        static AutoResetEvent are = new AutoResetEvent(false);

        delegate void InvokeMethodHandler(Form f, string methodName, params object[] parms);

        public static void InvokeMethod(Form f, string methodName, params object[] parms)

        {

            if (f.InvokeRequired)

            {

                Delegate d = new InvokeMethodHandler(InvokeMethod);

                f.Invoke(d, new object[] { f, methodName, parms });

                are.WaitOne();

            }

            else

            {

                Type t = f.GetType();

                MethodInfo mi = t.GetMethod(methodName, BindingFlagsList.Flags);

                mi.Invoke(f, parms);

                are.Set();

            }

        }

    }
问题2:假如测试套件触发了待测程序的某个方法,而这个方法直接或间接创建一个新的线程去执行。如果需要等新线程执行结束以后才能在测试套间里继续下一步操作:
- 如果知道时间暂停长度,可以使用Thread.Sleep().
- 如果没有办法知道具体要暂停多长时间, 更好的解决方案可用AutoResetEvent对象来进行同步. 当需要暂停自动化测试程序的时候,就可以插入are.WaitOne()语句, 这个语句会把AutoResetEvent对象的值设为未设置.当前线程会暂停执行, 直到are.Set()语句把AutoResetEvent对象的值被设为已设置.
结果
所有源代码如下
http://pan.baidu.com/s/1cCSqE
软件测试自动化之- 基于反射的UI自动化测试框架 - UI Automation Test Framework的更多相关文章
- 基于selenium+Python3.7+yaml+Robot Framework的UI自动化测试框架
前端自动化测试框架 项目说明 本框架是一套基于selenium+Python3.7+yaml+Robot Framework而设计的数据驱动UI自动化测试框架,Robot Framework 作为执行 ...
- 数据驱动 vs 关键字驱动:对搭建UI自动化测试框架的探索
UI自动化测试用例剖析 让我们先从分析一端自动化测试案例的代码开始我们的旅程.以下是我之前写的一个自动化测试的小Demo.这个Demo基于Selenium与Java.由于现在Selenium在自动化测 ...
- 避免重复造轮子的UI自动化测试框架开发
一懒起来就好久没更新文章了,其实懒也还是因为忙,今年上半年的加班赶上了去年一年的加班,加班不息啊,好了吐槽完就写写一直打算继续的自动化开发 目前各种UI测试框架层出不穷,但是万变不离其宗,驱动PC浏览 ...
- 自动化测试中级篇——LazyAndroid UI自动化测试框架使用指南
原文地址https://blog.csdn.net/iamhuanggua/article/details/53104345 简介 一直以来,安卓UI自动化测试都存在以下两个障碍,一是测试工具Mo ...
- 简单Web UI 自动化测试框架 pyse
WebUI automation testing framework based on Selenium and unittest. 基于 selenium 和 unittest 的 Web UI自动 ...
- UI自动化测试框架(项目实战)python、Selenium(日志、邮件、pageobject)
其实百度UI自动化测试框架,会出来很多相关的信息,不过就没有找到纯项目的,无法拿来使用的:所以我最近就写了一个简单,不过可以拿来在真正项目中可以使用的测试框架. 项目的地址:https://githu ...
- Ui自动化测试框架
为了提高我们的UI测试效率,我们引用Ui自动化测试框架,这里简单先描述一下,后续会详细补充: 了解一个测试框架,我们就需要了解一下源码,能看懂源码即可: 1.稳定先封装wait EC,电脑性能配置较好 ...
- UI自动化测试框架 ---TestCafe
UI自动化测试框架 ---TestCafe 官网文档链接: https://devexpress.github.io/testcafe/ https://devexpress.github.io/te ...
- 广深小龙-基于unittest、pytest自动化测试框架之demo来学习啦!!!
基于unittest.pytest自动化测试框架之demo,赶紧用起来,一起学习吧! demo分为两个框架:①pytest ②unittest demo 中 包含 web.api 自动化测试框架 ...
随机推荐
- python 读写CSV文件
#-*- coding: UTF-8 -*- import csv import os def WriteToCsv(): '''写CSV文件''' titls = ['序号', '链接', '备注' ...
- What's the difference between - (one hyphen) and — (two hyphens) in a command?
bash中看到这样的命令, curl -sL https://deb.nodesource.com/setup_10.x | sudo -E bash - sudo apt-get install - ...
- WdColor 枚举 (Word)
指定要应用的 位颜色. 名称 值 说明 wdColorAqua 水绿色. wdColorAutomatic - 自动配色.默认值:通常为黑色. wdColorBlack 黑色. wdColorBlue ...
- mssql2008R2 RCU-6083:ALTER database FWC SET READ_COMMITTED_SNAPSHOT ON
RCU-6083:失败 - 检查所选组件的先决条件要求:MDS 有关详细资料, 请参阅 E:\Setup\ofm_rcu\rcu\log\logdir.2014-11-27_12-39\rcu.log ...
- 防盗链Nginx设置图片防盗链,设置无效的请仔细看红字
*******************************************************************切记,替换的图片地址要使用没有防盗链的网站图片,否则由于替换的图片 ...
- 破解无线网络密码-BT3如何使用1
一分钟制作 BT3 U盘版 方便,快捷简单 光盘版BT3, 大概694MB,直接刻盘,然后用光盘引导,即可进入bt3,连接为: http://ftp.heanet.ie/mirrors/backtra ...
- Opencv2.4.9安装和在visualstudio 2013中配置
Opencv2.4.9安装和在visualstudio 2013中配置 下载opencv和在windows下安装: 最新版本号的opencv是2014.4.25的opencv2.4.9,这里选择当前最 ...
- 【AngularJS】Controller
理解控制器 在Angular中,一个容器就是一个JavaScript构造函数,用来增强Angular Scope. 当一个控制器通过ng-controller指令绑定到DOM,Angular就会实例化 ...
- Struts2(七)基础小结
一.struts2和action 二.Result 三.struts.xml 四.namespace 第一种绝对路径 <form action="${pageContext.reque ...
- Linux文件类型(学习笔记六)
一.Linux下的文件类型 普通文件:在由 ls –al 所显示出来的属性方面,第一个属性为 [ - ] 目录文件:在由 ls –al 所显示出来的属性方面,第一个属性为 [ d ] 设备文件:一般都 ...