Miniprofiler在swagger、vue、angular中的使用
本篇分为以下几个部分:
- 1.Swagger的简单应用
- 2.Miniprofier的后台配置
- 3.跨域配置
- 4.在angular中显示Miniprofier
- 5.在vue中显示Miniprofier
- 6.在swagger中显示Miniprofier
Swagger的简单应用
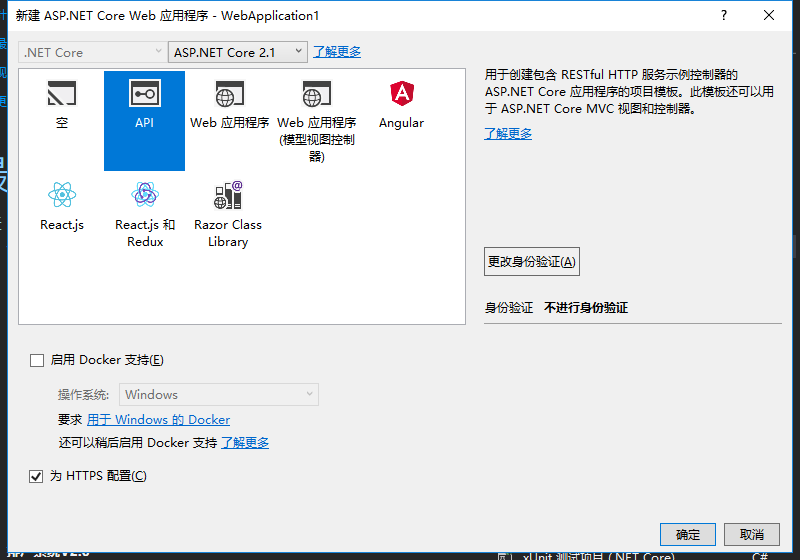
1、首先新建一个Api项目
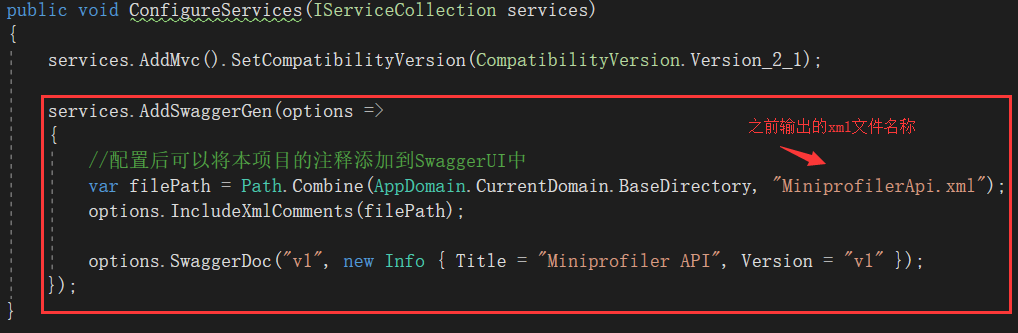
4、在Startup类的ConfigureServices方法和Configure方法中配置如下:

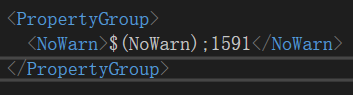
5、添加接口注释:

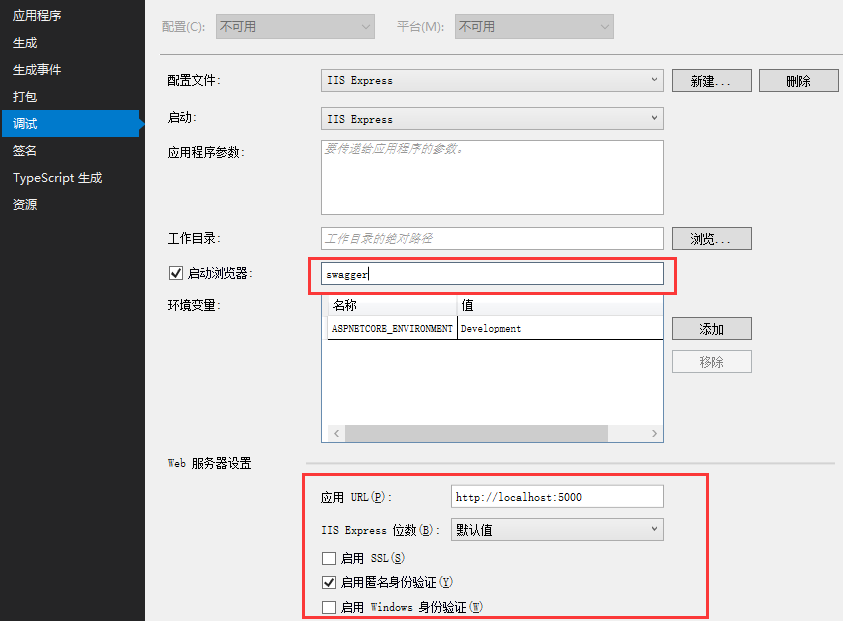
6、修改项目运行端口,访问路径,关闭ssl,右键项目=>属性=>调试,配置如下:
7、启动项目,界面效果如下:
Miniprofier的后台配置
1、安装MiniProfiler.AspNetCore.Mvc
2、在Startup类的ConfigureServices方法和Configure方法中配置如下:


3、运行程序:访问http://localhost:5000/mini-profiler-resources/results

跨域配置:


在angular中显示Miniprofier
1、在页面创建Miniprofier需要的js和css
import { Component } from '@angular/core';

import { HttpClient } from '@angular/common/http';

@Component({

  selector: 'app-root',

  templateUrl: './app.component.html',

  styleUrls: ['./app.component.css']

})

export class AppComponent {

  private src: string = 'http://localhost:5000/mini-profiler-resources/';

  private scriptSrc: string = `${this.src}includes.min.js`;

  private cssSrc: string = `${this.src}includes.min.css`;

  private id: string = 'mini-profiler';

  private dataPath: string = `${this.src}`;

  private dataVersion: string = '';

  private dataPosition: string = 'right';

  private dataChildren: boolean = true;

  private dataMaxTraces: number = 35;

  private dataAuthorized: boolean = true;

  private dataStartHidden: string = 'false';

  private dataToggleShortcut: string = 'Alt+P';

  private dataTrivialMilliseconds: number = 35;

  private dataTrivial: boolean = true;

  private dataControls: boolean = true;

  private dataCurrentId: string = '';

  private dataIds: string = '';

  private scriptAsync: boolean = true;

  private innerHTML: string = '';

  constructor(private http: HttpClient){

  }

  ngAfterViewInit(): void {

    //添加Miniprofier的js

    this.appendDivElement();

    //添加Miniprofier的css

    this.appendCssLink();

  }

  //请求后台接口

  send(): void{

    let serverurl: string = "http://localhost:5000//api/Values";

    this.http.get(serverurl)

    .toPromise()

    .then(response => {

      console.log()

    }).catch(error => {

    });

  }

  private appendDivElement(): void {

    const body = document.body as HTMLDivElement;

    const script = document.createElement('script');

    script.innerHTML = this.innerHTML;

    script.src = this.scriptSrc;

    script.setAttribute('data-version', this.dataVersion);

    script.setAttribute('data-path', this.dataPath);

    script.setAttribute('data-position', this.dataPosition);

    script.setAttribute('id', this.id);

    script.setAttribute('data-current-id', this.dataCurrentId);

    script.setAttribute('data-ids', this.dataIds);

    script.setAttribute('data-trivial', this.dataTrivial.toString());

    script.setAttribute('data-children', this.dataChildren.toString());

    script.setAttribute('data-max-traces', this.dataMaxTraces.toString());

    script.setAttribute('data-controls', this.dataControls.toString());

    script.setAttribute('data-authorized', this.dataAuthorized.toString());

    script.setAttribute('data-start-hidden', this.dataStartHidden.toString());

    script.setAttribute('data-toggle-shortcut', this.dataToggleShortcut);

    script.setAttribute('data-trivial-milliseconds', this.dataTrivialMilliseconds.toString());

    script.async = this.scriptAsync;

    body.appendChild(script);

  }

  private appendCssLink(): void {

      const body = document.body as HTMLDivElement;

      const css = document.createElement('link');

      css.href = this.cssSrc;

      css.rel = 'stylesheet';

      body.appendChild(css);

  }

}
2、添加Http拦截器,动态显示监听结果
import { Injectable } from '@angular/core';

import { HttpInterceptor, HttpHandler, HttpRequest, HttpEvent, HttpResponse, HttpHeaders }

  from '@angular/common/http';

import { Observable } from 'rxjs';

import { tap } from 'rxjs/operators';

declare var MiniProfiler: any;

@Injectable()

export class MiniProfilerInterceptor implements HttpInterceptor {

  intercept(

    req: HttpRequest<any>,

    next: HttpHandler

  ): Observable<HttpEvent<any>> {

    return next.handle(req).pipe(

        tap(evt => {

            if (evt instanceof HttpResponse) {

              if (evt && evt.headers) {

                this.makeMiniProfilerRequests(evt.headers);

              }

            }

          })

    )

  }

  private makeMiniProfilerRequests(headers: HttpHeaders) {

    const miniProfilerHeaders = headers.getAll('x-miniprofiler-ids');

    if (!miniProfilerHeaders) {

      return;

    }

    miniProfilerHeaders.forEach(miniProfilerIdHeaderValue => {

      const ids = JSON.parse(miniProfilerIdHeaderValue) as string[];

      MiniProfiler.fetchResults(ids);

    });

  }

}
3、在app.module.ts中的配置
import { BrowserModule } from '@angular/platform-browser';

import { NgModule } from '@angular/core';

import { AppComponent } from './app.component';

import { HttpClientModule, HTTP_INTERCEPTORS } from '@angular/common/http';

import { MiniProfilerInterceptor } from './mini-profiler-http';

@NgModule({

  declarations: [

    AppComponent

  ],

  imports: [

    BrowserModule,

    HttpClientModule

  ],

  providers: [{

    provide: HTTP_INTERCEPTORS,

    useClass: MiniProfilerInterceptor, multi: true

  }],

  bootstrap: [AppComponent]

})

export class AppModule { }
4、在app.component.html页面添加一个请求按钮
<div style="text-align:center;margin:100px auto">

  <button (click)="send()">click</button>

</div>
5、页面效果
在vue中显示Miniprofier
和在angular中的操作步骤一致,下面放主要代码:
1、App.vue 主组件
<template>

  <div id="app">

    <MiniProfiler

      :scriptSrc="scriptSrc"

      :dataPath="src"

      :cssSrc="cssSrc"/>

      <Dummy />

  </div>

</template>

<script lang="ts">

import { Component, Vue } from 'vue-property-decorator';

import MiniProfiler from './components/MiniProfiler.vue';

import Dummy from './components/Dummy.vue';

import axios from 'axios';

@Component({

  components: {

    MiniProfiler,

    Dummy,

  },

})

export default class App extends Vue {

  private src: string = 'http://localhost:5000/mini-profiler-resources/';

  private scriptSrc: string = `${this.src}includes.min.js`;

  private cssSrc: string = `${this.src}includes.min.css`;

}

</script>

<style>

#app {

  font-family: 'Avenir', Helvetica, Arial, sans-serif;

  -webkit-font-smoothing: antialiased;

  -moz-osx-font-smoothing: grayscale;

  text-align: center;

  color: #2c3e50;

  margin-top: 60px;

}

</style>
2、Dummy.vue 子组件用于发送接口请求
<template>

    <button type="button" @click="getProfiler">Click Me!</button>

</template>

<script lang="ts">

import { Component, Vue } from 'vue-property-decorator';

import axios from 'axios';

@Component

export default class Dummy extends Vue {

    private getProfiler() {

        axios.get('http://localhost:5000/api/values');

    }

}

</script>
3、MiniProfiler.vue 子组件用于添加拦截器和创建Miniprofier需要的js和css
<template>

</template>

<script lang="ts">

import { Component, Prop, Vue } from 'vue-property-decorator';

import axios from 'axios';

@Component

export default class MiniProfiler extends Vue {

    @Prop({ default: 'mini-profiler' }) private id!: string;

    @Prop() private scriptSrc!: string;

    @Prop() private cssSrc!: string;

    @Prop() private dataPath!: string;

    @Prop({ default: '' }) private dataVersion!: string;

    @Prop({ default: 'right' }) private dataPosition!: string;

    @Prop({ default: true }) private dataChildren!: boolean;

    @Prop({ default: 35 }) private dataMaxTraces!: number;

    @Prop({ default: true }) private dataAuthorized!: boolean;

    @Prop({ default: false }) private dataStartHidden!: string;

    @Prop({ default: 'Alt+P' }) private dataToggleShortcut!: string;

    @Prop({ default: 35 }) private dataTrivialMilliseconds!: number;

    @Prop({ default: true }) private dataTrivial!: boolean;

    @Prop({ default: true }) private dataControls!: boolean;

    @Prop({ default: '' }) private dataCurrentId!: string;

    @Prop({ default: '' }) private dataIds!: string;

    @Prop({ default: true }) private scriptAsync!: boolean;

    @Prop({ default: '' }) private innerHTML!: string;

    private created(): void {

        this.axiosSetUp();

        this.appendDivElement();

        this.appendCssLink();

    }

    private axiosSetUp(): void {

        const key: string = 'MiniProfiler';

        axios.interceptors.response.use(function success(config) {

            const miniProfiler: any = (window as any)[key];

            const miniProfilerIds = JSON.parse(config.headers['x-miniprofiler-ids']) as string[];

            miniProfiler.fetchResults(miniProfilerIds);

            return config;

        }, function bug(error) {

            return Promise.reject(error);

        });

    }

    private appendDivElement(): void {

        const body = document.body as HTMLDivElement;

        const script = document.createElement('script');

        script.innerHTML = this.innerHTML;

        script.src = this.scriptSrc;

        script.setAttribute('data-version', this.dataVersion);

        script.setAttribute('data-path', this.dataPath);

        script.setAttribute('data-position', this.dataPosition);

        script.setAttribute('id', this.id);

        script.setAttribute('data-current-id', this.dataCurrentId);

        script.setAttribute('data-ids', this.dataIds);

        script.setAttribute('data-trivial', this.dataTrivial.toString());

        script.setAttribute('data-children', this.dataChildren.toString());

        script.setAttribute('data-max-traces', this.dataMaxTraces.toString());

        script.setAttribute('data-controls', this.dataControls.toString());

        script.setAttribute('data-authorized', this.dataAuthorized.toString());

        script.setAttribute('data-start-hidden', this.dataStartHidden.toString());

        script.setAttribute('data-toggle-shortcut', this.dataToggleShortcut);

        script.setAttribute('data-trivial-milliseconds', this.dataTrivialMilliseconds.toString());

        script.async = this.scriptAsync;

        body.appendChild(script);

    }

    private appendCssLink(): void {

        const body = document.body as HTMLDivElement;

        const css = document.createElement('link');

        css.href = this.cssSrc;

        css.rel = 'stylesheet';

        body.appendChild(css);

    }

}

</script>
4、界面效果

在swagger中显示Miniprofier
1、将性能分析监测信息从后端发送到Swagger界面。
首先给swagger添加拦截器

拦截器代码如下:
using Microsoft.AspNetCore.Http;

using StackExchange.Profiling;

using Swashbuckle.AspNetCore.Swagger;

using Swashbuckle.AspNetCore.SwaggerGen;

namespace MiniprofilerApi.MiniProfierHelp

{

    public class InjectMiniProfiler : IDocumentFilter

    {

        private readonly IHttpContextAccessor _httpContext;

        public InjectMiniProfiler(IHttpContextAccessor httpContext)

        {

            _httpContext = httpContext;

        }

        public void Apply(SwaggerDocument swaggerDoc, DocumentFilterContext context)

        {

            swaggerDoc.Info.Contact = new Contact()

            {

                Name = MiniProfiler.Current.RenderIncludes(_httpContext.HttpContext).ToString()

            };

        }

    }

}
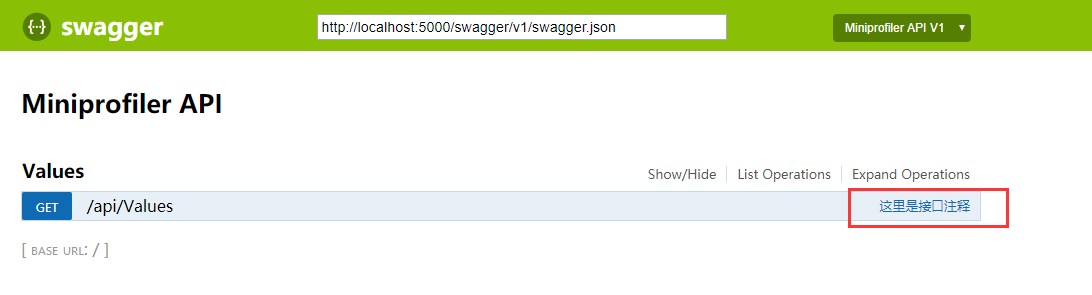
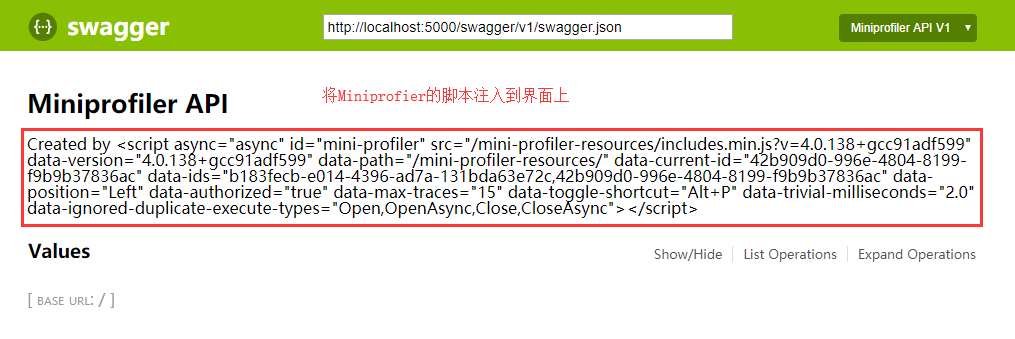
此时运行项目,swagger界面显示如下:
2、通过js解析MIniprofier的脚本,代码如下:
(function () {

    window.angular=true;

    //Create a mini profiler script tag with the right properites

    var MiniProfiler = $('#api_info > div:nth-child(3)').text();

    const attributes = [

        'src', 'data-version', 'data-path', 'data-current-id', 'data-ids',

        'data-position', 'data-trivial-milliseconds', 'data-max-traces',

        'data-authorized', 'data-toggle-shortcut', 'data-ignored-duplicate-execute-types'

    ];

    var GetAttr = function (input, attributeName) {

        const myRegexp = attributeName + '="(.*?)"';

        const re = new RegExp(myRegexp, "g");

        const match = re.exec(input);

        return match[1];

    }

    var s = document.createElement("script");

    s.type = "text/javascript";

    s.id = "mini-profiler";

    s.async = true;

    for (var i = 0; i < attributes.length; i++) {

        var element = attributes[i];

        s.setAttribute(element, GetAttr(MiniProfiler, element));

    }

    document.body.appendChild(s);

    // Remove injected tag from view

    $('#api_info > div:nth-child(3)').text('');

})();
配置swagger执行js:

3、界面效果如下:
全部源代码见:https://github.com/zrkcode/Miniprofiler.git
监听EF执行的Sql语句或更多NetCore+Miniprofiler相关配置见:https://miniprofiler.com/dotnet/AspDotNetCore
更多Swagger+NetCore配置见:https://docs.microsoft.com/en-us/aspnet/core/tutorials/getting-started-with-swashbuckle?view=aspnetcore-2.2&tabs=visual-studio
Miniprofiler在swagger、vue、angular中的使用的更多相关文章
- angular.js和vue.js中实现函数去抖(debounce)
问题描述 搜索输入框中,只当用户停止输入后,才进行后续的操作,比如发起Http请求等. 学过电子电路的同学应该知道按键防抖.原理是一样的:就是说当调用动作n毫秒后,才会执行该动作,若在这n毫秒内又调用 ...
- Vue.js中Directive知识
近期所学的Vue.js这个MVVM前端技术缓解了我一直愁于前后端开发杂糅所带来的痛苦.今天就来说说关于Vue.js里面的Directive知识. Directive Directive看上去虽然和An ...
- Angular中的数据绑定
(1)HTML绑定:{{}} (2)属性绑定:[] 注意:属性绑定通常赋值为变量,如果赋值为常量(如字符串常量) 必须用引号括起来,如<img [src]="'../../assets ...
- .net core WebAPI性能监控-MiniProfiler与Swagger集成
------------恢复内容开始------------ 安装Nuget Install-Package MiniProfiler.AspNetCore.Mvc Install-Package M ...
- Angular中ngCookies模块介绍
1.Cookie介绍 Cookie总是保存在客户端中,按在客户端中的存储位置,可分为内存Cookie和硬盘Cookie.内存Cookie由浏览器维护,保存在内存中,浏览器关闭后就消失了,其存在时间是短 ...
- 在使用 vscode 时 eslint 检测 .vue 文件中的less 部分内容
问题: 在使用 vscode 以及 eslint 来检测 基于 webpack 的 vue-cli 的项目中,eslint 无法检测到 .vue 文件中的less 部分内容. 解答: 1.通过 下载 ...
- angular 中父元素ng-repeat后子元素ng-click失效
在angular中使用ng-repeat后ng-click失效,今天在这个上面踩坑了.特此记录一下. 因为ng-repeat创造了新的SCOPE.如果要使用这个scope的话就必须使用$parent来 ...
- angular中的compile和link函数
angular中的compile和link函数 前言 这篇文章,我们将通过一个实例来了解 Angular 的 directives (指令)是如何处理的.Angular 是如何在 HTML 中找到这些 ...
- Deferred在jQuery和Angular中的使用与简单实现
Deferred在jQuery和Angular中的使用与简单实现 Deferred是在jQuery1.5版本中加入的,并且jQuery使用它完全重写了AJax,以前也只是偶尔使用.但是上次在使用Ang ...
随机推荐
- day3:vcp考试
Q41. An administrator creates a custom ESXi firewall rule using an XML file, however the rules do no ...
- [leetcode]215. Kth Largest Element in an Array 数组中第k大的元素
Find the kth largest element in an unsorted array. Note that it is the kth largest element in the so ...
- error: In function ‘void* opencv_showimg(void*)’:
今天这个问题折磨了我一下午,终于知道是为什么了,心酸历程.....赶紧来记录一下 错误: /home/wj/workspace/Loitor_VI_Sensor_SDK_V1./SDK/src/cam ...
- 无法启动MYSQL服务”1067 进程意外终止”解决的方法——汇总及终极方法
自己一開始依照百度经验里的方法--<MySQL下载安装.配置与使用(win7x64)>去安装和配置,可是到后面步骤总是出现1067代号的错误. 慢慢折腾去解决. 这里汇总各种导致mysql ...
- PAT 1057 数零壹 (20)(代码+思路)
1057 数零壹(20 分) 给定一串长度不超过 105 的字符串,本题要求你将其中所有英文字母的序号(字母 a-z 对应序号 1-26,不分大小写)相加,得到整数 N,然后再分析一下 N 的二 ...
- MEME(Motif-based sequence analysis tools)使用说明
MEME(Motif-based sequence analysis tools)使用说明 2011-05-27 ~ ADMIN MEME是用于从一堆序列中搜索功能结构域的工具.比如说当你拿到了许多C ...
- 连接redis
- vue组件介绍
https://www.cnblogs.com/Leo_wl/p/5863185.html vue.js说说组件 什么是组件:组件是Vue.js最强大的功能之一.组件可以扩展HTML元素,封装可重 ...
- 【Linux】MySQL配置
安装环境/工具 Linux( centOS 版) MySQL(MySQL-5.6.28-1.el7.x86_64.rpm-bundle.tar版) MySQL的目录结构 安装已经说过了,这里不再说了 ...
- 2018.10.20 bzoj1925: [Sdoi2010]地精部落(dp)
传送门 dp好题. 设f[i][j]f[i][j]f[i][j]表示iii个数结尾是jjj且结尾两个数递增的方案数. 那么显然可以对称的定义出g[i][j]g[i][j]g[i][j]表示iii个数结 ...