[svc]logstash和filebeat之间ssl加密
cfssl生成证书
wget https://pkg.cfssl.org/R1.2/cfssl_linux-amd64 -O /usr/local/bin/cfsslwget https://pkg.cfssl.org/R1.2/cfssljson_linux-amd64 -O /usr/local/bin/cfssljsonwget https://pkg.cfssl.org/R1.2/cfssl-certinfo_linux-amd64 -O /usr/local/bin/cfssl-certinfochmod +x /usr/local/bin/cfssl*cd;mkdir keys;cd keyscat > ca-config.json <<EOF{"signing": {"default": {"expiry": "8760h"},"profiles": {"app": {"usages": ["signing","key encipherment","server auth","client auth"],"expiry": "8760h"}}}}EOFcat > ca-csr.json <<EOF{"CN": "k8s","key": {"algo": "rsa","size": 2048},"names": [{"C": "CN","ST": "BeiJing","L": "BeiJing","O": "k8s","OU": "System"}]}EOFcfssl gencert -initca ca-csr.json | cfssljson -bare cacd /root/keyscat > app-csr.json <<EOF{"CN": "app","hosts": ["127.0.0.1","192.168.1.11","192.168.1.12"],"key": {"algo": "rsa","size": 2048},"names": [{"C": "CN","ST": "BeiJing","L": "BeiJing","O": "k8s","OU": "System"}]}EOFcfssl gencert -ca=/root/keys/ca.pem \-ca-key=/root/keys/ca-key.pem \-config=/root/keys/ca-config.json \-profile=app app-csr.json | cfssljson -bare appopenssl x509 -noout -text -in app.pem
可以看到san里包含了n1 和 n2的ip. 这里计划logstash(的ip)和filebeat(的ip)使用同一套证书
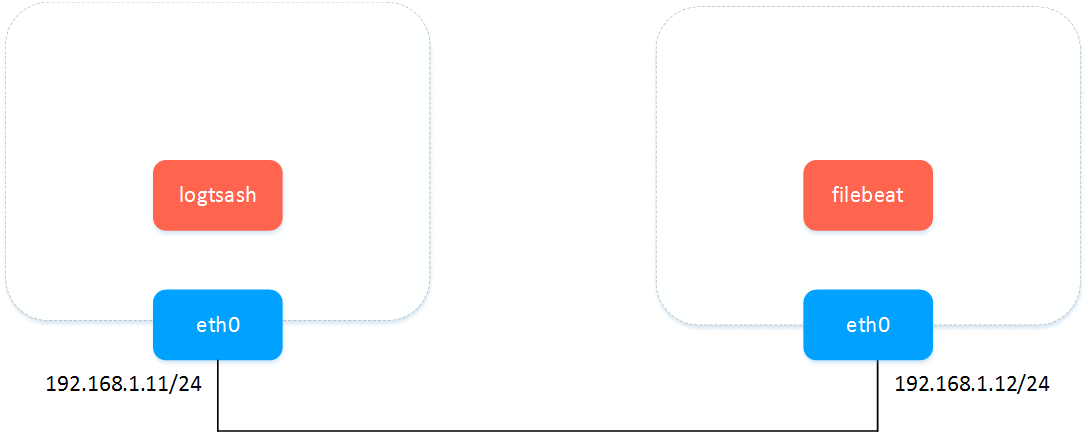
实验环境
logstash&filebeat之间传数据-明文
logstash配置
cat > pipeline.conf <<EOFinput {beats {port => 5044}stdin {codec => "json"}}output {stdout { codec => rubydebug }}EOFbin/logstash -f pipeline.conf --config.reload.automatic
filebeat多输入(不能多输出)参考: https://www.elastic.co/guide/en/beats/filebeat/current/migration-configuration.html
cat > filebeat.yml <<EOFfilebeat.prospectors:- type: logenabled: truepaths:- /tmp/ma.txt- type: stdinoutput.logstash:hosts: ["192.168.1.11:5044"]# output.console:# pretty: trueEOF./filebeat -e -c filebeat.yml -d "publish"
测试文字
helloworld helloworld helloworld helloworld helloworld helloworld helloworld helloworld helloworld helloworld helloworld helloworld helloworld helloworld helloworld helloworld helloworld helloworld helloworld helloworld helloworld helloworld helloworld helloworld helloworld helloworld helloworld helloworld helloworld helloworld helloworld helloworld helloworld helloworld helloworld helloworld helloworld helloworld helloworld helloworld helloworld helloworld helloworld helloworld helloworld helloworld helloworld helloworld helloworld helloworld helloworld helloworld helloworld helloworld helloworld helloworld helloworld helloworld helloworld helloworld helloworld helloworld helloworld helloworld helloworld helloworld helloworld helloworld helloworld helloworld helloworld helloworld helloworld helloworld helloworld helloworld helloworld helloworld helloworld helloworld helloworld helloworld helloworld helloworld helloworld helloworld helloworld
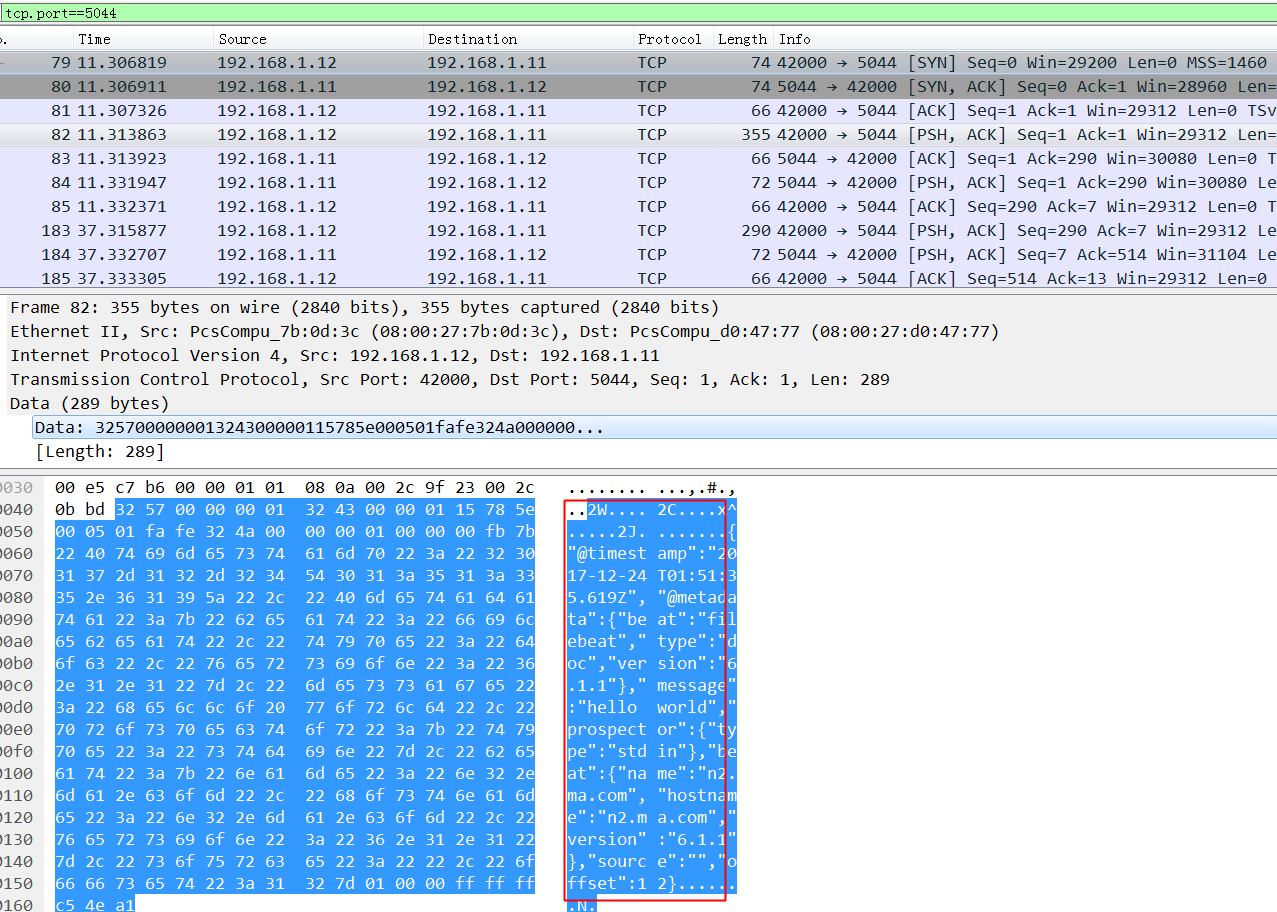
wireshark抓包: 不加密的时候,可以看到这玩意依稀可以看到依稀传输内容,如果互联网传输的话会有隐患.
logstash&filebeat之间传数据-ssl加密
- logstash配置ssl
参考: https://www.elastic.co/guide/en/beats/filebeat/current/configuring-ssl-logstash.html
cat > pipeline.conf <<EOFinput {beats {port => 5044ssl => truessl_certificate_authorities => ["/root/keys/ca.pem"]ssl_certificate => "/root/keys/app.pem"ssl_key => "/root/keys/app-key.pem"ssl_verify_mode => "force_peer"}stdin {codec => "json"}}output {stdout { codec => rubydebug }}EOFbin/logstash -f pipeline.conf --config.reload.automatic
- filebeat配置ssl
filebeat.prospectors:- type: logenabled: truepaths:- /tmp/ma.txtoutput.logstash:hosts: ["192.168.1.12:5043"]output.logstash.ssl.certificate_authorities: ["/root/keys/ca.pem"]output.logstash.ssl.certificate: "/root/keys/app.pem"output.logstash.ssl.key: "/root/keys/app-key.pem"output.console:pretty: true./filebeat -e -c filebeat.yml -d "publish"
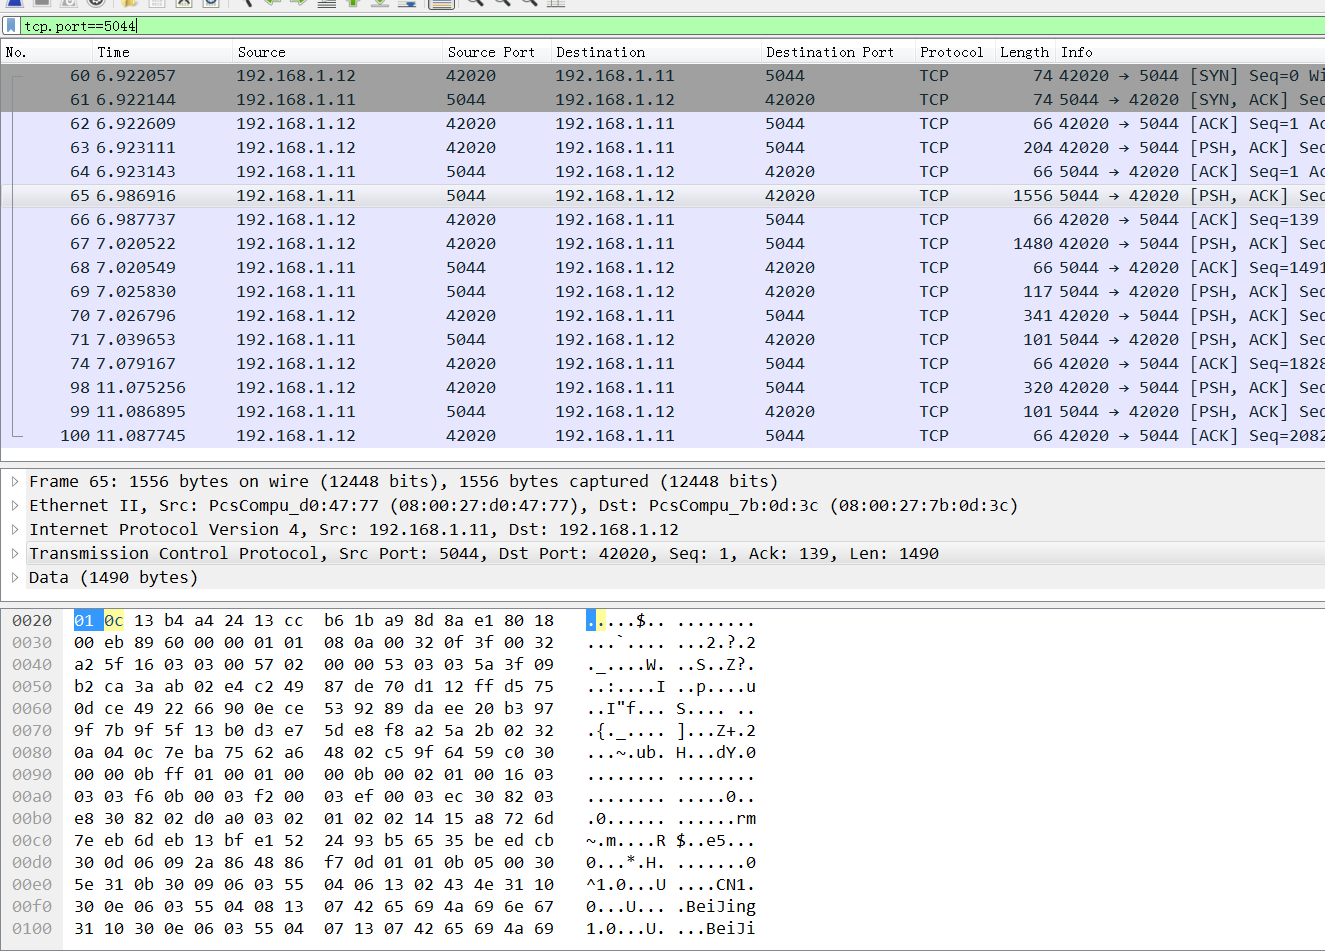
wireshark抓包: 看不到任何传输内容,依稀看到证书的subject(公开的).
报错doesn't contain any IP SANs
2017/12/24 02:33:59.242540 output.go:74: ERR Failed to connect: x509: cannot validate certificate for 192.168.1.11 because it doesn't contain any IP SANs2017/12/24 02:34:15.289558 output.go:74: ERR Failed to connect: x509: cannot validate certificate for 192.168.1.11 because it doesn't contain any IP SANs
ssl验证流程:
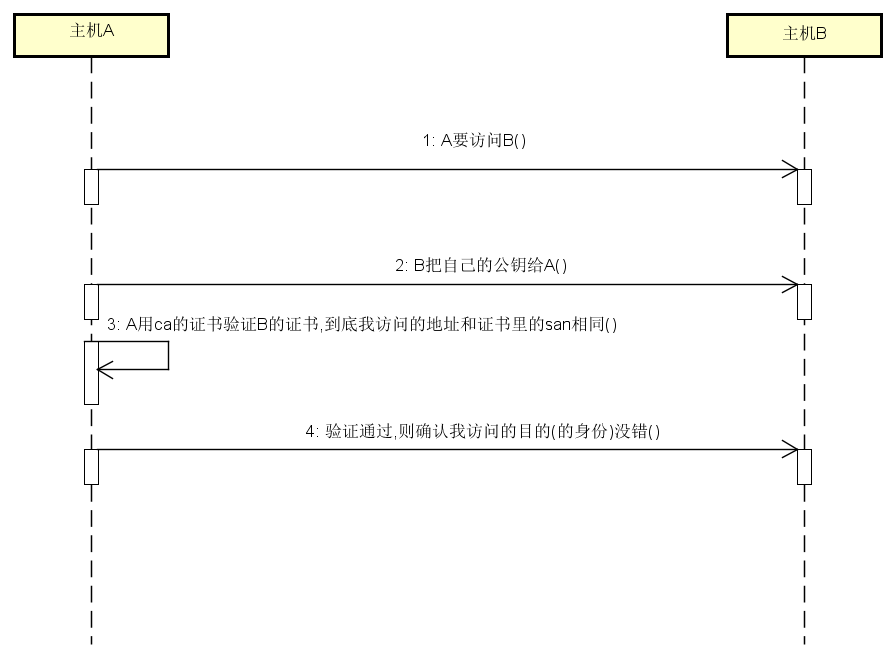
报错原因: 我生成证书请求的时候 hosts字段(即san)为空.
cd /root/keyscat > app-csr.json <<EOF{"CN": "192.168.1.12","hosts": [],"key": {"algo": "rsa","size": 2048},"names": [{"C": "CN","ST": "BeiJing","L": "BeiJing","O": "k8s","OU": "System"}]}EOFcfssl gencert -ca=/root/keys/ca.pem \-ca-key=/root/keys/ca-key.pem \-config=/root/keys/ca-config.json \-profile=app app-csr.json | cfssljson -bare appopenssl x509 -noout -text -in app.pem
[svc]logstash和filebeat之间ssl加密的更多相关文章
- Filebeat与Logstash配置SSL加密通信
为了保证应用日志数据的传输安全,我们可以使用SSL相互身份验证来保护Filebeat和Logstash之间的连接. 这可以确保Filebeat仅将加密数据发送到受信任的Logstash服务器,并确保L ...
- Chapter 1 Securing Your Server and Network(5):使用SSL加密会话
原文:Chapter 1 Securing Your Server and Network(5):使用SSL加密会话 原文出处:http://blog.csdn.net/dba_huangzj/art ...
- ELK 架构之 Logstash 和 Filebeat 配置使用(采集过滤)
相关文章: ELK 架构之 Elasticsearch 和 Kibana 安装配置 ELK 架构之 Logstash 和 Filebeat 安装配置 ELK 使用步骤:Spring Boot 日志输出 ...
- 利用Fiddler和Wireshark解密SSL加密流量
原文地址:http://kelvinh.github.io/blog/2014/01/12/decrypt-ssl-using-fiddler-and-wireshark/ Fiddler是一个著名的 ...
- Vsftpd支持SSL加密传输
ftp传输数据是明文,弄个抓包软件就可以通过数据包来分析到账号和密码,为了搭建一个安全性比较高ftp,可以结合SSL来解决问题 SSL(Secure Socket Layer)工作于传输层和应用程 ...
- .net mvc 站点自带简易SSL加密传输 Word报告自动生成(例如 导出数据库结构) 微信小程序:动画(Animation) SignalR 设计理念(一) ASP.NET -- WebForm -- ViewState ASP.NET -- 一般处理程序ashx 常用到的一些js方法,记录一下 CryptoJS与C#AES加解密互转
.net mvc 站点自带简易SSL加密传输 因项目需要,传输数据需要加密,因此有了一些经验,现简易抽出来分享! 请求:前端cryptojs用rsa/aes 或 rsa/des加密,后端.net ...
- 170228、Linux操作系统安装ELK stack日志管理系统--(1)Logstash和Filebeat的安装与使用
安装测试环境:Ubuntu 16.04.2 LTS 前言 (1)ELK是Elasticsearch,Logstash,Kibana 开源软件的集合,对外是作为一个日志管理系统的开源方案.它可以从任何来 ...
- YS端对端之间SSL通信安全问题
1.简介: 传统的互联网,SSL通信主要基于客户端和服务器之间,在物联网时代,端和端之间的加密通信将变得很普遍,在YS业务中主要的端和端通信为: (1).客户端(移动APP,YS工作 ...
- spice在桌面虚拟化中的应用系列之三(USB映射实现,SSL加密,密码认证,多客户端支持)
本系列其它文章 spice在桌面虚拟化中的应用系列之一(spice简介,性能优化等) spice在桌面虚拟化中的应用系列之二(Linux平台spice客户端的编译安装,支持USB映射) 1.spice ...
随机推荐
- android 动画具体解释(二)
以下就開始学习属性动画的基本使用方法,我们来看属性动画的继承关系,例如以下如所看到的: 显然关注的焦点应该是ValueAnimator,ObjectAnimator这两个类啦,ObjectAnimat ...
- AsyncTask 和 Thread 区别
一.AsyncTask是封装好的线程池,比起Thread+Handler的方式,AsyncTask在操作UI线程上更方便,因为onPreExecute().onPostExecute()及更新UI方法 ...
- git 使用流程(使用代码库github)
一:先在github 上注册账号,并创建一个项目: 二:mac 命令行-进入自己的工作空间 1:建立库 git init 2:初始化配置 git config --global user.na ...
- OSX: SSH密钥使用日记(1)
大家都知道,一个悠久的历史故事,使用SSH密钥对就可以不用密码登陆远程计算机.经典资料也是不少,不过那些资料对新学者可是有点太不象人话了,不好理解.所以本文试图用更人性一点的语言解释,并演示如何在Ma ...
- angular中如何监控dom渲染完毕
刚刚看到群上一个人说,他们公司凡是用angular和jquery插件一起用的人,都被解雇了,没看到这句话之前我很惭愧的说我有这样用过,其实angular的生态系统那么完善,完全可以不用去操作任何的do ...
- 【原创】浅析密码学在互联网支付中的应用|RSA,Hash,AES,DES,3DES,SHA1,SHA256,MD5,SSL,Private Key,Public Key
一)概述 什么是互联网支付? 当支付遇到互联网,一场革命自然不可避免.成为现实的是传统的现金支付已经“退居二线”,各种在线支付方式成为人们日常消费的主要支付方式.银行推出的网银以及第三方支付公司推出的 ...
- 在notepad++中运行python代码
#在notepad++中运行python代码 ''' 1.安装插件pyNPP, 2.允许插件pyNPP中的第一个和第二个选项即可,如果代码过少代码执行一闪而过,可能无法看到,可加入少量sleep时间即 ...
- jQuery 源码学习笔记
//检测 window 中新增的对象 //first var oldMap = {}; for(var i in window) { oldMap[i] = 1; } //second for(var ...
- JDBC 实例--JDBC通过工具类DBUtil连接到数据库,让我们不再恐惧操作数据库
利用JDBC连接到数据库一般需要几个步骤: 1.装载驱动程序. 2.建立连接. 3.发送和执行SQL语句. 4.释放资源 首先建立一个数据库: 脚本如下: create database csdn; ...
- 交叉编译OpenWrt 定制固件
在Centos7上交叉编译生成OpenWrt固件 安装ss-* 获取最新的ss, 当前是 wget https://github.com/shadowsocks/shadowsocks-libev/a ...