【Java EE 学习 53】【Spring学习第五天】【Spring整合Hibernate】【Spring整合Hibernate、Struts2】【问题:整合hibernate之后事务不能回滚】
一、Spring整合Hibernate
1.如果一个DAO 类继承了HibernateDaoSupport,只需要在spring配置文件中注入SessionFactory就可以了;如果一个DAO类没有继承HibernateDaoSupport,需要有一个HibernateTemplate的属性,并且在配置文件中进行注入。注意,之前使用的是JdbcDaoSupport和JdbcTemplate,传递的是DataSource,现在使用的是HibernateDaoSupport和HibernateTemplate,传递的是SessionFactory。
2.整合Spring整合Hibernate示例。
(1)hibernate.cfg.xml配置文件
 <?xml version="1.0" encoding="UTF-8"?>

 <!DOCTYPE hibernate-configuration PUBLIC

         "-//Hibernate/Hibernate Configuration DTD 3.0//EN"

         "http://www.hibernate.org/dtd/hibernate-configuration-3.0.dtd">

 <hibernate-configuration>

 <session-factory>

     <property name="connection.driver_class">

         com.mysql.jdbc.Driver

     </property>

     <property name="connection.username">root</property>

     <property name="connection.password">5a6f38</property>

     <property name="connection.url">

         jdbc:mysql://localhost:3306/test

     </property>

     <property name="show_sql">true</property>

     <property name="hbm2ddl.auto">update</property>

     <property name="dialect">

         org.hibernate.dialect.MySQLDialect

     </property>

     <property name="javax.persistence.validation.mode">none</property>

     <mapping resource="com/kdyzm/spring/hibernate/xml/Course.hbm.xml" />

 </session-factory>

 </hibernate-configuration>
hibernate.cfg.xml
(2)几个类
 package com.kdyzm.spring.hibernate.xml;

 import java.io.Serializable;

 /*

  * 课程类

  */

 public class Course implements Serializable{

     private static final long serialVersionUID = 3765276226357461359L;

     private Long cid;

     private String cname;

     public Course() {

     }

     @Override

     public String toString() {

         return "Course [cid=" + cid + ", cname=" + cname + "]";

     }

     public Long getCid() {

         return cid;

     }

     public void setCid(Long cid) {

         this.cid = cid;

     }

     public String getCname() {

         return cname;

     }

     public void setCname(String cname) {

         this.cname = cname;

     }

 }
com.kdyzm.spring.hibernate.xml.Course
 package com.kdyzm.spring.hibernate.xml;

 public interface CourseDao {

     public Course getCourse(Long cid);

     public Course updateCourse(Course course);

     public Course deleteCourse(Course course);

     public Course addCourse(Course course);

 }
com.kdyzm.spring.hibernate.xml.CourseDao
一个非常重要的类:com.kdyzm.spring.hibernate.xml.CourseDaoImpl
 package com.kdyzm.spring.hibernate.xml;

 import org.springframework.orm.hibernate3.HibernateTemplate;

 public class CourseDaoImpl implements CourseDao{

     //这里使用HibernateTemplate,而不是使用JdbcTemplate

     private HibernateTemplate hibernateTemplate;

     public HibernateTemplate getHibernateTemplate() {

         return hibernateTemplate;

     }

     public void setHibernateTemplate(HibernateTemplate hibernateTemplate) {

         this.hibernateTemplate = hibernateTemplate;

     }

     @Override

     public Course getCourse(Long cid) {

         return (Course) this.getHibernateTemplate().get(Course.class, cid);

     }

     @Override

     public Course updateCourse(Course course) {

         this.getHibernateTemplate().update(course);

         return course;

     }

     @Override

     public Course deleteCourse(Course course) {

         this.getHibernateTemplate().delete(course);

         return course;

     }

     @Override

     public Course addCourse(Course course) {

         this.getHibernateTemplate().saveOrUpdate(course);

         return course;

     }

 }
这里使用HibernateTemplate作为成员变量,也可以继承HibernateDaoSupport类,效果是相同的。
 package com.kdyzm.spring.hibernate.xml;

 public interface CourseService {

     public Course getCourse(Long cid);

     public Course updateCourse(Course course);

     public Course deleteCourse(Course course);

     public Course addCourse(Course course);

 }
com.kdyzm.spring.hibernate.CourseService
 package com.kdyzm.spring.hibernate.xml;

 public class CourseServiceImpl implements CourseService{

     private CourseDao courseDao;

     public CourseDao getCourseDao() {

         return courseDao;

     }

     public void setCourseDao(CourseDao courseDao) {

         this.courseDao = courseDao;

     }

     @Override

     public Course getCourse(Long cid) {

         return courseDao.getCourse(cid);

     }

     @Override

     public Course updateCourse(Course course) {

         return courseDao.updateCourse(course);

     }

     @Override

     public Course deleteCourse(Course course) {

         return courseDao.deleteCourse(course);

     }

     @Override

     public Course addCourse(Course course) {

         return courseDao.addCourse(course);

     }

 }
com.kdyzm.spring.hibernate.xml.CourseServiceImpl
最后:测试代码
 ApplicationContext context=new ClassPathXmlApplicationContext("com/kdyzm/spring/hibernate/xml/applicationContext.xml");

 2 CourseService courseService=(CourseService) context.getBean("courseService");

 3 Course course = new Course();

 //        course.setCid(11L);

 5 course.setCname("赵日天");

 6 courseService.addCourse(course);

 7 course =new Course();

 8 course.setCname("王大锤");

         //通过/0的异常测试事务回滚!

 //        int a=1/0;

11 courseService.addCourse(course);
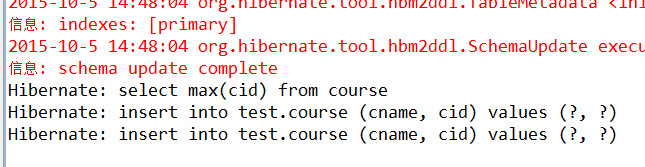
运行结果:
(3)com/kdyzm/spring/hibernate/xml/applicationContext.xml配置文件
 <?xml version="1.0" encoding="UTF-8"?>

 <beans xmlns="http://www.springframework.org/schema/beans"

     xmlns:xsi="http://www.w3.org/2001/XMLSchema-instance"

     xmlns:context="http://www.springframework.org/schema/context"

     xmlns:aop="http://www.springframework.org/schema/aop"

     xmlns:tx="http://www.springframework.org/schema/tx"

     xsi:schemaLocation="

            http://www.springframework.org/schema/beans http://www.springframework.org/schema/beans/spring-beans-2.5.xsd

            http://www.springframework.org/schema/context http://www.springframework.org/schema/context/spring-context-2.5.xsd

            http://www.springframework.org/schema/aop http://www.springframework.org/schema/aop/spring-aop-2.5.xsd

            http://www.springframework.org/schema/tx http://www.springframework.org/schema/tx/spring-tx-2.5.xsd

            ">

     <!-- 将hibernate.cfg.xml配置文件导入进来 -->

     <bean id="sessionFactory" class="org.springframework.orm.hibernate3.LocalSessionFactoryBean">

         <property name="configLocation">

             <value>classpath:hibernate.cfg.xml</value>

         </property>

     </bean>

     <!-- 程序员做的事情 -->

     <bean id="hibernateTemplate" class="org.springframework.orm.hibernate3.HibernateTemplate">

         <property name="sessionFactory" ref="sessionFactory"></property>

     </bean>

     <bean id="courseDao" class="com.kdyzm.spring.hibernate.xml.CourseDaoImpl">

         <property name="hibernateTemplate" ref="hibernateTemplate"></property>

     </bean>

     <bean id="courseService" class="com.kdyzm.spring.hibernate.xml.CourseServiceImpl">

         <property name="courseDao">

             <ref bean="courseDao"/>

         </property>

     </bean>

     <!-- Spring容器做的事情 -->

     <!-- 定义事务管理器 -->

     <bean id="hibernateTransactionManager" class="org.springframework.orm.hibernate3.HibernateTransactionManager">

         <property name="sessionFactory" ref="sessionFactory"></property>

     </bean>

     <!-- 哪些通知需要开启事务模板 -->

     <tx:advice id="advice" transaction-manager="hibernateTransactionManager">

         <tx:attributes>

             <tx:method name="add*" isolation="DEFAULT" propagation="REQUIRED" read-only="false"/>

         </tx:attributes>

     </tx:advice>

     <!-- 配置切面表达式和通知 -->

     <aop:config>

         <aop:pointcut expression="execution(* com.kdyzm.spring.hibernate.xml.*ServiceImpl.*(..))" id="perform"/>

         <aop:advisor advice-ref="advice" pointcut-ref="perform"/>

     </aop:config>

 </beans>
3.总结和分析
(1)和使用JDBC的流程基本上是相同的,需要在配置文件中注入SessionFactory对象,注入HibernateTemplate对象。
(2)以上的程序事务回滚没有实现!!!!原因不明
二、Spring整合Hibernate,使用注解的形式。
1.在配置文件中使用spring的自动扫描机制。
<context:component-scan base-package="com.kdyzm.spring.hibernate.xml"></context:component-scan>
2.在配置文件中引入注解解析器(需要指定事务管理器)
<tx:annotation-driven transaction-manager="hibernateTransactionManager"/>
3.在service层通过@Transaction进行注解。
三、Struts2自定义结果集
1.struts-default.xml文件中定义了一些结果集类型。
 <result-types>

             <result-type name="chain" class="com.opensymphony.xwork2.ActionChainResult"/>

             <result-type name="dispatcher" class="org.apache.struts2.dispatcher.ServletDispatcherResult" default="true"/>

             <result-type name="freemarker" class="org.apache.struts2.views.freemarker.FreemarkerResult"/>

             <result-type name="httpheader" class="org.apache.struts2.dispatcher.HttpHeaderResult"/>

             <result-type name="redirect" class="org.apache.struts2.dispatcher.ServletRedirectResult"/>

             <result-type name="redirectAction" class="org.apache.struts2.dispatcher.ServletActionRedirectResult"/>

             <result-type name="stream" class="org.apache.struts2.dispatcher.StreamResult"/>

             <result-type name="velocity" class="org.apache.struts2.dispatcher.VelocityResult"/>

             <result-type name="xslt" class="org.apache.struts2.views.xslt.XSLTResult"/>

             <result-type name="plainText" class="org.apache.struts2.dispatcher.PlainTextResult" />

             <result-type name="postback" class="org.apache.struts2.dispatcher.PostbackResult" />

         </result-types>
struts-default.xml配置文件中对结果集类型的定义
2.我们可以通过实现Result接口或者继承StrutsResultSupport类自己定义结果集类型
* 如果我们不需要跳转页面(使用了Ajax),则实现Result接口
* 如果我们需要在业务逻辑处理完毕之后进行页面的跳转(重定向或者转发),则继承StrutsResultSupport类。
3.自定义结果集小案例
(1)自定义结果集类型com.kdyzm.struts2.myresult.MyResult.java,这里继承了StrutsResultSupport类,这里的代码模仿了DispatcherResult类中的写法。
自定义结果集类型中的核心写法已经重点标注。
 package com.kdyzm.struts2.myresult;

 import javax.servlet.RequestDispatcher;

 import javax.servlet.http.HttpServletRequest;

 import javax.servlet.http.HttpServletResponse;

 import org.apache.struts2.ServletActionContext;

 import org.apache.struts2.dispatcher.StrutsResultSupport;

 import com.opensymphony.xwork2.ActionInvocation;

 public class MyResult extends StrutsResultSupport{

     private static final long serialVersionUID = 8851051594485015779L;

     @Override

     protected void doExecute(String finalLocation, ActionInvocation invocation)

             throws Exception {

         System.out.println("执行了自定义的 结果集类型!");

         HttpServletRequest request=ServletActionContext.getRequest();

         HttpServletResponse response = ServletActionContext.getResponse();

         RequestDispatcher requestDispatcher = request.getRequestDispatcher(finalLocation);

         requestDispatcher.forward(request, response);

     }

 }
(2)测试Action:com.kdyzm.struts2.myresult.MyResultAction.java
 package com.kdyzm.struts2.myresult;

 import com.opensymphony.xwork2.ActionSupport;

 public class MyResultAction extends ActionSupport {

     private static final long serialVersionUID = -6710770364035530645L;

     @Override

     public String execute() throws Exception {

         return super.execute();

     }

     public String add() throws Exception{

         return "myresult";

     }

 }
(3)局部配置文件com.kdyzm.strus2.myresult.myResult_struts.xml
<?xml version="1.0" encoding="utf-8" ?>

<!DOCTYPE struts PUBLIC

    "-//Apache Software Foundation//DTD Struts Configuration 2.3//EN"

    "http://struts.apache.org/dtds/struts-2.3.dtd">

<struts>

    <package name="myResult" namespace="/myResultNamespace" extends="struts-default">

        <!-- 自定义结果集类型 -->

        <result-types>

            <result-type name="myResult" class="com.kdyzm.struts2.myresult.MyResult"></result-type>

        </result-types>

        <action method="add" name="myResultAction" class="com.kdyzm.struts2.myresult.MyResultAction">

            <result name="myresult" type="myResult">

                <param name="location">

                    /main/index.jsp

                </param>

            </result>

        </action>

    </package>

</struts>
(4)classpath:struts.xml
 <?xml version="1.0" encoding="utf-8" ?>

 <!DOCTYPE struts PUBLIC

     "-//Apache Software Foundation//DTD Struts Configuration 2.3//EN"

     "http://struts.apache.org/dtds/struts-2.3.dtd">

     <!-- namespace一定要加上/,否则一般会报错! -->

 <struts>

     <package name="kdyzm" extends="struts-default" namespace="/kdyzm_namespace">

         <action name="helloAction" class="com.kdyzm.struts2.test.HelloWorldAction" method="execute">

             <result name="kdyzm_result">

                 /main/index.jsp

             </result>

         </action>

     </package>

 <include file="com/kdyzm/struts2/myresult/myResult_struts.xml"></include></struts>
struts.xml
(5)测试Jsp
<a href="${pageContext.servletContext.contextPath}/myResultNamespace/myResultAction.action">

            测试自定义结果集

</a>
(6)跳转到/main/index.jsp,显示出

四、SSH整合
1.整合的第一步:导入jar包,在/WEB-INF/lib文件夹下,按照功能划分为几个文件夹,分别存放不同类型的jar包。
* common:存放公共包
* db:存放数据库驱动包
* hibernate:存放hiberante相关包
* junit:存放单元测试相关包
* spring:存放spring相关包
* struts2:存放struts2相关包
尽可能的将jar包关联上源代码,便于代码追踪和书写。
2.创建三个项目资源文件夹和对应的包
(1)src:存放源代码
* dao
* dao.impl
* service:
* service.impl
* struts.action
* domain
(2) config:存放配置文件
* hibernate
* hibernate.cfg.xml
* spring
* applicationContext-db.xml
* applicationContext-person.xml
* applicationContext.xml
* struts2
struts-user.xml
struts.xml
(3)test:单元测试
3.SSH整合的jar包、关键类文件和配置文件
(1)Spring和Hibernate的整合过程见前面的笔记。
(2)关键的就是Spring和Struts2的整合
(3)Spring和Struts2整合需要一个关键的jar包:struts-spring-plugin-x.x.x.jar,该jar包可以在struts2项目中的lib文件夹中找到。
(4)在struts-spring-plugin.x.x.x.jar包中有一个非常重要的配置文件:struts-plugin.xml配置文件,该配置文件中的配置会覆盖掉struts-default.xml中的配置。
(5)需要在struts.xml配置文件中进行如下配置:
<constant name="struts.objectFactory" value="spring"></constant>
进行这样的配置之前必须导入struts-spring-plugin.x.x.x.jar包。
能够这样配置的依据是该jar包中的struts-plugin.xml配置文件中的配置:
<bean type="com.opensymphony.xwork2.ObjectFactory" name="spring" class="org.apache.struts2.spring.StrutsSpringObjectFactory" />
(6)怎样将Spring容器的初始化和Web服务器绑定在一起,使得服务器启动之后Spring容器就已经初始化成功。
解决方案就是在web.xml配置文件中添加一项监听器的配置。
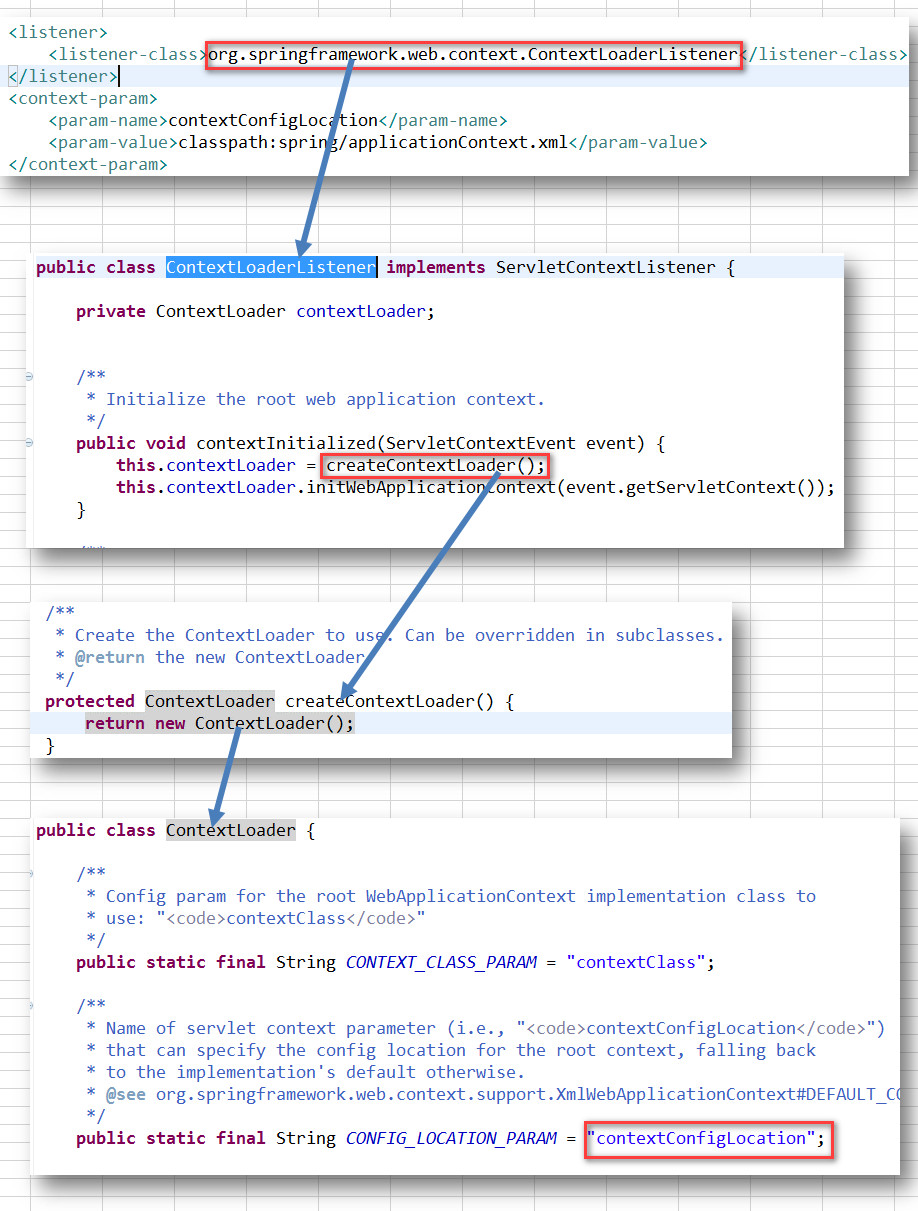
 <listener>

         <listener-class>org.springframework.web.context.ContextLoaderListener</listener-class>

     </listener>

     <context-param>

         <param-name>contextConfigLocation</param-name>

         <param-value>classpath:spring/applicationContext.xml</param-value>

     </context-param>
其中param-name标签中的内容contextConfigLocation是固定字符串,不能更改。contextConfigLocation字符串的出处:
(7)applicationContext.xml配置文件默认位置为:/WEB-INF/applicationContext.xml,通过XmlWebApplicationContext.xml配置文件就可以看出来。
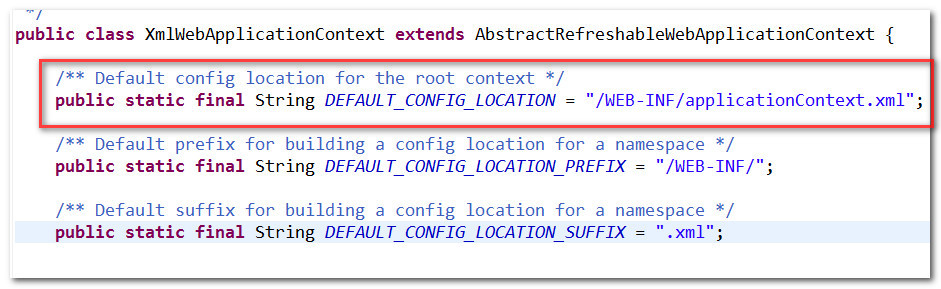
所以,如果applicationContext.xml在/WEB-INF目录下的话,就不需要再配置
<context-param>

         <param-name>contextConfigLocation</param-name>

          <param-value>classpath:spring/applicationContext.xml</param-value>

      </context-param>
了。
五、整合模板代码
https://github.com/kdyzm/day53_ssh_merge
【Java EE 学习 53】【Spring学习第五天】【Spring整合Hibernate】【Spring整合Hibernate、Struts2】【问题:整合hibernate之后事务不能回滚】的更多相关文章
- Spring事务管理——回滚(rollback-for)控制
探讨Spring事务控制中,异常触发事务回滚原理.文章进行了6种情况下的Spring事务是否回滚. 以下代码都是基于Spring与Mybatis整合,使用Spring声明式事务配置事务方法. 1.不捕 ...
- Spring事务管理回滚问题
Spring事务管理不能回滚问题 在前段时间学习SpringMVC的练习中,碰到声明式事务管理时,事务不能回滚的情况,通过查看博客和资料,解决了问题. 原因 导致Spring事务管理不能回滚的原因有两 ...
- Spring事务异常回滚,捕获异常不抛出就不会回滚(转载) 解决了我一年前的问题
最近遇到了事务不回滚的情况,我还考虑说JPA的事务有bug? 我想多了....... 为了打印清楚日志,很多方法我都加tyr catch,在catch中打印日志.但是这边情况来了,当这个方法异常 ...
- Spring事务不回滚原因分析
Synchronized用于线程间的数据共享,而ThreadLocal则用于线程间的数据隔离. 在我完成一个项目的时候,遇到了一个Spring事务不回滚的问题,通过aspectJ和@Transacti ...
- Spring,SpringMvc配置常见的坑,注解的使用注意事项,applicationContext.xml和spring.mvc.xml配置注意事项,spring中的事务失效,事务不回滚原因
1.Spring中的applicationContext.xml配置错误导致的异常 异常信息: org.apache.ibatis.binding.BindingException: Invalid ...
- spring@Transactional注解事务不回滚不起作用无效的问题处理
这几天在项目里面发现我使用@Transactional注解事务之后,抛了异常居然不回滚.后来终于找到了原因. 如果你也出现了这种情况,可以从下面开始排查. 一.特性先来了解一下@Transaction ...
- Spring事务为什么不会自动回滚?Spring事务怎样才会自动回滚?事务自动回滚条件及手动回滚
原文:https://blog.csdn.net/qq_32331073/article/details/76508147 更多Spring事务问题请访问链接:Spring事务回滚问题疑难详解 在此, ...
- 难道你还不知道Spring之事务的回滚和提交的原理吗,这篇文章带你走进源码级别的解读。
上一篇文章讲解了获取事务,并通过获取的connection设置只读,隔离级别等:这篇文章讲事务剩下的回滚和提交. 事务的回滚处理 之前已经完成了目标方法运行前的事务准备工作.而这些准备工作的最大目的无 ...
- spring + myBatis 常见错误:注解事务不回滚
最近项目在用springMVC+spring+myBatis框架,在配置事务的时候发现一个事务不能回滚的问题. 刚开始配置如下:springMVC.xml配置内容: spring.xml配置内容 从上 ...
- 抛出自定义异常,spring AOP事务不回滚的解决方案
spring AOP 默认对RuntimeException()异常或是其子类进行事务回滚,也就是说 事务回滚:throw new RuntimeException("xxxxxxxxxxx ...
随机推荐
- python网络编程
Socket是网络编程的一个抽象的概念. 通常我们用一个Socket表示"打开了一个网络链接",而打开一个Socket需要知道目标计算机的IP地址和端口号,再指定协议类型即可. 套 ...
- Nexus安装配置
一.下载最新版本的nexus 1.下载地址:http://www.sonatype.org/nexus/go 2.官网如果下载不了,就找个zip下载,我下载的是:nexus-2.10.0-02-bun ...
- marked.js简易手册
marked.js简易手册 本文介绍的是marked.js.秉持"来之即用"的原则,对它进行简要的翻译和归纳, 安装 在网上引用或者是引用本地文件即可.要么就用命令行: npm i ...
- WordPress酷炫CSS3读者墙代码
前几日在大前端看到他站点中最新的CSS3读者墙代码,一看效果绚丽的不得鸟,立刻就开始研究了,多次研究未果,可终究是研究出来了,昨天刚成功,今天啊和童鞋来我站说读者墙头像显示不对,我一看,还真是,头像都 ...
- js 刷新页面window.location.reload();
Javascript刷新页面的几种方法:1 history.go(0)2 window.location.reload() window.location.reload(true) 3 ...
- df命令
http://www.th7.cn/system/lin/201311/46839.shtml http://www.111cn.net/sys/CentOS/86335.htm
- jaee开发起步:tomcat服务器的配置
1.将下载下来的apache-tomcat-6.0.13.zip解压到任意文件夹. (打开tomcat官网,选择下载tomcat6.x.zip版本的tomcat不需要安装,直接解压并配置一下环境变量就 ...
- 配置 PHP 的 Session 存储到 Redis
PHP 的会话默认是以文件的形式存在的,可以配置到 NoSQL 中,即提高了访问速度,又能很好地实现会话共享,,,爽歪歪! 配置方式如下: 方法一:修改 php.ini 的设置 session.sav ...
- spring mvc controller间跳转 重定向 传参
http://blog.csdn.net/jackpk/article/details/19121777/
- 转载:gulp文件
这是我的文件目录结构图 下面是我gulpfile.js的配置 'use strict' var gulp=require('gulp'); var gutil=require('gulp-util' ...