virtualbox+vagrant学习-3-Vagrant Share-3-SSH Sharing
SSH Sharing
vagrant share通过向vagrant share提供--SSH标志,使远程SSH访问vagrant环境变得非常容易。
如果你想让同事访问你的SSH,以便对ops问题进行故障排除,那么简单的SSH共享是非常有用的。此外,如果你愿意,它还支持使用vagrant环境进行结对编程!
作为安全措施,SSH共享在默认情况下是禁用的。要启用SSH共享,只需在调用vagrant share时提供--SSH标志。
1.Usage使用
即运行vagrant share --ssh命令
当启用SSH共享时,Vagrant为SSH访问生成一个全新的密钥对。公钥部分自动插入到vagrant中,私钥部分提供给连接到vagrant share的用户。此私钥使用将提示你输入密码进行加密。这个密码永远不会通过vagrant在网络上传输,它是一个额外的安全层,可以防止任何可能知道你的共享名的人轻易访问你的计算机。
当你运行vagrant share --ssh命令后,它将输出你共享的名字
userdeMBP:~ user$ vagrant share --ssh

Vagrant Share now defaults to using the `ngrok` driver.

The `classic` driver has been deprecated.

For more information about the `ngrok` driver, please

refer to the documentation:

  https://www.vagrantup.com/docs/share/

==> default: Detecting network information for machine...

    default: Local machine address: 127.0.0.1

    default:

    default: Note: With the local address (127.0.0.1), Vagrant Share can only

    default: share any ports you have forwarded. Assign an IP or address to your

    default: machine to expose all TCP ports. Consult the documentation

    default: for your provider ('virtualbox') for more information.

    default:

    default: An HTTP port couldn't be detected! Since SSH is enabled, this is

    default: not an error. If you want to share both SSH and HTTP, please set

    default: an HTTP port with `--http`.

    default:

==> default: Generating new SSH key...

    default: Please enter a password to encrypt the key: //输入密码

    default: Repeat the password to confirm:

/Users/user/.vagrant.d/gems/2.4./gems/vagrant-share-1.1./lib/vagrant-share/activate.rb:: warning: constant OpenSSL::Cipher::Cipher is deprecated

    default: Inserting generated SSH key into machine...

    default: Local HTTP port: disabled

    default: Local HTTPS port: disabled

    default: SSH Port:

    default: Port:

==> default: Creating Vagrant Share session...

    share: Box 'hashicorp/vagrant-share' could not be found. Attempting to find and install...

    share: Box Provider: virtualbox

    share: Box Version: >=

    share: Loading metadata for box 'hashicorp/vagrant-share'

    share: URL: https://vagrantcloud.com/hashicorp/vagrant-share

    share: Adding box 'hashicorp/vagrant-share' (v0.1.0) for provider: virtualbox

    share: Downloading: https://vagrantcloud.com/hashicorp/boxes/vagrant-share/versions/0.1.0/providers/virtualbox.box

    share: Download redirected to host: s3.amazonaws.com

    share: Successfully added box 'hashicorp/vagrant-share' (v0.1.0) for 'virtualbox'!  //默认打开的是该虚拟机,进行下载即配置

    share: Importing base box 'hashicorp/vagrant-share'...

    share: Matching MAC address for NAT networking...

    share: Setting the name of the VM: share-0524aac2-590a-4caf-af81-0fb8f5025e88

    share: Fixed port collision for  => . Now on port .

    share: Vagrant has detected a configuration issue which exposes a

    share: vulnerability with the installed version of VirtualBox. The

    share: current guest is configured to use an E1000 NIC type for a

    share: network adapter which is vulnerable in this version of VirtualBox.

    share: Ensure the guest is trusted to use this configuration or update

    share: the NIC type using one of the methods below:

    share:

    share:   https://www.vagrantup.com/docs/virtualbox/configuration.html#default-nic-type

    share:   https://www.vagrantup.com/docs/virtualbox/networking.html#virtualbox-nic-type

    share: Clearing any previously set network interfaces...

    share: Preparing network interfaces based on configuration...

    share: Adapter : nat

    share: Forwarding ports...

    share:  (guest) =>  (host) (adapter )

    share:  (guest) =>  (host) (adapter )

    share: Running 'pre-boot' VM customizations...

    share: Booting VM...

    share: Waiting for machine to boot. This may take a few minutes...

    share: SSH address: 127.0.0.1:

    share: SSH username: tc

    share: SSH auth method: password

    share:

    share: Inserting generated public key within guest...

    share: Removing insecure key from the guest if it's present...

    share: Key inserted! Disconnecting and reconnecting using new SSH key...

    share: Machine booted and ready!

==> share: Halting Vagrant share!

==> share: TCP tunnels are only available after you sign up. //失败的原因是我没有在ngrox上注册或者是没有添加授权码

==> share: Sign up at: https://ngrok.com/signup

==> share:

==> share: If you have already signed up, make sure your authtoken is installed.

==> share: Your authtoken is available on your dashboard: https://dashboard.ngrok.com

==> share:

==> share: ERR_NGROK_302

==> share: Forcing shutdown of VM...

==> share: Destroying VM and associated drives...
我已经使用GitHub的账户登录了ngrox官网,那么就是还没有授权的原因,到该网址https://dashboard.ngrok.com查看你自己的授权码:

然后运行命令./ngrok authtoken 授权码 来进行授权
userdeMBP:~ user$ ./ngrok authtoken 我的授权码DMcU

Authtoken saved to configuration file: /Users/user/.ngrok2/ngrok.yml
然后再运行一次,果然就成功了:
userdeMBP:~ user$ vagrant share --ssh
Vagrant Share now defaults to using the `ngrok` driver.
The `classic` driver has been deprecated. For more information about the `ngrok` driver, please
refer to the documentation: https://www.vagrantup.com/docs/share/ ==> default: Detecting network information for machine...
default: Local machine address: 127.0.0.1
default:
default: Note: With the local address (127.0.0.1), Vagrant Share can only
default: share any ports you have forwarded. Assign an IP or address to your
default: machine to expose all TCP ports. Consult the documentation
default: for your provider ('virtualbox') for more information.
default:
default: An HTTP port couldn't be detected! Since SSH is enabled, this is
default: not an error. If you want to share both SSH and HTTP, please set
default: an HTTP port with `--http`.
default:
==> default: Generating new SSH key...
default: Please enter a password to encrypt the key: //设置你的密码
default: Repeat the password to confirm:
/Users/user/.vagrant.d/gems/2.4./gems/vagrant-share-1.1./lib/vagrant-share/activate.rb:: warning: constant OpenSSL::Cipher::Cipher is deprecated
default: Inserting generated SSH key into machine...
default: Local HTTP port: disabled
default: Local HTTPS port: disabled
default: SSH Port:
default: Port:
==> default: Creating Vagrant Share session...
share: Importing base box 'hashicorp/vagrant-share'...
share: Matching MAC address for NAT networking...
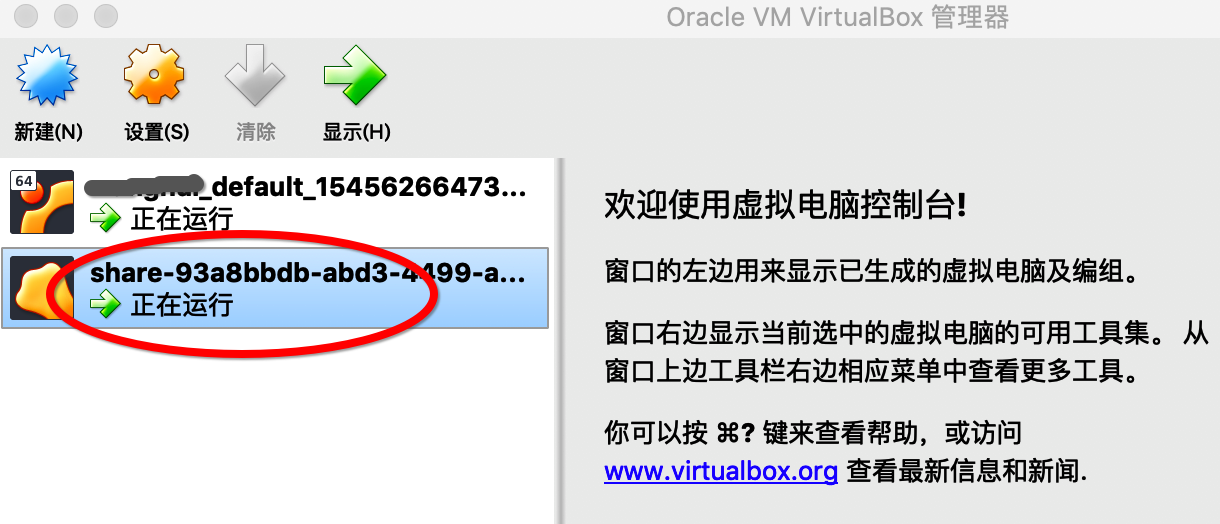
share: Setting the name of the VM: share-93a8bbdb-abd3--ac8d-bae03a558ada
share: Fixed port collision for => . Now on port .
share: Vagrant has detected a configuration issue which exposes a
share: vulnerability with the installed version of VirtualBox. The
share: current guest is configured to use an E1000 NIC type for a
share: network adapter which is vulnerable in this version of VirtualBox.
share: Ensure the guest is trusted to use this configuration or update
share: the NIC type using one of the methods below:
share:
share: https://www.vagrantup.com/docs/virtualbox/configuration.html#default-nic-type
share: https://www.vagrantup.com/docs/virtualbox/networking.html#virtualbox-nic-type
share: Clearing any previously set network interfaces...
share: Preparing network interfaces based on configuration...
share: Adapter : nat
share: Forwarding ports...
share: (guest) => (host) (adapter )
share: (guest) => (host) (adapter )
share: Running 'pre-boot' VM customizations...
share: Booting VM...
share: Waiting for machine to boot. This may take a few minutes...
share: SSH address: 127.0.0.1:
share: SSH username: tc
share: SSH auth method: password
share:
share: Inserting generated public key within guest...
share: Removing insecure key from the guest if it's present...
share: Key inserted! Disconnecting and reconnecting using new SSH key...
share: Machine booted and ready!
==> share:
==> share: Your Vagrant Share is running! Name: budget_status:chapter_insect
==> share:
==> share: You're sharing with SSH access. This means that another can SSH to
==> share: your Vagrant machine by running:
==> share:
==> share: vagrant connect --ssh budget_status:chapter_insect //这就是时候连接该共享时使用的名称
==> share:
然后任何人都可以通过运行vagrant connect --ssh 名称(其中名称是前面运行vagrant share --ssh命令输出的共享的名称)直接连接到你的vagrant环境。
$ vagrant connect --ssh budget_status:chapter_insect
如果私钥已加密(默认行为),则会提示连接的人输入解密私钥的密码。
同时,可以看见virtualBox果然新打开了一个虚拟机:
当使用ctrl-C关闭vagrant share时,该虚拟机机器相关的驱动都会自动关闭并删除:
^C==> share: Halting Vagrant share!

==> share: Forcing shutdown of VM...

==> share: Destroying VM and associated drives...
virtualbox+vagrant学习-3-Vagrant Share-3-SSH Sharing的更多相关文章
- virtualbox+vagrant学习-2(command cli)-17-vagrant ssh命令
SSH 格式: vagrant ssh [options] [name|id] [-- extra ssh args] 这将SSH导入正在运行的vagrant机器,并允许你访问机器的shell. us ...
- virtualbox+vagrant学习-4-Vagrantfile-3-Minimum Vagrant Version
Minimum Vagrant Version 可以在Vagrantfile中指定一组vagrant版本需求,以强制人们使用带有Vagrantfile文件的vagrant特定版本.这可以帮助解决使用带 ...
- virtualbox+vagrant学习-2(command cli)-26-vagrant share命令
Share share命令初始化了一个vagrant share会话,允许你与世界上任何一个人共享vagrant环境,允许在几乎任何网络环境中直接在vagrant环境中进行协作. 你可以在本博客的vi ...
- virtualbox+vagrant学习-1-环境安装及vagrantfile的简单配置-Mac系统
在学习docker-machine时,发现需要使用到虚拟化平台,所以选择了使用virtualBox. 然后后面发现需要使用vagrant来在mac系统中作为虚拟机管理软件,所以下面将会简述我自己学习使 ...
- virtualbox+vagrant学习-3-Vagrant Share-2-HTTP Sharing
HTTP Sharing Vagrant Share可以创建一个可公开访问的URL端点来访问在Vagrant环境中运行的HTTP服务器.这被称为“HTTP共享”,在使用Vagrant Share时默认 ...
- virtualbox+vagrant学习-3-Vagrant Share-1-简介
Vagrant Share 通过 ngrok 内网穿透功能实现让全世界人可以访问虚拟机的服务 Vagrant Share允许你与世界上的任何人共享您的Vagrant环境,几乎支持你在任何网络环境中使用 ...
- virtualbox+vagrant学习-3-Vagrant Share-4-Vagrant Connect
Vagrant Connect vagrant可以共享到vagrant环境的任何或每个端口,而不仅仅是SSH和HTTP.“vagrant connect”命令为连接人员提供一个静态IP,他们可以使用该 ...
- virtualbox+vagrant学习-2(command cli)-7-vagrant login命令
Login ⚠️该命令已经弃用了,别名为vagrant cloud auth login.看本博客的 格式: vagrant cloud auth login [options] 登录命令用于使用Ha ...
- virtualbox+vagrant学习-2(command cli)-2-vagrant cloud命令--有问题
Cloud https://www.vagrantup.com/docs/cli/cloud.html 命令: vagrant cloud 这是用来管理与vagrant相关的任何东西的命令. 该命令的 ...
随机推荐
- python 历险记(五)— python 中的模块
目录 前言 基础 模块化程序设计 模块化有哪些好处? 什么是 python 中的模块? 引入模块有几种方式? 模块的查找顺序 模块中包含执行语句的情况 用 dir() 函数来窥探模块 python 的 ...
- Nginx 反向代理时获取用户的真实 IP
在平时我们开发后端程序的过程中,应该多多少少都会碰到记录客户端 IP 的场景,例如我之前写过的 APP 用户的一个审计功能,就需要获取用户的 IP 地址:还有广告系统里面,也是需要获取用户的 IP 地 ...
- android chrome iframe设置src属性无法启动app
0x01 Android Intents with Chrome Android有一个很少人知道的特性可以通过web页面发送intent来启动apps.以前通过网页启动app是通过设置iframe的s ...
- SQL事务在存储过程的应用
-- ============================================= -- Author: jf_ou -- Create date: 2017-08-22 -- Desc ...
- css对ie的兼容性问题处理(一):
1.在制作sidebar时对li里面的元素进行浮动,li在ie6/7下会出现4px的间间隙: 解决方法:在li下加上vertical-align属性,值可为top.bottom.middle: 扩展: ...
- Dynamics 365Online 查询Web Api的请求WebUri
在on-premises版本中,获取weburi的方式是进设置-自定义项-开发人员资源中查看地址,但online版本中的地址会有些许的差异 online的开发者资源中的地址如下图,如果你在页面java ...
- Keras vs. PyTorch in Transfer Learning
We perform image classification, one of the computer vision tasks deep learning shines at. As traini ...
- 你真的了解View的坐标吗?
闲聊 View,对我们来说在熟悉不过了,从接触 Android 开始,我们就一直在接触 View,界面当中到处都是 View,比如我们经常用到的 TextView,Button,LinearLayou ...
- Dialog向Activity传递数据
PopupDialog中声明一个内部接口PriorityListener,接口中声明一个回调函数refreshPriorityUI,用于在 Dialog的监听事件触发后刷新Activity的UI显示. ...
- 一步一步pwn路由器之radare2使用全解
前言 本文由 本人 首发于 先知安全技术社区: https://xianzhi.aliyun.com/forum/user/5274 radare2 最近越来越流行,已经进入 github 前 25了 ...