Python并发编程-进程 线程 同步锁 线程死锁和递归锁
进程是最小的资源单位,线程是最小的执行单位
一、进程
进程:就是一个程序在一个数据集上的一次动态执行过程。
进程由三部分组成:
1、程序:我们编写的程序用来描述进程要完成哪些功能以及如何完成
2、数据集:数据集则是程序在执行过程中所需要使用的资源
3、进程控制块:进程控制块用来记录进程的外部特征,描述进程的执行变化过程,系统可以利用它来控制和管理进程,它是系统感
知进程存在的唯一标志。
二、线程
Threading用于提供线程相关的操作。线程是应用程序中工作的最小单元,它被包含在进程之中,是进程中的实际运作单位。一
条线程指的是进程中一个单一顺序的控制流,一个进程中可以并发多个线程,每条线程并行执行不同的任务。
1、实现线程并发
示例1:
- #!/usr/bin/env python
- # -*- coding:utf-8 -*-
- #Author: nulige
- import threading #线程
- import time
- def Hi(num): #有一个参数
- print("hello %s" %num)
- time.sleep(3)
- if __name__ == '__main__':
- t1=threading.Thread(target=Hi,args=(,)) #创建了一个线程对象t1,10做为一个参数,传给num
- t1.start()
- t2=threading.Thread(target=Hi,args=(,)) #创建了一个线程对象t2,9做为一个参数,传给num
- t2.start()
- print("ending.........") #主线程输出ending
执行结果:
- hello 10 #子线程
- hello 9 #子线程
- ending......... #主线程
- #上面三个同时出来,再停顿三秒才结束
- Process finished with exit code 0 #停顿3秒才结束
示例2:
- #!/usr/bin/env python
- # -*- coding:utf-8 -*-
- #Author: nulige
- import threading
- import time
- def music():
- print("begin to listen %s"%time.ctime())
- time.sleep(3)
- print("stop to listen %s" %time.ctime())
- def game():
- print("begin to play game %s"%time.ctime())
- time.sleep(5)
- print("stop to play game %s" %time.ctime())
- if __name__ == '__main__':
- t1=threading.Thread(target=music)
- t1.start()
- t2=threading.Thread(target=game)
- t2.start()
执行结果:
- #总共花了5秒时间
- begin to listen Sat Jan 14 12:34:43 2017
- begin to play game Sat Jan 14 12:34:43 2017 #1、先打印2个
- stop to listen Sat Jan 14 12:34:46 2017 #2、等待3秒再打印一个
- stop to play game Sat Jan 14 12:34:48 2017 #3、再等待2秒,打印一个
2、使用join方法
示例1:
- #!/usr/bin/env python
- # -*- coding:utf-8 -*-
- #Author: nulige
- import threading
- import time
- def music():
- print("begin to listen %s"%time.ctime())
- time.sleep(3)
- print("stop to listen %s" %time.ctime())
- def game():
- print("begin to play game %s"%time.ctime())
- time.sleep(5)
- print("stop to play game %s" %time.ctime())
- if __name__ == '__main__':
- t1=threading.Thread(target=music)
- t2=threading.Thread(target=game)
- t1.start() #运行实例的方法
- t2.start()
- t1.join() #子线程对象调用join()方法
- t2.join()
- print("ending") #在主线程中
执行结果:
- begin to listen Sat Jan 14 12:58:34 2017
- begin to play game Sat Jan 14 12:58:34 2017 #先打印2个
- stop to listen Sat Jan 14 12:58:37 2017 #等待3秒,再打印一个
- stop to play game Sat Jan 14 12:58:39 2017 #等待2秒,再打印两个
- ending
示例2:
- #!/usr/bin/env python
- # -*- coding:utf-8 -*-
- #Author: nulige
- import threading
- import time
- def music():
- print("begin to listen %s"%time.ctime())
- time.sleep(3)
- print("stop to listen %s" %time.ctime())
- def game():
- print("begin to play game %s"%time.ctime())
- time.sleep(5)
- print("stop to play game %s" %time.ctime())
- if __name__ == '__main__':
- t1=threading.Thread(target=music)
- t2=threading.Thread(target=game)
- t1.start() #运行实例的方法
- t2.start()
- t1.join() #t1线程不结束,谁都不往下走
- print("ending")
执行结果:
- begin to listen Sat Jan 14 13:06:07 2017
- begin to play game Sat Jan 14 13:06:07 2017 #先打印这两行
- stop to listen Sat Jan 14 13:06:10 2017 #再等待3秒打印这两行
- ending
- stop to play game Sat Jan 14 13:06:12 2017 #再等待2秒打印这行
示例3:
- #!/usr/bin/env python
- # -*- coding:utf-8 -*-
- #Author: nulige
- import threading
- import time
- def music():
- print("begin to listen %s"%time.ctime())
- time.sleep(3)
- print("stop to listen %s" %time.ctime())
- def game():
- print("begin to play game %s"%time.ctime())
- time.sleep(5)
- print("stop to play game %s" %time.ctime())
- if __name__ == '__main__':
- t1=threading.Thread(target=music)
- t2=threading.Thread(target=game)
- t1.start() #运行实例的方法
- t2.start()
- t2.join()
- print("ending") #在主线程中
执行结果:
- begin to listen Sat Jan 14 13:12:34 2017 #先打印这两行
- begin to play game Sat Jan 14 13:12:34 2017
- stop to listen Sat Jan 14 13:12:37 2017 #等待3秒,打印这一行
- stop to play game Sat Jan 14 13:12:39 2017 #等待2秒,打印这两行
- ending
示例4:并没有实现并发(失去多线程的意义)
- #!/usr/bin/env python
- # -*- coding:utf-8 -*-
- #Author: nulige
- import threading
- import time
- def music():
- print("begin to listen %s"%time.ctime())
- time.sleep(3)
- print("stop to listen %s" %time.ctime())
- def game():
- print("begin to play game %s"%time.ctime())
- time.sleep(5)
- print("stop to play game %s" %time.ctime())
- if __name__ == '__main__':
- t1=threading.Thread(target=music)
- t2=threading.Thread(target=game)
- t1.start()
- t1.join()
- t2.start()
- t2.join()
- print("ending") #在主线程中
执行结果:
- begin to listen Sat Jan 14 13:26:18 2017 #先打印条1行
- stop to listen Sat Jan 14 13:26:21 2017 #等待3秒再打印2行
- begin to play game Sat Jan 14 13:26:21 2017
- stop to play game Sat Jan 14 13:26:26 2017 #等待5秒打印2行
- ending
三、线程的两种调用方式
threading 模块建立在 thread 模块之上。thread 模块以低级、原始的方式来处理和控制线程,而 threading 模块通过对 thread
进行二次封装,提供了更方便的 api 来处理线程。
1、直接调用(推荐写法)
- #!/usr/bin/env python
- # -*- coding:utf-8 -*-
- #Author: nulige
- import threading
- import time
- def sayhi(num): # 定义每个线程要运行的函数
- print("running on number:%s" % num)
- time.sleep(3)
- if __name__ == '__main__':
- t1 = threading.Thread(target=sayhi, args=(1,)) # 生成一个线程实例
- t2 = threading.Thread(target=sayhi, args=(2,)) # 生成另一个线程实例
- t1.start() # 启动线程
- t2.start() # 启动另一个线程
- print(t1.getName()) # 获取线程名
- print(t2.getName())
执行结果:
- running on number:1
- running on number:2
- Thread-1
- Thread-2
2、继承式调用(有些编程人员会用这种写法,也要能看懂。不推荐这种写法)
- #!/usr/bin/env python
- # -*- coding:utf-8 -*-
- #Author: nulige
- import threading
- import time
- #自己定制一个MyThread的类
- class MyThread(threading.Thread):
- def __init__(self, num):
- threading.Thread.__init__(self)
- self.num = num
- def run(self): # 定义每个线程要运行的函数
- print("running on number:%s" % self.num)
- time.sleep(3)
- if __name__ == '__main__':
- t1 = MyThread(1) #继承这个类,把1这个参数,传给num ,t1就是个线程对象
- t2 = MyThread(2)
- t1.start()
- t2.start()
- print("ending......")
执行结果:
- running on number:1
- running on number:2
- ending......
四、 threading.thread的实例方法
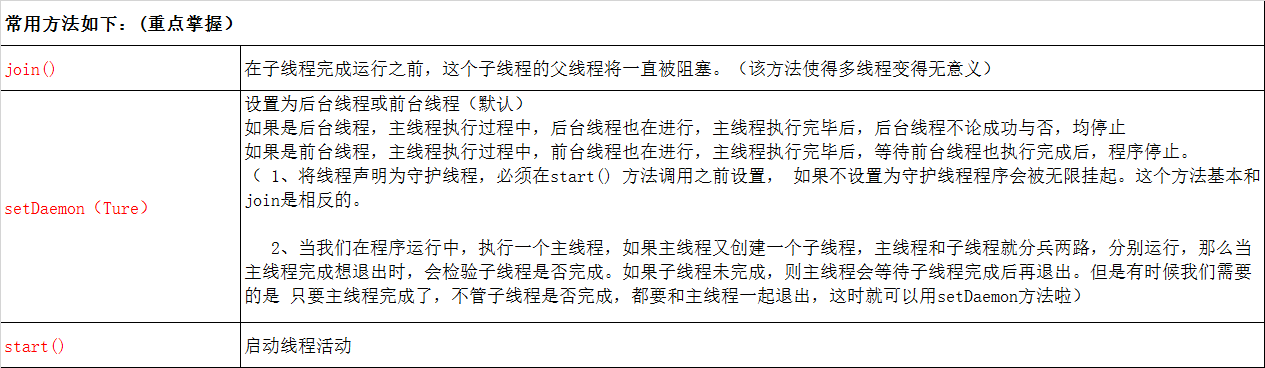
1、join&Daemon方法
示例1:没有用Daemon方法示例
- #!/usr/bin/env python
- # -*- coding:utf-8 -*-
- #Author: nulige
- import threading
- from time import ctime,sleep
- import time
- def ListenMusic(name):
- print ("Begin listening to %s. %s" %(name,ctime()))
- sleep(3)
- print("end listening %s"%ctime())
- def RecordBlog(title):
- print ("Begin recording the %s! %s" %(title,ctime()))
- sleep(5)
- print('end recording %s'%ctime())
- #创建一个列表,把t1和t2加到列表中去
- threads = []
- t1 = threading.Thread(target=ListenMusic,args=('水手',))
- t2 = threading.Thread(target=RecordBlog,args=('python线程',))
- threads.append(t1)
- threads.append(t2)
- if __name__ == '__main__':
- for t in threads:
- t.start()
- print ("all over %s" %ctime())
执行结果:
- Begin listening to 水手. Sat Jan 14 13:44:10 2017
- Begin recording the python线程! Sat Jan 14 13:44:10 2017
- all over Sat Jan 14 13:44:10 2017 #先打印三个出来; 主线程结束了
- end listening Sat Jan 14 13:44:13 2017 #等待3秒,打印这1个; 子线程还没有结束,会继续往下运行
- end recording Sat Jan 14 13:44:15 2017 #再等待2秒,打印这1个
示例2: 用Daemon方法示例(设置t为守护线程,就是子线程,跟着主线程一起退出)
- #!/usr/bin/env python
- # -*- coding:utf-8 -*-
- #Author: nulige
- import threading
- from time import ctime,sleep
- import time
- def ListenMusic(name):
- print ("Begin listening to %s. %s" %(name,ctime()))
- sleep(3)
- print("end listening %s"%ctime())
- def RecordBlog(title):
- print ("Begin recording the %s! %s" %(title,ctime()))
- sleep(5)
- print('end recording %s'%ctime())
- #创建一个列表,把t1和t2加到列表中去
- threads = []
- t1 = threading.Thread(target=ListenMusic,args=('水手',))
- t2 = threading.Thread(target=RecordBlog,args=('python线程',))
- threads.append(t1)
- threads.append(t2)
- if __name__ == '__main__':
- for t in threads:
- t.setDaemon(True) #设置t为守护线程; 注意:一定在start()之前设置,否则会报错
- t.start()
- print ("all over %s" %ctime())
执行结果:
- Begin listening to 水手. Sat Jan 14 13:51:30 2017 #三个同时打印出来
- Begin recording the python线程! Sat Jan 14 13:51:30 2017
- all over Sat Jan 14 13:51:30 2017
示例3:设置t1为守护线程,没有意义,达不到效果,因为t2还会继续执行
- #!/usr/bin/env python
- # -*- coding:utf-8 -*-
- #Author: nulige
- import threading
- from time import ctime,sleep
- import time
- def ListenMusic(name):
- print ("Begin listening to %s. %s" %(name,ctime()))
- sleep(3)
- print("end listening %s"%ctime())
- def RecordBlog(title):
- print ("Begin recording the %s! %s" %(title,ctime()))
- sleep(5)
- print('end recording %s'%ctime())
- #创建一个列表,把t1和t2加到列表中去
- threads = []
- t1 = threading.Thread(target=ListenMusic,args=('水手',))
- t2 = threading.Thread(target=RecordBlog,args=('python线程',))
- threads.append(t1)
- threads.append(t2)
- if __name__ == '__main__':
- t1.setDaemon(True) #设置t1为守护线程; 注意:一定在start之前设置,否则会报错
- for t in threads:
- t.start()
- print ("all over %s" %ctime())
执行结果:
- Begin listening to 水手. Sat Jan 14 14:02:07 2017
- Begin recording the python线程! Sat Jan 14 14:02:07 2017
- all over Sat Jan 14 14:02:07 2017 #设置t1为守护线程,所以会先把这三条先打印出来
- end listening Sat Jan 14 14:02:10 2017 #再等待3秒打印t2,
- end recording Sat Jan 14 14:02:12 2017 #再等待3秒打印这条出来
示例4:设置t2为守护线程,子线程才会跟着主线程一起退出
- #!/usr/bin/env python
- # -*- coding:utf-8 -*-
- #Author: nulige
- import threading
- from time import ctime,sleep
- import time
- def ListenMusic(name):
- print ("Begin listening to %s. %s" %(name,ctime()))
- sleep(3)
- print("end listening %s"%ctime())
- def RecordBlog(title):
- print ("Begin recording the %s! %s" %(title,ctime()))
- sleep(5)
- print('end recording %s'%ctime())
- #创建一个列表,把t1和t2加到列表中去
- threads = []
- t1 = threading.Thread(target=ListenMusic,args=('水手',))
- t2 = threading.Thread(target=RecordBlog,args=('python线程',))
- threads.append(t1)
- threads.append(t2)
- if __name__ == '__main__':
- t2.setDaemon(True) # 设置t2为守护线程; 注意:一定在start之前设置,否则会报错
- for t in threads:
- t.start()
- print ("all over %s" %ctime())
执行结果:
- Begin listening to 水手. Sat Jan 14 14:17:09 2017
- Begin recording the python线程! Sat Jan 14 14:17:09 2017
- all over Sat Jan 14 14:17:09 2017 #先打印这三条
- end listening Sat Jan 14 14:17:12 2017 #等待3秒,再打印这条;t1结束后,主线程也结束了。
2、一道面试题
- 1 #执行结果是什么?
- 2
- 3 i = 0
- 4 for i in range(10):
- 5 i += 1
- 6 print(i)
- 7
- 8 执行结果:
- 9 10
3、其它方法

示例:getName()方法 (一般没什么用)
- #!/usr/bin/env python
- # -*- coding:utf-8 -*-
- #Author: nulige
- import threading
- from time import ctime,sleep
- import time
- def ListenMusic(name):
- print ("Begin listening to %s. %s" %(name,ctime()))
- sleep(3)
- print("end listening %s"%ctime())
- def RecordBlog(title):
- print ("Begin recording the %s! %s" %(title,ctime()))
- sleep(5)
- print('end recording %s'%ctime())
- #创建一个列表,把t1和t2加到列表中去
- threads = []
- t1 = threading.Thread(target=ListenMusic,args=('水手',))
- t2 = threading.Thread(target=RecordBlog,args=('python线程',))
- threads.append(t1)
- threads.append(t2)
- if __name__ == '__main__':
- t2.setDaemon(True) # 设置t为守护进程; 注意:一定在start之前设置,否则会报错
- for t in threads:
- t.start()
- print(t.getName()) #返回线程名称:Thread-1
- print ("all over %s" %ctime())
执行结果:
- Begin listening to 水手. Sat Jan 14 14:36:44 2017
- Thread-1 #返回线程名称
- Begin recording the python线程! Sat Jan 14 14:36:44 2017
- Thread-2 #返回默认的线程名称
- all over Sat Jan 14 14:36:44 2017
- end listening Sat Jan 14 14:36:47 2017

示例:threading.activeCount(),返回正在运行的线程数量
- #!/usr/bin/env python
- # -*- coding:utf-8 -*-
- #Author: nulige
- import threading
- from time import ctime,sleep
- import time
- def ListenMusic(name):
- print ("Begin listening to %s. %s" %(name,ctime()))
- sleep(3)
- print("end listening %s"%ctime())
- def RecordBlog(title):
- print ("Begin recording the %s! %s" %(title,ctime()))
- sleep(5)
- print('end recording %s'%ctime())
- #创建一个列表,把t1和t2加到列表中去
- threads = []
- t1 = threading.Thread(target=ListenMusic,args=('水手',))
- t2 = threading.Thread(target=RecordBlog,args=('python线程',))
- threads.append(t1)
- threads.append(t2)
- if __name__ == '__main__':
- t2.setDaemon(True) #设置t为守护进程; 注意:一定在start之前设置,否则会报错
- for t in threads:
- t.start()
- print("count:", threading.active_count()) #判断有多少个线程的数量
- while threading.active_count()==1: #等于1就相当于只有一个主线程,没有子线程
- print ("all over %s" %ctime())
执行结果:
- Begin listening to 水手. Sat Jan 14 14:49:00 2017
- count: 2
- Begin recording the python线程! Sat Jan 14 14:49:00 2017
- count: 3 #得到的线程数量
- end listening Sat Jan 14 14:49:03 2017
五、进程与线程的关系区别
六、python的GIL
- In CPython, the global interpreter lock, or GIL, is a mutex that prevents multiple native threads from executing Python bytecodes at once.
This lock is necessary mainly because CPython’s memory management is not thread-safe. (However, since the GIL exists, other features havegrown
to depend on the guarantees that it enforces.)- 上面的核心意思就是:无论你启多少个线程,你有多少个cpu, Python在执行的时候会淡定的在同一时刻只允许一个线程运行。
常见概念:
1、什么是并发和并行?
并发:是指系统具有处理多个任务(动作)的能力(CPU通过切换来完成并发),并发是并行的一个子集。
并行:是指系统具有同时处理多个任务(动作)的能力
2、同步与异步的区别?
同步: 当进程执行到一个IO(等待外部数据)的时候你---->会一直等:同步 (示例: 打电话)
异步:当进程执行到一个IO(等待外部数据)的时候你---->不等:一直等到数据接收成功,再回来处理。异步效率更高(示例:发短信)
3、任务分为:
1、对于IO密集型的任务: python的多线程是有意义的,可以采用:多进程+协程的方式
2、对于计算密集型的任务:python的多线程就不推荐。python就不适用了。
七、同步锁
示例1:不加锁(拿到的值是不固定的)
- #!/usr/bin/env python
- # -*- coding:utf-8 -*-
- #Author: nulige
- import threading
- import time
- def sub():
- global num
- # num -= 1
- temp=num
- time.sleep(0.001) #别外75个线程,拿到100了,时间不固定。
- num=temp-1
- num =100
- l=[]
- for i in range(100):
- t=threading.Thread(target=sub)
- t.start()
- l.append(t)
- for t in l:
- t.join()
- print(num)
执行结果:
- 73 or 75 (这个值是随机的,会不断变化)
示例2:加锁 (加锁的作用:就是把多线程变成串行,结果不会变)
- #加锁的作用:就是把多线程变成串行,结果就不会变)
- #!/usr/bin/env python
- # -*- coding:utf-8 -*-
- #Author: nulige
- import threading
- import time
- def sub():
- global num
- # num -= 1
- lock.acquire() #获取锁
- temp=num
- time.sleep(0.001)
- num=temp-1
- lock.release() #释放锁
- num =100
- l=[]
- lock=threading.Lock()
- for i in range(100):
- t=threading.Thread(target=sub)
- t.start()
- l.append(t)
- for t in l:
- t.join()
- print (num)
执行结果:
- 0
GIL:全局解释器锁
作用:保证同一时刻,只有一个线程被CPU执行,无论你有多少个线程。
为什么这里还需要lock? 注意啦,这里的lock是用户级的lock,跟那个GIL没关系 ,具体我们通过下图进行讲解
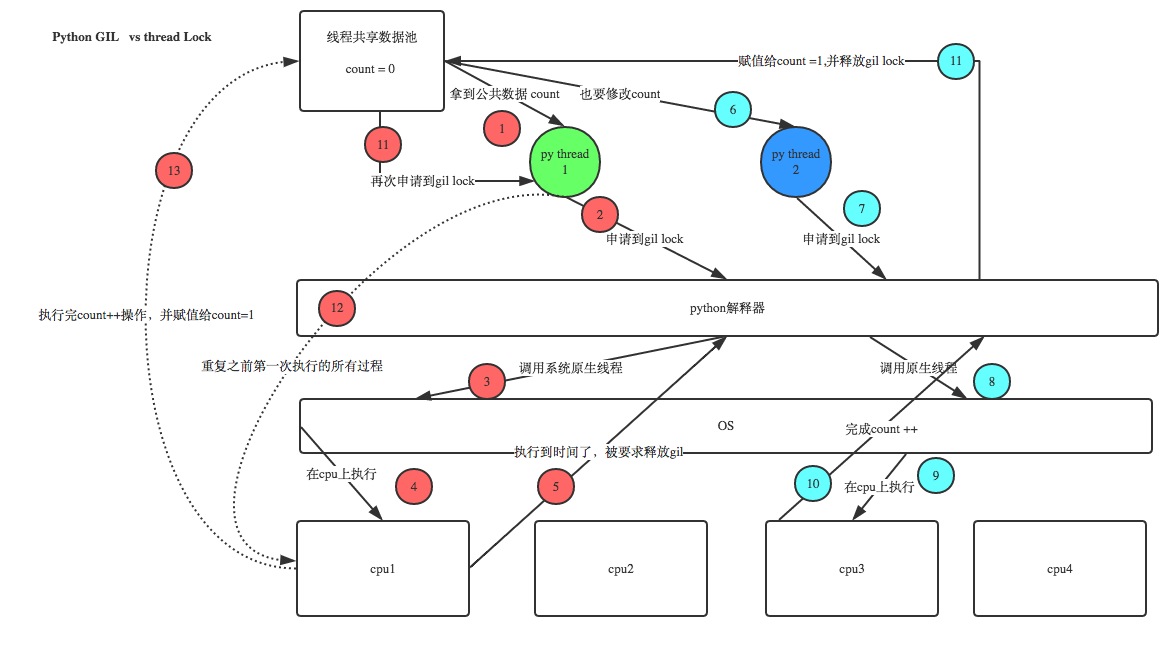
既然用户程序已经自己有锁了,那为什么C python还需要GIL呢?加入GIL主要的原因是为了降低程序的开发的复杂度,比如现在的你写python不需要关心内存回收的问题,因为Python解释器帮你自动定期进行内存回收,你可以理解为python解释器里有一个独立的线程,每过一段时间它起wake up做一次全局轮询看看哪些内存数据是可以被清空的,此时你自己的程序 里的线程和 py解释器自己的线程是并发运行的,假设你的线程删除了一个变量,py解释器的垃圾回收线程在清空这个变量的过程中的clearing时刻,可能一个其它线程正好又重新给这个还没来及得清空的内存空间赋值了,结果就有可能新赋值的数据被删除了,为了解决类似的问题,python解释器简单粗暴的加了锁,即当一个线程运行时,其它人都不能动,这样就解决了上述的问题,这可以说是Python早期版本的遗留问题。
八、线程死锁和递归锁
在线程间共享多个资源的时候,如果两个线程分别占有一部分资源并且同时等待对方的资源,就会造成死锁,因为系统判断这部分资源都
正在使用,所有这两个线程在无外力作用下将一直等待下去。
示例1:线程死锁
- #!/usr/bin/env python
- # -*- coding:utf-8 -*-
- # Author: nulige
- import threading
- import time
- class MyThread(threading.Thread):
- def actionA(self):
- A.acquire() # count=1
- print(self.name, "gotA", time.ctime())
- time.sleep(2)
- B.acquire() # count=2
- print(self.name, "gotB", time.ctime())
- time.sleep(1)
- B.release() # count=1
- A.release() # count=0
- def actionB(self):
- B.acquire() # count=1
- print(self.name, "gotB", time.ctime())
- time.sleep(2)
- A.acquire() # count=2
- print(self.name, "gotA", time.ctime())
- time.sleep(1)
- A.release() # count=1
- B.release() # count=0
- def run(self):
- self.actionA()
- self.actionB()
- if __name__ == '__main__':
- A = threading.Lock()
- B = threading.Lock()
- L = []
- for i in range(5):
- t = MyThread()
- t.start()
- L.append(t)
- for i in L:
- i.join()
- print("ending.....")
执行结果:
- Thread-1 gotA Mon Jan 16 17:33:58 2017
- Thread-1 gotB Mon Jan 16 17:34:00 2017
- Thread-1 gotB Mon Jan 16 17:34:01 2017
- Thread-2 gotA Mon Jan 16 17:34:01 2017 #死锁,一直卡在这里
解决办法:
使用递归锁,将
|
1
2
|
lockA=threading.Lock()lockB=threading.Lock()<br>#--------------<br>lock=threading.RLock() |
为了支持在同一线程中多次请求同一资源,python提供了“可重入锁”:threading.RLock。RLock内部维护着一个Lock和一个counter变量,counter记录了acquire的次数,从而使得资源可以被多次acquire。直到一个线程所有的acquire都被release,其他的线程才能获得资源。
示例2:递归锁(解决死锁问题)
- #!/usr/bin/env python
- # -*- coding:utf-8 -*-
- #Author: nulige
- import threading
- import time
- class MyThread(threading.Thread):
- def actionA(self):
- r_lcok.acquire() #count=1
- print(self.name,"gotA",time.ctime())
- time.sleep(2)
- r_lcok.acquire() #count=2
- print(self.name,"gotB",time.ctime())
- time.sleep(1)
- r_lcok.release() #count=1
- r_lcok.release() #count=0
- def actionB(self):
- r_lcok.acquire() #count=1
- print(self.name,"gotB",time.ctime())
- time.sleep(2)
- r_lcok.acquire() #count=2
- print(self.name,"gotA",time.ctime())
- time.sleep(1)
- r_lcok.release() #count=1
- r_lcok.release() #count=0
- def run(self):
- self.actionA()
- self.actionB()
- if __name__ == '__main__':
- r_lcok=threading.RLock()
- L=[]
- for i in range(5):
- t=MyThread()
- t.start()
- L.append(t)
- for i in L:
- i.join()
- print("ending.....")
执行结果:
- Thread-1 gotA Mon Jan 16 17:38:42 2017
- Thread-1 gotB Mon Jan 16 17:38:44 2017
- Thread-1 gotB Mon Jan 16 17:38:45 2017
- Thread-1 gotA Mon Jan 16 17:38:47 2017
- Thread-3 gotA Mon Jan 16 17:38:48 2017
- Thread-3 gotB Mon Jan 16 17:38:50 2017
- Thread-4 gotA Mon Jan 16 17:38:51 2017
- Thread-4 gotB Mon Jan 16 17:38:53 2017
- Thread-5 gotA Mon Jan 16 17:38:54 2017
- Thread-5 gotB Mon Jan 16 17:38:56 2017
- Thread-5 gotB Mon Jan 16 17:38:57 2017
- Thread-5 gotA Mon Jan 16 17:38:59 2017
- Thread-3 gotB Mon Jan 16 17:39:00 2017
- Thread-3 gotA Mon Jan 16 17:39:02 2017
- Thread-4 gotB Mon Jan 16 17:39:03 2017
- Thread-4 gotA Mon Jan 16 17:39:05 2017
- Thread-2 gotA Mon Jan 16 17:39:06 2017
- Thread-2 gotB Mon Jan 16 17:39:08 2017
- Thread-2 gotB Mon Jan 16 17:39:09 2017
- Thread-2 gotA Mon Jan 16 17:39:11 2017
- ending.....
九、同步条件(Event)
- An event is a simple synchronization object;the event represents an internal flag,
- and threads can wait for the flag to be set, or set or clear the flag themselves.
- event = threading.Event()
- # a client thread can wait for the flag to be set
- event.wait()
- # a server thread can set or reset it
- event.set()
- event.clear()
- If the flag is set, the wait method doesn’t do anything.
- If the flag is cleared, wait will block until it becomes set again.
- Any number of threads may wait for the same event.
示例:
- import threading,time
- class Boss(threading.Thread):
- def run(self):
- print("BOSS:今晚大家都要加班到22:00。")
- print(event.isSet())
- event.set()
- time.sleep(5)
- print("BOSS:<22:00>可以下班了。")
- print(event.isSet())
- event.set()
- class Worker(threading.Thread):
- def run(self):
- event.wait()
- print("Worker:哎……命苦啊!")
- time.sleep(1)
- event.clear()
- event.wait()
- print("Worker:OhYeah!")
- if __name__=="__main__":
- event=threading.Event()
- threads=[]
- for i in range(5):
- threads.append(Worker())
- threads.append(Boss())
- for t in threads:
- t.start()
- for t in threads:
- t.join()
执行结果:
- BOSS:今晚大家都要加班到22:00。
- False
- Worker:哎……命苦啊!
- Worker:哎……命苦啊!
- Worker:哎……命苦啊!
- Worker:哎……命苦啊!
- Worker:哎……命苦啊!
- BOSS:<22:00>可以下班了。
- False
- Worker:OhYeah!
- Worker:OhYeah!
- Worker:OhYeah!
- Worker:OhYeah!
- Worker:OhYeah!
- ending.....
十、信号量(Semaphore)
信号量:指同时开几个线程并发
信号量用来控制线程并发数的,BoundedSemaphore或Semaphore管理一个内置的计数 器,每当调用acquire()时-1,调用release()时+1。
计数器不能小于0,当计数器为 0时,acquire()将阻塞线程至同步锁定状态,直到其他线程调用release()。(类似于停车位的概念)
BoundedSemaphore与Semaphore的唯一区别在于前者将在调用release()时检查计数 器的值是否超过了计数器的初始值,如果超过了将抛出一个异常。
- #!/usr/bin/env python
- # -*- coding:utf-8 -*-
- #Author: nulige
- import threading,time
- class myThread(threading.Thread):
- def run(self): #启动后,执行run方法
- if semaphore.acquire(): #加把锁,可以放进去多个(相当于5把锁,5个钥匙,同时有5个线程)
- print(self.name)
- time.sleep(5)
- semaphore.release()
- if __name__=="__main__":
- semaphore=threading.Semaphore(5) #同时能有几个线程进去(设置为5就是一次5个线程进去),类似于停车厂一次能停几辆车
- thrs=[] #空列表
- for i in range(100): #100个线程
- thrs.append(myThread()) #加线程对象
- for t in thrs:
- t.start() #分别启动
执行结果:
- Thread-1
- Thread-2
- Thread-3
- Thread-4
- Thread-5 #5个线程同时出来
- Thread-8
- Thread-6
- Thread-9
- Thread-7
- Thread-10 #每隔3秒再打印5个出来
- 部分省略.......
十一、多线程利器---队列(queue) ( 重点掌握)
列表是不安全的数据结构
示例:
- #两个线程同时删除5,所以会报错,因为只有一个5,一个线程删除了就没有啦。
- import threading,time
- li=[1,2,3,4,5]
- def pri():
- while li:
- a=li[-1] #取值
- print(a)
- time.sleep(1)
- li.remove(a) #remove按索引去删除内容
- t1=threading.Thread(target=pri,args=()) #线程1
- t1.start()
- t2=threading.Thread(target=pri,args=()) #线程2
- t2.start()
执行结果:
- #会报错,因为只有一个5,删除了就没有啦,不能两个线程同时删除。
- 5
- 5
- 4
- Exception in thread Thread-2:
- Traceback (most recent call last):
- File "C:\Python3.5\lib\threading.py", line 914, in _bootstrap_inner
- self.run()
- File "C:\Python3.5\lib\threading.py", line 862, in run
- self._target(*self._args, **self._kwargs)
- File "D:/python/day34/s10.py", line 34, in pri
- li.remove(a)
- ValueError: list.remove(x): x not in list
- 3
- 2
- 1
思考:如何通过对列来完成上述功能?
queue is especially useful in threaded programming when information must be exchanged safely between multiple threads.
queue列队的三种模式及构造函数
1、先进先出模式 (谁先进去,谁先出来) ---->class queue.Queue(maxsize)
2、先进后出模式 (先进去的,最后出来) ---->class queue.LifoQueue(maxsize)
3、优先级模式 (优先级越低,先出来) ---->class queue.PriorityQueue(maxsize)
一、先进先出
示例1:
- #先进先出 (原则:谁先进去,谁就先出来)
- import queue #线程 队列
- q=queue.Queue() #先进先出
- q.put(12)
- q.put("hello")
- q.put({"name":"yuan"})
- while 1:
- data=q.get()
- print(data)
- print("-----------")
执行结果:
- 12 #他是第1个进去的,所以他先出来
- -----------
- hello
- -----------
- {'name': 'yuan'}
- -----------
示例2:
- import queue #队列,解决多线程问题 (注意:python2.7 Queue的首字母是大写的)
- # q=queue.Queue(3) #1、设置3就是满了,默认(FIFO 先进先出 ) #先进后出(手枪弹夹,后压进去的,先出来)
- q=queue.Queue()
- q.put(12)
- q.put("hello")
- q.put({"name":"yuan"})
- q.put(34)
- # q.put(34,False) #2、blook=True,如果改成Flase,提示你满了,会报错,但不会卡在这里
- while 1:
- data=q.get() #1、会卡着,等值进来
- # data=q.get(block=False) #3、队列为空
- print(data)
- print("-----------")
二、先进后出
示例:
- #先进后出
- import queue
- q=queue.LifoQueue() #先进后出
- q.put(12)
- q.put("hello")
- q.put({"name":"yuan"})
- while 1:
- data=q.get() #卡着,等值进来,
- print(data)
- print("-----------")
执行结果:
- {'name': 'yuan'} #后进来的先出去
- -----------
- hello
- -----------
- 12
- -----------
三、优化级
示例:
- #优先级
- import queue
- q=queue.PriorityQueue() #优先级
- q.put([3,12])
- q.put([2,"hello"]) #2先出来,按优化级 级别是:2--->3--->4 从级到高
- q.put([4,{"name":"yuan"}])
- while 1:
- data=q.get()
- print(data[1])
- print("-----------------------")
执行结果:
- hello #2先出来,按优先级
- -----------------------
- 12
- -----------------------
- {'name': 'yuan'}
- -----------------------
queue队列类的方法:
- 创建一个“队列”对象
- import Queue
- q = Queue.Queue(maxsize = 10)
- Queue.Queue类即是一个队列的同步实现。队列长度可为无限或者有限。可通过Queue的构造函数的可选参数maxsize来设定队列长度。如果maxsize小于1就表示队列长度无限。
- 将一个值放入队列中
- q.put(10)
- 调用队列对象的put()方法在队尾插入一个项目。put()有两个参数,第一个item为必需的,为插入项目的值;第二个block为可选参数,默认为
- 1。如果队列当前为空且block为1,put()方法就使调用线程暂停,直到空出一个数据单元。如果block为0,put方法将引发Full异常。
- 将一个值从队列中取出
- q.get()
- 调用队列对象的get()方法从队头删除并返回一个项目。可选参数为block,默认为True。如果队列为空且block为True,
- get()就使调用线程暂停,直至有项目可用。如果队列为空且block为False,队列将引发Empty异常。
- 此包中的常用方法(q = Queue.Queue()):
- q.qsize() 返回队列的大小
- q.empty() 如果队列为空,返回True,反之False
- q.full() 如果队列满了,返回True,反之False
- q.full 与 maxsize 大小对应
- q.get([block[, timeout]]) 获取队列,timeout等待时间
- q.get_nowait() 相当q.get(False)
- 非阻塞 q.put(item) 写入队列,timeout等待时间
- q.put_nowait(item) 相当q.put(item, False)
- q.task_done() 在完成一项工作之后,q.task_done() 函数向任务已经完成的队列发送一个信号
- q.join() 实际上意味着等到队列为空,再执行别的操作
示例1: q.qsize() and q.empty() and q.full
- import queue
- q=queue.Queue()
- q.put(12)
- q.put("hello")
- q.put({"name":"yuan"})
- print(q.qsize()) #判断队列大小
- print(q.empty()) #判断队列是否为空
- print(q.full) #判断队列是否满了
- while 1:
- data=q.get()
- print(data)
- print("-----------")
执行结果:
- 3 --->q.qsize()
- False ---->q.empty()
- <bound method Queue.full of <queue.Queue object at 0x01315A70>> --->full
示例2:g.put_nowait() 相当于q.get(Flase)
- import queue
- q=queue.Queue(3)
- q.put(12)
- q.put([2,"hello"])
- q.put([4,{"name":"yuan"}])
- q.put_nowait(56) #相当于q.get(Flase)
- while 1:
- data=q.get()
- print(data)
执行结果:
- Traceback (most recent call last):
- File "D:/python/day34/s7.py", line 79, in <module>
- q.put_nowait(56) #相当于q.get(Flase)
- File "C:\Python3.5\lib\queue.py", line 184, in put_nowait
- return self.put(item, block=False)
- File "C:\Python3.5\lib\queue.py", line 130, in put
- raise Full
- queue.Full
十二、生产者消费者模型
1、为什么要使用生产者和消费者模式
在线程世界里,生产者就是生产数据的线程,消费者就是消费数据的线程。在多线程开发当中,如果生产者处理速度很快,而消费者处理速度很慢,那么生产者就必须等待消费者处理完,才能继续生产数据。同样的道理,如果消费者的处理能力大于生产者,那么消费者就必须等待生产者。为了解决这个问题于是引入了生产者和消费者模式。
2、什么是生产者消费者模式
生产者消费者模式是通过一个容器来解决生产者和消费者的强耦合问题。生产者和消费者彼此之间不直接通讯,而通过阻塞队列来进行通讯,所以生产者生产完数据之后不用等待消费者处理,直接扔给阻塞队列,消费者不找生产者要数据,而是直接从阻塞队列里取,阻塞队列就相当于一个缓冲区,平衡了生产者和消费者的处理能力。
这就像,在餐厅,厨师做好菜,不需要直接和客户交流,而是交给前台,而客户去饭菜也不需要不找厨师,直接去前台领取即可,这也是一个结耦的过程。
示例1:边做包子,边吃包子
- #生产者消费者模型(生产者先执行,再吃包子。)
- import time,random
- import queue,threading
- q = queue.Queue()
- def Producer(name):
- count = 0
- while count <10:
- print("making........")
- time.sleep(random.randrange(3)) #产生一个随机数(1-2秒之间)
- q.put(count)
- print('Producer %s has produced %s baozi..' %(name, count))
- count +=1
- print("ok......")
- def Consumer(name):
- count = 0
- while count <10:
- time.sleep(random.randrange(4)) #产生一个随机数(1-3秒之间)
- if not q.empty():
- data = q.get()
- print('\033[32;1mConsumer %s has eat %s baozi...\033[0m' %(name, data))
- else:
- print("-----no baozi anymore----")
- count +=1
- p1 = threading.Thread(target=Producer, args=('A君',))
- c1 = threading.Thread(target=Consumer, args=('B君',))
- p1.start()
- c1.start()
执行结果:
- making........
- Producer A君 has produced 0 baozi..
- ok......
- making........
- Consumer B君 has eat 0 baozi...
- Producer A君 has produced 1 baozi..
- ok......
- making........
- Consumer B君 has eat 1 baozi...
- Producer A君 has produced 2 baozi..
- ok......
- making........
- Consumer B君 has eat 2 baozi...
- Producer A君 has produced 3 baozi..
- ok......
- making........
- Producer A君 has produced 4 baozi..
- ok......
- making........
- Consumer B君 has eat 3 baozi...
- Producer A君 has produced 5 baozi..
- ok......
- making........
- Producer A君 has produced 6 baozi..
- ok......
- making........
- Consumer B君 has eat 4 baozi...
- Producer A君 has produced 7 baozi..
- ok......
- making........
- Producer A君 has produced 8 baozi..
- ok......
- making........
- Producer A君 has produced 9 baozi..
- ok......
- Consumer B君 has eat 5 baozi...
- Consumer B君 has eat 6 baozi...
- Consumer B君 has eat 7 baozi...
- Consumer B君 has eat 8 baozi...
- Consumer B君 has eat 9 baozi...
- -----no baozi anymore----
- -----no baozi anymore----
- -----no baozi anymore----
- -----no baozi anymore----
- -----no baozi anymore----
- -----no baozi anymore----
- -----no baozi anymore----
- -----no baozi anymore----
- -----no baozi anymore----
- -----no baozi anymore----
示例2: 供不应求,吃包子的人太多了(1个人在生产包子,3个人在吃包子)
- #生产者消费者模型(供不应求,吃的人太多了,生产不赢)
- import time,random
- import queue,threading
- q = queue.Queue()
- def Producer(name):
- count = 0
- while count <10:
- print("making........")
- time.sleep(random.randrange(3)) #产生一个随机数(1-2秒之间)
- q.put(count)
- print('Producer %s has produced %s baozi..' %(name, count))
- count +=1
- print("ok......")
- def Consumer(name):
- count = 0
- while count <10:
- time.sleep(random.randrange(4)) #产生一个随机数(1-3秒之间)
- if not q.empty():
- data = q.get()
- print('\033[32;1mConsumer %s has eat %s baozi...\033[0m' %(name, data))
- else:
- print("-----no baozi anymore----")
- count +=1
- p1 = threading.Thread(target=Producer, args=('A君',)) #1个人生产包子
- c1 = threading.Thread(target=Consumer, args=('B君',))
- c2 = threading.Thread(target=Consumer, args=('C君',)) #3个人在吃包子,导致吃包子的人太多啦,生产不赢
- c3 = threading.Thread(target=Consumer, args=('D君',))
- p1.start()
- c1.start()
- c2.start()
- c3.start()
执行结果:
- making........
- -----no baozi anymore---- #生产不赢,供不应求,吃包子的人太多了
- -----no baozi anymore----
- Producer A君 has produced 0 baozi..
- ok......
- making........
- Producer A君 has produced 1 baozi..
- ok......
- making........
- Consumer C君 has eat 0 baozi...
- Consumer D君 has eat 1 baozi...
- -----no baozi anymore----
- -----no baozi anymore----
- -----no baozi anymore----
- -----no baozi anymore----
- -----no baozi anymore----
- -----no baozi anymore----
- Producer A君 has produced 2 baozi..
- ok......
- making........
- Producer A君 has produced 3 baozi..
- ok......
- making........
- Producer A君 has produced 4 baozi..
- ok......
- making........
- Consumer C君 has eat 2 baozi...
- Consumer D君 has eat 3 baozi...
- Consumer D君 has eat 4 baozi...
- -----no baozi anymore----
- -----no baozi anymore----
- Producer A君 has produced 5 baozi..
- ok......
- making........
- Producer A君 has produced 6 baozi..
- ok......
- making........
- Producer A君 has produced 7 baozi..
- ok......
- making........
- Producer A君 has produced 8 baozi..
- ok......
- making........
- Consumer B君 has eat 5 baozi...
- Consumer C君 has eat 6 baozi...
- Consumer D君 has eat 7 baozi...
- Producer A君 has produced 9 baozi..
- ok......
- Consumer B君 has eat 8 baozi...
- Consumer C君 has eat 9 baozi...
- -----no baozi anymore----
- -----no baozi anymore----
- -----no baozi anymore----
- -----no baozi anymore----
- -----no baozi anymore----
- -----no baozi anymore----
- -----no baozi anymore----
- -----no baozi anymore----
- -----no baozi anymore----
- -----no baozi anymore----
- -----no baozi anymore----
- -----no baozi anymore----
- -----no baozi anymore----
- -----no baozi anymore----
- -----no baozi anymore----
- -----no baozi anymore----
- -----no baozi anymore----
- -----no baozi anymore----
- -----no baozi anymore----
- -----no baozi anymore----
示例3:
- #!/usr/bin/env python
- # -*- coding:utf-8 -*-
- #Author: nulige
- import time,random
- import queue,threading
- q = queue.Queue()
- def Producer(name):
- count = 0
- while count <10:
- print("making........")
- time.sleep(5)
- q.put(count)
- print('Producer %s has produced %s baozi..' %(name, count))
- count +=1
- q.task_done() #发信号告诉队列在生产包子,让join接收,就开始吃包子
- print("ok......")
- def Consumer(name):
- count = 0
- while count <10:
- time.sleep(random.randrange(4)) #产生一个随机数(1秒-3秒之间)
- print("waiting...等待包子做的过程中...")
- q.join() #join开始接收
- data = q.get()
- print('\033[32;1mConsumer %s has eat %s baozi...\033[0m' %(name, data))
- count +=1
- p1 = threading.Thread(target=Producer, args=('A君',))
- c1 = threading.Thread(target=Consumer, args=('B君',))
- c2 = threading.Thread(target=Consumer, args=('C君',))
- c3 = threading.Thread(target=Consumer, args=('D君',))
- p1.start()
- c1.start()
- c2.start()
- c3.start()
执行结果:
- making........
- waiting...等待包子做的过程中...
- waiting...等待包子做的过程中...
- waiting...等待包子做的过程中...
- Producer A君 has produced 0 baozi..
- ok......
- making........
- Consumer D君 has eat 0 baozi...
- waiting...等待包子做的过程中...
- Producer A君 has produced 1 baozi..
- Consumer B君 has eat 1 baozi...
- waiting...等待包子做的过程中...
- ok......
- making........
- 部分代码省略......
示例4:
- #!/usr/bin/env python
- # -*- coding:utf-8 -*-
- #Author: nulige
- import time,random
- import queue,threading
- q = queue.Queue()
- def Producer(name):
- count = 0
- while count <10:
- print("making.....正在制作包子...")
- time.sleep(5)
- q.put(count)
- print('Producer %s has produced %s baozi..' %(name, count))
- count +=1
- q.join()
- print("ok......")
- def Consumer(name):
- count = 0
- while count <10:
- time.sleep(random.randrange(4)) #产生一个随机数(1秒-3秒之间)
- data = q.get()
- print("eating.......")
- time.sleep(4) #4秒钟这后
- q.task_done() #给他发一个信号,才打印ok
- print('\033[32;1mConsumer %s has eat %s baozi...\033[0m' %(name, data))
- count +=1
- p1 = threading.Thread(target=Producer, args=('A君',))
- c1 = threading.Thread(target=Consumer, args=('B君',))
- c2 = threading.Thread(target=Consumer, args=('C君',))
- c3 = threading.Thread(target=Consumer, args=('D君',))
- p1.start()
- c1.start()
- c2.start()
- c3.start()
执行结果:
- making.....正在制作包子...
- Producer A君 has produced 0 baozi..
- eating.......
- Consumer B君 has eat 0 baozi...
- ok......
- making.....正在制作包子...
- Producer A君 has produced 1 baozi..
- eating.......
- Consumer C君 has eat 1 baozi...
- ok......
- making.....正在制作包子...
- Producer A君 has produced 2 baozi..
- eating.......
- Consumer D君 has eat 2 baozi...
- ok......
- making.....正在制作包子...
- Producer A君 has produced 3 baozi..
- eating.......
- Consumer B君 has eat 3 baozi...
- ok......
- making.....正在制作包子...
- Producer A君 has produced 4 baozi..
- eating.......
- Consumer C君 has eat 4 baozi...
- ok......
- making.....正在制作包子...
- Producer A君 has produced 5 baozi..
- eating.......
- Consumer D君 has eat 5 baozi...
- ok......
- making.....正在制作包子...
- Producer A君 has produced 6 baozi..
- eating.......
- Consumer B君 has eat 6 baozi...
- ok......
- making.....正在制作包子...
总结:
task_done和join必须成对出现,类似于一个通信工具,我给你发个信号,你就知道我做了某个操作
(例如:put or get) 对方就是join。如果我put or get 你就处理。(类似于收到信号就处理)
类似于,我发信号,你收到就处理,没收到就Join卡住,一直在那等待。
十三、多进程模块 multiprocessing (主要解决GIL问题)
multiprocessing (主要解决GIL问题) Multiprocessingmultiprocessingmultiprocessing
由于GIL的存在,python中的多线程其实并不是真正的多线程,如果想要充分地使用多核CPU的资源,在python中大部分情况需要使用多进程。
multiprocessing包是Python中的多进程管理包。与threading.Thread类似,它可以利用multiprocessing.Process对象来创建一个进程。该进程可以运行在Python程序内部编写的函数。该Process对象与Thread对象的用法相同,也有start(), run(), join()的方法。此外multiprocessing包中也有Lock/Event/Semaphore/Condition类 (这些对象可以像多线程那样,通过参数传递给各个进程),用以同步进程,其用法与threading包中的同名类一致。所以,multiprocessing的很大一部份与threading使用同一套API,只不过换到了多进程的情景。
一、进程的调用
调用方式1:
- #!/usr/bin/env python
- # -*- coding:utf-8 -*-
- #Author: nulige
- #多进程调用(并行)
- from multiprocessing import Process
- import time
- def f(name):
- time.sleep(1)
- print('hello', name,time.ctime())
- if __name__ == '__main__':
- p_list=[]
- for i in range(3): #子进程
- p = Process(target=f, args=('alvin',))
- p_list.append(p)
- p.start()
- for i in p_list:
- i.join()
- print('end') #主进程
执行结果:
- hello alvin Mon Jan 16 18:38:08 2017 #并行,三个同时出现
- hello alvin Mon Jan 16 18:38:08 2017
- hello alvin Mon Jan 16 18:38:08 2017
- end
调用方式2:
示例1: 1秒钟这后,4条消息同时执行
- from multiprocessing import Process
- import time
- class MyProcess(Process):
- def run(self):
- time.sleep(1)
- print ('hello', self.name,time.ctime())
- if __name__ == '__main__':
- p_list=[]
- for i in range(3):
- p = MyProcess() #进程对象
- p.start() #启动执行run方法
- p_list.append(p)
- for p in p_list:
- p.join() #子进程没有执行完,主进程会一直等待
- print('end')
执行结果:
- hello MyProcess-1 Mon Jan 16 18:56:58 2017 #结果同时出来
- hello MyProcess-2 Mon Jan 16 18:56:58 2017
- hello MyProcess-3 Mon Jan 16 18:56:58 2017
- end
示例2:daemon=True 是属性,不是方法
- #设置为守护进程,打印的就是end
- from multiprocessing import Process
- import time
- class MyProcess(Process):
- def run(self):
- time.sleep(1)
- print ('hello', self.name,time.ctime())
- if __name__ == '__main__':
- p_list=[]
- for i in range(3):
- p = MyProcess() #进程对象
- p.daemon=True #是属性,不是方法
- p.start() #启动执行sun方法
- p_list.append(p)
- print('end') #主进程执行完之后,不管守护进程
执行结果:
- end
调用方法3:
- from multiprocessing import Process
- import os
- import time
- def info(title):
- print("title:", title)
- print('parent process:', os.getppid()) #父进程的pid
- print('process id:', os.getpid()) #打印进程号
- 9
- def f(name):
- info('function f')
- print('hello', name)
- if __name__ == '__main__':
- info('main process line')
- time.sleep(1)
- print("------------------")
- p = Process(target=info, args=('yuan',))
- p.start()
- p.join()
执行结果:
- title: main process line
- parent process: 4204
- process id: 7280
- ------------------
- title: yuan
- parent process: 7280
- process id: 3596
二、Process类
构造方法:
Process([group [, target [, name [, args [, kwargs]]]]])
group: 线程组,目前还没有实现,库引用中提示必须是None;
target: 要执行的方法;
name: 进程名;
args/kwargs: 要传入方法的参数。
实例方法:
is_alive():返回进程是否在运行。
join([timeout]):阻塞当前上下文环境的进程程,直到调用此方法的进程终止或到达指定的timeout(可选参数)。
start():进程准备就绪,等待CPU调度
run():strat()调用run方法,如果实例进程时未制定传入target,这star执行t默认run()方法。
terminate():不管任务是否完成,立即停止工作进程
属性:
daemon:和线程的setDeamon功能一样
name:进程名字。
pid:进程号。
示例:
- #!/usr/bin/env python
- # -*- coding:utf-8 -*-
- #Author: nulige
- import time
- from multiprocessing import Process
- class MyProcess(Process):
- def __init__(self,num):
- super(MyProcess,self).__init__()
- self.num=num
- def run(self):
- time.sleep(1)
- print(self.pid)
- print(self.is_alive())
- print(self.num)
- time.sleep(1)
- if __name__ == '__main__':
- p_list=[]
- for i in range(10):
- p = MyProcess(i)
- p_list.append(p)
- for p in p_list:
- p.start()
- print('main process end')
执行结果:
- main process end
- 7104
- True
- 2
- 7960
- True
- 3
- 9016
- True
- 1
- 4604
- True
- 7
- 1280
- True
- 6
- 7896
- True
- 5
- 7704
- True
- 0
- 8760
- True
- 9
- 7088
- True
- 8
- 2976
- True
- 4
三、进程间通讯
1、进程对列Queue
示例:
- #!/usr/bin/env python
- # -*- coding:utf-8 -*-
- #Author: nulige
- #进程通信 (拷贝了一份数据),在linux上ID是一样的。
- import time
- import multiprocessing
- def foo(q):
- time.sleep(1)
- print("son process",id(q))
- q.put(123)
- q.put("yuan")
- if __name__ == '__main__':
- q=multiprocessing.Queue()
- p=multiprocessing.Process(target=foo,args=(q,)) #传q是数据复制了一份,消耗内存
- p.start()
- print("main process",id(q))
- print(q.get())
- print(q.get())
执行结果:
- main process 31888848 #在windows上运行结果
- son process 35289968
- 123
- yuan
- ------------------------------------------------------------
- ('main process', ) #在linux上运行结果
- ('son process', )
- 123
- yuan
2、管道
- #!/usr/bin/env python
- # -*- coding:utf-8 -*-
- #Author: nulige
- #管道
- from multiprocessing import Process, Pipe
- def f(conn):
- conn.send([12, {"name":"yuan"}, 'hello']) #发送消息
- response=conn.recv() #接收消息
- print("response",response)
- conn.close()
- print("q_ID2:",id(conn))
- if __name__ == '__main__':
- parent_conn, child_conn = Pipe()
- print("q_ID1:",id(child_conn))
- p = Process(target=f, args=(child_conn,))
- p.start()
- print(parent_conn.recv()) #接收消息 prints "[42, None, 'hello']"
- parent_conn.send("儿子你好!") #发送消息
- p.join()
执行结果:
- q_ID1: 11578512
- [12, {'name': 'yuan'}, 'hello']
- response 儿子你好!
- q_ID2: 31830928
3、Managers
Queue和pipe只是实现了数据交互,并没实现数据共享,即一个进程去更改另一个进程的数据。
A manager object returned by Manager() controls a server process which holds Python objects and allows other processes to manipulate them using proxies.
A manager returned by Manager() will support types list, dict, Namespace, Lock, RLock, Semaphore, BoundedSemaphore, Condition, Event, Barrier, Queue, Value and Array. For example:
- #!/usr/bin/env python
- # -*- coding:utf-8 -*-
- #Author: nulige
- from multiprocessing import Process, Manager
- def f(d, l,n):
- d[n] = '' #{0:"1"}
- d[''] = 2 #{0:"1","2":2}
- l.append(n) #[0.1.2.3.4.0]
- # print(l)
- print("son process:",id(d),id(l))
- if __name__ == '__main__':
- with Manager() as manager: #用with相当于打开文件就不要关闭了
- d = manager.dict() #{} #主进程
- l = manager.list(range(5)) #[0,1,2,3,4]
- print("main process:",id(d),id(l))
- p_list = []
- for i in range(10): #10个子进程
- p = Process(target=f, args=(d,l,i)) #主进程传过去
- p.start()
- p_list.append(p)
- for res in p_list:
- res.join()
- print(d)
- print(l)
执行结果:
- main process: 23793136 50481712
- son process: 34508592 34286736
- son process: 23695120 23342192
- son process: 30969648 30682256
- son process: 23760656 23473264
- son process: 23432976 23080048
- son process: 31428368 31140976
- son process: 18976592 18754736
- son process: 20025072 19606608
- son process: 23301904 23014512
- son process: 26185488 25898096
- {0: '', 1: '', 2: '', 3: '', 4: '', '': 2, 6: '', 7: '', 8: '', 9: '', 5: ''}
- [0, 1, 2, 3, 4, 1, 2, 3, 9, 6, 0, 8, 5, 4, 7]
十四、进程同步
python2: 在python2中是元组,因为共享一个屏幕,会出现串行的情况,所以需要加把锁
python3: 在python3中,加不加锁,都不会出现串行的问题
示例1:
- #有锁的情况
- #!/usr/bin/env python
- # -*- coding:utf-8 -*-
- #Author: nulige
- from multiprocessing import Process,Lock
- import time
- def f(l, i):
- l.acquire()
- time.sleep(1)
- print('hello world %s' % i)
- l.release()
- if __name__ == '__main__':
- lock = Lock()
- for num in range(10):
- Process(target=f, args=(lock, num)).start()
执行结果:
- hello world 4
- hello world 5
- hello world 1
- hello world 2
- hello world 0
- hello world 8
- hello world 3
- hello world 9
- hello world 7
- hello world 6
示例2: 有锁的情况
- #有锁的情况
- from multiprocessing import Process,Lock
- def f(l,i):
- l.acquire()
- print('hello world',i) #python2是元组(因为共享一个屏幕,在python2中会串行,所以需要加把锁)
- # print('hello world %s' %i)
- l.release()
- if __name__ == '__main__':
- lock = Lock()
- for num in range(10):
- Process(target=f,args=(lock,num)).start()
执行结果:
- hello world 1
- hello world 7
- hello world 3
- hello world 2
- hello world 4
- hello world 0
- hello world 8
- hello world 9
- hello world 6
- hello world 5
示例2:没有锁的情况
- #没有锁的情况(在python2.7下,才能看到效果)
- from multiprocessing import Process,Lock
- def f(l,i):
- print('hello world %s' %i)
- if __name__ == '__main__':
- lock = Lock()
- for num in range(100):
- Process(target=f,args=(lock,num)).start()
执行结果:
- #在python2.7中,没有锁会出现串行的情况
- D:\python\day35>python2 s6.py
- hello world 1
- hello world 0
- hello world 6
- hello world 2
- hello world 5
- hhello world 4ello world 3
- hhhhello world 15
- hello world 9
- hhello world 24
- hhhello world 25
- hello world 29
- ello world 12hello world 28hello world 10hello world 49
- hhhhhello world 59
- hello world 63
- hello world 78
- hello world 77
- ello world 46hello world 70hhello world 57hhello world 58
- h
- hhello world 13hhello world 54ello world 39h
- ello world 44hhello world 69
- hello world 88
- hhhhhhello world 45
- hello world 38hello world 22
- hhello world 42
- ello world 52hhello world 90ello world 30
- hh
- hhhello world 18
- ello world 21h
- hhhello world 32hhhello world 91
- hh
- ello world 89ello world 53hello world 85hh
- hhhello world 27ello world 35
- h
- h
- ello world 62h
- hhhello world 23ello world 68ello world 14
- ello world 65ello world 66ello world 73
- hhhhhello world 71hhello world 37hh
- ello world 11hello world 7ello world 8ello world 20ello world 50ello world 81ello world 17
- ello world 31hello world 82
- ello world 16ello world 83
- ello world 94ello world 61
- ello world 26hello world 96ello world 40ello world 64ello world 51ello world 48
- ello world 33hello world 86hhello world 55ello world 75ello world 79ello world 41
- ello world 74
- ello world 76ello world 67ello world 56ello world 95
- ello world 47ello world 84
- ello world 72
十五、进程池(python没有线程池)
进程池内部维护一个进程序列,当使用时,则去进程池中获取一个进程,如果进程池序列中没有可供使用的进进程,那么程序就会等待,直到进程池中有可用进程为止。
进程池中有两个方法:
- apply:同步方法
- apply_async :异步方法
示例1:
- #!/usr/bin/env python
- # -*- coding:utf-8 -*-
- #Author: nulige
- from multiprocessing import Process,Pool
- import time,os
- def Foo(i):
- time.sleep(1)
- print(i)
- if __name__ == '__main__':
- pool = Pool(5) #进程池的数量
- for i in range(100): #进程数
- # pool.apply(func=Foo, args=(i,)) #同步接口
- pool.apply_async(func=Foo, args=(i,)) #用异步接口
- pool.close()
- pool.join() #join和close顺序是固定的
- print('end')
执行结果:
- 0
- 2
- 3
- 1
- 4
- 5
- 7
- 8
- 6
- 9
- 10
- 11
- 13
- 12
- 14
- 15
- 18
- 16
- 17
- 19
- 省略部分代码.......
示例2:
- from multiprocessing import Process,Pool
- import time,os
- def Foo(i):
- time.sleep(1)
- print(i)
- print("son:",os.getpid())
- return "HELLO %s "%i
- def Bar(arg): #回调函数
- print(arg)
- # print("hello")
- # print("Bar:",os.getpid())
- if __name__ == '__main__':
- pool = Pool(5) #进程池的数量
- print("main pid", os.getpid())
- for i in range(100): #进程数
- #pool.apply(func=Foo, args=(i,))
- # pool.apply_async(func=Foo, args=(i,))
- #回调函数: 就是某个动作或者函数执行成功后再去执行的函数
- pool.apply_async(func=Foo, args=(i,),callback=Bar)
- pool.close()
- pool.join()
- print('end')
执行结果:
- main pid 1220
- 0
- son: 3920
- HELLO 0
- 1
- son: 8660
- HELLO 1
- 2
- son: 1948
- HELLO 2
- 3
- son: 5808
- HELLO 3
- 4
- 部分结果省略............
示例3:子进程的结果,告诉callback,相当于获取子进程执行的结果。
- #!/usr/bin/env python
- # -*- coding:utf-8 -*-
- #Author: nulige
- from multiprocessing import Process,Lock,Pool
- import time
- #进程池
- def f(i):
- print('hello world %s'% i)
- time.sleep(1)
- return i
- def callback(data): #i的返回值给callback,其实就是个回执,告诉你干完活了。
- print("exec done--->",data)
- if __name__=='__main__':
- lock = Lock()
- pool = Pool(processes=5)
- for num in range(100):
- pool.apply_async(func=f, args=(num,), callback=callable) #子进程干完的结果,返回给callable
- pool.close()
- pool.join() #进程池中进程执行完毕后再关闭,如果注释,那么程序直接关闭。
执行结果:
- hello world 0 #分别5行,5行输出结果
- hello world 1
- hello world 2
- hello world 3
- hello world 4
- hello world 5
- hello world 6
- hello world 7
- hello world 8
- hello world 9
- hello world 10
- hello world 11
- hello world 12
- hello world 13
- hello world 14
十六、协程
协程,又称微线程,纤程。英文名Coroutine。
优点1: 协程极高的执行效率。因为子程序切换不是线程切换,而是由程序自身控制,因此,没有线程切换的开销,和多线程比,线程数量越多,协程的性能优势就越明显。
优点2: 不需要多线程的锁机制,因为只有一个线程,也不存在同时写变量冲突,在协程中控制共享资源不加锁,只需要判断状态就好了,所以执行效率比多线程高很多。
因为协程是一个线程执行,那怎么利用多核CPU呢?最简单的方法是多进程+协程,既充分利用多核,又充分发挥协程的高效率,可获得极高的性能。
示例:复习生成器
- #生成器
- def f():
- print("ok")
- s = yield 6
- print(s)
- print("ok2")
- yield
- gen=f()
- # print(gen)
- # next(gen) #方法一
- # next(gen)
- RET=gen.__next__() #方法二
- print(RET)
- gen.send(5) #方法三
执行结果:
- ok
- 6
- 5
- ok2
1、yield的简单实现
示例1:
- #!/usr/bin/env python
- # -*- coding:utf-8 -*-
- #Author: nulige
- import time
- import queue
- def consumer(name):
- print("--->ready to eat baozi........")
- while True:
- new_baozi = yield #yield实现上下文切换,传包子进来
- print("[%s] is eating baozi %s" % (name,new_baozi))
- #time.sleep(1)
- def producer():
- r = con.__next__()
- r = con2.__next__()
- n = 0
- while 1:
- time.sleep(1)
- print("\033[32;1m[producer]\033[0m is making baozi %s and %s" %(n,n+1) )
- con.send(n) #发送告诉他有包子了
- con2.send(n+1)
- n +=2
- if __name__ == '__main__':
- con = consumer("c1")
- con2 = consumer("c2")
- producer()
执行结果:
- --->ready to eat baozi........
- --->ready to eat baozi........
- [producer] is making baozi 0 and 1
- [c1] is eating baozi 0
- [c2] is eating baozi 1
- [producer] is making baozi 2 and 3
- [c1] is eating baozi 2
- [c2] is eating baozi 3
- [producer] is making baozi 4 and 5
- [c1] is eating baozi 4
- [c2] is eating baozi 5
- [producer] is making baozi 6 and 7
- [c1] is eating baozi 6
- [c2] is eating baozi 7
- [producer] is making baozi 8 and 9
- [c1] is eating baozi 8
- [c2] is eating baozi 9
- [producer] is making baozi 10 and 11
- [c1] is eating baozi 10
- [c2] is eating baozi 11
- 省略部分........
2、Greenlet
greenlet是一个用C实现的协程模块,相比与python自带的yield,它可以使你在任意函数之间随意切换,而不需把这个函数先声明为generator
- from greenlet import greenlet
- def test1():
- print(12)
- gr2.switch()
- print(34)
- gr2.switch()
- def test2():
- print(56)
- gr1.switch()
- print(78)
- gr1 = greenlet(test1)
- gr2 = greenlet(test2)
- gr1.switch()
20 test2()
3、Gevent
- #!/usr/bin/env python
- # -*- coding:utf-8 -*-
- #Author: nulige
- import gevent
- import requests,time
- start=time.time()
- def f(url):
- print('GET: %s' % url)
- resp =requests.get(url)
- data = resp.text
- print('%d bytes received from %s.' % (len(data), url))
- gevent.joinall([
- gevent.spawn(f, 'https://www.python.org/'),
- gevent.spawn(f, 'https://www.yahoo.com/'),
- gevent.spawn(f, 'https://www.baidu.com/'),
- gevent.spawn(f, 'https://www.sina.com.cn/'),
- ])
- #上下时间对比
- # f('https://www.python.org/')
- #
- # f('https://www.yahoo.com/')
- #
- # f('https://baidu.com/')
- #
- # f('https://www.sina.com.cn/')
- print("cost time:",time.time()-start)
协程的优势:
1、没有切换的消
2、没有锁的概念
有一个问题:能用多核吗?
答:可以采用多进程+协程,是一个很好的解决并发的方案
Python并发编程-进程 线程 同步锁 线程死锁和递归锁的更多相关文章
- 第十五章、Python多线程同步锁,死锁和递归锁
目录 第十五章.Python多线程同步锁,死锁和递归锁 1. 引子: 2.同步锁 3.死锁 引子: 4.递归锁RLock 原理: 不多说,放代码 总结: 5. 大总结 第十五章.Python多线程同步 ...
- 26 python 初学(线程、同步锁、死锁和递归锁)
参考博客: www.cnblogs.com/yuanchenqi/articles/5733873.html 并发:一段时间内做一些事情 并行:同时做多件事情 线程是操作系统能够进行运算调度的基本单位 ...
- Python之路(第四十四篇)线程同步锁、死锁、递归锁、信号量
在使用多线程的应用下,如何保证线程安全,以及线程之间的同步,或者访问共享变量等问题是十分棘手的问题,也是使用多线程下面临的问题,如果处理不好,会带来较严重的后果,使用python多线程中提供Lock ...
- python全栈开发,Day42(Thread类的其他方法,同步锁,死锁与递归锁,信号量,事件,条件,定时器,队列,Python标准模块--concurrent.futures)
昨日内容回顾 线程 什么是线程? 线程是cpu调度的最小单位 进程是资源分配的最小单位 进程和线程是什么关系? 线程是在进程中的一个执行单位 多进程 本质上开启的这个进程里就有一个线程 多线程 单纯的 ...
- GIL全局解释器锁、死锁、递归锁、线程队列
目录 GIL全局解释锁 多线程的作用 测试计算密集型 IO密集型 死锁现象 递归锁 信号量(了解) 线程队列 GIL全局解释锁 GIL本质上是一个互斥锁. GIL是为了阻止同一个进程内多个进程同时执行 ...
- python多线程,event,互斥锁,死锁,递归锁,信号量
Python多线程/event 多线程-threading python的thread模块是⽐较底层的模块, python的threading模块是对thread做了⼀些包装的, 可以更加⽅便的被使⽤ ...
- GIL锁、死锁、递归锁、定时器
GIL (Global Interpreter Lock) 锁 '''定义:In CPython, the global interpreter lock, or GIL, is a mutex th ...
- Python之路【第十六篇】:Python并发编程|进程、线程
一.进程和线程 进程 假如有两个程序A和B,程序A在执行到一半的过程中,需要读取大量的数据输入(I/O操作), 而此时CPU只能静静地等待任务A读取完数据才能继续执行,这样就白白浪费了CPU资源. 是 ...
- python 并发编程 进程池与线程池
一 进程池与线程池 1.为什么需要进程池和线程池 基于多进程或多线程实现并发的套接字通信,然而这种实现方式的致命缺陷是: 服务端的程序运行在一台机器身上,一台机器性能是有极限的,不能无限开线程 服务的 ...
随机推荐
- CI框架中site_url()和base_url()的区别
背景:在使用CI框架的使用经常碰到跳转和路径方面的问题,site_url()和base_url()很容易混淆,下面来说说他们的区别! 假如你config文件里面的base_url和index_page ...
- CSUOJ 1901 赏赐 OR 灾难 单调栈
Description 大G南征北战终于打下了大片土地成立了G国,大G在开国大典上传召帮助自己南征北战的三大开国元勋小A,小B,小C进殿,并要赏赐三人大量宝物以显示天恩浩荡.大G在征服其他国家的时候抢 ...
- SpringBoot常用配置
前言:springboot集成了主流的第三方框架,但是需要使用springboot那一套配置方式.但是我这里只列举了非常非常常用的,可以看已发的几篇博客,慢慢会补充.当然官方文档里也有相应的配置,可惜 ...
- bzoj——2127: happiness
2127: happiness Time Limit: 51 Sec Memory Limit: 259 MBSubmit: 2570 Solved: 1242[Submit][Status][D ...
- awk 提取列
awk '{OFS="";print(substr($0,1,6),substr($0,74,18),substr($0,15,3),substr($0,18,8))}' inpu ...
- oneDay
难受过 迷茫过 失望过 耍脾气过 开心过 伤心过 疼过 走了这么久的路: 我只想说 程序的道路上 很难走: 本来准备都放弃了: 自己逼自己了很久想明白了: 不能什么时候都想着靠外力 自己的不足就是自己 ...
- [leetcode tree]101. Symmetric Tree
Given a binary tree, check whether it is a mirror of itself (ie, symmetric around its center). For e ...
- MyBatis之MyBatis环境搭建
MyBatis之MyBatis环境搭建 一.MyBatis开发环境搭建 1.引入Jar包 ①MyBatis mybatis-3.4.1.jar ant-1.9.6.jar ant-launcher-1 ...
- java设计模式(五)责任链模式
很多对象有每个对象对其下家的引用而连接起来形成一条链,请求在这条链上传递,直到链上某个对象决定处理此请求,应用场景如单位审批流程等. 要点:1)抽象处理者角色:定义处理请求接口及设定下家引用 2 ...
- bzoj1503 Splay 维护名次数,支持删除
题目:http://www.lydsy.com/JudgeOnline/problem.php?id=1503 题解: 维护一颗Splay和一个外部变量,树中每个节点表示一个人,节点权值a + 外部变 ...