Docker namespace,cgroup,镜像构建,数据持久化及Harbor安装、高可用配置
1.Docker namespace
1.1 namespace介绍
namespace是Linux提供的用于分离进程树、网络接口、挂载点以及进程间通信等资源的方法。可以使运行在同一台机器上的不同服务能做到完全隔离,就像运行在多台不同的机器上一样。
当Docker创建一个容器时,它会创建新的以上六种NameSpace的实例,然后把容器中的所有进程放到这些NameSpace之中,使得容器这个父进程只对自己的子进程有感知,而对于宿主机其他进程一无所知,从而产生一种它就是一个独立的系统的“错觉”。
Docker技术通过Linux内核实现了六种NameSpace,如下:
| NameSpace | 系统调用参数 | 隔离内容 |
|---|---|---|
| UTS | CLONE_NEWUTS | 主机名与域名 |
| IPC | CLONE_NEWIPC | 信息量、消息队列和共享内存 |
| PID | CLONE_NEWPID | 进程编号 |
| NET | CLONE_NEWNET | 网络设备、网络栈、端口等等 |
| MNt | CLONE_NEWNS | 挂载点(文件系统 |
| USER | CLONE_NEWUSER | 用户和用户组 |
- UTS:允许每个container拥有独立的hostname(主机名)和domainname(域名),使其在网络上可以被视作一个独立的节点而非Host上的一个进程。
- IPC:contaner中进程交互还是采用linux常见的进程间交互方法,包括常见的信号量,消息队列和共享内存。container的进程间交互实际上还是host上具有相同pid中的进程交互。
- PID:不同用户的进程就是通过pid namesapce隔离开的,且不同namespace中可以有相同pid。所有的LXC(linux containers)进程在docker中的父进程为docker进程,每个LXC进程具有不同的namespace。
- NET:不同用户的进程就是通过pidnamespace隔离开的,且不同namespace中可以有相同pid。所有的LXC进程在docker中的父进程为docker进程,每个lxc进程具有不同的namespace。
- MNT:文件系统的挂载点。
- USRE:每个container可以有不同的user和groupid,也就是说可以在container内部用container内部的用户执行程序而非Host上的用户。
1.2 开启user namespace
USER namespace默认不开启,开启方法如下(开启默认账号下的镜像和容器将不可见):(参考docker官网 https://docs.docker.com/engine/security/userns-remap/)
# 创建普通用户

useradd testuser

# 查看是用哪个普通用户

cat /etc/subuid

user:100000:65536

testuser:165536:65536

# 开启user namespace,使用testuser账号

vim /etc/docker/daemon.json

{

    "userns-remap": "testuser"

}

# 重启docker使配置生效

systemctl daemon-reload && systemctl restart docker

# 验证是否开启

 docker info |grep  -A 4 'Security Options:'

WARNING: No swap limit support

 Security Options:

  apparmor

  seccomp

   Profile: default

  userns
1.3 user namespace验证
启用完成后,原有的images和容器将不可见(没有删除,ls -l /var/lib/docker/可以查看)
使用Dockerfile重新构建1个镜像
启动2个容器
docker run -d -p 87:80 --name c7 alpine_nginx1.80_yun_base_cms:20210910-v3

9929d3013cb930503989feef5c11f143118384c6925bce447ba46779dff2be9e

docker run -d -p 88:80 --name c8 alpine_nginx1.80_yun_base_cms:20210910-v3

7c5e3ed5d2084cb56251b97a3d1e92da9b0ca659b14ea956e283f02dfdba5998
查看2个容器的详细信息,发现容器文件被放在了 /var/lib/docker/165536.165536
165536正是testuser的id
ls -l /var/lib/docker/165536.165536/containers/

总用量 8

drwx-----x 4 root root 4096 9月  10 15:46 7c5e3ed5d2084cb56251b97a3d1e92da9b0ca659b14ea956e283f02dfdba5998

drwx-----x 4 root root 4096 9月  10 15:46 9929d3013cb930503989feef5c11f143118384c6925bce447ba46779dff2be9e
通过刚启动的2个nginx容器,查看其namespace id都不相同
pstree -p 1 |grep nginx

           |-containerd-shim(70769)-+-nginx(70793)---nginx(70843)

           |-containerd-shim(70904)-+-nginx(70925)---nginx(70974)

root@u20-docker:/data/docker-file/yun/front# ls -l /proc/70793/ns/

总用量 0

lrwxrwxrwx 1 165536 165536 0 9月  10 16:33 cgroup -> 'cgroup:[4026531835]'

lrwxrwxrwx 1 165536 165536 0 9月  10 16:33 ipc -> 'ipc:[4026532252]'

lrwxrwxrwx 1 165536 165536 0 9月  10 16:33 mnt -> 'mnt:[4026532250]'

lrwxrwxrwx 1 165536 165536 0 9月  10 15:46 net -> 'net:[4026532255]'

lrwxrwxrwx 1 165536 165536 0 9月  10 16:33 pid -> 'pid:[4026532253]'

lrwxrwxrwx 1 165536 165536 0 9月  10 16:37 pid_for_children -> 'pid:[4026532253]'

lrwxrwxrwx 1 165536 165536 0 9月  10 16:33 user -> 'user:[4026532249]'

lrwxrwxrwx 1 165536 165536 0 9月  10 16:33 uts -> 'uts:[4026532251]'

root@u20-docker:/data/docker-file/yun/front# ls -l /proc/70925/ns

总用量 0

lrwxrwxrwx 1 165536 165536 0 9月  10 16:33 cgroup -> 'cgroup:[4026531835]'

lrwxrwxrwx 1 165536 165536 0 9月  10 16:33 ipc -> 'ipc:[4026532358]'

lrwxrwxrwx 1 165536 165536 0 9月  10 16:33 mnt -> 'mnt:[4026532356]'

lrwxrwxrwx 1 165536 165536 0 9月  10 15:46 net -> 'net:[4026532361]'

lrwxrwxrwx 1 165536 165536 0 9月  10 16:33 pid -> 'pid:[4026532359]'

lrwxrwxrwx 1 165536 165536 0 9月  10 16:37 pid_for_children -> 'pid:[4026532359]'

lrwxrwxrwx 1 165536 165536 0 9月  10 16:33 user -> 'user:[4026532355]'

lrwxrwxrwx 1 165536 165536 0 9月  10 16:33 uts -> 'uts:[4026532357]'
官方文档指出如果开启了user namespace,在使用中会有一些兼容性问题,如下:
- 与主机共享 PID 或 NET 命名空间(--pid=host或--network=host)。
- 不知道或无法使用守护程序用户映射的外部(卷或存储)驱动程序。
- --privileged在docker run不指定的情况下 使用模式标志--userns=host。
2.Docker cgroup
实现cgroup是的主要目的是为不同用户层面的资源管理,提供一个统一化的接口。从单个进程的资源控制到操作系统层面的虚拟化。
cgroup的作用:
1) 资源的限制:cgroup可以对进程组使用的资源总额进行限制。
2) 优先级分配:通过分配的cpu时间片数量及磁盘IO带宽大小,实际上就是相当于控制了进程运行的优先级
3) 资源统计:Cgroup可以统计系统资源使用量。比如cpu使用时间,内存使用量等。
可用于按量计费。
4) 进程控制:可以对进程组执行挂起,恢复等操作。
2.1 内存限制
ram物理内存,swap交换内存
-m (-memory) 限制ram内存空间,接收k,b,m,g作为单位
--memory-swap * 限制交换内存空间使用,使用它的前提必须先设定-m,没有设置物理内存,就不能设置交换分区
--memory-swappiness 使用memory的倾向性(0-100),0表示能不用交换内存就不用
--memory-reservation 预留的内存空间
--oom-kill-disable 禁止OOM被KILL掉,如容器很消耗内存,但是又很重要不能被kill
# 下载测试的镜像

docker pull lorel/docker-stress-ng

# 查看帮助

docker run --name stress -it --rm -m 256m lorel/docker-stress-ng:latest stress --vm 2 --help

...

Example: stress-ng --cpu 8 --io 4 --vm 2 --vm-bytes 128M --fork 4 --timeout 10s

# 启动2个测试进程,每个256M内存,一共512M内存

docker run --name stress -it --rm lorel/docker-stress-ng:latest stress --vm 2 --vm-bytes 256M

# 可以看到内存被使用到512M左右

CONTAINER ID   NAME      CPU %     MEM USAGE / LIMIT   MEM %     NET I/O     BLOCK I/O   PIDS

c5a28d745ac6   stress    200.20%   517MiB / 31.36GiB   1.61%     876B / 0B   0B / 0B     5

# 增加内存限制

docker run --name stress -it --rm -m 128m lorel/docker-stress-ng:latest stress --vm 2 --vm-bytes 512M

CONTAINER ID   NAME      CPU %     MEM USAGE / LIMIT   MEM %     NET I/O     BLOCK I/O    PIDS

dc71296dbf07   stress    80.59%    128MiB / 128MiB     100.00%   876B / 0B   836MB / 0B   5

# 可以动态调整限制内存的大小

cat /sys/fs/cgroup/memory/docker/e80d25e568e61c1ec417451978361a6f1c3e41df995824d331105f4ded9752eb/memory.limit_in_bytes

134217728

echo '268435456' > /sys/fs/cgroup/memory/docker/e80d25e568e61c1ec417451978361a6f1c3e41df995824d331105f4ded9752eb/memory.limit_in_bytes

CONTAINER ID   NAME      CPU %     MEM USAGE / LIMIT   MEM %     NET I/O       BLOCK I/O   PIDS

e80d25e568e6   stress    27.21%    256MiB / 256MiB     99.99%    1.16kB / 0B   13GB / 0B   5
2.2 cpu 限制
--cpu-shares CPU资源共享,按比例切分系统上所有可用的CPU资源, 如当前系统上一共运行了两个容器,权重比是1024:512的值,假设两个容器不需要尽可能多的使用CPU,CPU资源假设有100份,两个容器的比例是2:1, 如果第二个容器启动几乎都不需要CPU资源,这时第一个容器可以占用所有的CPU资源,就是需要就按比例分,不需要就给需要用的。CPU是可压缩资源,随时按比例运行。
--cpus=<value> 一个容器可以使用几核心,可以使用小数,如1.5核(限制数量)
--cpuset-cpus 进程只能运行在指定那个核上(限制范围)
# 限制为2个cpu --cpus=2

docker run -it --rm --cpus=2 --name cputest lorel/docker-stress-ng:latest stress --vm 8

CONTAINER ID   NAME      CPU %     MEM USAGE / LIMIT   MEM %     NET I/O       BLOCK I/O   PIDS

46412d462677   cputest   196.95%   1.7GiB / 31.36GiB   5.42%     1.02kB / 0B   0B / 0B     17

top - 18:04:52 up 3 days,  1:50,  3 users,  load average: 1.11, 1.74, 1.41

任务: 279 total,   9 running, 270 sleeping,   0 stopped,   0 zombie

%Cpu0  : 16.2 us, 11.3 sy,  0.0 ni, 72.5 id,  0.0 wa,  0.0 hi,  0.0 si,  0.0 st

%Cpu1  :  0.3 us,  0.3 sy,  0.0 ni, 99.3 id,  0.0 wa,  0.0 hi,  0.0 si,  0.0 st

%Cpu2  : 17.4 us, 10.3 sy,  0.0 ni, 72.3 id,  0.0 wa,  0.0 hi,  0.0 si,  0.0 st

%Cpu3  : 16.5 us, 11.3 sy,  0.0 ni, 72.2 id,  0.0 wa,  0.0 hi,  0.0 si,  0.0 st

%Cpu4  :  0.0 us,  0.0 sy,  0.0 ni,100.0 id,  0.0 wa,  0.0 hi,  0.0 si,  0.0 st

%Cpu5  :  0.3 us,  0.7 sy,  0.0 ni, 99.0 id,  0.0 wa,  0.0 hi,  0.0 si,  0.0 st

%Cpu6  :  0.7 us,  0.3 sy,  0.0 ni, 99.0 id,  0.0 wa,  0.0 hi,  0.0 si,  0.0 st

%Cpu7  :  0.0 us,  0.0 sy,  0.0 ni,100.0 id,  0.0 wa,  0.0 hi,  0.0 si,  0.0 st

%Cpu8  : 17.1 us, 10.6 sy,  0.0 ni, 72.3 id,  0.0 wa,  0.0 hi,  0.0 si,  0.0 st

%Cpu9  :  0.0 us,  0.0 sy,  0.0 ni,100.0 id,  0.0 wa,  0.0 hi,  0.0 si,  0.0 st

%Cpu10 :  0.0 us,  0.0 sy,  0.0 ni,100.0 id,  0.0 wa,  0.0 hi,  0.0 si,  0.0 st

%Cpu11 : 16.8 us, 11.0 sy,  0.0 ni, 72.3 id,  0.0 wa,  0.0 hi,  0.0 si,  0.0 st

%Cpu12 : 16.8 us,  9.4 sy,  0.0 ni, 73.9 id,  0.0 wa,  0.0 hi,  0.0 si,  0.0 st

%Cpu13 : 19.0 us,  8.4 sy,  0.0 ni, 72.6 id,  0.0 wa,  0.0 hi,  0.0 si,  0.0 st

%Cpu14 : 15.5 us, 12.3 sy,  0.0 ni, 72.3 id,  0.0 wa,  0.0 hi,  0.0 si,  0.0 st

%Cpu15 :  0.0 us,  0.0 sy,  0.0 ni,100.0 id,  0.0 wa,  0.0 hi,  0.0 si,  0.0 st

MiB Mem :  32115.2 total,  27112.8 free,   2366.2 used,   2636.1 buff/cache

MiB Swap:   4096.0 total,   4092.0 free,      4.0 used.  29291.7 avail Mem

 进程号 USER      PR  NI    VIRT    RES    SHR    %CPU  %MEM     TIME+ COMMAND

1009785 root      20   0  268420 243696    488 R  25.8   0.7   0:11.25 stress-ng-vm

1009790 root      20   0  268420 262440    488 R  25.8   0.8   0:11.41 stress-ng-vm

1009792 root      20   0  268420 262440    488 R  25.8   0.8   0:11.36 stress-ng-vm

1009794 root      20   0  268420 242112    488 R  25.8   0.7   0:11.13 stress-ng-vm

1009787 root      20   0  268420 262440    488 R  25.5   0.8   0:11.40 stress-ng-vm

1009788 root      20   0  268420 236832    488 R  25.2   0.7   0:11.19 stress-ng-vm

1009795 root      20   0  268420 215448    488 R  25.2   0.7   0:11.14 stress-ng-vm

1009796 root      20   0  268420 236304    488 R  24.5   0.7   0:11.23 stress-ng-vm

# 限制为1个cpu --cpus=1

/data/docker-file/yun/front# docker run -it --rm --cpus=1 --name cputest lorel/docker-stress-ng:latest stress --vm 8

CONTAINER ID   NAME      CPU %     MEM USAGE / LIMIT     MEM %     NET I/O     BLOCK I/O   PIDS

7e24493aa9de   cputest   97.98%    999.2MiB / 31.36GiB   3.11%     736B / 0B   0B / 0B     17

# 限制为0.5个cpu --cpus=0.5

docker run -it --rm --cpus=0.5 --name cputest lorel/docker-stress-ng:latest stress --vm 8

CONTAINER ID   NAME      CPU %     MEM USAGE / LIMIT    MEM %     NET I/O     BLOCK I/O   PIDS

e09ef68d133c   cputest   48.95%    2.01GiB / 31.36GiB   6.41%     876B / 0B   0B / 0B     17
3.镜像构建
3.1 使用alipne构建nginx
目录及文件准备
mkdir -p /data/docker-file/yun/{front,backend,db,stor}

cd /data/docker-file/yun/front

ls -l

总用量 9764

drwxr-xr-x 2 root root    4096 9月  10 18:48 ./

drwxr-xr-x 5 root root    4096 9月   7 18:15 ../

-rw-r--r-- 1 root root 6836681 9月   7 16:40 base_cms_html.tgz

-rw-r--r-- 1 root root     760 9月  10 18:46 bms.faxuanyun.com.conf

-rw-r--r-- 1 root root    1270 9月  10 14:43 Dockerfile

-rw-r--r-- 1 root root 1039530 9月   7 16:43 nginx-1.18.0.tar.gz

-rw-r--r-- 1 root root    1155 9月  10 18:40 nginx.conf

-rw-r--r-- 1 root root 2090750 2月  13  2020 pcre-8.44.tar.gz

-rw-r--r-- 1 root root     425 9月  10 18:48 tool.ip.faxuan.com.conf
Docderfile文件编写
cat Dockerfile

# yun front html for base,cms

# yanqianling 2021.9.7

FROM 192.168.1.8/base-os/alpine_20210907:3.14.2

LABEL maintainer="yanql<yanqianling@faxuan.net>"

# 复制nginx,pcre的包到/usr/local/src

ADD nginx-1.18.0.tar.gz  pcre-8.44.tar.gz /tmp/

# 将alpine-linux:apk的安装源改为国内镜像并安装依赖包

RUN sed -i 's/dl-cdn.alpinelinux.org/mirrors.ustc.edu.cn/g' /etc/apk/repositories && \

    apk add wget gcc g++ make libressl-dev zlib-dev

# 编译nginx

RUN cd /tmp/nginx-1.18.0 && \

    ./configure --prefix=/usr/local/nginx --with-pcre=/tmp/pcre-8.44 --with-http_realip_module --with-http_stub_status_module --with-http_ssl_module && \

    make && make install && \

    ln -s /usr/local/nginx/sbin/nginx /usr/sbin/ && \

    mkdir /usr/local/nginx/conf/vhosts && \

    rm -rf /tmp/*

# 增加nginx用户

RUN addgroup  -g 2019 -S nginx && adduser  -s /sbin/nologin -S -D  -u 2019 -G nginx nginx

# 复制配置文件到镜像中

COPY  nginx.conf /usr/local/nginx/conf/

COPY  tool.ip.faxuan.com.conf /usr/local/nginx/conf/vhosts/

COPY  bms.faxuanyun.com.conf /usr/local/nginx/conf/vhosts/

ADD base_cms_html.tgz /usr/local/nginx/

RUN chown -R nginx.nginx /usr/local/nginx/

# 开放80端口

EXPOSE 80

# 启动nginx命令

CMD ["nginx", "-g", "daemon off;"]
构建镜像
docker build -t alpine_nginx1.80_yun_base_cms:20210910-v6

...

Successfully built 4e9ffc08888b

Successfully tagged alpine_nginx1.80_yun_base_cms:20210910-v6
使用镜像启动容器进行测试
docker run -d --name nginx_cms -p80:80 192.168.1.8/yun/front/alpine_nginx1.80_yun_base_cms:20210910-v6

43e320ac5902a6c54a0e0ce241d984db29cba3af4a939ad244c1c2950229f6fe

root@u20-docker:/data/docker-file/yun/backend# curl 'http://192.168.1.110/cms/version.txt'

cms 146578

root@u20-docker:/data/docker-file/yun/backend# curl -I 'http://192.168.1.110/cms/version.txt'

HTTP/1.1 200 OK

Server: nginx/1.18.0

Date: Fri, 10 Sep 2021 12:46:30 GMT

Content-Type: text/plain; charset=utf-8

Content-Length: 11

Last-Modified: Thu, 24 Dec 2020 10:10:37 GMT

Connection: keep-alive

Keep-Alive: timeout=60

ETag: "5fe4691d-b"

Access-Control-Allow-Origin: *

Accept-Ranges: bytes
3.2 使用alpine构建tomcat镜像
目录及文件准备
cd /data/docker-file/yun/backend

ls -l

总用量 199608

drwxr-xr-x 2 root root      4096 9月  10 20:29 ./

drwxr-xr-x 6 root root      4096 9月  10 19:03 ../

-rw-r--r-- 1 root root  10564666 8月  10 03:52 apache-tomcat-8.5.70.tar.gz

-rw-r--r-- 1 root root       750 9月  10 20:29 Dockerfile

-rw-r--r-- 1 root root   2054960 9月  10 19:58 glibc-2.29-r0.apk

-rw-r--r-- 1 root root 191757099 9月  10 19:23 jdk-8u192-linux-x64.tar.gz
Docderfile文件编写
FROM 192.168.1.8/base-os/alpine_20210907:3.14.2

LABEL maintainer="yanql<yanqianling@faxuan.net>"

# 将alpine-linux:apk的安装源改为国内镜像并安装依赖包

RUN sed -i 's/dl-cdn.alpinelinux.org/mirrors.ustc.edu.cn/g' /etc/apk/repositories

COPY glibc-2.29-r0.apk /

RUN wget -q -O /etc/apk/keys/sgerrand.rsa.pub https://alpine-pkgs.sgerrand.com/sgerrand.rsa.pub && \

    apk add glibc-2.29-r0.apk

# 复制jdk、tomcat的包到/usr/local

ADD jdk-8u192-linux-x64.tar.gz /usr/local/

ADD apache-tomcat-8.5.70.tar.gz /usr/local/

# 配置java环境变量

ENV JAVA_HOME /usr/local/jdk1.8.0_192

ENV PATH ${PATH}:${JAVA_HOME}/bin

# 开放80端口

EXPOSE 8080

# 启动tomcat命令

CMD ["/usr/local/apache-tomcat-8.5.70/bin/catalina.sh", "run"]
构建镜像
docker build -t 192.168.1.8/yun/backend/alpine-jdk1.9-tomcat8:20210910-v1 .
使用镜像启动容器进行测试
docker run -d --name tomcat -p 8080:8080 192.168.1.8/yun/backend/alpine-jdk1.9-tomcat8:20210910-v1

49817460743cf5c7d10daf69e8558ef8adcb884d37672fbf989807f5092b5d35

root@u20-docker:/data/docker-file/yun/backend# docker ps

CONTAINER ID   IMAGE                                                             COMMAND                  CREATED         STATUS         PORTS                                       NAMES

49817460743c   192.168.1.8/yun/backend/alpine-jdk1.9-tomcat8:20210910-v1         "/usr/local/apache-t…"   3 seconds ago   Up 2 seconds   0.0.0.0:8080->8080/tcp, :::8080->8080/tcp   tomcat

root@u20-docker:/data/docker-file/yun/backend# curl -I '192.168.1.110:8080'

HTTP/1.1 200

Content-Type: text/html;charset=UTF-8

Transfer-Encoding: chunked

Date: Fri, 10 Sep 2021 12:48:56 GMT

root@u20-docker:/data/docker-file/yun/backend# curl '192.168.1.110:8080'

<!DOCTYPE html>

<html lang="en">

    <head>

        <meta charset="UTF-8" />

        <title>Apache Tomcat/8.5.70</title>

        <link href="favicon.ico" rel="icon" type="image/x-icon" />

        <link href="tomcat.css" rel="stylesheet" type="text/css" />

    </head>

...
4.docker数据持久化(volume)-V
启动容器时将应用代码所在的文件目录使用 -V参数映射到容器内,比如tomcat的webapps目录
# 准备测试项目文件

mkdir /data/apps

cd !$

echo "docker volume test for tomcat" >> index.html

# 启动容器 并使用-V挂载映射目录

docker run -d --name tomcat-volume -v /data/apps/:/usr/local/apache-tomcat-8.5.70/webapps/apps -p 8081:8080 192.168.1.8/yun/backend/alpine-jdk1.9-tomcat8:20210910-v1

b824f49a4dc3b1f4c22b112addeec397018fbfee5f6ae39c70d67498b064b8fe

# 查看容器

docker ps

CONTAINER ID   IMAGE                                                             COMMAND                  CREATED          STATUS          PORTS                                       NAMES

b824f49a4dc3   192.168.1.8/yun/backend/alpine-jdk1.9-tomcat8:20210910-v1         "/usr/local/apache-t…"   10 seconds ago   Up 9 seconds    0.0.0.0:8081->8080/tcp, :::8081->8080/tcp   tomcat-volume

# 访问测试

curl 'http://192.168.1.110:8081/apps/index.html'

docker volume test for tomcat

# 对容器外的文件进行修改并测试

echo `date` >> /data/apps/index.html

root@u20-docker:/data/docker-file/yun/backend# curl 'http://192.168.1.110:8081/apps/index.html'

docker volume test for tomcat

2021年 09月 10日 星期五 21:10:14 CST
5.基于haproxy反向代理的harbor镜像仓库高可用
5.1 使用清华源镜像安装docker及docker-compose
# 如果你过去安装过 docker,先删掉

apt-get remove docker docker-engine docker.io

# 安装依赖

apt-get install apt-transport-https ca-certificates curl gnupg2 software-properties-common

# 信任 Docker 的 GPG 公钥:

curl -fsSL https://download.docker.com/linux/ubuntu/gpg | sudo apt-key add -

# 对于 amd64 架构的计算机,添加软件仓库:

add-apt-repository \

   "deb [arch=amd64] https://mirrors.tuna.tsinghua.edu.cn/docker-ce/linux/ubuntu \

   $(lsb_release -cs) \

   stable"

# 安装

apt-get update

apt install docker-ce docker-compose
5.2 安装Harbor
5.2.1 下载离线安装包
root@harbor:/opt/harbor# wget https://github.com/goharbor/harbor/releases/download/v2.3.2/harbor-offline-installer-v2.3.2.tgz

# 解压

root@harbor:/opt/harbor# cd /opt

root@harbor:/opt/harbor# tar xf harbor-offline-installer-v2.3.2.tgz
5.2.2 修改配置文件
root@harbor:/opt/harbor# cd harbor

root@harbor:/opt/harbor/harbor# cp harbor.yml.tmpl harbor.yml

root@harbor:/opt/harbor/harbor# vim harbor.yml

# 修改以下内容

hostname: 192.168.1.8

harbor_admin_password: xxxxxx

database:

  password: root.123

data_volume: /data/harbor-data

注释关闭https相关配置
5.2.3 运行安装脚本
(增加开启镜像安全扫描的功能参数--with-trivy)
root@harbor:/opt/harbor/harbor# ./install.sh --with-trivy
5.2.4 启动harbor
(上步安装完成后会自动使用docker-compose启动harbor,此步可以忽略)
root@harbor:/opt/harbor/harbor# docker-compose start
5.3 harbor高可用配置
IP 规划
192.168.1.8 harbor

192.168.1.170 harbor02
5.3.1 安装另外一台harbor02(步骤同5.2)
harbor02安装完成后使用浏览器登录
新建一个'tset'项目用于后续步骤上传镜像文件测试。
5.3.2 harbor02配置及测试
将第二台harbor的IP加入docker daemon配置文件
root@u20-docker:~# vim /etc/docker/daemon.json

{

    "registry-mirrors": [

         "https://vrneuv0q.mirror.aliyuncs.com",

         "https://docker.mirrors.ustc.edu.cn",

         "https://registry.docker-cn.com"

    ],

    "insecure-registries": ["http://192.168.1.8","http://192.168.1.170"]

}
否则使用docker login 登录时会提示使用https 协议登录
root@u20-docker:~# docker login http://192.168.1.170

Username: admin

Password:

Error response from daemon: Get "https://192.168.1.170/v2/": dial tcp 192.168.1.170:443: connect: connection refused
重启docker使配置生效
root@u20-docker:~# systemctl daemon-reload && systemctl restart docker
查看是否生效
root@u20-docker:~# docker info |grep -A 3 ' Insecure Registries'

WARNING: No swap limit support

 Insecure Registries:

  192.168.1.170

  192.168.1.8

  127.0.0.0/8
再次登录,成功!
root@u20-docker:~# docker login http://192.168.1.170

Username: admin

Password:

WARNING! Your password will be stored unencrypted in /root/.docker/config.json.

Configure a credential helper to remove this warning. See

https://docs.docker.com/engine/reference/commandline/login/#credentials-store

Login Succeeded
上传镜像测试
root@u20-docker:~# docker tag lorel/docker-stress-ng 192.168.1.170/test/lorel-docker-stress-ng

root@u20-docker:~# docker push 192.168.1.170/test/lorel-docker-stress-ng

Using default tag: latest

The push refers to repository [192.168.1.170/test/lorel-docker-stress-ng]

5f70bf18a086: Pushed

ea580b0285fe: Pushed

6102f0d2ad33: Pushed

latest: digest: sha256:5768a5d8e196be8c8fabbda04d937aabe1407f397b2f12e1fea2573e4b9d9bef size: 1563
5.3.3 高可用配置
harbor dashbord页面 配置同步
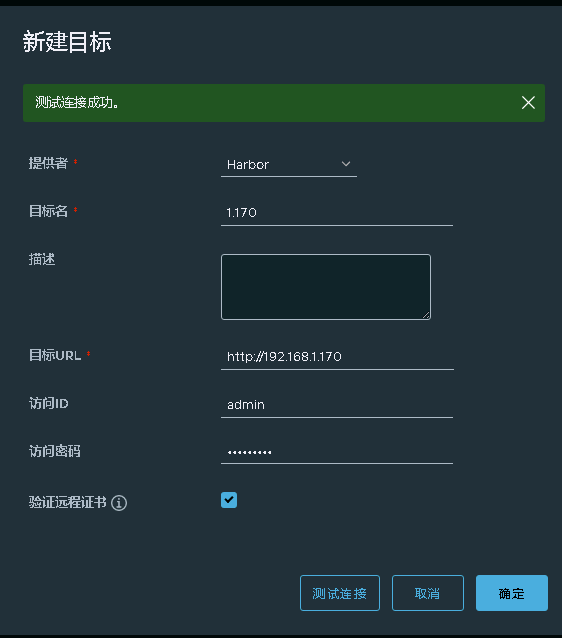
浏览器登录harbor dashbord页面,依次点击"系统管理","仓库管理","新建目标",配置harbo02 IP等的信息。

同样在harbor02上做相同的配置

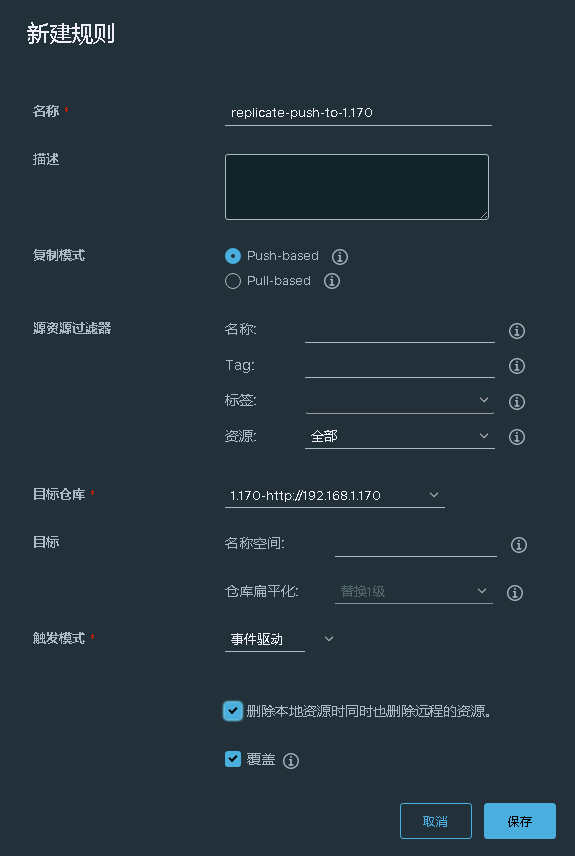
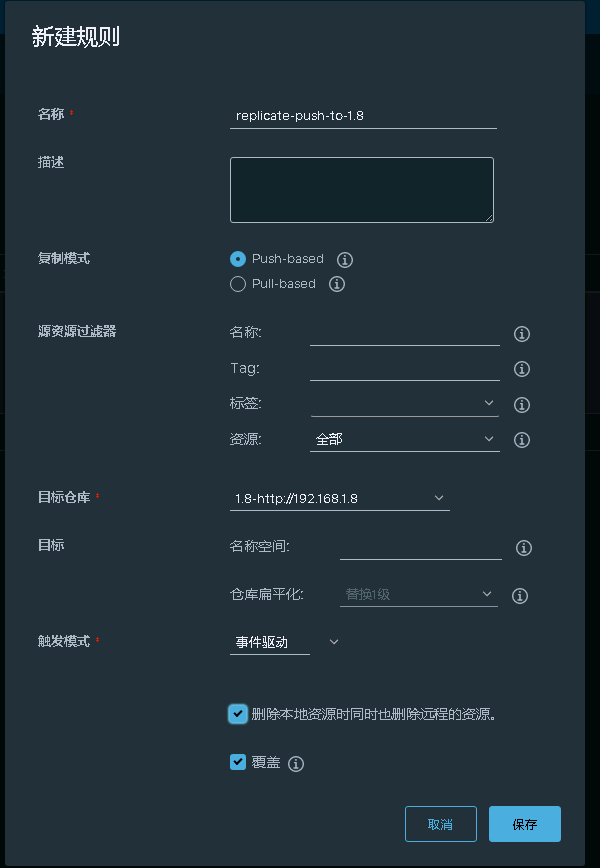
2个harbor都需要在"复制管理"页面"新建规则",复制模式选"Push-based",目标参考选"对方IP",触发模式选"事件驱动"


配置haproxy反向代理
haproxy配置文件增加一下内容
# vim /etc/haproxy/haproxy.cfg

frontend harbor

    bind *:80

    mode tcp

    log global

    default_backend harbor-servers

backend harbor-servers

    balance source

    server websrv1 192.168.1.8:80 check maxconn 2000

    server websrv2 192.168.1.170:80 check maxconn 2000
重启haproxy使配置生效
# systemctl restart haproxy

#  netstat -ntlp |grep 80

tcp        0      0 0.0.0.0:80              0.0.0.0:*               LISTEN      1044864/haproxy
在需要访问harbor的docker客户端配置docker和增加hosts配置(将ip解析为域名),增加对代理IP和域名的信任,haproxy 代理服务器IP为:192.168.1.110
# vim /etc/docker/daemon.json

{

    "registry-mirrors": [

         "https://vrneuv0q.mirror.aliyuncs.com",

         "https://docker.mirrors.ustc.edu.cn",

         "https://registry.docker-cn.com"

    ],

    "insecure-registries": ["http://192.168.1.8","http://192.168.1.170","http://harbor.faxuanyun.com","http://192.168.1.110"]

}
重启doeker使配置生效
systemctl daemon-reload && systemctl restart docker
增加域名解析至hosts
# echo "192.168.1.110 harbor.faxuanyun.com" >> /etc/hosts
登录
# docker login 192.168.1.110

Username: admin

Password:

WARNING! Your password will be stored unencrypted in /root/.docker/config.json.

Configure a credential helper to remove this warning. See

https://docs.docker.com/engine/reference/commandline/login/#credentials-store

Login Succeeded

# docker login harbor.faxuanyun.com

Authenticating with existing credentials...

WARNING! Your password will be stored unencrypted in /root/.docker/config.json.

Configure a credential helper to remove this warning. See

https://docs.docker.com/engine/reference/commandline/login/#credentials-store

Login Succeeded
上传镜像测试
先通过dashbord创建项目"test"
再通过docker客户端上传镜像测试
# docker pull alpine

Using default tag: latest

latest: Pulling from library/alpine

a0d0a0d46f8b: Pull complete

Digest: sha256:e1c082e3d3c45cccac829840a25941e679c25d438cc8412c2fa221cf1a824e6a

Status: Downloaded newer image for alpine:latest

docker.io/library/alpine:latest

# docker images

REPOSITORY   TAG       IMAGE ID       CREATED       SIZE

alpine       latest    14119a10abf4   2 weeks ago   5.6MB

# docker tag alpine harbor.faxuanyun.com/test/alpine:v1

# docker images

REPOSITORY                         TAG       IMAGE ID       CREATED       SIZE

alpine                             latest    14119a10abf4   2 weeks ago   5.6MB

harbor.faxuanyun.com/test/alpine   v1        14119a10abf4   2 weeks ago   5.6MB

# docker push harbor.faxuanyun.com/test/alpine:v1

The push refers to repository [harbor.faxuanyun.com/test/alpine]

e2eb06d8af82: Pushed

v1: digest: sha256:69704ef328d05a9f806b6b8502915e6a0a4faa4d72018dc42343f511490daf8a size: 528

root@u20-docker:/etc/haproxy# docker rmi 14119a10abf4 -f

Untagged: alpine:latest

Untagged: alpine@sha256:e1c082e3d3c45cccac829840a25941e679c25d438cc8412c2fa221cf1a824e6a

Untagged: harbor.faxuanyun.com/test/alpine:v1

Untagged: harbor.faxuanyun.com/test/alpine@sha256:69704ef328d05a9f806b6b8502915e6a0a4faa4d72018dc42343f511490daf8a

Deleted: sha256:14119a10abf4669e8cdbdff324a9f9605d99697215a0d21c360fe8dfa8471bab

Deleted: sha256:e2eb06d8af8218cfec8210147357a68b7e13f7c485b991c288c2d01dc228bb68

root@u20-docker:/etc/haproxy# docker images

REPOSITORY   TAG       IMAGE ID   CREATED   SIZE

# docker pull harbor.faxuanyun.com/test/alpine:v1

v1: Pulling from test/alpine

a0d0a0d46f8b: Pull complete

Digest: sha256:69704ef328d05a9f806b6b8502915e6a0a4faa4d72018dc42343f511490daf8a

Status: Downloaded newer image for harbor.faxuanyun.com/test/alpine:v1

harbor.faxuanyun.com/test/alpine:v1

# docker images

REPOSITORY                         TAG       IMAGE ID       CREATED       SIZE

harbor.faxuanyun.com/test/alpine   v1        14119a10abf4   2 weeks ago   5.6MB
通过dashbord页面查看,2个harbor都有刚上传的2个镜像,说明高可用配置成功。

Docker namespace,cgroup,镜像构建,数据持久化及Harbor安装、高可用配置的更多相关文章
- Docker的MySQL镜像, 实行数据,配置信息,日志持久化
Docker的MySQL8镜像, 实行数据持久化 使用Docker的MySQL8.0.17实例化一个容器之后需要对其进行数据持久化操作, 使用 docker docker run -p 7797:33 ...
- SQL Server上唯一的数据库集群:负载均衡、读写分离、容灾(数据零丢失、服务高可用)
SQL Server上唯一的数据库集群:负载均衡.读写分离.容灾(数据零丢失.服务高可用).审计.优化,全面解决数据库用户问题.一键安装,易用稳定,性价比高,下载链接:http://www.zheti ...
- Docker集群管理Swarm数据持久化
一.前言 和docker容器一样,Swarm集群中运行的服务也能够做数据持久化.我们可以通过volume.bind和nfs等方式来实现swarm集群应用数据的持久化.其实和docker数据持久化的形式 ...
- Docker教程:镜像构建和自动镜像构建dockerfile
http://blog.csdn.net/pipisorry/article/details/50805379 Docker透过Dockerfile来记录建立Container映象文件的每一个步骤,可 ...
- docker之NGINX镜像构建
Nginx是一个高性能的Web和反向代理服务器,它具有很多非常优越的特性:1.作为Web服务器.2.作为负载均衡服务器.3.作为邮件代理服务器.4.安装及配置简单.接下来我们介绍在docker构建ng ...
- Docker容器 关于镜像构建的安全问题
写在前面 确保容器中服务与应用安全是容器化演进的关键点.容器安全涉及到应用开发与维护的整个生命周期,本文主要从镜像构建的视角来看docker容器的一些安全问题及应对措施. 一.权限管理 1.避免以容器 ...
- 7.云原生之Docker容器Dockerfile镜像构建浅析与实践
转载自:https://www.bilibili.com/read/cv15220707/?from=readlist Dockerfile 镜像构建浅析与实践 描述:Dockerfile是一个文本格 ...
- Docker Compose搭建Redis一主二从三哨兵高可用集群
一.Docker Compose介绍 https://docs.docker.com/compose/ Docker官方的网站是这样介绍Docker Compose的: Compose是用于定义和运行 ...
- 大数据 - hadoop - HDFS+Zookeeper实现高可用
高可用(Hign Availability,HA) 一.概念 作用:用于解决负载均衡和故障转移(Failover)问题. 问题描述:一个NameNode挂掉,如何启动另一个NameNode.怎样让两个 ...
随机推荐
- Spring启动过程源码分析基本概念
Spring启动过程源码分析基本概念 本文是通过AnnotationConfigApplicationContext读取配置类来一步一步去了解Spring的启动过程. 在看源码之前,我们要知道某些类的 ...
- 3.2 Dependencies of the Projects in the Solution 解决方案中项目间的依赖项
3.2 Dependencies of the Projects in the Solution 解决方案中项目间的依赖项 The diagram below shows the essential ...
- c语言中“ld返回值1退回状态”
在c语言运行中我们经常会看到error:ld return 1 exit status的运行错误,其翻译为"ld返回值1退回状态".在生成程序时.有多个工具参与到步骤的运行中以创建 ...
- Java:死锁编码及定位分析
Java:死锁编码及定位分析 本笔记是根据bilibili上 尚硅谷 的课程 Java大厂面试题第二季 而做的笔记 概念 死锁是指两个或多个以上的进程在执行过程中,因争夺资源而造成一种互相等待的现象, ...
- Gopher们写if err != nil是否腻了?
效果 go里面没有try catch,比较类似的有panic() 和 recover()机制,但是代价太大了,他们的场景更多使用在"程序异常,无法继续往下执行了这种场景",比如配置 ...
- 极简实用的Asp.NetCore框架再新增商城模块
概述 关于这个框架的背景,在前面我已经交代过了.不清楚的可以查看这个链接 1.极简实用的Asp.NetCore模块化框架决定免费开源了 2.极简实用的Asp.NetCore模块化框架新增CMS模块 算 ...
- Noip模拟35 2021.8.10
考试题目变成四道了,貌似确实根本改不完... 不过给了两个小时颓废时间确实很爽(芜湖--) 但是前几天三道题改着不是很费劲的时候为什么不给放松时间, 非要在改不完题的时候颓?? 算了算了不碎碎念了.. ...
- linux wifi热点服务脚本
最近有关wifi热点的驱动,启动参数都调试完了,验证可以连接传输数据. 首先要在系统启动脚本中插入wifi驱动,配置wlan0的ip insmod /system/vendor/modules/818 ...
- 【动图解释】关系数据库de关系代数小记
本文章在 Github 撰写,同时在 我的博客 进行了发布. 最近学数据库概论学到了关系数据库的关系代数了.哎嘛,真的把我整晕了,尤其是关系代数的使用,很容易让人被蒙在鼓里. 对我来说槽点最大的莫过于 ...
- Spring Cloud Gateway实战之一:初探
欢迎访问我的GitHub 这里分类和汇总了欣宸的全部原创(含配套源码):https://github.com/zq2599/blog_demos 关于<Spring Cloud Gateway实 ...
