Linux_搭建Samba服务(认证访问)
【RHEL8】—SMBserver;【RHEL7】—SMBclient
!!!测试环境我们首关闭防火墙和selinux(SMBserver和SMBclient都需要)
- [root@localhost ~]# systemctl stop firewalld
- [root@localhost ~]# systemctl disable firewalld
- [root@localhost ~]# sed -i 's/SELINUX=enforcing/SELINUX=disabled/g' /etc/selinux/config
- [root@localhost ~]# setenforce 0
关于Samba配置文件的说明,访问:https://www.cnblogs.com/520qiangge/p/13413414.html
一、Samba服务端配置
1、查看一下服务端IP
- [root@SMBserver ~]# ifconfig
- ens160: flags=4163<UP,BROADCAST,RUNNING,MULTICAST> mtu 1500
- inet 192.168.174.128 netmask 255.255.255.0 broadcast 192.168.174.255
- inet6 fe80::fa13:32e0:3b9f:2196 prefixlen 64 scopeid 0x20<link>
- ether 00:0c:29:cd:6a:1b txqueuelen 1000 (Ethernet)
- RX packets 1109 bytes 92293 (90.1 KiB)
- RX errors 0 dropped 0 overruns 0 frame 0
- TX packets 658 bytes 77689 (75.8 KiB)
- TX errors 0 dropped 0 overruns 0 carrier 0 collisions 0
- lo: flags=73<UP,LOOPBACK,RUNNING> mtu 65536
- inet 127.0.0.1 netmask 255.0.0.0
- inet6 ::1 prefixlen 128 scopeid 0x10<host>
- loop txqueuelen 1000 (Local Loopback)
- RX packets 88 bytes 7600 (7.4 KiB)
- RX errors 0 dropped 0 overruns 0 frame 0
- TX packets 88 bytes 7600 (7.4 KiB)
- TX errors 0 dropped 0 overruns 0 carrier 0 collisions 0
2、SMBserver安装Samba服务,并设置开机自启
- [root@SMBserver ~]# yum install -y samba
- [root@SMBserver ~]# rpm -qa samba
- samba-4.10.4-1.el8.x86_64
- [root@SMBserver ~]# systemctl start smb nmb
- [root@SMBserver ~]# systemctl enable smb nmb
- Created symlink /etc/systemd/system/multi-user.target.wants/smb.service → /usr/lib/systemd/system/smb.service.
- Created symlink /etc/systemd/system/multi-user.target.wants/nmb.service → /usr/lib/systemd/system/nmb.service.
3、查看端口是否监听
- [root@SMBserver ~]# netstat -tunlp
- Active Internet connections (only servers)
- Proto Recv-Q Send-Q Local Address Foreign Address State PID/Program name
- tcp 0 0 0.0.0.0:22 0.0.0.0:* LISTEN 1083/sshd
- tcp 0 0 0.0.0.0:445 0.0.0.0:* LISTEN 18363/smbd
- tcp 0 0 0.0.0.0:139 0.0.0.0:* LISTEN 18363/smbd
- tcp6 0 0 :::22 :::* LISTEN 1083/sshd
- tcp6 0 0 :::445 :::* LISTEN 18363/smbd
- tcp6 0 0 :::139 :::* LISTEN 18363/smbd
- udp 0 0 0.0.0.0:68 0.0.0.0:* 1588/dhclient
- udp 0 0 192.168.174.255:137 0.0.0.0:* 18367/nmbd
- udp 0 0 192.168.174.128:137 0.0.0.0:* 18367/nmbd
- udp 0 0 0.0.0.0:137 0.0.0.0:* 18367/nmbd
- udp 0 0 192.168.174.255:138 0.0.0.0:* 18367/nmbd
- udp 0 0 192.168.174.128:138 0.0.0.0:* 18367/nmbd
- udp 0 0 0.0.0.0:138 0.0.0.0:* 18367/nmbd
4、创建认证用户(zhangsan),并为zhangsan用户创建smb共享密码
- [root@SMBserver ~]# useradd -M zhangsan
- [root@SMBserver ~]# id zhangsan
- uid=1000(zhangsan) gid=1000(zhangsan) 组=1000(zhangsan)
- [root@SMBserver ~]# smbpasswd -a zhangsan
- New SMB password: //这里我设置密码123456
- Retype new SMB password:
- Added user zhangsan.
5、创建共享资源,并给予完全共享的(给全部的权限)
- [root@SMBserver ~]# mkdir -p /sambadir/share
- [root@SMBserver ~]# chmod 777 /sambadir/share/
- [root@SMBserver ~]# ll /sambadir/
- 总用量 0
- drwxrwxrwx. 2 root root 6 8月 1 15:28 share
6、编辑配置文件
- [root@SMBserver ~]# vim /etc/samba/smb.conf
- [root@SMBserver ~]# cat /etc/samba/smb.conf
- # See smb.conf.example for a more detailed config file or
- # read the smb.conf manpage.
- # Run 'testparm' to verify the config is correct after
- # you modified it.
- [global]
- workgroup = SAMBA
- security = user
- passdb backend = tdbsam
- printing = cups
- printcap name = cups
- load printers = yes
- cups options = raw
- [homes]
- comment = Home Directories
- valid users = %S, %D%w%S
- browseable = No
- read only = No
- inherit acls = Yes
- [printers]
- comment = All Printers
- path = /var/tmp
- printable = Yes
- create mask = 0600
- browseable = No
- [print$]
- comment = Printer Drivers
- path = /var/lib/samba/drivers
- write list = @printadmin root
- force group = @printadmin
- create mask = 0664
- directory mask = 0775
- [share]
- comment = my first samba-file
- path = /sambadir/share
- browseable = yes
- public = yes
- writeable = yes
- write list = zhangsan //添加这句,允许zhangsan 用户访问该文件目录
7、测试smb.conf文件语法是否错误
- [root@SMBserver ~]# testparm
- Load smb config files from /etc/samba/smb.conf
- Loaded services file OK.
- Server role: ROLE_STANDALONE
- Press enter to see a dump of your service definitions
- //这里提示这样的信息,叫你回车就会显示刚刚写的配置文件的内容,就代表没有语法错误,我就没回车了,节省时间
8、重启smb,nmb服务
- [root@SMBserver ~]# systemctl restart smb
- [root@SMBserver ~]# systemctl restart nmb
- [root@SMBserver ~]# netstat -tunlp
- Active Internet connections (only servers)
- Proto Recv-Q Send-Q Local Address Foreign Address State PID/Program name
- tcp 0 0 0.0.0.0:22 0.0.0.0:* LISTEN 1083/sshd
- tcp 0 0 0.0.0.0:445 0.0.0.0:* LISTEN 24451/smbd
- tcp 0 0 0.0.0.0:139 0.0.0.0:* LISTEN 24451/smbd
- tcp6 0 0 :::22 :::* LISTEN 1083/sshd
- tcp6 0 0 :::445 :::* LISTEN 24451/smbd
- tcp6 0 0 :::139 :::* LISTEN 24451/smbd
- udp 0 0 0.0.0.0:68 0.0.0.0:* 1588/dhclient
- udp 0 0 192.168.174.255:137 0.0.0.0:* 24462/nmbd
- udp 0 0 192.168.174.128:137 0.0.0.0:* 24462/nmbd
- udp 0 0 0.0.0.0:137 0.0.0.0:* 24462/nmbd
- udp 0 0 192.168.174.255:138 0.0.0.0:* 24462/nmbd
- udp 0 0 192.168.174.128:138 0.0.0.0:* 24462/nmbd
- udp 0 0 0.0.0.0:138 0.0.0.0:* 24462/nmbd
到这认证访问的服务端就配置完成
二、配置客户端
1、SMBclient查看是否有安装samba-client,cifs-utils软件包
- [root@smbclient ~]# yum info samba-client cifs-utils
- 已加载插件:product-id, search-disabled-repos, subscription-manager
- This system is not registered with an entitlement server. You can use subscription-manager to register.
- 可安装的软件包
- 名称 :cifs-utils
- 架构 :x86_64
- 版本 :6.2
- 发布 :10.el7
- 大小 :85 k
- 源 :dvd
- 简介 : Utilities for mounting and managing CIFS mounts
- 网址 :http://linux-cifs.samba.org/cifs-utils/
- 协议 : GPLv3
- 描述 : The SMB/CIFS protocol is a standard file sharing protocol widely deployed
- : on Microsoft Windows machines. This package contains tools for mounting
- : shares on Linux using the SMB/CIFS protocol. The tools in this package
- : work in conjunction with support in the kernel to allow one to mount a
- : SMB/CIFS share onto a client and use it as if it were a standard Linux
- : file system.
- 名称 :samba-client
- 架构 :x86_64
- 版本 :4.6.2
- 发布 :8.el7
- 大小 :597 k
- 源 :dvd
- 简介 : Samba client programs
- 网址 :http://www.samba.org/
- 协议 : GPLv3+ and LGPLv3+
- 描述 : The samba-client package provides some SMB/CIFS clients to complement
- : the built-in SMB/CIFS filesystem in Linux. These clients allow access
- : of SMB/CIFS shares and printing to SMB/CIFS printers.
2、安装samba-client,cifs-utils软件包
- [root@smbclient ~]# yum install -y samba-client cifs-utils
- [root@smbclient ~]# rpm -qa samba-client cifs-utils
- cifs-utils-6.2-10.el7.x86_64
- samba-client-4.6.2-8.el7.x86_64
3、客户端以zhangsan用户身份查看samba服务器有哪些共享资源
- [root@smbclient ~]# smbclient -L //192.168.174.128 -U zhangsan
- Enter SAMBA\zhangsan's password: //输入刚刚给zhangsan用户创建的smb共享密码
- Domain=[SMBSERVER] OS=[Windows 6.1] Server=[Samba 4.10.4]
- Sharename Type Comment
- --------- ---- -------
- print$ Disk Printer Drivers
- share Disk my first samba-file
- IPC$ IPC IPC Service (Samba 4.10.4)
- zhangsan Disk Home Directories
- Domain=[SMBSERVER] OS=[Windows 6.1] Server=[Samba 4.10.4]
- Server Comment
- --------- -------
- Workgroup Master
- --------- -------
- SAMBA SMBSERVER
4、客户端创建挂载目录
- [root@smbclient ~]# mkdir /smbdir
5、客户端以zhangsan用户身份挂载服务端共享的资源目录
- [root@smbclient ~]# mount.cifs -o username=zhangsan,password=123456 //192.168.174.128/share /smbdir/
- //这里不需要输入密码
- 如果密码错误会会提示报错
- 错误示例:
- [root@smbclient ~]# mount.cifs -o username=zhangsan,password=123 //192.168.174.128/share /smbdir/
- mount error(13): Permission denied
- Refer to the mount.cifs(8) manual page (e.g. man mount.cifs)
- //这里就会显示拒绝访问
6、查看是否挂载成功
- [root@smbclient ~]# df -h
- 文件系统 容量 已用 可用 已用% 挂载点
- /dev/mapper/rhel-root 50G 1.1G 49G 3% /
- devtmpfs 901M 0 901M 0% /dev
- tmpfs 912M 0 912M 0% /dev/shm
- tmpfs 912M 8.7M 904M 1% /run
- tmpfs 912M 0 912M 0% /sys/fs/cgroup
- /dev/sr0 3.8G 3.8G 0 100% /mnt
- /dev/mapper/rhel-home 27G 33M 27G 1% /home
- /dev/sda1 1014M 143M 872M 15% /boot
- tmpfs 183M 0 183M 0% /run/user/0
- //192.168.174.128/share 50G 2.0G 49G 4% /smbdir
- //最后一行说明挂载成功
三、测试
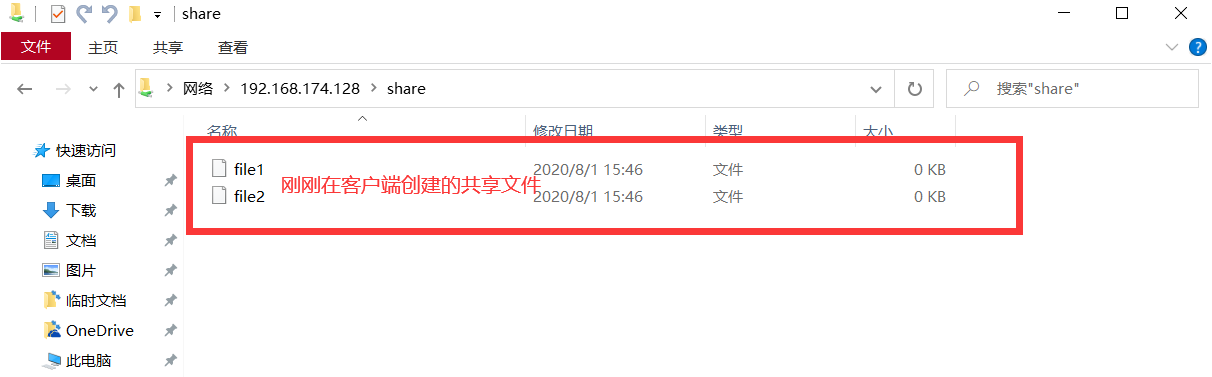
1、首先在客户端创建两个文件,然后在服务端查看
- //SMBclient
- [root@smbclient ~]# cd /smbdir/
- [root@smbclient smbdir]# ls
- [root@smbclient smbdir]# touch {file1,file2}
- [root@smbclient smbdir]# ls
- file1 file2
- //SMBserver
- [root@SMBserver ~]# cd /sambadir/share/
- [root@SMBserver share]# ls
- file1 file2
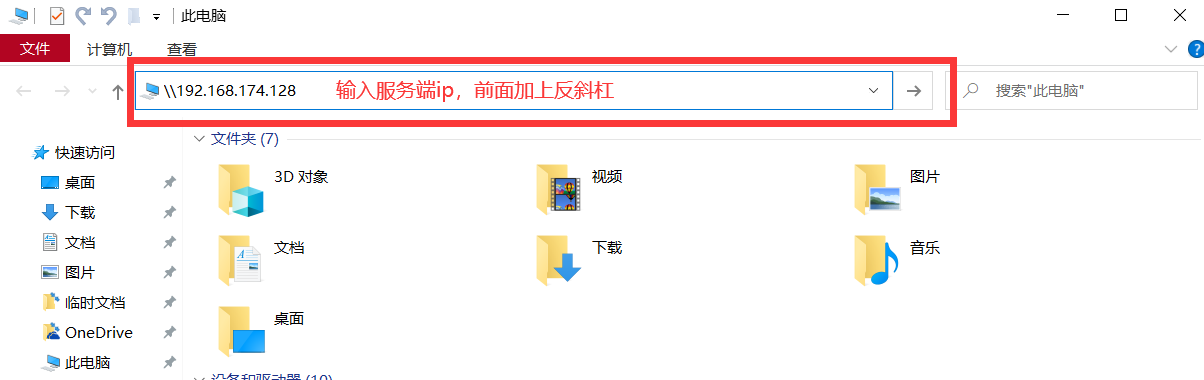
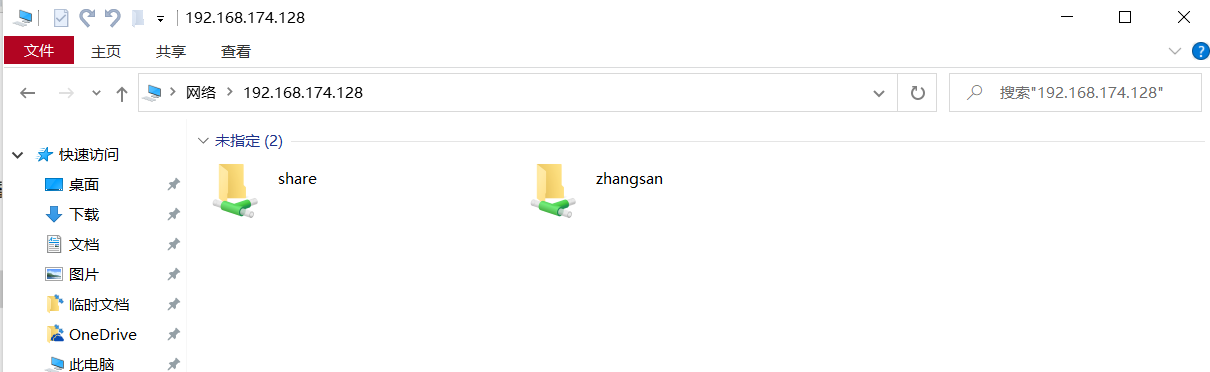
2、在windows的资源管理器上登录

Linux_搭建Samba服务(认证访问)的更多相关文章
- Linux_搭建Samba服务(匿名访问)
[RHEL8]-SMBserver:[RHEL7]-SMBclient !!!测试环境我们首关闭防火墙和selinux(SMBserver和SMBclient都需要) [root@localhost ...
- 如何在RHEL7上搭建Samba服务实现Windows与Linux之间的文件共享
如何在RHEL7上搭建Samba服务实现Windows与Linux之间的文件共享 实现环境:VMware workstations.RHEL7.0 第一步:配置网卡IP及yum软件仓库 命令:vim ...
- 搭建SAMBA服务
说明:这里是Linux服务综合搭建文章的一部分,本文可以作为单独搭建SABMA服务的参考. 注意:这里所有的标题都是根据主要的文章(Linux基础服务搭建综合)的顺序来做的. 如果需要查看相关软件版本 ...
- Centos6搭建Samba服务并使用Windows挂载
一.安装相关软件 [root@mail ~]# yum install samba samba-client -y #安装相关软件 二.配置匿名访问 [root@mail ~]# cd /etc/sa ...
- CentOS6.5下搭建Samba服务实现与Windows系统之间共享文件资源
FTP文件传输服务确实可以让主机之间的文件传输变得简单方便,但是FTP协议的本质是传输文件,而非共享文件,因此要想通过客户端直接在服务器上修改文件内容还是一件比较麻烦的事情. 1987年,微软公司和英 ...
- 如何搭建samba服务?
为了日后便于查询,本文所涉及到的所有命令集合如下: chkconfig iptables off #关闭防火墙命令 在Centos7中使用的是chkconfig firewalld off seten ...
- 笔记 : win8系统中的VM虚拟机的Ubuntu搭建samba服务
1. 环境准备 (此处使用root超级管理员帐户,执行命令时不用加sudo, 普通帐户需要前面加sudo): (1)安装好Ubutun虚拟系统后,Ubuntu 的软件源配置文件是 /etc/apt/ ...
- ubuntu系统搭建samba服务
安装samba服务 # apt-get install samba 创建一个samba服务的分享目录 # mkdir /share 创建一个samba服务限制的用户及组 #useradd public ...
- 搭建nodejs服务,访问本地站点文件
搭建nodejs服务器步骤: 1.安装nodejs服务(从官网下载安装) 2.在自己定义的目录下新建服务器文件如 server.js 例如,我在E:\PhpProject\html5\websocke ...
随机推荐
- ASP.NET网页开发基础(7)
整理了一点的小知识点: 1.ASP.NET网页扩展名: .asax 全局应用程序类的扩展名 .xml 访问网页时的扩展名 .htm .ascx Web用户控件的扩展名 ...
- UnitFourSummary
目录 第四单元架构设计 taskOne taskTwo taskThree 四个单元架构设计与OO方法理解的演进 四个单元架构设计 UnitOne UnitTwo UnitThree UnitFour ...
- MySQL提升笔记(2):存储引擎盘点
在前面我们了解了server层调用存储引擎层接口来完成sql的执行,使用存储引擎的好处是:每个存储引擎都有各自的特点,能够根据具体的应用建立不同存储引擎表. 需要注意的是,存储引擎是基于表的,而不是数 ...
- JAVAEE_Servlet_06_ServletContext接口
ServletContext接口 * javax.servlet.ServletContext * Tomcat服务器中ServletContecxt的完整类名: ServletContext:org ...
- 基于MVC框架的JavaWeb网站开发demo项目(JSP+Servlet+JavaBean)
1.环境配置 Windows10+Eclipse2020+jdk8+Tomcat9+MySQL8+Navicat10 2.需求分析 ①用户登录注册注销(查找.增加) ②显示用户列表(查找) ③显示用户 ...
- PAT 乙级 -- 1003 -- 我要通过!
题目简述 "答案正确"是自动判题系统给出的最令人欢喜的回复.本题属于PAT的"答案正确"大派送 -- 只要读入的字符串满足下列条件,系统就输出"答案正 ...
- Win64 驱动内核编程-3.内核里使用内存
内核里使用内存 内存使用,无非就是申请.复制.设置.释放.在 C 语言里,它们对应的函数是:malloc.memcpy.memset.free:在内核编程里,他们分别对应 ExAllocatePool ...
- CVE-2019-11043 Nginx PHP 远程代码执行漏洞复现
漏洞背景:来自Wallarm的安全研究员Andrew Danau在9月14-16号举办的Real World CTF中,意外的向服务器发送%0a(换行符)时,服务器返回异常信息.由此发现了这个0day ...
- pycharm2019
812LFWMRSH-eyJsaWNlbnNlSWQiOiI4MTJMRldNUlNIIiwibGljZW5zZWVOYW1lIjoi5q2j54mIIOaOiOadgyIsImFzc2lnbmVlT ...
- Android开机时间分析
http://blog.csdn.net/huangyabin001/article/details/42777703