Android之布局
Android中的布局分为六种,分别是相对布局、线性布局、表格布局、网格布局、帧布局、绝对布局,良好的布局设计对UI界面至关重要,下面先来看看先相对布局。
相对布局(RelativeLayout):
在Eclipse中开发Android程序时,默认采用的就是相对布局。相对布局通常有两种形式,一种是相对于容器而言的,一种是相对于控件而言的,为了能准确定位布局中的控件,相对布局提供了很多属性。
android:layout_centerHrizontal  水平居中

android:layout_centerVertical    垂直居中

android:layout_centerInparent  相对于父元素完全居中

android:layout_alignParentBottom   贴紧父元素的下边缘

android:layout_alignParentLeft        贴紧父元素的左边缘

android:layout_alignParentRight      贴紧父元素的右边缘

android:layout_alignParentTop        贴紧父元素的上边缘

android:layout_alignWithParentIfMissing     如果对应的兄弟元素找不到的话就以父元素做参照物

android:layout_below        在某元素的下方

android:layout_above        在某元素的的上方

android:layout_toLeftOf     在某元素的左边

android:layout_toRightOf   在某元素的右边

android:layout_alignTop       本元素的上边缘和某元素的的上边缘对齐

android:layout_alignLeft       本元素的左边缘和某元素的的左边缘对齐

android:layout_alignBottom  本元素的下边缘和某元素的的下边缘对齐

android:layout_alignRight     本元素的右边缘和某元素的的右边缘对齐

android:layout_marginBottom   离某元素底边缘的距离

android:layout_marginLeft        离某元素左边缘的距离

android:layout_marginRight      离某元素右边缘的距离

android:layout_marginTop        离某元素上边缘的距离
介绍的这些布局属性,我们经常会用到,下面来看看一个布局界面图感受数形结合感受一下:

线性布局(LinearLayout):
线性布局是Android中较为常用的布局方式,它使用<LinearLayout>标签表示。线性布局主要有两种形式,一种是水平线性布局,一种是垂直线性布局。


表格布局(TableLayout):
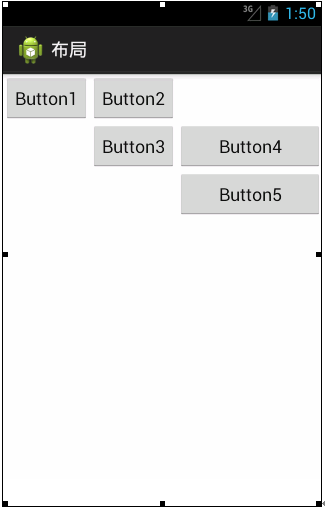
在表格布局TableLayout中,行数由TableRow对象控制的,即布局中有多少TableRow对象,就有多少行。每个TableRow中可以放置多个组件。列数由最宽的单元格决定,假如第一个TableRow有两个控件,第二个TableRow有三个控件,那这个TableLayout就有三列。在控件中通过android:layout_column属性指定具体的列数,该属性的值从“0”开始,表示第一列。下面看一个表格布局:

布局中有一个三行三列的表格,也就是有三个TableRow对象。下面看一下表格布局对应的代码:
<?xml version="1.0" encoding="utf-8"?>

<TableLayout xmlns:android="http://schemas.android.com/apk/res/android"

    android:layout_width="fill_parent"

    android:layout_height="fill_parent"

    android:stretchColumns="2" >

    <TableRow>

        <Button

            android:id="@+id/button1"

            android:layout_width="wrap_content"

            android:layout_height="wrap_content"

            android:layout_column="0"

            android:text="Button1" />

        <Button

            android:id="@+id/button2"

            android:layout_width="wrap_content"

            android:layout_height="wrap_content"

            android:layout_column="1"

            android:text="Button2" />

    </TableRow>

    <TableRow>

        <Button

            android:id="@+id/button3"

            android:layout_width="wrap_content"

            android:layout_height="wrap_content"

            android:layout_column="1"

            android:text="Button3" />

        <Button

            android:id="@+id/button4"

            android:layout_width="wrap_content"

            android:layout_height="wrap_content"

            android:layout_column="1"

            android:text="Button4" />

    </TableRow>

    <TableRow>

        <Button

            android:id="@+id/button5"

            android:layout_width="wrap_content"

            android:layout_height="wrap_content"

            android:layout_column="2"

            android:text="Button5" />

    </TableRow>

</TableLayout>
网格布局(GirdLayout):
网格布局是Android4.0新增的布局,它实现了控件的交错显示,能够避免因布局嵌套对设备性能的影响,更利于自由布局的开发。网格布局用一组无限细的直线将绘图区域分成行、列和单元,并指定控件的显示区域和控件在该区域的显示方式,如图所示:

网格布局中的控件可以很整齐的排列,并且可以控制每个控件所占的行数和列数。下面看一下网格布局对应的代码:
<?xml version="1.0" encoding="utf-8"?>

<GridLayout xmlns:android="http://schemas.android.com/apk/res/android"

    android:layout_width="wrap_content"

    android:layout_height="wrap_content"

    android:layout_gravity="center"

    android:columnCount="4"

    android:orientation="horizontal" >

    <Button

        android:layout_column="3"

        android:text="/" />

    <Button android:text="1" />

    <Button android:text="2" />

    <Button android:text="3" />

    <Button android:text="*" />

    <Button android:text="4" />

    <Button android:text="5" />

    <Button android:text="6" />

    <Button android:text="-" />

    <Button android:text="7" />

    <Button android:text="8" />

    <Button android:text="9" />

    <Button

        android:layout_gravity="fill"

        android:layout_rowSpan="3"

        android:text="+" />

    <Button

        android:layout_columnSpan="2"

        android:layout_gravity="fill"

        android:text="0" />

    <Button android:text="00" />

    <Button

        android:layout_columnSpan="3"

        android:layout_gravity="fill"

        android:text="=" />

</GridLayout>
上述代码中,可以看到有很多个Button,个别的Button按钮中包含一些属性,如android:layout_column表示该按钮在第几列,android:layout_rowSpan表示该控件占用几行,android:layout_columnSpan表示该控件占用几列。
在这里要特别注意的是:由于GridLayout是Android4.0之后有的新功能,如果要在项目中使用这种布局,需要把SDK的最低版本指定为Android4.0(API14)以上,所以我们需要配置好SDK版本:
<uses-sdk

     android:minSdkVersion="14"

     android:targetSdkVersion="17" />
帧布局(FrameLayout):
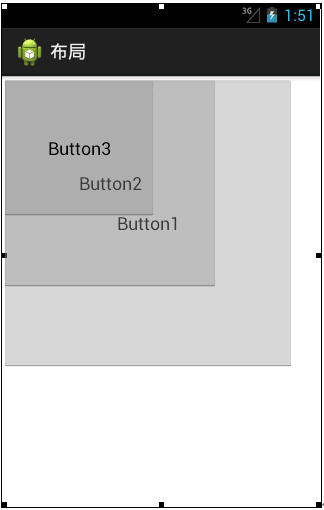
帧布局是Android布局中最简单的一种,帧布局为每个加入其中的控件创建一个空白区域(称为一帧,每个控件占据一帧)。采用帧布局方式设计界面时,只能在屏幕左上角显示一个控件,如果添加多个控件,这些控件会按照顺序在屏幕的左上角重叠显示,且会透明显示之前控件的文本,如图所示:

从图中可以看出,界面中添加了3个Button控件,Button1是最先添加的大按钮,Button2是接着添加的较小按钮,Button3是最后添加的小按钮,这三个控件叠加显示在屏幕的左上角。
下面看一下帧布局对应的代码,具体如下:
<?xml version="1.0" encoding="utf-8"?>

<FrameLayout xmlns:android="http://schemas.android.com/apk/res/android"

    android:layout_width="match_parent"

    android:layout_height="match_parent" >

    <Button

        android:id="@+id/button1"

        android:layout_width="294dp"

        android:layout_height="294dp"

        android:text="Button1" />

    <Button

        android:id="@+id/button2"

        android:layout_width="218dp"

        android:layout_height="214dp"

        android:text="Button2" />

    <Button

        android:id="@+id/button3"

        android:layout_width="156dp"

        android:layout_height="143dp"

        android:text="Button3" />

</FrameLayout>
绝对布局(AbsoluteLayout):
绝对布局需要通过指定x、y坐标来控制每一个组件的位置,放入该布局的组件需要通过android:layout_x和android:layout_y两个属性指定其准确的坐标值,并显示在屏幕上,布局如图所示:

从图我们就可以看出,组件是以屏幕左上角为坐标原点,将Button1的坐标设置为(50,50),Button2的坐标设置为(200,150),根据这个坐标精确定位组件在屏幕中的位置,相对应的代码如下:
<?xml version="1.0" encoding="utf-8"?>

<AbsoluteLayout xmlns:android="http://schemas.android.com/apk/res/android"

    android:layout_width="match_parent"

    android:layout_height="match_parent" >

    <Button

        android:id="@+id/button2"

        android:layout_width="wrap_content"

        android:layout_height="wrap_content"

        android:layout_x="50dp"

        android:layout_y="50dp"

        android:text="Button1" />

    <Button

        android:id="@+id/button1"

        android:layout_width="wrap_content"

        android:layout_height="wrap_content"

        android:layout_x="200dp"

        android:layout_y="150dp"

        android:text="Button2" />

</AbsoluteLayout>
上述代码中,Button控件的android:layout_x属性表示该控件在X坐标的第50dp像素上,android:layout_y属性表示控件在Y坐标的第50dp象素上,Button2也是通过这两个属性设置的控件位置。
而我们需要注意的是,理论上绝对布局可以完成任何的布局设计,且灵活性很大,但是实际的工程应用中不提倡使用这种布局。因为使用这种布局不但需要精确计算每个组件的大小,而且当应用程序运行在不用屏幕的手机上产生的效果也不相同,因此,一般不推荐使用绝对布局。
Android之布局的更多相关文章
- 【腾讯Bugly干货分享】Android动态布局入门及NinePatchChunk解密
本文来自于腾讯bugly开发者社区,非经作者同意,请勿转载,原文地址:http://dev.qq.com/topic/57c7ff5d53bbcffd68c64411 作者:黄进——QQ音乐团队 摆脱 ...
- Xamarin.Android之布局文件智能提示问题
一.前言 看到有人问关于xamarin.android的布局没智能提示问题(VS 2015),当然,写布局这东西没提示这是一件相对痛苦的事 ,所以这里就提供一个解决的方案! 二.解决方案 想要智能提示 ...
- android—-线性布局
android五大布局之线性布局. 1.线性布局的特点:各个子元素彼此连接,中间不留空白 而今天我们要讲解的就是第一个布局,LinearLayout(线性布局),我们屏幕适配的使用 用的比较多的就是L ...
- Android基本布局
android基本布局有三种:LinearLayout,RelativeLayout,FrameLayout. 一.LinearLayout 1,这是一种垂直布局(或者水平布局),可以通过下面这一句来 ...
- android layout布局属性
参考:http://blog.csdn.net/msmile_my/article/details/9018775 第一类:属性值 true或者 false android:lay ...
- Android 学习第10课,Android的布局
Android的布局 线性布局
- Android 优化布局层次结构
前面介绍过使用HierarchyViewer和Android lint来优化我们的程序,这一篇算是总结性的,借助一个小例子来说用怎么优化应用布局.这个例子是android官网给出的,作者也当一把翻译. ...
- Android 五大布局
Android 五大布局: FrameLayout(框架布局),LinearLayout (线性布局),AbsoluteLayout(绝对布局),RelativeLayout(相对布局),Table ...
- Android界面布局基本知识简述
Android手机操作系统在模拟器中进行相关的编写,可以帮助我们实现各种功能需求.尤其是在界面的操作方面显得更为突出.在这里我们就可以对Android界面布局的相关操作来对这方面的知识进行一个深入的了 ...
- android的布局管理器
理论上通过setContentView(view)能够把一个view设置到activity中,但当你有很多个view控件的时候,就需要用android的布局管理器来管理view控件了. android ...
随机推荐
- 使用apt-get autoremove造成的系统无法开机
由于误操作(apt-get autoremove xxx)删除了一些lib文件貌似,之后,系统直接重启,然后就无法进入系统,后使用引导盘对系统进行修复,思路如下: 1.挂载已经有的分区,挂载为可读可写 ...
- 根据powerdesigner的OO模型生成C#代码
2007-05-15 08:34:11| 分类: 转贴部分 | 标签:学习帖子 |字号 订阅 习惯了用Powerdesigner设计数据库模型,XDE设计类图.因此我一般的设计方法是用PD做分析模 ...
- 让table 居于页面的正中间(上下左右均居中的方法)
? <table bgcolor="#jnkc" width="300" height="200" style="posit ...
- IOS 7 开发范例 - UISwitch的使用
Creating and Using Switches with UISwitch You would like to give your users the ability to turn an o ...
- C++ Button右键弹出式菜单
Button右键弹出式菜单 关键点 用类来实现 的 实现过程 新建1个类 类名CButtonPopMenu 基类CButton 新建1个菜单资源 IDR_MENU1 // ButtonPopMenu ...
- TOJ 4325 RMQ with Shifts / 线段树单点更新
RMQ with Shifts 时间限制(普通/Java):1000MS/3000MS 运行内存限制:65536KByte 描述 In the traditional RMQ (Range M ...
- [MEAN Stack] First API -- 5. Using $resource to setup REST app
Front-end changes: app.js: Uinsg $resource /** * Created by Answer1215 on 12/9/2014. */ 'use strict' ...
- Android 滑动效果进阶篇(六)—— 倒影效果
上篇介绍了使用Animation实现3D动画旋转翻页效果,现在介绍图片倒影实现,先看效果图 本示例主要通过自定义Gallery和ImageAdapter(继承自BaseAdapter)实现 1.倒影绘 ...
- C# Tcp协议收发数据
运行这个程序前需要先关闭Windows防火墙,Win7系统关闭防火墙的方法是在控制面板的“控制面板\系统和安全\Windows 防火墙\自定义设置”路径中,将“家庭或工作(专用)网络位置设置”和“公用 ...
- XtraBackup原理5
http://www.cnblogs.com/gomysql/p/3650645.html xtrabackup是Percona公司CTO Vadim参与开发的一款基于InnoDB的在线热备工具,具有 ...
