C++智能指针及其简单实现
本文将简要介绍智能指针shared_ptr和unique_ptr,并简单实现基于引用计数的智能指针。
使用智能指针的缘由
1. 考虑下边的简单代码:
 int main()

 {

     int *ptr = new int();

     return ;

 }
就如上边程序,我们有可能一不小心就忘了释放掉已不再使用的内存,从而导致资源泄漏(resoure leak,在这里也就是内存泄漏)。
2. 考虑另一简单代码:
 int main()

 {

     int *ptr = new int();

     delete ptr;

     return ;

 }
我们可能会心想,这下程序应该没问题了?可实际上程序还是有问题。上边程序虽然最后释放了申请的内存,但ptr会变成空悬指针(dangling pointer,也就是野指针)。空悬指针不同于空指针(nullptr),它会指向“垃圾”内存,给程序带去诸多隐患(如我们无法用if语句来判断野指针)。
上述程序在我们释放完内存后要将ptr置为空,即:
ptr = nullptr;
除了上边考虑到的两个问题,上边程序还存在另一问题:如果内存申请不成功,new会抛出异常,而我们却什么都没有做!所以对这程序我们还得继续改进(也可用try...catch...):
 #include <iostream>

 using namespace std;

 int main()

 {

     int *ptr = new(nothrow) int();

     if(!ptr)

     {

         cout << "new fails."

         return ;

     }

     delete ptr;

     ptr = nullptr;

     return ;

 }
3. 考虑最后一简单代码:
 #include <iostream>

 using namespace std;

 int main()

 {

     int *ptr = new(nothrow) int();

     if(!ptr)

     {

         cout << "new fails."

         return ;

     }

     // 假定hasException函数原型是 bool hasException()

     if (hasException())

         throw exception();

     delete ptr;

     ptr = nullptr;

     return ;

 }
当我们的程序运行到“if(hasException())”处且“hasException()”为真,那程序将会抛出一个异常,最终导致程序终止,而已申请的内存并没有释放掉。
当然,我们可以在“hasException()”为真时释放内存:
 // 假定hasException函数原型是 bool hasException()

 if (hasException())

 {

         delete ptr;

         ptr = nullptr;

         throw exception();

 }
但,我们并不总会想到这么做。而且,这样子做也显得麻烦,不够人性化。
如果,我们使用智能指针,上边的问题我们都不用再考虑,因为它都已经帮我们考虑到了。
因此,我们使用智能指针的原因至少有以下三点:
1)智能指针能够帮助我们处理资源泄露问题;
2)它也能够帮我们处理空悬指针的问题;
3)它还能够帮我们处理比较隐晦的由异常造成的资源泄露。
智能指针
自C++11起,C++标准提供两大类型的智能指针:
1. Class shared_ptr实现共享式拥有(shared ownership)概念。多个智能指针可以指向相同对象,该对象和其相关资源会在“最后一个引用(reference)被销毁”时候释放。为了在结构复杂的情境中执行上述工作,标准库提供了weak_ptr、bad_weak_ptr和enable_shared_from_this等辅助类。
2. Class unique_ptr实现独占式拥有(exclusive ownership)或严格拥有(strict ownership)概念,保证同一时间内只有一个智能指针可以指向该对象。它对于避免资源泄露(resourece leak)——例如“以new创建对象后因为发生异常而忘记调用delete”——特别有用。
注:C++98中的Class auto_ptr在C++11中已不再建议使用。
shared_ptr
几乎每一个有分量的程序都需要“在相同时间的多处地点处理或使用对象”的能力。为此,我们必须在程序的多个地点指向(refer to)同一对象。虽然C++语言提供引用(reference)和指针(pointer),还是不够,因为我们往往必须确保当“指向对象”的最末一个引用被删除时该对象本身也被删除,毕竟对象被删除时析构函数可以要求某些操作,例如释放内存或归还资源等等。
所以我们需要“当对象再也不被使用时就被清理”的语义。Class shared_ptr提供了这样的共享式拥有语义。也就是说,多个shared_ptr可以共享(或说拥有)同一对象。对象的最末一个拥有者有责任销毁对象,并清理与该对象相关的所有资源。
shared_ptr的目标就是,在其所指向的对象不再被使用之后(而非之前),自动释放与对象相关的资源。
下边程序摘自《C++标准库(第二版)》5.2.1节:
 #include <iostream>

 #include <string>

 #include <vector>

 #include <memory>

 using namespace std;

 int main(void)

 {

     // two shared pointers representing two persons by their name

     shared_ptr<string> pNico(new string("nico"));

     shared_ptr<string> pJutta(new string("jutta"),

             // deleter (a lambda function)

             [](string *p)

             {

                 cout << "delete " << *p << endl;

                 delete p;

             }

         );

     // capitalize person names

     (*pNico)[] = 'N';

     pJutta->replace(, , "J");

     // put them multiple times in a container

     vector<shared_ptr<string>> whoMadeCoffee;

     whoMadeCoffee.push_back(pJutta);

     whoMadeCoffee.push_back(pJutta);

     whoMadeCoffee.push_back(pNico);

     whoMadeCoffee.push_back(pJutta);

     whoMadeCoffee.push_back(pNico);

     // print all elements

     for (auto ptr : whoMadeCoffee)

         cout << *ptr << " ";

     cout << endl;

     // overwrite a name again

     *pNico = "Nicolai";

     // print all elements

     for (auto ptr : whoMadeCoffee)

         cout << *ptr << " ";

     cout << endl;

     // print some internal data

     cout << "use_count: " << whoMadeCoffee[].use_count() << endl;

     return ;

 }
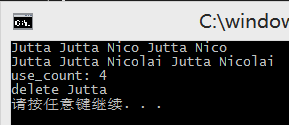
程序运行结果如下:

关于程序逻辑可见下图:

关于程序的几点说明:
1)对智能指针pNico的拷贝是浅拷贝,所以当我们改变对象“Nico”的值为“Nicolai”时,指向它的指针都会指向新值。
2)指向对象“Jutta”的有四个指针:pJutta和pJutta的三份被安插到容器内的拷贝,所以上述程序输出的use_count为4。
4)shared_ptr本身提供默认内存释放器(default deleter),调用的是delete,不过只对“由new建立起来的单一对象”起作用。当然我们也可以自己定义内存释放器,就如上述程序。不过值得注意的是,默认内存释放器并不能释放数组内存空间,而是要我们自己提供内存释放器,如:
 shared_ptr<int> pJutta2(new int[],

         // deleter (a lambda function)

         [](int *p)

         {

             delete[] p;

         }

     );
或者使用为unique_ptr而提供的辅助函数作为内存释放器,其内调用delete[]:
shared_ptr<int> p(new int[], default_delete<int[]>());
unique_ptr
unique_ptr是C++标准库自C++11起开始提供的类型。它是一种在异常发生时可帮助避免资源泄露的智能指针。一般而言,这个智能指针实现了独占式拥有概念,意味着它可确保一个对象和其相应资源同一时间只被一个指针拥有。一旦拥有者被销毁或变成空,或开始拥有另一个对象,先前拥有的那个对象就会被销毁,其任何相应资源也会被释放。
现在,本文最开头的程序就可以写成这样啦:
 #include <memory>

 using namespace std;

 int main()

 {

     unique_ptr<int> ptr(new int());

     return ;

 }
智能指针简单实现
基于引用计数的智能指针可以简单实现如下(详细解释见程序中注释):
 #include <iostream>

 using namespace std;

 template<class T>

 class SmartPtr

 {

 public:

     SmartPtr(T *p);

     ~SmartPtr();

     SmartPtr(const SmartPtr<T> &orig);                // 浅拷贝

     SmartPtr<T>& operator=(const SmartPtr<T> &rhs);    // 浅拷贝

 private:

     T *ptr;

     // 将use_count声明成指针是为了方便对其的递增或递减操作

     int *use_count;

 };

 template<class T>

 SmartPtr<T>::SmartPtr(T *p) : ptr(p)

 {

     try

     {

         use_count = new int();

     }

     catch (...)

     {

         delete ptr;

         ptr = nullptr;

         use_count = nullptr;

         cout << "Allocate memory for use_count fails." << endl;

         exit();

     }

     cout << "Constructor is called!" << endl;

 }

 template<class T>

 SmartPtr<T>::~SmartPtr()

 {

     // 只在最后一个对象引用ptr时才释放内存

     if (--(*use_count) == )

     {

         delete ptr;

         delete use_count;

         ptr = nullptr;

         use_count = nullptr;

         cout << "Destructor is called!" << endl;

     }

 }

 template<class T>

 SmartPtr<T>::SmartPtr(const SmartPtr<T> &orig)

 {

     ptr = orig.ptr;

     use_count = orig.use_count;

     ++(*use_count);

     cout << "Copy constructor is called!" << endl;

 }

 // 重载等号函数不同于复制构造函数,即等号左边的对象可能已经指向某块内存。

 // 这样,我们就得先判断左边对象指向的内存已经被引用的次数。如果次数为1,

 // 表明我们可以释放这块内存;反之则不释放,由其他对象来释放。

 template<class T>

 SmartPtr<T>& SmartPtr<T>::operator=(const SmartPtr<T> &rhs)

 {

     // 《C++ primer》:“这个赋值操作符在减少左操作数的使用计数之前使rhs的使用计数加1,

     // 从而防止自身赋值”而导致的提早释放内存

     ++(*rhs.use_count);

     // 将左操作数对象的使用计数减1,若该对象的使用计数减至0,则删除该对象

     if (--(*use_count) == )

     {

         delete ptr;

         delete use_count;

         cout << "Left side object is deleted!" << endl;

     }

     ptr = rhs.ptr;

     use_count = rhs.use_count;

     cout << "Assignment operator overloaded is called!" << endl;

     return *this;

 }
测试程序如下:
 #include <iostream>

 #include "smartptr.h"

 using namespace std;

 int main()

 {

     // Test Constructor and Assignment Operator Overloaded

     SmartPtr<int> p1(new int());

     p1 = p1;

     // Test Copy Constructor

     SmartPtr<int> p2(p1);

     // Test Assignment Operator Overloaded

     SmartPtr<int> p3(new int());

     p3 = p1;

     return ;

 }
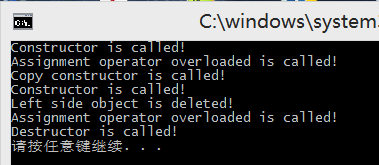
测试结果如下:

参考资料
《C++标准库(第二版)》
C++智能指针及其简单实现的更多相关文章
- 【C++】智能指针auto_ptr简单的实现
//[C++]智能指针auto_ptr简单的实现 #include <iostream> using namespace std; template <class _Ty> c ...
- C++ 引用计数技术及智能指针的简单实现
一直以来都对智能指针一知半解,看C++Primer中也讲的不够清晰明白(大概是我功力不够吧).最近花了点时间认真看了智能指针,特地来写这篇文章. 1.智能指针是什么 简单来说,智能指针是一个类,它对普 ...
- C++ 拷贝控制和资源管理,智能指针的简单实现
C++ 关于拷贝控制和资源管理部分的笔记,并且介绍了部分C++ 智能指针的概念,然后实现了一个基于引用计数的智能指针.关于C++智能指针部分,后面会有专门的研究. 通常,管理类外资源的类必须定义拷贝控 ...
- C++ 智能指针的简单实现
智能指针的用处:在c++中,使用普通指针容易造成堆内存的泄露问题,即程序员会忘记释放,以及二次释放,程序发生异常时内存泄漏等问题,而使用智能指针可以更好的管理堆内存.注意,在这里智能指针是一个类而非真 ...
- C++智能指针
引用计数技术及智能指针的简单实现 基础对象类 class Point { public: Point(int xVal = 0, int yVal = 0) : x(xVal), y(yVal) { ...
- 智能指针auto_ptr & shared_ptr
转载:智能指针auto_ptr 很多人听说过标准auto_ptr智能指针机制,但并不是每个人都天天使用它.这真是个遗憾,因为auto_ptr优雅地解决了C++设计和编码中常见的问题,正确地使用它可以生 ...
- STL 智能指针
转自: https://blog.csdn.net/k346k346/article/details/81478223 STL一共给我们提供了四种智能指针:auto_ptr.unique_ptr.sh ...
- C++ auto_ptr智能指针的用法
C++中指针申请和释放内存通常采用的方式是new和delete.然而标准C++中还有一个强大的模版类就是auto_ptr,它可以在你不用的时候自动帮你释放内存.下面简单说一下用法. 用法一: std: ...
- C++智能指针的几种用法
auto在c++11中已经弃用. 一.auto_ptr模板 auto_ptr与shared_ptr.unique_ptr都定义了类似指针的对象,可以将new到的地址赋给这一对象,当智能指针过期时,析构 ...
随机推荐
- Android Studio精彩案例(三)《模仿微信ViewPage+Fragment实现方式二》
转载本专栏文章,请注明出处,尊重原创 .文章博客地址:道龙的博客 写在前面的话:此专栏是博主在工作之余所写,每一篇文章尽可能写的思路清晰一些,属于博主的"精华"部分,不同于以往专栏 ...
- Linux中的高级文本处理命令,cut命令,sed命令,awk命令
1.2.1 cut命令 cut命令可以从一个文本文件或者文本流中提取文本列. cut语法 [root@www ~]# cut -d'分隔字符' -f fields ## 用于有特定分隔字符 [r ...
- Velocity 语法及其在springMVC中的配置
强烈推荐具体的整合博客:http://blog.csdn.net/duqi_2009/article/details/47752169 整合文章中有几处问题: xml中配置的vm视图解析器,应该按照本 ...
- SQL Server性能优化——等待——SLEEP_BPROOL_FLUSH
前言: 有一个用于历史归档的数据库(简称历史库),经过一定时间的积累,数据文件已经达到700多GB,后来决定某些数据可以不需要保留,就把这部分数据truncate了,空余出600多GB的空间,也就是说 ...
- 在代码中写view 的长宽高等
获得资源的id的另一种方法 int layoutRes = getResources().getIdentifier("pager_view" + i, "layout& ...
- 使用jQuery AJAX读取二进制数据
READING BINARY DATA USING JQUERY AJAX http://www.henryalgus.com/reading-binary-files-using-jquery-aj ...
- JDBC数据库连接简介(一)
jdbc的由来 odbc(open database connection) 最初各个数据库比如mysql和oracle等,虽然都支持sql,但是他们的连接方式是不一样的,需要按照相应的api来编写不 ...
- Android 自定义View-android学习之旅(十四)
自定义View的步骤 当andoid提供的系统组件不满足要求时候,完全可以集成View来派生自定义组件. 首定定义一个继承View的子类,然后重写他一个或几个方法. 重写的方法介绍 构造器:这是定制V ...
- (一〇九)UIButton的使用技巧 -imageView、titleLabel、圆角等
UIButton是一个常用控件,使用方法十分基本,但是有很多技巧常常不被注意,本文主要介绍UIButton的一些较高级技巧,用于实现图片和标签显示的美观性等. 开发时常常碰到按钮的下侧或者右侧有标题的 ...
- 讲究门面的Request
为什么说Request讲究门面?注意这里所说的门面并非我们常理解的外表的意思,其实是说它使用了门面设计模式,门面的使用主要用于数据安全的考虑.一个大的系统体系的多个子系统之间涉及交互通信.一个系统中的 ...
