CAGradientLayer的一些属性解析
CAGradientLayer的一些属性解析

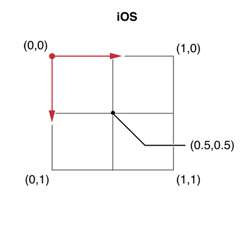
iOS中Layer的坐标系统:

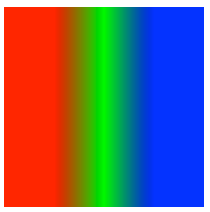
效果:

- (void)viewDidLoad

{

    [super viewDidLoad];

    CAGradientLayer *colorLayer = [CAGradientLayer layer];

    colorLayer.frame    = (CGRect){CGPointZero, CGSizeMake(, )};

    colorLayer.position = self.view.center;

    [self.view.layer addSublayer:colorLayer];

    // 颜色分配

    colorLayer.colors = @[(__bridge id)[UIColor redColor].CGColor,

                          (__bridge id)[UIColor greenColor].CGColor,

                          (__bridge id)[UIColor blueColor].CGColor];

    // 颜色分割线

    colorLayer.locations  = @[@(0.25), @(0.5), @(0.75)];

    // 起始点

    colorLayer.startPoint = CGPointMake(, );

    // 结束点

    colorLayer.endPoint   = CGPointMake(, );

}

颜色分配严格遵守Layer的坐标系统,locations,startPoint,endPoint都是以Layer坐标系统进行计算的.
而locations并不是表示颜色值所在位置,它表示的是颜色在Layer坐标系相对位置处要开始进行渐变颜色了.

CAGradientLayer 的这四个属性 colors locations startPoint endPoint 都是可以进行动画的哦.
附录:
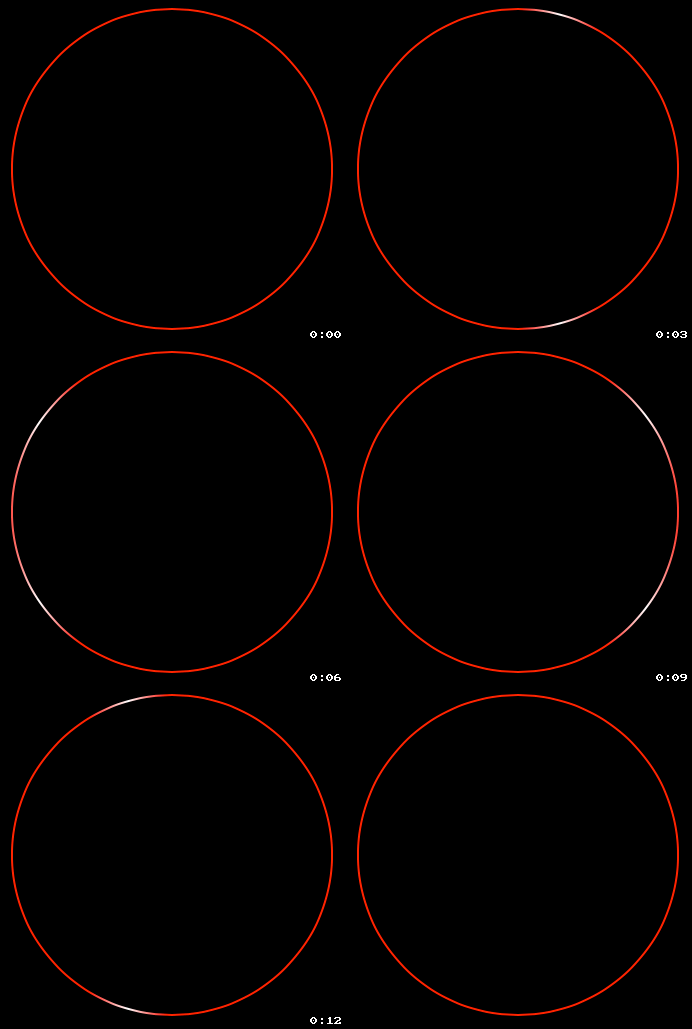
稍微复杂点的动画效果

#import "RootViewController.h"

#import "YXGCD.h"

@interface RootViewController ()

@property (nonatomic, strong) GCDTimer  *timer;

@end

@implementation RootViewController

- (void)viewDidLoad

{

    [super viewDidLoad];

    CAGradientLayer *colorLayer = [CAGradientLayer layer];

    colorLayer.backgroundColor = [UIColor blueColor].CGColor;

    colorLayer.frame    = (CGRect){CGPointZero, CGSizeMake(, )};

    colorLayer.position = self.view.center;

    [self.view.layer addSublayer:colorLayer];

    // 颜色分配

    colorLayer.colors = @[(__bridge id)[UIColor cyanColor].CGColor,

                          (__bridge id)[UIColor orangeColor].CGColor,

                          (__bridge id)[UIColor magentaColor].CGColor];

    // 起始点

    colorLayer.startPoint = CGPointMake(, );

    // 结束点

    colorLayer.endPoint   = CGPointMake(, );

    _timer = [[GCDTimer alloc] initInQueue:[GCDQueue mainQueue]];

    [_timer event:^{

        static CGFloat test = - 0.1f;

        if (test >= 1.1)

        {

            test = - 0.1f;

            [CATransaction setDisableActions:YES];

            colorLayer.locations  = @[@(test), @(test + 0.05), @(test + 0.1)];

        }

        else

        {

            [CATransaction setDisableActions:NO];

            colorLayer.locations  = @[@(test), @(test + 0.05), @(test + 0.1)];

        }

        test += 0.1f;

    } timeInterval:NSEC_PER_SEC];

    [_timer start];

}

@end

    _timer = [[GCDTimer alloc] initInQueue:[GCDQueue mainQueue]];

    [_timer event:^{

        static CGFloat test = - 0.1f;

        if (test >= 1.1)

        {

            test = - 0.1f;

            [CATransaction setDisableActions:NO];

            colorLayer.locations  = @[@(test), @(test + 0.01), @(test + 0.011)];

        }

        else

        {

            [CATransaction setDisableActions:NO];

            colorLayer.locations  = @[@(test), @(test + 0.01), @(test + 0.011)];

        }

        test += 0.1f;

    } timeInterval:NSEC_PER_SEC];

    [_timer start];
配合CAShapeLayer使用

//

//  RootViewController.m

//

//  Copyright (c) 2014年 Y.X. All rights reserved.

//

#import "RootViewController.h"

#import "YXGCD.h"

@interface RootViewController ()

@property (nonatomic, strong) GCDTimer  *timer;

@end

// 将常数转换为度数

#define   DEGREES(degrees)  ((M_PI * (degrees))/ 180.f)

@implementation RootViewController

- (void)viewDidLoad

{

    [super viewDidLoad];

    self.view.backgroundColor = [UIColor blackColor];

    CAGradientLayer *colorLayer = [CAGradientLayer layer];

    colorLayer.backgroundColor = [UIColor blueColor].CGColor;

    colorLayer.frame    = (CGRect){CGPointZero, CGSizeMake(200, 200)};

    colorLayer.position = self.view.center;

    [self.view.layer addSublayer:colorLayer];

    // 颜色分配

    colorLayer.colors = @[(__bridge id)[UIColor redColor].CGColor,

                          (__bridge id)[UIColor whiteColor].CGColor,

                          (__bridge id)[UIColor redColor].CGColor];

    colorLayer.locations  = @[@(-0.2), @(-0.1), @(0)];

    // 起始点

    colorLayer.startPoint = CGPointMake(0, 0);

    // 结束点

    colorLayer.endPoint   = CGPointMake(1, 0);

    CAShapeLayer *circle = [RootViewController LayerWithCircleCenter:CGPointMake(102, 100)

                                                              radius:80

                                                          startAngle:DEGREES(0)

                                                            endAngle:DEGREES(360)

                                                           clockwise:YES

                                                     lineDashPattern:nil];

    circle.strokeColor = [UIColor redColor].CGColor;

    [self.view.layer addSublayer:circle];

    circle.strokeEnd = 1.f;

    colorLayer.mask = circle;

    _timer = [[GCDTimer alloc] initInQueue:[GCDQueue mainQueue]];

    [_timer event:^{

        static int i = 0;

        if (i++ % 2 == 0)

        {

            CABasicAnimation* fadeAnim = [CABasicAnimation animationWithKeyPath:@"locations"];

            fadeAnim.fromValue = @[@(-0.2), @(-0.1), @(0)];

            fadeAnim.toValue   = @[@(1.0), @(1.1), @(1.2)];

            fadeAnim.duration  = 1.5;

            [colorLayer addAnimation:fadeAnim forKey:nil];

        }

    } timeInterval:NSEC_PER_SEC];

    [_timer start];

}

+ (CAShapeLayer *)LayerWithCircleCenter:(CGPoint)point

                                 radius:(CGFloat)radius

                             startAngle:(CGFloat)startAngle

                               endAngle:(CGFloat)endAngle

                              clockwise:(BOOL)clockwise

                        lineDashPattern:(NSArray *)lineDashPattern

{

    CAShapeLayer *layer = [CAShapeLayer layer];

    // 贝塞尔曲线(创建一个圆)

    UIBezierPath *path = [UIBezierPath bezierPathWithArcCenter:CGPointMake(0, 0)

                                                        radius:radius

                                                    startAngle:startAngle

                                                      endAngle:endAngle

                                                     clockwise:clockwise];

    // 获取path

    layer.path = path.CGPath;

    layer.position = point;

    // 设置填充颜色为透明

    layer.fillColor = [UIColor clearColor].CGColor;

    // 获取曲线分段的方式

    if (lineDashPattern)

    {

        layer.lineDashPattern = lineDashPattern;

    }

    return layer;

}

@end
转http://www.cnblogs.com/YouXianMing/p/3793913.html
CAGradientLayer的一些属性解析的更多相关文章
- CAGradientLayer的一些属性解析-b
CAGradientLayer的一些属性解析 iOS中Layer的坐标系统: 效果: - (void)viewDidLoad { [super viewDidLoad]; CAGradientLaye ...
- Activity设置全屏显示的两种方式及系统自带theme属性解析
转载说明:原贴地址:http://blog.csdn.net/a_running_wolf/article/details/50480386 设置Activity隐藏标题栏.设置Activity全屏显 ...
- PE知识复习之PE的各种头属性解析
PE知识复习之PE的各种头属性解析 一丶DOS头结构体 typedef struct _IMAGE_DOS_HEADER { // DOS .EXE header WORD e_magic; // M ...
- 【Spring源码深度解析学习系列】复杂标签属性解析(四)
一.创建用于属性承载的BeanDefinition BeanDefiniton是一个接口,在Spring中存在三种实现:RootBeanDefinition.ChildBeanDefinition.G ...
- CALayer的additive属性解析
CALayer的additive属性解析 效果: 源码:https://github.com/RylanJIN/ShareOfCoreAnimation // // CAPartAViewContro ...
- Atitit.注解and属性解析(2)---------语法分析 生成AST attilax总结 java .net
Atitit.注解and属性解析(2)---------语法分析 生成AST attilax总结 java .net 1. 应用场景:::因为要使用ui化的注解 1 2. 使用解释器方式来实现生成 ...
- HTTP中的请求头和响应头属性解析
HTTP中的请求头和响应头属性解析 下面总结一下平时web开发中,HTTP请求的相关过程以及重要的参数意义 一次完整的HTTP请求所经历的7个步骤 说明:HTTP通信机制是在一次完整的HTTP通信过程 ...
- cocos2d-x 3.0游戏实例学习笔记《卡牌塔防》第七步---英雄要升级&属性--解析csv配置文件
/* 说明: **1.本次游戏实例是<cocos2d-x游戏开发之旅>上的最后一个游戏,这里用3.0重写并做下笔记 **2.我也问过木头本人啦.他说:随便写,第一别全然照搬代码:第二能够说 ...
- springMVC自定义方法属性解析器
使用场景例子: 用户登陆系统一般会往Session里放置一个VO对象,然后在controller里会来获取用户的userId等信息. 之前的写法是:@SessionAttributes配合@Model ...
随机推荐
- 【Android】Android Studio 进行代码混淆,打包release APK
整了一天,感觉坑挺多. 1. 选择如图中的选项Android Studio进行签名打包: 2. 填写APP对应的信息:(最好用个文本记下来放在项目中同步给Team) - Key store path: ...
- Mac删除JDK
安装了1.6以后,没有安装1.7发现Android Studio报错: invalid source release: JDK 1.7 原因是Android Studio需要1.7以上的版本,结果再次 ...
- Android聚合广告AFP的对接系统设计
工作需要,要对接阿里妈妈的广告聚合平台,简称AFP.对于一般的应用而言,想要流量变现,广告是显而易见的手段,尤其是在中国,打开一个千万级别的用户,肯定有某个地方是有对接广告的,只不过明不明显而已. 阿 ...
- JAVA 设计模式 命令模式
用途 命令模式 (Command) 将一个请求封装为一个对象,从而使你可以用不同的请求对客户进行参数化:对请求排队或请求日志,以及支持可撤销的操作. 命令模式是一种行为型模式. 结构
- CP/IP,SPDY,WebSocket 三者之间的关系
按照OSI网络分层模型,IP是网络层协议,TCP是传输层协议,而HTTP是应用层的协议.在这三者之间,SPDY和WebSocket都是与HTTP相关的协议,而TCP是HTTP底层的协议.一.HTTP的 ...
- C# 视频流操作
发送视频流 void SendVideoBuffer(object bufferIn) { try { TcpClient tcp = ); NetworkStream ns = tcp.GetStr ...
- LeetCode - Balanced Binary Tree
题目: Given a binary tree, determine if it is height-balanced. For this problem, a height-balanced bin ...
- Sandcastle入门:创建C#帮助文档
Sandcastle入门:创建C#帮助文档 今天学到了一个东西:利用vs2005生成的dll/xml来生成帮助文档. 完成这个伟大任务的是Sandcastle,微软推出的类库文档编译工具. 在开始这篇 ...
- jquery列表顺序倒转排序效果
html文件代码: <!DOCTYPE html> <html> <head> <meta http-equiv="Content-Type&quo ...
- 局部(或全局)设置<a>标签的target属性
对于超链接<a>标签,target属性的设置是比较关键的,在不同的用户场景下选用适合的新页面载入方式,可以大大的提高访客的体验感.我们一般对target的设置可以挨个来,但 ...
