【JavaFx教程】第三部分:与用户的交互
第3部分的主题:
- 在表中反应选择的改变(TableView中)。
- 增加增加,编辑和删除按钮的功能。
- 创建自定义弹出对话框编辑人员。
- 验证用户输入。
响应表的选择
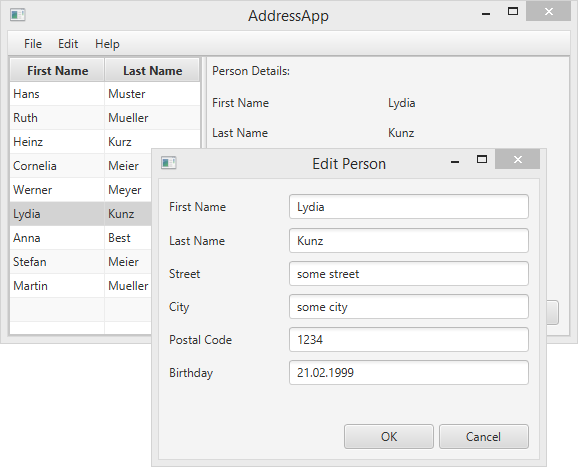
显然,我们还没有使用应用程序的右边。想法是当用户选择表中的人员时,在右边显示人员的详情。
首先,让我们在PersonOverviewController添加一个新的方法,帮助我们使用单个人员的数据填写标签。
创建方法showPersonDetails(Person person)。遍历所有标签,并且使用setText(…)方法设置标签的文本为个人的详情。如果null作为参数传递,所有的标签应该被清空。
PersonOverviewController.java
/**

 * Fills all text fields to show details about the person.

 * If the specified person is null, all text fields are cleared.

 *

 * @param person the person or null

 */

private void showPersonDetails(Person person) {

    if (person != null) {

        // Fill the labels with info from the person object.

        firstNameLabel.setText(person.getFirstName());

        lastNameLabel.setText(person.getLastName());

        streetLabel.setText(person.getStreet());

        postalCodeLabel.setText(Integer.toString(person.getPostalCode()));

        cityLabel.setText(person.getCity());

        // TODO: We need a way to convert the birthday into a String!

        // birthdayLabel.setText(...);

    } else {

        // Person is null, remove all the text.

        firstNameLabel.setText("");

        lastNameLabel.setText("");

        streetLabel.setText("");

        postalCodeLabel.setText("");

        cityLabel.setText("");

        birthdayLabel.setText("");

    }

}
转换生日日期为字符串
你注意到我们没有设置birthday到标签中,因为它是LocalDate类型,不是String。我们首先需要格式化日期。
在几个地方上我们使用LocalDate和String之间的转换。好的实践是创建一个带有static方法的帮助类。我们称它为DateUtil,并且把它放到单独的包中,称为ch.makery.address.util。
DateUtil.java
package ch.makery.address.util;

import java.time.LocalDate;

import java.time.format.DateTimeFormatter;

import java.time.format.DateTimeParseException;

/**

 * Helper functions for handling dates.

 *

 * @author Marco Jakob

 */

public class DateUtil {

    /** The date pattern that is used for conversion. Change as you wish. */

    private static final String DATE_PATTERN = "dd.MM.yyyy";

    /** The date formatter. */

    private static final DateTimeFormatter DATE_FORMATTER =

            DateTimeFormatter.ofPattern(DATE_PATTERN);

    /**

     * Returns the given date as a well formatted String. The above defined

     * {@link DateUtil#DATE_PATTERN} is used.

     *

     * @param date the date to be returned as a string

     * @return formatted string

     */

    public static String format(LocalDate date) {

        if (date == null) {

            return null;

        }

        return DATE_FORMATTER.format(date);

    }

    /**

     * Converts a String in the format of the defined {@link DateUtil#DATE_PATTERN}

     * to a {@link LocalDate} object.

     *

     * Returns null if the String could not be converted.

     *

     * @param dateString the date as String

     * @return the date object or null if it could not be converted

     */

    public static LocalDate parse(String dateString) {

        try {

            return DATE_FORMATTER.parse(dateString, LocalDate::from);

        } catch (DateTimeParseException e) {

            return null;

        }

    }

    /**

     * Checks the String whether it is a valid date.

     *

     * @param dateString

     * @return true if the String is a valid date

     */

    public static boolean validDate(String dateString) {

        // Try to parse the String.

        return DateUtil.parse(dateString) != null;

    }

}
提示:你能通过改变DATE_PATTERN修改日期的格式。所有可能的格式参考 DateTimeFormatter.
使用DateUtil
现在,我们需要在PersonOverviewController的showPersonDetails方法中使用我们新建的DateUtil。使用下面这样替代我们添加的TODO。
birthdayLabel.setText(DateUtil.format(person.getBirthday()));
监听表选择的改变
为了当用户在人员表中选择一个人时获得通知,我们需要监听改变。
在JavaFX中有一个接口称为ChangeListener,带有一个方法changed()。该方法有三个参数:observable, oldValue和newValue。
我们使用*Java 8 lambda*表达式创建这样一个ChangeListener。让我们添加一些行到PersonOverviewController的initialize()方法中。现在看起来是这样的。
PersonOverviewController.java
@FXML

private void initialize() {

    // Initialize the person table with the two columns.

    firstNameColumn.setCellValueFactory(

            cellData -> cellData.getValue().firstNameProperty());

    lastNameColumn.setCellValueFactory(

            cellData -> cellData.getValue().lastNameProperty());

    // Clear person details.

    showPersonDetails(null);

    // Listen for selection changes and show the person details when changed.

    personTable.getSelectionModel().selectedItemProperty().addListener(

            (observable, oldValue, newValue) -> showPersonDetails(newValue));

}
使用showPersonDetails(null),我们重设个人详情。
使用personTable.getSelectionModel...,我们获得人员表的selectedItemProperty,并且添加监听。不管什么时候用户选择表中的人员,都会执行我们的lambda表达式。我们获取新选择的人员,并且把它传递给showPersonDetails(...)方法。
现在试着运行你的应用程序,验证当你选择表中的人员时,关于该人员的详情是否正确的显示。
如果有些事情不能工作,你可以对比下PersonOverviewController.java中的PersonOverviewController类
删除按钮
我们的用户接口已经包含一个删除按钮,但是没有任何功能。我们能在*SceneBuilder*中的按钮上选择动作。在我们控制器中的任何使用@FXML(或者它是公用的)注释的方法都可以被*Scene Builder*访问。因此,让我们在PersonOverviewController类的最后添加一个删除方法。
PersonOverviewController.java
/**

 * Called when the user clicks on the delete button.

 */

@FXML

private void handleDeletePerson() {

    int selectedIndex = personTable.getSelectionModel().getSelectedIndex();

    personTable.getItems().remove(selectedIndex);

}
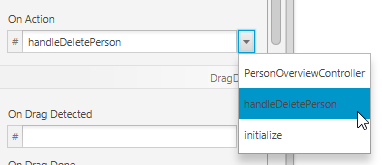
现在,使用*SceneBuilder*打开PersonOverview.fxml文件,选择*Delete*按钮,打开*Code*组,在On Actin的下拉菜单中选择handleDeletePerson。
错误处理
如果你现在运行应用程序,你应该能够从表中删除选择的人员。但是,当你没有在表中选择人员时点击删除按钮时会发生什么呢。
这里有一个ArrayIndexOutOfBoundsException,因为它不能删除掉索引为-1人员项目。索引-1由getSelectedIndex()返回,它意味着你没有选择项目。
当然,忽略这种错误不是非常好。我们应该让用户知道在删除时必须选择一个人员。(更好的是我们应该禁用删除按钮,以便用户没有机会做错误的事情)。
我们添加一个弹出对话框通知用户,你将需要*添加一个库Dialogs:
- 下载controlsfx-8.0.6_20.jar (你也能从ControlsFX Website中获取)。 重要:ControlsFX必须是8.0.6_20以上版本才能在
JDK8U20以上版本工作。 - 在项目中创建一个lib子目录,添加controlsf jar文件到该目录下。
- 添加库到你的项目classpath中。在Eclipse中右击jar文件|选择Build Path| *Add to Build Path*。现在Eclipse知道这个库了。

对handleDeletePerson()方法做一些修改后,不管什么时候用户没有选择表中的人员时按下删除按钮,我们能显示一个简单的对话框。
PersonOverviewController.java
/**

 * Called when the user clicks on the delete button.

 */

@FXML

private void handleDeletePerson() {

    int selectedIndex = personTable.getSelectionModel().getSelectedIndex();

    if (selectedIndex >= 0) {

        personTable.getItems().remove(selectedIndex);

    } else {

        // Nothing selected.

        Dialogs.create()

            .title("No Selection")

            .masthead("No Person Selected")

            .message("Please select a person in the table.")

            .showWarning();

    }

}
更多如何使用Dialog的示例,请阅读JavaFX 8 Dialogs.
新建和编辑对话框
新建和编辑的动作有点工作:我们需要一个自定义带表单的对话框(例如:新的Stage),询问用户关于人员的详情。
设计对话框
在*view*包中创建新的fxml文件,称为
PersonEditDialog.fxml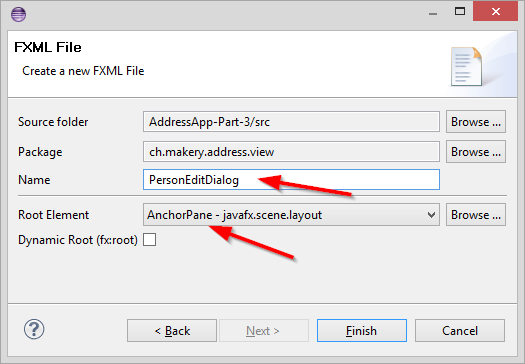
使用
GridPan,Label,TextField和Button创建一个对话框,如下所示: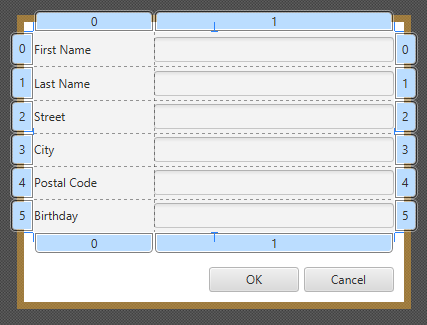
如果你不能完成工作,你能下载这个PersonEditDialog.fxml.
创建控制器
为对话框创建控制器PersonEditDialogController.java:
PersonEditDialogController.java
package ch.makery.address.view;

import javafx.fxml.FXML;

import javafx.scene.control.TextField;

import javafx.stage.Stage;

import org.controlsfx.dialog.Dialogs;

import ch.makery.address.model.Person;

import ch.makery.address.util.DateUtil;

/**

 * Dialog to edit details of a person.

 *

 * @author Marco Jakob

 */

public class PersonEditDialogController {

    @FXML

    private TextField firstNameField;

    @FXML

    private TextField lastNameField;

    @FXML

    private TextField streetField;

    @FXML

    private TextField postalCodeField;

    @FXML

    private TextField cityField;

    @FXML

    private TextField birthdayField;

    private Stage dialogStage;

    private Person person;

    private boolean okClicked = false;

    /**

     * Initializes the controller class. This method is automatically called

     * after the fxml file has been loaded.

     */

    @FXML

    private void initialize() {

    }

    /**

     * Sets the stage of this dialog.

     *

     * @param dialogStage

     */

    public void setDialogStage(Stage dialogStage) {

        this.dialogStage = dialogStage;

    }

    /**

     * Sets the person to be edited in the dialog.

     *

     * @param person

     */

    public void setPerson(Person person) {

        this.person = person;

        firstNameField.setText(person.getFirstName());

        lastNameField.setText(person.getLastName());

        streetField.setText(person.getStreet());

        postalCodeField.setText(Integer.toString(person.getPostalCode()));

        cityField.setText(person.getCity());

        birthdayField.setText(DateUtil.format(person.getBirthday()));

        birthdayField.setPromptText("dd.mm.yyyy");

    }

    /**

     * Returns true if the user clicked OK, false otherwise.

     *

     * @return

     */

    public boolean isOkClicked() {

        return okClicked;

    }

    /**

     * Called when the user clicks ok.

     */

    @FXML

    private void handleOk() {

        if (isInputValid()) {

            person.setFirstName(firstNameField.getText());

            person.setLastName(lastNameField.getText());

            person.setStreet(streetField.getText());

            person.setPostalCode(Integer.parseInt(postalCodeField.getText()));

            person.setCity(cityField.getText());

            person.setBirthday(DateUtil.parse(birthdayField.getText()));

            okClicked = true;

            dialogStage.close();

        }

    }

    /**

     * Called when the user clicks cancel.

     */

    @FXML

    private void handleCancel() {

        dialogStage.close();

    }

    /**

     * Validates the user input in the text fields.

     *

     * @return true if the input is valid

     */

    private boolean isInputValid() {

        String errorMessage = "";

        if (firstNameField.getText() == null || firstNameField.getText().length() == 0) {

            errorMessage += "No valid first name!\n";

        }

        if (lastNameField.getText() == null || lastNameField.getText().length() == 0) {

            errorMessage += "No valid last name!\n";

        }

        if (streetField.getText() == null || streetField.getText().length() == 0) {

            errorMessage += "No valid street!\n";

        }

        if (postalCodeField.getText() == null || postalCodeField.getText().length() == 0) {

            errorMessage += "No valid postal code!\n";

        } else {

            // try to parse the postal code into an int.

            try {

                Integer.parseInt(postalCodeField.getText());

            } catch (NumberFormatException e) {

                errorMessage += "No valid postal code (must be an integer)!\n";

            }

        }

        if (cityField.getText() == null || cityField.getText().length() == 0) {

            errorMessage += "No valid city!\n";

        }

        if (birthdayField.getText() == null || birthdayField.getText().length() == 0) {

            errorMessage += "No valid birthday!\n";

        } else {

            if (!DateUtil.validDate(birthdayField.getText())) {

                errorMessage += "No valid birthday. Use the format dd.mm.yyyy!\n";

            }

        }

        if (errorMessage.length() == 0) {

            return true;

        } else {

            // Show the error message.

            Dialogs.create()

                .title("Invalid Fields")

                .masthead("Please correct invalid fields")

                .message(errorMessage)

                .showError();

            return false;

        }

    }

}
关于该控制器的一些事情应该注意:
setPerson(…)方法可以从其它类中调用,用来设置编辑的人员。- 当用户点击OK按钮时,调用
handleOK()方法。首先,通过调用isInputValid()方法做一些验证。只有验证成功,Person对象使用输入的数据填充。这些修改将直接应用到Person对象上,传递给setPerson(…)。 - 布尔值
okClicked被使用,以便调用者决定用户是否点击OK或者Cancel按钮。
连接视图和控制器
使用已经创建的视图(FXML)和控制器,需要连接到一起。
- 使用SceneBuilder打开
PersonEditDialog.fxml文件 - 在左边的*Controller*组中选择
PersonEditDialogController作为控制器类 - 设置所有TextField的
fx:id到相应的控制器字段上。 - 设置两个按钮的onAction到相应的处理方法上。
打开对话框
在MainApp中添加一个方法加载和显示编辑人员的对话框。
MainApp.java
/**

 * Opens a dialog to edit details for the specified person. If the user

 * clicks OK, the changes are saved into the provided person object and true

 * is returned.

 *

 * @param person the person object to be edited

 * @return true if the user clicked OK, false otherwise.

 */

public boolean showPersonEditDialog(Person person) {

    try {

        // Load the fxml file and create a new stage for the popup dialog.

        FXMLLoader loader = new FXMLLoader();

        loader.setLocation(MainApp.class.getResource("view/PersonEditDialog.fxml"));

        AnchorPane page = (AnchorPane) loader.load();

        // Create the dialog Stage.

        Stage dialogStage = new Stage();

        dialogStage.setTitle("Edit Person");

        dialogStage.initModality(Modality.WINDOW_MODAL);

        dialogStage.initOwner(primaryStage);

        Scene scene = new Scene(page);

        dialogStage.setScene(scene);

        // Set the person into the controller.

        PersonEditDialogController controller = loader.getController();

        controller.setDialogStage(dialogStage);

        controller.setPerson(person);

        // Show the dialog and wait until the user closes it

        dialogStage.showAndWait();

        return controller.isOkClicked();

    } catch (IOException e) {

        e.printStackTrace();

        return false;

    }

}
添加下面的方法到PersonOverviewController中。当用户按下*New*或*Edit*按钮时,这些方法将从MainApp中调用showPersonEditDialog(...)。
PersonOverviewController.java
/**

 * Called when the user clicks the new button. Opens a dialog to edit

 * details for a new person.

 */

@FXML

private void handleNewPerson() {

    Person tempPerson = new Person();

    boolean okClicked = mainApp.showPersonEditDialog(tempPerson);

    if (okClicked) {

        mainApp.getPersonData().add(tempPerson);

    }

}

/**

 * Called when the user clicks the edit button. Opens a dialog to edit

 * details for the selected person.

 */

@FXML

private void handleEditPerson() {

    Person selectedPerson = personTable.getSelectionModel().getSelectedItem();

    if (selectedPerson != null) {

        boolean okClicked = mainApp.showPersonEditDialog(selectedPerson);

        if (okClicked) {

            showPersonDetails(selectedPerson);

        }

    } else {

        // Nothing selected.

        Dialogs.create()

            .title("No Selection")

            .masthead("No Person Selected")

            .message("Please select a person in the table.")

            .showWarning();

    }

}
在Scene Builder中打开PersonOverview.fxml文件,为New和Edit按钮的*On Action*中选择对应的方法。
完成!
现在你应该有一个可以工作的*Address应用*。应用能够添加、编辑和删除人员。这里甚至有一些文本字段的验证避免坏的用户输入。
我希望本应用的概念和结构让开始编写自己的JavaFX应用!玩的开心。
--------------------- 本文来自 jobbible 的CSDN 博客 ,全文地址请点击:https://blog.csdn.net/moshenglv/article/details/82877639?utm_source=copy
【JavaFx教程】第三部分:与用户的交互的更多相关文章
- C#入门教程(三)–接收用户输入、转义字符、类型转换-打造C#入门教程
上次教程主要讲解了visual stdio快捷键.变量相关的知识.具体教程戳这里:http://www.chengxiaoxiao.com/net/1027.html 越来越深入去写教程越来越发现,自 ...
- Laravel大型项目系列教程(三)之发表文章
Laravel大型项目系列教程(三)之发表文章 一.前言 上一节教程中完成了用户管理,这节教程将大概完成发表Markdown格式文章并展示的功能. 二.Let's go 1.数据库迁移 文章模块中我们 ...
- [译]MVC网站教程(三):动态布局和站点管理
目录 1. 介绍 2. 软件环境 3. 在运行示例代码之前(源代码 + 示例登陆帐号) 4. 自定义操作结果和控制器扩展 1) OpenFileResult 2) ImageR ...
- Senparc.Weixin.MP SDK 微信公众平台开发教程(三):微信公众平台开发验证
要对接微信公众平台的"开发模式",即对接到自己的网站程序,必须在注册成功之后(见Senparc.Weixin.MP SDK 微信公众平台开发教程(一):微信公众平台注册),等待官方 ...
- Webpack4教程 - 第三部分,如何使用插件
转载请注明出处:葡萄城官网,葡萄城为开发者提供专业的开发工具.解决方案和服务,赋能开发者.原文出处:https://wanago.io/2018/07/23/webpack-4-course-part ...
- Ocelot简易教程(三)之主要特性及路由详解
作者:依乐祝 原文地址:https://www.cnblogs.com/yilezhu/p/9664977.html 上篇<Ocelot简易教程(二)之快速开始2>教大家如何快速跑起来一个 ...
- Java NIO系列教程(三) Channel之Socket通道
目录: <Java NIO系列教程(二) Channel> <Java NIO系列教程(三) Channel之Socket通道> 在<Java NIO系列教程(二) Ch ...
- Android实战简易教程-第三十九枪(第三方短信验证平台Mob和验证码自己主动填入功能结合实例)
用户注冊或者找回password时通常会用到短信验证功能.这里我们使用第三方的短信平台进行验证实例. 我们用到第三方短信验证平台是Mob,地址为:http://mob.com/ 一.注冊用户.获取SD ...
- EnjoyingSoft之Mule ESB开发教程第三篇:Mule message structure - Mule message结构
目录 1. 探索Mule Message结构 2. Mule Message的Payload 3. Mule Message的Property 4. Mule Message的Attachment 5 ...
- [ABP教程]第三章 创建、更新和删除图书
Web应用程序开发教程 - 第三章: 创建,更新和删除图书 关于本教程 在本系列教程中, 你将构建一个名为 Acme.BookStore 的用于管理书籍及其作者列表的基于ABP的应用程序. 它是使用以 ...
随机推荐
- MariaDB 数据库系统概述(1)
MariaDB数据库管理系统是MySQL的一个分支,主要由开源社区在维护,采用GPL授权许可MariaDB的目的是完全兼容MySQL,包括API和命令行,MySQL由于现在闭源了,而能轻松成为MySQ ...
- Tree with Small Distances(cf1029E)(树形动规)
You are given an undirected tree consisting of \(n\) vertices. An undirected tree is a connected und ...
- svn重新安装后报You need to upgrade the working copy first错误
问题来源 最近重新安装了操作系统,安装了一个最新版的svn,提交代码的时候报了一个错误:You need to upgrade the working copy first,!网上找了很多解决办法,都 ...
- Git - 信息查看
git help git version # Display the version of git. git help # Prints the synopsis and a list of the ...
- Vue.js之下拉列表及选中触发事件
老早就听说了Vue.js是多么的简单.易学.好用等等,然而我只是粗略的看了下文档,简单的敲了几个例子,仅此而已. 最近由于项目的需要,系统的看了下文档,也学到了一些东西. 废话不多说,这里要说的是下拉 ...
- WebSocket集成XMPP网页即时通讯3:二进制文件收发
WebSocket支持二进制的发送,见jetty官网: http://www.eclipse.org/jetty/documentation/current/jetty-websocket-api-s ...
- h5文字超出,两行显示,超出显示省略号
最近接到一个需求,要求商场导航里的文字最多显示两行,超出两行的省略号显示,查一些资料,又根据自己的需求,改了很多,直接上代码吧 <html> <head> <style ...
- Linux驱动:I2C驱动编写要点
继续上一篇博文没讲完的内容“针对 RepStart 型i2c设备的驱动模型”,其中涉及的内容有:i2c_client 的注册.i2c_driver 的注册.驱动程序的编写. 一.i2c 设备的注册分析 ...
- Java抽象类应用—模板方法模式
模板方法模式(Templete method) 定义一个操作中的算法的骨架,而将一些可变部分的实现延迟到子类中,模板方法模式使得子类可以不改变一个算法的结构即可重新定义该算法的某些特定的步骤. 例: ...
- jieba分词(2)
结巴分词系统中实现了两种关键词抽取法,一种是TF-IDF关键词抽取算法另一种是TextRank关键词抽取算法,它们都是无监督的算法. 以下是两种算法的使用: #-*- coding:utf-8 -*- ...