WPF中的常用布局
一 写在开头
1.1 写在开头
评价一门技术的好坏得看具体的需求,没有哪门技术是面面俱到地好。
1.2 本文内容
本文主要内容为WPF中的常用布局,大部分内容转载至https://blog.csdn.net/woshisunjiale/article/details/54136323,代码片段可能有所不同。
二 WPF中的常用布局
因为项目需要,所以得学习WPF开发。WPF使软件界面和逻辑相分离,手写xaml进行程序UI的开发是件很惬意的事情。从这点来说WPF要比Qt和GTK+要好。当然了,如果其能跨平台甚至开源那就更好了。但是,商业有商业自身的规律。
2.1 Canvas布局
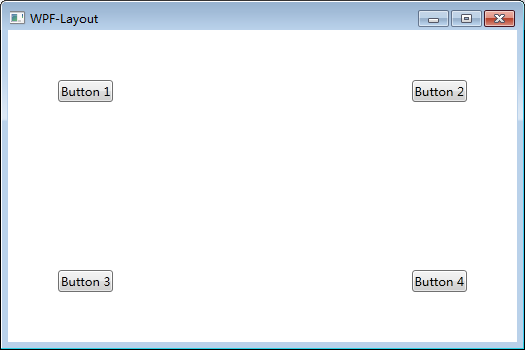
Canvas是一个类似于坐标系的面板,所有的元素通过设置坐标来决定其在坐标系中的位置。具体表现为使用Left、Top、Right、 Bottom附加属性在Canvas中定位控件。
 <Window x:Class="WPF_Layout.MainWindow"

 xmlns="http://schemas.microsoft.com/winfx/2006/xaml/presentation"

 xmlns:x="http://schemas.microsoft.com/winfx/2006/xaml"

 Title="WPF-Layout" Height="350" Width="525">

 <Grid>

 <Canvas>

 <Button Canvas.Left="50" Canvas.Top="50" Content="Button 1"></Button>

 <Button Canvas.Right="50" Canvas.Top="50" Content="Button 2"></Button>

 <Button Canvas.Left="50" Canvas.Bottom="50" Content="Button 3"></Button>

 <Button Canvas.Right="50" Canvas.Bottom="50" Content="Button 4"></Button>

 </Canvas>

 </Grid>

 </Window>

注意:如果同时设置 Canvas.Left="50"Canvas.Right="50",则以Canvas.Left="50"为准。如果同时设置Canvas.Top="50" Canvas.Bottom="50",则以Canvas.Top ="50"为准。(别这么丧心病狂地同时写Left和Right,请遵循基本的编程逻辑)
2.2 StackPanel布局
StackPanel将控件按照行或列来顺序排列,但不会换行。通过设置面板的Orientation属性设置了两种排列方式:横排(Horizontal默认的)和竖排(Vertical),默认为竖排(Vertical)。
 <Window x:Class="WPF_Layout.MainWindow"

 xmlns="http://schemas.microsoft.com/winfx/2006/xaml/presentation"

 xmlns:x="http://schemas.microsoft.com/winfx/2006/xaml"

 Title="WPF-Layout" Height="350" Width="525">

 <Grid>

 <StackPanel Name="stackpanel1" Orientation="Horizontal">

 <Button Content="Button1"></Button>

 <Button Content="Button2"></Button>

 <Button Content="Button3"></Button>

 </StackPanel>

 <StackPanel Name="stackpanel2" Orientation="Vertical">

 <Button Content="Button4"></Button>

 <Button Content="Button5"></Button>

 <Button Content="Button6"></Button>

 </StackPanel>

 <StackPanel Name="stackpanel3" Orientation="Horizontal" FlowDirection="RightToLeft">

 <Button Content="Button7"></Button>

 <Button Content="Button8"></Button>

 <Button Content="Button9"></Button>

 </StackPanel>

 </Grid>

 </Window>
注意:Orientation="Horizontal"时,设置FlowDirection属性为RightToLeft,,则元素将从右向左排列。
2.3 DockPanel布局
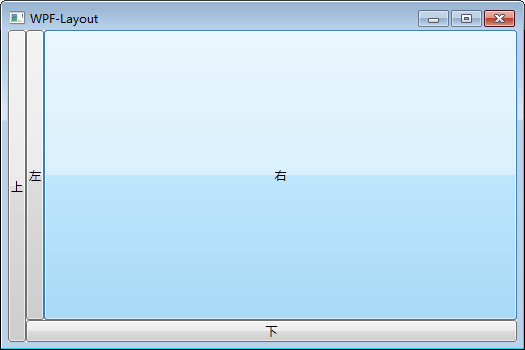
DockPanel支持让元素简单地停靠在整个面板的某一条边上,然后拉伸元素以填满全部宽度或高度。它也支持让一个元素填充其他已停靠元素没有占用的剩余空间。
DockPanel有一个Dock附加属性,因此子元素用4个值来控制她们的停靠:Left、Top、Right、Bottom。Dock没有Fill值。作为替代,最后的子元素将加入一个DockPanel并填满所有剩余的空间,除非DockPanel的LastChildFill属性为false,它将朝某个方向停靠。
 <Window x:Class="WPF_Layout.MainWindow"

         xmlns="http://schemas.microsoft.com/winfx/2006/xaml/presentation"

         xmlns:x="http://schemas.microsoft.com/winfx/2006/xaml"

         Title="WPF-Layout" Height="350" Width="525">

     <Grid>

         <DockPanel>

             <Button Content="上" DockPanel.Dock="Left"></Button>

             <Button Content="下" DockPanel.Dock="Bottom"></Button>

             <Button Content="左" DockPanel.Dock="Left"></Button>

             <Button Content="右" DockPanel.Dock="Right"></Button>

         </DockPanel>

     </Grid>

 </Window>

设置LastChildFill属性为false
 <Window x:Class="WPF_Layout.MainWindow"

         xmlns="http://schemas.microsoft.com/winfx/2006/xaml/presentation"

         xmlns:x="http://schemas.microsoft.com/winfx/2006/xaml"

         Title="WPF-Layout" Height="350" Width="525">

     <Grid>

         <DockPanel LastChildFill="False">

             <Button Content="上" DockPanel.Dock="Left"></Button>

             <Button Content="下" DockPanel.Dock="Bottom"></Button>

             <Button Content="左" DockPanel.Dock="Left"></Button>

             <Button Content="右" DockPanel.Dock="Right"></Button>

         </DockPanel>

     </Grid>

 </Window>

2.4 WrapPanel布局
WrapPanel布局面板将各个控件按照一定方向罗列,当长度或高度不够时自动调整进行换行换列。
Orientation="Horizontal"时各控件从左至右罗列,当面板长度不够时,子控件就会自动换行,继续按照从左至右的顺序排列。
Orientation="Vertical"时各控件从上至下罗列,当面板高度不够时,子控件就会自动换列,继续按照从上至下的顺序排列。
 <Window x:Class="WPF_Layout.MainWindow"

         xmlns="http://schemas.microsoft.com/winfx/2006/xaml/presentation"

         xmlns:x="http://schemas.microsoft.com/winfx/2006/xaml"

         Title="WPF-Layout" Height="350" Width="525">

     <Grid>

         <WrapPanel Orientation="Horizontal">

             <Button Content="Button 150" Width="150"></Button>

             <Button Content="Button 200" Width="200"></Button>

             <Button Content="Button 150" Width="150"></Button>

             <Button Content="Button 200" Width="200"></Button>

             <Button Content="Button 150" Width="150"></Button>

             <Button Content="Button 200" Width="200"></Button>

             <Button Content="Button 150" Width="150"></Button>

         </WrapPanel>

     </Grid>

 </Window>

2.5 Grid布局
Grid允许我们通过自定义行列来进行布局,这类似于表格.通过定义Grid的RowDifinitions和ColumnDifinitions来实现对于表格行和列的定义,元素根据附加属性Grid.Row和Grid.Column确定自己的位置。
1)Grid的列宽与行高可采用固定、自动、按比列三种方式定义
第一种,固定长度——值为一个确定的数字
第二种,自动长度——值为Auto,实际作用就是取实际控件所需的最小值
第三种,比例长度——*表示占用剩余的全部宽度;两行都是*,将平分剩余宽度;一个2*,一个*,则前者占剩余全部宽度的2/3,后者占1/3;依此类推
 <Window x:Class="WPF_Layout.MainWindow"

         xmlns="http://schemas.microsoft.com/winfx/2006/xaml/presentation"

         xmlns:x="http://schemas.microsoft.com/winfx/2006/xaml"

         Title="WPF-Layout" Height="350" Width="525">

     <Grid>

         <Grid.RowDefinitions>

             <RowDefinition Height="40"></RowDefinition>

             <RowDefinition Height="Auto"></RowDefinition>

             <RowDefinition Height="2*"></RowDefinition>

             <RowDefinition Height="*"></RowDefinition>

         </Grid.RowDefinitions>

         <Button Grid.Row="0" Content="Button 1"></Button>

         <Button Grid.Row="1" Content="Button 2"></Button>

         <Button Grid.Row="2" Content="Button 3"></Button>

         <Button Grid.Row="3" Content="Button 4"></Button>

     </Grid>

 </Window>

2) 合并行或列
 <Window x:Class="WPF_Layout.MainWindow"

         xmlns="http://schemas.microsoft.com/winfx/2006/xaml/presentation"

         xmlns:x="http://schemas.microsoft.com/winfx/2006/xaml"

         Title="WPF-Layout" Height="350" Width="525">

     <Grid>

         <Grid.RowDefinitions>

             <RowDefinition Height="40"></RowDefinition>

             <RowDefinition Height="Auto"></RowDefinition>

             <RowDefinition Height="2*"></RowDefinition>

             <RowDefinition Height="*"></RowDefinition>

         </Grid.RowDefinitions>

         <Button Grid.Row="0" Content="Button 1"></Button>

         <Button Grid.Row="1" Content="Button 2"></Button>

         <Button Grid.Row="2" Grid.RowSpan="2" Content="Button 3"></Button>

     </Grid>

 </Window>

3)GridSplitter重新分布Grid控件的列间距或行间距。(类似于WinForm中SplitContainer)
 <Window x:Class="WPF_Layout.MainWindow"

         xmlns="http://schemas.microsoft.com/winfx/2006/xaml/presentation"

         xmlns:x="http://schemas.microsoft.com/winfx/2006/xaml"

         Title="WPF-Layout" Height="350" Width="525">

     <Grid>

         <Grid.RowDefinitions>

             <RowDefinition Height="*"></RowDefinition>

             <RowDefinition Height="3"></RowDefinition>

             <RowDefinition Height="*"></RowDefinition>

         </Grid.RowDefinitions>

         <Button Grid.Row="0" Content="Button"></Button>

         <GridSplitter Grid.Row="1" HorizontalAlignment="Stretch"></GridSplitter>

         <Button Grid.Row="2" Content="Button"></Button>

     </Grid>

 </Window>

2.6 UniformGrid布局
UniformGrid就是Grid的简化版,每个单元格的大小相同,不需要定义行列集合。每个单元格始终具有相同的大小,每个单元格只能容纳一个控件。
若不设置RowsColums,则按照定义在其内部的元素个数,自动创建行列,并通常保持相同的行列数。若只设置Rows则固定行数,自动扩展列数。若只设置Colums则固定列数,自动扩展行数。
UniformGrid 中没有Row和Column附加属性,也没有空白单元格。
 <Window x:Class="WPF_Layout.MainWindow"

         xmlns="http://schemas.microsoft.com/winfx/2006/xaml/presentation"

         xmlns:x="http://schemas.microsoft.com/winfx/2006/xaml"

         Title="WPF-Layout" Height="350" Width="525">

     <Grid>

         <UniformGrid>

             <Button Content="Button"></Button>

             <Button Content="Button"></Button>

             <Button Content="Button"></Button>

             <Button Content="Button"></Button>

             <Button Content="Button"></Button>

             <Button Content="Button"></Button>

             <Button Content="Button"></Button>

         </UniformGrid>

     </Grid>

 </Window>

 <Window x:Class="WPF_Layout.MainWindow"

         xmlns="http://schemas.microsoft.com/winfx/2006/xaml/presentation"

         xmlns:x="http://schemas.microsoft.com/winfx/2006/xaml"

         Title="WPF-Layout" Height="350" Width="525">

     <Grid>

         <UniformGrid Columns="2">

             <Button Content="Button"></Button>

             <Button Content="Button"></Button>

             <Button Content="Button"></Button>

             <Button Content="Button"></Button>

             <Button Content="Button"></Button>

             <Button Content="Button"></Button>

             <Button Content="Button"></Button>

         </UniformGrid>

     </Grid>

 </Window>

2.7 ScrollViewer布局
ScrollViewer是带有滚动条的面板。在ScrollViewer中只能有一个子控件,若要显示多个子控件,需要将一个附加的 Panel控件放置在父 ScrollViewer中。然后可以将子控件放置在该控件中。
HorizontalScrollBarVisibility水平滚动条是否显示默认为Hidden
VerticalScrollBarVisibility垂直滚动条是否显示 默认为Visible。
一般我们都会设置 HorizontalScrollBarVisibility="Auto" VerticalScrollBarVisibility="Auto"
意思是:当内容超出可视范围时,才显示横向/纵向滚动条
 <Window x:Class="WPF_Layout.MainWindow"

         xmlns="http://schemas.microsoft.com/winfx/2006/xaml/presentation"

         xmlns:x="http://schemas.microsoft.com/winfx/2006/xaml"

         Title="WPF-Layout" Height="350" Width="525">

     <Grid>

         <ScrollViewer HorizontalScrollBarVisibility="Auto" VerticalScrollBarVisibility="Auto">

             <Button Content="Button" Width="800" Height="800"></Button>

         </ScrollViewer>

     </Grid>

 </Window>

2.8 ViewBox布局
Viewbox的作用是拉伸或延展位于其中的组件,以填满可用空间。在Viewbox中只能有一个子控件,若要显示多个子控件,需要将一个附加的Panel控件放置在父Viewbox中。然后可以将子控件放置在该控件中。
常用属性:
Stretch:获取或设置拉伸模式以决定该组件中的内容以怎样的形式填充该组件的已有空间。具体设置值如下:
None:不进行拉伸,按子元素设置的长宽显示。
Uniform:按原比例缩放子元素,使得一边不足,另一边恰好填充
Fill:缩放子元素,使得子元素的长变为Viewbox的长,宽变为Viewbox的宽
UniformToFill:按原比例缩放子元素,使得子元素一边恰好填充,另一边超出Viewbox的区域
Stretch默认值为Uniform。
 <Window x:Class="WPF_Layout.MainWindow"

         xmlns="http://schemas.microsoft.com/winfx/2006/xaml/presentation"

         xmlns:x="http://schemas.microsoft.com/winfx/2006/xaml"

         Title="WPF-Layout" Height="350" Width="525">

     <Grid>

         <Grid.RowDefinitions>

             <RowDefinition>

             </RowDefinition>

         </Grid.RowDefinitions>

         <Grid.ColumnDefinitions>

             <ColumnDefinition>

             </ColumnDefinition>

         </Grid.ColumnDefinitions>

         <Viewbox Grid.Row="0" Grid.Column="0" Stretch="None">

             <Button Width="100" Height="50" Content="None"></Button>

         </Viewbox>

         <Viewbox Grid.Row="0" Grid.Column="1" Stretch="Uniform">

             <Button Width="100" Height="50" Content="Uniform"></Button>

         </Viewbox>

         <Viewbox Grid.Row="1" Grid.Column="0" Stretch="Fill">

             <Button Width="100" Height="50" Content="Fill"></Button>

         </Viewbox>

         <Viewbox Grid.Row="1" Grid.Column="1" Stretch="UniformToFill">

             <Button Width="100" Height="50" Content="UniformToFill"></Button>

         </Viewbox>

     </Grid>

 </Window>

2.9 Border
Border 是一个装饰的控件,此控件用于绘制边框及背景,在Border中只能有一个子控件,若要显示多个子控件,需要将一个附加的Panel控件放置在父Border中。然后可以将子控件放置在该 Panel控件中。
常用属性:
Background: 背景色 ;
BorderBrush: 边框色 ;
BorderThickness: 边框宽度;
CornerRadius: 各个角 圆的半径;
 <Window x:Class="WPF_Layout.MainWindow"

         xmlns="http://schemas.microsoft.com/winfx/2006/xaml/presentation"

         xmlns:x="http://schemas.microsoft.com/winfx/2006/xaml"

         Title="WPF-Layout" Height="350" Width="525">

     <Grid>

         <Border Background="YellowGreen" BorderBrush="Black" BorderThickness="0, 2, 4, 6" CornerRadius="0, 10, 20, 30"></Border>

     </Grid>

 </Window>

三 精确定位的常用属性
在设计UI时,WPF为我们提供了一些属性用于精确定位元素,其中最常用的有三个:Alignment(包括水平,垂直),Margin,Padding,具体用法如下:
HorizontalAlignment: 子元素在水平方向的对齐方式,有左对齐,右对齐,中间对齐,拉伸填充等四种方式。
VerticalAlignment:子元素在垂直方向的对齐方式,有顶端对齐,底部对齐,中间对齐,拉伸填充等四种方式。
Margin:用于指定元素与其父级或同级之间的距离,包括上下左右四个值。也可通过使用 Margin="20"同时指定四个值。
Padding:用于指定元素与其子级之间的距离,包括上下左右四个值。也可通过使用Padding="20"同时指定四个值。
 <Window x:Class="WPF_Layout.MainWindow"

         xmlns="http://schemas.microsoft.com/winfx/2006/xaml/presentation"

         xmlns:x="http://schemas.microsoft.com/winfx/2006/xaml"

         Title="WPF-Layout" Height="350" Width="525">

     <Grid>

         <Grid.RowDefinitions>

             <RowDefinition>

             </RowDefinition>

             <RowDefinition>

             </RowDefinition>

         </Grid.RowDefinitions>

         <Button Grid.Row="0" Content="Center" HorizontalAlignment="Center"></Button>

         <Button Grid.Row="1" Content="Left" HorizontalAlignment="Left"></Button>

         <Button Grid.Row="2" Content="Right" HorizontalAlignment="Right"></Button>

         <Button Grid.Row="3" Content="Stretch" HorizontalAlignment="Stretch"></Button>

     </Grid>

 </Window>

 <Window x:Class="WPF_Layout.MainWindow"

         xmlns="http://schemas.microsoft.com/winfx/2006/xaml/presentation"

         xmlns:x="http://schemas.microsoft.com/winfx/2006/xaml"

         Title="WPF-Layout" Height="350" Width="525">

     <Grid>

         <Border Background="YellowGreen">

             <Button Margin="0, 50, 100, 150"></Button>

         </Border>

     </Grid>

 </Window>

 <Window x:Class="WPF_Layout.MainWindow"

         xmlns="http://schemas.microsoft.com/winfx/2006/xaml/presentation"

         xmlns:x="http://schemas.microsoft.com/winfx/2006/xaml"

         Title="WPF-Layout" Height="350" Width="525">

     <Grid>

         <Border Background="YellowGreen" Padding="0, 50, 100, 150">

             <Button ></Button>

         </Border>

     </Grid>

 </Window>

WPF中的常用布局的更多相关文章
- WPF中的常用布局 栈的实现 一个关于素数的神奇性质 C# defualt关键字默认值用法 接口通俗理解 C# Json序列化和反序列化 ASP.NET CORE系列【五】webapi整理以及RESTful风格化
WPF中的常用布局 一 写在开头1.1 写在开头微软是一家伟大的公司.评价一门技术的好坏得看具体的需求,没有哪门技术是面面俱到地好,应该抛弃对微软和微软的技术的偏见. 1.2 本文内容本文主要内容 ...
- android中的常用布局管理器(三)
接上篇博客 (5)TableLayout 表格布局管理器 在android中,线性布局和表格布局用的是最多的. 在很多的输出操作中,往往会使用表格的形式对显示的数据进行排版,tablelayo ...
- WPF中的常用类汇总:
1.FrameworkElement: WPF中大部分的控件都可以转化成FrameworkElement,利用FrameworkElement属性获取相应的值: 2.WPF获取当前工作区域的宽度和高度 ...
- [转]在WPF中区别TextBlock和Label
TextBlock和Label都是用来显示少量数据的.好多文章对Label存在的描述都是它允许使用"快速获取"."快速获取"就是允许你用Alt加上其它的按键快速 ...
- WPF中的触发器简单总结
原文 http://blog.sina.com.cn/s/blog_5f2ed5cb0100p3ab.html 触发器,从某种意义上来说它也是一种Style,因为它包含有一个Setter集合,并根据一 ...
- 【WPF学习笔记】[转]周银辉之WPF中的动画 && 晓风影天之wpf动画——new PropertyPath属性链
(一)WPF中的动画 动画无疑是WPF中最吸引人的特色之一,其可以像Flash一样平滑地播放并与程序逻辑进行很好的交互.这里我们讨论一下故事板. 在WPF中我们采用Storyboard(故事板)的方式 ...
- 示例:WPF中自定义StoryBoarService在代码中封装StoryBoard、Animation用于简化动画编写
原文:示例:WPF中自定义StoryBoarService在代码中封装StoryBoard.Animation用于简化动画编写 一.目的:通过对StoryBoard和Animation的封装来简化动画 ...
- WPF常用布局介绍
概述:本文简要介绍了WPF中布局常用控件及布局相关的属性 1 Canvas Canvas是一个类似于坐标系的面板,所有的元素通过设置坐标来决定其在坐标系中的位置..具体表现为使用Left.Top.Ri ...
- WPF中Grid布局
WPF中Grid布局XMAl与后台更改,最普通的登录界面为例. <Grid Width="200" Height="100" > <!--定义 ...
随机推荐
- linq 左连接后实现与主表一对一关系数据
var query1 = from r in _residentRepository.GetAll() join i in _inLogRepository.GetAll() on r.Id equa ...
- chrome总是提示“请停用开发者模式运行的扩展程序”
方法1:通过组策略的扩展白名单.要下载一个组策略管理模板 1.开始 -> 运行 -> 输入gpedit.msc -> 回车确定打开计算机本地组策略编辑器(通过Win + R快捷键可以 ...
- TortoiseGit之配置密钥
TortoiseGit 使用扩展名为ppk的密钥,而不是ssh-keygen生成的rsa密钥.使用命令ssh-keygen -C "邮箱地址" -t rsa产生的密钥在Tortoi ...
- js倒计时、计时开始
最近项目中用到倒计时与计时的功能,代码如下: <!DOCTYPE html> <html> <head> <meta charset="utf-8& ...
- springboot + mybatis +pageHelper分页排序
今天下午写查出来的数据的排序,原来的数据没有排序,现在把排序功能加上...原来用的,是xml中的sql动态传参 ,,1个小数没有弄出来,果断放弃... 网上百度一下,发现用pageHelper 可以 ...
- [LeetCode] 10. 正则表达式匹配
题目链接:https://leetcode-cn.com/problems/regular-expression-matching/ 题目描述: 给定一个字符串 (s) 和一个字符模式 (p).实现支 ...
- Linux内核入门到放弃-模块-《深入Linux内核架构》笔记
使用模块 依赖关系 modutils标准工具集中的depmod工具可用于计算系统的各个模块之间的依赖关系.每次系统启动时或新模块安装后,通常都会运行该程序.找到的依赖关系保存在一个列表中.默认情况下, ...
- myBatista批量查询和插入
<select id="queryCompanyByDistrict" resultType="WyCompany"> SELECT * FROM ...
- MyBatis基础:MyBatis缓存(5)
1. MyBatis缓存简介 MyBatis提供支持一级缓存及二级缓存. 一级缓存: 2.MyBatis一级缓存
- 前端获取checkbox复选框的值 通过数组形式传递
html代码: <form role="form" class="select_people"> <div style="displ ...
