keras图像风格迁移
风格迁移: 在内容上尽量与基准图像保持一致,在风格上尽量与风格图像保持一致。
- 1. 使用预训练的VGG19网络提取特征
- 2. 损失函数之一是“内容损失”(content loss),代表合成的图像的特征与基准图像的特征之间的L2距离,保证生成的图像内容和基准图像保持一致。
- 3. 损失函数之二是“风格损失”(style loss),代表合成图像的特征与风格图像的特征之间的Gram矩阵之间的差异,保证生成图像的风格和风格图像保持一致。
- 4. 损失函数之三是“差异损失”(variation loss),代表合成的图像局部特征之间的差异,保证生成的图像局部特征的一致性,整体看上去自然不突兀。
基于keras的代码实现:
# coding: utf-8
from __future__ import print_function
from keras.preprocessing.image import load_img, img_to_array
import numpy as np
from scipy.optimize import fmin_l_bfgs_b
import time
import argparse
from scipy.misc import imsave
from keras.applications import vgg19
from keras import backend as K
import os
from PIL import Image, ImageFont, ImageDraw, ImageOps, ImageEnhance, ImageFilter
# 输入参数
parser = argparse.ArgumentParser(description='基于Keras的图像风格迁移.') # 解析器
parser.add_argument('--style_reference_image_path', metavar='ref', type=str,default = './style.jpg',
help='目标风格图片的位置')
parser.add_argument('--base_image_path', metavar='ref', type=str,default = './base.jpg',
help='基准图片的位置')
parser.add_argument('--iter', type=int, default=25, required=False,
help='迭代次数')
parser.add_argument('--pictrue_size', type=int, default=500, required=False,
help='图片大小.')
# 获取参数
args = parser.parse_args()
base_image_path = args.base_image_path
style_reference_image_path = args.style_reference_image_path
iterations = args.iter
pictrue_size = args.pictrue_size
source_image = Image.open(base_image_path)
source_image= source_image.resize((pictrue_size, pictrue_size))
width, height = pictrue_size, pictrue_size
def save_img(fname, image, image_enhance=True): # 图像增强
image = Image.fromarray(image)
if image_enhance:
# 亮度增强
enh_bri = ImageEnhance.Brightness(image)
brightness = 1.2
image = enh_bri.enhance(brightness)
# 色度增强
enh_col = ImageEnhance.Color(image)
color = 1.2
image = enh_col.enhance(color)
# 锐度增强
enh_sha = ImageEnhance.Sharpness(image)
sharpness = 1.2
image = enh_sha.enhance(sharpness)
imsave(fname, image)
return
# util function to resize and format pictures into appropriate tensors
def preprocess_image(image):
"""
预处理图片,包括变形到(1,width, height)形状,数据归一到0-1之间
:param image: 输入一张图片
:return: 预处理好的图片
"""
image = image.resize((width, height))
image = img_to_array(image)
image = np.expand_dims(image, axis=0) # (width, height)->(1,width, height)
image = vgg19.preprocess_input(image) # 0-255 -> 0-1.0
return image
def deprocess_image(x):
"""
将0-1之间的数据变成图片的形式返回
:param x: 数据在0-1之间的矩阵
:return: 图片,数据都在0-255之间
"""
x = x.reshape((width, height, 3))
x[:, :, 0] += 103.939
x[:, :, 1] += 116.779
x[:, :, 2] += 123.68
# 'BGR'->'RGB'
x = x[:, :, ::-1]
x = np.clip(x, 0, 255).astype('uint8') # 以防溢出255范围
return x
def gram_matrix(x): # Gram矩阵
assert K.ndim(x) == 3
if K.image_data_format() == 'channels_first':
features = K.batch_flatten(x)
else:
features = K.batch_flatten(K.permute_dimensions(x, (2, 0, 1)))
gram = K.dot(features, K.transpose(features))
return gram
# 风格损失,是风格图片与结果图片的Gram矩阵之差,并对所有元素求和
def style_loss(style, combination):
assert K.ndim(style) == 3
assert K.ndim(combination) == 3
S = gram_matrix(style)
C = gram_matrix(combination)
S_C = S-C
channels = 3
size = height * width
return K.sum(K.square(S_C)) / (4. * (channels ** 2) * (size ** 2))
#return K.sum(K.pow(S_C,4)) / (4. * (channels ** 2) * (size ** 2)) # 居然和平方没有什么不同
#return K.sum(K.pow(S_C,4)+K.pow(S_C,2)) / (4. * (channels ** 2) * (size ** 2)) # 也能用,花后面出现了叶子
def eval_loss_and_grads(x): # 输入x,输出对应于x的梯度和loss
if K.image_data_format() == 'channels_first':
x = x.reshape((1, 3, height, width))
else:
x = x.reshape((1, height, width, 3))
outs = f_outputs([x]) # 输入x,得到输出
loss_value = outs[0]
if len(outs[1:]) == 1:
grad_values = outs[1].flatten().astype('float64')
else:
grad_values = np.array(outs[1:]).flatten().astype('float64')
return loss_value, grad_values
# an auxiliary loss function
# designed to maintain the "content" of the
# base image in the generated image
def content_loss(base, combination):
return K.sum(K.square(combination - base))
# the 3rd loss function, total variation loss,
# designed to keep the generated image locally coherent
def total_variation_loss(x,img_nrows=width, img_ncols=height):
assert K.ndim(x) == 4
if K.image_data_format() == 'channels_first':
a = K.square(x[:, :, :img_nrows - 1, :img_ncols - 1] - x[:, :, 1:, :img_ncols - 1])
b = K.square(x[:, :, :img_nrows - 1, :img_ncols - 1] - x[:, :, :img_nrows - 1, 1:])
else:
a = K.square(x[:, :img_nrows - 1, :img_ncols - 1, :] - x[:, 1:, :img_ncols - 1, :])
b = K.square(x[:, :img_nrows - 1, :img_ncols - 1, :] - x[:, :img_nrows - 1, 1:, :])
return K.sum(K.pow(a + b, 1.25))
# Evaluator可以只需要进行一次计算就能得到所有的梯度和loss
class Evaluator(object):
def __init__(self):
self.loss_value = None
self.grads_values = None
def loss(self, x):
assert self.loss_value is None
loss_value, grad_values = eval_loss_and_grads(x)
self.loss_value = loss_value
self.grad_values = grad_values
return self.loss_value
def grads(self, x):
assert self.loss_value is not None
grad_values = np.copy(self.grad_values)
self.loss_value = None
self.grad_values = None
return grad_values
# 得到需要处理的数据,处理为keras的变量(tensor),处理为一个(3, width, height, 3)的矩阵
# 分别是基准图片,风格图片,结果图片
base_image = K.variable(preprocess_image(source_image)) # 基准图像
style_reference_image = K.variable(preprocess_image(load_img(style_reference_image_path)))
if K.image_data_format() == 'channels_first':
combination_image = K.placeholder((1, 3, width, height))
else:
combination_image = K.placeholder((1, width, height, 3))
# 组合以上3张图片,作为一个keras输入向量
input_tensor = K.concatenate([base_image, style_reference_image, combination_image], axis=0) #组合
# 使用Keras提供的训练好的Vgg19网络,不带3个全连接层
model = vgg19.VGG19(input_tensor=input_tensor,weights='imagenet', include_top=False)
model.summary() # 打印出模型概况
'''
Layer (type) Output Shape Param #
=================================================================
input_1 (InputLayer) (None, None, None, 3) 0
_________________________________________________________________
block1_conv1 (Conv2D) (None, None, None, 64) 1792 A
_________________________________________________________________
block1_conv2 (Conv2D) (None, None, None, 64) 36928
_________________________________________________________________
block1_pool (MaxPooling2D) (None, None, None, 64) 0
_________________________________________________________________
block2_conv1 (Conv2D) (None, None, None, 128) 73856 B
_________________________________________________________________
block2_conv2 (Conv2D) (None, None, None, 128) 147584
_________________________________________________________________
block2_pool (MaxPooling2D) (None, None, None, 128) 0
_________________________________________________________________
block3_conv1 (Conv2D) (None, None, None, 256) 295168 C
_________________________________________________________________
block3_conv2 (Conv2D) (None, None, None, 256) 590080
_________________________________________________________________
block3_conv3 (Conv2D) (None, None, None, 256) 590080
_________________________________________________________________
block3_conv4 (Conv2D) (None, None, None, 256) 590080
_________________________________________________________________
block3_pool (MaxPooling2D) (None, None, None, 256) 0
_________________________________________________________________
block4_conv1 (Conv2D) (None, None, None, 512) 1180160 D
_________________________________________________________________
block4_conv2 (Conv2D) (None, None, None, 512) 2359808
_________________________________________________________________
block4_conv3 (Conv2D) (None, None, None, 512) 2359808
_________________________________________________________________
block4_conv4 (Conv2D) (None, None, None, 512) 2359808
_________________________________________________________________
block4_pool (MaxPooling2D) (None, None, None, 512) 0
_________________________________________________________________
block5_conv1 (Conv2D) (None, None, None, 512) 2359808 E
_________________________________________________________________
block5_conv2 (Conv2D) (None, None, None, 512) 2359808
_________________________________________________________________
block5_conv3 (Conv2D) (None, None, None, 512) 2359808
_________________________________________________________________
block5_conv4 (Conv2D) (None, None, None, 512) 2359808 F
_________________________________________________________________
block5_pool (MaxPooling2D) (None, None, None, 512) 0
=================================================================
'''
# Vgg19网络中的不同的名字,储存起来以备使用
outputs_dict = dict([(layer.name, layer.output) for layer in model.layers])
loss = K.variable(0.)
layer_features = outputs_dict['block5_conv2']
base_image_features = layer_features[0, :, :, :]
combination_features = layer_features[2, :, :, :]
content_weight = 0.08
loss += content_weight * content_loss(base_image_features,
combination_features)
feature_layers = ['block1_conv1','block2_conv1','block3_conv1','block4_conv1','block5_conv1']
feature_layers_w = [0.1,0.1,0.4,0.3,0.1]
# feature_layers = ['block5_conv1']
# feature_layers_w = [1]
for i in range(len(feature_layers)):
# 每一层的权重以及数据
layer_name, w = feature_layers[i], feature_layers_w[i]
layer_features = outputs_dict[layer_name] # 该层的特征
style_reference_features = layer_features[1, :, :, :] # 参考图像在VGG网络中第i层的特征
combination_features = layer_features[2, :, :, :] # 结果图像在VGG网络中第i层的特征
loss += w * style_loss(style_reference_features, combination_features) # 目标风格图像的特征和结果图像特征之间的差异作为loss
loss += total_variation_loss(combination_image)
# 求得梯度,输入combination_image,对loss求梯度, 每轮迭代中combination_image会根据梯度方向做调整
grads = K.gradients(loss, combination_image)
outputs = [loss]
if isinstance(grads, (list, tuple)):
outputs += grads
else:
outputs.append(grads)
f_outputs = K.function([combination_image], outputs)
evaluator = Evaluator()
x = preprocess_image(source_image)
img = deprocess_image(x.copy())
fname = '原始图片.png'
save_img(fname, img)
# 开始迭代
for i in range(iterations):
start_time = time.time()
print('迭代', i,end=" ")
x, min_val, info = fmin_l_bfgs_b(evaluator.loss, x.flatten(), fprime=evaluator.grads, maxfun=20, epsilon=1e-7)
# 一个scipy的L-BFGS优化器
print('目前loss:', min_val,end=" ")
# 保存生成的图片
img = deprocess_image(x.copy())
fname = 'result_%d.png' % i
end_time = time.time()
print('耗时%.2f s' % (end_time - start_time))
if i%5 == 0 or i == iterations-1:
save_img(fname, img, image_enhance=True)
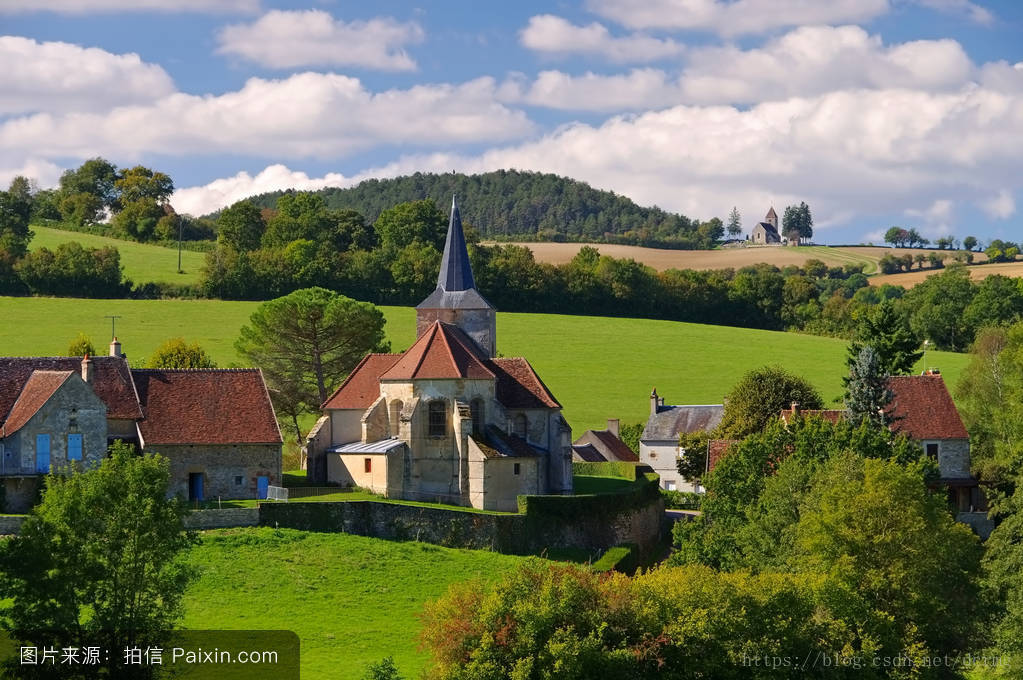
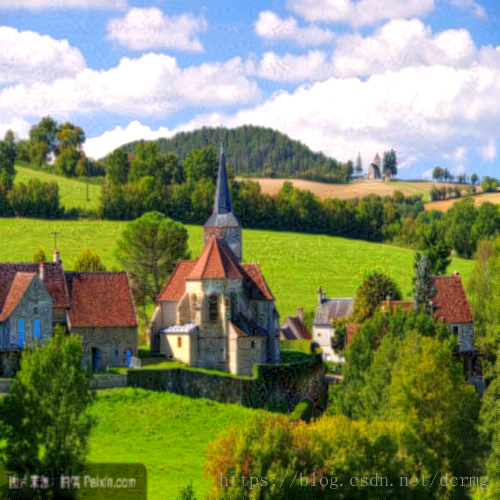
print('文件保存为', fname)基准图像:
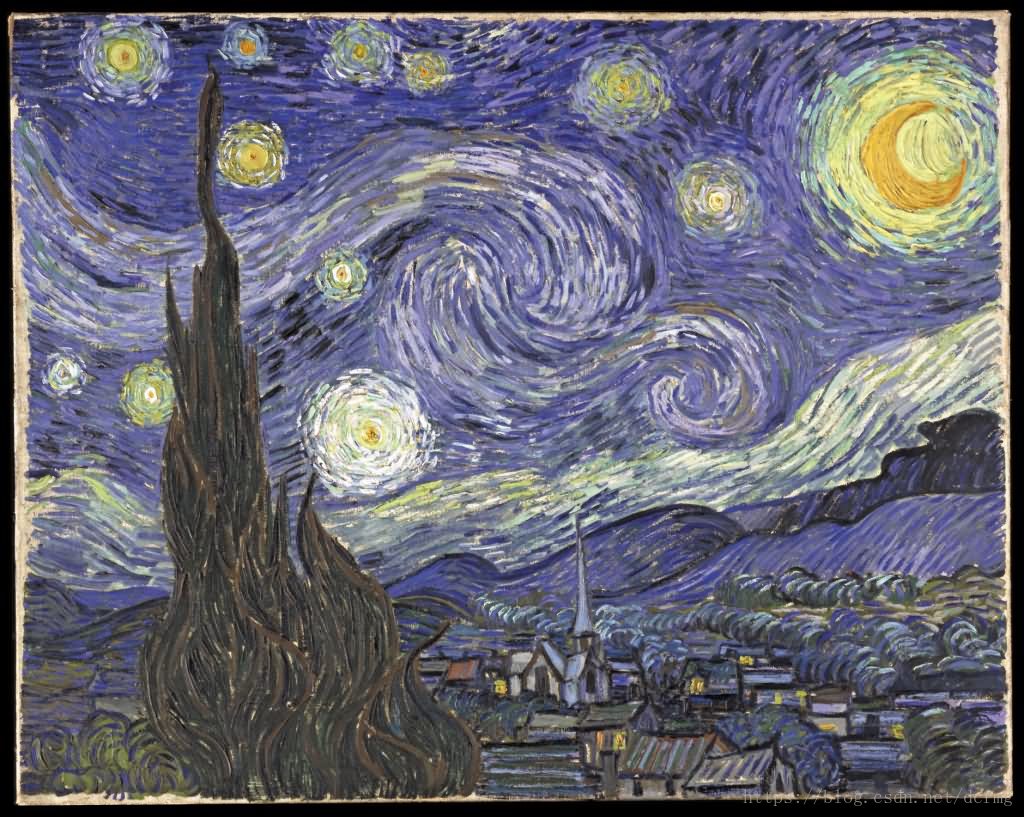
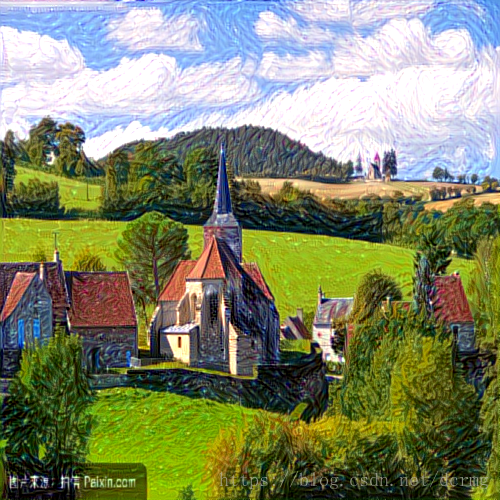
风格图像:
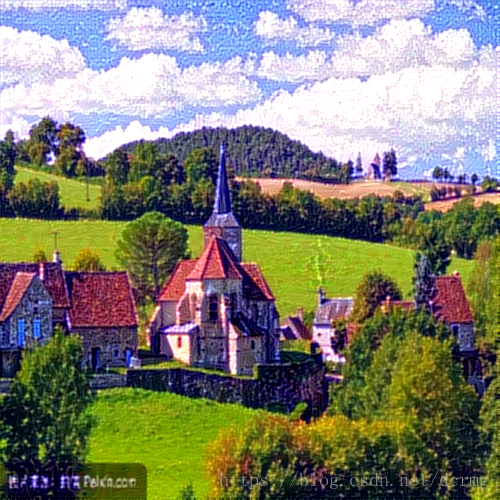
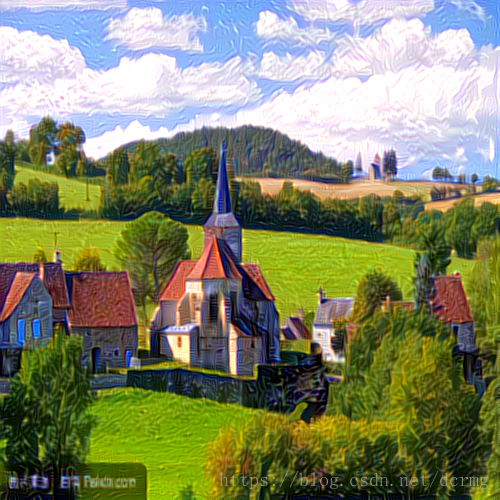
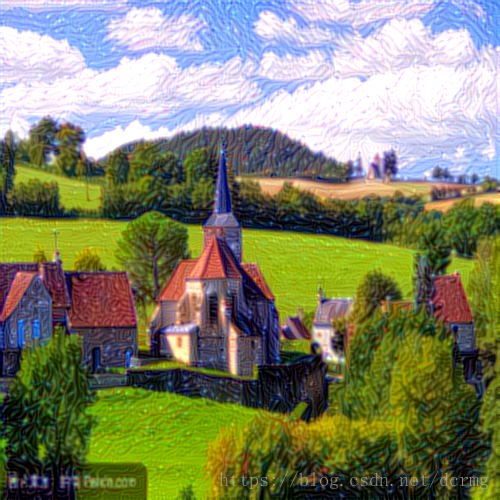
合成的艺术风格图像:

训练时候整体的loss是3个loss的和,每个loss都有一个系数,调整不同的系数,对应不同的效果。
“内容损失”(content loss)
以下图片分别对应内容损失系数为0.1、1、5、10的效果:


随着内容损失系数的增大,迭代优化会更加侧重于调整合成图像的内容,使得图像跟原始图像越来越接近。
“风格损失”(style loss)
风格损失是VGG网络5个CNN层的特征的融合,单纯增大风格损失系数对图像最终风格影响不大,以下是系数是1和100的对比:


系数相差100倍,但是图像风格并没有明显的改变。可能调整5个卷积特征不同的比例系数会有效果。
以下是单纯使用第1、2、3、4、5个卷积层特征的效果:


可见 5个卷积层特征里第3和第4个卷积层对图像的风格影响较大。
以下调整第3和第4个卷积层的系数,5个系数比为1:1:1:1:1和0.5:0.5:0.4:0.4:1

增大第3、4层比例之后,图像风格更加接近风格图像。
“差异损失”(variation loss)
图像差异损失衡量的是图像本身的局部特征之间的差异,系数越大,图像局部越接近,表现在图像上就是图像像素间过度自然,以下是系数是1、5、10的效果:


以上。
keras图像风格迁移的更多相关文章
- 图像风格迁移(Pytorch)
图像风格迁移 最后要生成的图片是怎样的是难以想象的,所以朴素的监督学习方法可能不会生效, Content Loss 根据输入图片和输出图片的像素差别可以比较损失 \(l_{content} = \fr ...
- Keras实现风格迁移
风格迁移 风格迁移算法经历多次定义和更新,现在应用在许多智能手机APP上. 风格迁移在保留目标图片内容的基础上,将图片风格引用在目标图片上. 风格本质上是指在各种空间尺度上图像中的纹理,颜色和视觉图案 ...
- fast neural style transfer图像风格迁移基于tensorflow实现
引自:深度学习实践:使用Tensorflow实现快速风格迁移 一.风格迁移简介 风格迁移(Style Transfer)是深度学习众多应用中非常有趣的一种,如图,我们可以使用这种方法把一张图片的风格“ ...
- Distill详述「可微图像参数化」:神经网络可视化和风格迁移利器!
近日,期刊平台 Distill 发布了谷歌研究人员的一篇文章,介绍一个适用于神经网络可视化和风格迁移的强大工具:可微图像参数化.这篇文章从多个方面介绍了该工具. 图像分类神经网络拥有卓越的图像生成能力 ...
- 基于 Keras 实现图像风格转移
Style Transfer 这个方向火起来是从2015年Gatys发表的Paper A Neural Algorithm of Artistic Style(神经风格迁移) , 这里就简单提一下论 ...
- A Neural Algorithm of Artistic Style 图像风格转换 - keras简化版实现
前言 深度学习是最近比较热的词语.说到深度学习的应用,第一个想到的就是Prisma App的图像风格转换.既然感兴趣就直接开始干,读了论文,一知半解:看了别人的源码,才算大概了解的具体的实现,也惊叹别 ...
- Gram格拉姆矩阵在风格迁移中的应用
Gram定义 n维欧式空间中任意k个向量之间两两的内积所组成的矩阵,称为这k个向量的格拉姆矩阵(Gram matrix) 根据定义可以看到,每个Gram矩阵背后都有一组向量,Gram矩阵就是由这一组向 ...
- 『cs231n』通过代码理解风格迁移
『cs231n』卷积神经网络的可视化应用 文件目录 vgg16.py import os import numpy as np import tensorflow as tf from downloa ...
- ng-深度学习-课程笔记-14: 人脸识别和风格迁移(Week4)
1 什么是人脸识别( what is face recognition ) 在相关文献中经常会提到人脸验证(verification)和人脸识别(recognition). verification就 ...
随机推荐
- 学号20175212 《Java程序设计》第7周学习总结
学号20175212 <Java程序设计>第7周学习总结 教材学习内容总结 8.1.String类 可以使用String类声明对象并创建对象,例如: String s = new Stri ...
- springMVC的配置与使用
springMVC的配置与使用 spring mvc 核心类与接口 先来了解一下,几个重要的接口与类.现在不知道他们是干什么的没关系,先混个脸熟,为以后认识他们打个基础. DispatcherServ ...
- DMA 内存存取原理
DMA直接内存存取原理 DMADMA直接内存存取原理是指外部设备不通过CPU而直接与系统内存交换数据的接口技术. 要把外设的数据读入内存或把内存的数据传送到外设,一般都要通过CPU控制完成,如CPU程 ...
- Qt 适合做界面
确实感觉的Qt的界面开发相比MFC方便了许多,不用为设计和实现窗口烦恼.不需要太细研究界面的实现,从Qt自带的例子中就能轻松学习和应用.在界面开发上Qt的实用比MFC前进了许多.做C++开发不管怎样如 ...
- sciense
I hate the word "networking." It must be one of the most overused words in the English lan ...
- EFCore Owned Entity Types,彩蛋乎?鸡肋乎?之鸡肋篇
鸡肋 鸡肋(Chicken ribs),现代汉语词语,出自<三国志·魏书·武帝纪>裴松之注引<九州春秋>曰:"夫鸡肋,弃之如可惜,食之无所得,以比汉中,知王欲还也.& ...
- maven的依赖特性
若排版紊乱可查看我的个人博客原文地址 maven的依赖特性很多很杂,这里大概总结一下,maven的依赖特性主要是依赖范围和传递依赖,前者会影响后者,这篇文章会介绍传递依赖的传递原则,出现冲突传递依赖默 ...
- react系列笔记:第三记-redux-saga
github : https://github.com/redux-saga/redux-saga 文档:https://redux-saga.js.org/ redux-saga: redux中间 ...
- 用Git将本地项目推送到github
[博客园cnblogs笔者m-yb原创,转载请加本文博客链接,笔者github: https://github.com/mayangbo666,公众号aandb7,QQ群927113708] http ...
- java上传图片
-- jsp 一定要加上enctype="multipart/form-data" method="post" 不加无法辨别是否是上传表单的数据 <fo ...