【ASP.NET Core分布式项目实战】(二)oauth2 + oidc 实现 server部分
资料
我们基于之前的MvcCookieAuthSample来做开发
MvcCookieAuthSample下载地址:https://files.cnblogs.com/files/wyt007/ASPNETCore%E5%BF%AB%E9%80%9F%E5%85%A5%E9%97%A8.rar
MvcCookieAuthSample教程地址:http://www.cnblogs.com/wyt007/p/8204731.html
正文
给网站设置默认地址 http://localhost:5000

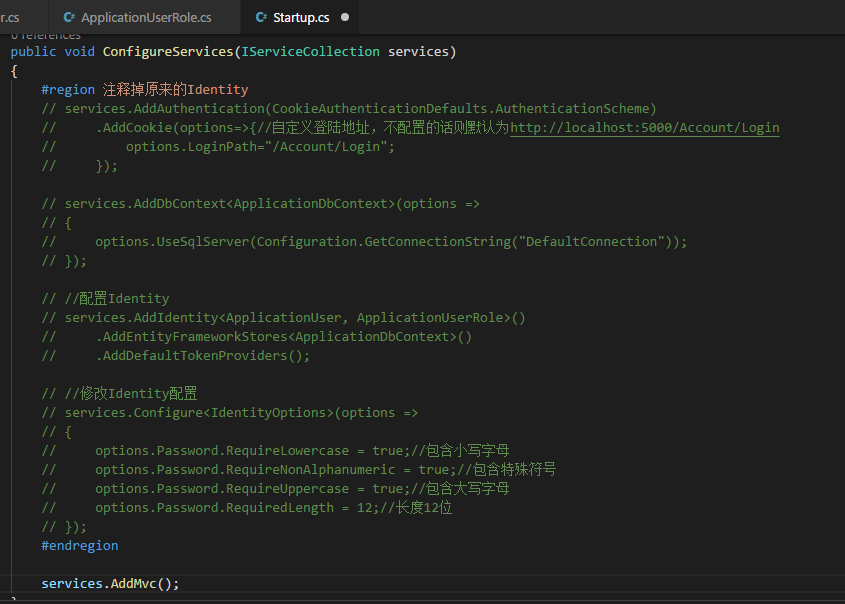
首先,我们将之前写的系统的Identity注释掉,在Startup.cs中

第一步:添加Nuget包:IdentityServer4
我们可以在vscode中使用ctrl+P键来打开命令面板。然后输入nuget按回车,输入identityserver4后按回车来选择版本进行安装
第二步:添加Config.cs配置类
我们接下来添加一个Config.cs类,这个类是用来初始化IdentityServer的
using System.Collections;

using System.Collections.Generic;

using IdentityServer4;

using IdentityServer4.Models;

using IdentityServer4.Test;

namespace MvcCookieAuthSample

{

    public class Config

    {

        //所有可以访问的Resource

        public static IEnumerable<ApiResource> GetApiResources()

        {

            return new List<ApiResource>

            {

                new ApiResource("api1","API Application")

            };

        }

        //客户端

        public static IEnumerable<Client> GetClients()

        {

            return new List<Client>

            {

                new Client()

                {

                    ClientId="mvc",

                    AllowedGrantTypes= GrantTypes.Implicit,//模式:最简单的模式

                    ClientSecrets={//私钥

                        new Secret("secret".Sha256())

                    },

                    AllowedScopes={//可以访问的Resource

                        IdentityServerConstants.StandardScopes.Profile,

                        IdentityServerConstants.StandardScopes.OpenId,

                    },

                    RedirectUris={"http://localhost:5001/signin-oidc"},//跳转登录到的客户端的地址

                    PostLogoutRedirectUris={"http://localhost:5001/signout-callback-oidc"},//跳转登出到的客户端的地址

                    RequireConsent=false//是否需要用户点击确认进行跳转

                }

            };

        }

        //测试用户

        public static List<TestUser> GetTestUsers()

        {

            return new List<TestUser>{

                new TestUser{

                    SubjectId="",

                    Username="wyt",

                    Password="password"

                }

            };

        }

        //定义系统中的资源

        public static IEnumerable<IdentityResource> GetIdentityResources()

        {

            return new List<IdentityResource>

            {

                new IdentityResources.OpenId(),

                new IdentityResources.Profile(),

                new IdentityResources.Email()

            };

        }

    }

}
以上使用IdentityServer4测试数据类添加数据,直接存在内存中。IdentityServer4 是支持持久化。
第三步:添加Startup配置
引用命名空间:
using IdentityServer4;
然后打开Startup.cs 加入如下:
services.AddIdentityServer()

    .AddDeveloperSigningCredential()//添加开发人员签名凭据

    .AddInMemoryApiResources(Config.GetApiResources())//添加内存apiresource

    .AddInMemoryClients(Config.GetClients())//添加内存client

    .AddInMemoryIdentityResources(Config.GetIdentityResources())//添加系统中的资源

    .AddTestUsers(Config.GetTestUsers());//添加测试用户
public void Configure(IApplicationBuilder app, IHostingEnvironment env, ILoggerFactory loggerFactory)

 {

    ...

    //app.UseAuthentication();

    app.UseIdentityServer();

    ...
接着安装UI,UI部分也可以自己编写,也就是登录 注销 允许和错误。
可以到 https://github.com/IdentityServer/IdentityServer4.Quickstart.UI/tree/release 下载,然后解压到项目目录下。
也可以使用命令提示符快速安装:
powershell iex ((New-Object System.Net.WebClient).DownloadString('https://raw.githubusercontent.com/IdentityServer/IdentityServer4.Quickstart.UI/release/get.ps1'))
在项目目录下打开命令提示符,输入以上命令。
更多信息,可以查看官方readme:https://github.com/IdentityServer/IdentityServer4.Quickstart.UI/blob/release/README.md
大神博客:https://www.cnblogs.com/linezero/p/identityserver4openidconnect.html
修改LoginViewModel,将Email改为UserName,并修改强类型视图的引用部分Login.cshtml
namespace MvcCookieAuthSample.ViewModels

{

    public class LoginViewModel

    {

        //[Required]//必须的

        //[DataType(DataType.EmailAddress)]//内容检查是否为邮箱

        //public string Email { get; set; }

        [Required]

        public string UserName { get; set; }

        [Required]//必须的

        [DataType(DataType.Password)]//内容检查是否为密码

        public string Password { get; set; }

    }

}
修改AccountController,原来的_userManager和_signInManager不再使用
using Microsoft.AspNetCore.Authentication;

using Microsoft.AspNetCore.Authorization;

using Microsoft.AspNetCore.Authentication.Cookies;

using System.Security.Claims;

using Microsoft.AspNetCore.Mvc;

using System.Collections.Generic;

using Microsoft.AspNetCore.Identity;

using MvcCookieAuthSample.Models;

using System.Threading.Tasks;

using MvcCookieAuthSample.ViewModels;

using IdentityServer4.Test;

using System;

namespace MvcCookieAuthSample.Controllers

{

    public class AccountController : Controller

    {

        // private UserManager<ApplicationUser> _userManager;//创建用户的

        // private SignInManager<ApplicationUser> _signInManager;//用来登录的

        private readonly TestUserStore _users;

        public AccountController(TestUserStore users)

        {

            _users=users;

        }

                // //依赖注入

        // public AccountController(UserManager<ApplicationUser> userManager, SignInManager<ApplicationUser> signInManager)

        // {

        //     _userManager = userManager;

        //     _signInManager = signInManager;

        // }

        //内部跳转

        private IActionResult RedirectToLocal(string returnUrl)

        {

            if (Url.IsLocalUrl(returnUrl))

            {//如果是本地

                return Redirect(returnUrl);

            }

            return RedirectToAction(nameof(HomeController.Index), "Home");

        }

        //添加验证错误

        private void AddError(IdentityResult result)

        {

            //遍历所有的验证错误

            foreach (var error in result.Errors)

            {

                //返回error到model

                ModelState.AddModelError(string.Empty, error.Description);

            }

        }

        public IActionResult Register(string returnUrl = null)

        {

            ViewData["returnUrl"] = returnUrl;

            return View();

        }

        [HttpPost]

        public async Task<IActionResult> Register(RegisterViewModel registerViewModel, string returnUrl = null)

        {

            // if (ModelState.IsValid)

            // {

            //     ViewData["returnUrl"] = returnUrl;

            //     var identityUser = new ApplicationUser

            //     {

            //         Email = registerViewModel.Email,

            //         UserName = registerViewModel.Email,

            //         NormalizedUserName = registerViewModel.Email

            //     };

            //     var identityResult = await _userManager.CreateAsync(identityUser, registerViewModel.Password);

            //     if (identityResult.Succeeded)

            //     {

            //         //注册完成登录生成cookies信息

            //         await _signInManager.SignInAsync(identityUser, new AuthenticationProperties { IsPersistent = true });

            //         return RedirectToLocal(returnUrl);

            //     }

            //     else//注册失败

            //     {

            //         //添加验证错误

            //         AddError(identityResult);

            //     }

            // }

            return View();

        }

        public IActionResult Login(string returnUrl = null)

        {

            ViewData["returnUrl"] = returnUrl;

            return View();

        }

        [HttpPost]

        public async Task<IActionResult> Login(LoginViewModel  loginViewModel, string returnUrl = null)

        {

            if (ModelState.IsValid)

            {

                ViewData["returnUrl"] = returnUrl;

                //var user = await _userManager.FindByEmailAsync(loginViewModel.Email);

                var user = _users.FindByUsername(loginViewModel.UserName);

                if (user == null)

                {

                    ModelState.AddModelError(nameof(loginViewModel.UserName), "UserName not exists");

                }

                else

                {

                    if (_users.ValidateCredentials(loginViewModel.UserName,loginViewModel.Password))

                    {

                        //是否记住

                        var prop = new AuthenticationProperties()

                        {

                            IsPersistent = true,

                            ExpiresUtc = DateTimeOffset.UtcNow.Add(TimeSpan.FromMinutes(30))

                        };

                        //HttpContext.SignInAsync(user.SubjectId, user.Username, prop);

                        await Microsoft.AspNetCore.Http.AuthenticationManagerExtensions.SignInAsync(HttpContext, user.SubjectId, user.Username, prop);

                    }

                }

                //账号密码先不做验证,需要可以自己写

                //await _signInManager.SignInAsync(user, new AuthenticationProperties { IsPersistent = true });

                return RedirectToLocal(returnUrl);

            }

            return View();

        }

        //登出

        public async Task<IActionResult> Logout()

        {

            await HttpContext.SignOutAsync();

            return RedirectToAction("Index", "Home");

        }

    }

}
接下来我们需要将原来的Program.cs中的数据库初始化的内容注释掉

然后我们就可以运行网站,输入用户名和密码进行登录了

新建客户端
新建一个MVC网站MvcClient
dotnet new mvc --name MvcClient
给网站设置默认地址 http://localhost:5001

MVC的网站已经内置帮我们实现了Identity,所以我们不需要再额外添加Identity引用
添加认证
services.AddAuthentication(options =>

{

    options.DefaultScheme = "Cookies";//使用Cookies认证

    options.DefaultChallengeScheme = "oidc";//使用oidc

})

.AddCookie("Cookies")//配置Cookies认证

.AddOpenIdConnect("oidc",options=> {//配置oidc

    options.SignInScheme = "Cookies";

    options.Authority = "http://localhost:5000";

    options.RequireHttpsMetadata = false;

    options.ClientId = "mvc";

    options.ClientSecret = "secret";

    options.SaveTokens = true;

});
在管道中使用Authentication
app.UseAuthentication();
Login.cshtml 页面接收returnUrl进行跳转
<form method="post" asp-controller="Account" asp-action="Login">

    <h4>Use a local account to log in.</h4>

    <hr />

    @*用于登录后进行跳转*@

    <input type="hidden" name="returnUrl" value="@ViewData["returnUrl"]" />

    <div class="form-group">

        <label asp-for="UserName"></label>

        <input asp-for="UserName" class="form-control" />

        <span asp-validation-for="UserName" class="text-danger"></span>

    </div>

    <div class="form-group">

        <label asp-for="Password"></label>

        <input asp-for="Password" type="password" class="form-control" />

        <span asp-validation-for="Password" class="text-danger"></span>

    </div>

    <div class="form-group">

        <button type="submit" class="btn btn-block btn-danger">Log in</button>

    </div>

</form>
接下来我们在HomeController上打上 [Authorize] 标签,然后启动运行
我们这个时候访问首页http://localhost:5001会自动跳转到ocalhost:5000/account/login登录

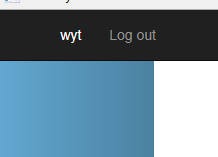
登录之后会自动跳转回来

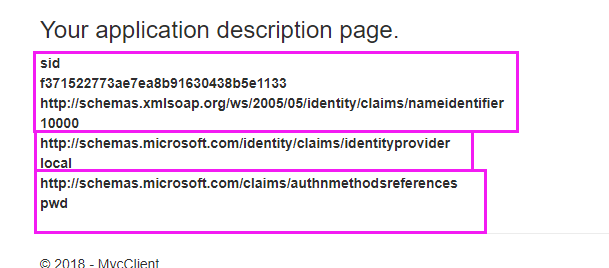
我们可以在Home/About页面将claim的信息显示出来
@{

    ViewData["Title"] = "About";

}

<h2>@ViewData["Title"]</h2>

<h3>@ViewData["Message"]</h3>

<dl>

    @foreach (var claim in User.Claims)

    {

        <dt>@claim.Type</dt>

        <dt>@claim.Value</dt>

    }

</dl>

这边的内容是根据我们在IdentityServer服务中定义的返回资源决定的

【ASP.NET Core分布式项目实战】(二)oauth2 + oidc 实现 server部分的更多相关文章
- ASP.NET Core分布式项目实战
ASP.NET Core开发者成长路线图 asp.net core 官方文档 https://docs.microsoft.com/zh-cn/aspnet/core/getting-started/ ...
- 【笔记目录2】ASP.NET Core分布式项目实战
当前标签: ASP.NET Core分布式项目实战 共2页: 上一页 1 2 11.ClientCredential模式总结 GASA 2019-03-11 12:59 阅读:26 评论:0 10. ...
- 【笔记目录1】ASP.NET Core分布式项目实战
当前标签: ASP.NET Core分布式项目实战 共2页: 1 2 下一页 35.Docker安装Mysql挂载Host Volume GASA 2019-06-20 22:02 阅读:51 评论 ...
- ASP.NET Core分布式项目实战-目录
前言 今年是2018年,发现已经有4年没有写博客了,在这4年的时光里,接触了很多的.NET技术,自己的技术也得到很大的进步.在这段时光里面很感谢张队长以及其他开发者一直对.NET Core开源社区做出 ...
- 【ASP.NET Core分布式项目实战】(三)整理IdentityServer4 MVC授权、Consent功能实现
本博客根据http://video.jessetalk.cn/my/course/5视频整理(内容可能会有部分,推荐看源视频学习) 前言 由于之前的博客都是基于其他的博客进行开发,现在重新整理一下方便 ...
- 【ASP.NET Core分布式项目实战】(五)Docker制作dotnet core控制台程序镜像
Docker制作dotnet core控制台程序镜像 基于dotnet SDK 新建控制台程序 mkdir /home/console cd /home/console dotnet new cons ...
- 【ASP.NET Core分布式项目实战】(一)IdentityServer4登录中心、oauth密码模式identity server4实现
本博客根据http://video.jessetalk.cn/my/course/5视频整理 资料 OAuth2 流程:http://www.ruanyifeng.com/blog/2014/05/o ...
- 【ASP.NET Core分布式项目实战】(六)Gitlab安装
Gitlab GitLab是由GitLabInc.开发,使用MIT许可证的基于网络的Git仓库管理工具,且具有wiki和issue跟踪功能.使用Git作为代码管理工具,并在此基础上搭建起来的web服务 ...
- 【ASP.NET Core分布式项目实战】(四)使用mysql/mysql-server安装mysql
Docker安装Mysql 拉取镜像 docker pull mysql/mysql-server 运行mysql docker run -d -p : --name mysql01 mysql/my ...
随机推荐
- 基于低代码平台(Low Code Platform)开发中小企业信息化项目
前言:中小企业信息化需求强烈,对于开发中小企业信息化项目的软件工作和程序员来说,如何根据中小企业的特点,快速理解其信息化项目的需求并及时交付项目,是一个值得关注和研讨的话题. 最近几年来,随着全球经济 ...
- 结对编程-四则运算GUI的实现
一.项目成员以及coding地址: 洪灏捷(本人)201321122020 coding地址:https://git.coding.net/hoje/The-GUI-operation.git 白至 ...
- activeMq 使用方法
一:activeMq介绍 ActiveMQ是一种开源的,实现了JMS1.1规范的,面向消息(MOM)的中间件,为应用程序提供高效的.可扩展的.稳定的和安全的企业级消息通信,下载地址是:http://a ...
- The ResourceConfig instance does not contain any root resource classes
问题描述 当我们在使用 myeclipse 创建 Web Service Projects 项目后,运行项目然后就会出现这个问题. 解决方案 通过这个错误描述,我们项目没有找到这个资源.报错的原因在于 ...
- case
case $变量 in "值1") 执行语句; ;; "值2") 执行语句; ;; ... *) 默认执行语句 ;; esac #!/bin/bash read ...
- sqlserver 存储过程 修改
CREATE PROCEDURE [dbo].[UpdateMessage] @strTable varchar(), --要修改的表 @strColumn varchar(),--要修改的列名(如果 ...
- iis 10 ftp 被动模式配置
第一步: 进入 Server Level 的FTP Firewall Support 第二步: 在 Data Channel Port Range 下配置 Passive mode 的端口号范围,注意 ...
- 小白的Python之路 day4 迭代器
迭代器 学习前,我们回想一下可以直接作用于for循环的数据类型有以下几种: 1.集合数据类型,如list.tuple.dict.set.str等: 2.是generator,包括生成器和带yield的 ...
- headfirst设计模式(4)—工厂模式
开篇 天天逛博客园,就是狠不下心来写篇博客,忙是一方面,但是说忙能有多忙呢,都有时间逛博客园,写篇博客的时间都没有?(这还真不好说) 每次想到写一篇新的设计模式,我总会问自己: 1,自己理解了吗? 2 ...
- 绝世emacs配置for Ubuntu
反正过不了几天就要退役了,把emacs配置放出来造福(祸害)大众? 浓浓的OIER风格,除了方便打代码就没别的用处(F8并不这样认为?),只可惜windows下的弄丢了,只有Ubuntu下的. F1不 ...
