SpringMVC学习笔记(二)
一、导航
复杂类型的参数绑定
校验
异常处理
图片上传
json交互
拦截器
二、复杂类型参数绑定
①.包装类型的pojo参数绑定
使用场景:实现商品查询条件传入。
实现方法:》通过添加HttpServletRequest形参来获取参数
》通过包装类型的pojo来获取
package cn.mycookies.ssm.po;public class ItemsQueryVo {

    //为了系统 可扩展性,对原始生成的po进行扩展
    private ItemsCustom itemsCustom;

      public ItemsCustom getItemsCustom() {
        return itemsCustom;
    }

    public void setItemsCustom(ItemsCustom itemsCustom) {
        this.itemsCustom = itemsCustom;
    }

}
1.controller中的参数接收
// 商品查询
    @RequestMapping(value = "/queryItems.action")
    public ModelAndView queryItems3(ItemsQueryVo itemsQueryVo) throws Exception {
2.页面中的参数传递
商品名称<input type="text" name="itemsCustom.name"/></td>
②集合类型绑定
1.数组绑定
表现层实现
<c:forEach items="${itemsList }" var="item">
<tr>
    <td><input type="checkbox" name="items_id" value="${item.id }"/></td>
。。。
</c:forEach>
controller中实现
@RequestMapping(value = "/deleteItems", method = { RequestMethod.POST })
    public String deleteItems(Integer[] items_id) throws Exception {
③list集合绑定
通过包装类型的pojo来接收list集合
package cn.mycookies.ssm.po;

import java.util.ArrayList;
import java.util.List;

public class ItemsQueryVo {

    //批量商品信息
    List<ItemsCustom> itemsList = new ArrayList<ItemsCustom>();

    public List<ItemsCustom> getItemsList() {
        return itemsList;
    }
    public void setItemsList(List<ItemsCustom> itemsList) {
        this.itemsList = itemsList;
    }

}
页面定义
<c:forEach items="${itemsLists }" var="item" varStatus="index" >
<tr>
    <td><input type="hidden" name="itemsList[${index.index }].id" value="${item.id}"></td>
    <td><input name="itemsList[${index.index }].name" value="${item.name }"></td>
    <td><input name="itemsList[${index.index }].price" value="${item.price }"></td>
    <td><input name="itemsList[${index.index }].createtime" value="<fmt:formatDate value='${item.createtime}' pattern='yyyy-MM-dd HH:mm:ss'/>"/></td>
    <td><input name="itemsList[${index.index }].detail" value="${item.detail }"></td>

</tr>
</c:forEach>
Controller中定义
    // 批量修改提交
    // 吧批量商品信息存储到ItemsQueryVo的itemsList属性中
    @RequestMapping(value = "/editItemsAllSubmit.action")
    public String editItemsAllSubmit(ItemsQueryVo itemsQueryVo)
            throws Exception {
④Map集合绑定
包装类如下
Public class QueryItemsVo {
private Map<String, Object> itemInfo = new HashMap<String, Object>();
  //get/set方法..
}
页面定义
<tr>
<td>学生信息:</td>
<td>
姓名:<inputtype="text"name="itemInfo['name']"/>
年龄:<inputtype="text"name="itemInfo['price']"/>
.. .. ..
</td>
</tr>
Controller中的方法
public String useraddsubmit(Model model,QueryItemsVo queryItmsVo)throws Exception{

}
三、数据校验
首先要导入相关jar包然后配置校验器,并注入校验器,最后定义校验规则,配置校验并捕获信息
springmvc配置文件中配置校验器
<!-- 校验器 -->
    <bean id="validator"
        class="org.springframework.validation.beanvalidation.LocalValidatorFactoryBean">
        <!-- 校验器 -->
        <property name="providerClass" value="org.hibernate.validator.HibernateValidator" />
        <!-- 指定校验使用的资源文件,如果不指定则默认使用classpath下的ValidationMessages.properties -->
        <property name="validationMessageSource" ref="messageSource" />
    </bean>
    <!-- 校验错误信息配置文件 -->
    <bean id="messageSource"
        class="org.springframework.context.support.ReloadableResourceBundleMessageSource">
        <!-- 资源文件名 -->
        <property name="basenames">
            <list>
                <value>classpath:CustomValidationMessages</value>
            </list>
        </property>
        <!-- 资源文件编码格式 -->
        <property name="fileEncodings" value="utf-8" />
        <!-- 对资源文件内容缓存时间,单位秒 -->
        <property name="cacheSeconds" value="120" />
    </bean>
注入校验器
<!-- conversion-service:注入自定义参数绑定 -->
    <mvc:annotation-driven validator="validator" conversion-service="conversionService"></mvc:annotation-driven>
添加校验规则
public class Items {
    private Integer id;

    //只针对分组一进行校验
    @Size(min=1,max=30,groups={ValidGroup1.class},message="{items.name.length.error}")
    private String name;

    private Float price;

    private String pic;

    @NotNull(message="{items.createtime.isNull}")   private Date createtime;
错误信息配置文件CustomValidationMessages.properties
items.name.length.error=名字长度有误
items.createtime.isNull=创建时间不能为空
@RequestMapping(value="/editItemsSubmit.action" ,method={RequestMethod.POST})
    public String editItemsSubmit(
            Model model,
            HttpServletRequest request,
            Integer id,
            @ModelAttribute("itemsCustom") @Validated(value = ValidGroup1.class) ItemsCustom itemsCustom,
            BindingResult bindingResult,
            MultipartFile items_pic//用来接收商品的图片
            ) throws Exception {

        if (bindingResult.hasErrors()) {
            List<ObjectError> allErrors = bindingResult.getAllErrors();
            for (ObjectError error : allErrors) {
                System.out.println(error.getDefaultMessage() + "***");
            }
            model.addAttribute("allErrors", allErrors);
            return "items/editItems";
        }
**分组校验
1。定义一个借口不需要指定任何方法》2.在校验规则中添加分组》3.在controller方法中指定分组的校验
分组校验时数据只会按照指定分组对应的校验方式进行校验。
四、异常处理
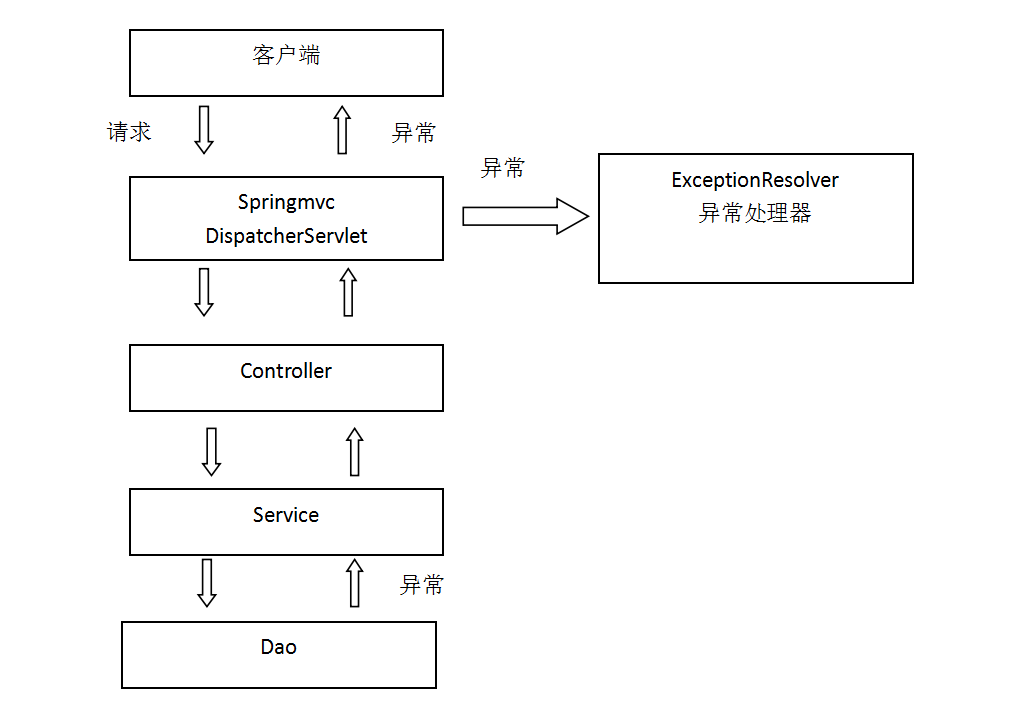
系统中异常包括两类:预期异常和运行时异常RuntimeException,前者通过捕获异常从而获取异常信息,后者主要通过规范代码开发、测试通过手段减少运行时异常的发生。系统的dao、service、controller出现都通过throws Exception向上抛出,最后由springmvc前端控制器交由异常处理器进行异常处理,如下图:

springmvc提供全局异常处理器,进行统一异常处理(一个系统只有一个)
1.自定义异常类(继承Exception)
2.定义一个全局异常处理器
public class CustomExceptionResolver implements HandlerExceptionResolver {

    @Override
    public ModelAndView resolveException(HttpServletRequest request,
            HttpServletResponse response, Object handler, Exception exception) {
        // handler就是处理器是配置要执行的handler对象,只有method方法
        // 1.解析异常类型
        String message = null;
        if (exception instanceof CustomException) {
            // 2.如果是系统自定义的异常直接取出异常在错误页面显示
            message = ((CustomException) exception).getMessage();
        } else {
            // 3.如果不是系统自定义异常,构造一个位置异常抛出
            message = "未知错误!";
        }
        ModelAndView modelAndView = new ModelAndView();
        modelAndView.addObject("message", message);
        modelAndView.setViewName("error");
        return modelAndView;
    }

}
3.在pringmvc.xml配置全局异常处理器
<bean class="cn.mycookies.ssm.exception.CustomExceptionResolver"></bean>
五、文件上传
1.导入文件上传jar包
2.在 页面form中提交enctype="multipart/form-data"的数据时,需要springmvc对multipart类型的数据进行解析。
<form id="itemForm" action="${pageContext.request.contextPath }/items/editItemsSubmit.action" method="post" enctype="multipart/form-data">
<!-- 上传名字和接收绑定的一致 -->
        <input type="file"  name="items_pic"
3.在springmvc.xml中配置multipart类型解析器。
    <!-- 文件上传 -->
    <bean id="multipartResolver"
        class="org.springframework.web.multipart.commons.CommonsMultipartResolver">
        <!-- 设置上传文件的最大尺寸为50MB -->
        <property name="maxUploadSize">
            <value>52428800</value>
        </property>
    </bean
4.controller方法中处理
    @RequestMapping(value="/editItemsSubmit.action" ,method={RequestMethod.POST})
    public String editItemsSubmit(
            Model model,
            HttpServletRequest request,
            Integer id,
            @ModelAttribute("itemsCustom") @Validated(value = ValidGroup1.class) ItemsCustom itemsCustom,
            BindingResult bindingResult,
            MultipartFile items_pic//用来接收商品的图片
            ) throws Exception {
    //异常处理
        if (bindingResult.hasErrors()) {
            List<ObjectError> allErrors = bindingResult.getAllErrors();
            for (ObjectError error : allErrors) {
                System.out.println(error.getDefaultMessage() + "***");
            }
            model.addAttribute("allErrors", allErrors);
            return "items/editItems";
        }
        //图片原始名称
        String originalFileName = items_pic.getOriginalFilename();
        //上传图片
        if(items_pic!=null&&originalFileName!=null&&originalFileName.length()>0){
            //存储图片的虚拟路径
            String pic_path = "D:\\develop\\upload\\temp\\";
            String prefix = "";
            Calendar calendar = Calendar.getInstance();
            //给上传的文件分包
            prefix=calendar.get(Calendar.YEAR)+"\\"+calendar.get(Calendar.MONTH)+"\\"+calendar.get(Calendar.DAY_OF_MONTH)+"\\";
            File file = new File(pic_path+prefix);
            //如果文件夹不存在就创建一个
            if(!file.isDirectory()){
                file.mkdirs();
            }
            //新图片的名字
            String newFileName =prefix+UUID.randomUUID()+originalFileName.substring(originalFileName.lastIndexOf("."));
            //新图片
            File newFile = new File(pic_path+newFileName);
            //将内存中的数据写入磁盘
            items_pic.transferTo(newFile);
            //删除以前的图片
            File oldFile = new File(pic_path+itemsCustom.getPic());
            oldFile.delete();

            //将新的图片名称写入到itemsCustom
            itemsCustom.setPic(newFileName);
        }

        // 调用servcie更新商品信息
        itemsService.updateItems(id, itemsCustom);

        return "forward:queryItems.action";
    }
注:配置虚拟目录
在tomcat的conf/server.xml文件中host标签下
<Context doBase="D:\develop\upload\temp" path="/pic" reloadable="false"/>
页面中显示上传的图片
<img src="/pic/${item.pic}" width=200 height=200/>
六、Json数据交互

1.导入jar包(springmvc使用jackson包进行json转换)
2.配置json转换器
使用<mvc:annotation-driven />后无需在单独配置
3.交互测试
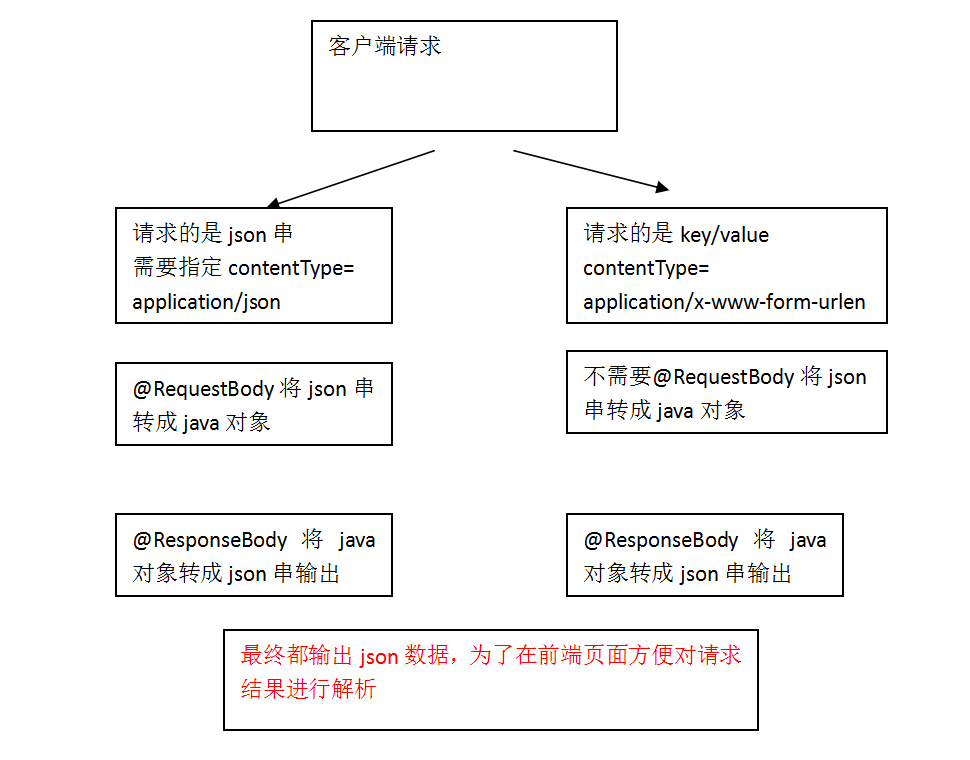
1.请求json数据,响应json
2.请求key-value,相应json
页面请求
    //请求的是json输出的是json
   function requestJson(){
     $.ajax({
      type:'post',
      url:'${pageContext.request.contextPath}/requestJson.action',
      contentType:'application/json;charset=utf-8',
      data:'{"name":"手机","price":"999"}',
     success:function(data){//返回json结果
      alert(data.name);
     }
    });
   }
   //请求的是key value  输出的是json
  function responseJson(){
    var user = "name='电脑'&price=99.9";
   $.ajax({
   type:'post',
   url:'${pageContext.request.contextPath}/requestKeyValue.action',
   //keyvalue类型不需要指定 因为默认请求的就是keyvalue累I型那个
   //contentType:'application/json;charset=utf-8',
   data:user,
  success:function(data){//返回json结果
   alert(1);
   alert(data);

  }
 });
controller中方法
    // 输入的是json串输出的json串
    @RequestMapping("requestJson.action")
    // @RequestBody:将接收到的json串转换为java对象
    // @ResponseBody:将java对象转为json
    public @ResponseBody
    ItemsCustom requestJson(@RequestBody ItemsCustom itemsCustom) {
        System.out.println(itemsCustom + "这是接受到的数据");
        itemsCustom.setDetail("这是我添加进来的信息");

        return itemsCustom;

    }

    // 输入的是key Value输出的是json串
    @RequestMapping("requestKeyValue.action")
    public @ResponseBody ItemsCustom requestKeyValue(ItemsCustom itemsCustom){
        itemsCustom.setDetail("这是我瞎JB设置的");
        return itemsCustom;
    }
}
七、拦截器
1.定义拦截器,实现HandlerInterceptor
public class HandlerInterceptor1 implements HandlerInterceptor {

    //handler方法执行之后执行
    //同一异常处理,同一日志处理
    @Override
    public void afterCompletion(HttpServletRequest request,
            HttpServletResponse response, Object handler, Exception exception)
            throws Exception {
        // TODO Auto-generated method stub
System.out.println("afterCompletion1........执行");
    }

    //进入handler方法之后返回modelandview之前执行
    //应用场景从modelAndView出发
    //将公用的模型数据传到页面中,也可以同一指定视图,比如菜单导航
    @Override
    public void postHandle(HttpServletRequest arg0, HttpServletResponse request,
            Object handler, ModelAndView modelAndView) throws Exception {
        // TODO Auto-generated method stub
System.out.println("postHandle1............执行");
    }

    //在进入handler方法之前执行
    //可以用于身份认证,身份授权等,认证不通过表示没有登陆需要此方法进行拦截不在向下执行
    @Override
    public boolean preHandle(HttpServletRequest request, HttpServletResponse response,
            Object handler) throws Exception {
        System.out.println("preHandle1...........执行");
        HttpSession session = request.getSession();

        //return false表示拦截 true放行
        return true;
    }

}
2.配置拦截器
    <!-- 拦截器的配置 -->
    <mvc:interceptors>
        <!-- 多个拦截器顺序执行 -->
        <mvc:interceptor>
            <!-- /**表示拦截所有url和子url路径 -->
            <mvc:mapping path="/**"/>
            <bean class="cn.mycookies.ssm.Interceptor.LoginInterceptor"></bean>
        </mvc:interceptor>
        <mvc:interceptor>
            <!-- /**表示拦截所有url和子url路径 -->
            <mvc:mapping path="/**"/>
            <bean class="cn.mycookies.ssm.Interceptor.HandlerInterceptor1"></bean>
        </mvc:interceptor>
        <mvc:interceptor>
            <!-- /**表示拦截所有url和子url路径 -->
            <mvc:mapping path="/**"/>
            <bean class="cn.mycookies.ssm.Interceptor.HandlerInterceptor2"></bean>
        </mvc:interceptor>
    </mvc:interceptors>
3.多个拦截器进行测试结论
两个拦截器都放行:preHandle顺序执行,PostHandle和afterCompletion逆序执行
拦截器1放行2不放行:(prehandle1>prehandle2>aftercompletion1)拦截器1放行拦截器2prehandle才会执行,拦截器2prehandle不放行,拦截器postHandle和afterCompletion不会执行,只要有一个拦截器不放行,postHandle都不会执行。
SpringMVC学习笔记(二)的更多相关文章
- springMVC学习笔记(二)-----注解和非注解入门小程序
最近一直在做一个电商的项目,周末加班,忙的都没有时间更新博客了.终于在上周五上线了,可以轻松几天了.闲话不扯淡了,继续谈谈springMvc的学习. 现在,用到SpringMvc的大部分使用全注解配置 ...
- SpringMVC学习笔记(二)
一.HandleMapping和HandlerAdapter的讲解 HandleMapping:处理映射器,可以理解为为请求的url查找对应的Controller类. HandlerAdapter:可 ...
- SpringMVC学习笔记二:常用注解
转载请注明原文地址:http://www.cnblogs.com/ygj0930/p/6831976.html 参考:http://www.cnblogs.com/leskang/p/5445698 ...
- springMVC学习笔记二
六.springmvc的注解 xml的配置→注解 1.新建一个配置文件还是在config下 新建springAnnotation-servlet.xml web.xml 修改初始化为<param ...
- SpringMVC学习笔记二第一个小的程序
首先:我们要用springmvc来写一个helloworld的例子: 首先我们需要导入所需要的架包: /demo1/WebRoot/WEB-INF/lib/commons-logging-1.1.1. ...
- SpringMVC 学习笔记(二) @RequestMapping、@PathVariable等注解
版权声明:本文为博主原创文章,博客地址:http://blog.csdn.net/a67474506?viewmode=contents 1.1. @RequestMapping映射请求 Spring ...
- springmvc学习笔记二:重定向,拦截器,参数绑定
Controller方法返回值 返回ModelAndView controller方法中定义ModelAndView对象并返回,对象中可添加model数据.指定view. 返回void 在Contro ...
- SpringMVC学习笔记二:参数接受
该项目用来介绍SpringMVC对参数接受的方法: 项目目录树:在前一个项目上修改添加 新添加了Student类和Group类,用来测试整体参数接受 Student.java package com. ...
- SpringMVC学习笔记之二(SpringMVC高级参数绑定)
一.高级参数绑定 1.1 绑定数组 需求:在商品列表页面选中多个商品,然后删除. 需求分析:功能要求商品列表页面中的每个商品前有一个checkbok,选中多个商品后点击删除按钮把商品id传递给Cont ...
- 史上最全的SpringMVC学习笔记
SpringMVC学习笔记---- 一.SpringMVC基础入门,创建一个HelloWorld程序 1.首先,导入SpringMVC需要的jar包. 2.添加Web.xml配置文件中关于Spring ...
随机推荐
- INotifyPropertyChanged(监听数据),当数据改变时调用
public class BaseViewModel : INotifyPropertyChanged { public event PropertyChangedEventHan ...
- jQuery实现鼠标滑过导航栏呈现不同的样式
素材图片 源码: <!DOCTYPE html PUBLIC "-//W3C//DTD XHTML 1.0 Transitional//EN" "http://ww ...
- 通过response设置响应体
(1)响应体设置文本 PrintWriter getWriter() 获得字符流,通过字符流的write(String s)方法可以将字符串设置到response 缓冲区中,随后Tomcat会将res ...
- SVN 通过IIS设置反向代理访问
原因 一个字,穷,没办法,只有一台机器 要当测试服务器还要做源码管理. 解决办法 通过IIS配置反向代理访问SVN,给SVN访问的HTTPS绑定上域名,就可以正常访问了. 1.修改SVN配置 把SVN ...
- mysql 数据库安装步骤个人总结
1.mysql-5.7.19-winx64.zip(此为免安装版,318兆左右,还有一种是安装版,380兆左右mysql-installer-community-5.7.19.0.msi)将此安装包解 ...
- 闭锁——CountDownLatch
一.概念 闭锁是一个同步工具类,主要用于等待其他线程活动结束后,再执行后续的操作.例如:在王者荣耀游戏中,需要10名玩家都准备就绪后,游戏才能开始. CountDownLatch是concurrent ...
- 对于c语言存储分配程序(malloc函数)实现的理解
内容主要出自<The C Programming Language>一书,不得不说这是一本程序员必读的书,我大二读了前面几章就扔到一边了,直到最近才又拿起来再读,找不到言语来形容我现在后悔 ...
- ant安装以及环境变量配置、验证
(一)安装 ant 下载地址: http://ant.apache.org/ 根据自己电脑下载对应版本 下载完成以后,可自行解压到自己常用的盘中,但是要记住解压到哪里了,以便后续的环境变量配置 ...
- 探索JSP中的 "9大内置对象!"
1.什么是JSP内置对象? jsp内置对象就是Web容器创建的一组对象,我们都知道Tomcat可以看成是一种Web容器,所以我们可以知道所谓的内置对象Tomcat创建的,使用内置对象时可以不适用new ...
- CentOS7中将home迁移到/下的命令
CentOS7中将home迁移到/下的命令
# mkdir -p /backup # cp -r /home/* /backup # umount /home # df -hl # fdisk -l # lvremove /dev/cento ...
