iOS:针对固定数据源,更好的封装cell
一、介绍
在iOS开发中,tableView非常常用,能将其展示出来,它的数据源必不可少。当然数据源有动态下发的,有固定写死的,这里我只探讨固定写死的情况。对于死数据,我们在项目中经常遇到的场景就是我的模块,以及设置模块等。那么,这些死数据我们如何组装的呢? 在以前开发中,我直接用一个可变数组装着每一个cell对应的字典(字典中包含每一个cell需要字段的键值对),虽然也可以实现效果,但是扩展不方便,本人不推荐。 在开发中,我的搭档推荐我项目中的封装的cell模型,我一看,确实不错,在这里给大家分享一下。
二、思想
1、定义继承NSObject的CustomCellConfig类,定义cell可能需要的全部属性
2、定义一个实例化的方法,参数为字典
3、在实例化方法中接着通过OC的setValuesForKeysWithDictionary方法将对应的所有赋值的属性初始化
4、当然再重写一下该类的init方法,默认赋值cell的高为44.0f像素
5、在控制器中创建CustomCellConfig的实体对象并存入数据源,最后刷新tableView
6、获取CustomCellConfig实体对象对cell进行赋值并触发block即可
三、代码
//

//  CustomCellConfig.h

//  CustomCellConfig

//

//  Created by 夏远全 on 2017/12/8.

//  Copyright © 2017年 夏远全. All rights reserved.

//

#import <Foundation/Foundation.h>

#import <UIKit/UIKit.h>

@class CustomCellConfig;

typedef void (^CustomCellSelectedBlock)(CustomCellConfig *config);

@interface CustomCellConfig : NSObject

@property (nonatomic, strong) NSString *title;

@property (nonatomic, strong) NSString *detail;

@property (nonatomic, strong) UIImage  *image;

@property (nonatomic, strong) NSString *avatar;

@property (nonatomic, assign) int       badge;

@property (nonatomic, assign) int       contentType;

@property (nonatomic, assign) float     height;

@property (nonatomic, assign) BOOL      canEdit;

@property (nonatomic, assign) UITableViewCellAccessoryType    accessoryType;

@property (nonatomic,   copy) CustomCellSelectedBlock block;

@property (nonatomic, strong) NSString *viewController;

@property (nonatomic, strong) NSString *segue;

@property (nonatomic, strong) NSIndexPath *indexPath;

@property (nonatomic,   copy) NSAttributedString *attributedDetail;

@property (nonatomic, strong) NSString *identify;

@property (nonatomic, strong) id        object;

+ (CustomCellConfig *)configWithDictionary:(NSDictionary *)dict;

@end
//

//  CustomCellConfig.m

//  CustomCellConfig

//

//  Created by 夏远全 on 2017/12/8.

//  Copyright © 2017年 夏远全. All rights reserved.

//

#import "CustomCellConfig.h"

@implementation CustomCellConfig

- (id)init {

    if (self = [super init]) {

        self.height = 44.0f;

    }

    return self;

}

+ (CustomCellConfig *)configWithDictionary:(NSDictionary *)dict {

    CustomCellConfig *config = [[CustomCellConfig alloc] init];

    [config setValuesForKeysWithDictionary:dict];

    return config;

}

@end
四、使用
//
// ViewController.m
// CustomCellConfig
//
// Created by 夏远全 on 2017/12/8.
// Copyright © 2017年 夏远全. All rights reserved.
// #import "ViewController.h"
#import "CustomCellConfig.h" @interface ViewController ()<UITableViewDataSource,UITableViewDelegate>
@property (strong,nonatomic)UITableView *tableView;
@property (strong,nonatomic)NSMutableArray *dataSource;
@end @implementation ViewController #pragma mark - life cycle - (void)viewDidLoad {
[super viewDidLoad]; [self setupNavigation];
[self setupDefaultValue];
[self setupSubviews]; [self loadData];
} -(void)viewWillAppear:(BOOL)animated
{
[super viewWillAppear:animated];
} -(void)viewWillDisappear:(BOOL)animated
{
[super viewWillDisappear:animated];
} -(void)setupNavigation
{
self.title = @"测试cellConfig";
} -(void)setupDefaultValue
{
self.tableView.backgroundColor = [UIColor whiteColor];
self.tableView.tableFooterView = [[UIView alloc] initWithFrame:CGRectZero];
} -(void)setupSubviews
{
[self addSubViews];
[self setupSubviewsConstraints];
} #pragma mark - add subviews -(void)addSubViews
{
[self.view addSubview:self.tableView];
} #pragma mark - layout subviews -(void)setupSubviewsConstraints
{ } #pragma mark - load data
-(void)loadData
{ __weak typeof(self) weakSelf = self; //第一组cell
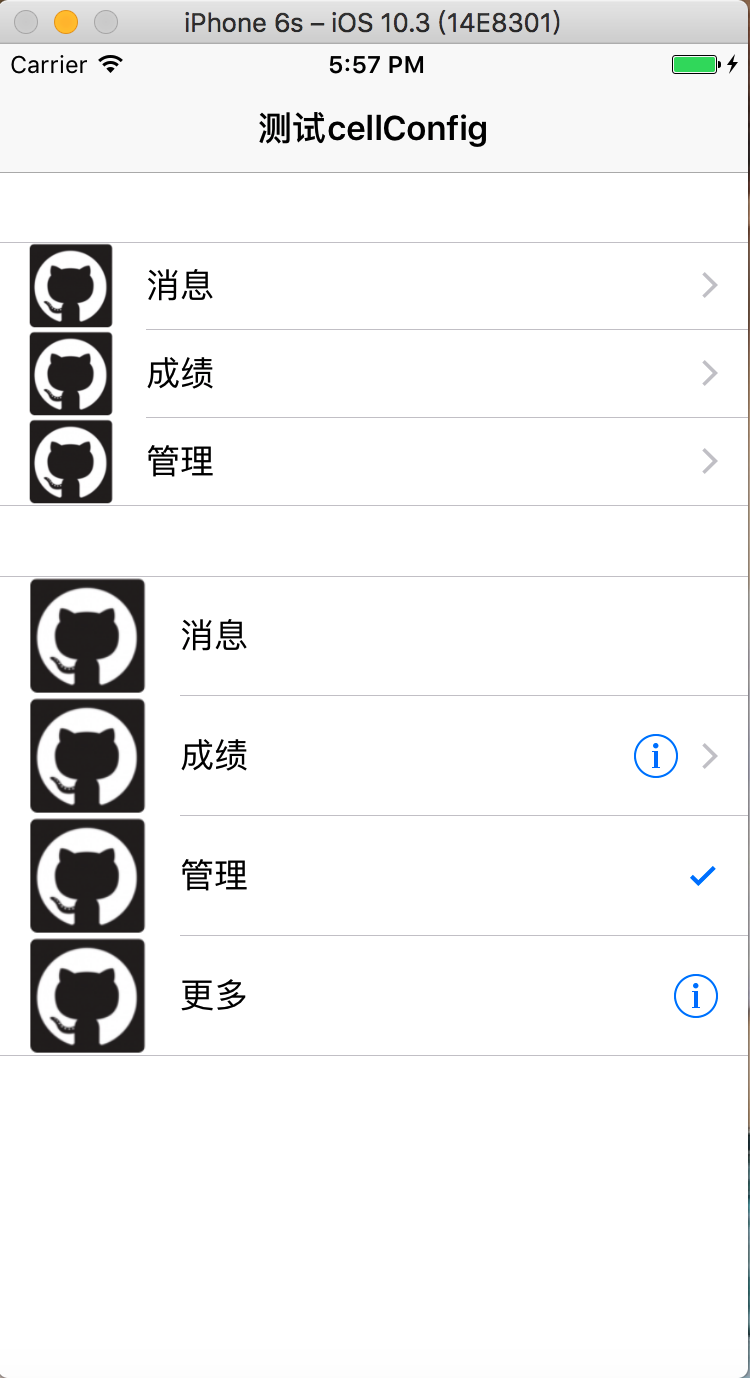
CustomCellConfig *cellConfig1 = [CustomCellConfig configWithDictionary:@{@"image":[UIImage imageNamed:@"avatar"],@"title":@"消息",@"accessoryType":@(UITableViewCellAccessoryDisclosureIndicator),@"block":^(CustomCellConfig *config){ [weakSelf pushViewController:config]; }}]; CustomCellConfig *cellConfig2 = [CustomCellConfig configWithDictionary:@{@"image":[UIImage imageNamed:@"avatar"],@"title":@"成绩",@"detail":@"分析",@"accessoryType":@(UITableViewCellAccessoryDisclosureIndicator),@"block":^(CustomCellConfig *config){ [weakSelf pushViewController:config]; }}];
CustomCellConfig *cellConfig3 = [CustomCellConfig configWithDictionary:@{@"image":[UIImage imageNamed:@"avatar"],@"title":@"管理",@"attributedDetail":@"",@"accessoryType":@(UITableViewCellAccessoryDisclosureIndicator),@"block":^(CustomCellConfig *config){ [weakSelf pushViewController:config]; }}];
NSArray<CustomCellConfig *> *section1 = @[cellConfig1,cellConfig2,cellConfig3]; //第二组cell
CustomCellConfig *cellConfig4 = [CustomCellConfig configWithDictionary:@{@"image":[UIImage imageNamed:@"avatar"],@"title":@"消息",@"height":@(),@"accessoryType":@(UITableViewCellAccessoryNone),@"block":^(CustomCellConfig *config){ [weakSelf pushViewController:config]; }}];
CustomCellConfig *cellConfig5 = [CustomCellConfig configWithDictionary:@{@"image":[UIImage imageNamed:@"avatar"],@"title":@"成绩",@"height":@(),@"detail":@"分析",@"accessoryType":@(UITableViewCellAccessoryDetailDisclosureButton),@"block":^(CustomCellConfig *config){ [weakSelf pushViewController:config]; }}];
CustomCellConfig *cellConfig6 = [CustomCellConfig configWithDictionary:@{@"image":[UIImage imageNamed:@"avatar"],@"title":@"管理",@"height":@(),@"accessoryType":@(UITableViewCellAccessoryCheckmark),@"block":^(CustomCellConfig *config){ [weakSelf pushViewController:config]; }}];
CustomCellConfig *cellConfig7 = [CustomCellConfig configWithDictionary:@{@"image":[UIImage imageNamed:@"avatar"],@"title":@"更多",@"height":@(),@"accessoryType":@(UITableViewCellAccessoryDetailButton),@"block":^(CustomCellConfig *config){ [weakSelf pushViewController:config]; }}];
NSArray<CustomCellConfig *> *section2 = @[cellConfig4,cellConfig5,cellConfig6,cellConfig7]; //......等等......该模型的字段均可用,自己根据需要进行赋值...........// [self.dataSource addObject:section1];
[self.dataSource addObject:section2];
[self.tableView reloadData];
} #pragma mark - delegate - datasource methods
-(NSInteger)numberOfSectionsInTableView:(UITableView *)tableView
{
return self.dataSource.count;
} -(NSInteger)tableView:(UITableView *)tableView numberOfRowsInSection:(NSInteger)section
{
return [self.dataSource[section] count];
} -(UITableViewCell *)tableView:(UITableView *)tableView cellForRowAtIndexPath:(NSIndexPath *)indexPath{ static NSString *reuserIdentifier = @"reuserIdentifier";
UITableViewCell *cell = [tableView dequeueReusableCellWithIdentifier:reuserIdentifier];
if (!cell) {
cell = [[UITableViewCell alloc] initWithStyle:UITableViewCellStyleDefault reuseIdentifier:reuserIdentifier];
}
CustomCellConfig *cellConfig = self.dataSource[indexPath.section][indexPath.row];
cell.imageView.image = cellConfig.image;
cell.textLabel.text = cellConfig.title;
cell.detailTextLabel.text = cellConfig.detail;
cell.accessoryType = cellConfig.accessoryType;
return cell;
} -(CGFloat)tableView:(UITableView *)tableView heightForRowAtIndexPath:(NSIndexPath *)indexPath{
CustomCellConfig *cellConfig = self.dataSource[indexPath.section][indexPath.row];
return cellConfig.height;
} -(void)tableView:(UITableView *)tableView didSelectRowAtIndexPath:(NSIndexPath *)indexPath{ [tableView deselectRowAtIndexPath:indexPath animated:YES]; CustomCellConfig *cellConfig = self.dataSource[indexPath.section][indexPath.row];
if (cellConfig.block) {
cellConfig.block(cellConfig);
}
} #pragma mark - event rsponse
-(void)pushViewController:(CustomCellConfig *)cellConfig{ UIViewController *vc = [[UIViewController alloc] init];
vc.view.backgroundColor = [UIColor redColor];
[self.navigationController pushViewController:vc animated:YES];
} #pragma mark - public methods #pragma mark - private methods #pragma mark - getters and setters
-(UITableView *)tableView
{
if (!_tableView) {
_tableView = [[UITableView alloc] initWithFrame:self.view.bounds style:UITableViewStyleGrouped];
_tableView.dataSource = self;
_tableView.delegate = self;
}
return _tableView;
}
-(NSMutableArray *)dataSource{
if (!_dataSource) {
_dataSource = [NSMutableArray array];
}
return _dataSource;
} @end
五、效果
iOS:针对固定数据源,更好的封装cell的更多相关文章
- iOS开发之微信聊天工具栏的封装
之前山寨了一个新浪微博(iOS开发之山寨版新浪微博小结),这几天就山寨个微信吧.之前已经把微信的视图结构简单的拖了一下(IOS开发之微信山寨版),今天就开始给微信加上具体的实现功能,那么就先从微信的聊 ...
- wzplayer for ios 针对(mms)优化版本V1.0
wzplayer for ios针对mms优化版本发布. 1.支持mms,http,rtmp,rtsp等协议 2.支持全格式 下载地址:http://www.coolradio.cn/WzPlayer ...
- web自动化针对PO模式进行二次封装之basepage
在PO模式当中,我们做到了页面对象与测试用例的分离,但在页面对象编写时,我们仍然还有优化的空间.页面对象有一些共同的基本操作,可以封装起来,并可以在基本操作当中加上日志和异常截图的处理.比如说我们在查 ...
- iOS开发UI篇—核心动画(UIView封装动画)
iOS开发UI篇—核心动画(UIView封装动画) 一.UIView动画(首尾) 1.简单说明 UIKit直接将动画集成到UIView类中,当内部的一些属性发生改变时,UIView将为这些改变提供动画 ...
- APP自动化针对PO模式进行二次封装之basepage
APP自动化跟WEB自动化所使用的框架基本一样,都是采用的PO模式结合pytest框架编写自动化测试脚本,为了提高代码的复用性.稳定性和易维护性,我们针对PO模式进行了二次封装,将日志,等待以及异常截 ...
- iOS开发之自定义表情键盘(组件封装与自动布局)
下面的东西是编写自定义的表情键盘,话不多说,开门见山吧!下面主要用到的知识有MVC, iOS开发中的自动布局,自定义组件的封装与使用,Block回调,CoreData的使用.有的小伙伴可能会问写一个自 ...
- iOS数据库离线缓存思路和网络层封装
一直想总结一下关于iOS的离线数据缓存的方面的问题,然后近期也简单的对AFN进行了再次封装.全部想把这两个结合起来写一下.数据展示型的页面做离线缓存能够有更好的用户体验,用户在离线环境下仍然能够获取一 ...
- 让iOS开发变得更有效率-分类、工具类
在工作中整理的一些分类与工具类,分享给大家.这些工具类可以减少项目中的代码量,让代码变得更简洁,可以大大的提升项目的效率,直接拖到项目中使用即可.下载地址:https://github.com/lee ...
- iOS菜鸟之FMDB的二次封装简单易用
闲来无事写点东西,希望大家多多指正! 大家先去git下载FMDB,然后将其中source文件夹中的fmdb文件夹拖入自己的项目中.最后就可以引用下面的代码对fmdb进行一次简单的封装. 这样可以更直观 ...
随机推荐
- Python 正则表达式模块 (re) 简介
Python 的 re 模块(Regular Expression 正则表达式)提供各种正则表达式的匹配操作,和 Perl 脚本的正则表达式功能类似,使用这一内嵌于 Python 的语言工具,尽管不能 ...
- Linux 快速删除已输入的命令
从输入模式到命令模式: 按”:“到最后一行,再按ctrl+z 就好了 history 显示命令历史列表 ↑(Ctrl+p) 显示上一条命令 ↓(Ctrl+n) 显示下一条命令 !num 执行命令历史列 ...
- window 连linux
https://blog.csdn.net/ruanjianruanjianruan/article/details/46954681 https://blog.csdn.net/u013754317 ...
- springMVC源码分析--FlashMap和FlashMapManager重定向数据保存
在上一篇博客springMVC源码分析--页面跳转RedirectView(三)中我们看到了在RedirectView跳转时会将跳转之前的请求中的参数保存到fFlashMap中,然后通过FlashMa ...
- python3 + selenium 之文件上传下载
文件上传 文件上传下载的联系html: uplad.html <html> <head> <meta http-equiv="content-type" ...
- istringstream、ostringstream、stringstream 类介绍 和 stringstream类 clear函数的真正用途
istringstream.ostringstream.stringstream 类介绍 和 stringstream类 clear函数的真正用途 来源: http://blog.csdn.net/T ...
- 【LOJ】#150. 挑战多项式
原题链接 多项式全家桶!快乐!(好像少个除法,不过有除法好像不太快乐) (说真的这是我第一次写exp和开根...水平不行.. 从最基础要实现的操作开始吧.. 多项式取模\(x^n\) 这个..很简单了 ...
- PHP函数比较变量
作为一个PHPer,一定要多看PHP手册,每过一遍手册,你总会发现一些以前被你忽略的一些东西:我们可以从各个不同的地方/渠道学习到PHP的相关知识,但也不要忘记我们的手册,PHP手册永远是学习和提升P ...
- 连连看 (BFS)
难点在于判断转弯小于两次 这个还好 主要是 走过的路还能再走 但是去掉标记数组会超时 *******所以用 v.step<=f[v.x][v.y]即可!!! 这个思想非常重用!! ...
- MyEclipse里面如何把偏好设置导出
长时间使用Myeclipse,里面快捷键和代码风格以及其它设置都用习惯了,一旦需要重新安装,再次配置起来 就会很浪费时间,这里我们可以将自己的配置风格保留下来,下次重新安装时直接导入就可以了,不用再重 ...