Android学习07
自定义Dialog
创建一个Java类CustomDialog继承Dialog。
package com.example.helloworld.widget;

import android.app.Dialog;

import android.content.Context;

import android.graphics.Point;

import android.os.Bundle;

import android.text.TextUtils;

import android.view.Display;

import android.view.View;

import android.view.WindowManager;

import android.widget.TextView;

import androidx.annotation.NonNull;

import com.example.helloworld.R;

public class CustomDialog extends Dialog implements View.OnClickListener {

    private TextView mTvTitle,mTvMessage,mTvCancel,mTvConfirm;

    private String title,message,cancel,confirm;

    private IOnCancelListener cancelListener;  //取消按钮被点击了的监听器

    private IOnConfirmlListener confirmlListener;  //确定按钮被点击了的监听器

    public CustomDialog(@NonNull Context context) {

        super(context);

    }

    public CustomDialog(@NonNull Context context,int themeId) {

        super(context,themeId);

    }

    public CustomDialog setTitle(String title) {

        this.title = title;

        return this;

    }

    public CustomDialog setMessage(String message) {

        this.message = message;

        return this;

    }

    public CustomDialog setCancel(String cancel,IOnCancelListener listener) {

        this.cancel = cancel;

        this.cancelListener = listener;

        return this;

    }

    public CustomDialog setConfirm(String confirm,IOnConfirmlListener listener) {

        this.confirm = confirm;

        this.confirmlListener = listener;

        return this;

    }

    @Override

    protected void onCreate(Bundle savedInstanceState) {

        super.onCreate(savedInstanceState);

        setContentView(R.layout.layout_custom_dialog);

        //空白处不能取消动画

        setCanceledOnTouchOutside(false);

        //设置宽度

        WindowManager m = getWindow().getWindowManager();

        Display d = m.getDefaultDisplay();

        WindowManager.LayoutParams p =getWindow().getAttributes();

        Point size = new Point();

        d.getSize(size);

        p.width = (int)(size.x * 0.8);  //设置dialog的宽度为当前手机屏幕的宽度*0.8

        getWindow().setAttributes(p);

        mTvTitle = findViewById(R.id.tv_title);

        mTvMessage = findViewById(R.id.tv_message);

        mTvCancel = findViewById(R.id.tv_cancel);

        mTvConfirm = findViewById(R.id.tv_confirm);

        if (!TextUtils.isEmpty(title)){

            mTvTitle.setText(title);

        }

        if (!TextUtils.isEmpty(message)){

            mTvMessage.setText(message);

        }

        if (!TextUtils.isEmpty(cancel)){

            mTvCancel.setText(cancel);

        }

        if (!TextUtils.isEmpty(confirm)){

            mTvConfirm.setText(confirm);

        }

        //设置取消和确定的监听事件

        mTvCancel.setOnClickListener(this);

        mTvConfirm.setOnClickListener(this);

    }

    @Override

    public void onClick(View v) {

        switch (v.getId()){

            case R.id.tv_cancel:

                if (cancelListener!=null){

                    cancelListener.onCancel(this);

                }

                break;

            case R.id.tv_confirm:

                if (confirmlListener!=null){

                    confirmlListener.onConfirm(this);

                }

                break;

        }

    }

//回调接口

    public interface IOnCancelListener{

        void onCancel(CustomDialog dialog);

    }

    public interface IOnConfirmlListener{

        void onConfirm(CustomDialog dialog);

    }

}
activity_custom.xml:
<?xml version="1.0" encoding="utf-8"?>
<LinearLayout xmlns:android="http://schemas.android.com/apk/res/android"
android:layout_width="match_parent"
android:layout_height="match_parent"
android:orientation="vertical"
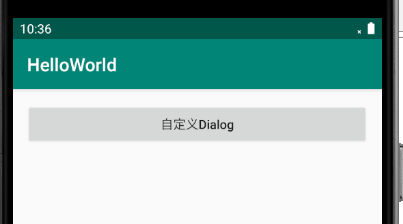
android:padding="15dp"> <Button
android:id="@+id/btn_custom_dialog"
android:layout_width="match_parent"
android:layout_height="wrap_content"
android:text="自定义Dialog"
android:textAllCaps="false"/> </LinearLayout>
在drawable中新建bg_custom_dialog.xml设置边框:
<?xml version="1.0" encoding="utf-8"?>

<shape xmlns:android="http://schemas.android.com/apk/res/android"

    android:layout_width="match_parent"

    android:layout_height="match_parent">

    <solid android:color="#ffffff" />

    <stroke

        android:width="0.8dp"

        android:color="#ffffff" />

    <!-- 圆角 -->

    <corners android:radius="6dp" />

</shape>
新建layout文件,layout_custom_dialog.xml:
<?xml version="1.0" encoding="utf-8"?>
<LinearLayout xmlns:android="http://schemas.android.com/apk/res/android"
android:orientation="vertical"
android:layout_width="match_parent"
android:layout_height="match_parent"
android:gravity="center_horizontal"
android:background="@drawable/bg_custom_dialog"> <TextView
android:id="@+id/tv_title"
android:layout_width="wrap_content"
android:layout_height="wrap_content"
android:textSize="30sp"
android:textColor="#000"
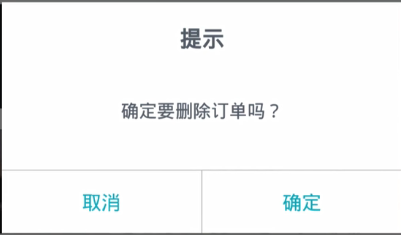
android:text="提示"
android:textStyle="bold"
android:layout_marginTop="15dp"/> <TextView
android:id="@+id/tv_message"
android:layout_width="wrap_content"
android:layout_height="wrap_content"
android:textSize="30sp"
android:textColor="#000"
android:text="删除?"
android:layout_marginTop="20dp"
android:layout_marginBottom="20dp"/> <View
android:layout_width="match_parent"
android:layout_height="1dp"
android:background="#3CA9C4"/> <LinearLayout
android:layout_width="match_parent"
android:layout_height="45dp"
android:orientation="horizontal"> <TextView
android:id="@+id/tv_cancel"
android:layout_width="0dp"
android:layout_height="match_parent"
android:layout_weight="1"
android:text="取消"
android:textSize="20sp"
android:textColor="#3CA9C4"
android:gravity="center"/> <View
android:layout_width="1dp"
android:layout_height="match_parent"
android:background="#3CA9C4"/> <TextView
android:id="@+id/tv_confirm"
android:layout_width="0dp"
android:layout_height="match_parent"
android:layout_weight="1"
android:text="确定"
android:textSize="20sp"
android:textColor="#3CA9C4"
android:gravity="center"/> </LinearLayout> </LinearLayout>
CustomActivity:
package com.example.helloworld;

import androidx.appcompat.app.AppCompatActivity;

import android.os.Bundle;

import android.view.View;

import android.widget.Button;

import android.widget.Toast;

import com.example.helloworld.widget.CustomDialog;

public class CustomDialogActivity extends AppCompatActivity {

    private Button mBtnDialog;

    @Override

    protected void onCreate(Bundle savedInstanceState) {

        super.onCreate(savedInstanceState);

        setContentView(R.layout.activity_custom);

        mBtnDialog = findViewById(R.id.btn_custom_dialog);

        mBtnDialog.setOnClickListener(new View.OnClickListener() {

            @Override

            public void onClick(View v) {

                final CustomDialog customDialog = new CustomDialog(CustomDialogActivity.this);

                customDialog.setTitle("提示").setMessage("确认删除?")

                        .setCancel("取消", new CustomDialog.IOnCancelListener() {

                    @Override

                    public void onCancel(CustomDialog dialog) {

                        Toast.makeText(CustomDialogActivity.this, "取消", Toast.LENGTH_SHORT).show();

                        customDialog.dismiss();

                    }

                })

                        .setConfirm("确认", new CustomDialog.IOnConfirmlListener() {

                    @Override

                    public void onConfirm(CustomDialog dialog) {

                        Toast.makeText(CustomDialogActivity.this, "确定", Toast.LENGTH_SHORT).show();

                        customDialog.dismiss();

                    }

                }).show();

            }

        });

    }

}
运行截图:

Android学习07的更多相关文章
- Android 学习资源
下面这些资源对Android开发来说是很有帮助的! 最常用的: Android开发官方网站:http://developer.android.com/index.html 这个网站应该是Android ...
- Android学习资料收集
1.Android 学习之路 http://stormzhang.com/android/2014/07/07/learn-android-from-rookie/
- Android学习——windows下搭建NDK_r9环境
1. NDK(Native Development Kit) 1.1 NDK简介 Android NDK是一套允许开发人员使用本地代码(如C/C++)进行Android APP功能开发的工具,通过这个 ...
- Android 学习之路
转载:http://stormzhang.com/android/2014/07/07/learn-android-from-rookie/ 这篇博客背后的故事 一路走来很不容易,刚好知乎上被人邀请回 ...
- 10、android学习资源整理
1.github上整理好的开源工程 https://github.com/Trinea/android-open-project 2.最流行的android组件大全 http://colobu.com ...
- android学习系列:jercy——AI3 的博客
[android学习之十七]——特色功能2:桌面组件(快捷方式,实时文件夹) 二.桌面组件 1.快捷方式 Android手机上得快捷方式的意思可以以我们实际PC机器上程序的快捷方式来理解.而andro ...
- Android 学习之路和App开发框架
学习之路: 1. http://www.stormzhang.com/android/2014/07/07/learn-android-from-rookie/ 框架: 2. https://gith ...
- Android学习路线总结,绝对干货
title: Android学习路线总结,绝对干货 tags: Android学习路线,Android学习资料,怎么学习android grammar_cjkRuby: true --- 一.前言 不 ...
- Android学习——第一个NDK程序
在前面的学习中,我们已经讲解了关于NDK编程的环境搭建流程,简单的使用我们也通过官网本身自带的例子进行说明了.可是相信大家一定还存在这么的一个疑惑:“如果我要自己利用NDK编写一个Android应用, ...
随机推荐
- 解决 genymotion 安装apk报错 app contains ARM native code and your Genymotion device cannot run ARM instructions
1.某些APP安装在模拟器时提示“ this probably means that the app contains ARM native code and your Genymotion devi ...
- 自动构建自己的ASP.NET Core基础镜像
在开发过程中,我们可以根据自身情况来定制自己的基础镜像,以便加快CI\CD构建速度以及提高开发体验.这里我们就以ASP.NET Core的基础镜像为例来进行讲解. 本次教程代码见开源库:https:/ ...
- mssql 数据库 基本知识
数据库中禁用/启用标识列的自增长 SET IDENTITY_INSERT [ database_name . [ schema_name ] . ] table { ON | OFF } 恢复数据时要 ...
- IntelliJ IDEA 2017.3尚硅谷-----模板
https://www.jetbrains.com/help/idea/using-live-templates.html
- AcWing 799. 最长连续不重复子序列 双指针(一般先写一个朴素暴力的做法,然后看两个指针直接是否存在单调关系,如果存在,就想方法优化)
https://www.acwing.com/problem/content/801/ #include<bits/stdc++.h> using namespace std ; int ...
- setInterval 和 setTimeout 定时器
前端定时器 setInterval 和 setTimeout setInterval 循环执行 循环执行就是设置一个时间间隔,每过一段时间都会执行一次这个方法,直到这个定时器被销毁掉. 用法是setI ...
- awk从放弃到入门(2):awk分隔符
一.awk分隔符 awk的默认分割符是空格,但是,这样描述并不精确,因为,awk的分隔符还分为两种,"输入分隔符" 和 "输出分隔符" . (1)输入分隔符:英 ...
- winform学习(1)初识winform
winform是Windows窗体应用程序 在窗体设计界面 单击鼠标右键--查看代码,即可转到Form1.cs的代码界面 从代码界面转到窗体设计界面的三种快捷方法:①双击解决方案资源管理器的 For ...
- java把带小数点的字符串转换成int类型
String number ="1.0000"; int num =Double.valueOf(number).intValue();//转换为Int类型
- centos6.5下安装mysql数据库
centos6.5下安装mysql数据库 1.安装mysql数据库:yum install mysql-server 2.临时启动数据库:service mysqld start 3.开机启动数据库: ...