python 多线程,tthread模块比较底层,而threading模块是对thread做了一些包装,multithreading
Python多线程详解
1、多线程的理解
多进程和多线程都可以执行多个任务,线程是进程的一部分。线程的特点是线程之间可以共享内存和变量,资源消耗少(不过在Unix环境中,多进程和多线程资源调度消耗差距不明显,Unix调度较快),缺点是线程之间的同步和加锁比较麻烦。
2、Python多线程创建
在Python中,同样可以实现多线程,有两个标准模块thread和threading,不过我们主要使用更高级的threading模块。使用例子:
|
1
2
3
4
5
6
7
8
9
10
11
12
13
14
15
16
17
18
19
20
|
import threading
import time
def target():
print 'the curent threading %s is running' % threading.current_thread().name
time.sleep(1)
print 'the curent threading %s is ended' % threading.current_thread().name
print 'the curent threading %s is running' % threading.current_thread().name
t = threading.Thread(target=target)
t.start()
t.join()
print 'the curent threading %s is ended' % threading.current_thread().name
输出:
the curent threading MainThread is running
the curent threading Thread-1 is running
the curent threading Thread-1 is ended
the curent threading MainThread is ended
|
start是启动线程,join是阻塞当前线程,即使得在当前线程结束时,不会退出。从结果可以看到,主线程直到Thread-1结束之后才结束。
Python中,默认情况下,如果不加join语句,那么主线程不会等到当前线程结束才结束,但却不会立即杀死该线程。如不加join输出如下:
|
1
2
3
4
|
the curent threading MainThread is running
the curent threading Thread-1 is running
the curent threading MainThread is ended
the curent threading Thread-1 is ended
|
但如果为线程实例添加t.setDaemon(True)之后,如果不加join语句,那么当主线程结束之后,会杀死子线程。代码:
|
1
2
3
4
5
6
7
8
9
10
11
12
13
14
15
|
import threading
import time
def target():
print 'the curent threading %s is running' % threading.current_thread().name
time.sleep(4)
print 'the curent threading %s is ended' % threading.current_thread().name
print 'the curent threading %s is running' % threading.current_thread().name
t = threading.Thread(target=target)
t.setDaemon(True)
t.start()
t.join()
print 'the curent threading %s is ended' % threading.current_thread().name
输出如下:
the curent threading MainThread is running
the curent threading Thread-1 is runningthe curent threading MainThread is ended
|
如果加上join,并设置等待时间,就会等待线程一段时间再退出:
|
1
2
3
4
5
6
7
8
9
10
11
12
13
14
15
16
17
18
19
20
|
import threading
import time
def target():
print 'the curent threading %s is running' % threading.current_thread().name
time.sleep(4)
print 'the curent threading %s is ended' % threading.current_thread().name
print 'the curent threading %s is running' % threading.current_thread().name
t = threading.Thread(target=target)
t.setDaemon(True)
t.start()
t.join(1)
输出:
the curent threading MainThread is running
the curent threading Thread-1 is running
the curent threading MainThread is ended
主线程等待1秒,就自动结束,并杀死子线程。如果join不加等待时间,t.join(),就会一直等待,一直到子线程结束,输出如下:
the curent threading MainThread is running
the curent threading Thread-1 is running
the curent threading Thread-1 is ended
the curent threading MainThread is ended
|
3、线程锁和ThreadLocal
(1)线程锁
对于多线程来说,最大的特点就是线程之间可以共享数据,那么共享数据就会出现多线程同时更改一个变量,使用同样的资源,而出现死锁、数据错乱等情况。
假设有两个全局资源,a和b,有两个线程thread1,thread2. thread1占用a,想访问b,但此时thread2占用b,想访问a,两个线程都不释放此时拥有的资源,那么就会造成死锁。
对于该问题,出现了Lock。 当访问某个资源之前,用Lock.acquire()锁住资源,访问之后,用Lock.release()释放资源。
|
1
2
3
4
5
6
7
8
9
10
11
12
13
|
a = 3
lock = threading.Lock()
def target():
print 'the curent threading %s is running' % threading.current_thread().name
time.sleep(4)
global a
lock.acquire()
try:
a += 3
finally:
lock.release()
print 'the curent threading %s is ended' % threading.current_thread().name
print 'yes'
|
用finally的目的是防止当前线程无线占用资源。
(2)ThreadLocal
介绍完线程锁,接下来出场的是ThreadLocal。当不想将变量共享给其他线程时,可以使用局部变量,但在函数中定义局部变量会使得在函数之间传递特别麻烦。ThreadLocal是非常牛逼的东西,它解决了全局变量需要枷锁,局部变量传递麻烦的两个问题。通过在线程中定义:
local_school = threading.local()
此时这个local_school就变成了一个全局变量,但这个全局变量只在该线程中为全局变量,对于其他线程来说是局部变量,别的线程不可更改。 def process_thread(name):# 绑定ThreadLocal的student: local_school.student = name
这个student属性只有本线程可以修改,别的线程不可以。代码:
|
1
2
3
4
5
6
7
8
9
10
11
|
local = threading.local()
def func(name):
print 'current thread:%s' % threading.currentThread().name
local.name = name
print "%s in %s" % (local.name,threading.currentThread().name)
t1 = threading.Thread(target=func,args=('haibo',))
t2 = threading.Thread(target=func,args=('lina',))
t1.start()
t2.start()
t1.join()
t2.join()
|
从代码中也可以看到,可以将ThreadLocal理解成一个dict,可以绑定不同变量。
ThreadLocal用的最多的地方就是每一个线程处理一个HTTP请求,在Flask框架中利用的就是该原理,它使用的是基于Werkzeug的LocalStack。
4、Map实现多线程:
对于多线程的使用,我们经常是用thread来创建,比较繁琐:
|
1
2
3
4
5
6
7
8
9
10
11
12
13
14
15
16
17
18
19
20
|
class MyThread(threading.Thread):
def init(self):
threading.Thread.init(self)
def run(self):
lock.acquire()
print threading.currentThread().getName()
lock.release()
def build_worker(num):
workers = []
for t in range(num):
work = MyThread()
work.start()
workers.append(work)
return workers
def producer():
threads = build_worker(4)
for w in threads:
w.join()
print 'Done'
|
如果要创建更多的线程,那就要一一加到里面,操作麻烦,代码可读性也变差。在Python中,可以使用map函数简化代码。map可以实现多任务的并发,简单示例:
|
1
2
|
urls = ['http://www.baidu.com','http://www.sina.com','http://www.qq.com']
results=map(urllib2.urlopen,urls)
|
map将urls的每个元素当做参数分别传给urllib2.urlopen函数,并最后把结果放到results列表中,map 函数一手包办了序列操作、参数传递和结果保存等一系列的操作。 其原理:
map函数负责将线程分给不同的CPU。
在 Python 中有个两个库包含了 map 函数: multiprocessing 和它鲜为人知的子库 multiprocessing.dummy.dummy 是 multiprocessing 模块的完整克隆,唯一的不同在于 multiprocessing 作用于进程,而 dummy 模块作用于线程。代码:
|
1
2
3
4
5
6
7
8
9
10
11
12
13
14
|
import urllib2
from multiprocessing.dummy import Pool as ThreadPool
urls = ['http://www.baidu.com','http://www.sina.com','http://www.qq.com']
pool = ThreadPool()
results = pool.map(urllib2.urlopen,urls)
print results
pool.close()
pool.join()
print 'main ended'
|
- pool = ThreadPool()创建了线程池,其默认值为当前机器 CPU 的核数,可以指定线程池大小,不是越多越好,因为越多的话,线程之间的切换也是很消耗资源的。
- results = pool.map(urllib2.urlopen,urls) 该语句将不同的url传给各自的线程,并把执行后结果返回到results中。
代码清晰明了,巧妙得完成Threading模块完成的功能。
5、Python多线程的缺陷:
上面说了那么多关于多线程的用法,但Python多线程并不能真正能发挥作用,因为在Python中,有一个GIL,即全局解释锁,该锁的存在保证在同一个时间只能有一个线程执行任务,也就是多线程并不是真正的并发,只是交替得执行。假如有10个线程炮在10核CPU上,当前工作的也只能是一个CPU上的线程。
6、Python多线程的应用场景。
虽然Python多线程有缺陷,总被人说成是鸡肋,但也不是一无用处,它很适合用在IO密集型任务中。I/O密集型执行期间大部分是时间都用在I/O上,如数据库I/O,较少时间用在CPU计算上。因此该应用场景可以使用Python多线程,当一个任务阻塞在IO操作上时,我们可以立即切换执行其他线程上执行其他IO操作请求。
总结:Python多线程在IO密集型任务中还是很有用处的,而对于计算密集型任务,应该使用Python多进程。
目前python 提供了几种多线程实现方式 thread,threading,multithreading ,其中thread模块比较底层,而threading模块是对thread做了一些包装,可以更加方便的被使用。
2.7版本之前python对线程的支持还不够完善,不能利用多核CPU,但是2.7版本的python中已经考虑改进这点,出现了multithreading 模块。threading模块里面主要是对一些线程的操作对象化,创建Thread的class。一般来说,使用线程有两种模式:
A 创建线程要执行的函数,把这个函数传递进Thread对象里,让它来执行;
B 继承Thread类,创建一个新的class,将要执行的代码 写到run函数里面。
本文介绍两种实现方法。
第一种 创建函数并且传入Thread 对象中
t.py 脚本内容
- import threading,time
- from time import sleep, ctime
- def now() :
- return str( time.strftime( '%Y-%m-%d %H:%M:%S' , time.localtime() ) )
- def test(nloop, nsec):
- print 'start loop', nloop, 'at:', now()
- sleep(nsec)
- print 'loop', nloop, 'done at:', now()
- def main():
- print 'starting at:',now()
- threadpool=[]
- for i in xrange(10):
- th = threading.Thread(target= test,args= (i,2))
- threadpool.append(th)
- for th in threadpool:
- th.start()
- for th in threadpool :
- threading.Thread.join( th )
- print 'all Done at:', now()
- if __name__ == '__main__':
- main()
执行结果:

thclass.py 脚本内容:
- import threading ,time
- from time import sleep, ctime
- def now() :
- return str( time.strftime( '%Y-%m-%d %H:%M:%S' , time.localtime() ) )
- class myThread (threading.Thread) :
- """docstring for myThread"""
- def __init__(self, nloop, nsec) :
- super(myThread, self).__init__()
- self.nloop = nloop
- self.nsec = nsec
- def run(self):
- print 'start loop', self.nloop, 'at:', ctime()
- sleep(self.nsec)
- print 'loop', self.nloop, 'done at:', ctime()
- def main():
- thpool=[]
- print 'starting at:',now()
- for i in xrange(10):
- thpool.append(myThread(i,2))
- for th in thpool:
- th.start()
- for th in thpool:
- th.join()
- print 'all Done at:', now()
- if __name__ == '__main__':
- main()
执行结果:

单线程
在好些年前的MS-DOS时代,操作系统处理问题都是单任务的,我想做听音乐和看电影两件事儿,那么一定要先排一下顺序。
(好吧!我们不纠结在DOS时代是否有听音乐和看影的应用。^_^)

from time import ctime,sleep

def music():

    for i in range(2):

        print "I was listening to music. %s" %ctime()

        sleep(1)

def move():

    for i in range(2):

        print "I was at the movies! %s" %ctime()

        sleep(5)

if __name__ == '__main__':

    music()

    move()

    print "all over %s" %ctime()

我们先听了一首音乐,通过for循环来控制音乐的播放了两次,每首音乐播放需要1秒钟,sleep()来控制音乐播放的时长。接着我们又看了一场电影,
每一场电影需要5秒钟,因为太好看了,所以我也通过for循环看两遍。在整个休闲娱乐活动结束后,我通过
print "all over %s" %ctime()
看了一下当前时间,差不多该睡觉了。
运行结果:

>>=========================== RESTART ================================

>>>

I was listening to music. Thu Apr 17 10:47:08 2014

I was listening to music. Thu Apr 17 10:47:09 2014

I was at the movies! Thu Apr 17 10:47:10 2014

I was at the movies! Thu Apr 17 10:47:15 2014

all over Thu Apr 17 10:47:20 2014

其实,music()和move()更应该被看作是音乐和视频播放器,至于要播放什么歌曲和视频应该由我们使用时决定。所以,我们对上面代码做了改造:

#coding=utf-8

import threading

from time import ctime,sleep

def music(func):

    for i in range(2):

        print "I was listening to %s. %s" %(func,ctime())

        sleep(1)

def move(func):

    for i in range(2):

        print "I was at the %s! %s" %(func,ctime())

        sleep(5)

if __name__ == '__main__':

    music(u'爱情买卖')

    move(u'阿凡达')

    print "all over %s" %ctime()

对music()和move()进行了传参处理。体验中国经典歌曲和欧美大片文化。
运行结果:

>>> ======================== RESTART ================================

>>>

I was listening to 爱情买卖. Thu Apr 17 11:48:59 2014

I was listening to 爱情买卖. Thu Apr 17 11:49:00 2014

I was at the 阿凡达! Thu Apr 17 11:49:01 2014

I was at the 阿凡达! Thu Apr 17 11:49:06 2014

all over Thu Apr 17 11:49:11 2014

多线程
科技在发展,时代在进步,我们的CPU也越来越快,CPU抱怨,P大点事儿占了我一定的时间,其实我同时干多个活都没问题的;于是,操作系统就进入了多任务时代。我们听着音乐吃着火锅的不在是梦想。
python提供了两个模块来实现多线程thread 和threading ,thread 有一些缺点,在threading 得到了弥补,为了不浪费你和时间,所以我们直接学习threading 就可以了。
继续对上面的例子进行改造,引入threadring来同时播放音乐和视频:

#coding=utf-8

import threading

from time import ctime,sleep

def music(func):

    for i in range(2):

        print "I was listening to %s. %s" %(func,ctime())

        sleep(1)

def move(func):

    for i in range(2):

        print "I was at the %s! %s" %(func,ctime())

        sleep(5)

threads = []

t1 = threading.Thread(target=music,args=(u'爱情买卖',))

threads.append(t1)

t2 = threading.Thread(target=move,args=(u'阿凡达',))

threads.append(t2)

if __name__ == '__main__':

    for t in threads:

        t.setDaemon(True)

        t.start()

    print "all over %s" %ctime()

import threading
首先导入threading 模块,这是使用多线程的前提。
threads = []
t1 = threading.Thread(target=music,args=(u'爱情买卖',))
threads.append(t1)
创建了threads数组,创建线程t1,使用threading.Thread()方法,在这个方法中调用music方法target=music,args方法对music进行传参。 把创建好的线程t1装到threads数组中。
接着以同样的方式创建线程t2,并把t2也装到threads数组。
for t in threads:
t.setDaemon(True)
t.start()
最后通过for循环遍历数组。(数组被装载了t1和t2两个线程)
setDaemon()
setDaemon(True)将线程声明为守护线程,必须在start() 方法调用之前设置,如果不设置为守护线程程序会被无限挂起。子线程启动后,父线程也继续执行下去,当父线程执行完最后一条语句print "all over %s" %ctime()后,没有等待子线程,直接就退出了,同时子线程也一同结束。
start()
开始线程活动。
运行结果:
>>> ========================= RESTART ================================

>>>

I was listening to 爱情买卖. Thu Apr 17 12:51:45 2014 I was at the 阿凡达! Thu Apr 17 12:51:45 2014  all over Thu Apr 17 12:51:45 2014
从执行结果来看,子线程(muisc 、move )和主线程(print "all over %s" %ctime())都是同一时间启动,但由于主线程执行完结束,所以导致子线程也终止。
继续调整程序:

...

if __name__ == '__main__':

    for t in threads:

        t.setDaemon(True)

        t.start()

    t.join()

    print "all over %s" %ctime()

我们只对上面的程序加了个join()方法,用于等待线程终止。join()的作用是,在子线程完成运行之前,这个子线程的父线程将一直被阻塞。
注意: join()方法的位置是在for循环外的,也就是说必须等待for循环里的两个进程都结束后,才去执行主进程。
运行结果:

>>> ========================= RESTART ================================

>>>

I was listening to 爱情买卖. Thu Apr 17 13:04:11 2014  I was at the 阿凡达! Thu Apr 17 13:04:11 2014

I was listening to 爱情买卖. Thu Apr 17 13:04:12 2014

I was at the 阿凡达! Thu Apr 17 13:04:16 2014

all over Thu Apr 17 13:04:21 2014

从执行结果可看到,music 和move 是同时启动的。
开始时间4分11秒,直到调用主进程为4分22秒,总耗时为10秒。从单线程时减少了2秒,我们可以把music的sleep()的时间调整为4秒。

...

def music(func):

    for i in range(2):

        print "I was listening to %s. %s" %(func,ctime())

        sleep(4)

...

执行结果:

>>> ====================== RESTART ================================

>>>

I was listening to 爱情买卖. Thu Apr 17 13:11:27 2014I was at the 阿凡达! Thu Apr 17 13:11:27 2014

I was listening to 爱情买卖. Thu Apr 17 13:11:31 2014

I was at the 阿凡达! Thu Apr 17 13:11:32 2014

all over Thu Apr 17 13:11:37 2014

子线程启动11分27秒,主线程运行11分37秒。
虽然music每首歌曲从1秒延长到了4 ,但通多程线的方式运行脚本,总的时间没变化。
本文从感性上让你快速理解python多线程的使用,更详细的使用请参考其它文档或资料。
==========================================================
class threading.Thread()说明:
class threading.Thread(group=None, target=None, name=None, args=(), kwargs={})
This constructor should always be called with keyword arguments. Arguments are:
group should be None; reserved for future extension when a ThreadGroup class is implemented.
target is the callable object to be invoked by the run() method. Defaults to None, meaning nothing is called.
name is the thread name. By default, a unique name is constructed of the form “Thread-N” where N is a small decimal number.
args is the argument tuple for the target invocation. Defaults to ().
kwargs is a dictionary of keyword arguments for the target invocation. Defaults to {}.
If the subclass overrides the constructor, it must make sure to invoke the base class constructor (Thread.__init__()) before doing
anything else to the thread.
Python代码代码的执行由python虚拟机(也叫解释器主循环)来控制。Python在设计之初就考虑到要在主循环中,同时只有一个线 程在执行,就像单CPU的系统中运行多个进程那样,内存中可以存放多个程序,但任意时候,只有一个程序在CPU中运行。同样,虽然python解释器可以 “运行”多个线程,但在任意时刻,只有一个线程在解释器中运行。
对python虚拟机的访问由全局解释器锁(GIL)来控制,这个GIL能保证同一时刻只有一个线程在运行。在多线程环境中,python虚拟机按以下方式执行:
1 设置GIL
2 切换到一个线程去运行
3 运行:(a.指定数量的字节码指令,或者b.线程主动让出控制(可以调用time.sleep()))
4 把线程设置为睡眠状态
5 解锁GIL
6 重复以上所有步骤
那么为什么要提出多线程呢?我们首先看一个单线程的例子。
from time import sleep,ctime
def loop0():
print 'start loop 0 at:',ctime()
sleep(4)
print 'loop 0 done at:',ctime()
def loop1():
print 'start loop 1 at:',ctime()
sleep(2)
print 'loop 1 done at:',ctime()
def main():
print 'starting at:',ctime()
loop0()
loop1()
print 'all DONE at:',ctime()
if __name__=='__main__':
main()
运行结果:
>>>
starting at: Mon Aug 31 10:27:23 2009
start loop 0 at: Mon Aug 31 10:27:23 2009
loop 0 done at: Mon Aug 31 10:27:27 2009
start loop 1 at: Mon Aug 31 10:27:27 2009
loop 1 done at: Mon Aug 31 10:27:29 2009
all DONE at: Mon Aug 31 10:27:29 2009
>>>
可以看到单线程中的两个循环, 只有一个循环结束后另一个才开始。 总共用了6秒多的时间。假设两个loop中执行的不是sleep,而是一个别的运算的话,如果我们能让这些运算并行执行的话,是不是可以减少总的运行时间呢,这就是我们提出多线程的前提。
Python中的多线程模块:thread,threading,Queue。
1 thread ,这个模块一般不建议使用。下面我们直接把以上的例子改一下,演示一下。
from time import sleep,ctime
import thread
def loop0():
print 'start loop 0 at:',ctime()
sleep(4)
print 'loop 0 done at:',ctime()
def loop1():
print 'start loop 1 at:',ctime()
sleep(2)
print 'loop 1 done at:',ctime()
def main():
print 'starting at:',ctime()
thread.start_new_thread(loop0,())
thread.start_new_thread(loop1,())
sleep(6)
print 'all DONE at:',ctime()
if __name__=='__main__':
main()
运行结果:
>>>
starting at: Mon Aug 31 11:04:39 2009
start loop 0 at: Mon Aug 31 11:04:39 2009
start loop 1 at: Mon Aug 31 11:04:39 2009
loop 1 done at: Mon Aug 31 11:04:41 2009
loop 0 done at: Mon Aug 31 11:04:43 2009
all DONE at: Mon Aug 31 11:04:45 2009
>>>
可以看到实际是运行了4秒两个loop就完成了。效率确实提高了。
2 threading模块
首先看一下threading模块中的对象:
Thread :表示一个线程的执行的对象
Lock :锁原语对象
RLock :可重入锁对象。使单线程可以再次获得已经获得的锁
Condition :条件变量对象能让一个线程停下来,等待其他线程满足了某个“条件”,如状态的改变或值的改变
Event :通用的条件变量。多个线程可以等待某个事件发生,在事件发生后,所有的线程都被激活
Semaphore :为等待锁的线程提供一个类似“等候室”的结构
BoundedSemaphore :与semaphore类似,只是它不允许超过初始值
Timer : 与Thread类似,只是,它要等待一段时间后才开始运行
其中Thread类是你主要的运行对象,它有很多函数,用它你可以用多种方法来创建线程,常用的为以下三种。
创建一个Thread的实例,传给它一个函数
创建一个Thread实例,传给它一个可调用的类对象
从Thread派生出一个子类,创建一个这个子类的实例
Thread类的函数有:
getName(self) 返回线程的名字
|
| isAlive(self) 布尔标志,表示这个线程是否还在运行中
|
| isDaemon(self) 返回线程的daemon标志
|
| join(self, timeout=None) 程序挂起,直到线程结束,如果给出timeout,则最多阻塞timeout秒
|
| run(self) 定义线程的功能函数
|
| setDaemon(self, daemonic) 把线程的daemon标志设为daemonic
|
| setName(self, name) 设置线程的名字
|
| start(self) 开始线程执行
下面看一个例子:(方法一:创建Thread实例,传递一个函数给它)
import threading
from time import sleep,ctime
loops=[4,2]
def loop(nloop,nsec):
print 'start loop',nloop,'at:',ctime()
sleep(nsec)
print 'loop',nloop,'done at:',ctime()
def main():
print 'starting at:',ctime()
threads=[]
nloops=range(len(loops))
for i in nloops:
t=threading.Thread(target=loop,args=(i,loops[i]))
threads.append(t)
for i in nloops:
threads[i].start()
for i in nloops:
threads[i].join()
print 'all done at:',ctime()
if __name__=='__main__':
main()
可以看到第一个for循环,我们创建了两个线程,这里用到的是给Thread类传递了函数,把两个线程保存到threads列表中,第二个for循环是让两个线程开始执行。然后再让每个线程分别调用join函数,使程序挂起,直至两个线程结束。
另外的例子:(方法二:创建一个实例,传递一个可调用的类的对象)
import threading
from time import sleep,ctime
loops=[4,2]
class ThreadFunc(object):
def __init__(self,func,args,name=''):
self.name=name
self.func=func
self.args=args
def __call__(self):
self.res=self.func(*self.args)
def loop(nloop,nsec):
print 'start loop',nloop,'at:',ctime()
sleep(nsec)
print 'loop',nloop,'done at:',ctime()
def main():
print 'starting at:',ctime()
threads=[]
nloops=range(len(loops))
for i in nloops:
t=threading.Thread(target=ThreadFunc(loop,(i,loops[i]),loop.__name__))
threads.append(t)
for i in nloops:
threads[i].start()
for i in nloops:
threads[i].join()
print 'all done at:',ctime()
if __name__=='__main__':
main()
最后的方法:(方法三:创建一个这个子类的实例)
import threading
from time import sleep,ctime
loops=(4,2)
class MyThread(threading.Thread):
def __init__(self,func,args,name=''):
threading.Thread.__init__(self)
self.name=name
self.func=func
self.args=args
def run(self):
apply(self.func,self.args)
def loop(nloop,nsec):
print 'start loop',nloop,'at:',ctime()
sleep(nsec)
print 'loop',nloop,'done at:',ctime()
def main():
print 'starting at:',ctime()
threads=[]
nloops=range(len(loops))
for i in nloops:
t=MyThread(loop,(i,loops[i]),loop.__name__)
threads.append(t)
for i in nloops:
threads[i].start()
for i in nloops:
threads[i].join()
print 'all done at:',ctime()
if __name__=='__main__':
main()
另外我们可以把MyThread单独编成一个脚本模块,然后我们可以在别的程序里导入这个模块直接使用。
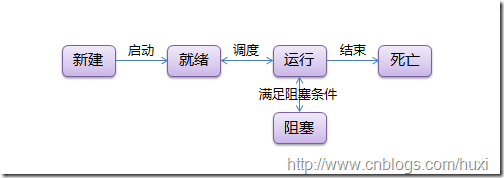
1.1. 线程状态
线程有5种状态,状态转换的过程如下图所示:
1.2. 线程同步(锁)
多 线程的优势在于可以同时运行多个任务(至少感觉起来是这样)。但是当线程需要共享数据时,可能存在数据不同步的问题。考虑这样一种情况:一个列表里所有元 素都是0,线程"set"从后向前把所有元素改成1,而线程"print"负责从前往后读取列表并打印。那么,可能线程"set"开始改的时候,线 程"print"便来打印列表了,输出就成了一半0一半1,这就是数据的不同步。为了避免这种情况,引入了锁的概念。
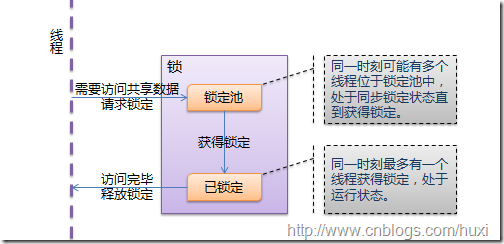
锁有两种状态—— 锁定和未锁定。每当一个线程比如"set"要访问共享数据时,必须先获得锁定;如果已经有别的线程比如"print"获得锁定了,那么就让线程"set" 暂停,也就是同步阻塞;等到线程"print"访问完毕,释放锁以后,再让线程"set"继续。经过这样的处理,打印列表时要么全部输出0,要么全部输出 1,不会再出现一半0一半1的尴尬场面。
线程与锁的交互如下图所示:
1.3. 线程通信(条件变量)
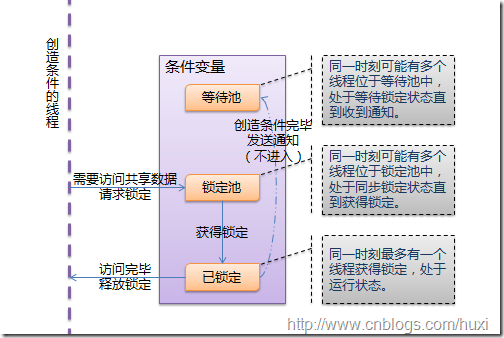
然 而还有另外一种尴尬的情况:列表并不是一开始就有的;而是通过线程"create"创建的。如果"set"或者"print" 在"create"还没有运行的时候就访问列表,将会出现一个异常。使用锁可以解决这个问题,但是"set"和"print"将需要一个无限循环——他们 不知道"create"什么时候会运行,让"create"在运行后通知"set"和"print"显然是一个更好的解决方案。于是,引入了条件变量。
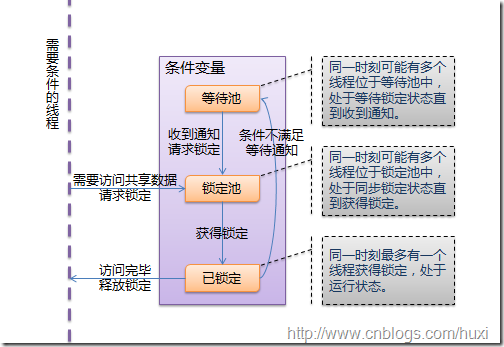
条件变量允许线程比如"set"和"print"在条件不满足的时候(列表为None时)等待,等到条件满足的时候(列表已经创建)发出一个通知,告诉"set" 和"print"条件已经有了,你们该起床干活了;然后"set"和"print"才继续运行。
线程与条件变量的交互如下图所示:
1.4. 线程运行和阻塞的状态转换
最后看看线程运行和阻塞状态的转换。
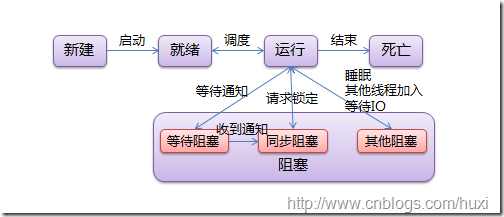
阻塞有三种情况:
同步阻塞是指处于竞争锁定的状态,线程请求锁定时将进入这个状态,一旦成功获得锁定又恢复到运行状态;
等待阻塞是指等待其他线程通知的状态,线程获得条件锁定后,调用“等待”将进入这个状态,一旦其他线程发出通知,线程将进入同步阻塞状态,再次竞争条件锁定;
而其他阻塞是指调用time.sleep()、anotherthread.join()或等待IO时的阻塞,这个状态下线程不会释放已获得的锁定。
tips: 如果能理解这些内容,接下来的主题将是非常轻松的;并且,这些内容在大部分流行的编程语言里都是一样的。(意思就是非看懂不可 >_< 嫌作者水平低找别人的教程也要看懂)
2. thread
Python通过两个标准库thread和threading提供对线程的支持。thread提供了低级别的、原始的线程以及一个简单的锁。
|
1
2
3
4
5
6
7
8
9
10
11
12
13
14
15
16
17
18
19
20
21
22
23
24
25
26
27
28
29
30
31
32
33
34
35
36
37
38
39
40
|
# encoding: UTF-8import threadimport time# 一个用于在线程中执行的函数def func(): for i in range(5): print 'func' time.sleep(1) # 结束当前线程 # 这个方法与thread.exit_thread()等价 thread.exit() # 当func返回时,线程同样会结束 # 启动一个线程,线程立即开始运行# 这个方法与thread.start_new_thread()等价# 第一个参数是方法,第二个参数是方法的参数thread.start_new(func, ()) # 方法没有参数时需要传入空tuple# 创建一个锁(LockType,不能直接实例化)# 这个方法与thread.allocate_lock()等价lock = thread.allocate()# 判断锁是锁定状态还是释放状态print lock.locked()# 锁通常用于控制对共享资源的访问count = 0# 获得锁,成功获得锁定后返回True# 可选的timeout参数不填时将一直阻塞直到获得锁定# 否则超时后将返回Falseif lock.acquire(): count += 1 # 释放锁 lock.release()# thread模块提供的线程都将在主线程结束后同时结束time.sleep(6) |
thread 模块提供的其他方法:
thread.interrupt_main(): 在其他线程中终止主线程。
thread.get_ident(): 获得一个代表当前线程的魔法数字,常用于从一个字典中获得线程相关的数据。这个数字本身没有任何含义,并且当线程结束后会被新线程复用。
thread还提供了一个ThreadLocal类用于管理线程相关的数据,名为 thread._local,threading中引用了这个类。
由于thread提供的线程功能不多,无法在主线程结束后继续运行,不提供条件变量等等原因,一般不使用thread模块,这里就不多介绍了。
3. threading
threading基于Java的线程模型设计。锁(Lock)和条件变量(Condition)在Java中是对象的基本行为(每一个对象都自带
了锁和条件变量),而在Python中则是独立的对象。Python Thread提供了Java
Thread的行为的子集;没有优先级、线程组,线程也不能被停止、暂停、恢复、中断。Java
Thread中的部分被Python实现了的静态方法在threading中以模块方法的形式提供。
threading 模块提供的常用方法:
threading.currentThread(): 返回当前的线程变量。
threading.enumerate(): 返回一个包含正在运行的线程的list。正在运行指线程启动后、结束前,不包括启动前和终止后的线程。
threading.activeCount(): 返回正在运行的线程数量,与len(threading.enumerate())有相同的结果。
threading模块提供的类:
Thread, Lock, Rlock, Condition, [Bounded]Semaphore, Event, Timer, local.
3.1. Thread
Thread是线程类,与Java类似,有两种使用方法,直接传入要运行的方法或从Thread继承并覆盖run():
|
1
2
3
4
5
6
7
8
9
10
11
12
13
14
15
16
17
|
# encoding: UTF-8import threading# 方法1:将要执行的方法作为参数传给Thread的构造方法def func(): print 'func() passed to Thread't = threading.Thread(target=func)t.start()# 方法2:从Thread继承,并重写run()class MyThread(threading.Thread): def run(self): print 'MyThread extended from Thread't = MyThread()t.start() |
构造方法:
Thread(group=None, target=None, name=None, args=(), kwargs={})
group: 线程组,目前还没有实现,库引用中提示必须是None;
target: 要执行的方法;
name: 线程名;
args/kwargs: 要传入方法的参数。
实例方法:
isAlive(): 返回线程是否在运行。正在运行指启动后、终止前。
get/setName(name): 获取/设置线程名。
is/setDaemon(bool): 获取/设置是否守护线程。初始值从创建该线程的线程继承。当没有非守护线程仍在运行时,程序将终止。
start(): 启动线程。
join([timeout]): 阻塞当前上下文环境的线程,直到调用此方法的线程终止或到达指定的timeout(可选参数)。
一个使用join()的例子:
|
1
2
3
4
5
6
7
8
9
10
11
12
13
14
15
16
17
18
19
20
21
22
23
|
# encoding: UTF-8import threadingimport timedef context(tJoin): print 'in threadContext.' tJoin.start() # 将阻塞tContext直到threadJoin终止。 tJoin.join() # tJoin终止后继续执行。 print 'out threadContext.'def join(): print 'in threadJoin.' time.sleep(1) print 'out threadJoin.'tJoin = threading.Thread(target=join)tContext = threading.Thread(target=context, args=(tJoin,))tContext.start() |
运行结果:
in threadContext.
in threadJoin.out threadJoin.
out threadContext.
3.2. Lock
Lock(指令锁)是可用的最低级的同步指令。Lock处于锁定状态时,不被特定的线程拥有。Lock包含两种状态——锁定和非锁定,以及两个基本的方法。
可以认为Lock有一个锁定池,当线程请求锁定时,将线程至于池中,直到获得锁定后出池。池中的线程处于状态图中的同步阻塞状态。
构造方法:
Lock()
实例方法:
acquire([timeout]): 使线程进入同步阻塞状态,尝试获得锁定。
release(): 释放锁。使用前线程必须已获得锁定,否则将抛出异常。
|
1
2
3
4
5
6
7
8
9
10
11
12
13
14
15
16
17
18
19
20
21
22
23
24
25
26
27
28
29
|
# encoding: UTF-8import threadingimport timedata = 0lock = threading.Lock()def func(): global data print '%s acquire lock...' % threading.currentThread().getName() # 调用acquire([timeout])时,线程将一直阻塞, # 直到获得锁定或者直到timeout秒后(timeout参数可选)。 # 返回是否获得锁。 if lock.acquire(): print '%s get the lock.' % threading.currentThread().getName() data += 1 time.sleep(2) print '%s release lock...' % threading.currentThread().getName() # 调用release()将释放锁。 lock.release()t1 = threading.Thread(target=func)t2 = threading.Thread(target=func)t3 = threading.Thread(target=func)t1.start()t2.start()t3.start() |
3.3. RLock
RLock(可重入锁)是一个可以被同一个线程请求多次的同步指令。RLock使用了“拥有的线程”和“递归等级”的概念,处于锁定状态时,RLock被某个线程拥有。拥有RLock的线程可以再次调用acquire(),释放锁时需要调用release()相同次数。
可以认为RLock包含一个锁定池和一个初始值为0的计数器,每次成功调用 acquire()/release(),计数器将+1/-1,为0时锁处于未锁定状态。
构造方法:
RLock()
实例方法:
acquire([timeout])/release(): 跟Lock差不多。
|
1
2
3
4
5
6
7
8
9
10
11
12
13
14
15
16
17
18
19
20
21
22
23
24
25
26
27
28
29
30
31
32
33
34
|
# encoding: UTF-8import threadingimport timerlock = threading.RLock()def func(): # 第一次请求锁定 print '%s acquire lock...' % threading.currentThread().getName() if rlock.acquire(): print '%s get the lock.' % threading.currentThread().getName() time.sleep(2) # 第二次请求锁定 print '%s acquire lock again...' % threading.currentThread().getName() if rlock.acquire(): print '%s get the lock.' % threading.currentThread().getName() time.sleep(2) # 第一次释放锁 print '%s release lock...' % threading.currentThread().getName() rlock.release() time.sleep(2) # 第二次释放锁 print '%s release lock...' % threading.currentThread().getName() rlock.release()t1 = threading.Thread(target=func)t2 = threading.Thread(target=func)t3 = threading.Thread(target=func)t1.start()t2.start()t3.start() |
3.4. Condition
Condition(条件变量)通常与一个锁关联。需要在多个Contidion中共享一个锁时,可以传递一个Lock/RLock实例给构造方法,否则它将自己生成一个RLock实例。
可以认为,除了Lock带有的锁定池外,Condition还包含一个等待池,池中的线程处于状态图中的等待阻塞状态,直到另一个线程调用notify()/notifyAll()通知;得到通知后线程进入锁定池等待锁定。
构造方法:
Condition([lock/rlock])
实例方法:
acquire([timeout])/release(): 调用关联的锁的相应方法。
wait([timeout]): 调用这个方法将使线程进入Condition的等待池等待通知,并释放锁。使用前线程必须已获得锁定,否则将抛出异常。
notify(): 调用这个方法将从等待池挑选一个线程并通知,收到通知的线程将自动调用acquire()尝试获得锁定(进入锁定池);其他线程仍然在等待池中。调用这个方法不会释放锁定。使用前线程必须已获得锁定,否则将抛出异常。
notifyAll(): 调用这个方法将通知等待池中所有的线程,这些线程都将进入锁定池尝试获得锁定。调用这个方法不会释放锁定。使用前线程必须已获得锁定,否则将抛出异常。
例子是很常见的生产者/消费者模式:
|
1
2
3
4
5
6
7
8
9
10
11
12
13
14
15
16
17
18
19
20
21
22
23
24
25
26
27
28
29
30
31
32
33
34
35
36
37
38
39
40
41
42
43
44
45
46
47
|
# encoding: UTF-8import threadingimport time# 商品product = None# 条件变量con = threading.Condition()# 生产者方法def produce(): global product if con.acquire(): while True: if product is None: print 'produce...' product = 'anything' # 通知消费者,商品已经生产 con.notify() # 等待通知 con.wait() time.sleep(2)# 消费者方法def consume(): global product if con.acquire(): while True: if product is not None: print 'consume...' product = None # 通知生产者,商品已经没了 con.notify() # 等待通知 con.wait() time.sleep(2)t1 = threading.Thread(target=produce)t2 = threading.Thread(target=consume)t2.start()t1.start() |
3.5. Semaphore/BoundedSemaphore
Semaphore(信号量)是计算机科学史上最古老的同步指令之一。Semaphore管理一个内置的计数器,每当调用acquire()时
-1,调用release()
时+1。计数器不能小于0;当计数器为0时,acquire()将阻塞线程至同步锁定状态,直到其他线程调用release()。
基于这个特点,Semaphore经常用来同步一些有“访客上限”的对象,比如连接池。
BoundedSemaphore 与Semaphore的唯一区别在于前者将在调用release()时检查计数器的值是否超过了计数器的初始值,如果超过了将抛出一个异常。
构造方法:
Semaphore(value=1): value是计数器的初始值。
实例方法:
acquire([timeout]): 请求Semaphore。如果计数器为0,将阻塞线程至同步阻塞状态;否则将计数器-1并立即返回。
release(): 释放Semaphore,将计数器+1,如果使用BoundedSemaphore,还将进行释放次数检查。release()方法不检查线程是否已获得 Semaphore。
|
1
2
3
4
5
6
7
8
9
10
11
12
13
14
15
16
17
18
19
20
21
22
23
24
25
26
27
28
29
30
31
32
33
34
35
|
# encoding: UTF-8import threadingimport time# 计数器初值为2semaphore = threading.Semaphore(2)def func(): # 请求Semaphore,成功后计数器-1;计数器为0时阻塞 print '%s acquire semaphore...' % threading.currentThread().getName() if semaphore.acquire(): print '%s get semaphore' % threading.currentThread().getName() time.sleep(4) # 释放Semaphore,计数器+1 print '%s release semaphore' % threading.currentThread().getName() semaphore.release()t1 = threading.Thread(target=func)t2 = threading.Thread(target=func)t3 = threading.Thread(target=func)t4 = threading.Thread(target=func)t1.start()t2.start()t3.start()t4.start()time.sleep(2)# 没有获得semaphore的主线程也可以调用release# 若使用BoundedSemaphore,t4释放semaphore时将抛出异常print 'MainThread release semaphore without acquire'semaphore.release() |
3.6. Event
Event(事件)是最简单的线程通信机制之一:一个线程通知事件,其他线程等待事件。Event内置了一个初始为False的标志,当调用set()时设为True,调用clear()时重置为 False。wait()将阻塞线程至等待阻塞状态。
Event其实就是一个简化版的 Condition。Event没有锁,无法使线程进入同步阻塞状态。
构造方法:
Event()
实例方法:
isSet(): 当内置标志为True时返回True。
set(): 将标志设为True,并通知所有处于等待阻塞状态的线程恢复运行状态。
clear(): 将标志设为False。
wait([timeout]): 如果标志为True将立即返回,否则阻塞线程至等待阻塞状态,等待其他线程调用set()。
|
1
2
3
4
5
6
7
8
9
10
11
12
13
14
15
16
17
18
19
20
21
22
23
24
|
# encoding: UTF-8import threadingimport timeevent = threading.Event()def func(): # 等待事件,进入等待阻塞状态 print '%s wait for event...' % threading.currentThread().getName() event.wait() # 收到事件后进入运行状态 print '%s recv event.' % threading.currentThread().getName()t1 = threading.Thread(target=func)t2 = threading.Thread(target=func)t1.start()t2.start()time.sleep(2)# 发送事件通知print 'MainThread set event.'event.set() |
3.7. Timer
Timer(定时器)是Thread的派生类,用于在指定时间后调用一个方法。
构造方法:
Timer(interval, function, args=[], kwargs={})
interval: 指定的时间
function: 要执行的方法
args/kwargs: 方法的参数
实例方法:
Timer从Thread派生,没有增加实例方法。
|
1
2
3
4
5
6
7
8
|
# encoding: UTF-8import threadingdef func(): print 'hello timer!'timer = threading.Timer(5, func)timer.start() |
3.8. local
local是一个小写字母开头的类,用于管理 thread-local(线程局部的)数据。对于同一个local,线程无法访问其他线程设置的属性;线程设置的属性不会被其他线程设置的同名属性替换。
可以把local看成是一个“线程-属性字典”的字典,local封装了从自身使用线程作为 key检索对应的属性字典、再使用属性名作为key检索属性值的细节。
|
1
2
3
4
5
6
7
8
9
10
11
12
13
14
15
|
# encoding: UTF-8import threadinglocal = threading.local()local.tname = 'main'def func(): local.tname = 'notmain' print local.tnamet1 = threading.Thread(target=func)t1.start()t1.join()print local.tname |
熟练掌握Thread、Lock、Condition就可以应对绝大多数需要使用线程的场合,某些情况下local也是非常有用的东西。本文的最后使用这几个类展示线程基础中提到的场景:
|
1
2
3
4
5
6
7
8
9
10
11
12
13
14
15
16
17
18
19
20
21
22
23
24
25
26
27
28
29
30
31
32
33
34
35
36
37
|
# encoding: UTF-8import threadingalist = Nonecondition = threading.Condition()def doSet(): if condition.acquire(): while alist is None: condition.wait() for i in range(len(alist))[::-1]: alist[i] = 1 condition.release()def doPrint(): if condition.acquire(): while alist is None: condition.wait() for i in alist: print i, print condition.release()def doCreate(): global alist if condition.acquire(): if alist is None: alist = [0 for i in range(10)] condition.notifyAll() condition.release()tset = threading.Thread(target=doSet,name='tset')tprint = threading.Thread(target=doPrint,name='tprint')tcreate = threading.Thread(target=doCreate,name='tcreate')tset.start()tprint.start()tcreate.start() |
Python多线程学习
一.创建线程
1.通过thread模块中的start_new_thread(func,args)创建线程:
在Eclipse+pydev中敲出以下代码:
- # -*- coding: utf-8 -*-
- import thread
- def run_thread(n):
- for i in range(n):
- print i
- thread.start_new_thread(run_thread,(4,)) #参数一定是元组,两个参数可以写成(a,b)
运行报错如下:
- Unhandled exception in thread started by
- sys.excepthook is missing
- lost sys.stderr
网上查出原因是不建议使用thread,然后我在pythonGUI中做了测试,测试结果如下,显然python是支持thread创建多线程的,在pydev中出错原因暂时不明。
- >>> import thread
- >>> def run(n):
- for i in range(n):
- print i
- >>> thread.start_new_thread(run,(4,))
- 98520
- 1
- >>>
- 2
- 3
2.通过继承threading.Thread创建线程,以下示例创建了两个线程
- # -*- coding: utf-8 -*-
- '''''
- Created on 2012-8-8
- @author: jeromewei
- '''
- from threading import Thread
- import time
- class race(Thread):
- def __init__(self,threadname,interval):
- Thread.__init__(self,name=threadname)
- self.interval = interval
- self.isrunning = True
- def run(self): #重写threading.Thread中的run()
- while self.isrunning:
- print 'thread %s is running,time:%s\n' %(self.getName(),time.ctime()) #获得线程的名称和当前时间
- time.sleep(self.interval)
- def stop(self):
- self.isrunning = False
- def test():
- thread1 = race('A',1)
- thread2 = race('B',2)
- thread1.start()
- thread2.start()
- time.sleep(5)
- thread1.stop()
- thread2.stop()
- if __name__ =='__main__':
- test()
3. 在threading.Thread中指定目标函数作为线程处理函数
- # -*- coding: utf-8 -*-
- from threading import Thread
- def run_thread(n):
- for i in range(n):
- print i
- t1 = Thread(target=run_thread,args=(5,))#指定目标函数,传入参数,这里参数也是元组
- t1.start() #启动线程
二. threading.Thread中常用函数说明
| 函数名 | 功能 |
| run() | 如果采用方法2创建线程就需要重写该方法 |
| getName() | 获得线程的名称(方法2中有示例) |
| setName() | 设置线程的名称 |
| start() | 启动线程 |
| join(timeout) | 在join()位置等待另一线程结束后再继续运行join()后的操作,timeout是可选项,表示最大等待时间 |
| setDaemon(bool) | True:当父线程结束时,子线程立即结束;False:父线程等待子线程结束后才结束。默认为False |
| isDaemon() | 判断子线程是否和父线程一起结束,即setDaemon()设置的值 |
| isAlive() | 判断线程是否在运行 |
以上方法中,我将对join()和setDaemon(bool)作着重介绍,示例如下:
(1)join方法:
- # -*- coding: utf-8 -*-
- import threading
- import time #导入time模块
- class Mythread(threading.Thread):
- def __init__(self,threadname):
- threading.Thread.__init__(self,name = threadname)
- def run(self):
- time.sleep(2)
- for i in range(5):
- print '%s is running····'%self.getName()
- t2 = Mythread('B')
- t2.start()
- #t2.join()
- for i in range(5):
- print 'the program is running···'
这时的程序流程是:主线程先运行完,然后等待B线程运行,所以输出结果为:
- the program is running···
- the program is running···
- the program is running···
- B is running····
- B is running····
- B is running····
如果启用t2.join()
,这时程序的运行流程是:当主线程运行到
t2.join()
时,它将等待
t2
运行完,然后再继续运行
t2.join()
后的操作,呵呵,你懂了吗,所以输出结果为:
- B is running····
- B is running····
- B is running····
- the program is running···
- the program is running···
- the program is running···
(2)setDaemon方法:
- # -*- coding: utf-8 -*-
- import threading
- import time
- class myThread(threading.Thread):
- def __init__(self, threadname):
- threading.Thread.__init__(self, name=threadname)
- def run(self):
- time.sleep(5)
- print '%s is running·······done'%self.getName()
- t=myThread('son thread')
- #t.setDaemon(True)
- t.start()
- if t.isDaemon():
- print "the father thread and the son thread are done"
- else:
- print "the father thread is waiting the son thread····"
这段代码的运行流程是:主线程打印完最后一句话后,等待son thread
运行完,然后程序才结束,所以输出结果为:
- the father thread is waitting the son thread····
- son thread is running·······done
如果启用t.setDaemon(True)
,这段代码的运行流程是:当主线程打印完最后一句话后,不管
son thread
是否运行完,程序立即结束,所以输出结果为:
- the father thread and the son thread are done
三. 小结
介绍到这里,python多线程使用级别的知识点已全部介绍完了,下面我会分析一下python多线程的同步问题。
一、Python中的线程使用:
Python中使用线程有两种方式:函数或者用类来包装线程对象。
1、 函数式:调用thread模块中的start_new_thread()函数来产生新线程。如下例:
- import time
- import thread
- def timer(no, interval):
- cnt = 0
- while cnt<10:
- print 'Thread:(%d) Time:%s/n'%(no, time.ctime())
- time.sleep(interval)
- cnt+=1
- thread.exit_thread()
- def test(): #Use thread.start_new_thread() to create 2 new threads
- thread.start_new_thread(timer, (1,1))
- thread.start_new_thread(timer, (2,2))
- if __name__=='__main__':
- test()
上面的例子定义了一个线程函数timer,它打印出10条时间记录后退出,每次打印的间隔由interval参数决定。thread.start_new_thread(function, args[, kwargs])的第一个参数是线程函数(本例中的timer方法),第二个参数是传递给线程函数的参数,它必须是tuple类型,kwargs是可选参数。
线程的结束可以等待线程自然结束,也可以在线程函数中调用thread.exit()或thread.exit_thread()方法。
2、 创建threading.Thread的子类来包装一个线程对象,如下例:
- import threading
- import time
- class timer(threading.Thread): #The timer class is derived from the class threading.Thread
- def __init__(self, num, interval):
- threading.Thread.__init__(self)
- self.thread_num = num
- self.interval = interval
- self.thread_stop = False
- def run(self): #Overwrite run() method, put what you want the thread do here
- while not self.thread_stop:
- print 'Thread Object(%d), Time:%s/n' %(self.thread_num, time.ctime())
- time.sleep(self.interval)
- def stop(self):
- self.thread_stop = True
- def test():
- thread1 = timer(1, 1)
- thread2 = timer(2, 2)
- thread1.start()
- thread2.start()
- time.sleep(10)
- thread1.stop()
- thread2.stop()
- return
- if __name__ == '__main__':
- test()
就我个人而言,比较喜欢第二种方式,即创建自己的线程类,必要时重写threading.Thread类的方法,线程的控制可以由自己定制。
threading.Thread类的使用:
1,在自己的线程类的__init__里调用threading.Thread.__init__(self, name = threadname)
Threadname为线程的名字
2, run(),通常需要重写,编写代码实现做需要的功能。
3,getName(),获得线程对象名称
4,setName(),设置线程对象名称
5,start(),启动线程
6,jion([timeout]),等待另一线程结束后再运行。
7,setDaemon(bool),设置子线程是否随主线程一起结束,必须在start()之前调用。默认为False。
8,isDaemon(),判断线程是否随主线程一起结束。
9,isAlive(),检查线程是否在运行中。
此外threading模块本身也提供了很多方法和其他的类,可以帮助我们更好的使用和管理线程。可以参看http://www.python.org/doc/2.5.2/lib/module-threading.html。
这段时间一直在用 Python 写一个游戏的服务器程序。在编写过程中,不可避免的要用多线程来处理与客户端的交互。 Python 标准库提供了 thread 和 threading 两个模块来对多线程进行支持。其中, thread 模块以低级、原始的方式来处理和控制线程,而 threading 模块通过对 thread 进行二次封装,提供了更方便的 api 来处理线程。 虽然使用 thread 没有 threading 来的方便,但它更灵活。今天先介绍 thread 模块的基本使用,下一篇 将介绍 threading 模块。
在介绍 thread 之前,先看一段代码,猜猜程序运行完成之后,在控制台上输出的结果是什么?
- #coding=gbk
- import thread, time, random
- count = 0
- def threadTest():
- global count
- for i in xrange(10000):
- count += 1
- for i in range(10):
- thread.start_new_thread(threadTest, ()) #如果对start_new_thread函数不是很了解,不要着急,马上就会讲解
- time.sleep(3)
- print count #count是多少呢?是10000 * 10 吗?
thread.start_new_thread ( function , args [ , kwargs ] )
函数将创建一个新的线程,并返回该线程的标识符(标识符为整数)。参数 function 表示线程创建之后,立即执行的函数,参数 args 是该函数的参数,它是一个元组类型;第二个参数 kwargs 是可选的,它为函数提供了命名参数字典。函数执行完毕之后,线程将自动退出。如果函数在执行过程中遇到未处理的异常,该线程将退出,但不会影响其他线程的执行。 下面是一个简单的例子:
- #coding=gbk
- import thread, time
- def threadFunc(a = None, b = None, c = None, d = None):
- print time.strftime('%H:%M:%S', time.localtime()), a
- time.sleep(1)
- print time.strftime('%H:%M:%S', time.localtime()), b
- time.sleep(1)
- print time.strftime('%H:%M:%S', time.localtime()), c
- time.sleep(1)
- print time.strftime('%H:%M:%S', time.localtime()), d
- time.sleep(1)
- print time.strftime('%H:%M:%S', time.localtime()), 'over'
- thread.start_new_thread(threadFunc, (3, 4, 5, 6)) #创建线程,并执行threadFunc函数。
- time.sleep(5)
thread.exit ()
结束当前线程。调用该函数会触发 SystemExit 异常,如果没有处理该异常,线程将结束。
thread.get_ident ()
返回当前线程的标识符,标识符是一个非零整数。
thread.interrupt_main ()
在主线程中触发 KeyboardInterrupt 异常。子线程可以使用该方法来中断主线程。下面的例子演示了在子线程中调用 interrupt_main ,在主线程中捕获异常 :
- import thread, time
- thread.start_new_thread(lambda : (thread.interrupt_main(), ), ())
- try:
- time.sleep(2)
- except KeyboardInterrupt, e:
- print 'error:', e
- print 'over'
下面介绍 thread 模块中的琐,琐可以保证在任何时刻,最多只有一个线程可以访问共享资源。
thread.LockType 是 thread 模块中定义的琐类型。它有如下方法:
lock.acquire ( [ waitflag ] )
获取琐。函数返回一个布尔值,如果获取成功,返回 True ,否则返回 False 。参数 waitflag 的默认值是一个非零整数,表示如果琐已经被其他线程占用,那么当前线程将一直等待,只到其他线程释放,然后获取访琐。如果将参数 waitflag 置为 0 ,那么当前线程会尝试获取琐,不管琐是否被其他线程占用,当前线程都不会等待。
lock.release ()
释放所占用的琐。
lock.locked ()
判断琐是否被占用。
现在我们回过头来看文章开始处给出的那段代码:代码中定义了一个函数 threadTest ,它将全局变量逐一的增加 10000 ,然后在主线程中开启了 10 个子线程来调用 threadTest 函数。但结果并不是预料中的 10000 * 10 ,原因主要是对 count 的并发操作引来的。全局变量 count 是共享资源,对它的操作应该串行的进行。下面对那段代码进行修改,在对 count 操作的时候,进行加琐处理。看看程序运行的结果是否和预期一致。修改后的代码:
- #coding=gbk
- import thread, time, random
- count = 0
- lock = thread.allocate_lock() #创建一个琐对象
- def threadTest():
- global count, lock
- lock.acquire() #获取琐
- for i in xrange(10000):
- count += 1
- lock.release() #释放琐
- for i in xrange(10):
- thread.start_new_thread(threadTest, ())
- time.sleep(3)
- print count
thread模块是不是并没有想像中的那么难!简单就是美,这就是Python。更多关于thread模块的内容,请参考Python手册 thread 模块
上一篇 介绍了thread模块,今天来学习Python中另一个操作线程的模块:threading。threading通过对thread模块进行二次封装,提供了更方便的API来操作线程。今天内容比较多,闲话少说,现在就开始切入正题!
threading.Thread
Thread 是threading模块中最重要的类之一,可以使用它来创建线程。有两种方式来创建线程:一种是通过继承Thread类,重写它的run方法;另一种是 创建一个threading.Thread对象,在它的初始化函数(__init__)中将可调用对象作为参数传入。下面分别举例说明。先来看看通过继承 threading.Thread类来创建线程的例子:
- #coding=gbk
- import threading, time, random
- count = 0
- class Counter(threading.Thread):
- def __init__(self, lock, threadName):
- '''''@summary: 初始化对象。
- @param lock: 琐对象。
- @param threadName: 线程名称。
- '''
- super(Counter, self).__init__(name = threadName) #注意:一定要显式的调用父类的初始
- 化函数。
- self.lock = lock
- def run(self):
- '''''@summary: 重写父类run方法,在线程启动后执行该方法内的代码。
- '''
- global count
- self.lock.acquire()
- for i in xrange(10000):
- count = count + 1
- self.lock.release()
- lock = threading.Lock()
- for i in range(5):
- Counter(lock, "thread-" + str(i)).start()
- time.sleep(2) #确保线程都执行完毕
- print count
在代码中,我们创建了一个Counter类,它继承了threading.Thread。初始化函数接收两个参数,一个是琐对象,另一个是线程 的名称。在Counter中,重写了从父类继承的run方法,run方法将一个全局变量逐一的增加10000。在接下来的代码中,创建了五个 Counter对象,分别调用其start方法。最后打印结果。这里要说明一下run方法 和start方法: 它们都是从Thread继承而来的,run()方法将在线程开启后执行,可以把相关的逻辑写到run方法中(通常把run方法称为活动[Activity]。);start()方法用于启动线程。
再看看另外一种创建线程的方法:
- import threading, time, random
- count = 0
- lock = threading.Lock()
- def doAdd():
- '''''@summary: 将全局变量count 逐一的增加10000。
- '''
- global count, lock
- lock.acquire()
- for i in xrange(10000):
- count = count + 1
- lock.release()
- for i in range(5):
- threading.Thread(target = doAdd, args = (), name = 'thread-' + str(i)).start()
- time.sleep(2) #确保线程都执行完毕
- print count
在这段代码中,我们定义了方法doAdd,它将全局变量count 逐一的增加10000。然后创建了5个Thread对象,把函数对象doAdd 作为参数传给它的初始化函数,再调用Thread对象的start方法,线程启动后将执行doAdd函数。这里有必要介绍一下 threading.Thread类的初始化函数原型:
def __init__(self, group=None, target=None, name=None, args=(), kwargs={})
参数group是预留的,用于将来扩展;
参数target是一个可调用对象(也称为活动[activity]),在线程启动后执行;
参数name是线程的名字。默认值为“Thread-N“,N是一个数字。
参数args和kwargs分别表示调用target时的参数列表和关键字参数。
Thread类还定义了以下常用方法与属性:
Thread.getName()
Thread.setName()
Thread.name
用于获取和设置线程的名称。
Thread.ident
获取线程的标识符。线程标识符是一个非零整数,只有在调用了start()方法之后该属性才有效,否则它只返回None。
Thread.is_alive()
Thread.isAlive()
判断线程是否是激活的(alive)。从调用start()方法启动线程,到run()方法执行完毕或遇到未处理异常而中断 这段时间内,线程是激活的。
Thread.join([timeout])
调用Thread.join将会使主调线程堵塞,直到被调用线程运行结束或超时。参数timeout是一个数值类型,表示超时时间,如果未提供该参数,那么主调线程将一直堵塞到被调线程结束。下面举个例子说明join()的使用:
- import threading, time
- def doWaiting():
- print 'start waiting:', time.strftime('%H:%M:%S')
- time.sleep(3)
- print 'stop waiting', time.strftime('%H:%M:%S')
- thread1 = threading.Thread(target = doWaiting)
- thread1.start()
- time.sleep(1) #确保线程thread1已经启动
- print 'start join'
- thread1.join() #将一直堵塞,直到thread1运行结束。
- print 'end join'
threading.RLock和threading.Lock
在threading模块中,定义两种类型的琐:threading.Lock和threading.RLock。它们之间有一点细微的区别,通过比较下面两段代码来说明:
- import threading
- lock = threading.Lock() #Lock对象
- lock.acquire()
- lock.acquire() #产生了死琐。
- lock.release()
- lock.release()
- import threading
- rLock = threading.RLock() #RLock对象
- rLock.acquire()
- rLock.acquire() #在同一线程内,程序不会堵塞。
- rLock.release()
- rLock.release()
这两种琐的主要区别是:RLock允许在同一线程中被多次acquire。而Lock却不允许这种情况。注意:如果使用RLock,那么acquire和release必须成对出现,即调用了n次acquire,必须调用n次的release才能真正释放所占用的琐。
threading.Condition
可以把Condiftion理解为一把高级的琐,它提供了比Lock,
RLock更高级的功能,允许我们能够控制复杂的线程同步问题。threadiong.Condition在内部维护一个琐对象(默认是RLock),可
以在创建Condigtion对象的时候把琐对象作为参数传入。Condition也提供了acquire,
release方法,其含义与琐的acquire,
release方法一致,其实它只是简单的调用内部琐对象的对应的方法而已。Condition还提供了如下方法(特别要注意:这些方法只有在占用琐
(acquire)之后才能调用,否则将会报RuntimeError异常。):
Condition.wait([timeout]):
wait方法释放内部所占用的琐,同时线程被挂起,直至接收到通知被唤醒或超时(如果提供了timeout参数的话)。当线程被唤醒并重新占有琐的时候,程序才会继续执行下去。
Condition.notify():
唤醒一个挂起的线程(如果存在挂起的线程)。注意:notify()方法不会释放所占用的琐。
Condition.notify_all()
Condition.notifyAll()
唤醒所有挂起的线程(如果存在挂起的线程)。注意:这些方法不会释放所占用的琐。
现在写个捉迷藏的游戏来具体介绍threading.Condition的基本使用。假设这个游戏由两个人来玩,一个藏(Hider),一个找
(Seeker)。游戏的规则如下:1. 游戏开始之后,Seeker先把自己眼睛蒙上,蒙上眼睛后,就通知Hider;2.
Hider接收通知后开始找地方将自己藏起来,藏好之后,再通知Seeker可以找了; 3.
Seeker接收到通知之后,就开始找Hider。Hider和Seeker都是独立的个体,在程序中用两个独立的线程来表示,在游戏过程中,两者之间的
行为有一定的时序关系,我们通过Condition来控制这种时序关系。
- #---- Condition
- #---- 捉迷藏的游戏
- import threading, time
- class Hider(threading.Thread):
- def __init__(self, cond, name):
- super(Hider, self).__init__()
- self.cond = cond
- self.name = name
- def run(self):
- time.sleep(1) #确保先运行Seeker中的方法
- self.cond.acquire() #b
- print self.name + ': 我已经把眼睛蒙上了'
- self.cond.notify()
- self.cond.wait() #c
- #f
- print self.name + ': 我找到你了 ~_~'
- self.cond.notify()
- self.cond.release()
- #g
- print self.name + ': 我赢了' #h
- class Seeker(threading.Thread):
- def __init__(self, cond, name):
- super(Seeker, self).__init__()
- self.cond = cond
- self.name = name
- def run(self):
- self.cond.acquire()
- self.cond.wait() #a #释放对琐的占用,同时线程挂起在这里,直到被notify并重新占
- 有琐。
- #d
- print self.name + ': 我已经藏好了,你快来找我吧'
- self.cond.notify()
- self.cond.wait() #e
- #h
- self.cond.release()
- print self.name + ': 被你找到了,哎~~~'
- cond = threading.Condition()
- seeker = Seeker(cond, 'seeker')
- hider = Hider(cond, 'hider')
- seeker.start()
- hider.start()
threading.Event
Event实现与Condition类似的功能,不过比Condition简单一点。它通过维护内部的标识符来实现线程间的同步问题。
(threading.Event和.NET中的System.Threading.ManualResetEvent类实现同样的功能。)
Event.wait([timeout])
堵塞线程,直到Event对象内部标识位被设为True或超时(如果提供了参数timeout)。
Event.set()
将标识位设为Ture
Event.clear()
将标识伴设为False。
Event.isSet()
判断标识位是否为Ture。
下面使用Event来实现捉迷藏的游戏(可能用Event来实现不是很形象)
- #---- Event
- #---- 捉迷藏的游戏
- import threading, time
- class Hider(threading.Thread):
- def __init__(self, cond, name):
- super(Hider, self).__init__()
- self.cond = cond
- self.name = name
- def run(self):
- time.sleep(1) #确保先运行Seeker中的方法
- print self.name + ': 我已经把眼睛蒙上了'
- self.cond.set()
- time.sleep(1)
- self.cond.wait()
- print self.name + ': 我找到你了 ~_~'
- self.cond.set()
- print self.name + ': 我赢了'
- class Seeker(threading.Thread):
- def __init__(self, cond, name):
- super(Seeker, self).__init__()
- self.cond = cond
- self.name = name
- def run(self):
- self.cond.wait()
- print self.name + ': 我已经藏好了,你快来找我吧'
- self.cond.set()
- time.sleep(1)
- self.cond.wait()
- print self.name + ': 被你找到了,哎~~~'
- cond = threading.Event()
- seeker = Seeker(cond, 'seeker')
- hider = Hider(cond, 'hider')
- seeker.start()
- hider.start()
threading.Timer
threading.Timer是threading.Thread的子类,可以在指定时间间隔后执行某个操作。下面是Python手册上提供的一个例子:
- def hello():
- print "hello, world"
- t = Timer(3, hello)
- t.start() # 3秒钟之后执行hello函数。
threading模块中还有一些常用的方法没有介绍:
threading.active_count()
threading.activeCount()
获取当前活动的(alive)线程的个数。
threading.current_thread()
threading.currentThread()
获取当前的线程对象(Thread object)。
threading.enumerate()
获取当前所有活动线程的列表。
threading.settrace(func)
设置一个跟踪函数,用于在run()执行之前被调用。
threading.setprofile(func)
设置一个跟踪函数,用于在run()执行完毕之后调用。
threading模块的内容很多,一篇文章很难写全,更多关于threading模块的信息,请查询Python手册 threading
模块。
多线程总结
1. 多线程内幕:
2. 从1中我们知道了一个问题
显然不是很中意的感觉,所以我们引进了锁的概念。什么是锁? 这里的锁不是把线程锁到一个牢房里面而限制这个线程运行,
而相反,当某个线程被锁住了才有执行的权利,否者就是处于阻塞状态,什么是阻塞请看第三点,
既然锁有这个功能,那么我们就可以锁住某个线程,在这个线程被锁住的时间段内,cpu就只处理这个线程,
这样就可以控制时间和空间了,至少这样给了一点儿自己控制的欲望,哈哈
3.什么是阻塞
我认为分两种情况,情况一就是这个线程处于锁定池中,那么线程就被阻挡于cpu的门外,只有等
cpu(纯属拟物表达)里面的线程执行完毕才有机会(只是有机会,因为锁定池里面可是一池子的线程等待呀);情况二就是线程压根儿就没有进锁定池,还是处
于等待池(这个待会儿解释)中,这个时候离被执行的时间还长着了,就相当于被阻挡于锁定池外吧
4,锁定池是什么呢?
人进来他们才能进来5.还谈谈线程同步的问题吧,其实就是上面说的第2点,是靠锁解决6.谈谈什么是线程通讯的问题,也就是上面谈得连院子都还没进的人什
么时候进入院子的事儿。这个问题转化为正在执行的这个线程在cpu中执行完之后标记一个条件变量(就一变量),这个变量就是通知院子外的线程可以升级了,
在院子里面来接着等吧(呵呵)
5.这个地方还有我另外一段的总结, 放这里吧,相信对你也是有帮助的:
线程总结2:
(就是阻塞状态))这个功能
执行(否则就没有供线程2,3,4...操作的数据),为了达到让线程先后执行的目的就引入了线程之间的通讯机制,也就是设一个条件变量,只
有当 线程一执行后设定条件变量为可行(我感觉是自己(线程一)执行完毕)时,此时等待池(此处线程状态为等待)里面的线程才能进入
锁定池 (此时线程为暂停,或者是阻塞)变为阻塞状态
等待池是等待一个事件的发生(条件变量),比如等待磁盘I/O的完成,等I/O完成后,会通知一个或全部之前等待的线程,于是这些线程进
入锁定 池,同样也是阻塞状态。为什么不直接进入运行状态(已锁定)?因为所有线程共享一个mutex/lock,只有锁定池中的一个可以线
程幸运的获得 锁,进入已锁定状态。所以,等待池中的线程等的是条件变量的触发,锁定池中的线程等的是获得共享锁。这些都是条件变
量的特点。
子们终于等到了通知,一个激动全部冲入妈妈的肚子里,此时进入等待锁定池,等待着和妈妈的卵子结合! ---> 最终只有一个幸运的精子可
以得到卵子的垂青,结合在一起!此时就是已锁定状态!
此线以后就是跟python有关了
1.python的time.sleep(val)是干什么的呢
息了,休息了的这段时间cpu课不能闲着呀, 还得去执行别的线程,等休息了val秒后接着执行(个人感觉别的线程可不是那么容易的将执行权还
给这个线程,应该会拖拖拉拉的)
2. thread模块只能提供简单的锁
3.threading,高度成熟的一个库
下面我着重介绍一下threading模块的使用:
三种不同的创建线程方法
方法1:
方法2:
- #encode:utf-8
- import thread
- import threading
- import time
- def ClassFunc(object):
- def ___init__(self, func, args, name):
- self.name = name
- self.func = func
- self.args = args
- def __call__(self):
- apply(self.func, self.args, self.name)
- loops = [2, 4]
- def loop(n, nsec):
- print 'loop ', n, 'start at :', time.time()
- time.sleep(nsec)
- print 'loop ', n, 'done at :', time.time()
- def main():
- nloops = range(len(loops))
- threads = []
- for i in nloops:
- print nloops[i]
- t = threading.Thread(target = loop, args = (i, loops[i]))
- threads.append(t)
- print 'all loop start at:', time.time()
- for i in threads:
- i.start()
- for i in threads:
- i.join()
- print 'all loop done at:', time.time()
- if __name__ == '__main__':
- main()
上面的问题答案就是将自动调用方法__call__,这个方法就是为线程专门设计,大家也看到了__call__这个方法里面有一条apply(...)
了吧,其实这个函数的作用就是调用存于元组或者字典里面的方法,现在self.func, self.args, self.name
里面就是一个完整的方法,有方法名,参数列表,线程名字
方法3:
- #coding=gbk
- import threading, time, random
- count = 0
- class Counter(threading.Thread):
- def __init__(self, lock, threadName):
- '''@summary: 初始化对象。
- @param lock: 琐对象。
- @param threadName: 线程名称。
- '''
- super(Counter, self).__init__(name = threadName)
- self.lock = lock
- def run(self):
- '''@summary: 重写父类run方法,在线程启动后执行该方法内的代码。
- '''
- global count
- self.lock.acquire()
- for i in xrange(100000000):
- count = count + 1
- self.lock.release()
- lock = threading.Lock()
- for i in range(5):
- Counter(lock, "thread-" + str(i)).start()
- time.sleep(5)
- print count
python 多线程,tthread模块比较底层,而threading模块是对thread做了一些包装,multithreading的更多相关文章
- python threading模块使用 以及python多线程操作的实践(使用Queue队列模块)
今天花了近乎一天的时间研究python关于多线程的问题,查看了大量源码 自己也实践了一个生产消费者模型,所以把一天的收获总结一下. 由于GIL(Global Interpreter Lock)锁的关系 ...
- Python 官方文档解读(2):threading 模块
使用 Python 可以编写多线程程序,注意,这并不是说程序能在多个 CPU 核上跑.如果你想这么做,可以看看关于 Python 并行计算的,比如官方 Wiki. Python 线程的主要应用场景是一 ...
- Python的并发并行[1] -> 线程[0] -> threading 模块
threading模块 / threading Module 1 常量 / Constants Pass 2 函数 / Function 2.1 setprofile()函数 函数调用: thread ...
- python多线程与_thread模块
进程与线程 1.进程:计算机程序只是存储在磁盘中的可执行二进制(或其他类型)的文件.只有把他们加载到内存中并被操作系统调用,才具有其生命周期.进程则是一个执行中的程序.每个进程都拥有自己的地址空间,内 ...
- Python:使用threading模块实现多线程编程
转:http://blog.csdn.net/bravezhe/article/details/8585437 Python:使用threading模块实现多线程编程一[综述] Python这门解释性 ...
- python学习笔记之使用threading模块实现多线程(转)
综述 Python这门解释性语言也有专门的线程模型,Python虚拟机使用GIL(Global Interpreter Lock,全局解释器锁)来互斥线程对共享资源的访问,但暂时无法利用多处理器的优势 ...
- thread/threading——Python多线程入门笔记
1 什么是线程? (1)线程不同于程序. 线程不能够独立执行,必须依存在应用程序中,由应用程序提供多个线程执行控制: 多线程类似于同时执行多个不同程序. (2)线程不同于进程. 每个独立的进程有一个程 ...
- python 多线程编程
这篇文章写的很棒http://blog.csdn.net/bravezhe/article/details/8585437 使用threading模块实现多线程编程一[综述] Python这门解释性语 ...
- 【Python】python 多线程两种实现方式
目前python 提供了几种多线程实现方式 thread,threading,multithreading ,其中thread模块比较底层,而threading模块是对thread做了一些包装,可以更 ...
随机推荐
- LinqToExcel 简洁与优美开源库
转载:https://www.cnblogs.com/codefish/archive/2013/04/08/3009098.html 正在做项目,同事问道有啥简单的方法读取excel到DataTab ...
- Laravel5.8 使用结巴中文分词的简单教程_php中文分词
1.首先用composer加载结巴中文分词-PHP composer require fukuball/jieba-php:dev-master 2.在composer.json 中引用, 让他自动加 ...
- RSA 2019安全大会:企业资产管理成行业新风向标,云上安全占优势
美国时间3月4-8日,国际知名信息安全峰会RSA Conference在美国旧金山开幕,云安全及云可以为企业提供更可靠的资产管理方式成为大会热点. 此次峰会共吸引全球700多家机构参展,其中近42%为 ...
- HDU - 1724 Ellipse 自适应辛普森模板
OJ 题解传送门 //Achen #include<algorithm> #include<iostream> #include<cstring> #include ...
- hdu 1045 Fire Net(二分匹配 or 暴搜)
Fire Net Time Limit: 2000/1000 MS (Java/Others) Memory Limit: 65536/32768 K (Java/Others)Total Su ...
- DirectX11笔记(三)--Direct3D初始化2
原文:DirectX11笔记(三)--Direct3D初始化2 版权声明:本文为博主原创文章,未经博主允许不得转载. https://blog.csdn.net/u010333737/article/ ...
- Element UI table组件源码分析
本文章从如下图所示的最基本的table入手,分析table组件源代码.本人已经对table组件原来的源码进行削减,源码点击这里下载.本文只对重要的代码片段进行讲解,推荐下载代码把项目运行起来,跟着文章 ...
- jsp之jstl(展示所有商品、重写登录案例)
jsp之jstl jstl: jsp标准的标签库语言,apache的,是用来替代java脚本 使用步骤: 1.导入jar包 (jstl.jar和standard.jar) 2.在页面上导入标签库 &l ...
- Leetcode693.Binary Number with Alternating Bits交替位二进制数
给定一个正整数,检查他是否为交替位二进制数:换句话说,就是他的二进制数相邻的两个位数永不相等. 示例 1: 输入: 5 输出: True 解释: 5的二进制数是: 101 示例 2: 输入: 7 输出 ...
- thrift python安装
http://thrift.apache.org/download/ tar -zxvf thrift-0.11.0.tar.gz cd thrift-0.11.0 ./configure --pre ...
