Android布局样式
本篇介绍一下Android中的几种常用的布局,主要介绍内容有:
·View视图
·LinearLayout
·RelativeLayout
在介绍布局之前,我们首先要了解视图View的基本属性,因为所有的控件和布局都是直接或间接由View派生而来的,故而View类的基本属性和方法是各控件和布局通用的。
在这里介绍一下View在XML文件中的常用属性定义
·layout_margin:指定该视图与周围视图之间的空白距离(包括上下左右),另可分别写成layout_marginTop、layout_marginLeft、layout_marginRight、layout_marginBottom,和HTML中margin作用相似
·minWidth:指定该视图的最小宽度
·minHeight:指定该视图得到最小高度
·padding:指定该视图的内边距。同样有paddingBottom、paddingTop、paddingLeft、paddingRight属性
·visable:指定该视图的可视类型(visable 可见;invisible 不可见但是占位;gone 消失,不可见且不占位)
·layout_gravity:指定该视图与上级视图的对齐方式(left,right,top,bottom,center,center_horizontal,center_vertical)
·layout_width、layout_height、background、id不再详述
在代码中的常用设置方法说明:
·setLayoutParams:设置视图宽高,参数对象的构造函数可以设置视图的宽高,其中,有LayoutParams.MATCH_PARENT和LayoutParams.WRAP_CONTENT
·setBackgroundcolor:设置背景颜色
·setBackgroundDrawable:设置背景图片
·setBackgroundResourse:设置背景资源ID
·setPadding和setVisability不再详述
下面我们通过代码观察效果:
<?xml version="1.0" encoding="utf-8"?>

<LinearLayout xmlns:android="http://schemas.android.com/apk/res/android"

    xmlns:tools="http://schemas.android.com/tools"

    android:layout_width="match_parent"

    android:layout_height="300dp"

    android:background="#00aaff"

    android:orientation="vertical"

    android:padding="5dp">

    <LinearLayout

        android:layout_width="match_parent"

        android:layout_height="match_parent"

        android:layout_margin="20dp"

        android:background="#ffff99"

        android:padding="60dp">

        <View

            android:layout_width="match_parent"

            android:layout_height="match_parent"

            android:background="#ff0000"/>

    </LinearLayout>

</LinearLayout>
效果如下,同web前端开发效果相同,不再详述:
 ,,
,,
线性布局LinearLayout
LinearLayout有这样几个特有的xml属性:
·orientation:指定线性布局的方向。horizontal(默认)表示水平布局,vertical表示垂直布局
·gravity:指定布局内部视图与本线性布局的对齐方式,取值同layout_gravity
`layout_weight:指定当前视图在宽度上占的权重,如果指定的是宽度上的权重,就要同时设置layout_width为0dp,高度同理
接下来重点解释layout_gravity和gravity的区别
前面说过,layout_gravity指定该视图与上级视图的对齐方式,而gravity指定布局内部与本布局的对齐方式,具体例子如下:
<?xml version="1.0" encoding="utf-8"?>

<LinearLayout xmlns:android="http://schemas.android.com/apk/res/android"

    xmlns:tools="http://schemas.android.com/tools"

    android:layout_width="match_parent"

    android:layout_height="300dp"

    android:background="#ffff99"

    android:orientation="horizontal"

    android:padding="5dp">

    <LinearLayout

        android:layout_width="0dp"

        android:layout_height="200dp"

        android:layout_weight="1"

        android:layout_gravity="bottom"

        android:gravity="left"

        android:layout_margin="10dp"

        android:background="#ff0000"

        android:padding="10dp">

        <View

            android:layout_width="100dp"

            android:layout_height="100dp"

            android:background="#00ffff"/>

    </LinearLayout>

    <LinearLayout

        android:layout_width="0dp"

        android:layout_height="200dp"

        android:layout_weight="1"

        android:layout_gravity="top"

        android:gravity="right"

        android:background="#ff0000"

        android:layout_margin="10dp"

        android:padding="10dp"

        android:orientation="vertical">

        <View

            android:layout_width="100dp"

            android:layout_height="100dp"

            android:background="#00ffff"/>

    </LinearLayout>

</LinearLayout>
效果如下:
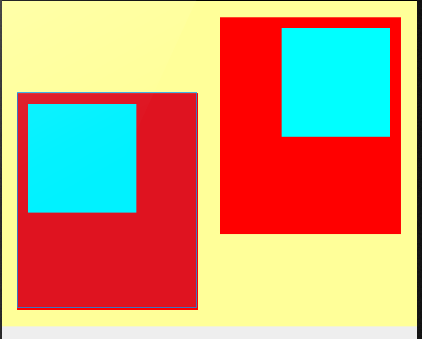
可以简记为,layout_gravity是子对父使用,gravity是父对子使用
相对布局RelativeLayout
RelativeLayout下级视图的位置是相对位置,得有具体的参照物才能确定最终位置。如果不设定下级视图的参照物,那么下级视图默认显示在Relative内部的左上角。用于确定视图位置的参照物可以是该视图的平级视图也可以是该视图的上级视图,这里不再列出具体属性,因为它们通过属性名的字面意思就可以理解,我们直接代码看看各种属性应用的效果:
<?xml version="1.0" encoding="utf-8"?>

<RelativeLayout xmlns:android="http://schemas.android.com/apk/res/android"

    xmlns:tools="http://schemas.android.com/tools"

    android:layout_width="match_parent"

    android:layout_height="500dp"

    >

    <Button

        android:layout_width="wrap_content"

        android:layout_height="wrap_content"

        android:id="@+id/btn_center"

        android:layout_centerInParent="true"

        android:text="我在中间"/>

    <Button

        android:layout_width="wrap_content"

        android:layout_height="wrap_content"

        android:id="@+id/btn_center_horizontal"

        android:layout_centerHorizontal="true"

        android:text="我在水平中间"/>

    <Button

        android:layout_width="wrap_content"

        android:layout_height="wrap_content"

        android:id="@+id/btn_center_vertical"

        android:layout_centerVertical="true"

        android:text="我在垂直中间"/>

    <Button

        android:layout_width="wrap_content"

        android:layout_height="wrap_content"

        android:id="@+id/btn_parent_left"

        android:layout_marginTop="100dp"

        android:layout_alignParentLeft="true"

        android:text="我跟上级左边对齐"/>

    <Button

        android:layout_width="wrap_content"

        android:layout_height="wrap_content"

        android:id="@+id/btn_parent_top"

        android:layout_alignParentTop="true"

        android:text="我跟上级顶部对齐"/>

    <Button

        android:layout_width="wrap_content"

        android:layout_height="wrap_content"

        android:id="@+id/btn_parent_right"

        android:layout_alignParentRight="true"

        android:text="我跟上级右边对齐"/>

    <Button

        android:layout_width="wrap_content"

        android:layout_height="wrap_content"

        android:id="@+id/btn_parent_bottom"

        android:layout_alignParentBottom="true"

        android:layout_centerHorizontal="true"

        android:text="我跟上级底部对齐"/>

    <Button

        android:layout_width="wrap_content"

        android:layout_height="wrap_content"

        android:id="@+id/btn_left_bottom"

        android:layout_toLeftOf="@+id/btn_parent_bottom"

        android:layout_alignTop="@+id/btn_parent_bottom"

        android:text="我在底部左边"/>

    <Button

        android:layout_width="wrap_content"

        android:layout_height="wrap_content"

        android:id="@+id/btn_right_bottom"

        android:layout_toRightOf="@+id/btn_parent_bottom"

        android:layout_alignTop="@+id/btn_parent_bottom"

        android:text="我在底部右边"/>

    <Button

        android:layout_width="wrap_content"

        android:layout_height="wrap_content"

        android:id="@+id/btn_above_center"

        android:layout_above="@+id/btn_center"

        android:layout_alignLeft="@id/btn_center"

        android:text="我在中间上面"/>

    <Button

        android:layout_width="wrap_content"

        android:layout_height="wrap_content"

        android:id="@+id/btn_below_center"

        android:layout_below="@+id/btn_center"

        android:layout_alignLeft="@id/btn_center"

        android:text="我在中间下面"/>

</RelativeLayout>
效果如图:

代码很简单,这里不再详细介绍。
下面在代码中给RelativeLayout动态添加子视图并指定子视图的相对位置
package com.example.animator.android_learning;

import android.content.Context;

import android.graphics.Color;

import android.support.v7.app.ActionBarActivity;

import android.os.Bundle;

import android.util.DisplayMetrics;

import android.view.View;

import android.view.Window;

import android.view.WindowManager;

import android.widget.Button;

import android.widget.RelativeLayout;

import android.widget.TextView;

public class MainActivity extends ActionBarActivity {

    RelativeLayout relativeLayout;

    Button btn_1;

    Button btn_2;

    Button btn_3;

    Button btn_4;

    Button btn_5;

    Button btn_6;

    Button btn_7;

    Button btn_8;

    Button btn_9;

    @Override

    protected void onCreate(Bundle savedInstanceState) {

        super.onCreate(savedInstanceState);

        setContentView(R.layout.activity_main);

        relativeLayout= (RelativeLayout) findViewById(R.id.r1_content);

        btn_1= (Button) findViewById(R.id.btn_1);

        btn_2= (Button) findViewById(R.id.btn_2);

        btn_3= (Button) findViewById(R.id.btn_3);

        btn_4= (Button) findViewById(R.id.btn_4);

        btn_5= (Button) findViewById(R.id.btn_5);

        btn_6= (Button) findViewById(R.id.btn_6);

        btn_7= (Button) findViewById(R.id.btn_7);

        btn_8= (Button) findViewById(R.id.btn_8);

        btn_9= (Button) findViewById(R.id.btn_9);

        btn_1.setOnClickListener(new View.OnClickListener() {

            @Override

            public void onClick(View view) {

                addNewView(RelativeLayout.LEFT_OF,RelativeLayout.ALIGN_TOP,R.id.btn_1);

            }

        });

        btn_2.setOnClickListener(new View.OnClickListener() {

            @Override

            public void onClick(View view) {

                addNewView(RelativeLayout.ABOVE,RelativeLayout.ALIGN_LEFT,R.id.btn_2);

            }

        });

        btn_3.setOnClickListener(new View.OnClickListener() {

            @Override

            public void onClick(View view) {

                addNewView(RelativeLayout.RIGHT_OF,RelativeLayout.ALIGN_TOP,R.id.btn_3);

            }

        });

        btn_4.setOnClickListener(new View.OnClickListener() {

            @Override

            public void onClick(View view) {

                addNewView(RelativeLayout.BELOW,RelativeLayout.ALIGN_LEFT,R.id.btn_4);

            }

        });

        btn_5.setOnClickListener(new View.OnClickListener() {

            @Override

            public void onClick(View view) {

                addNewView(RelativeLayout.CENTER_IN_PARENT,RelativeLayout.ALIGN_BASELINE,R.id.btn_5);

            }

        });

        btn_6.setOnClickListener(new View.OnClickListener() {

            @Override

            public void onClick(View view) {

                addNewView(RelativeLayout.ALIGN_PARENT_LEFT,0,R.id.btn_6);

            }

        });

        btn_7.setOnClickListener(new View.OnClickListener() {

            @Override

            public void onClick(View view) {

                addNewView(RelativeLayout.ALIGN_PARENT_TOP,0,R.id.btn_7);

            }

        });

        btn_8.setOnClickListener(new View.OnClickListener() {

            @Override

            public void onClick(View view) {

                addNewView(RelativeLayout.ALIGN_PARENT_RIGHT,0,R.id.btn_8);

            }

        });

        btn_9.setOnClickListener(new View.OnClickListener() {

            @Override

            public void onClick(View view) {

                addNewView(RelativeLayout.ALIGN_PARENT_BOTTOM,0,R.id.btn_9);

            }

        });

    }

    private void addNewView(int firstAlign,int secondAlign,int referId){

        //创建一个新的视图对象

        View v=new View(this);

        //把该视图的背景设置为半透明的绿色

        v.setBackgroundColor(0xaa66ff66);

        //声明一个布局参数,其中宽度为100dp,高度也为100dp

        RelativeLayout.LayoutParams r1_params=new RelativeLayout.LayoutParams(dip2px(this,100),dip2px(this,100));

        //给布局参数添加第一个相对位置的规则,firstAlign代表位置类型,referId代表参考对象

        r1_params.addRule(firstAlign,referId);

        if(secondAlign>=0){

            //如果存在第二个相对位置,则同时给布局添加第二个相对位置的规则

            r1_params.addRule(secondAlign,referId);

        }

        //给该视图设置布局参数

        v.setLayoutParams(r1_params);

        //设置该视图的长按监听器

        v.setOnLongClickListener(new View.OnLongClickListener() {

            @Override

            public boolean onLongClick(View view) {

                //一旦监听到长按事件,就从相对布局中删除该视图

                relativeLayout.removeView(view);

                return true;

            }

        });

        //往相对布局中添加该视图

        relativeLayout.addView(v);

    }

    //根据手机的分辨率从dp单位转换成px单位

    public static int dip2px(Context context,float dpValue){

        //获取当前手机的像素密度

        final float scale=context.getResources().getDisplayMetrics().density;

        return (int)(dpValue*scale+0.5f); //四舍五入取整

    }

    //根据手机的分辨率从px单位转换成dp单位

    public static int px2dip(Context context,float pxValue){

        //获取当前手机的像素密度

        final float scale=context.getResources().getDisplayMetrics().density;

        return (int)(pxValue/scale+0.5f); //四舍五入取整

    }

    public static int getScreenWidth(Context context){

        //从系统服务中获取窗口管理器

        WindowManager windowManager=(WindowManager)context.getSystemService(context.WINDOW_SERVICE);

        DisplayMetrics displayMetrics=new DisplayMetrics();

        //从默认显示器中获取显示参数保存到displayMetrics对象中

        windowManager.getDefaultDisplay().getMetrics(displayMetrics);

        return displayMetrics.widthPixels; //返回屏幕的宽度数值

    }

    public static int getScreenHeight(Context context){

        //从系统服务中获取窗口管理器

        WindowManager windowManager=(WindowManager)context.getSystemService(context.WINDOW_SERVICE);

        DisplayMetrics displayMetrics=new DisplayMetrics();

        //从默认显示器中获取显示参数保存到displayMetrics对象中

        windowManager.getDefaultDisplay().getMetrics(displayMetrics);

        return displayMetrics.heightPixels; //返回屏幕的高度数值

    }

    public static float getScreenDensity(Context context){

        //从系统服务中获取窗口管理器

        WindowManager windowManager=(WindowManager)context.getSystemService(context.WINDOW_SERVICE);

        DisplayMetrics displayMetrics=new DisplayMetrics();

        //从默认显示器中获取显示参数保存到displayMetrics对象中

        windowManager.getDefaultDisplay().getMetrics(displayMetrics);

        return displayMetrics.density; //返回屏幕的高度数值

    }

}
效果如图:
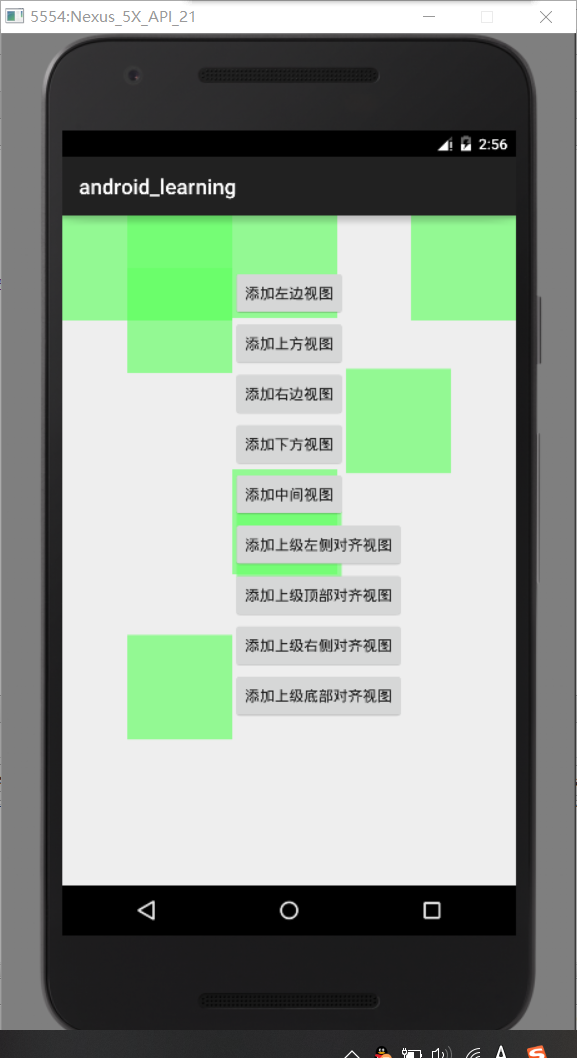
按钮布局很简单,读者可根据上述relativelayout布局样式测试自行编写xml代码
Android布局样式的更多相关文章
- Android开发工程师文集-Fragment,适配器,轮播图,ScrollView,Gallery 图片浏览器,Android常用布局样式
Android开发工程师文集-Fragment,适配器,轮播图,ScrollView,Gallery 图片浏览器,Android常用布局样式 Fragment FragmentManager frag ...
- android布局 及 布局属性
Code highlighting produced by Actipro CodeHighlighter (freeware)http://www.CodeHighlighter.com/--> ...
- 【转】android布局属性详解
LinearLayout布局: 线性版面配置,在这个标签中,所有元件都是按由上到下的排队排成的.在这个界面中,我们应用了一个 LinearLayout的布局,它是垂直向下扩展的 ,所以创建的布局XML ...
- Android 布局
转自:http://www.cnblogs.com/chiao/archive/2011/08/24/2152435.html Android布局是应用界面开发的重要一环,在Android中,共有五种 ...
- android studio样式文件汇总
android studio样式文件汇总:shape.Theme|styles .selector 1:shape shape用于设定形状,有6个子标签,各属性如下: res/drawable/sty ...
- Android布局属性
LinearLayout布局: 线性版面配置,在这个标签中,所有元件都是按由上到下的排队排成的.在这个界面中,我们应用了一个 LinearLayout的布局,它是垂直向下扩展的 ,所以创建的布局XML ...
- 万能的TextView,实现常用布局样式
package com.loaderman.textviewdemo; import android.content.Context; import android.content.res.Typed ...
- android布局文件中android:icon="?attr/menuIconCamera"找不到对应图标路径
如 <item android:id="@+id/camera" android:title="Camera" android:icon="?a ...
- 【转】在Android布局中使用include和merge标签
内容转自:http://fengweipeng1208.blog.163.com/blog/static/21277318020138229754135/ 在我们开发android布局时,经常会有很多 ...
随机推荐
- 目标检测之单步检测(Single Shot detectors)
目标检测之单步检测(Single Shot detectors) 前言 像RCNN,fast RCNN,faster RCNN,这类检测方法都需要先通过一些方法得到候选区域,然后对这些候选区使用高质量 ...
- 形象解释各种卷积算法(Convolution animations)
No padding, no strides Arbitrary padding, no strides Half padding, no strides Full padding, no strid ...
- HDU_3410_单调栈
http://acm.hdu.edu.cn/showproblem.php?pid=3410 初探单调栈,从左往右,求l,从右往左,求r. #include<iostream> #incl ...
- 《Python学习手册 第五版》 -第9章 元组、文件与其他核心类型
本章的主要内容是介绍了元组和文件的使用,同时作为介绍数据类型的最后一个章节,本章也总结和复习了前面所介绍的核心数据类型,总结的部分在此不多介绍,因为前面章节都有,在此就重点介绍以下两点内容 1.元组 ...
- 利用idea对tomcat容器进行debug
通过idea对tomcat容器进行debug有两种方式: 一种直接修改idea中引用tomcat的启动配置 另一种是修改tomcat的启动脚本再通过设置diea的远程debug的方式进行调试 1.设置 ...
- 在.NET Core中使用MachineKey
在.NET Core中使用MachineKey 姐妹篇:<ASP.NET Cookie是怎么生成的> 姐妹篇:<.NET Core验证ASP.NET密码> 在上篇文章中,我介绍 ...
- 【JavaScript】进制转换&位运算,了解一下?
前言 在一般的代码中很少会接触到进制和位运算,但这不代表我们可以不去学习它.作为一位编程人员,这些都是基础知识.如果你没有学过这方面的知识,也不要慌,接下来的知识并不会很难.本文你将会学习到: 进制转 ...
- Andriod you must restart adb and eclipse
今天看着视频 学习着 andriod ,启动 的时候 竟然报错 我试了N种google来的方法,都失效,现在把我的解决方法告诉大家,希望能帮到大家. 首先,我先罗列下我搜到的方法,大家也可以尝试. 1 ...
- VFP日期时间转中文日期时间
本函数原为VFP中取日期转中文日期方式,后增加日期时间处理,并改用Iif及ICase修改原代码.Function DateTime2CHNParameters pdDate,plTime*!* pdD ...
- kubernetes集合
kubernetes集合 kubernetes(1):kubernetes简介和组件 kubernetes(2):yum安装kubernetes kubernetes(3):kubeadm安装k8s1 ...