centos7安装mysql-5.6.43二进制包
卸载老版本的MySQL。查找并删除mysql有关的文件
# find / -name mysql
# rm -rf /usr/lib64/mysql /usr/share/mysql
[root@localhost ~]# find / -name mysql

/usr/lib64/mysql

/usr/share/mysql

[root@localhost ~]# rm -rf /usr/lib64/mysql /usr/share/mysql

[root@localhost ~]#
上传mysql安装包并解压
# tar -zxf mysql-5.6.43-linux-glibc2.12-x86_64.tar.gz
[root@localhost ~]# ls

anaconda-ks.cfg  mysql-5.6.-linux-glibc2.-x86_64.tar.gz

[root@localhost ~]# tar -zxf mysql-5.6.-linux-glibc2.-x86_64.tar.gz

[root@localhost ~]# ls

anaconda-ks.cfg                      mysql-5.6.-linux-glibc2.-x86_64.tar.gz

mysql-5.6.-linux-glibc2.-x86_64
选择安装位置并重命名
mv mysql-5.6.43-linux-glibc2.12-x86_64 /usr/mysql-5.6.43
[root@localhost ~]# mv mysql-5.6.-linux-glibc2.-x86_64 /usr/mysql-5.6.

[root@localhost ~]#

[root@localhost ~]# ls

anaconda-ks.cfg  mysql-5.6.-linux-glibc2.-x86_64.tar.gz

[root@localhost ~]#

[root@localhost ~]# ls /usr/

bin  etc  games  include  lib  lib64  libexec  local  mysql-5.6.  sbin  share  src  tmp
添加用户组和用户
# groupadd mysql
# useradd mysql -g mysql
# groups mysql
[root@localhost ~]# groupadd mysql

[root@localhost ~]# useradd mysql -g mysql

[root@localhost ~]# groups mysql

mysql : mysql
更改MySQL目录权限,进入mysql目录
[root@localhost ~]# cd /usr/mysql-5.6./

[root@localhost mysql-5.6.]#

[root@localhost mysql-5.6.]# ls

bin  COPYING  data  docs  include  lib  man  mysql-test  README  scripts  share  sql-bench  support-files

[root@localhost mysql-5.6.]#

[root@localhost mysql-5.6.]# pwd

/usr/mysql-5.6.

[root@localhost mysql-5.6.]# chown -R mysql:mysql /usr/mysql-5.6.

[root@localhost mysql-5.6.]# ll

total

drwxr-xr-x.   mysql mysql   May  : bin

-rw-r--r--.   mysql mysql  Dec  : COPYING

drwxr-xr-x.   mysql mysql     May  : data

drwxr-xr-x.   mysql mysql     May  : docs

drwxr-xr-x.   mysql mysql   May  : include

drwxr-xr-x.   mysql mysql   May  : lib

drwxr-xr-x.   mysql mysql     May  : man

drwxr-xr-x.  mysql mysql   May  : mysql-test

-rw-r--r--.   mysql mysql   Dec  : README

drwxr-xr-x.   mysql mysql     May  : scripts

drwxr-xr-x.  mysql mysql   May  : share

drwxr-xr-x.   mysql mysql   May  : sql-bench

drwxr-xr-x.   mysql mysql   May  : support-files
安装相关的包
# yum install perl perl-devel autoconf -y
Installed:

  perl-devel.x86_64 :5.16.-.el7_6

Dependency Installed:

  gdbm-devel.x86_64 :1.10-.el7                     libdb-devel.x86_64 :5.3.-.el7              perl-ExtUtils-Install.noarch :1.58-.el7_6       perl-ExtUtils-MakeMaker.noarch :6.68-.el7

  perl-ExtUtils-Manifest.noarch :1.61-.el7       perl-ExtUtils-ParseXS.noarch :3.18-.el7       pyparsing.noarch :1.5.-.el7                      systemtap-sdt-devel.x86_64 :3.3-.el7

Updated:

  perl.x86_64 :5.16.-.el7_6

Dependency Updated:

  libdb.x86_64 :5.3.-.el7                                   libdb-utils.x86_64 :5.3.-.el7                                   perl-libs.x86_64 :5.16.-.el7_6

Complete!
数据库初始化
# ./mysql_install_db --basedir=/usr/mysql-5.6.43/ --datadir=/usr/mysql-5.6.43/data/ --user=mysql
[root@localhost ~]# cd /usr/mysql-5.6./

[root@localhost mysql-5.6.]#

[root@localhost mysql-5.6.]#

[root@localhost mysql-5.6.]# ls

bin  COPYING  data  docs  include  lib  man  mysql-test  README  scripts  share  sql-bench  support-files

[root@localhost mysql-5.6.]#

[root@localhost mysql-5.6.]#

[root@localhost mysql-5.6.]# cd scripts/

[root@localhost scripts]#

[root@localhost scripts]#

[root@localhost scripts]# ls

mysql_install_db

[root@localhost scripts]#

[root@localhost scripts]#

[root@localhost scripts]# ll

total

-rwxr-xr-x.  mysql mysql  Dec  : mysql_install_db

[root@localhost scripts]#

[root@localhost scripts]#

[root@localhost scripts]# ./mysql_install_db --basedir=/usr/mysql-5.6./ --datadir=/usr/mysql-5.6./data/ --user=mysql

Installing MySQL system tables...-- ::  [Warning] TIMESTAMP with implicit DEFAULT value is deprecated. Please use --explicit_defaults_for_timestamp server option (see documentation for more details).

-- ::  [Note] Ignoring --secure-file-priv value as server is running with --bootstrap.

-- ::  [Note] /usr/mysql-5.6.//bin/mysqld (mysqld 5.6.43) starting as process 7286 ...

-- ::  [Note] InnoDB: Using atomics to ref count buffer pool pages

-- ::  [Note] InnoDB: The InnoDB memory heap is disabled

-- ::  [Note] InnoDB: Mutexes and rw_locks use GCC atomic builtins

-- ::  [Note] InnoDB: Memory barrier is not used

-- ::  [Note] InnoDB: Compressed tables use zlib 1.2.

-- ::  [Note] InnoDB: Using Linux native AIO

-- ::  [Note] InnoDB: Using CPU crc32 instructions

-- ::  [Note] InnoDB: Initializing buffer pool, size = 128.0M

-- ::  [Note] InnoDB: Completed initialization of buffer pool

-- ::  [Note] InnoDB: The first specified data file ./ibdata1 did not exist: a new database to be created!

-- ::  [Note] InnoDB: Setting file ./ibdata1 size to  MB

-- ::  [Note] InnoDB: Database physically writes the file full: wait...

-- ::  [Note] InnoDB: Setting log file ./ib_logfile101 size to  MB

-- ::  [Note] InnoDB: Setting log file ./ib_logfile1 size to  MB

-- ::  [Note] InnoDB: Renaming log file ./ib_logfile101 to ./ib_logfile0

-- ::  [Warning] InnoDB: New log files created, LSN=

-- ::  [Note] InnoDB: Doublewrite buffer not found: creating new

-- ::  [Note] InnoDB: Doublewrite buffer created

-- ::  [Note] InnoDB:  rollback segment(s) are active.

-- ::  [Warning] InnoDB: Creating foreign key constraint system tables.

-- ::  [Note] InnoDB: Foreign key constraint system tables created

-- ::  [Note] InnoDB: Creating tablespace and datafile system tables.

-- ::  [Note] InnoDB: Tablespace and datafile system tables created.

-- ::  [Note] InnoDB: Waiting for purge to start

-- ::  [Note] InnoDB: 5.6. started; log sequence number

-- ::  [Note] Binlog end

-- ::  [Note] InnoDB: FTS optimize thread exiting.

-- ::  [Note] InnoDB: Starting shutdown...

-- ::  [Note] InnoDB: Shutdown completed; log sequence number

OK

Filling help tables...-- ::  [Warning] TIMESTAMP with implicit DEFAULT value is deprecated. Please use --explicit_defaults_for_timestamp server option (see documentation for more details).

-- ::  [Note] Ignoring --secure-file-priv value as server is running with --bootstrap.

-- ::  [Note] /usr/mysql-5.6.//bin/mysqld (mysqld 5.6.43) starting as process 7327 ...

-- ::  [Note] InnoDB: Using atomics to ref count buffer pool pages

-- ::  [Note] InnoDB: The InnoDB memory heap is disabled

-- ::  [Note] InnoDB: Mutexes and rw_locks use GCC atomic builtins

-- ::  [Note] InnoDB: Memory barrier is not used

-- ::  [Note] InnoDB: Compressed tables use zlib 1.2.

-- ::  [Note] InnoDB: Using Linux native AIO

-- ::  [Note] InnoDB: Using CPU crc32 instructions

-- ::  [Note] InnoDB: Initializing buffer pool, size = 128.0M

-- ::  [Note] InnoDB: Completed initialization of buffer pool

-- ::  [Note] InnoDB: Highest supported file format is Barracuda.

-- ::  [Note] InnoDB:  rollback segment(s) are active.

-- ::  [Note] InnoDB: Waiting for purge to start

-- ::  [Note] InnoDB: 5.6. started; log sequence number

-- ::  [Note] Binlog end

-- ::  [Note] InnoDB: FTS optimize thread exiting.

-- ::  [Note] InnoDB: Starting shutdown...

-- ::  [Note] InnoDB: Shutdown completed; log sequence number

OK

To start mysqld at boot time you have to copy

support-files/mysql.server to the right place for your system

PLEASE REMEMBER TO SET A PASSWORD FOR THE MySQL root USER !

To do so, start the server, then issue the following commands:

  /usr/mysql-5.6.//bin/mysqladmin -u root password 'new-password'

  /usr/mysql-5.6.//bin/mysqladmin -u root -h localhost.localdomain password 'new-password'

Alternatively you can run:

  /usr/mysql-5.6.//bin/mysql_secure_installation

which will also give you the option of removing the test

databases and anonymous user created by default.  This is

strongly recommended for production servers.

See the manual for more instructions.

You can start the MySQL daemon with:

  cd . ; /usr/mysql-5.6.//bin/mysqld_safe &

You can test the MySQL daemon with mysql-test-run.pl

  cd mysql-test ; perl mysql-test-run.pl

Please report any problems at http://bugs.mysql.com/

The latest information about MySQL is available on the web at

  http://www.mysql.com

Support MySQL by buying support/licenses at http://shop.mysql.com

New default config file was created as /usr/mysql-5.6.//my.cnf and

will be used by default by the server when you start it.

You may edit this file to change server settings

WARNING: Default config file /etc/my.cnf exists on the system

This file will be read by default by the MySQL server

If you do not want to use this, either remove it, or use the

--defaults-file argument to mysqld_safe when starting the server
拷贝 my-default.cnf到/etc/my.cnf
# cd ../support-files/
# cp my-default.cnf /etc/my.cnf
[root@localhost scripts]# cd ../support-files/

[root@localhost support-files]#

[root@localhost support-files]# ls

binary-configure  magic  my-default.cnf  mysqld_multi.server  mysql-log-rotate  mysql.server

[root@localhost support-files]#

[root@localhost support-files]# cp my-default.cnf /etc/my.cnf

cp: overwrite ‘/etc/my.cnf’? yes

[root@localhost support-files]#
向/etc/init.d中添加mysql的启动服务
init.d目录包含许多系统各种服务的启动和停止脚本。
[root@localhost support-files]# pwd

/usr/mysql-5.6./support-files

[root@localhost support-files]# ls

binary-configure  magic  my-default.cnf  mysqld_multi.server  mysql-log-rotate  mysql.server

[root@localhost support-files]# cp mysql.server /etc/init.d/mysqld

[root@localhost support-files]#
修改/etc/init.d/mysqld权限
# cd /etc/init.d/
# chmod 755 mysqld
[root@localhost support-files]# cd /etc/init.d/

[root@localhost init.d]#

[root@localhost init.d]# ls

functions  mysqld  netconsole  network  README

[root@localhost init.d]#

[root@localhost init.d]# chmod -R  mysqld

[root@localhost init.d]#

[root@localhost init.d]# ll

total

-rw-r--r--.  root root  Sep    functions

-rwxr-xr-x.  root root  May  : mysqld

-rwxr-xr-x.  root root   Sep    netconsole

-rwxr-xr-x.  root root   Sep    network

-rw-r--r--.  root root   Nov    README
修改/etc/init.d/mysqld
# vi /etc/init.d/mysqld
配置环境变量
将MySQL配置到环境变量中,这样就可以在任何地方用mysql命令了
# vi /etc/profile
在最后添加
#mysql

export MYSQL_HOME=/usr/mysql-5.6.

#PATH

export PATH=$MYSQL_HOME/bin:$PATH
执行如下指令,使上述配置立即生效
# source /etc/profile
启动MySQL
# /etc/init.d/mysqld start
[root@localhost ~]# /etc/init.d/mysqld start

Starting MySQL.Logging to '/usr/mysql-5.6.43/data/localhost.localdomain.err'.

................... SUCCESS!
查看err的信息
# cd /usr/mysql-5.6.43/data/
# cat localhost.localdomain.err
[root@localhost data]# cd /usr/mysql-5.6./data/

[root@localhost data]#

[root@localhost data]#

[root@localhost data]# ls

auto.cnf  ibdata1  ib_logfile0  ib_logfile1  localhost.localdomain.err  localhost.localdomain.pid  mysql  performance_schema  test

[root@localhost data]#

[root@localhost data]# cat localhost.localdomain.err

2019-05-24 20:37:02 7566 [Note] Plugin 'FEDERATED' is disabled.

-- ::  [Note] InnoDB: Using atomics to ref count buffer pool pages

-- ::  [Note] InnoDB: The InnoDB memory heap is disabled

-- ::  [Note] InnoDB: Mutexes and rw_locks use GCC atomic builtins

-- ::  [Note] InnoDB: Memory barrier is not used

-- ::  [Note] InnoDB: Compressed tables use zlib 1.2.

-- ::  [Note] InnoDB: Using Linux native AIO

-- ::  [Note] InnoDB: Using CPU crc32 instructions

-- ::  [Note] InnoDB: Initializing buffer pool, size = 128.0M

-- ::  [Note] InnoDB: Completed initialization of buffer pool

-- ::  [Note] InnoDB: Highest supported file format is Barracuda.

-- ::  [Note] InnoDB:  rollback segment(s) are active.

-- ::  [Note] InnoDB: Waiting for purge to start

-- ::  [Note] InnoDB: 5.6. started; log sequence number

-- ::  [Warning] No existing UUID has been found, so we assume that this is the first time that this server has been started. Generating a new UUID: a27e1f65-7e20-11e9--000c294cff47.

-- ::  [Note] Server hostname (bind-address): '*'; port:

-- ::  [Note] IPv6 is available.

-- ::  [Note]   - '::' resolves to '::';

-- ::  [Note] Server socket created on IP: '::'.

-- ::  [Note] Event Scheduler: Loaded  events

-- ::  [Note] /usr/mysql-5.6./bin/mysqld: ready for connections.

Version: '5.6.43'  socket: '/tmp/mysql.sock'  port:   MySQL Community Server (GPL)
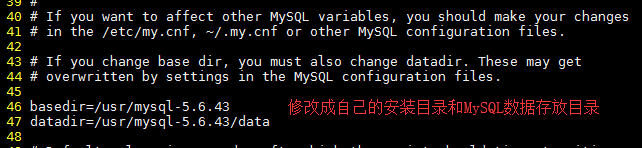
修改/etc/my.cnf
# vi /etc/my.cnf
添加federated
# For advice on how to change settings please see

# http://dev.mysql.com/doc/refman/5.6/en/server-configuration-defaults.html

# *** DO NOT EDIT THIS FILE. It's a template which will be copied to the

# *** default location during install, and will be replaced if you

# *** upgrade to a newer version of MySQL.

[mysqld]

federated

# Remove leading # and set to the amount of RAM for the most important data

# cache in MySQL. Start at % of total RAM for dedicated server, else %.

# innodb_buffer_pool_size = 128M

# Remove leading # to turn on a very important data integrity option: logging

# changes to the binary log between backups.

# log_bin

# These are commonly set, remove the # and set as required.

# basedir = .....

# datadir = .....

# port = .....

# server_id = .....

# socket = .....

# Remove leading # to set options mainly useful for reporting servers.

# The server defaults are faster for transactions and fast SELECTs.

# Adjust sizes as needed, experiment to find the optimal values.

# join_buffer_size = 128M

# sort_buffer_size = 2M

# read_rnd_buffer_size = 2M

sql_mode=NO_ENGINE_SUBSTITUTION,STRICT_TRANS_TABLES
再次重新启动
[root@localhost ~]# /etc/init.d/mysqld stop

Shutting down MySQL.. SUCCESS!

[root@localhost ~]#

[root@localhost ~]#

[root@localhost ~]# /etc/init.d/mysqld start

Starting MySQL... SUCCESS!

[root@localhost ~]#

[root@localhost ~]# ps -aux | grep mysqld

root         0.0  0.0    pts/    S    :   : /bin/sh /usr/mysql-5.6./bin/mysqld_safe --datadir=/usr/mysql-5.6./data --pid-file=/usr/mysql-5.6./data/localhost.localdomain.pid

mysql        9.6 24.2   pts/  Sl   :   : /usr/mysql-5.6./bin/mysqld --basedir=/usr/mysql-5.6. --datadir=/usr/mysql-5.6./data --plugin-dir=/usr/mysql-5.6./lib/plugin --user=mysql --log-error=localhost.localdomain.err --pid-file=/usr/mysql-5.6./data/localhost.localdomain.pid

root         0.0  0.0     pts/    S+   :   : grep --color=auto mysqld
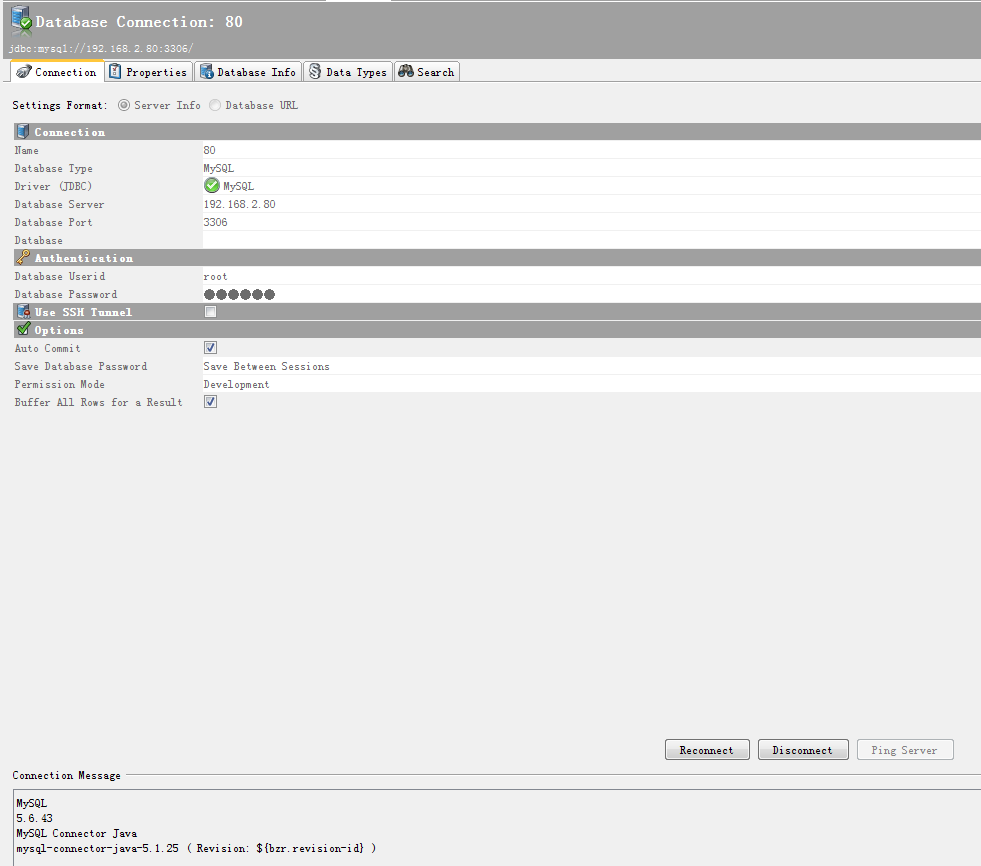
登陆MySQL数据库
# mysql -uroot -p
[root@localhost ~]# mysql -uroot -p

Enter password:

Welcome to the MySQL monitor.  Commands end with ; or \g.

Your MySQL connection id is

Server version: 5.6. MySQL Community Server (GPL)

Copyright (c) , , Oracle and/or its affiliates. All rights reserved.

Oracle is a registered trademark of Oracle Corporation and/or its

affiliates. Other names may be trademarks of their respective

owners.

Type 'help;' or '\h' for help. Type '\c' to clear the current input statement.

mysql> select user,host,password from mysql.user;

+------+-----------------------+----------+

| user | host                  | password |

+------+-----------------------+----------+

| root | localhost             |          |

| root | localhost.localdomain |          |

| root | 127.0.0.1             |          |

| root | ::                   |          |

|      | localhost             |          |

|      | localhost.localdomain |          |

+------+-----------------------+----------+

 rows in set (0.00 sec)
授权并设置root密码
mysql> update mysql.user set password=password('000000') where user='root' and host='localhost';
mysql> grant all privileges on *.* to root@'%' identified by '000000';
mysql> update mysql.user set password=password('') where user='root' and host='localhost';

Query OK,  row affected (0.04 sec)

Rows matched:   Changed:   Warnings:

mysql> flush privileges;

Query OK,  rows affected (0.00 sec)

mysql> select user,host,password from mysql.user;

+------+-----------------------+-------------------------------------------+

| user | host                  | password                                  |

+------+-----------------------+-------------------------------------------+

| root | localhost             | *032197AE5731D4664921A6CCAC7CFCE6A0698693 |

| root | localhost.localdomain |                                           |

| root | 127.0.0.1             |                                           |

| root | ::                   |                                           |

|      | localhost             |                                           |

|      | localhost.localdomain |                                           |

+------+-----------------------+-------------------------------------------+

 rows in set (0.00 sec)

mysql> grant all privileges on *.* to root@'%' identified by '';

Query OK,  rows affected (0.00 sec)

mysql> flush privileges;

Query OK,  rows affected (0.00 sec)

mysql> select user,host,password from mysql.user;

+------+-----------------------+-------------------------------------------+

| user | host                  | password                                  |

+------+-----------------------+-------------------------------------------+

| root | localhost             | *032197AE5731D4664921A6CCAC7CFCE6A0698693 |

| root | localhost.localdomain |                                           |

| root | 127.0.0.1             |                                           |

| root | ::                   |                                           |

|      | localhost             |                                           |

|      | localhost.localdomain |                                           |

| root | %                     | *032197AE5731D4664921A6CCAC7CFCE6A0698693 |

+------+-----------------------+-------------------------------------------+

 rows in set (0.00 sec)
关闭防火墙客户端连接
参考博客
https://www.cnblogs.com/dengshihuang/p/8029092.html
https://blog.csdn.net/qiushisoftware/article/details/86617699
Linux--Linux服务器数据库MySQL5.6.43版本安装过程说明(阿里云服务器)
https://blog.csdn.net/fumushan/article/details/87073240
阿里云CentOS安装mysql-5.6.43
https://blog.csdn.net/qiushisoftware/article/details/86617699
centos7安装mysql-5.6.43二进制包的更多相关文章
- Centos7 安装MySQL 5.7 (通用二进制包)
1.下载安装包 下载地址 https://dev.mysql.com/get/Downloads/MySQL-5.7/mysql-5.7.17-linux-glibc2.5-x86_64.tar.gz ...
- CentOS7安装MySQL的方法之RPM包方式
CentOS7安装MySQL的方法之RPM包方式
- CentOS7安装MySQL的方法之通用二进制格式
CentOS7安装MySQL的方法之通用二进制格式
- [CentOs7]安装mysql(2)
摘要 之前安装过一次mysql,最后配置,发现在本地无法连接,重启服务的时候一直卡在那里不动,感觉是安装的过程出问题,最后没办法还是卸载了,然后重新安装一下. [CentOs7]安装mysql Mys ...
- centos7安装mysql(yum)
centos7安装mysql(yum) ----安装环境----依赖安装----检查mysql是否已安装----安装----验证是否添加成功----选择要启用的mysql版本----通过Yum安装my ...
- centos7安装Mysql爬坑记录
centos7安装Mysql爬坑记录 查看是否已安装 使用下列命令查看是否已经安装过mysql/mariadb/PostgreSQL 如果未安装,不返回任何结果(ECS的centos镜像默认未安装 ...
- Centos7 安装mysql服务器并开启远程访问功能
大二的暑假,波波老师送了一个华为云的服务器给我作测试用,这是我程序员生涯里第一次以root身份拥有一台真实的云服务器 而之前学习的linux知识在这时也派上了用场,自己的物理机用的是ubuntu系统, ...
- CentOS7安装mysql提示“No package mysql-server available.”
针对centos7安装mysql,提示"No package mysql-server available."错误,解决方法如下: Centos 7 comes with Mari ...
- centos7安装mysql
centos7安装mysql 1 查找系统是否安装了myql rpm -q mysql mysql-server1.1如果安装了.就删除 sudo yum -y remove mysql mysql- ...
- Mysql 官网下载二进制包_图解步骤
MYSQL下载方式 下载二进制包,直接使用wget下载 [root@db ~]# wget https://downloads.mysql.com/archives/get/p/23/file/mys ...
随机推荐
- unbuntu18.04安装启用splash
官网:https://splash.readthedocs.io/en/stable/ 1.安装Docker https://www.cnblogs.com/wt7018/p/11880666.htm ...
- ip 地址库 这个 准么 呢
- hihoCoder 1387 A Research on "The Hundred Family Surnames"
搬家一个月,庆祝一下 啪啪啪啪啪啪啪啪啪啪❀❀❀❀ 题目传送门 分析: 这什么奇奇怪怪的OJ,以前从来不知道的2333 以前只知道合并两个连通块时,其中一边直径端点为A,B,另一边为C,D D=max ...
- Linux网络文件共享服务之NFS
一.NFS服务简介 NFS全称network file system 网络文件系统,基于内核的文件系统,有sun公司开发,通过使用NFS,用户和程序可以像访问本地文件一样访问远端系统上的文件,它基于r ...
- 从O365中获取users到D365中
用D365 online可能会遇到这样的问题. 顾客需要获取O365 user的email address 发email使用. 但是又不想给这部分的users licenses. 那我们就可以通过g ...
- Python变量、方法、类的命名规则
1. 变量命名总结: - 1.单下划线开头变量:protected - 2.双下划线开头变量:private - 3.双下划线开头,双下划线结尾:系统内置变量 2. 函数命名总结: - 1.私有方法: ...
- Linux下安装nvidia显卡驱动
部署环境 操作系统:Centos 7.4 在线源:Centos 7.4镜像源 安装操作 1.安装系统插件 [root@localhost ~]# yum -y install gcc kernel-d ...
- js 字符串方法 和 数组方法总览
字符串方法 search() 方法搜索特定值的字符串,并返回匹配的位置. 相比于indexOf(),search()可以设置更强大的搜索值(正则表 ...
- 并发队列之ConcurrentLinkedQueue
本来想着直接说线程池的,不过在说线程池之前,我们必须要知道并发安全队列:因为一般情况下线程池中的线程数量是一定的,肯定不会超过某个阈值,那么当任务太多了的时候,我们必须把多余的任务保存到并发安全队列中 ...
- HTML简介介绍
网页概述 网页:纯文本格式的文件:(以村文本格式编写,后缀名改为HTML的文本文件) ---- 网站:多个网页的集合: ---- 主页:打开网站后显示的第一个页面: ---- 浏览器:将纯文本格式的文 ...