SG Input 软件安全分析之fuzz
前言
前面介绍了通过静态读代码的方式去发现问题,这里介绍两种 fuzz 目标软件的方式。
相关文件
链接:https://pan.baidu.com/s/1l6BuuL-HPFdkFsVNOLpjUQ

提取码:erml
使用winafl
winafl 是 afl 在 windows 上的移植版本,这里首先尝试使用 winafl 去 fuzz 一下目标软件中感兴趣的函数。 为了学习 winafl 的使用,可以先写一个 demo 程序来学习一下 winafl 的用法。
示例
为了做示范,这里我们开发一个 dll, 这个 dll 会导出一个函数 vuln 。
  __cdecl vuln(char *a1)

{

  char v2; // [esp+0h] [ebp-E0h]

  char v3; // [esp+1h] [ebp-DFh]

  char v4; // [esp+C8h] [ebp-18h]

  FILE *v5; // [esp+DCh] [ebp-4h]

  v5 = fopen(a1, "rb");

  if ( v5 )

  {

    fread(&v2, 0xC8u, 1u, v5);

    fclose(v5);

  }

  if ( v2 == -56 && v3 == -56 )

    memcpy(&v4, &v2, 0xC8u);

  return 1;

}
函数的功能比较简单,参数是文件路径,程序首先打开文件然后读取内容。当文件的开头 2 个字节均为 \xc8 时就会触发栈溢出.
下面我们看看怎么用 winafl 来 fuzz 它。
winafl 不能直接去 fuzz 动态链接库,所以首先需要写一个加载程序,加载程序的逻辑如下。
- 首先加载
dll - 获取要
fuzz的目标函数在内存中的地址 - 把
winafl生成的样本数据交给目标函数进行处理。
具体代码如下
// 读取文件内容

typedef int (*vuln) (char* path);

vuln pVuln = NULL;

int fuzzme(char* fpath){

    return  pVuln(fpath);

}

int _tmain(int argc, _TCHAR* argv[])

{

    HMODULE hMod = LoadLibrary(_T("vuln.dll"));//dll路径

    if (hMod)

    {

        pVuln = (vuln)GetProcAddress(hMod, "vuln");

        int ret = fuzzme(argv[1]);

        printf("%d", ret);

        FreeLibrary(hMod);

    }else

    {

        MessageBox(NULL,TEXT("vuln.dll 模块加载失败"),TEXT("警告"),0);

        exit(0);

    }

    return 0;

}
就把命令行的第一个参数作为文件路径传入 vuln 函数。
下面用 winafl 测试一波
afl-fuzz.exe -i F:\security_tools\winafl\fuzz\demo\in\ -o F:\security_tools\winafl\fuzz\demo\out -D F:\security_tools\winafl\dynamorio\bin32 -t 20000 -- -coverage_module vuln.dll -target_module fuzz.exe -target_offset 0x1000 -nargs 1 -- F:\security_tools\winafl\fuzz\demo\fuzz\Release\fuzz.exe @@
其中
-target_module  加载程序名

-target_offset 为 fuzzme 的函数偏移

-D 指定 dynamorio 的路径

-coverage_module 指定 winafl 统计代码覆盖了的模块, 一般为待测函数所在的模块

@@ 是占位符, winafl会把生成的样本文件的路径替换掉 @@
具体参数的意思可以看官方文档。
这里就表示每次 fuzz 生成的样本文件的路径在命令行的第一个参数里面,然后在程序中我们把第一个参数传给了漏洞函数(因为目标函数要的参数就是一个文件路径),这样我们就能对 vuln 函数进行 fuzz 。
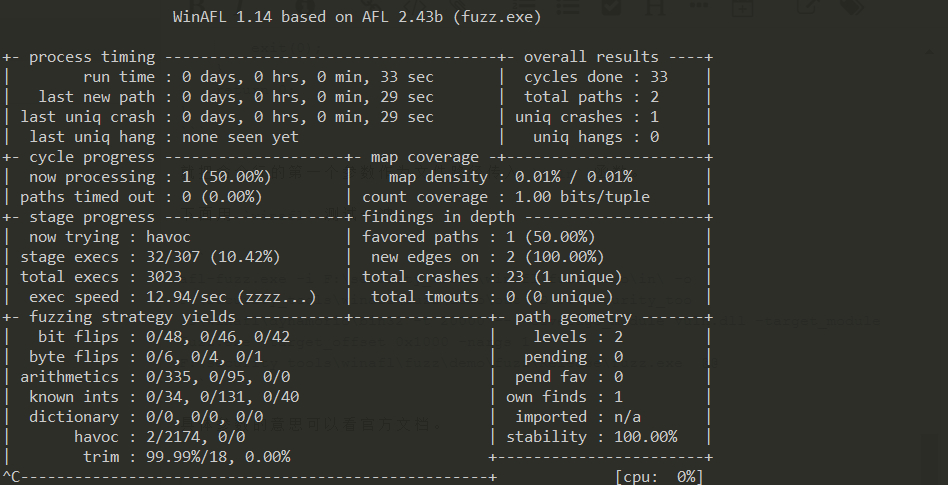
fuzz 截图
ZipLib.dll
通过前面对程序处理皮肤文件逻辑的分析,发现程序在处理老格式的皮肤文件时会调用程序目录下的 ZipLib.dll 来进行解压,我们可以尝试用 winafl 来 fuzz 一下。
首先看看 ZipLib.dll 的导出函数。
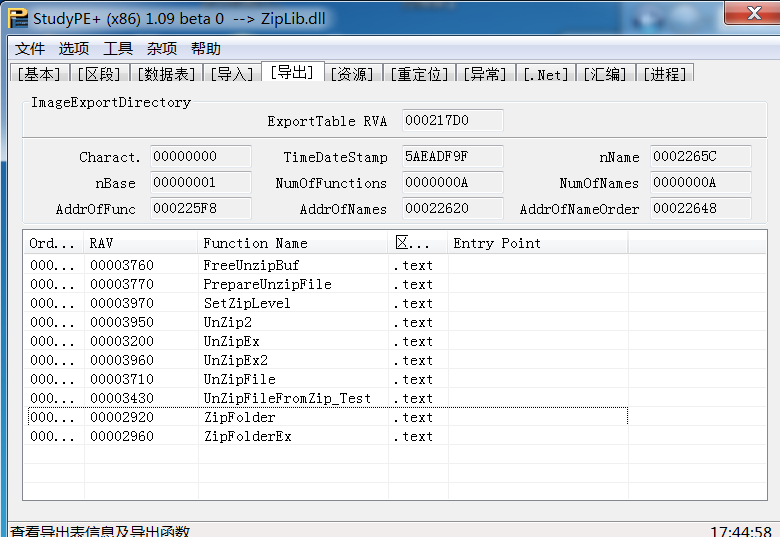
看到名字基本就大概猜到功能了。然后通过分析输入法处理老版本皮肤格式的处理的逻辑,发现在 0x49F544 会调用ZipLib.dll 的 UnZipFile 这个函数。
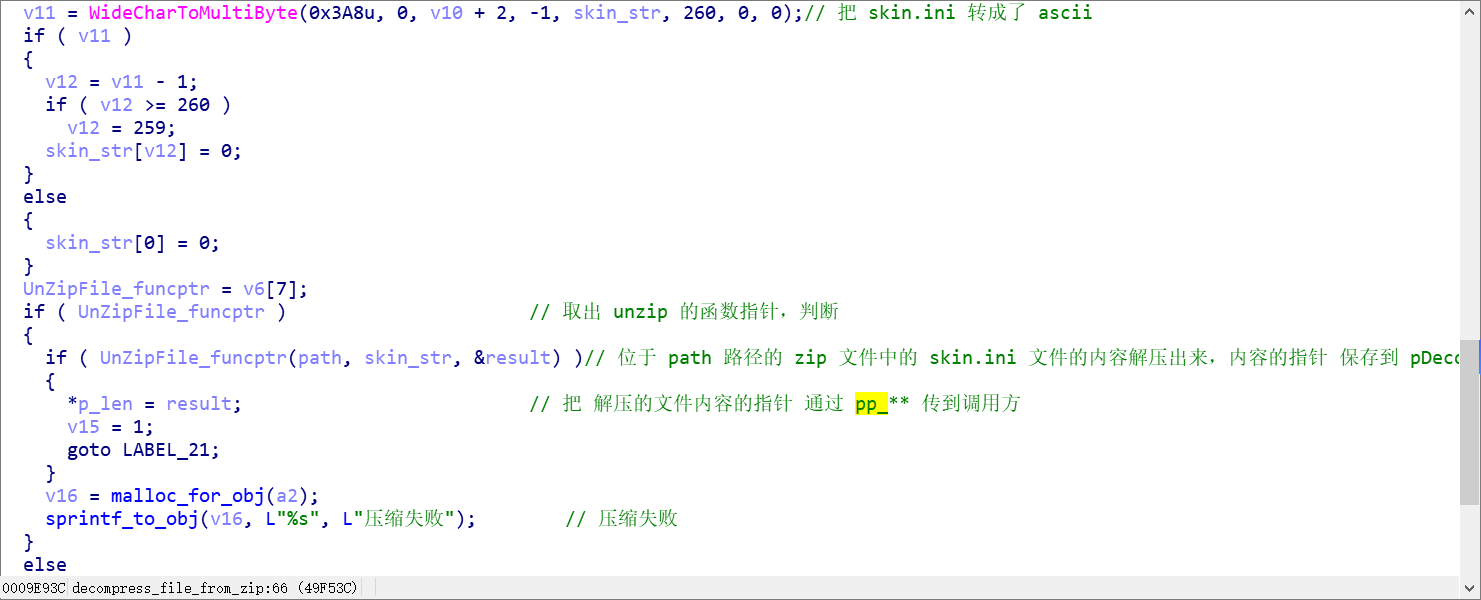
通过调试,可以得到 UnZipFile 的参数的信息。
- 第一个参数为
zip文件的路径 - 第二个参数为需要解压的文件内容
- 第三个参数为一个结构体指针,用于传出解压的结果
保存解压结构的结构体的定义如下
typedef struct{

    int len; // 内容的长度

    char* buf; // 内容的指针

}result;
要进行 fuzz, 下面还需要写一个小程序,把被测 api 调起来. 具体代码如下
#include "stdafx.h"

#include <windows.h>

#include <crtdbg.h>

typedef struct{

    int len; // 内容的长度

    char* buf; // 内容的指针

}result;

// 把 path 的zip 文件中的 target 文件的内容解压出来,内容的指针和长度 保存到 res 里面

typedef int (*UnZipFile) (char* path,char* target, result* res);

typedef int (*FreeUnzipBuf) (result * res);

UnZipFile pUnZipFile = NULL;

FreeUnzipBuf pFreeUnzipBuf = NULL;

int fuzzme(char* fpath){

    char* target = "skin.ini";

    result res = {0};

    int ret = pUnZipFile(fpath, target, &res);

    printf("res.buf:0x%p, res.len: 0x%p\n", res.buf, res.len);

    if(res.buf){

        pFreeUnzipBuf(&res);

    }

    return  ret;

}

int _tmain(int argc, _TCHAR* argv[])

{

    HMODULE hMod = LoadLibrary(_T("ZipLib.dll"));//dll路径

    if (hMod)

    {

        pUnZipFile = (UnZipFile)GetProcAddress(hMod, "UnZipFile");//直接使用原工程函数名

        pFreeUnzipBuf = (FreeUnzipBuf)GetProcAddress(hMod, "FreeUnzipBuf");

        int ret = fuzzme(argv[1]);

        printf("%d\n", ret);

        FreeLibrary(hMod);

    }else

    {

        MessageBox(NULL,TEXT("ZipLib.dll 模块加载失败"),TEXT("警告"),0);

        exit(0);

    }

    return 0;

}
主要逻辑为 首先用 LoadLibrary 把 ZipLib.dll 加载起来,然后获取到被测函数的地址,然后传参数调用。
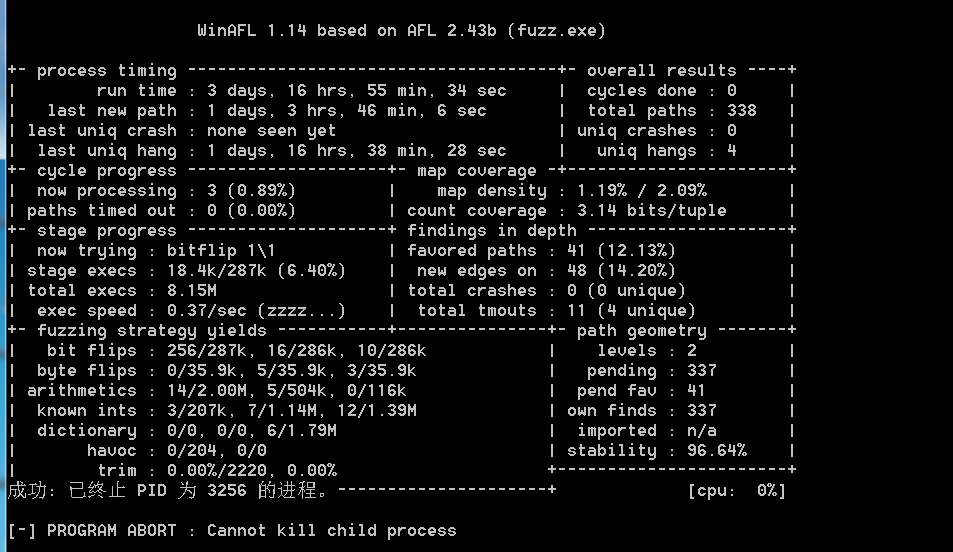
C:\Users\XinSai\Desktop\fuzz\winafl\bin32>afl-fuzz.exe -D C:\Users\XinSai\Desktop\fuzz\dynamorio\bin32 -i C:\Users\XinSai\Desktop\fuzz\sougou\zip -o C:\Users\XinSai\Desktop\fuzz\sougou\out -t 20000 -- -coverage_module ZipLib.dll -target_module fuzz.exe -target_offset 0x8010 -nargs 1 -- C:\Users\XinSai\Desktop\fuzz\sougou\fuzz.exe @@
通过 hook 的方式进行 fuzz
介绍
这种方式是之前从谷歌的一篇博客里面看到的。
https://googleprojectzero.blogspot.com/2018/12/adventures-in-video-conferencing-part-1.html
文章的大致思路是首先找出目标程序中负责数据解密的函数, 然后利用 hook 的方式替换 解密函数为一个 fuzz 的函数(功能其实就是随机填充数据)。 之后当程序正常接收数据时,会首先调用解密函数先解密数据,然后在对解密的数据进行处理。由于此时解密函数已经替换为了 fuzz 函数, 所以我们相当于直接跳过了解密这个步骤,去 fuzz 解密后具体对数据进行处理的那部分逻辑, 而往往会产生安全问题的恰恰就是真正处理数据的部分。这种 fuzz 方案的优势在于可以在不逆向加解密算法的基础上 fuzz 比较深层次的代码。
回到我们的目标程序。在处理新版本的皮肤文件时,会首先使用自定义的解密算法对数据进行解密。解密出来的数据是 zlib 压缩的,后面紧接着使用 zlib 解压缩。
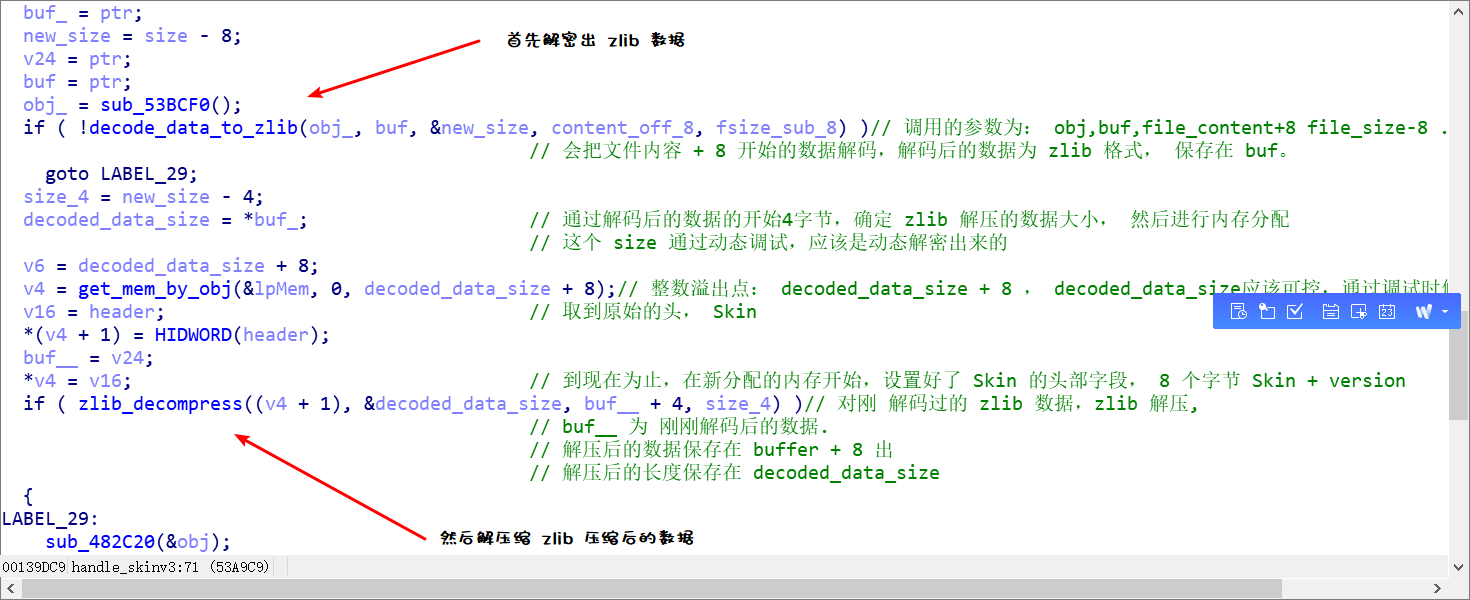
后面就开始处理进一步解析文件格式了。如下图所示

然后替换 解密函数 和 解压函数为 hook 函数就可以对 解析数据部分进行 fuzz 了。如下图所示

这里hook 的方式采用 mhook 框架, 这个框架可以很方便的进行 inline hook.
#include "stdafx.h"

#include "tchar.h"

#include "mhook-lib/mhook.h"

typedef unsigned int(*decode_to_zlib)(char* out_buf,int* out_size,  char* buf, unsigned int size);

typedef unsigned int(*zlib_decompress)(char* out, int* decoded_data_size, char* buf, unsigned int size);

void hexdump(FILE * stream, void const * data, unsigned int len)

{

    unsigned int i;

    unsigned int r, c;

    if (!stream)

        return;

    if (!data)

        return;

    for (r = 0, i = 0; r < (len / 16 + (len % 16 != 0)); r++, i += 16)

    {

        fprintf(stream, "%04X:   ", i); /* location of first byte in line */

        for (c = i; c < i + 8; c++) /* left half of hex dump */

            if (c < len)

                fprintf(stream, "%02X ", ((unsigned char const *)data)[c]);

            else

                fprintf(stream, "   "); /* pad if short line */

        fprintf(stream, "  ");

        for (c = i + 8; c < i + 16; c++) /* right half of hex dump */

            if (c < len)

                fprintf(stream, "%02X ", ((unsigned char const *)data)[c]);

            else

                fprintf(stream, "   "); /* pad if short line */

        fprintf(stream, "   ");

        for (c = i; c < i + 16; c++) /* ASCII dump */

            if (c < len)

                if (((unsigned char const *)data)[c] >= 32 &&

                    ((unsigned char const *)data)[c] < 127)

                    fprintf(stream, "%c", ((char const *)data)[c]);

                else

                    fprintf(stream, "."); /* put this for non-printables */

            else

                fprintf(stream, " "); /* pad if short line */

        fprintf(stream, "\n");

    }

    fflush(stream);

}

void log_to_file(char *log) {

    FILE *pfile = fopen("c:\\log.txt", "a");

    fwrite(log, 1, strlen(log), pfile);

    fflush(pfile);

    fclose(pfile);

}

unsigned long long count = 0;

void fuzz(char* buf, int len) {

    int q = rand() % 10;

    if (q == 7) {

        int ind = rand() % len;

        buf[ind] = rand();

    }

    if (q == 5) {

        for (int i = 0; i < len; i++)

            buf[i] = rand();

    }

    char path[0x100] = { 0 };

    snprintf(path, 0x100, "c:\\fuzz_%p.txt", count++);

    FILE *pfile = fopen(path, "a");

    hexdump(pfile, buf, len);

    fflush(pfile);

    fclose(pfile);

}

// 由于默认使用 stdcall , 取参数时会从栈里面取, 而目标函数的第一个参数为 this 指针,通过 ecx 取,所以不需要。

unsigned int hook_decode_to_zlib(char* out_buf, int* out_size, char* buf, unsigned int size)

{

    char log[0x100] = { 0 };

    snprintf(log, 0x100, "target:%p, buf:%p ,size:%p\n", out_buf, buf, size);

    //MessageBoxA(0, log, "hook_decode_to_zlib", MB_ICONEXCLAMATION);

    log_to_file(log);

    memcpy(out_buf, buf, size);

    return 1;

}

unsigned int hook_zlib_decompress(char* out, int* decoded_data_size, char* buf, unsigned int size)

{

    char log[0x100] = { 0 };

    unsigned int de_size = *decoded_data_size;

    snprintf(log, 0x100, "buf:%p ,de_size:%p, count: %p\n", buf, de_size, count);

    //MessageBoxA(0, log, "hook_zlib_decompress", MB_ICONEXCLAMATION);

    log_to_file(log);

    memcpy(out, buf, de_size);

    fuzz(out, de_size);

    return 1;

}

int __stdcall DllMain(HINSTANCE hinstDLL, DWORD  fdwReason, LPVOID lpReserved)

{

    char* base = NULL;

    char* decode_to_zlib = NULL;

    char* zlib_decompress = NULL;

    switch (fdwReason)

    {

    case DLL_PROCESS_ATTACH://加载时候

        base = (char*)GetModuleHandle(_T("SGTool.exe"));

        decode_to_zlib = base + 0x239610;

        zlib_decompress = base + 0x4ffac0;

        /*

        // hook decode_to_zlib 函数

        if (Mhook_SetHook((PVOID*)&decode_to_zlib, hook_decode_to_zlib)) {

            char out[1024];

            snprintf(out, 1024, "base: %p, func:%p", base, decode_to_zlib);

            MessageBoxA(0, out, "inject", MB_ICONEXCLAMATION);

        }

        */

        // hook zlib_decompress 函数

        if (Mhook_SetHook((PVOID*)&zlib_decompress, hook_zlib_decompress)) {

            char out[1024];

            snprintf(out, 1024, "base: %p, func:%p", base, zlib_decompress);

            MessageBoxA(0, out, "inject", MB_ICONEXCLAMATION);

        }

        break;

    default:

        break;

    }

    return TRUE;

    return 0;

}
代码的逻辑是把 zlib_decompress (即 zlib 解压缩函数) 替换为 hook_zlib_decompress 函数。
unsigned int hook_zlib_decompress(char* out, int* decoded_data_size, char* buf, unsigned int size)

{

	char log[0x100] = { 0 };

	unsigned int de_size = *decoded_data_size;

	snprintf(log, 0x100, "buf:%p ,de_size:%p, count: %p\n", buf, de_size, count);

	//MessageBoxA(0, log, "hook_zlib_decompress", MB_ICONEXCLAMATION);

	log_to_file(log);

	memcpy(out, buf, de_size);

	fuzz(out, de_size);

	return 1;

}
这个函数首先会对记录一些信息, 然后把数据复制到 out 缓冲区, 然后把 out 缓冲区的地址和 大小传入 fuzz 函数,进行 fuzz 处理。
unsigned long long count = 0;

void fuzz(char* buf, int len) {

	srand(time(0));

	for (int i = 0; i < len; i++)

		buf[i] = rand();

	char path[0x100] = { 0 };

	snprintf(path, 0x100, "c:\\fuzz_%p.bin", count++);

	FILE *fp = fopen(path, "wb");

	fwrite(buf, 1, len, fp);

	fflush(fp);

	fclose(fp);

}
fuzz 函数就是往 buf 里面填随机数, 然后保存样本到磁盘,以便后面进行复现。这里的 fuzz 函数写的比较简单,对数据的变异仅仅只是填充随机数。以后可以考虑借鉴 afl 的策略来提升 fuzz 的效率。编译 hook 代码会得到一个 dll。
Fuzz
首先使用
"C:\Program Files (x86)\SogouInput\9.1.0.2657\SGTool.exe" -daemon
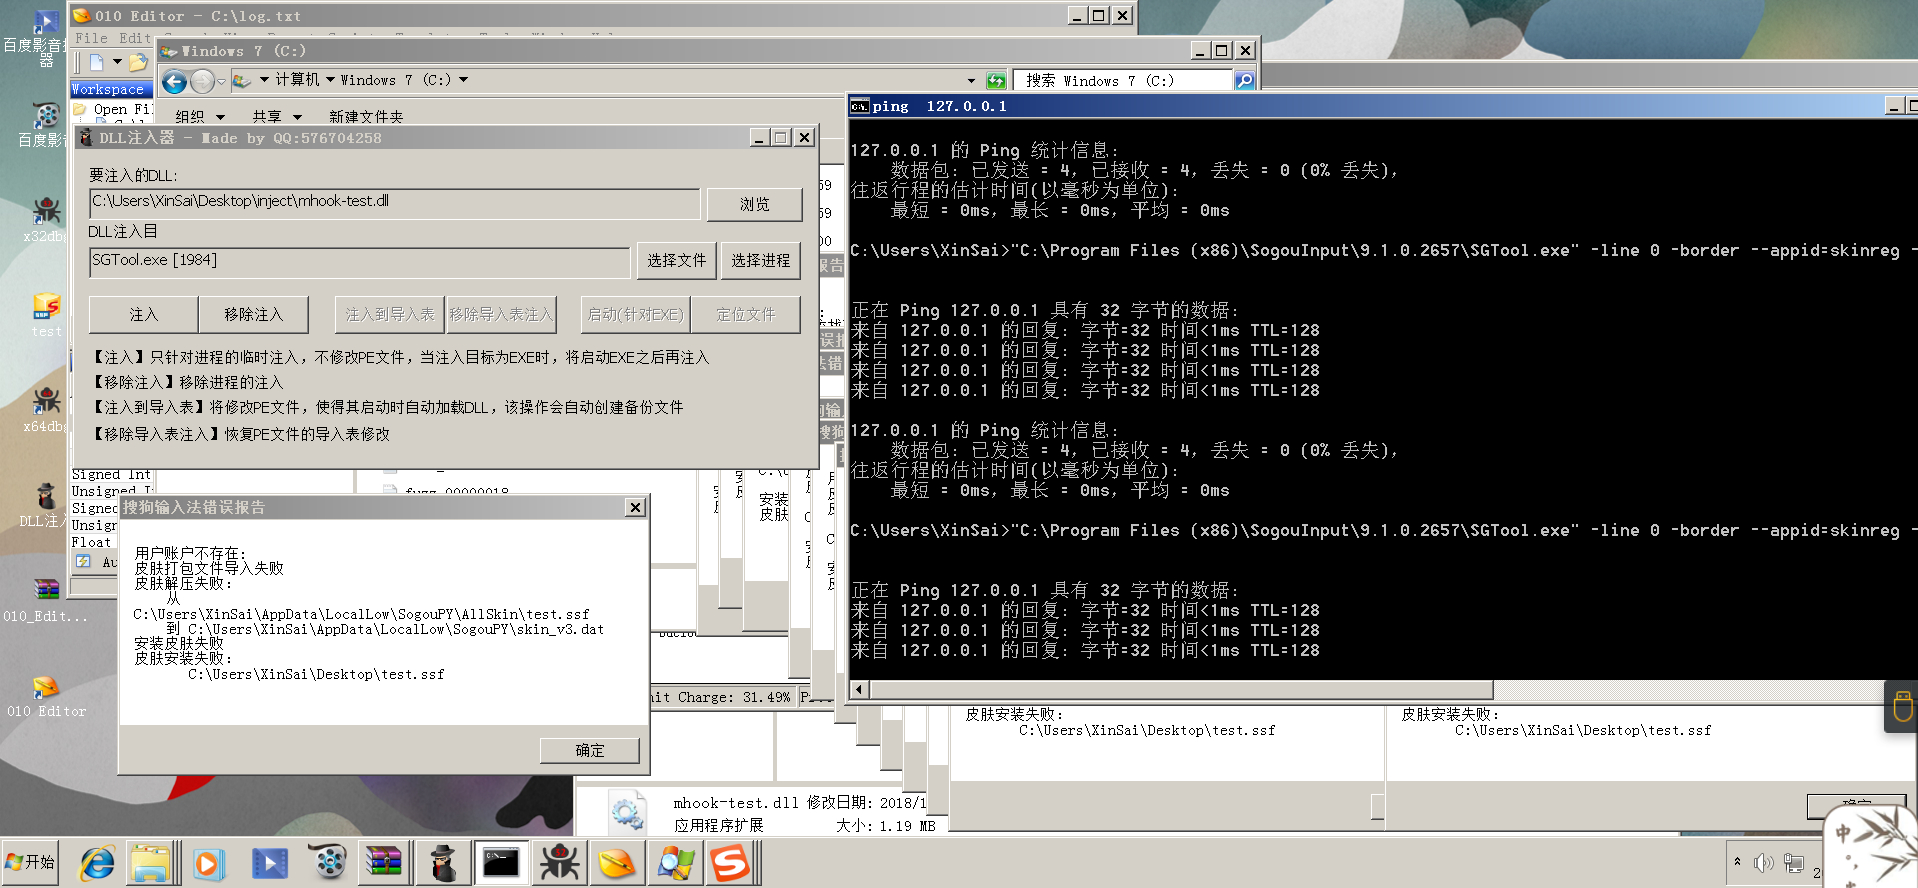
创建一个守护进程,监听客户端的皮肤安装请求。然后使用 dll 注入工具 ,把生成的 dll 注入到进程中, 然后用调试器附加上监控崩溃。
接下来就可以不断的发出安装请求,这样 sgtool 守护进程就会不断调用解密函数,而此时我们已经hook了解密函数,则此时实际调用的是 fuzz 函数对数据进行变异,这样就对程序进行了 fuzz.
for /l %i in (1 1 1000) do "C:\Program Files (x86)\SogouInput\9.1.0.2657\SGTool.exe" -line 0 -border --appid=skinreg -install -c "C:\Users\XinSai\Desktop\test.ssf" -q -ef && ping 127.0.0.1
就是不断的安装皮肤,然后用 ping 命令来 防止频率过高。
TIPS: 和这种方式类似的 fuzz : 内存fuzz
参考链接
https://googleprojectzero.blogspot.com/2018/12/adventures-in-video-conferencing-part-1.html
https://symeonp.github.io/2017/09/17/fuzzing-winafl.html
https://github.com/googleprojectzero/winafl
https://github.com/martona/mhook
SG Input 软件安全分析之fuzz的更多相关文章
- SG Input 软件安全分析之逆向分析
前言 通过本文介绍怎么对一个 windows 程序进行安全分析.分析的软件版本为 2018-10-9 , 所有相关文件的链接 链接:https://pan.baidu.com/s/1l6BuuL-HP ...
- Linux input子系统分析
输入输出是用户和产品交互的手段,因此输入驱动开发在Linux驱动开发中很常见.同时,input子系统的分层架构思想在Linux驱动设计中极具代表性和先进性,因此对Linux input子系统进行深入分 ...
- input子系统分析(转)
转自:http://www.linuxidc.com/Linux/2011-09/43187.htm 作者:作者:YAOZHENGUO2006 Input子系统处理输入事务,任何输入设备的驱动程序都可 ...
- 内核input子系统分析
打开/driver/input/input.c 这就是input代码的核心 找到 static int __init input_init(void) { err = class_register(& ...
- linux kernel input 子系统分析
Linux 内核为了处理各种不同类型的的输入设备 , 比如说鼠标 , 键盘 , 操纵杆 , 触摸屏 , 设计并实现了一个对上层应用统一的试图的抽象层 , 即是Linux 输入子系统 . 输入子系统的层 ...
- input子系统分析
------------------------------------------ 本文系本站原创,欢迎转载! 转载请注明出处:http://ericxiao.cublog.cn/ -------- ...
- input子系统分析之三:驱动模块
内核版本:3.9.5 本节将以even handler来分析设备的注册和打开的过程,分析之前不妨回顾一下上节介绍的数据结构. 结合前两节分析可知,input子系统分为3层,最上一层是event han ...
- input子系统分析之一:框架
内核版本:3.9.5 输入设备总类繁杂,包括按键,键盘,触摸屏,鼠标,摇杆等等,它们本身都是字符设备,不过内核为了能将这些设备的共性抽象出来,简化驱动的开发,建立了一个Input子系统.Input子系 ...
- 常用6种type的form表单的input标签分析及示例
<input> 标签用于搜集用户信息. 根据不同的 type 属性值,输入字段拥有很多种形式.输入字段可以是文本字段.复选框.掩码后的文本控件.单选按钮.按钮等等. 在这里博主介绍6中ty ...
随机推荐
- 使用Qt开发绘制多个设备的流量曲线图(附带项目图)
一.说明: 在实际项目中,主要是使用Qt开发CS程序,当然主要是客户端.公司项目中有这个需求是实时显示多个设备的流量曲线图,设备将流量信息发给服务端,服务端再将信息通过Socket发给Qt客户端,Qt ...
- HTML里面form表单name,action,method,target,enctype等属性用法
HTML里面的form表单里面的name,target,enctype,method以及action的用法 HML表单HTML里面的表单是HTML页面与浏览器交互的重要手段,表单主要提交一些客户端的数 ...
- C++primer笔记之关联容器
在这一章中,有以下的几点收获: 1.pair类型的使用相当频繁,如果需要定义多个相同的pair类型对象,可考虑利用typedef简化其声明: typedef pair<string, strin ...
- Spring Cloud Finchley 正式发布,包含 4 个重大更新!
在 Spring 的官方博客上已经看到 Spring Cloud Finchley 在 06 月 19 日这一天正式发布了,我们在 Maven 中央仓库也看到了最新版的更新. Finchley 正式版 ...
- linux中crontab的使用方法
crontab参数说明: -e : 执行文字编辑器来设定时程表,内定的文字编辑器是 VI,如果你想用别的文字编辑器,则请先设定 VISUAL 环境变数来指定使用那个文字编辑器(比如说 setenv V ...
- 用DDD模拟案例分析
之前我写了几篇关于DDD的介绍和一些小例子说明,我想这对于介绍DDD还是有些模糊,甚至还不知道怎么用DDD来分析设计.昨天和园友讨论也发现没有例子很难说明,所以今天我模拟了一个案例,同时这个案例也是真 ...
- for in 循环 和for循环 for of循环
for in 循环得到的是数组的key值 for in 循环用以遍历对象的属性 var scores=[10,11,12]; var total=0; for(var score in scores ...
- Java并发框架AbstractQueuedSynchronizer(AQS)
1.前言 本文介绍一下Java并发框架AQS,这是大神Doug Lea在JDK5的时候设计的一个抽象类,主要用于并发方面,功能强大.在新增的并发包中,很多工具类都能看到这个的影子,比如:CountDo ...
- Python -- tabulate 模块,
pip install tabulate >>> from tabulate import tabulate >>> table = [["Sun&quo ...
- 第五章:Android布局
View的布局显示方式有下面几种:线性布局(Linear Layout).相对布局(Relative Layout).表格布局(Table Layout).帧布局(FrameLayout).绝对布局( ...
