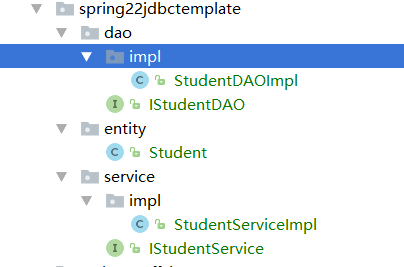
Spring配置JDBCTemplate
案例:单测查询全部学生
项目结构:

1.导入部署jar包:spring-jdbc
<!--spring-jdbc-->

        <dependency>

            <groupId>org.springframework</groupId>

            <artifactId>spring-jdbc</artifactId>

            <version>4.2.0.RELEASE</version>

        </dependency>
2.创建实体类:Student
public class Student {

    private Integer id;  //编号

    private String name;  //姓名

    private Integer age;  //年龄

    private Date birthday;  //出生日期

}
3.创建dao层的接口和实现类:
IStudentDAO:
public interface IStudentDAO {

    //查询全部

    public List<Student> findAll();

}
StudentDAOImpl:继承JdbcDaoSupport 实现IStudentDAO
public class StudentDAOImpl extends JdbcDaoSupport implements IStudentDAO{

    public List<Student> findAll() {

        String sql="select * from student";

        List<Student> list=this.getJdbcTemplate().query(sql, new RowMapper<Student>() {

            /**

             *

             * @param rs

             * @param i

             * @return

             * @throws SQLException

             */

            public Student mapRow(ResultSet rs, int i) throws SQLException {

                Student student=new Student();

                student.setId(rs.getInt("id"));

                student.setName(rs.getString("name"));

                student.setAge(rs.getInt("age"));

                student.setBirthday(rs.getDate("birthday"));

                return student;

            }

        });

        return list;

    }

}
4.创建service层的接口和实现类:
IStudentService:
public interface IStudentService {

    //查询全部

    public List<Student> findAll();

}
StudentServiceImpl:
public class StudentServiceImpl implements IStudentService {

    private IStudentDAO dao;

    public List<Student> findAll() {

        return dao.findAll();

    }

    public IStudentDAO getDao() {

        return dao;

    }

    public void setDao(IStudentDAO dao) {

        this.dao = dao;

    }

}
在applicationContextSpring15jdbctemplate.xml中配置:
<?xml version="1.0" encoding="UTF-8"?>

<beans xmlns="http://www.springframework.org/schema/beans"

       xmlns:aop="http://www.springframework.org/schema/aop"

       xmlns:context="http://www.springframework.org/schema/context"

       xmlns:xsi="http://www.w3.org/2001/XMLSchema-instance"

       xsi:schemaLocation="

       http://www.springframework.org/schema/beans http://www.springframework.org/schema/beans/spring-beans.xsd

       http://www.springframework.org/schema/aop http://www.springframework.org/schema/aop/spring-aop.xsd

       http://www.springframework.org/schema/context http://www.springframework.org/schema/context/spring-context.xsd

">

   <!--00.识别jdbc.properties-->

    <!--方式一-->

   <!-- <context:property-placeholder location="jdbc.properties"></context:property-placeholder>-->

    <!--方式二-->

    <bean class="org.springframework.beans.factory.config.PropertyPlaceholderConfigurer">

        <property name="location" value="jdbc.properties"></property>

    </bean>

    <!--01.建立数据源-->

    <bean id="dataSource" class="org.springframework.jdbc.datasource.DriverManagerDataSource">

        <property name="driverClassName" value="${jdbc.driver}"></property>

        <property name="url" value="${jdbc.url}"></property>

        <property name="username" value="${jdbc.uname}"></property>

        <property name="password" value="${jdbc.password}"></property>

    </bean>

    <!--03.dao的配置-->

    <bean id="studentDao" class="cn.happy.spring22jdbctemplate.dao.impl.StudentDAOImpl">

        <property name="dataSource" ref="dataSource"></property>

    </bean>

    <!--04.service的配置-->

    <bean id="studentService" class="cn.happy.spring22jdbctemplate.service.impl.StudentServiceImpl">

        <property name="dao" ref="studentDao"></property>

    </bean>

</beans>
其他三种数据源的方案:
 <!--02建立数据源 dbcp-->

     <bean id="dataSource" class="org.apache.commons.dbcp.BasicDataSource">

         <property name="driverClassName" value="${jdbc.driver}"></property>

         <property name="url" value="${jdbc.url}"></property>

         <property name="username" value="${jdbc.uname}"></property>

         <property name="password" value="${jdbc.password}"></property>

     </bean>

     <!--03建立数据源 c3p0-->

     <bean id="dataSource" class="com.mchange.v2.c3p0.ComboPooledDataSource">

         <property name="driverClass" value="${jdbc.driver}"></property>

         <property name="jdbcUrl" value="${jdbc.url}"></property>

         <property name="user" value="${jdbc.uname}"></property>

         <property name="password" value="${jdbc.password}"></property>

     </bean>

     <!--03建立数据源 alibaba-->

     <bean id="dataSource" class="com.alibaba.druid.pool.DruidDataSource">

         <property name="driverClassName" value="${jdbc.driver}"></property>

         <property name="url" value="${jdbc.url}"></property>

         <property name="username" value="${jdbc.uname}"></property>

         <property name="password" value="${jdbc.password}"></property>

     </bean>
单元测试:
  //jdbcTemplate

    @Test

    public void test01(){

        ApplicationContext context=new ClassPathXmlApplicationContext("applicationContextSpring15jdbctemplate.xml");

        IStudentService dao=(IStudentService) context.getBean("studentService");

        List<Student> list = dao.findAll();

        for (Student item:list){

            System.out.println(item.getName());

        }

    }
执行结果:

Spring配置JDBCTemplate的更多相关文章
- Spring:JdbcTemplate使用指南
Spring:JdbcTemplate使用指南 Spring:JdbcTemplate使用指南 前言: 本文指在介绍Spring框架中的JdbcTemplate类的使用方法,涉及基本的Spring反转 ...
- spring配置连接池和dao使用jdbcTemplate
1 spring配置c3p0连接池 第一步 导入jar包 第二步 创建spring配置文件,配置连接池 (1)把代码中的实现在配置文件中实现 2 dao使用jdbcTemplate (1) 创建ser ...
- Spring配置连接池和 Dao 层使用 jdbcTemplate
1.Spring 配置 c3p0 连接池 (1)导入jar包(Maven项目) <dependency> <groupId>com.mchange</groupId> ...
- spring配置属性的两种方式
spring配置属性有两种方式,第一种方式通过context命名空间中的property-placeholder标签 <context:property-placeholder location ...
- spring配置详解
1.前言 公司老项目的后台,均是基于spring框架搭建,其中还用到了log4j.jar等开源架包.在新项目中,则是spring和hibernate框架均有使用,利用了hibernate框架,来实现持 ...
- spring配置事务
一.配置JDBC事务处理机制 <!-- 配置Hibernate事务处理 --> <bean id="transactionManager" class=" ...
- spring使用jdbcTemplate和jdbcdaosupport和namedparameter
jdbcTemplate: 首先连接数据库 <!-- 导入外部文件 --> <context:property-placeholder location="classpat ...
- Spring之JDBCTemplate学习
一.Spring对不同的持久化支持: Spring为各种支持的持久化技术,都提供了简单操作的模板和回调 ORM持久化技术 模板类 JDBC org.springframework.jdbc.core. ...
- spring使用JdbcTemplate和jdbcDaosupport及具名参数使用
关于jdbctemplate: 个人感觉比Java链接mysql那一套方便好维护多了,只需在配置文件维护即可 需要的包: com.springsource.net.sf.cglib-2.2.0.jar ...
随机推荐
- bootstrap-table 刷新页面数据
bom.bootstrapTable('load',msg['object']);//这一步 务必要添加. if(msg['code']==1){ bom.find('tbody').css('dis ...
- javascript 将毫秒值转换为天-小时-分钟-秒钟
var start_timeMS = new Date(start_date).getTime(); var end_timeMS = new Date(end_date).getTime(); va ...
- 步步为营102-Css样式加个版本
背景:当系统发布后修改了css样式,由于浏览器有缓存,所以会造成css样式无效.可通过在css中添加版本号来解决 1 修改css引用 <link rel="stylesheet&quo ...
- Hadoop的namenode的管理机制,工作机制和datanode的工作原理
HDFS前言: 1) 设计思想 分而治之:将大文件.大批量文件,分布式存放在大量服务器上,以便于采取分而治之的方式对海量数据进行运算分析: 2)在大数据系统中作用: 为各类分布式运算框架(如:mapr ...
- C++ 定位new运算符
这里说的定位new运算符,是一种相对于普通的new运算符,可以指定内存地址的运算符,程序直接使用我们提供的地址,不管它是否已经被使用,而且可以看到新值直接覆盖在旧值上面. 定位new运算符直接使用传递 ...
- zookeeper 学习 zookeeper下载部署
下载 http://mirror.bit.edu.cn/apache/zookeeper/ 校验 解压后得到zookeeper-3.4.10.jar,使用md5sum zookeeper-3.4.10 ...
- C#default关键字(泛型代码中的默认关键字)
在泛型类和泛型方法中产生的一个问题是,在预先未知以下情况时,如何将默认值分配给参数化类型 T:T 是引用类型还是值类型.如果 T 为值类型,则它是数值还是结构.给定参数化类型 T 的一个变量 t,只有 ...
- springboot1.5.4 集成cxf完整实例
WebService 服务端 添加依赖 <?xml version="1.0" encoding="UTF-8"?> <project xml ...
- [转]oracle分页用两层循环还是三层循环?
select t2.* from --两层嵌套 (select t.* , rownum as row_numfrom t where rownum <=20) t2 where t2.row_ ...
- Linux图形化监控网络流量:speedometer查看流量
Speedometer是一个带宽控制台和对数带宽显示的文件下载进度监控,以及一个简单的命令行界面.其目的是测量和显示网络连接或数据存储在文件中的数据率. Speedometer 2.8该版本增加了一个 ...
