GPU 环境搭建指南:使用 GPU Operator 加速 Kubernetes GPU 环境搭建

本文主要分享如何使用 GPU Operator 快速搭建 Kubernetes GPU 环境。
1. 概述
上一篇文章 GPU 使用指南:如何在裸机、Docker、K8s 等环境中使用 GPU 分享了裸机、Docker 环境以及 K8s 环境中如何使用 GPU。
整个流程还算比较简单,但是因为需要在节点上安装 GPU Driver、Container Toolkit 等组件,当集群规模较大时还是比较麻烦的。
为了解决这个问题,NVIDIA 推出了 GPU Operator,GPU Operator 旨在简化在 Kubernetes 环境中使用 GPU 的过程,通过自动化的方式处理 GPU 驱动程序安装、Controller Toolkit、Device-Plugin 、监控等组件。
基本上把需要手动安装、配置的地方全部自动化处理了,极大简化了 k8s 环境中的 GPU 使用。
ps:只有 NVIDIA GPU 可以使用,其他厂家现在基本还是手动安装。
2. 组件介绍
这部分主要分析下 GPU Operator 涉及到的各个组件及其作用。
NVIDIA GPU Operator总共包含如下的几个组件:
- NFD(Node Feature Discovery):用于给节点打上某些标签,这些标签包括 cpu id、内核版本、操作系统版本、是不是 GPU 节点等,其中需要关注的标签是
nvidia.com/gpu.present=true,如果节点存在该标签,那么说明该节点是 GPU 节点。 - GFD(GPU Feature Discovery):用于收集节点的 GPU 设备属性(GPU 驱动版本、GPU型号等),并将这些属性以节点标签的方式透出。在k8s 集群中以 DaemonSet 方式部署,只有节点拥有标签
nvidia.com/gpu.present=true时,DaemonSet 控制的 Pod 才会在该节点上运行。- 新版本 GFD 迁移到了 NVIDIA/k8s-device-plugin
- NVIDIA Driver Installer:基于容器的方式在节点上安装 NVIDIA GPU 驱动,在 k8s 集群中以 DaemonSet 方式部署,只有节点拥有标签
nvidia.com/gpu.present=true时,DaemonSet 控制的 Pod 才会在该节点上运行。 - NVIDIA Container Toolkit Installer:能够实现在容器中使用 GPU 设备,在 k8s 集群中以 DaemonSet 方式部署,同样的,只有节点拥有标签
nvidia.com/gpu.present=true时,DaemonSet 控制的 Pod 才会在该节点上运行。 - NVIDIA Device Plugin:NVIDIA Device Plugin 用于实现将 GPU 设备以 Kubernetes 扩展资源的方式供用户使用,在 k8s 集群中以 DaemonSet 方式部署,只有节点拥有标签
nvidia.com/gpu.present=true时,DaemonSet 控制的 Pod 才会在该节点上运行。 - DCGM Exporter:周期性的收集节点 GPU 设备的状态(当前温度、总的显存、已使用显存、使用率等)并暴露 Metrics,结合 Prometheus 和 Grafana 使用。在 k8s 集群中以DaemonSet 方式部署,只有节点拥有标签
nvidia.com/gpu.present=true时,DaemonSet 控制的 Pod 才会在该节点上运行。
首先是 GFD、NFD,二者都是用于发现 Node 上的信息,并以 label 形式添加到 k8s node 对象上,特别是 GFD 会添加nvidia.com/gpu.present=true 标签表示该节点有 GPU,只有携带该标签的节点才会安装后续组件。
然后则是 Driver Installer、Container Toolkit Installer 用于安装 GPU 驱动和 container toolkit。
接下来这是 device-plugin 让 k8s 能感知到 GPU 资源信息便于调度和管理。
最后的 exporter 则是采集 GPU 监控并以 Prometheus Metrics 格式暴露,用于做 GPU 监控。
这些组件基本就把需要手动配置的东西都自动化了。
NVIDIA GPU Operator 依如下的顺序部署各个组件,并且如果前一个组件部署失败,那么其后面的组件将停止部署:
- NVIDIA Driver Installer
- NVIDIA Container Toolkit Installer
- NVIDIA Device Plugin
- DCGM Exporter
- GFD
每个组件都是以 DaemonSet 方式部署,并且只有当节点存在标签 nvidia.com/gpu.present=true 时,各 DaemonSet控制的 Pod 才会在节点上运行。
nvidia.com/gpu.deploy.driver=pre-installed
GFD & NFD
GFD:GPU Feature Discovery
NFD:Node Feature Discovery
根据名称基本能猜到这两个组件的功能,发现节点信息和 GPU 信息并以 Label 形式添加到 k8s 中的 node 对象上。
其中 NFD 添加的 label 以 feature.node.kubernetes.io 作为前缀,比如:
feature.node.kubernetes.io/cpu-cpuid.ADX=true

feature.node.kubernetes.io/system-os_release.ID=ubuntu

feature.node.kubernetes.io/system-os_release.VERSION_ID.major=22

feature.node.kubernetes.io/system-os_release.VERSION_ID.minor=04

feature.node.kubernetes.io/system-os_release.VERSION_ID=22.04
对于 GFD 则主要记录 GPU 信息
nvidia.com/cuda.runtime.major=12

nvidia.com/cuda.runtime.minor=2

nvidia.com/cuda.driver.major=535

nvidia.com/cuda.driver.minor=161

nvidia.com/gpu.product=Tesla-T4

nvidia.com/gpu.memory=15360
Driver Installer
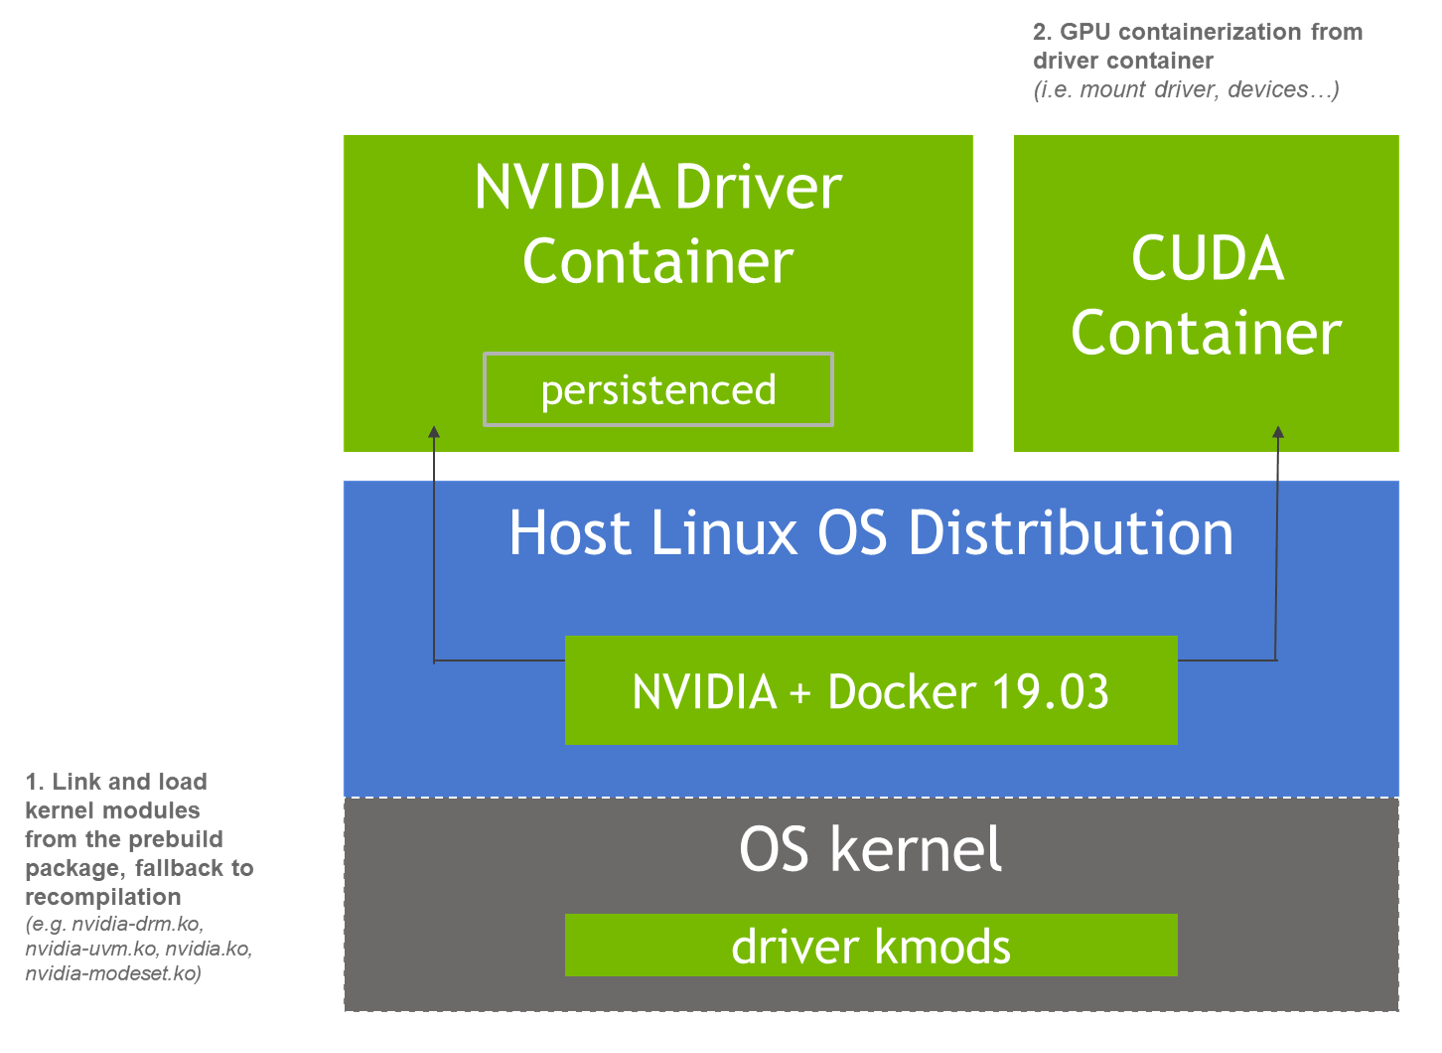
NVIDIA 官方提供了一种基于容器安装 NVIDIA 驱动的方式,GPU Operator 安装 nvidia 驱动也是采用的这种方式。
当 NVIDIA 驱动基于容器化安装后,整个架构将演变成图中描述的样子:

Driver Installer 组件对应的 DaemonSet 就是nvidia-driver-daemonset-5.15.0-105-generic-ubuntu22.04。
该 DaemonSet 对应的镜像为
root@test:~# kgo get ds nvidia-driver-daemonset-5.15.0-105-generic-ubuntu22.04 -oyaml|grep image

        image: nvcr.io/nvidia/driver:535-5.15.0-105-generic-ubuntu22.04
其中 DaemonSet 名称/镜像由几部分组件:
- nvidia-driver-daemonset 这部分为前缀
- 5.15.0-105-generic 为内核版本,使用
uname -r命令查看 - ubuntu22.04 操作系统版本,使用
cat /etc/os-release命令查看 - 535:这个是 GPU Driver 的版本号,这里表示安装 535 版本驱动,在部署时可以指定。
GPU Operator 会自动根据节点上的内核版本和操作系统生成 DaemonSet 镜像,因为是以 DaemonSet 方式运行的,所有节点上都是跑的同一个 Pod,因此要限制集群中的所有 GPU 节点操作系统和内核版本必须一致。
ps:如果提前手动在节点上安装 GPU 驱动,那么 GPU Operator 检测到之后就不会在该节点上启动 Installer Pod,这样该节点就可以不需要管操作系统和内核版本。
NVIDIA Container Toolkit Installer
该组件用于安装 NVIDIA Container Toolkit。
手动安装的时候有两个步骤:
- 1)安装 NVIDIA Container Toolkit
- 2)修改 Runtime 配置指定使用 nvidia-runtime
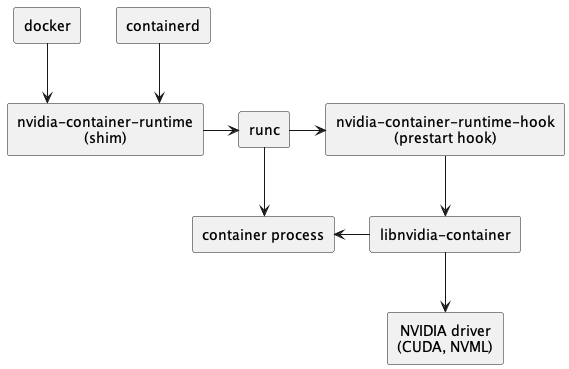
在整个调用链中新增 nvidia-container-runtime,以便处理 GPU 相关操作。

这个 Installer 做的操作也就是这两步:
- 1)将容器中NVIDIA Container Toolkit组件所涉及的命令行工具和库文件移动到/usr/local/nvidia/toolkit目录下
- 2)在 /usr/local/nvidia/toolkit/.config/nvidia-container-runtime创建nvidia-container-runtime的配置文件config.toml,并设置nvidia-container-cli.root的值为/run/nvidia/driver。
3. 部署
参考官方文档: operator-install-guide
准备工作
要求:
1)GPU 节点必须运行相同的操作系统,
- 如果提前手动在节点上安装驱动的话,该节点可以使用不同的操作系统
- CPU 节点操作系统没要求,因为 gpu-operator 只会在 GPU 节点上运行
2)GPU 节点必须配置相同容器引擎,例如都是 containerd 或者都是 docker
3)如果使用了 Pod Security Admission (PSA) ,需要为 gpu-operator 标记特权模式
kubectl create ns gpu-operator

kubectl label --overwrite ns gpu-operator pod-security.kubernetes.io/enforce=privileged
4)集群中不要安装 NFD,如果已经安装了需要再安装 gpu-operator 时禁用 NFD 部署。
使用以下命令查看集群中是否部署 NFD
kubectl get nodes -o json | jq '.items[].metadata.labels | keys | any(startswith("feature.node.kubernetes.io"))'
如果返回 true 则说明集群中安装了 NFD。
使用 Helm 部署
# 添加 nvidia helm 仓库并更新

helm repo add nvidia https://helm.ngc.nvidia.com/nvidia \

    && helm repo update

# 以默认配置安装

helm install --wait --generate-name \

    -n gpu-operator --create-namespace \

    nvidia/gpu-operator

# 如果提前手动安装了 gpu 驱动,operator 中要禁止 gpu 安装

helm install --wait --generate-name \

     -n gpu-operator --create-namespace \

     nvidia/gpu-operator \

     --set driver.enabled=false
完成后 会启动 Pod 安装驱动,如果节点上已经安装了驱动了,那么 gpu-operaotr 就不会启动安装驱动的 Pod,通过 label 进行筛选。
- 没安装驱动的节点会打上
nvidia.com/gpu.deploy.driver=true,表示需要安装驱动 - 已经手动安装过驱动的节点会打上
nvidia.com/gpu.deploy.driver=pre-install,Daemonset 则不会在该节点上运行
当然,并不是每个操作系统+内核版本的组合,NVIDIA 都提供了对应的镜像,可以提前在 NVIDIA/driver tags 查看当前 NVIDIA 提供的驱动版本。
测试
部署后,会在gpu-operator namespace 下启动相关 Pod,查看一下 Pod 的运行情况,除了一个 Completed 之外其他应该都是 Running 状态。
root@test:~# kubectl -n gpu-operator get po

NAME                                                           READY   STATUS      RESTARTS      AGE

gpu-feature-discovery-jdqpb                                    1/1     Running     0             35d

gpu-operator-67f8b59c9b-k989m                                  1/1     Running     6 (35d ago)   35d

nfd-node-feature-discovery-gc-5644575d55-957rp                 1/1     Running     6 (35d ago)   35d

nfd-node-feature-discovery-master-5bd568cf5c-c6t9s             1/1     Running     6 (35d ago)   35d

nfd-node-feature-discovery-worker-sqb7x                        1/1     Running     6 (35d ago)   35d

nvidia-container-toolkit-daemonset-rqgtv                       1/1     Running     0             35d

nvidia-cuda-validator-9kqnf                                    0/1     Completed   0             35d

nvidia-dcgm-exporter-8mb6v                                     1/1     Running     0             35d

nvidia-device-plugin-daemonset-7nkjw                           1/1     Running     0             35d

nvidia-driver-daemonset-5.15.0-105-generic-ubuntu22.04-g5dgx   1/1     Running     5 (35d ago)   35d

nvidia-operator-validator-6mqlm                                1/1     Running     0             35d
然后进入nvidia-driver-daemonset-xxx Pod,该 Pod 负责 GPU Driver 的安装,在该 Pod 中可以执行 nvidia-smi 命令,比如查看 GPU 信息:
root@j99cloudvm:~# kubectl -n gpu-operator exec -it nvidia-driver-daemonset-5.15.0-105-generic-ubuntu22.04-g5dgx -- nvidia-smi

Defaulted container "nvidia-device-plugin" out of: nvidia-device-plugin, config-manager, toolkit-validation (init), config-manager-init (init)

Wed Jul 17 01:49:35 2024

+-----------------------------------------------------------------------------+

| NVIDIA-SMI 525.147.05   Driver Version: 525.147.05   CUDA Version: 12.0     |

|-------------------------------+----------------------+----------------------+

| GPU  Name        Persistence-M| Bus-Id        Disp.A | Volatile Uncorr. ECC |

| Fan  Temp  Perf  Pwr:Usage/Cap|         Memory-Usage | GPU-Util  Compute M. |

|                               |                      |               MIG M. |

|===============================+======================+======================|

|   0  NVIDIA A40          Off  | 00000000:00:07.0 Off |                    0 |

|  0%   46C    P0    88W / 300W |    484MiB / 46068MiB |      0%      Default |

|                               |                      |                  N/A |

+-------------------------------+----------------------+----------------------+

|   1  NVIDIA A40          Off  | 00000000:00:08.0 Off |                    0 |

|  0%   48C    P0    92W / 300W |  40916MiB / 46068MiB |      0%      Default |

|                               |                      |                  N/A |

+-------------------------------+----------------------+----------------------+

+-----------------------------------------------------------------------------+

| Processes:                                                                  |

|  GPU   GI   CI        PID   Type   Process name                  GPU Memory |

|        ID   ID                                                   Usage      |

|=============================================================================|

+-----------------------------------------------------------------------------+
最后再查看 Pod 信息
$ kubectl get node xxx -oyaml

status:

  addresses:

  - address: 172.18.187.224

    type: InternalIP

  - address: izj6c5dnq07p1ic04ei9vwz

    type: Hostname

  allocatable:

    cpu: "4"

    ephemeral-storage: "189889991571"

    hugepages-1Gi: "0"

    hugepages-2Mi: "0"

    memory: 15246720Ki

    nvidia.com/gpu: "1"

    pods: "110"

  capacity:

    cpu: "4"

    ephemeral-storage: 206043828Ki

    hugepages-1Gi: "0"

    hugepages-2Mi: "0"

    memory: 15349120Ki

    nvidia.com/gpu: "1"

    pods: "110"
确认 capacity 是否包含 GPU,正常应该是有的,比如这样:
  capacity:

    nvidia.com/gpu: "1"
至此,说明我们的 GPU Operator 已经安装成功,K8s 也能感知到节点上的 GPU,接下来就可以在 Pod 中使用 GPU 了。
创建一个测试 Pod,申请一个 GPU:
apiVersion: v1

kind: Pod

metadata:

  name: cuda-vectoradd

spec:

  restartPolicy: OnFailure

  containers:

  - name: cuda-vectoradd

    image: "nvcr.io/nvidia/k8s/cuda-sample:vectoradd-cuda11.7.1-ubuntu20.04"

    resources:

      limits:

        nvidia.com/gpu: 1
正常的 Pod 日志如下:
$ kubectl logs pod/cuda-vectoradd

[Vector addition of 50000 elements]

Copy input data from the host memory to the CUDA device

CUDA kernel launch with 196 blocks of 256 threads

Copy output data from the CUDA device to the host memory

Test PASSED

Done
至此,我们已经可以在 k8s 中使用 GPU 了。
【Kubernetes 系列】持续更新中,搜索公众号【探索云原生】订阅,阅读更多文章。

4. 原理
这部分主要分析一下 Driver Installer 和 NVIDIA Container Toolkit Installer 这两个组件是怎么实现的,大致原理。
Driver Installer
NVIDIA 官方提供了一种基于容器安装 NVIDIA 驱动的方式,GPU Operator 安装 nvidia 驱动也是采用的这种方式。
当 NVIDIA 驱动基于容器化安装后,整个架构将演变成图中描述的样子:

安装
Driver Installer 组件对应的 DaemonSet 就是nvidia-driver-daemonset-5.15.0-105-generic-ubuntu22.04。
该 DaemonSet 对应的镜像为
root@test:~# kgo get ds nvidia-driver-daemonset-5.15.0-105-generic-ubuntu22.04 -oyaml|grep image

        image: nvcr.io/nvidia/driver:535-5.15.0-105-generic-ubuntu22.04
其中 DaemonSet 名称/镜像由几部分组件:
- nvidia-driver-daemonset 这部分为前缀
- 5.15.0-105-generic 为内核版本,使用
uname -r命令查看 - ubuntu22.04 操作系统版本,使用
cat /etc/os-release命令查看 - 535:这个是 GPU Driver 的版本号,这里表示安装 535 版本驱动,在部署时可以指定。
查看一下 Pod 日志:
root@test:~# kubectl -n gpu-operaator logs -f nvidia-driver-daemonset-5.15.0-105-generic-ubuntu22.04-g5dgx

========== NVIDIA Software Installer ==========

Starting installation of NVIDIA driver branch 535 for Linux kernel version 5.15.0-105-generic

Stopping NVIDIA persistence daemon...

Unloading NVIDIA driver kernel modules...

Unmounting NVIDIA driver rootfs...

Installing NVIDIA driver kernel modules...

Reading package lists...

Building dependency tree...

Reading state information...

The following packages were automatically installed and are no longer required:

 ...

Setting up linux-modules-nvidia-535-server-5.15.0-105-generic (5.15.0-105.115+1) ...

linux-image-nvidia-5.15.0-105-generic: constructing .ko files

nvidia-drm.ko: OK

nvidia-modeset.ko: OK

nvidia-peermem.ko: OK

nvidia-uvm.ko: OK

nvidia.ko: OK

Processing triggers for linux-image-5.15.0-105-generic (5.15.0-105.115) ...

/etc/kernel/postinst.d/dkms:

 * dkms: running auto installation service for kernel 5.15.0-105-generic

   ...done.

Parsing kernel module parameters...

Loading ipmi and i2c_core kernel modules...

Loading NVIDIA driver kernel modules...

+ modprobe nvidia

+ modprobe nvidia-uvm

+ modprobe nvidia-modeset

+ set +o xtrace -o nounset

Starting NVIDIA persistence daemon...

Mounting NVIDIA driver rootfs...

Done, now waiting for signal
可以看到,先是在安装驱动,安装完成后又加载了一些内核模块。
为了实现在容器中安装驱动,该 Pod 通过 hostPath 将安装驱动相关的目录都挂载到容器中了,
      volumes:

      - hostPath:

          path: /run/nvidia

          type: DirectoryOrCreate

        name: run-nvidia

      - hostPath:

          path: /etc/os-release

          type: ""

        name: host-os-release

      - hostPath:

          path: /run/nvidia-topologyd

          type: DirectoryOrCreate

        name: run-nvidia-topologyd

        name: run-mellanox-drivers

      - hostPath:

          path: /run/nvidia/validations

          type: DirectoryOrCreate

        name: run-nvidia-validations

      - hostPath:

          path: /sys

          type: Directory
镜像构建
根据 Dockerfile 来看下镜像是怎么构建的,以 CentOS8 的 Dockerfile 为例
文件来自:https://gitlab.com/nvidia/container-images/driver/-/blob/master/centos8/Dockerfile
FROM nvidia/cuda:11.4.1-base-centos8

ENV NVIDIA_VISIBLE_DEVICES=void

RUN NVIDIA_GPGKEY_SUM=d0664fbbdb8c32356d45de36c5984617217b2d0bef41b93ccecd326ba3b80c87 && \

    curl -fsSL https://developer.download.nvidia.com/compute/cuda/repos/rhel8/x86_64/D42D0685.pub | sed '/^Version/d' > /etc/pki/rpm-gpg/RPM-GPG-KEY-NVIDIA && \

    echo "$NVIDIA_GPGKEY_SUM  /etc/pki/rpm-gpg/RPM-GPG-KEY-NVIDIA" | sha256sum -c --strict -

#首先安装一些依赖

RUN dnf install -y \

        ca-certificates \

        curl \

        gcc \

        glibc.i686 \

        make \

        dnf-utils \

        kmod && \

    rm -rf /var/cache/dnf/*

RUN curl -fsSL -o /usr/local/bin/donkey https://github.com/3XX0/donkey/releases/download/v1.1.0/donkey && \

    curl -fsSL -o /usr/local/bin/extract-vmlinux https://raw.githubusercontent.com/torvalds/linux/master/scripts/extract-vmlinux && \

    chmod +x /usr/local/bin/donkey /usr/local/bin/extract-vmlinux

#ARG BASE_URL=http://us.download.nvidia.com/XFree86/Linux-x86_64

ARG BASE_URL=https://us.download.nvidia.com/tesla

ARG DRIVER_VERSION

ENV DRIVER_VERSION=$DRIVER_VERSION

# 然后下载驱动文件并安装,注意 --no-kernel-module,这里只安装了 userspace 部分

RUN cd /tmp && \

    curl -fSsl -O $BASE_URL/$DRIVER_VERSION/NVIDIA-Linux-x86_64-$DRIVER_VERSION.run && \

    sh NVIDIA-Linux-x86_64-$DRIVER_VERSION.run -x && \

    cd NVIDIA-Linux-x86_64-$DRIVER_VERSION && \

    ./nvidia-installer --silent \

                       --no-kernel-module \

                       --install-compat32-libs \

                       --no-nouveau-check \

                       --no-nvidia-modprobe \

                       --no-rpms \

                       --no-backup \

                       --no-check-for-alternate-installs \

                       --no-libglx-indirect \

                       --no-install-libglvnd \

                       --x-prefix=/tmp/null \

                       --x-module-path=/tmp/null \

                       --x-library-path=/tmp/null \

                       --x-sysconfig-path=/tmp/null && \

    mkdir -p /usr/src/nvidia-$DRIVER_VERSION && \

    mv LICENSE mkprecompiled kernel /usr/src/nvidia-$DRIVER_VERSION && \

    sed '9,${/^\(kernel\|LICENSE\)/!d}' .manifest > /usr/src/nvidia-$DRIVER_VERSION/.manifest && \

    rm -rf /tmp/*

COPY nvidia-driver /usr/local/bin

WORKDIR /usr/src/nvidia-$DRIVER_VERSION

ARG PUBLIC_KEY=empty

COPY ${PUBLIC_KEY} kernel/pubkey.x509

ARG PRIVATE_KEY

# Remove cuda repository to avoid GPG errors

RUN rm -f /etc/yum.repos.d/cuda.repo

# Add NGC DL license from the CUDA image

RUN mkdir /licenses && mv /NGC-DL-CONTAINER-LICENSE /licenses/NGC-DL-CONTAINER-LICENSE

ENTRYPOINT ["nvidia-driver", "init"]
最后执行的 nvidia-driver 是一个脚本文件,init 部分内容如下:
init() {

    echo -e "\n========== NVIDIA Software Installer ==========\n"

    echo -e "Starting installation of NVIDIA driver version ${DRIVER_VERSION} for Linux kernel version ${KERNEL_VERSION}\n"

    exec 3> ${PID_FILE}

    if ! flock -n 3; then

        echo "An instance of the NVIDIA driver is already running, aborting"

        exit 1

    fi

    echo $$ >&3

    trap "echo 'Caught signal'; exit 1" HUP INT QUIT PIPE TERM

    trap "_shutdown" EXIT

    _unload_driver || exit 1

    _unmount_rootfs

    if _kernel_requires_package; then

        _update_package_cache

        _resolve_kernel_version || exit 1

        _install_prerequisites

        _create_driver_package

        #_remove_prerequisites

        _cleanup_package_cache

    fi

    _install_driver

    _load_driver

    _mount_rootfs

    _write_kernel_update_hook

    echo "Done, now waiting for signal"

    sleep infinity &

    trap "echo 'Caught signal'; _shutdown && { kill $!; exit 0; }" HUP INT QUIT PIPE TERM

    trap - EXIT

    while true; do wait $! || continue; done

    exit 0

}
然后_install_driver 部分在安装驱动,因为之前构建镜像时就安装了 userspace 部分,因此这里指定了--kernel-module-only 来限制安装驱动部分。
这也是为什么容器方式安装很快,因为在构建镜像时就不 驱动的 userspace 部分安装好了。
# Link and install the kernel modules from a precompiled package using the nvidia-installer.

_install_driver() {

    local install_args=()

    echo "Installing NVIDIA driver kernel modules..."

    cd /usr/src/nvidia-${DRIVER_VERSION}

    rm -rf /lib/modules/${KERNEL_VERSION}/video

    if [ "${ACCEPT_LICENSE}" = "yes" ]; then

        install_args+=("--accept-license")

    fi

    nvidia-installer --kernel-module-only --no-drm --ui=none --no-nouveau-check ${install_args[@]+"${install_args[@]}"}

}
_load_driver 加载相关内核模块
# Load the kernel modules and start persistenced.

_load_driver() {

    echo "Loading ipmi and i2c_core kernel modules..."

    modprobe -a i2c_core ipmi_msghandler ipmi_devintf

    echo "Loading NVIDIA driver kernel modules..."

    modprobe -a nvidia nvidia-uvm nvidia-modeset

    echo "Starting NVIDIA persistence daemon..."

    nvidia-persistenced --persistence-mode

}
_mount_rootfs 将驱动程序挂载到 /var/run 目录下
# Mount the driver rootfs into the run directory with the exception of sysfs.

_mount_rootfs() {

    echo "Mounting NVIDIA driver rootfs..."

    mount --make-runbindable /sys

    mount --make-private /sys

    mkdir -p ${RUN_DIR}/driver

    mount --rbind / ${RUN_DIR}/driver

}
这就是驱动安装的部分流程,和我们看到的 Pod 日志也是匹配的。
卸载的话就是相反的操作了。
NVIDIA Container Toolkit Installer
该组件用于安装 NVIDIA Container Toolkit。
手动安装的时候有两个步骤:
- 1)安装 NVIDIA Container Toolkit
- 2)修改 Runtime 配置指定使用 nvidia-runtime
在整个调用链中新增 nvidia-container-runtime,以便处理 GPU 相关操作。

这个 Installer 做的操作也就是这两步:
- 1)将容器中NVIDIA Container Toolkit组件所涉及的命令行工具和库文件移动到/usr/local/nvidia/toolkit目录下
- 2)在 /usr/local/nvidia/toolkit/.config/nvidia-container-runtime创建nvidia-container-runtime的配置文件config.toml,并设置nvidia-container-cli.root的值为/run/nvidia/driver。
安装
该 Installer 对应的 DaemonSet 为nvidia-container-toolkit-daemonset。
Pod 启动命令如下:
      containers:

      - args:

        - /bin/entrypoint.sh

        command:

        - /bin/bash

        - -c
这个entrypoint.sh内容存放在nvidia-container-toolkit-entrypoint Configmap 中,内容如下:
apiVersion: v1

data:

  entrypoint.sh: |-

    #!/bin/bash

    set -e

    driver_root=/run/nvidia/driver

    driver_root_ctr_path=$driver_root

    if [[ -f /run/nvidia/validations/host-driver-ready ]]; then

      driver_root=/

      driver_root_ctr_path=/host

    fi

    export NVIDIA_DRIVER_ROOT=$driver_root

    export DRIVER_ROOT_CTR_PATH=$driver_root_ctr_path

    #

    # The below delay is a workaround for an issue affecting some versions

    # of containerd starting with 1.6.9. Staring with containerd 1.6.9 we

    # started seeing the toolkit container enter a crashloop whereby it

    # would recieve a SIGTERM shortly after restarting containerd.

    #

    # Refer to the commit message where this workaround was implemented

    # for additional details:

    #   https://github.com/NVIDIA/gpu-operator/commit/963b8dc87ed54632a7345c1fcfe842f4b7449565

    #

    sleep 5

    exec nvidia-toolkit
设置了驱动相关环境变量,真正执行配置的是exec nvidia-toolkit 这一句。
该同样使用 hostPath 方式把宿主机目录挂载到容器中,便于对宿主机上的内容进行修改。
      volumes:

      - hostPath:

          path: /run/nvidia

          type: DirectoryOrCreate

        name: nvidia-run-path

      - hostPath:

          path: /run/nvidia/validations

          type: DirectoryOrCreate

        name: run-nvidia-validations

      - hostPath:

          path: /run/nvidia/driver

          type: ""

        name: driver-install-path

        name: host-root

      - hostPath:

          path: /usr/local/nvidia

          type: ""

        name: toolkit-install-dir

      - hostPath:

          path: /run/containers/oci/hooks.d

          type: ""

        name: crio-hooks

      - hostPath:

          path: /dev/char

          type: ""

        name: host-dev-char

      - hostPath:

          path: /var/run/cdi

          type: DirectoryOrCreate

        name: cdi-root

      - hostPath:

          path: /etc/docker

          type: DirectoryOrCreate

        name: docker-config

      - hostPath:

          path: /var/run

          type: ""

        name: docker-socket
查看 Pod 日志,看看安装流程
root@test:~# kubectl -n gpu-operator logs -f nvidia-container-toolkit-daemonset-rqgtv

# 安装 container toolkit

time="2024-06-12T02:07:58Z" level=info msg="Parsing arguments"

time="2024-06-12T02:07:58Z" level=info msg="Starting nvidia-toolkit"

time="2024-06-12T02:07:58Z" level=info msg="Verifying Flags"

time="2024-06-12T02:07:58Z" level=info msg=Initializing

time="2024-06-12T02:07:58Z" level=info msg="Installing toolkit"

time="2024-06-12T02:07:58Z" level=info msg="Installing NVIDIA container toolkit to '/usr/local/nvidia/toolkit'"

# 修改配置

time="2024-06-12T02:07:58Z" level=info msg="Installing NVIDIA container toolkit config '/usr/local/nvidia/toolkit/.config/nvidia-container-runtime/config.toml'"

time="2024-06-12T02:07:58Z" level=info msg="Skipping unset option: nvidia-container-runtime.debug"

time="2024-06-12T02:07:58Z" level=info msg="Skipping unset option: nvidia-container-runtime.log-level"

time="2024-06-12T02:07:58Z" level=info msg="Skipping unset option: nvidia-container-runtime.mode"

time="2024-06-12T02:07:58Z" level=info msg="Skipping unset option: nvidia-container-runtime.modes.cdi.annotation-prefixes"

time="2024-06-12T02:07:58Z" level=info msg="Skipping unset option: nvidia-container-runtime.runtimes"

time="2024-06-12T02:07:58Z" level=info msg="Skipping unset option: nvidia-container-cli.debug"

Using config:

accept-nvidia-visible-devices-as-volume-mounts = false

accept-nvidia-visible-devices-envvar-when-unprivileged = true

disable-require = false

[nvidia-container-cli]

  environment = []

  ldconfig = "@/run/nvidia/driver/sbin/ldconfig.real"

  load-kmods = true

  path = "/usr/local/nvidia/toolkit/nvidia-container-cli"

  root = "/run/nvidia/driver"

[nvidia-container-runtime]

  log-level = "info"

  mode = "auto"

  runtimes = ["docker-runc", "runc"]

  [nvidia-container-runtime.modes]

    [nvidia-container-runtime.modes.cdi]

      default-kind = "management.nvidia.com/gpu"

    [nvidia-container-runtime.modes.csv]

      mount-spec-path = "/etc/nvidia-container-runtime/host-files-for-container.d"

[nvidia-container-runtime-hook]

  path = "/usr/local/nvidia/toolkit/nvidia-container-runtime-hook"

  skip-mode-detection = true

[nvidia-ctk]

  path = "/usr/local/nvidia/toolkit/nvidia-ctk"

time="2024-06-12T02:07:58Z" level=info msg="Setting up runtime"

time="2024-06-12T02:07:58Z" level=info msg="Parsing arguments: [/usr/local/nvidia/toolkit]"

time="2024-06-12T02:07:58Z" level=info msg="Successfully parsed arguments"

time="2024-06-12T02:07:58Z" level=info msg="Starting 'setup' for docker"

time="2024-06-12T02:07:58Z" level=info msg="Loading docker config from /runtime/config-dir/daemon.json"

time="2024-06-12T02:07:58Z" level=info msg="Successfully loaded config"

time="2024-06-12T02:07:58Z" level=info msg="Flushing config to /runtime/config-dir/daemon.json"
和手动安装类似,分为两步。
查看宿主机上 Docker 的配置文件,也确实是被修改过的,default-runtime 改成了 nvidia。
root@test:~# cat /etc/docker/daemon.json

{

    "data-root": "/var/lib/docker",

    "default-runtime": "nvidia",

    "exec-opts": [

        "native.cgroupdriver=systemd"

    ],

    "log-driver": "json-file",

    "log-opts": {

        "max-file": "3",

        "max-size": "100m"

    },

    "registry-mirrors": [

        "https://docker.chenby.cn"

    ],

    "runtimes": {

        "nvidia": {

            "args": [],

            "path": "/usr/local/nvidia/toolkit/nvidia-container-runtime"

        },

        "nvidia-cdi": {

            "args": [],

            "path": "/usr/local/nvidia/toolkit/nvidia-container-runtime.cdi"

        },

        "nvidia-experimental": {

            "args": [],

            "path": "/usr/local/nvidia/toolkit/nvidia-container-runtime.experimental"

        },

        "nvidia-legacy": {

            "args": [],

            "path": "/usr/local/nvidia/toolkit/nvidia-container-runtime.legacy"

        }

    },

    "storage-driver": "overlay2",

    "storage-opts": [

        "overlay2.override_kernel_check=true"

    ]

}
这就是 NVIDIA Container Toolkit Installer 的安装部分,具体代码实现可以看下一节 镜像构建 部分。
镜像构建
Installer 代码合并到了 nvidia-container-toolkit 仓库 tools 目录,分别为不同的 Runtime 做了不同的实现,比如 Containerd 的实现就在 containerd.go 中,部分代码如下:
// Setup updates a containerd configuration to include the nvidia-containerd-runtime and reloads it

func Setup(c *cli.Context, o *options) error {

	log.Infof("Starting 'setup' for %v", c.App.Name)

	cfg, err := containerd.New(

		containerd.WithPath(o.Config),

		containerd.WithRuntimeType(o.runtimeType),

		containerd.WithUseLegacyConfig(o.useLegacyConfig),

		containerd.WithContainerAnnotations(o.containerAnnotationsFromCDIPrefixes()...),

	)

	if err != nil {

		return fmt.Errorf("unable to load config: %v", err)

	}

	runtimeConfigOverride, err := o.runtimeConfigOverride()

	if err != nil {

		return fmt.Errorf("unable to parse config overrides: %w", err)

	}

	err = o.Configure(cfg, runtimeConfigOverride)

	if err != nil {

		return fmt.Errorf("unable to configure containerd: %v", err)

	}

	err = RestartContainerd(o)

	if err != nil {

		return fmt.Errorf("unable to restart containerd: %v", err)

	}

	log.Infof("Completed 'setup' for %v", c.App.Name)

	return nil

}

// Cleanup reverts a containerd configuration to remove the nvidia-containerd-runtime and reloads it

func Cleanup(c *cli.Context, o *options) error {

	log.Infof("Starting 'cleanup' for %v", c.App.Name)

	cfg, err := containerd.New(

		containerd.WithPath(o.Config),

		containerd.WithRuntimeType(o.runtimeType),

		containerd.WithUseLegacyConfig(o.useLegacyConfig),

		containerd.WithContainerAnnotations(o.containerAnnotationsFromCDIPrefixes()...),

	)

	if err != nil {

		return fmt.Errorf("unable to load config: %v", err)

	}

	err = o.Unconfigure(cfg)

	if err != nil {

		return fmt.Errorf("unable to unconfigure containerd: %v", err)

	}

	err = RestartContainerd(o)

	if err != nil {

		return fmt.Errorf("unable to restart containerd: %v", err)

	}

	log.Infof("Completed 'cleanup' for %v", c.App.Name)

	return nil

}
其中
- Setup 为修改 Runtime 配置,增加 nvidia runtime
- Cleanup 则是取消 Runtime 配置中 nvidia runtime
对应的 Dockerfile内容如下:
# Copyright (c) 2019-2021, NVIDIA CORPORATION.  All rights reserved.

#

# Licensed under the Apache License, Version 2.0 (the "License");

# you may not use this file except in compliance with the License.

# You may obtain a copy of the License at

#

#     http://www.apache.org/licenses/LICENSE-2.0

#

# Unless required by applicable law or agreed to in writing, software

# distributed under the License is distributed on an "AS IS" BASIS,

# WITHOUT WARRANTIES OR CONDITIONS OF ANY KIND, either express or implied.

# See the License for the specific language governing permissions and

# limitations under the License.

ARG GOLANG_VERSION=x.x.x

ARG VERSION="N/A"

FROM nvidia/cuda:12.5.1-base-ubi8 as build

RUN yum install -y \

    wget make git gcc \

     && \

    rm -rf /var/cache/yum/*

ARG GOLANG_VERSION=x.x.x

RUN set -eux; \

    \

    arch="$(uname -m)"; \

    case "${arch##*-}" in \

        x86_64 | amd64) ARCH='amd64' ;; \

        ppc64el | ppc64le) ARCH='ppc64le' ;; \

        aarch64 | arm64) ARCH='arm64' ;; \

        *) echo "unsupported architecture" ; exit 1 ;; \

    esac; \

    wget -nv -O - https://storage.googleapis.com/golang/go${GOLANG_VERSION}.linux-${ARCH}.tar.gz \

    | tar -C /usr/local -xz

ENV GOPATH /go

ENV PATH $GOPATH/bin:/usr/local/go/bin:$PATH

WORKDIR /build

COPY . .

# NOTE: Until the config utilities are properly integrated into the

# nvidia-container-toolkit repository, these are built from the `tools` folder

# and not `cmd`.

RUN GOPATH=/artifacts go install -ldflags="-s -w -X 'main.Version=${VERSION}'" ./tools/...

FROM nvidia/cuda:12.5.1-base-ubi8

ENV NVIDIA_DISABLE_REQUIRE="true"

ENV NVIDIA_VISIBLE_DEVICES=void

ENV NVIDIA_DRIVER_CAPABILITIES=utility

ARG ARTIFACTS_ROOT

ARG PACKAGE_DIST

COPY ${ARTIFACTS_ROOT}/${PACKAGE_DIST} /artifacts/packages/${PACKAGE_DIST}

WORKDIR /artifacts/packages

ARG PACKAGE_VERSION

ARG TARGETARCH

ENV PACKAGE_ARCH ${TARGETARCH}

RUN PACKAGE_ARCH=${PACKAGE_ARCH/amd64/x86_64} && PACKAGE_ARCH=${PACKAGE_ARCH/arm64/aarch64} && \

    yum localinstall -y \

    ${PACKAGE_DIST}/${PACKAGE_ARCH}/libnvidia-container1-1.*.rpm \

    ${PACKAGE_DIST}/${PACKAGE_ARCH}/libnvidia-container-tools-1.*.rpm \

    ${PACKAGE_DIST}/${PACKAGE_ARCH}/nvidia-container-toolkit*-${PACKAGE_VERSION}*.rpm

WORKDIR /work

COPY --from=build /artifacts/bin /work

ENV PATH=/work:$PATH

LABEL io.k8s.display-name="NVIDIA Container Runtime Config"

LABEL name="NVIDIA Container Runtime Config"

LABEL vendor="NVIDIA"

LABEL version="${VERSION}"

LABEL release="N/A"

LABEL summary="Automatically Configure your Container Runtime for GPU support."

LABEL description="See summary"

RUN mkdir /licenses && mv /NGC-DL-CONTAINER-LICENSE /licenses/NGC-DL-CONTAINER-LICENSE

ENTRYPOINT ["/work/nvidia-toolkit"]
这部分比较简单,就是编译生成二进制文件,以及安装部分依赖的 RPM 包。
【Kubernetes 系列】持续更新中,搜索公众号【探索云原生】订阅,阅读更多文章。

5. 小结
本文主要分享如何使用 GPU Operator 自动化完成 GPU Driver、NVIDIA Container Toolkit、device-plugin、exporter 等组件的部署,快速实现在 k8s 环境中使用 GPU。
最后简单分析了 Driver Installer 和 NVIDIA Container Toolkit Installer 这两个组件的工作原理。
GPU Operator 极大简化了在 k8s 中使用 GPU 的繁琐过程,但是也存在一些缺点:
- Driver Installer 以 DaemonSet 方式运行的,每个节点上运行的 Pod 都一样,但是镜像由 驱动版本+内核版本+操作系统版本拼接而成,因此需要集群中所有节点操作系统一致。
- NVIDIA Container Toolkit Installer 同样是以 DaemonSet 方式运行的,另外安装时需要指定 Runtime,这也造成了集群的节点必须安装相同的 Container Runtime。
6. 参考
NVIDIA GPU Operator分析一:NVIDIA驱动安装
GPU 环境搭建指南:使用 GPU Operator 加速 Kubernetes GPU 环境搭建的更多相关文章
- Windows下C,C++开发环境搭建指南
Windows下C,C++开发环境搭建指南 前情提要 基于近一段时间很多网友发邮件反馈,说一些项目编译出现问题,诸如此类的情况. 就觉得很有必要写一篇C,C++开发环境的小指南,统一回复. 1.君欲善 ...
- Ubuntu16.04+Tensorflow+CUDA9.0+cuDNN7.0 环境简明搭建指南
最近在研究风格化得内容,发现搭建环境实在是很头疼的事情,虽然网上已经有各路大神总结整理好了很多搭建指南,各种问题的解决方案都已经罗列出来供大家参考.然后参考终究是参考,真正自己上手,发现仍旧是各种坑, ...
- ubuntu基于VSCode的C++编程语言的构建调试环境搭建指南
ubuntu基于VSCode的C++编程语言的构建调试环境搭建指南 首先安装g++ sudo apt install g++ 检查是否安装成功: 在插件栏安装插件c/c++.code runner: ...
- GPU 编程入门到精通(四)之 GPU 程序优化
博主因为工作其中的须要,開始学习 GPU 上面的编程,主要涉及到的是基于 GPU 的深度学习方面的知识,鉴于之前没有接触过 GPU 编程.因此在这里特地学习一下 GPU 上面的编程.有志同道合的小伙伴 ...
- GPU 编程入门到精通(五)之 GPU 程序优化进阶
博主因为工作其中的须要,開始学习 GPU 上面的编程,主要涉及到的是基于 GPU 的深度学习方面的知识.鉴于之前没有接触过 GPU 编程.因此在这里特地学习一下 GPU 上面的编程. 有志同道合的小伙 ...
- [转]OpenShift 集群搭建指南
转自:http://www.cnblogs.com/zhangning/p/7251810.html OpenShift 集群搭建指南 v1.0 搭建Hyper-v虚拟机或物理机 配置物理机静态IP, ...
- NTP搭建指南
NTP搭建指南 前言: NTP是网络时间协议(Network Time Protocol),用于全球的标准时间(UTC)的校正. 一般NTP 服务有不同的层次:一层是源头NTP 服务器,一层服务器都设 ...
- Lsyncd实时同步搭建指南
linux文件实时同步: inotify+rsync.sersync.lsyncd工具比较 一.inotify + rsync 最近一直在寻求生产服务服务器上的同步替代方案,原先使用的是inotify ...
- WPF管理系统开发框架搭建指南,2020从入门到放弃
WPF技术是一个很不错的技术,但一直没有上手过正式的项目,趁在做这个医疗项目时,遂搭建一个WPF开发框架,目的是为了统一WPF开发并提高开发效率:我对WPF技术算是零基础,现学现卖,用这些不成体系的文 ...
- 搭建eclipse+maven+scala-ide的scala web开发环境
http://www.tuicool.com/articles/NBzAzy 江湖传闻,scala开发的最佳利器乃 JetBrains 的神作 IntelliJ IDEA ,外加构建工具sbt 是也. ...
随机推荐
- C#二叉搜索树算法
二叉搜索树算法实现原理 二叉搜索树(Binary Search Tree,简称BST)是一种节点有序排列的二叉树数据结构.它具有以下性质: 每个节点最多有两个子节点. 对于每个节点,其左子树的所有节点 ...
- Java Web专题攻关
servlet概念 servlet其实就是运行在服务器的一个小程序 如何去理解呢?我们访问服务器的资源包括静态资源和动态资源,其中静态资源是我们放置的模板,CSS.JS等文件,是不变的.而我们访问的动 ...
- Redis实战-session共享之修改登录拦截器
在上一篇中Redis实战之session共享,我们知道了通过Redis实现session共享了,那么token怎么续命呢?怎么刷新用户呢?本来咱们就通过拦截器来实现这两个功能. 登录拦截器优化: 凯哥 ...
- 修改SpringBoot的配置文件application.yaml后启动失败
经常碰到修改application.yaml文件之后,SpringBoot项目启动失败的,报错信息如下 Connected to the target VM, address: '127.0.0.1: ...
- LeetCode题集-1- 两数之和
这个题目是什么意思呢?简单来说就是在一个数组中找出两个元素,使其和为我们设定的值,并且每个元素只能用一次. 如下图具体示例: 到这里不知道你是否已经有解题思路了呢? 解法一:双层循环 我第一反应就是双 ...
- Identity – HTTP Authentication
前言 HTTP Authentication 是很古老的东西. 已经很少地方会用到了. 但还是给我遇上了. 在做 Google Ads Offline Conversion 时, 它提供了 2 种方式 ...
- CSS – min(), max(), clamp()
介绍 它们类似 calc(). 用来通过 formula 输出一个值. 用于 font-size, width, height 之类的, 这些地方. 非常适合用来做 RWD 哦 (特别是 font-s ...
- ASP.NET Core – Swagger API Versioning
前言 Versioning 会导致 Swagger 直接坏掉. 因为 1 个文档无法支持多个版本. 所以需要每一个版本做一个文档. 主要参考 Integrating ASP.NET Core Api ...
- HTTP——请求数据格式
请求数据格式
- 我发布了一款相亲平台《i相遇》
因缘际会之下,我踏入了相亲平台的领域.起初,是为一位客户打造专属相亲应用,过程中深入体验了众多同类平台,却遗憾地发现它们普遍掺杂着欺诈的阴影--高昂的费用.兼职托儿的身影.以及虚假的钓鱼信息,不一而足 ...
