devops-持续集成管理之SonarQube
1. devops-持续集成管理之SonarQube
1) 代码质量七宗罪
编码规范:是否遵守了编码规范,遵循了最佳实践。

潜在的BUG:可能在最坏情况下出现问题的代码,以及存在安全漏洞的代码。

文档和注释:过少(缺少必要信息)、过多(没有信息量)、过时的文档或注释。

重复代码:违反了DontRepeat Yourself原则

复杂度:代码结构太复杂(如圈复杂度太高),难以理解、测试和维护。

测试覆盖率:编写单元测试,特别是针对复杂代码的测试覆盖是否足够。

设计与架构:是否高内聚、低耦合,依赖最少
2) 安装sonarqube
(1) 官网地址: https://www.sonarqube.org/
安装包代码下载地址:https://binaries.sonarsource.com/Distribution/sonarqube/sonarqube-6.7.6.zip
(2) 代码扫描
3) 安装mysql数据库
(1) 准备sonar数据库
为sonar准备mysql数据库,版本必须大于5.6
(2) 下载mysql二进制包
[root@jenkins ~]# cd /usr/local/src

[root@jenkins src]# wget http://dev.mysql.com/get/Downloads/MySQL-5.6/mysql-5.6.30-linux-glibc2.5-x86_64.tar.gz

[root@jenkins src]# ll

total 438228

-rw-r--r-- 1 root root 314592758 Mar  3  2016 mysql-5.6.30-linux-glibc2.5-x86_64.tar.gz
(3) 创建mysql用户
[root@jenkins ~]# groupadd mysql

[root@jenkins ~]# useradd -r -g mysql -s /bin/false mysql
(4) 解压mysql二进制包
[root@jenkins ~]# cd /usr/local/src/

[root@jenkins src]# tar zxf mysql-5.6.30-linux-glibc2.5-x86_64.tar.gz

[root@jenkins src]# mv mysql-5.6.30-linux-glibc2.5-x86_64 /usr/local/

[root@jenkins src]# chown -R mysql.mysql /usr/local/mysql-5.6.30-linux-glibc2.5-x86_64

[root@jenkins src]# ln -s /usr/local/mysql-5.6.30-linux-glibc2.5-x86_64 /usr/local/mysql

[root@jenkins src]# ll /usr/local/

total 0

drwxr-xr-x.  2 root  root    6 Apr 11  2018 bin

drwxr-xr-x.  2 root  root    6 Apr 11  2018 etc

drwxr-xr-x.  2 root  root    6 Apr 11  2018 games

drwxr-xr-x.  2 root  root    6 Apr 11  2018 include

drwxr-xr-x.  2 root  root    6 Apr 11  2018 lib

drwxr-xr-x.  2 root  root    6 Apr 11  2018 lib64

drwxr-xr-x.  2 root  root    6 Apr 11  2018 libexec

lrwxrwxrwx   1 root  root   45 Jan 26 16:38 mysql -> /usr/local/mysql-5.6.30-linux-glibc2.5-x86_64

drwxr-xr-x  13 mysql mysql 191 Jan 26 16:37 mysql-5.6.30-linux-glibc2.5-x86_64

drwxr-xr-x.  2 root  root    6 Apr 11  2018 sbin

drwxr-xr-x.  5 root  root   49 Oct 24 21:37 share

drwxr-xr-x.  2 root  root   82 Jan 26 16:37 src

[root@jenkins src]# chown -R mysql:mysql /usr/local/mysql
(5) 初始化mysql
[root@jenkins src]# /usr/local/mysql/scripts/mysql_install_db --defaults-file=/usr/local/mysql/my.cnf  --user=mysql --basedir=/usr/local/mysql/ --datadir=/usr/local/mysql/data/

Installing MySQL system tables...2019-01-26 16:41:26 0 [Warning] TIMESTAMP with implicit DEFAULT value is deprecated. Please use --explicit_defaults_for_timestamp server option (see documentation for more details).

2019-01-26 16:41:26 0 [Note] /usr/local/mysql//bin/mysqld (mysqld 5.6.30) starting as process 1650 ...

2019-01-26 16:41:26 1650 [Note] InnoDB: Using atomics to ref count buffer pool pages

2019-01-26 16:41:26 1650 [Note] InnoDB: The InnoDB memory heap is disabled

2019-01-26 16:41:26 1650 [Note] InnoDB: Mutexes and rw_locks use GCC atomic builtins

2019-01-26 16:41:26 1650 [Note] InnoDB: Memory barrier is not used

2019-01-26 16:41:26 1650 [Note] InnoDB: Compressed tables use zlib 1.2.3

2019-01-26 16:41:26 1650 [Note] InnoDB: Using Linux native AIO

2019-01-26 16:41:26 1650 [Note] InnoDB: Using CPU crc32 instructions

2019-01-26 16:41:26 1650 [Note] InnoDB: Initializing buffer pool, size = 128.0M

2019-01-26 16:41:26 1650 [Note] InnoDB: Completed initialization of buffer pool

2019-01-26 16:41:26 1650 [Note] InnoDB: The first specified data file ./ibdata1 did not exist: a new database to be created!

2019-01-26 16:41:26 1650 [Note] InnoDB: Setting file ./ibdata1 size to 12 MB

2019-01-26 16:41:26 1650 [Note] InnoDB: Database physically writes the file full: wait...

2019-01-26 16:41:26 1650 [Note] InnoDB: Setting log file ./ib_logfile101 size to 48 MB

2019-01-26 16:41:26 1650 [Note] InnoDB: Setting log file ./ib_logfile1 size to 48 MB

2019-01-26 16:41:27 1650 [Note] InnoDB: Renaming log file ./ib_logfile101 to ./ib_logfile0

2019-01-26 16:41:27 1650 [Warning] InnoDB: New log files created, LSN=45781

2019-01-26 16:41:27 1650 [Note] InnoDB: Doublewrite buffer not found: creating new

2019-01-26 16:41:27 1650 [Note] InnoDB: Doublewrite buffer created

2019-01-26 16:41:27 1650 [Note] InnoDB: 128 rollback segment(s) are active.

2019-01-26 16:41:27 1650 [Warning] InnoDB: Creating foreign key constraint system tables.

2019-01-26 16:41:27 1650 [Note] InnoDB: Foreign key constraint system tables created

2019-01-26 16:41:27 1650 [Note] InnoDB: Creating tablespace and datafile system tables.

2019-01-26 16:41:27 1650 [Note] InnoDB: Tablespace and datafile system tables created.

2019-01-26 16:41:27 1650 [Note] InnoDB: Waiting for purge to start

2019-01-26 16:41:27 1650 [Note] InnoDB: 5.6.30 started; log sequence number 0

2019-01-26 16:41:27 1650 [Note] Binlog end

2019-01-26 16:41:27 1650 [Note] InnoDB: FTS optimize thread exiting.

2019-01-26 16:41:27 1650 [Note] InnoDB: Starting shutdown...

2019-01-26 16:41:29 1650 [Note] InnoDB: Shutdown completed; log sequence number 1625977

OK

Filling help tables...2019-01-26 16:41:29 0 [Warning] TIMESTAMP with implicit DEFAULT value is deprecated. Please use --explicit_defaults_for_timestamp server option (see documentation for more details).

2019-01-26 16:41:29 0 [Note] /usr/local/mysql//bin/mysqld (mysqld 5.6.30) starting as process 1672 ...

2019-01-26 16:41:29 1672 [Note] InnoDB: Using atomics to ref count buffer pool pages

2019-01-26 16:41:29 1672 [Note] InnoDB: The InnoDB memory heap is disabled

2019-01-26 16:41:29 1672 [Note] InnoDB: Mutexes and rw_locks use GCC atomic builtins

2019-01-26 16:41:29 1672 [Note] InnoDB: Memory barrier is not used

2019-01-26 16:41:29 1672 [Note] InnoDB: Compressed tables use zlib 1.2.3

2019-01-26 16:41:29 1672 [Note] InnoDB: Using Linux native AIO

2019-01-26 16:41:29 1672 [Note] InnoDB: Using CPU crc32 instructions

2019-01-26 16:41:29 1672 [Note] InnoDB: Initializing buffer pool, size = 128.0M

2019-01-26 16:41:29 1672 [Note] InnoDB: Completed initialization of buffer pool

2019-01-26 16:41:29 1672 [Note] InnoDB: Highest supported file format is Barracuda.

2019-01-26 16:41:29 1672 [Note] InnoDB: 128 rollback segment(s) are active.

2019-01-26 16:41:29 1672 [Note] InnoDB: Waiting for purge to start

2019-01-26 16:41:29 1672 [Note] InnoDB: 5.6.30 started; log sequence number 1625977

2019-01-26 16:41:29 1672 [Note] Binlog end

2019-01-26 16:41:29 1672 [Note] InnoDB: FTS optimize thread exiting.

2019-01-26 16:41:29 1672 [Note] InnoDB: Starting shutdown...

2019-01-26 16:41:31 1672 [Note] InnoDB: Shutdown completed; log sequence number 1625987

OK

To start mysqld at boot time you have to copy

support-files/mysql.server to the right place for your system

PLEASE REMEMBER TO SET A PASSWORD FOR THE MySQL root USER !

To do so, start the server, then issue the following commands:

  /usr/local/mysql//bin/mysqladmin -u root password 'new-password'

  /usr/local/mysql//bin/mysqladmin -u root -h jenkins password 'new-password'

Alternatively you can run:

  /usr/local/mysql//bin/mysql_secure_installation

which will also give you the option of removing the test

databases and anonymous user created by default.  This is

strongly recommended for production servers.

See the manual for more instructions.

You can start the MySQL daemon with:

  cd . ; /usr/local/mysql//bin/mysqld_safe &

You can test the MySQL daemon with mysql-test-run.pl

  cd mysql-test ; perl mysql-test-run.pl

Please report any problems at http://bugs.mysql.com/

The latest information about MySQL is available on the web at

  http://www.mysql.com

Support MySQL by buying support/licenses at http://shop.mysql.com

New default config file was created as /usr/local/mysql//my.cnf and

will be used by default by the server when you start it.

You may edit this file to change server settings

WARNING: Default config file /etc/my.cnf exists on the system

This file will be read by default by the MySQL server

If you do not want to use this, either remove it, or use the

--defaults-file argument to mysqld_safe when starting the server
(6) 拷贝启动文件
[root@jenkins bin]# cp /usr/local/mysql/support-files/mysql.server /etc/init.d/mysqld
(7) 拷贝my.cnf
[root@jenkins bin]# cp /usr/local/mysql/my.cnf  /etc/my.cnf

cp: overwrite ‘/etc/my.cnf’? y
(8) 启动数据库
[root@jenkins bin]# /etc/init.d/mysqld start

Starting MySQL. SUCCESS!
(9) 添加mysql环境变量
[root@jenkins bin]# mysql

-bash: mysql: command not found               #提示没这个命令

[root@jenkins bin]# echo 'PATH=/usr/local/mysql/bin:$PATH' >> /etc/profile

[root@jenkins bin]# echo $PATH

/usr/local/sbin:/usr/local/bin:/usr/sbin:/usr/bin:/root/bin

[root@jenkins bin]# source /etc/profile
(10) 登录数据库
[root@jenkins bin]# mysql

Welcome to the MySQL monitor.  Commands end with ; or \g.

Your MySQL connection id is 1

Server version: 5.6.30 MySQL Community Server (GPL)

Copyright (c) 2000, 2016, Oracle and/or its affiliates. All rights reserved.

Oracle is a registered trademark of Oracle Corporation and/or its

affiliates. Other names may be trademarks of their respective

owners.

Type 'help;' or '\h' for help. Type '\c' to clear the current input statement.

mysql> Ctrl-C -- exit!

Aborted

[root@jenkins bin]# mysql

Welcome to the MySQL monitor.  Commands end with ; or \g.

Your MySQL connection id is 2

Server version: 5.6.30 MySQL Community Server (GPL)

Copyright (c) 2000, 2016, Oracle and/or its affiliates. All rights reserved.

Oracle is a registered trademark of Oracle Corporation and/or its

affiliates. Other names may be trademarks of their respective

owners.

Type 'help;' or '\h' for help. Type '\c' to clear the current input statement.

mysql> show databases;

+--------------------+

| Database           |

+--------------------+

| information_schema |

| mysql              |

| performance_schema |

| test               |

+--------------------+

4 rows in set (0.00 sec)
(11) 创建sonarqube数据库连接权限
mysql> CREATE DATABASE sonar CHARACTER SET utf8 COLLATE utf8_general_ci;

Query OK, 1 row affected (0.00 sec)

mysql> GRANT ALL ON sonar.* TO 'sonar'@'localhost' IDENTIFIED BY 'sonar@pw';

Query OK, 0 rows affected (0.00 sec)

mysql> GRANT ALL ON sonar.* TO 'sonar'@'%' IDENTIFIED BY 'sonar@pw';

Query OK, 0 rows affected (0.00 sec)

mysql> FLUSH PRIVILEGES;

Query OK, 0 rows affected (0.00 sec)
4)安装sonarqube
(1) 安装sonar
[root@jenkins ~]# yum install -y java-1.8.0
(2) 下载sonar
[root@jenkins ~]# cd /usr/local/src/

[root@jenkins src]# wget https://binaries.sonarsource.com/Distribution/sonarqube/sonarqube-6.7.6.zip

[root@jenkins src]# ll

total 463092

-rw-r--r-- 1 root root 314592758 Mar  3  2016 mysql-5.6.30-linux-glibc2.5-x86_64.tar.gz

-rw-r--r-- 1 root root 159610886 Nov 20 20:23 sonarqube-6.7.6.zip
(3) 解压sonar
[root@jenkins src]# yum -y install unzip        #安装解压工具

[root@jenkins src]# unzip sonarqube-6.7.6.zip

[root@jenkins src]# ll

total 463092

-rw-r--r--  1 root root 314592758 Mar  3  2016 mysql-5.6.30-linux-glibc2.5-x86_64.tar.gz

drwxr-xr-x 11 root root       141 Nov 20 09:59 sonarqube-6.7.6

-rw-r--r--  1 root root 159610886 Nov 20 20:23 sonarqube-6.7.6.zip

[root@jenkins  src]# mv sonarqube-6.7.6 /usr/local/

[root@jenkins src]# ln -s /usr/local/sonarqube-6.7.6/ /usr/local/sonarqube
(4) 修改sonar配置文件
[root@jenkins src]# cd /usr/local/sonarqube/conf/

[root@jenkins conf]# ll

total 24

-rw-r--r-- 1 root root 17786 Nov 20 09:50 sonar.properties

-rw-r--r-- 1 root root  3311 Nov 20 09:50 wrapper.conf

[root@jenkins conf]# vim sonar.properties                         #按照以下内容修改

sonar.web.host=0.0.0.0

sonar.web.port=9000

sonar.jdbc.username=sonar

sonar.jdbc.password=sonar@pw

sonar.jdbc.url=jdbc:mysql://localhost:3306/sonar?useUnicode=true&characterEncoding=utf8&rewriteBatchedStatements=true&useConfigs=maxPerformance&useSSL=false
(5) 创建一个普通用户启动sonar程序
[root@jenkins conf]# useradd sonarqube

[root@jenkins conf]# chown -R sonarqube.sonarqube /usr/local/sonarqube-6.7.6

[root@jenkins conf]# chown -R sonarqube.sonarqube /usr/local/sonarqube

[root@jenkins conf]# su - sonarqube

[sonarqube@jenkins ~]$ cd /usr/local/sonarqube

[sonarqube@jenkins sonarqube]$ ll

total 12

drwxr-xr-x 8 sonarqube sonarqube  136 Nov 20 09:59 bin

drwxr-xr-x 2 sonarqube sonarqube   50 Jan 26 17:42 conf

-rw-r--r-- 1 sonarqube sonarqube 7651 Nov 20 09:50 COPYING

drwxr-xr-x 2 sonarqube sonarqube   24 Nov 20 09:50 data

drwxr-xr-x 7 sonarqube sonarqube  150 Nov 20 09:59 elasticsearch

drwxr-xr-x 4 sonarqube sonarqube   40 Nov 20 09:50 extensions

drwxr-xr-x 9 sonarqube sonarqube  140 Nov 20 09:59 lib

drwxr-xr-x 2 sonarqube sonarqube   37 Jan 26 17:39 logs

drwxr-xr-x 3 sonarqube sonarqube   38 Jan 26 17:35 temp

drwxr-xr-x 9 sonarqube sonarqube 4096 Nov 20 09:59 web

[sonarqube@jenkins sonarqube]$ ll /usr/local/sonarqube/bin/

jsw-license/         linux-x86-32/        linux-x86-64/        macosx-universal-64/ windows-x86-32/      windows-x86-64/

[sonarqube@jenkins sonarqube]$ ll /usr/local/sonarqube/bin/linux-x86-64/

lib/      sonar.sh  wrapper

[sonarqube@jenkins sonarqube]$  /usr/local/sonarqube/bin/linux-x86-64/sonar.sh start

Starting SonarQube...

Started SonarQube.
(6) 验证是否启动
[sonarqube@jenkins sonarqube]$ ps -ef |grep sonarqube

root       2322   1559  0 17:43 pts/2    00:00:00 su - sonarqube

sonarqu+   2442      1  0 17:43 ?        00:00:00 /usr/local/sonarqube-6.7.6/bin/linux-x86-64/./wrapper /usr/local/sonarqube-6.7.6/bin/linux-x86-64/../../conf/wrapper.conf wrapper.syslog.ident=SonarQube wrapper.pidfile=/usr/local/sonarqube-6.7.6/bin/linux-x86-64/./SonarQube.pid wrapper.daemonize=TRUE

sonarqu+   2469   2444 39 17:43 ?        00:00:32 /usr/lib/jvm/java-1.8.0-openjdk-1.8.0.191.b12-1.el7_6.x86_64/jre/bin/java -XX:+UseConcMarkSweepGC -XX:CMSInitiatingOccupancyFraction=75 -XX:+UseCMSInitiatingOccupancyOnly -XX:+AlwaysPreTouch -server -Xss1m -Djava.awt.headless=true -Dfile.encoding=UTF-8 -Djna.nosys=true -Djdk.io.permissionsUseCanonicalPath=true -Dio.netty.noUnsafe=true -Dio.netty.noKeySetOptimization=true -Dio.netty.recycler.maxCapacityPerThread=0 -Dlog4j.shutdownHookEnabled=false -Dlog4j2.disable.jmx=true -Dlog4j.skipJansi=true -Xms512m -Xmx512m -XX:+HeapDumpOnOutOfMemoryError -Des.path.home=/usr/local/sonarqube-6.7.6/elasticsearch -cp /usr/local/sonarqube-6.7.6/elasticsearch/lib/* org.elasticsearch.bootstrap.Elasticsearch -Epath.conf=/usr/local/sonarqube-6.7.6/temp/conf/es

sonarqu+   2557   2444 51 17:44 ?        00:00:38 /usr/lib/jvm/java-1.8.0-openjdk-1.8.0.191.b12-1.el7_6.x86_64/jre/bin/java -Djava.awt.headless=true -Dfile.encoding=UTF-8 -Djava.io.tmpdir=/usr/local/sonarqube-6.7.6/temp -Xmx512m -Xms128m -XX:+HeapDumpOnOutOfMemoryError -cp ./lib/common/*:./lib/server/*:/usr/local/sonarqube-6.7.6/lib/jdbc/mysql/mysql-connector-java-5.1.42.jar org.sonar.server.app.WebServer /usr/local/sonarqube-6.7.6/temp/sq-process5217028904409453940properties

sonarqu+   2734   2444 29 17:44 ?        00:00:12 /usr/lib/jvm/java-1.8.0-openjdk-1.8.0.191.b12-1.el7_6.x86_64/jre/bin/java -Djava.awt.headless=true -Dfile.encoding=UTF-8 -Djava.io.tmpdir=/usr/local/sonarqube-6.7.6/temp -Xmx512m -Xms128m -XX:+HeapDumpOnOutOfMemoryError -cp ./lib/common/*:./lib/server/*:./lib/ce/*:/usr/local/sonarqube-6.7.6/lib/jdbc/mysql/mysql-connector-java-5.1.42.jar org.sonar.ce.app.CeServer /usr/local/sonarqube-6.7.6/temp/sq-process4860119420686879380properties

[sonarqube@jenkins sonarqube]$ netstat -lntup|grep 9000

(Not all processes could be identified, non-owned process info

 will not be shown, you would have to be root to see it all.)

tcp        0      0 0.0.0.0:9000            0.0.0.0:*               LISTEN      2557/java
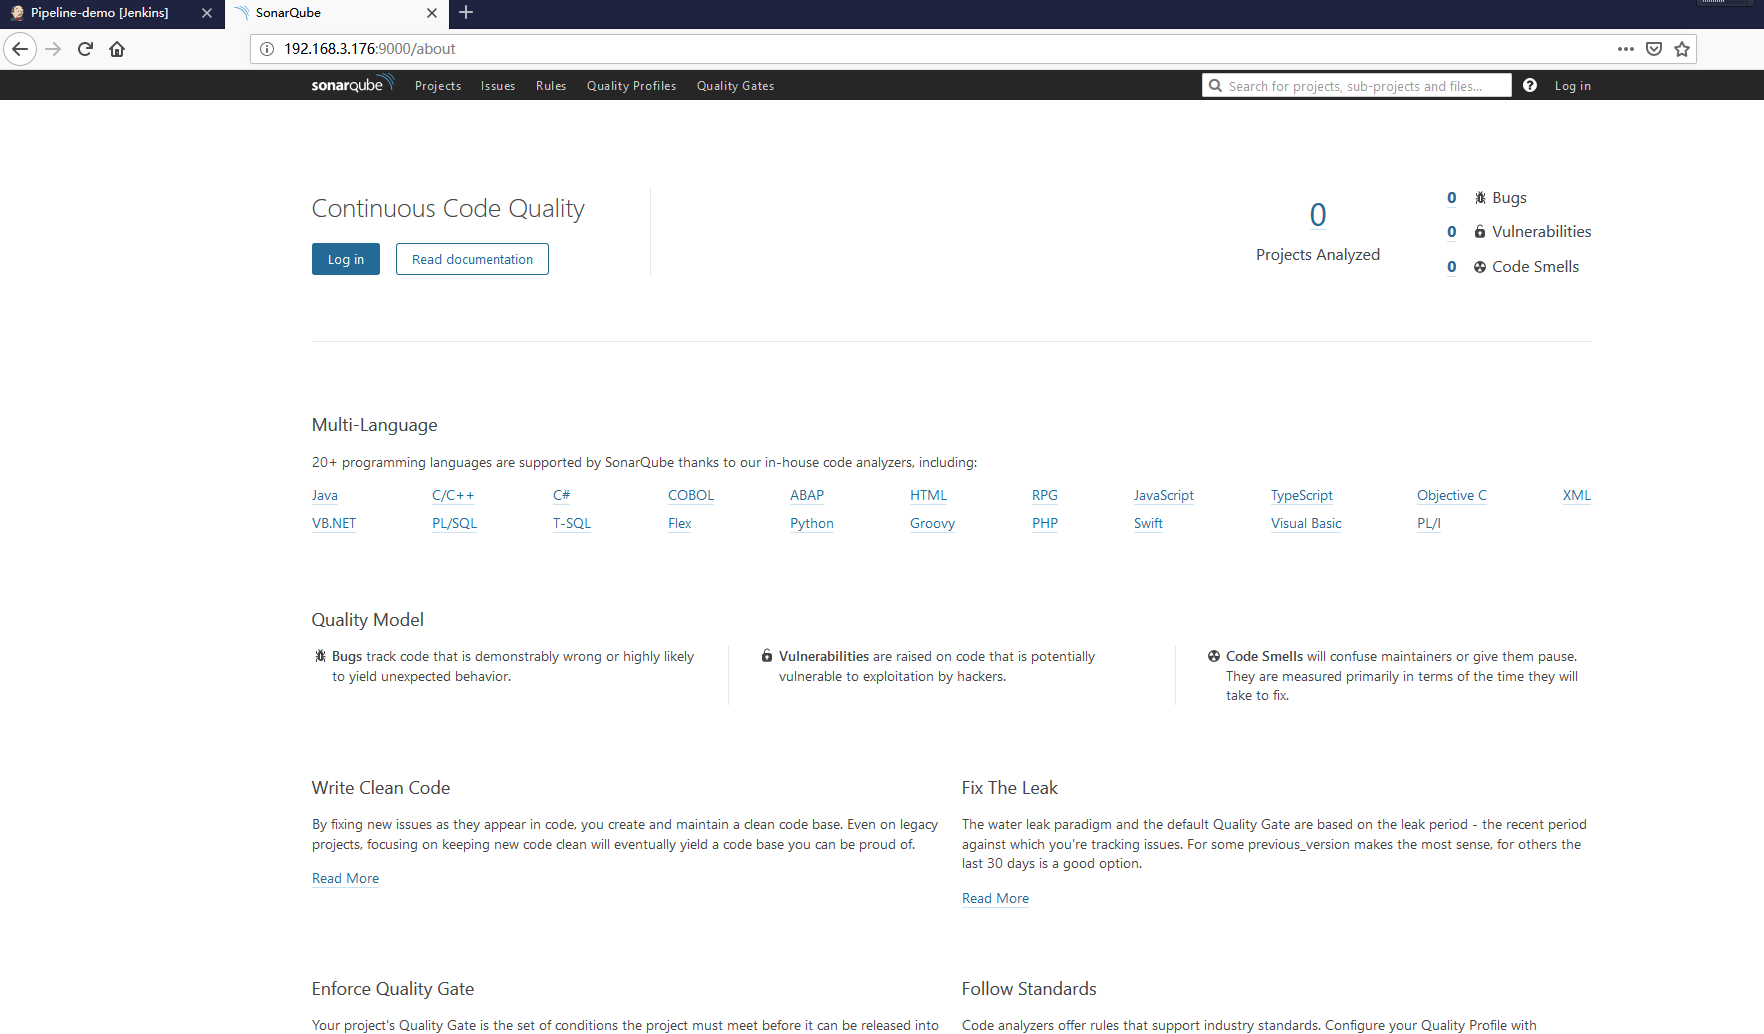
(7)浏览器访问
(8) 首次登陆默认登陆用户admin、登陆密码admin
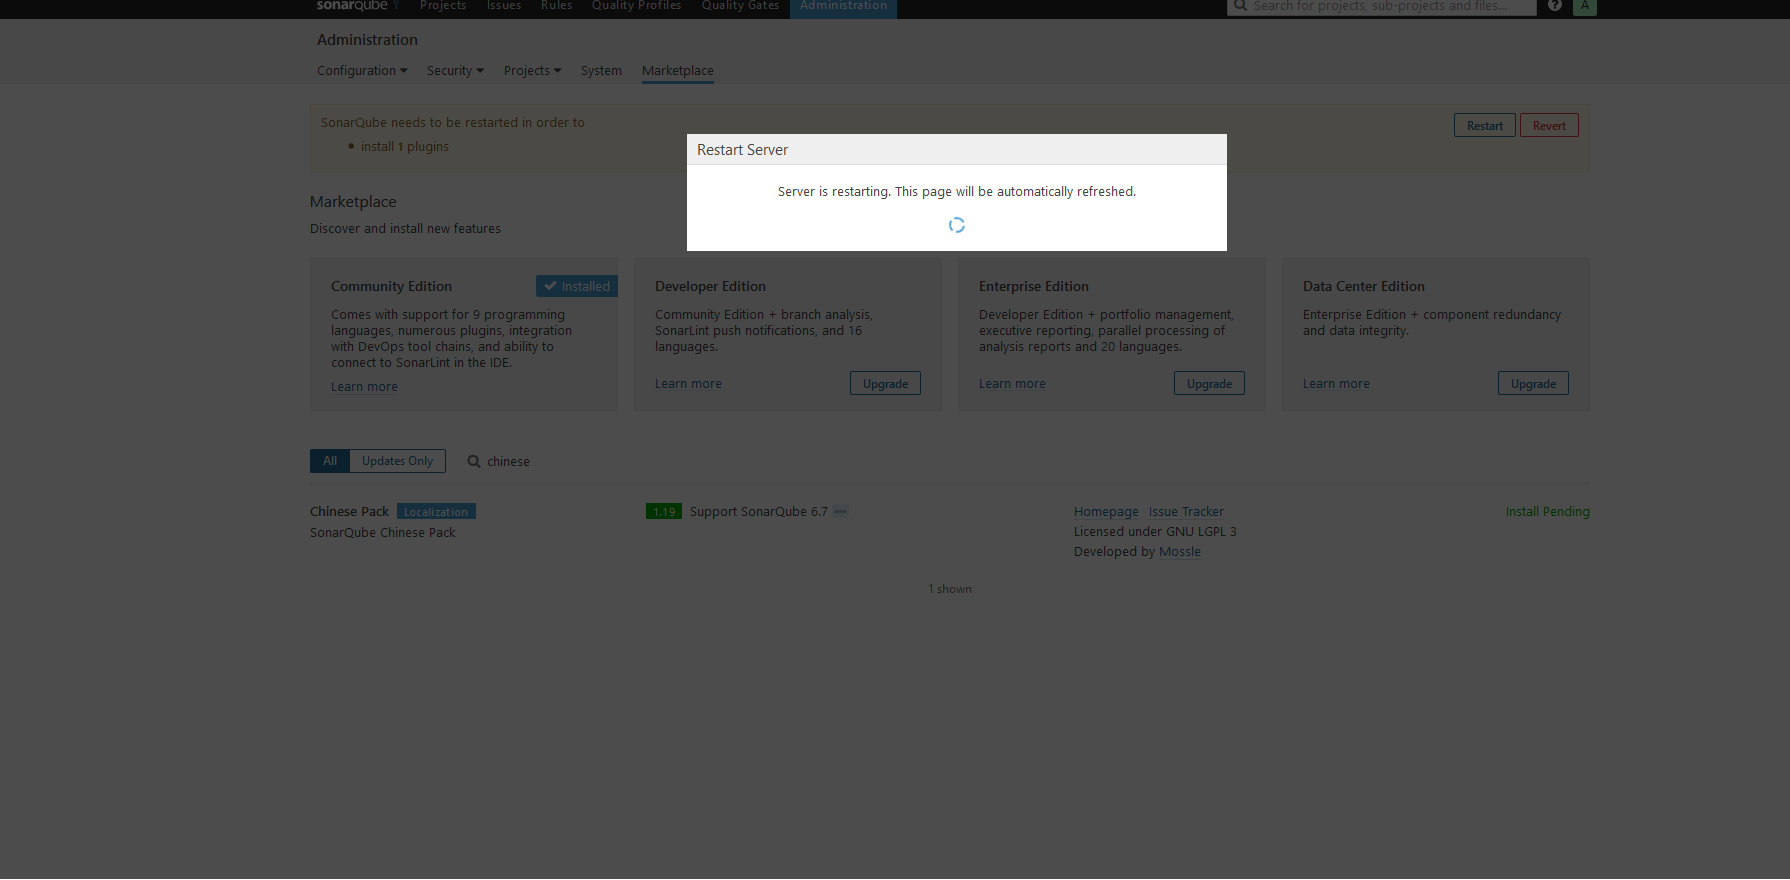
(9) 汉化界面
安装汉化包试试:页面上找到Administration > Marketplace,在搜索框中输入chinese,出现一个Chinese Pack,点击右侧的install按钮。
安装成功后,会提示重启 SonarQube 服务器。
devops-持续集成管理之SonarQube的更多相关文章
- 【Jenkins持续集成(一)】SonarQube 入门安装使用教程
一.前言 持续集成管理平台不只是CI服务器,是一系列软件开发管理工具的组合. 源码版本管理:svn.git 项目构建工具:Maven.Ant 代码质量管理:Sonar(Checkstyle.PMD.F ...
- 构建gitlab+Jenkins+harbor+kubernetes的DevOps持续集成持续部署环境
构建gitlab+Jenkins+harbor+kubernetes的DevOps持续集成持续部署环境 整个环境的结构图. 一.准备工作 gitlab和harbor我是安装在kubernetes集群外 ...
- Dubbo入门到精通学习笔记(六):持续集成管理平台之Hudson 持续集成服务器的安装配置与使用
文章目录 安装Hudson 使用Hudson tips:自动化部署 附录:两个脚本 安装Hudson IP:192.168.4.221 8G 内存(Hudson 多个工程在同时构建的情况下比较耗内存) ...
- 使用TeamCity对项目进行可持续集成管理
使用TeamCity对项目进行可持续集成管理 一.可持续集成管理 持续集成,CI:即Continuous integration. 可持续集成的概念是基于团队(小组)协作开发而提出来的,为了提高团 ...
- Hudson持续集成管理平台搭建
IP: 10.0.70.106 8G 内存 (Hudson 多 个 工程 在 同 时 构建 的情况下 比 较耗内存) 环 境: CentOS 6.5 . JDK7 注:Hudson 只是一个持续集成 ...
- [转]使用TeamCity对项目进行可持续集成管理(一)
一.可持续集成管理 持续集成,CI:即Continuous integration. 可持续集成的概念是基于团队(小组)协作开发而提出来的,为了提高团队开发效率与降低集成风险(早发现,早解决.晚发现, ...
- Dubbo入门到精通学习笔记(三):持续集成管理平台之SVN版本管理系统的安装和使用
文章目录 持续集成管理平台介绍 持续集成介绍 持续集成管理平台的组成 持续集成实践介绍 即将学习 SVN版本管理系统的安装 安装 Subversion + Apache 安装 jsvnadmin 简单 ...
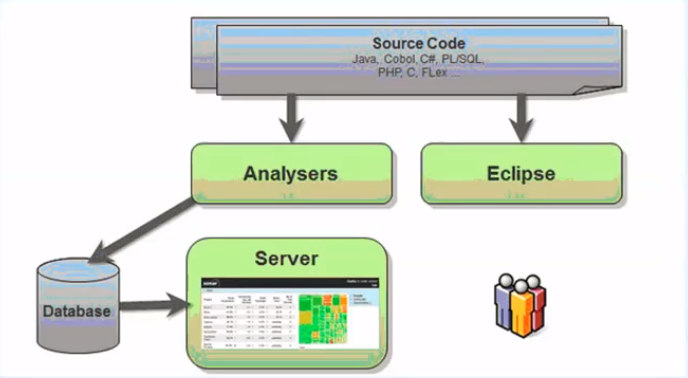
- Dubbo入门到精通学习笔记(五):持续集成管理平台之sonarqube代码质量管理平台的介绍与安装
文章目录 SonarQube的介绍 SonarQube的安装 安装简介 详细安装过程 详细使用过程 SonarQube的介绍 SonarQube是一个管理代码质量的开放平台. 可以从七个维度检测代码质 ...
- devops持续集成
目录 Devops 版本控制系统 Git安装 Git使用 git四种状态 git基础命令 git分支 git合并冲突 git标签 git命令总结 Github使用 创建仓库 HTTP协议 SSH协议 ...
- DevOps - 持续集成(Continuous Integration)
1 - 持续集成简介 持续集成(Continuous integration,简称CI)是软件的开发和发布标准流程中最重要的部分. 作为一种开发实践,在CI中可以通过自动化等手段高频率地去获取产品反馈 ...
随机推荐
- 关于`ClawHub的技术分享`公众号
生命不息,折腾不止! 该公众号的内容大部分为平时学习积累所整理的笔记,包括但不限于源码.原理.经验等. 如果感兴趣,也可以访问clawhub的博客主站https://clawhub.club
- 面试【JAVA基础】JVM
1.内存模型 1.1.堆 堆是所有线程共享的,主要存放对象实例和数组. 新生代和老年代的比例是1:2. 新生代中三个区域的比例是 8 : 1 : 1. 1.1.1.新生代 对象分配在eden区中,当e ...
- 分布式ID方案SnowFlake雪花算法分析
1.算法 SnowFlake算法生成的数据组成结构如下: 在java中用long类型标识,共64位(每部分用-分开): 0 - 0000000000 0000000000 0000000000 000 ...
- [BUUOJ记录] [ACTF2020 新生赛]Include
本题主要考查了利用php://filter伪协议进行文件包含 进入题目根据Tip进入正题,可以看到URL中存在文件包含(题目名也很直接) 首先考虑 "php://input"伪协议 ...
- java基础(swing+jsp+mybatis配置)
JAVA SE GUI编程(swing) # 组件 描述 1 JFrame 一个普通的窗口(绝大多数 Swing 图形界面程序使用 JFrame 作为顶层容器) 2 JDialog 对话框 常用的中间 ...
- 利用ANSI转义序列在控制台输出彩色文字
说明:无论什么语言,只要你的终端能够解释ANSI转义序列(大多数的类unix终端仿真器都能够解释ANSI转义序列,win32控制台则不支持),就能够使用ANSI转义序列输出颜色.这个功能看似鸡肋,但只 ...
- 判断Java程序是否在jar中运行
URL url = TextRenderer.class.getResource(""); String protocol = url.getProtocol(); boolean ...
- Oracle 根据不同成绩,对应不同等级信息
--查询每一颗成绩的:优秀.良好.不良的数量 --校园需要一张各科成绩状态统计表,格式如下: --科目名称 优秀人数 良好人数 不良人数 --高等数学 5 12 2 --英语 8 18 1 先创建一个 ...
- Spring框架学习笔记(1)
Spring 框架学习笔记(1) 一.简介 Rod Johnson(spring之父) Spring是分层的Java SE/EE应用 full-stack(服务端的全栈)轻量级(跟EJB比)开源框架, ...
- 谈谈 mysql和oracle的使用感受 -- 差异
之前一直使用mysql作为存储数据库,虽然中间偶尔使用sqlite作为本地数据库存储,但没有感觉多少差别. 后来遇上了oracle,且以其作为主要存储,这下就不得不好好了解其东西了.oracle作为商 ...