Docker Compose部署 EFK(Elasticsearch + Fluentd + Kibana)收集日志
简述
本文用于记录如何使用Docker Compose部署 EFK(Elasticsearch + Fluentd + Kibana) 收集Docker容器日志,使用EFK,可以无侵入代码,获得灵活,易用的日志收集和分析。
fluentd镜像构建相关文件、docker-compose.yml文件都放在 https://github.com/LXD24/EFK 仓库里。
1、首先弄个fluentd镜像
因为Fluentd需要fluent-plugin-elasticsearch插件才能将日志传输到Elasticsearch,所以需要根据fluentd基础镜像构建一个集成fluent-plugin-elasticsearch插件的镜像,当然也可以在网上找一个已经集成的镜像,这里懒得找就自己构建了。
按照 https://github.com/fluent/fluentd-docker-image/blob/master/README.md 上的说明创建个Dockerfile文件,看了说明需要先下载两个文件(fluent.conf 和 entrypoint.sh),github上有地址。
Dockerfile内容如下,因为我想着到时挂载fluent.conf配置文件,所以删掉了 COPY fluent.conf /fluentd/etc/ 这句复制配置文件的命令。
FROM fluent/fluentd:v1.11-1

# Use root account to use apk

USER root

# below RUN includes plugin as examples elasticsearch is not required

# you may customize including plugins as you wish

RUN apk add --no-cache --update --virtual .build-deps \

        sudo build-base ruby-dev \

 && sudo gem install fluent-plugin-elasticsearch \

 && sudo gem sources --clear-all \

 && apk del .build-deps \

 && rm -rf /tmp/* /var/tmp/* /usr/lib/ruby/gems/*/cache/*.gem

#COPY fluent.conf /fluentd/etc/

COPY entrypoint.sh /bin/

USER fluent
然后就是docker build -t custom-fluentd:latest ./ 看着一顿下载构建镜像。
2、准备一个会输出日志的镜像
这里我随便弄了个.net core web服务,输出下访问接口的日志到控制台。
3、编写docker-compose.yml
内容如下:
version: '2'

services:

  webapplication1:

    image: webapplication1

    container_name: webapplication1

    ports:

      - '8001:80'

    links:

      - fluentd

    logging:

      driver: 'fluentd'

      options:

        fluentd-address: localhost:24224

        tag: httpd.access

  fluentd:

    image: custom-fluentd

    container_name: fluentd

    volumes:

      - ./fluentd/conf:/fluentd/etc

    links:

      - 'elasticsearch'

    ports:

      - '24224:24224'

      - '24224:24224/udp'

  elasticsearch:

    image: elasticsearch:6.6.2

    container_name: elasticsearch

    ports:

      - '9200:9200'

    environment:

      - 'discovery.type=single-node'

      - 'cluster.name=docker-cluster'

      - 'bootstrap.memory_lock=true'

      - 'ES_JAVA_OPTS=-Xms512m -Xmx512m'

    ulimits:

      memlock:

        soft: -1

        hard: -1

    volumes:

      - ./data:/usr/share/elasticsearch/data

  kibana:

    image: kibana:6.6.2

    container_name: kibana

    links:

      - 'elasticsearch'

    ports:

      - '5601:5601'
webapplication1是我创建的web服务,需要配置日志驱动为fluentd
fluentd需要挂载fluent.conf配置文件,fluent.conf内容如下:
<source>

  @type forward

  port 24224

  bind 0.0.0.0

</source>

<match *.**>

  @type copy

  <store>

    @type elasticsearch

    host elasticsearch

    port 9200

    logstash_format true

    logstash_prefix fluentd

    logstash_dateformat %Y%m%d

    include_tag_key true

    type_name access_log

    tag_key @log_name

    flush_interval 1s

  </store>

  <store>

    @type stdout

  </store>

</match>
4、启动
到yml文件夹目录下敲 docker-compose up 启动。
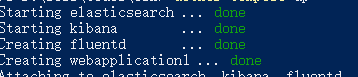
看到四个服务都是done的就可以了。
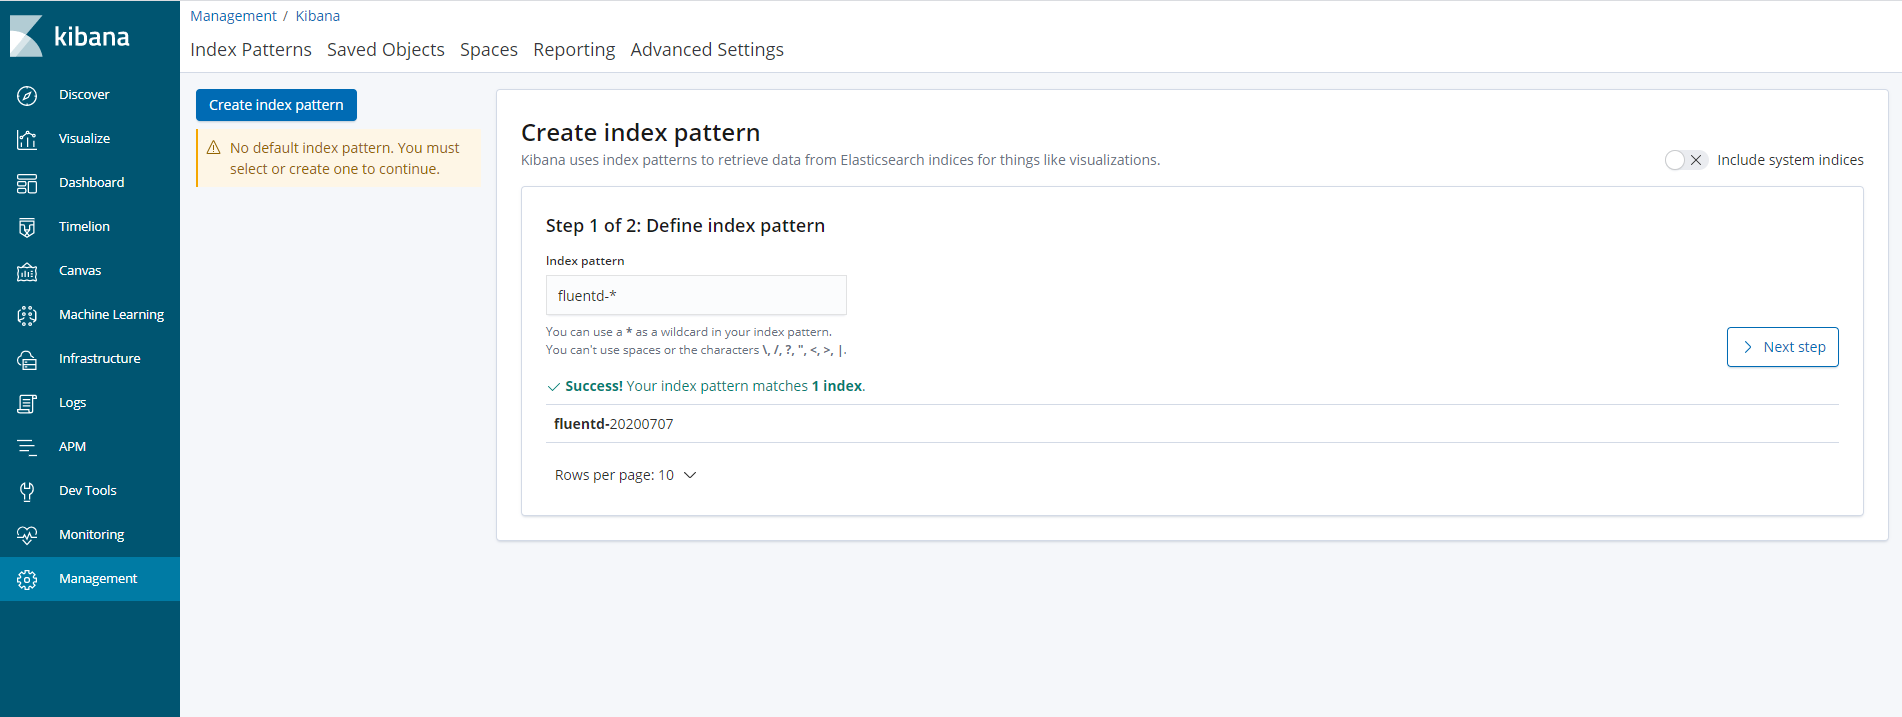
先访问下webapplication1造点日志,然后访问 http://localhost:5601 ,为Kibana设置匹配的索引名
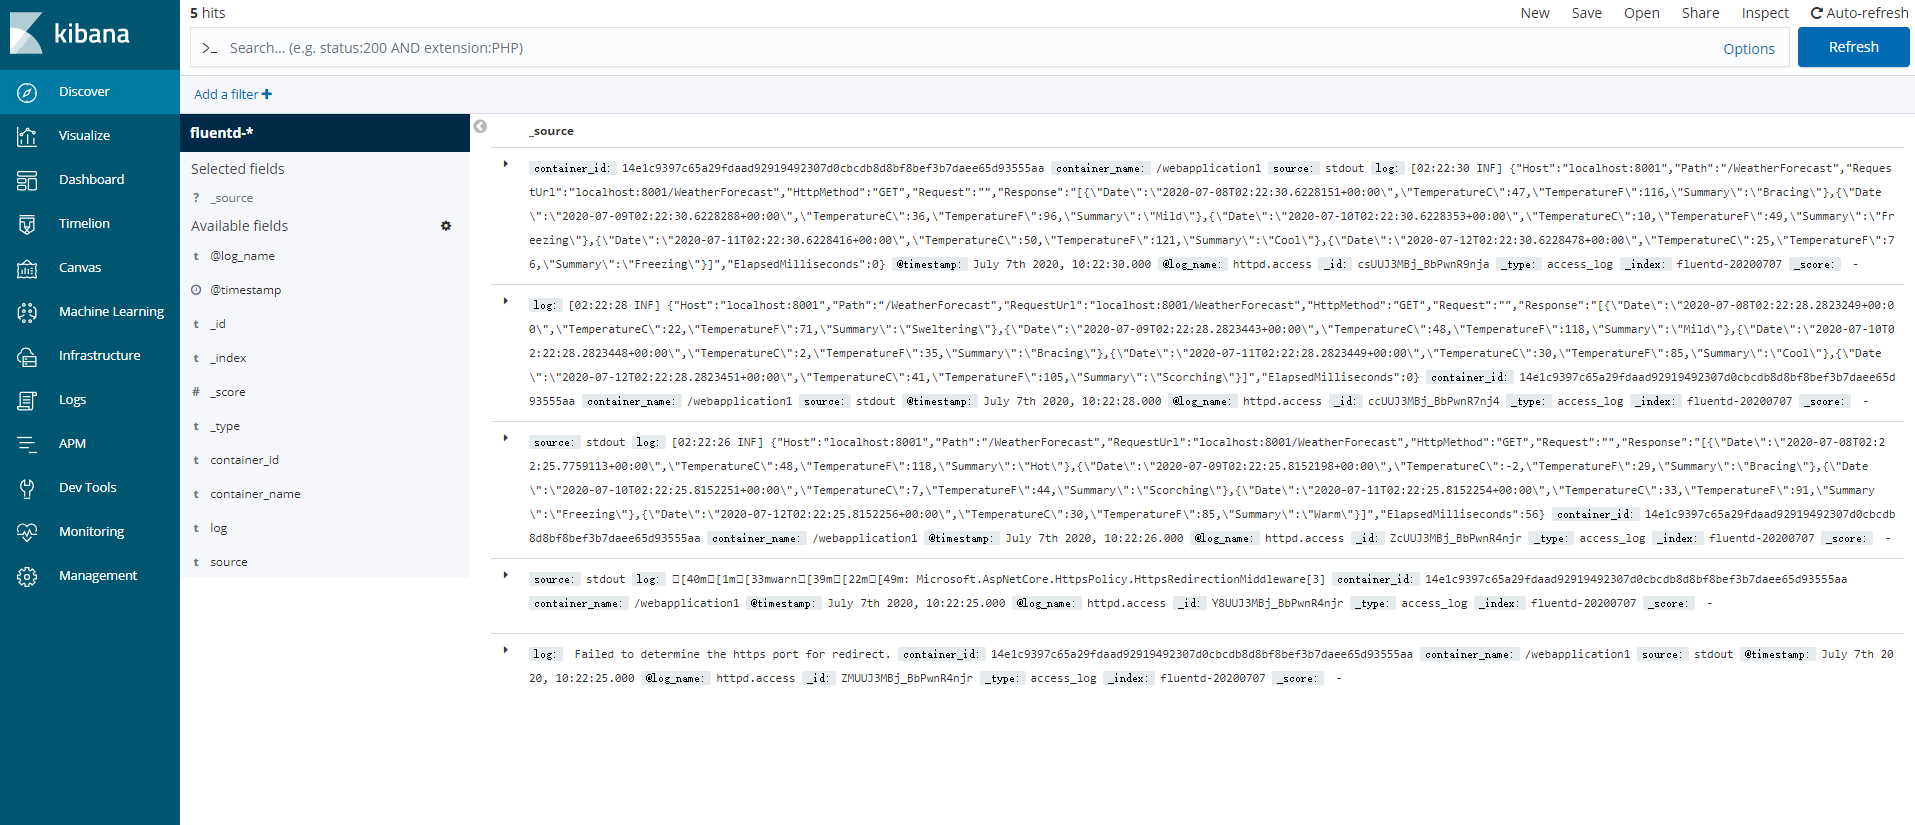
然后就能看到收集的日志了。
Docker Compose部署 EFK(Elasticsearch + Fluentd + Kibana)收集日志的更多相关文章
- EFK(Elasticsearch+Filebeat+Kibana)收集容器日志
介绍 Elasticsearch 是一个实时的.分布式的可扩展的搜索引擎,允许进行全文.结构化搜索,它通常用于索引和搜索大量日志数据,也可用于搜索许多不同类型的文档. Beats 是数据采集的得力工具 ...
- Docker Compose部署GitLab服务,搭建自己的代码托管平台(图文教程)
场景 Docker-Compose简介与Ubuntu Server 上安装Compose: https://blog.csdn.net/BADAO_LIUMANG_QIZHI/article/deta ...
- 使用Docker Compose部署基于Sentinel的高可用Redis集群
使用Docker Compose部署基于Sentinel的高可用Redis集群 https://yq.aliyun.com/articles/57953 Docker系列之(五):使用Docker C ...
- Docker Compose 部署前后端分离应用
部署前后端分离应用 容器化 Abp 应用 关于 Abp 应用的容器化,其实和普通的 ASP.NET Core 应用差不多,大家可以参考我此前的文章. 唯一需要注意的是:因为 Abp 解决方案中有多个项 ...
- Docker Compose部署项目到容器-基于Tomcat和mysql的项目yml配置文件代码
场景 Docker-Compose简介与Ubuntu Server 上安装Compose: https://blog.csdn.net/BADAO_LIUMANG_QIZHI/article/deta ...
- 在Windows Server 2019通过Docker Compose部署Asp.Net Core
一.安装Docker Enterprise 安装文档是: https://docs.docker.com/install/windows/docker-ee/ 安装完成后,如下图 二.首先,拉取一个W ...
- 使用Docker Compose 部署Nexus后初次登录账号密码不正确,并且在nexus-data下没有admin,password
场景 Ubuntu Server 上使用Docker Compose 部署Nexus(图文教程): https://blog.csdn.net/BADAO_LIUMANG_QIZHI/article/ ...
- Ubuntu Server 上使用Docker Compose 部署Nexus(图文教程)
场景 Docker-Compose简介与Ubuntu Server 上安装Compose: https://blog.csdn.net/BADAO_LIUMANG_QIZHI/article/deta ...
- Docker Compose部署Nexus3时的docker-compose,yml代码
场景 Docker-Compose简介与Ubuntu Server 上安装Compose: https://blog.csdn.net/BADAO_LIUMANG_QIZHI/article/deta ...
随机推荐
- PHP文件包含 整理
文件包含 目录 文件包含 1. 概述 1.1 常见的引发漏洞的函数: 1.2 利用条件 1.3 分类和利用思路 2. 利用方法 2.1 配合文件解析漏洞来包含 2.2 读取系统敏感文件(路径遍历) 2 ...
- Dart Memo for Android Developers
Dart Memo for Android Developers Dart语言一些语法特点和编程规范. 本文适合: 日常使用Kotlin, 突然想写个Flutter程序的Android程序员. Dar ...
- 文本溢出后,隐藏显示"..."和margin边距重叠
一.隐藏加省略 单行文本: overflow: hidden; white-space: nowrap; text-overflow: ellipsis; 多行文本: overflow: hidden ...
- Python进阶——详解元类,metaclass的原理和用法
本文始发于个人公众号:TechFlow,原创不易,求个关注 今天是Python专题第18篇文章,我们来继续聊聊Python当中的元类. 在上上篇文章当中我们介绍了type元类的用法,在上一篇文章当中我 ...
- 多语言工作者の十日冲刺<2/10>
这个作业属于哪个课程 软件工程 (福州大学至诚学院 - 计算机工程系) 这个作业要求在哪里 团队作业第五次--Alpha冲刺 这个作业的目标 团队进行Alpha冲刺--第二天(05.01) 作业正文 ...
- Nginx负载均衡的详细配置 + Keepalived使用
1,话不多说, 这里我们来说下很重要的负载均衡, 那么什么是负载均衡呢? 由于目前现有网络的各个核心部分随着业务量的提高,访问量和数据流量的快速增长,其处理能力和计算强度也相应地增大,使得单一的服务器 ...
- 一小时彻底搞懂RabbitMQ
windows上面安装rabbitmq-server-3.7.4.exe 首先需要安装otp_win64_20.3.exe 步骤1:安装Erlang RabbitMQ 它依赖于Erlang,需要先安装 ...
- Downloadmanager实现app实现的升级下载使用
1.app升级下载现在不推荐使用downloadmanager下载: 原因有下面的几个方面: (1)三星note系列部分手机需要手动打开这个权限才能用这个功能,而有些国产手机更加nb了直接个阉割了(d ...
- 2、尚硅谷_SSM高级整合_使用ajax操作实现页面的查询功能
16.尚硅谷_SSM高级整合_查询_返回分页的json数据.avi 在上一章节的操作中我们是将PageInfo对象存储在request域中,然后list页面解析request域中的对象实现信息的显示. ...
- 入门大数据---Spring+Mybatis+Phoenix整合
一.前言 使用 Spring+Mybatis 操作 Phoenix 和操作其他的关系型数据库(如 Mysql,Oracle)在配置上是基本相同的,下面会分别给出 Spring/Spring Boot ...