学习 Haproxy (六)
HAProxy
HAProxy是免费 高效 可靠的高可用及负载均衡解决方案,该软件非常适合于处理高负载
站点的七层数据请求,HAProxy的工作模式使其可以非常容易且安全地集成到我们现有的站点
架构中。使用类似的代理软件还可以对外屏蔽内部真实Web服务器,防止内部服务器遭受外部攻击
Haproxy有8种负载均衡算法(balance),分别如下:
1.balance roundrobin # 轮询,软负载均衡基本都具备这种算法
2.balance static-rr # 根据权重,建议使用
3.balance leastconn # 最少连接者先处理,建议使用
4.balance source # 根据请求源IP,建议使用
5.balance uri # 根据请求的URI
6.balance url_param,# 根据请求的URl参数'balance url_param' requires an URL parameter name
7.balance hdr(name) # 根据HTTP请求头来锁定每一次HTTP请求
8.balance rdp-cookie(name) # 根据据cookie(name)来锁定并哈希每一次TCP请求
由于负载请求分发到不同服务器,可能导致Session会话不同步的问题,若想实现会话共享或保持,可采用如下3种方式:
1.用户IP 识别
haroxy 将用户IP经过hash计算后 指定到固定的真实服务器上(类似于nginx 的IP hash 指令)
配置指令
- balance source
2.Cookie 识别
haproxy 将WEB服务端发送给客户端的cookie中插入(或添加加前缀)haproxy定义的后端的服务器COOKIE ID。
配置指令例举
- cookie SESSION_COOKIE insert indirect nocache
用firebug可以观察到用户的请求头的cookie里 有类似” Cookie jsessionid=0bc588656ca05ecf7588c65f9be214f5; SESSION_COOKIE=app1” SESSION_COOKIE=app1就是haproxy添加的内容
3.Session 识别
haproxy 将后端服务器产生的session和后端服务器标识存在haproxy中的一张表里。客户端请求时先查询这张表。
配置指令例举
- appsession JSESSIONID len 64 timeout 5h request-learn
安装部署HAProxy
环境准备:两台机器
linux-node1.example.com 192.168.56.11
linux-node2.example.com 192.168.56.12
salt 安装 haproxy
创建安装路径
- mkdir /srv/salt/prod/
- mkdir /srv/salt/prod/haproxy/files -pv
- mkdir /srv/salt/prod/pkg/files -pv
依赖包配置文件
- cd /srv/salt/prod/pkg
vim pkg-init.sls
pkg-init:- pkg.installed:
- - names:
- - gcc
- - gcc-c++
- - glibc
- - make
- - autoconf
- - openssl
- - openssl-devel
将配置文件、启动文件复制到/srv/salt/prod/haproxy/files下
- step1:
- mv haproxy-1.6.2.tar.gz /srv/salt/prod/haproxy/files/
- cd /srv/salt/prod/haproxy/files/
- tar zxf haproxy-1.6.2.tar.gz
- cd haproxy-1.6.2/examples/
- vim haproxy.init
- BIN=/usr/local/haporxy/sbin/$BASENAME
- step2::
- cp haproxy.init /srv/salt/prod/haproxy/files/
- step3:
- cd /srv/salt/prod/haproxy/files
- rm -rf haproxy-1.6.2
编写install.sls
- vim install.sls
- include:
- - pkg.pkg-init
- haproxy-install:
- file.managed:
- - name: /usr/local/src/haproxy-1.6.2.tar.gz
- - source: salt://haproxy/files/haproxy-1.6.2.tar.gz
- - user: root
- - group: root
- - mode: 755
- cmd.run:
- - name: cd /usr/local/src && tar zxf haproxy-1.6.2.tar.gz && cd haproxy-1.6.2 && make TARGET=linux26 PREFIX=/usr/local/haproxy && make install PREFIX=/usr/local/haproxy
- - unless: test -d /usr/local/haproxy
- - require:
- - pkg: pkg-init
- - file: haproxy-install
- haproxy-init:
- file.managed:
- - name: /etc/init.d/haproxy
- - source: salt://haproxy/files/haproxy.init
- - user: root
- - group: root
- - mode: 755
- - require:
- - cmd: haproxy-install
- cmd.run:
- - name: chkconfig --add haproxy
- - unless: chkconfig --list | grep haproxy
- - require:
- - file: /etc/init.d/haproxy
- net.ipv4.ip_nonlocal_bind:
- sysctl.present:
- - value: 1
- haproxy-config-dir:
- file.directory:
- - name: /etc/haproxy
- - user: root
- - group: root
- - mode: 755
提示:
1、如果是拷贝配置文件,确保$符号和配置之间没有空格,不然执行会出错,vim下,使用set list命令可以查看
2、层级关系是2、4、6个空格
建议先执行测试然后再实际配置修改,命令如下:
# salt '*' state.sls haproxy.install env=prod test=True
编写业务引用
- haproxy配置文件
- mkdir -p /srv/salt/prod/cluster/files
- cd /srv/salt/prod/cluster/files/
- vim /srv/salt/prod/cluster/files/haproxy-outside.cfg
- global
- maxconn 100000
- chroot /usr/local/haproxy
- uid 99
- gid 99
- daemon
- nbproc 1
- pidfile /usr/local/haproxy/logs/haproxy.pid
- log 127.0.0.1 local3 info
- defaults
- option http-keep-alive
- maxconn 100000
- mode http
- timeout connect 5000ms
- timeout client 50000ms
- timeout server 50000ms
- listen stats
- mode http
- bind 0.0.0.0:8888
- stats enable
- stats uri /haproxy-status
- stats auth haproxy:saltstack
- frontend frontend_www_example_com
- bind 192.168.3.11:80
- mode http
- option httplog
- log global
- default_backend backend_www_example_com
- backend backend_www_example_com
- option forwardfor header X-REAL-IP
- option httpchk HEAD / HTTP/1.0
- balance source
- server web-node1 192.168.217.149:8080 check inter 2000 rise 30 fall 15
- server web-node2 192.168.217.150:8080 check inter 2000 rise 30 fall 15
- cd /srv/salt/prod/cluster/
- vim /srv/salt/prod/cluster/haproxy-outside.sls
- include:
- - haproxy.install
- haproxy-service:
- file.managed:
- - name: /etc/haproxy/haproxy.cfg
- - source: salt://cluster/files/haproxy-outside.cfg
- - user: root
- - group: root
- - mode: 644
- service.running:
- - name: haproxy
- - enable: True
- - reload: True
- - require:
- - cmd: haproxy-init
- - watch:
- - file: haproxy-service
haproxy配置文件
编写top.sls
- cd /srv/salt/base/
- vim top.sls
- base:
- '*':
- - init.env_init
- prod:
- "node1":
- - cluster.haproxy-outside
- "node2":
- - cluster.haproxy-outside
执行安装配置
- salt '*' state.highstate
Web查看服务状态
从web登陆192.168.217.149:8888/haproxy-status
用户名和密码在/srv/salt/prod/cluster/files/haproxy-outside.cfg中
- grep 'auth' /srv/salt/prod/cluster/files/haproxy-outside.cfg
- stats auth haproxy:saltstack
编辑haproxy配置文件,配置log,并启动
- [root@linux-node1 ~]# cd /etc/haproxy/
- [root@linux-node1 haproxy]# cat haproxy.cfg
- global
- #全局配置,在所有配置段中都生效
- log 127.0.0.1 local3 info
- #记录日志
- chroot /var/lib/haproxy
- user haproxy
- group haproxy
- daemon
- defaults
- #默认配置,可以被前端和后端继承
- log global
- #使用global的log设置
- mode http
- #使用http模式,也可以使用tcp模式
- option httplog
- #启动http请求的log
- option dontlognull
- #在日志中不记录空连接(空连接:健康检查的链接)
- timeout connect 5000
- #长连接超时时间
- timeout client 50000
- #客户端连接超时
- timeout server 50000
- #RS连接超时
- frontend www_chuck-blog_com
- #前端配置 + 一个配置段的名字(最好不要乱写,和项目直接相关最佳)
- mode http
- #使用http模式,也可以使用tcp模式
- bind *:80
- #监听80端口
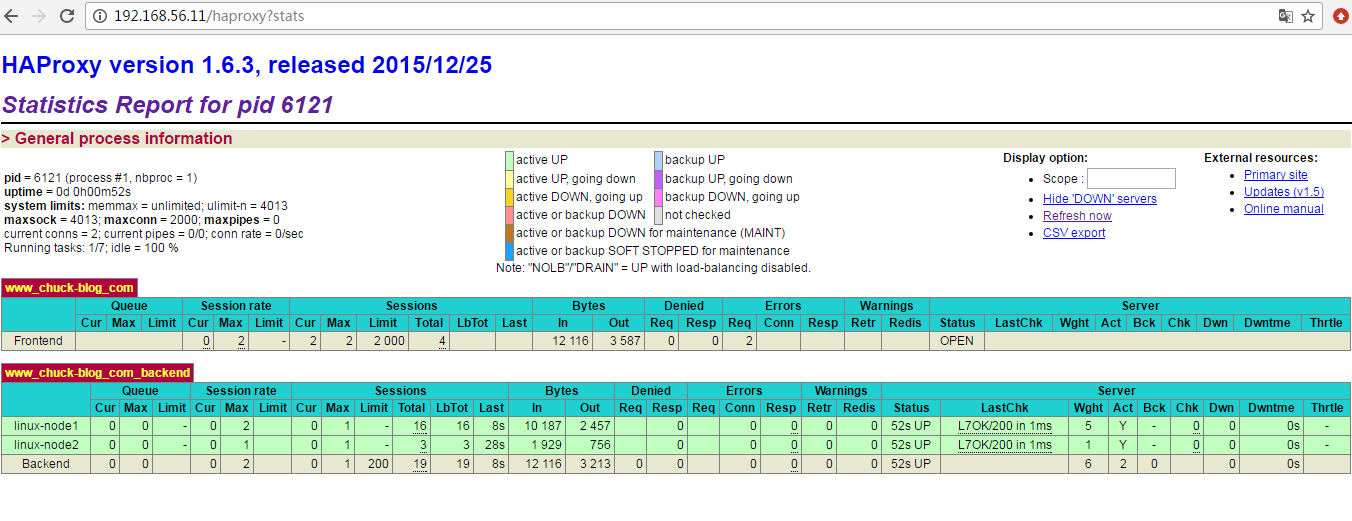
- stats uri /haproxy?stats
- #状态页面dashboard
- default_backend www_chuck-blog_com_backend
- #对应的backend名称
- backend www_chuck-blog_com_backend
- #对应的frontend的default_backend
- #source cookie SERVERID
- option httpchk GET /index.html
- #设置检测url的详细的页面
- balance roundrobin
- #使用rr负载均衡方式
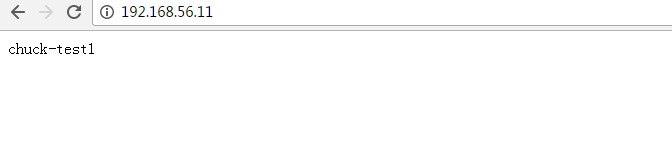
- server linux-node1 192.168.56.11:8080 check inter 2000 rise 3 fall 3 weight 5
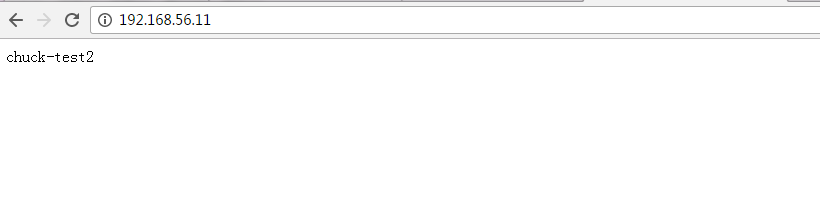
- server linux-node2 192.168.56.12:8080 check inter 2000 rise 3 fall 3 weight 1
- #RS健康检测时间间隔2秒,重试三次,失败三次不可用,权重1
打开rsyslog配置文件的注释
- [root@linux-node1 haproxy]# vim /etc/rsyslog.conf
- 15 $ModLoad imudp #打开注释
- 16 $UDPServerRun 514 #打开注释
- local7.* /var/log/boot.log
- #在此行的下面添加如下内容
- local3.* /var/log/haproxy.log
- #local3的路径
启动HAProxy
- [root@linux-node1 haproxy]# systemctl restart rsyslog.service
- [root@linux-node1 haproxy]# /etc/init.d/haproxy start
检查是否成功
查看检测状态
通过ACL设置虚拟主机
通过acl设置虚拟主机,一个前端可以对应多个后端
- [root@linux-node1 haproxy]# cat haproxy.cfg
- global
- log 127.0.0.1 local3 info
- chroot /var/lib/haproxy
- user haproxy
- group haproxy
- daemon
- defaults
- log global
- mode http
- option httplog
- option dontlognull
- timeout connect 5000
- timeout client 50000
- timeout server 50000
- frontend www_chuck-blog_com
- mode http
- bind *:80
- stats uri /haproxy?stats
- #默认的backend
- default_backend www_chuck-blog_com_backend
- acl is_other_chuck-blog_com hdr_end(host) other.chuck-blog.com
- #is_other_chuck-blog_com:给此acl起一个名字;hdr(host):固定格式,用来识别host,如果没有匹配到acl,即访问default的bankcend
- use_backend other_chuck-blog_com_backend if is_other_chuck-blog_com
- #use_backend:关键词,使用哪个banckend;other_chuck-blog_com_backend:指定哪个backend的名称;if is_other_chuck-blog_com:用来判断acl
- backend www_chuck-blog_com_backend
- option forwardfor header X-REAL-IP
- option httpchk GET /index.html
- balance roundrobin
- server linux-node1 192.168.56.11:8080 check inter 2000 rise 3 fall 3 weight 1
- backend other_chuck-blog_com_backend
- option forwardfor header X-REAL-IP
- option httpchk GET /index.html
- balance roundrobin
- server linux-node2 192.168.56.12:8080 check inter 2000 rise 3 fall 3 weight 1
重启
- [root@linux-node1 ~]# systemctl reload haproxy
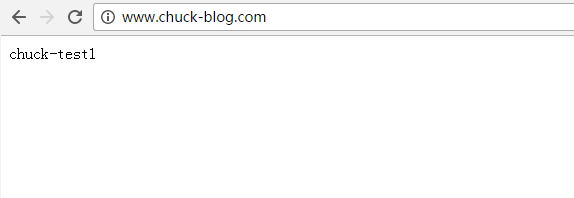
在本地电脑使用host解析
- 192.168.56.11 www.chuck-blog.com other.chuck-blog.com
通过浏览器访问不同的域名

在fortend添加acl,根据静态文件,设置不同的backend(类似于location),注释的两行和前两行的意义相同
分别是通过url正则匹配和url的后缀匹配
- acl is_static_reg url_reg /*.(css|jpg|png|js|jpeg|gif)$
- use_backend other_chuck-blog_com_backend if is_static_reg
- #acl is_static_path path_end .gif .png .css .jpg .jpeg
- #use_backend other_chuck-blog_com_backend if is_static_path
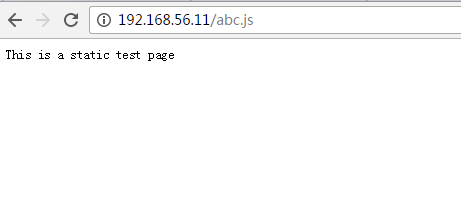
- [root@linux-node2 ~]# echo "This is a static test page " >/var/www/html/abc.js
- [root@linux-node1 ~]# /etc/init.d/haproxy restart
打开浏览器查看
其它ACL 可以查看百度
- acl is_do_path url_reg /chuck.do
- use_backend other_chuck-blog_com_backend if is_do_path
- acl is_UA_path hdr_reg(User-Agent) -i andriod #基于安卓手机
- use_backend other_chuck-blog_com_backend if is_UA_path
HAProxy动态维护
在配置文件添加socket
- [root@linux-node1 haproxy]# head -8 haproxy.cfg
- global
- log 127.0.0.1 local3 info
- chroot /var/lib/haproxy
- user haproxy
- group haproxy
- daemon
- stats socket /var/lib/haproxy/haproxy.sock mode 600 level admin
- #指定socket文件路径,权限,管理级别
- stats timeout 2m
- #指定超时时间
重启服务生效
- [root@linux-node1 haproxy]# /etc/init.d/haproxy restart
安装socat连接haproxy.sock文件
- [root@linux-node1 ~]yum install -y socat
使用help查看socat的事情
- [root@linux-node1 haproxy]# echo "help" |socat stdio /var/lib/haproxy/haproxy.sock
- Unknown command. Please enter one of the following commands only :
- clear counters : clear max statistics counters (add 'all' for all counters)
- clear table : remove an entry from a table
- help : this message
- prompt : toggle interactive mode with prompt
- quit : disconnect
- show backend : list backends in the current running config
- show info : report information about the running process #查看所有信息
- show pools : report information about the memory pools usage #查看所有poll
- show stat : report counters for each proxy and server #显示状态
- show errors : report last request and response errors for each proxy
- show sess [id] : report the list of current sessions or dump this session
- show table [id]: report table usage stats or dump this table's contents
- show servers state [id]: dump volatile server information (for backend <id>)
- get weight : report a server's current weight #获得权重信息
- set weight : change a server's weight #设置权重
- set server : change a server's state, weight or address #改变一个server的转态权重或地址
- set table [id] : update or create a table entry's data
- set timeout : change a timeout setting
- set maxconn : change a maxconn setting
- set rate-limit : change a rate limiting value
- disable : put a server or frontend in maintenance mode #将一个server或者fortend置于维护模式
- enable : re-enable a server or frontend which is in maintenance mode #启用一个维护状态的server或者frontend
- shutdown : kill a session or a frontend (eg:to release listening ports)
- show acl [id] : report avalaible acls or dump an acl's contents
- get acl : reports the patterns matching a sample for an ACL
- add acl : add acl entry
- del acl : delete acl entry
- clear acl <id> : clear the content of this acl
- show map [id] : report avalaible maps or dump a map's contents
- get map : reports the keys and values matching a sample for a map
- set map : modify map entry
- add map : add map entry
- del map : delete map entry
- clear map <id> : clear the content of this map
- set ssl <stmt> : set statement for ssl
设置监控
查看info信息,内容值可以利用来监控
- [root@linux-node1 haproxy]# echo "show info" |socat stdio /var/lib/haproxy/haproxy.sock
- Name: HAProxy
- Version: 1.6.3
- Release_date: 2015/12/25
- Nbproc: 1
- Process_num: 1
- Pid: 6778
- Uptime: 0d 0h16m20s
- Uptime_sec: 980
- Memmax_MB: 0
- Ulimit-n: 4033
- Maxsock: 4033
- Maxconn: 2000
- Hard_maxconn: 2000
- CurrConns: 0
- CumConns: 10
- CumReq: 12
- Maxpipes: 0
- PipesUsed: 0
- PipesFree: 0
- ConnRate: 0
- ConnRateLimit: 0
- MaxConnRate: 2
- SessRate: 0
- SessRateLimit: 0
- MaxSessRate: 2
- CompressBpsIn: 0
- CompressBpsOut: 0
- CompressBpsRateLim: 0
- Tasks: 8
- Run_queue: 1
- Idle_pct: 100
- node: linux-node1.example.com
- description:
关闭主机
关闭linux-node2主机
- [root@linux-node1 haproxy]# echo "disable server other_chuck-blog_com_backend/linux-node2" |socat stdio /var/lib/haproxy/haproxy.sock
- [root@linux-node1 haproxy]#
- Message from syslogd@localhost at Dec 4 13:31:37 ...
- haproxy[6778]: backend other_chuck-blog_com_backend has no server available!
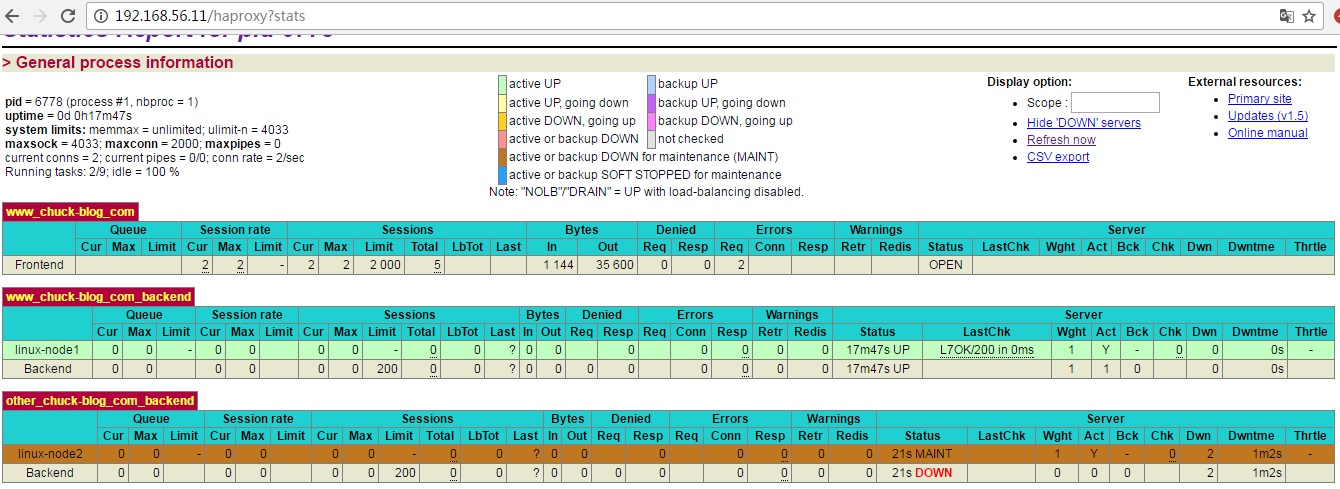
可以看到 linux -node2 进入了维护maintain状态
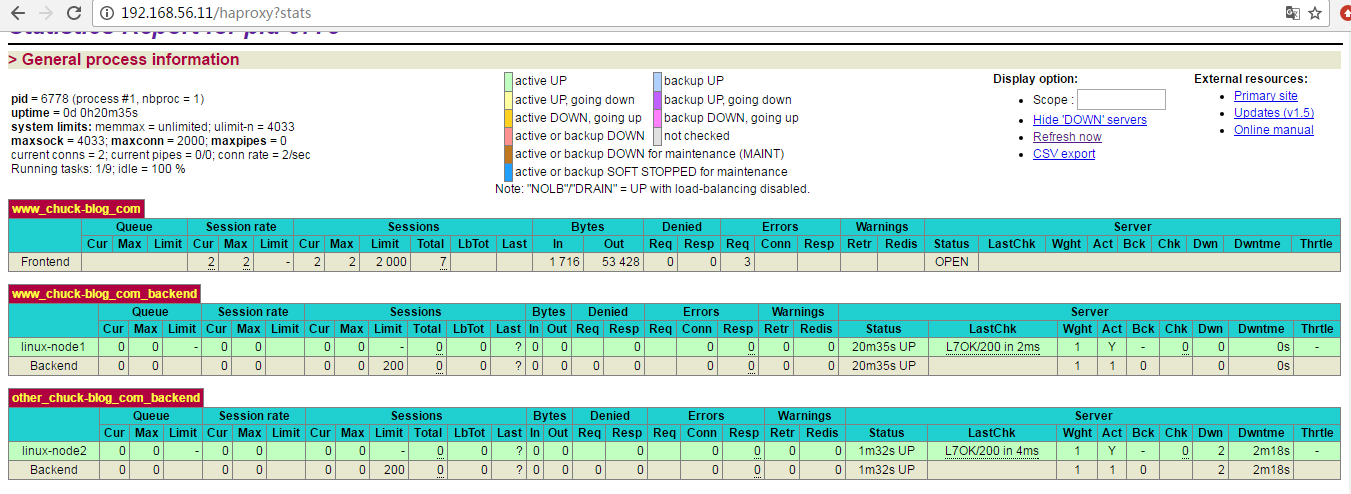
开启主机
打开linux-node2主机(只对现有的server生效,不能用来新增节点)
- [root@linux-node1 haproxy]# echo "enable server other_chuck-blog_com_backend/linux-node2" |socat stdio /var/lib/haproxy/haproxy.sock
可以看到linux-node2恢复正常
生产问题
haproxy的本地端口可能用尽,解决方案
1)更改local的端口范围,调整内核参数
- [root@linux-node1 haproxy]# cat /proc/sys/net/ipv4/ip_local_port_range
- 32768 61000
2)调整timewait的端口复用,设置为1
- [root@linux-node1 haproxy]# cat /proc/sys/net/ipv4/tcp_tw_reuse
- 0
3)缩短tcp_wait的时间,并不建议修改
- [root@linux-node1 haproxy]# cat /proc/sys/net/ipv4/tcp_fin_timeout
- 60
4)终极方案:增加为多个ip,自然端口数就够了
haproxy对比nginx
nginx
优点:
1 web服务器,应用比较广泛
2 7层负载均衡,location设置复杂的基于HTTP的负载均衡
3 性能强大,网络依赖小
4 安装配置简单
缺点
1 监控检查单一
2 负载均衡算法少
3 不能动态管理
4 没有集群upstream的状态页面
haproxy
优点
1 专门做负载均衡
2 负载均衡算法多
3 性能>=nginx
4 通过和haproxy socker通信进行动态管理
5 有比较丰富的dashboard页面
6 强大的7层代理
缺点
1 配置没有nginx简单
2 应用没有nginx广泛
提示:很多CDN会使用LVS+Haproxy来做负载均衡
Haproxy TCP端口耗尽解决方案
在实际使用过程中,有两个问题比较容易发生:
- TCP端口耗尽
- 网卡带宽跑满
本文重点讲讲如何优化问题1,问题2暂不讨论。
优化一:使用尽可能多的端口
Linux系统默认提供了65K个端口,每当Haproxy建立了一个到MySQL的连接,就会消耗一个端口;当Haproxy断开和MySQL的连接时,该端口并不会立即释放,而是会处于TIME_WAIT状态(2*MSL),超时后才会释放此端口供新的连接使用。
我的环境中,tcp_fin_timeout为15秒,也就是说如果我环境中的haproxy可以承载的最大并发连接数为64K/(15*2)=2.1K,可实际上达不到这个上限,原因如下:
- net.ipv4.ip_local_port_range = 15000 65000
linux会保留一段端口,实际能参与分配的端口数只有50K,为了获得尽可能多的可分配端口,做如下调整:
- # sysctl net.ipv4.ip_local_port_range="1025 65000"
- # sysctl net.ipv4.ip_local_port_range="1025 65000"
- #记得修改/etc/sysctl.conf中对应的内容
优化二:复用处于TIME_WAIT的端口
调整两个参数:
- net.ipv4.tcp_tw_reuse = 1
- net.ipv4.tcp_tw_recycle = 1
第一个参数很安全,可以不用过多关注。需要注意的是第二个参数,某些情况下会导致数据包被丢弃。
例如:client通过NAT连接haproxy,并且haproxy端打开了tcp_tw_recycle,同时saw_tstamp也没有关闭,当第一个连接建立并关闭后,此端口(句柄)处于TIME_WAIT状态,在2*MSL时间内又一个client(相同IP,如果打开了xfrm还要相同PORT)发一个syn包,此时linux内核就会认为这个数据包异常,从而丢掉这个包,并发送rst包.
不过通常情况下,client都是通过内网直接连接haproxy,所以可以认为tcp_tw_recycle是安全的,只是需要记住此坑。
优化三:缩短TIME_WAIT时间
Linux系统默认MSL为60秒,也就是正常情况下,120秒后处于TIME_WAIT的端口(句柄)才会释放,可以将MSL的时间缩小,缩短端口的释放周期。
- # cat /proc/sys/net/ipv4/tcp_fin_timeout
- 60
- # echo 15 > /proc/sys/net/ipv4/tcp_fin_timeout
- #这是一个折中的数值,太小也会导致其它问题
优化四:使用多IP
如优化一中所说,我们已经尽可能多的使用了系统提供的端口范围。但最多依然不超过65K。
Haproxy提供了内建的端口管理方法,可以充分利用以扩大我们的端口范围。
- server mysql0 10.0.3.1:3306 check source 10.0.3.100:1025-65000
- server mysql1 10.0.3.1:3306 check source 10.0.3.101:1025-65000
如果使用两个ip,我们可用的端口数就接近130K。扩展多个IP,就可以不断增加端口数。
优化五:使用长连接
服务最好使用长连接,一是避免频繁的申请连接,导致端口耗尽;二是避免创建连接带来的时间消耗。
Haproxy 在线维护
Haproxy Sock
开启Haproxy Unix Socket
在global添加:
- stats socket /usr/local/haproxy/haproxy.sock mode 600 level admin
- stats timeout 2m
Socat 工具
socat是一个多功能的网络工具,名字来由是“Socket CAT”,可以看作是netcat的N倍加强版,socat的官方网站:http://www.dest-unreach.org/socat/ 。
socat是一个两个独立数据通道之间的双向数据传输的继电器。这些数据通道包含文件、管道、设备(终端或调制解调器等)、插座(Unix,IP4,IP6 - raw,UDP,TCP)、SSL、SOCKS4客户端或代理CONNECT。
socat支持广播和多播、抽象Unix sockets、Linux tun/tap、GNU readline和PTY。它提供了分叉、记录和进程间通信的不同模式。多个选项可用于调整socat和其渠道,Socat可以作为TCP中继(一次性或守护进程),作为一个守护进程基于socksifier,作为一个shell Unix套接字接口,作为IP6的继电器,或面向TCP的程序重定向到一个串行线。
socat的主要特点就是在两个数据流之间建立通道;且支持众多协议和链接方式:ip, tcp, udp, ipv6, pipe,exec,system,open,proxy,openssl,socket等。
使用socat可以查看和设置HAProxy状态,首先得让HAProxy产生出一个sock出来(hatop ,socat都是基于这个的,没这个什么都做不了)。
- [root@lb-node3 ~]#yum install –y readline-devel openssl-devel tcp_wrappers
- [root@lb-node3 ~]# cd /usr/local/src
- [root@lb-node3 src]# wgethttp://www.dest-unreach.org/socat/download/socat-1.7.2.4.tar.gz
- [root@lb-node3 src]# tar zxf socat-1.7.2.4.tar.gz
- [root@lb-node3 src]# cd socat-1.7.2.4
- [root@lb-node3 socat-1.7.2.4]# ./configure&& make && make install
常用功能
获取帮助:
- echo "help"| socat stdio /usr/local/haproxy/haproxy.sock
- Unknown command. Please enter one of the following commands only :
- clear counters : clear max statistics counters (add 'all' for all counters)
- clear table : remove an entry from a table
- help : this message
- prompt : toggle interactive mode with prompt
- quit : disconnect
- show info : report information about the running process
- show pools : report information about the memory pools usage
- show stat : report counters for each proxy and server
- show errors : report last request and response errors for each proxy
- show sess [id] : report the list of current sessions or dump this session
- show table [id]: report table usage stats or dump this table's contents
- get weight : report a server's current weight
- set weight : change a server's weight
- set server : change a server's state or weight
- set table [id] : update or create a table entry's data
- set timeout : change a timeout setting
- set maxconn : change a maxconn setting
- set rate-limit : change a rate limiting value
- disable : put a server or frontend in maintenance mode
- enable : re-enable a server or frontend which is in maintenance mode
- shutdown : kill a session or a frontend (eg:to release listening ports)
- show acl [id] : report avalaible acls or dump an acl's contents
- get acl : reports the patterns matching a sample for an ACL
- add acl : add acl entry
- del acl : delete acl entry
- clear acl <id> : clear the content of this acl
- show map [id] : report avalaible maps or dump a map's contents
- get map : reports the keys and values matching a sample for a map
- set map : modify map entry
- add map : add map entry
- del map : delete map entry
- clear map <id> : clear the content of this map
- set ssl <stmt> : set statement for ssl
- #查看状态:
- echo "show info;show stat" | socat /usr/local/haproxy/haproxy.sock stdio
- #关闭节点:
- echo "disable server b_yxpopo_com/hongbao-node11" | socat /usr/local/haproxy/haproxy.sock stdio
- #启用节点:
- echo "enable server b_yxpopo_com/hongbao-node11" | socat /usr/local/haproxy/haproxy.sock stdio
学习 Haproxy (六)的更多相关文章
- 前端学习 第六弹: javascript中的函数与闭包
前端学习 第六弹: javascript中的函数与闭包 当function里嵌套function时,内部的function可以访问外部function里的变量 function foo(x) { ...
- Android Animation学习(六) View Animation介绍
Android Animation学习(六) View Animation介绍 View Animation View animation系统可以用来执行View上的Tween animation和F ...
- java之jvm学习笔记六-十二(实践写自己的安全管理器)(jar包的代码认证和签名) (实践对jar包的代码签名) (策略文件)(策略和保护域) (访问控制器) (访问控制器的栈校验机制) (jvm基本结构)
java之jvm学习笔记六(实践写自己的安全管理器) 安全管理器SecurityManager里设计的内容实在是非常的庞大,它的核心方法就是checkPerssiom这个方法里又调用 AccessCo ...
- Bootstrap3.0学习第六轮(表单)
Bootstrap3.0学习第六轮(表单) 前言 阅读之前您也可以到Bootstrap3.0入门学习系列导航中进行查看http://www.cnblogs.com/aehyok/p/3404867.h ...
- Learning ROS for Robotics Programming Second Edition学习笔记(六) indigo xtion pro live
中文译著已经出版,详情请参考:http://blog.csdn.net/ZhangRelay/article/category/6506865 Learning ROS for Robotics Pr ...
- Maven学习(六)-- Maven与Eclipse整合
由于我使用的是IDEA所以就不摘录了,感兴趣的移步 Maven学习总结(六)--Maven与Eclipse整合 Maven学习总结(七)--eclipse中使用Maven创建Web项目
- python学习第六讲,python中的数据类型,列表,元祖,字典,之列表使用与介绍
目录 python学习第六讲,python中的数据类型,列表,元祖,字典,之列表使用与介绍. 二丶列表,其它语言称为数组 1.列表的定义,以及语法 2.列表的使用,以及常用方法. 3.列表的常用操作 ...
- Python学习第六课
Python学习第六课 课前回顾 列表 创建 通过 [] :写在[]里,元素之间用逗号隔开 对应操作: 查 增 append insert 改(重新赋值) 删除(remove del pop(删除后会 ...
- Typescript 学习笔记六:接口
中文网:https://www.tslang.cn/ 官网:http://www.typescriptlang.org/ 目录: Typescript 学习笔记一:介绍.安装.编译 Typescrip ...
- 【转载】 强化学习(六)时序差分在线控制算法SARSA
原文地址: https://www.cnblogs.com/pinard/p/9614290.html ------------------------------------------------ ...
随机推荐
- 自助式BI工具怎么选?这款用过都说好!
随着大数据时代的到来,很多公司的业务数据量不断增长,公司必须集中精力管理数据,并在BI工具的帮助下进行数据分析,以便从过去的数据中获得洞察力,预测未来的发展.近年来,随着企业对数据的关注度的增加,企业 ...
- Could not load file or assembly 'System.Windows.Forms, Version=6.0.2.0, Culture=neutral, PublicKeyToken=b77a5c561934e089
项目升级后提示错误 System.IO.FileNotFoundException: Could not load file or assembly 'System.Windows.Forms, Ve ...
- Qt:打包成可执行文件(exe文件)后出现Driver not Loaded的解决方法
问题 在当前电脑上打包为exe可以正常执行,发送给另一台电脑后却无法执行,并且出现"Driver not loaded"的提示框. 可能原因 1.另一台电脑上没有MySQL(或ex ...
- omnet++:官方文档翻译总结(二)
这一部分是官方案例介绍 1.Introduction 学习自:Introduction - OMNeT++ Technical Articles 本教程是基于Tictoc的仿真案例,这些案例我们可以在 ...
- Vue el-date-picker 日期组件的使用
一:显示年月 <el-date-picker v-model="selectMonth" type="month" placeholder="选 ...
- 如何设置计算机IP地址
今天公司变更网络环境让同学们设置IP地址,我竟然不会,我问了一句IP还能自己设置啊,.low爆了,于是赶紧百度,现总结如下 IP地址的设置一种是静态IP,一种是自动获取IP(之前都是自动获取的吧,而且 ...
- C# Event (1) —— 我想搞个事件
本文地址:https://www.cnblogs.com/oberon-zjt0806/p/15975299.html 本文最初来自于博客园 本文遵循CC BY-NC-SA 4.0协议,转载请注明出处 ...
- 快速整透Redis中的压缩列表到底是个啥
压缩列表简介 压缩列表(ziplist)是由一个连续内存组成的顺序型数据结构.一个压缩列表可以包含任意多个节点,每个节点上可以保存一个字节数组或整数值.它是Redis为了节省内存空间而开发的. 压缩列 ...
- base64学习笔记
关于是什么: 定义 8Bits字节编码方式之一 应用 传输8Bit字节代码 特性 Base64编码具有不可读性 描述 Base64可以成为密码学的基石,非常重要. 特点 可以将任意的二进制数据进行Ba ...
- MATLAB菜鸟入门笔记【函数章】
一.用捷径表达式赋值 1.first:incr:last first代表数组的每一个值,incr代表步增量,last代表这个数组的最后一个值. Ep:>>x=1:2:10 ...