Saltstack自动化扩容
一. etcd服务的安装和使用
1.安装etcd应用:
wget https://github.com/coreos/etcd/releases/download/v2.2.5/etcd-v2.2.5-linux-amd64.tar.gz -O etcd-v2.2.5-linux-amd64.tar.gz

tar -zxvf etcd-v2.2.5-linux-amd64.tar.g

cp etcd etcdctl /usr/local/bin/
2.启动etcd服务:
mkdir -p /data/etcd    #创建数据存储目录

nohup etcd -name auto_scale --data-dir /data/etcd/ \

     --listen-peer-urls 'http://172.16.1.211:2380,http://172.16.1.211:7001' \

     --listen-client-urls 'http://172.16.1.211:2379,http://172.16.1.211:4001' \

     --advertise-client-urls 'http://172.16.1.211:2379,http://172.16.1.211:4001' &
3.提交key到etcd中:
curl -s http://172.16.1.211:2379/v2/keys/message -XPUT -d value="hello world" | python -m json.tool #结果通过python的json模块转义输出,增加可读性。
4.获取刚才提交的key值:
curl -s http://172.16.1.211:2379/v2/keys/message | python -m json.tool
5.删除刚才提交的key:
curl -s http://172.16.1.211:2379/v2/keys/message -XDELETE | python -m json.tool
6.提交带10秒过期时间的key:
curl -s http://172.16.1.211:2379/v2/keys/ttl_use -XPUT -d value="hello world 1" -d ttl=10 | python -m json.tool
二. 实现Salt自动化让Haproxy扩容
1.配置salt的pillar连接etcd:
yum install python-pip

pip install python-etcd #安装python的etcd包

vim /etc/salt/master

#底部添加

etcd_pillar_config:

  etcd.host: 172.16.1.211

  etcd.port: 4001

ext_pillar:

  - etcd: etcd_pillar_config root=/salt/haproxy/   #root参数是指定etcd里面的目录
2.测试通过salt获取pillar:
curl -s http://172.16.1.211:2379/v2/keys/salt/haproxy/backend_www_wmj_com/web-node1 -XPUT -d value="172.16.1.213:8080" | python -m json.tool

salt '*' pillar.item
3.让salt模板自动添加haproxy的backend:
vim /srv/salt/prod/cluster/files/haproxy-outside.cfg

#server web-node1  172.16.1.213:8080 check inter 2000 rise 30 fall 15

#使用for循环获取etcd的key值

{% for web,web_ip in pillar.backend_www_wmj_com.iteritems() %} server {{ web }} {{ web_ip }} check inter 2000 rise 30 fall 15 {% endfor %}
4.添加一台haproxy的节点:
curl -s http://172.16.1.211:2379/v2/keys/salt/haproxy/backend_www_wmj_com/web-node3 -XPUT -d value="172.16.1.215:8080" | python -m json.tool

salt '*' state.sls cluster.haproxy-outside env=prod
5.简单的自动化扩容脚本:
#!/bin/bash

create_host(){

        echo "create host"

}

deploy_service(){

        salt '*' state.sls nginx.install env=prod

}

deploy_code(){

        echo "deploy code ok"

}

service_check(){

        STATUS=$(curl -s --head http://172.16.1.213:8080/ | grep '200 OK')

        if [ -n "$STATUS" ];then

                echo "HTTP ok"

        else

                echo "HTTP not ok"

                exit 1

        fi

}

etcd_key(){

        curl -s http://172.16.1.211:2379/v2/keys/salt/haproxy/backend_www_wmj_com/web-node4 -XPUT -d value="172.16.1.213:8080"

}

sync_state(){

        salt '*' state.sls cluster.haproxy-outside env=prod

}

main(){

        create_host

       deploy_service

        deploy_code

        service_check

        etcd_key

        sync_state

}

main
############################################################################################
|
1
2
3
|
[root@node1 src]# tar xf etcd-v3.2.9-linux-amd64.tar.gzcd etcd-v3.2.9-linux-amd64cp etcd etcdctl /usr/local/bin/ |
然后开启etcd集群:
1、首先创建数据目录:mkdir /data/etcd -p
2、开启服务:
|
1
|
nohup etcd --name auto_scale --data-dir /data/etcd/ --listen-peer-urls http://192.168.44.134:2380,http://192.168.44.134:7001 --listen-client-urls http://192.168.44.134:2379,http://192.168.44.134:4001 --advertise-client-urls http://192.168.44.134:2379,http://192.168.44.134:4001 & |
|
1
2
3
4
5
|
[root@node1 ~]# netstat -tunlp|grep etcdtcp 0 0 192.168.44.134:2379 0.0.0.0:* LISTEN 52094/etcd tcp 0 0 192.168.44.134:2380 0.0.0.0:* LISTEN 52094/etcd tcp 0 0 192.168.44.134:7001 0.0.0.0:* LISTEN 52094/etcd tcp 0 0 192.168.44.134:4001 0.0.0.0:* LISTEN 52094/etcd |
1、创建一个key/value
|
1
|
[root@node1 ~]# curl -s http://192.168.44.134:2379/v2/keys/key1 -XPUT -d value="Hello world" |
2、获取创建的key/value
|
1
|
[root@node1 ~]# curl -s http://192.168.44.134:2379/v2/keys/salt/haproxy/backend_www/www1 |
3、删除创建的key/value
|
1
|
[root@node1 ~]# curl -s http://192.168.44.134:2379/v2/keys/key1 -XDELETE |
或者将上面的输出结果以json格式输出:
|
1
2
3
4
5
6
7
8
9
10
|
[root@node1 ~]# curl -s http://192.168.44.134:2379/v2/keys/salt/haproxy/backend_www/www1|python -m json.tool{ "action": "get", "node": { "createdIndex": 9, "key": "/salt/haproxy/backend_www/www1", "modifiedIndex": 9, "value": "192.168.44.134:8080" }} |
将etcd配置在saltstack中,结合使用:
1、首先需要安装依赖包:
|
1
2
3
4
5
6
7
|
####config etcd my_etcd_config: etcd.host: 192.168.44.134 etcd.port: 4001ext_pillar: - etcd: my_etcd_config root=/salt/haproxy |
3、重启master
|
1
|
[root@node1 ~]# /etc/init.d/salt-master restart |
|
1
2
3
4
5
6
7
8
9
10
11
12
13
|
[root@node1 ~]# salt '*' pillar.itemsnode2: ---------- backend_www: ---------- zabbix-agent: ---------- Zabbix_Server: 192.168.44.134 zabbix-agent-host: ---------- zabbix_host: node2 |
现在通过添加etcd的key来增加haproxy后端的节点服务器:
|
1
|
curl -s http://192.168.44.134:2379/v2/keys/salt/haproxy/backend_www/www1 -XPUT -d value="192.168.44.134:8081"|python -m json.tool |
2、查看pillar
|
1
2
3
4
5
6
7
|
[root@node1 ~]# salt '*' pillar.itemsnode1: ---------- backend_www: ---------- www1: 192.168.44.134:8081 |
3、修改haproxy配置文件:vim /srv/salt/prod/cluster/files/haproxy-outside.cfg
|
1
2
3
|
{% for www,www_ip in pillar.backend_www.iteritems() %}server {{ www }} {{ www_ip }} check inter 1000{% endfor %} |
4、修改haproxy状态配置文件:vim /srv/salt/prod/cluster/haproxy-outside.sls
|
1
2
3
4
5
6
7
8
|
haproxy-service: file.managed: - name: /etc/haproxy/haproxy.cfg - source: salt://cluster/files/haproxy-outside.cfg - user: root - group: root - mode: 644 - template: jinja 新增一行,使用jinja模板,使用变量 |
测试并验证:

|
1
2
3
4
5
6
7
8
9
10
11
12
13
14
15
16
17
18
19
20
|
[root@node1 ~]# curl -s http://192.168.44.134:2379/v2/keys/salt/haproxy/backend_www/www2 -XPUT -d value="192.168.44.134:8080"|python -m json.tool { "action": "set", "node": { "createdIndex": 14, "key": "/salt/haproxy/backend_www/www2", "modifiedIndex": 14, "value": "192.168.44.134:8080" }}[root@node1 ~]# curl -s http://192.168.44.134:2379/v2/keys/salt/haproxy/backend_www/www3 -XPUT -d value="192.168.44.135:8080"|python -m json.tool { "action": "set", "node": { "createdIndex": 15, "key": "/salt/haproxy/backend_www/www3", "modifiedIndex": 15, "value": "192.168.44.135:8080" }} |
查看设置的pillar:
|
1
2
3
4
5
6
7
8
9
10
11
|
[root@node1 ~]# salt '*' pillar.itemsnode2: ---------- backend_www: ---------- www1: 192.168.44.134:8081 www2: 192.168.44.134:8080 www3: 192.168.44.135:8080 |
执行salt状态配置文件:

自动化运维-基于etcd加saltstack的自动化扩容
# tar -xf etcd-v2.2.1-linux-amd64.tar.gz

# cd etcd-v2.2.1-linux-amd64

# cp etcd etcdctl /usr/local/bin/
查看版本
# etcd --version
创建数据目录
# mkdir -p /data/etcd
后台运行进程
# nohup etcd --name auto_scale --data-dir /data/etcd/ --listen-peer-urls 'http://192.168.3.12:2380,http://192.168.3.12:7001' --listen-client-urls 'http://192.168.3.12:2379,http://192.168.3.12:4001' --advertise-client-urls 'http://192.168.3.12:2379,http://192.168.3.12:4001' &
创建key和value
# curl -s http://192.168.3.12:2379/v2/keys/message -XPUT -d value="hello world" | python -m json.tool
结果
{

"action": "set",

"node": {

"createdIndex": 5,

"key": "/message",

"modifiedIndex": 5,

"value": "hello world"

}

}
查看key和value
# curl -s http://192.168.3.12:2379/v2/keys/message | python -m json.tool
结果
{

"action": "get",

"node": {

"createdIndex": 5,

"key": "/message",

"modifiedIndex": 5,

"value": "hello world"

}

}
删除key,可以看到查不到了
# curl -s http://192.168.3.12:2379/v2/keys/message -XDELETE | python -m json.tool
结果
{

"action": "delete",

"node": {

"createdIndex": 5,

"key": "/message",

"modifiedIndex": 6

},

"prevNode": {

"createdIndex": 5,

"key": "/message",

"modifiedIndex": 5,

"value": "hello world"

}

}
查看删除
# curl -s http://192.168.3.12:2379/v2/keys/message | python -m json.tool
结果
{

"cause": "/message",

"errorCode": 100,

"index": 6,

"message": "Key not found"

}
建一个只存在25秒的键值,25秒后发现该键值查不到了
# curl -s http://192.168.3.12:2379/v2/keys/ttl_use -XPUT -d value='hello world 1' -d ttl=25 | python -m json.tool
结果
{

"action": "set",

"node": {

"createdIndex": 9,

"expiration": "2017-04-18T03:04:54.538607442Z",

"key": "/ttl_use",

"modifiedIndex": 9,

"ttl": 25,

"value": "hello world 1"

}

}
查看
# curl -s http://192.168.3.12:2379/v2/keys/ttl_use | python -m json.tool
结果
{

"action": "get",

"node": {

"createdIndex": 9,

"expiration": "2017-04-18T03:04:54.538607442Z",

"key": "/ttl_use",

"modifiedIndex": 9,

"ttl": 24,

"value": "hello world 1"

}
编辑salt,修改etcd相关配置
# vim /etc/salt/master

etcd_pillar_config:

etcd.host: 192.168.3.12

etcd.port: 4001

ext_pillar:

- etcd: etcd_pillar_config root=/salt/haproxy/
重启服务
# /etc/init.d/salt-master restart
测试
curl -s http://192.168.3.12:2379/v2/keys/salt/haproxy/backend_www_chinasoft_com/web-node1 -XPUT -d value="192.168.3.12:8080" | python -m json.tool
结果
{

"action": "set",

"node": {

"createdIndex": 11,

"key": "/salt/haproxy/backend_www_chinasoft_com/web-node1",

"modifiedIndex": 11,

"value": "192.168.3.12:8080"

}
安装etcd
# yum install -y python-pip

# pip search python-etcd

# pip install python-etcd
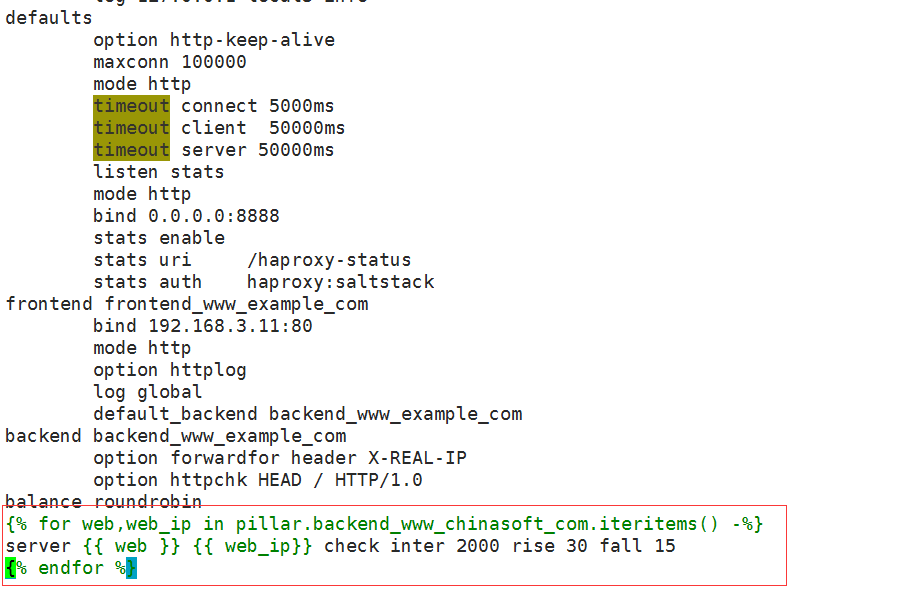
1)编写haproxy的配置文件
vim /srv/salt/prod/cluster/files/haproxy-outside.cfg


 balance roundrobin

 {% for web,web_ip in pillar.backend_www_chinasoft_com.iteritems() -%}

 server {{ web }} {{ web_ip}} check inter 2000 rise 30 fall 15

 {% endfor %}
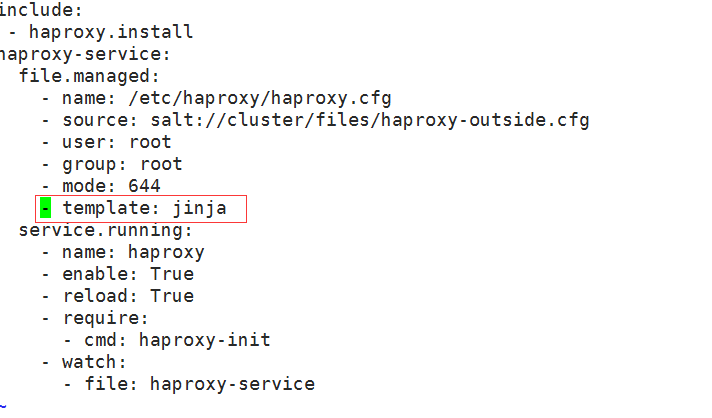
2)编写sls文件
vim /srv/salt/prod/cluster/haproxy-outside.sls

include:

- haproxy.install

haproxy-service:

file.managed:

- name: /etc/haproxy/haproxy.cfg

- source: salt://cluster/files/haproxy-outside.cfg

- user: root

- group: root

- mode: 644

- template: jinja # 添加了jinja这一行

service.running:

- name: haproxy

- enable: True

- reload: True

- require:

- cmd: haproxy-init

- watch:

- file: haproxy-service
执行以下高级状态,如果报错jinja has no attibute backend_www_chinasoft_com重启一下master即可
# salt '*' state.highstate
此时向haproxy添加backend主机
curl -s http://192.168.3.12:2379/v2/keys/salt/haproxy/backend_www_chinasoft_com/web-node2 -XPUT -d value="192.168.3.12:8080" | python -m json.tool

curl -s http://192.168.3.12:2379/v2/keys/salt/haproxy/backend_www_chinasoft_com/web-node3 -XPUT -d value="192.168.3.12:8080" | python -m json.tool

curl -s http://192.168.3.12:2379/v2/keys/salt/haproxy/backend_www_chinasoft_com/web-node4 -XPUT -d value="192.168.3.12:8080" | python -m json.tool
执行变更
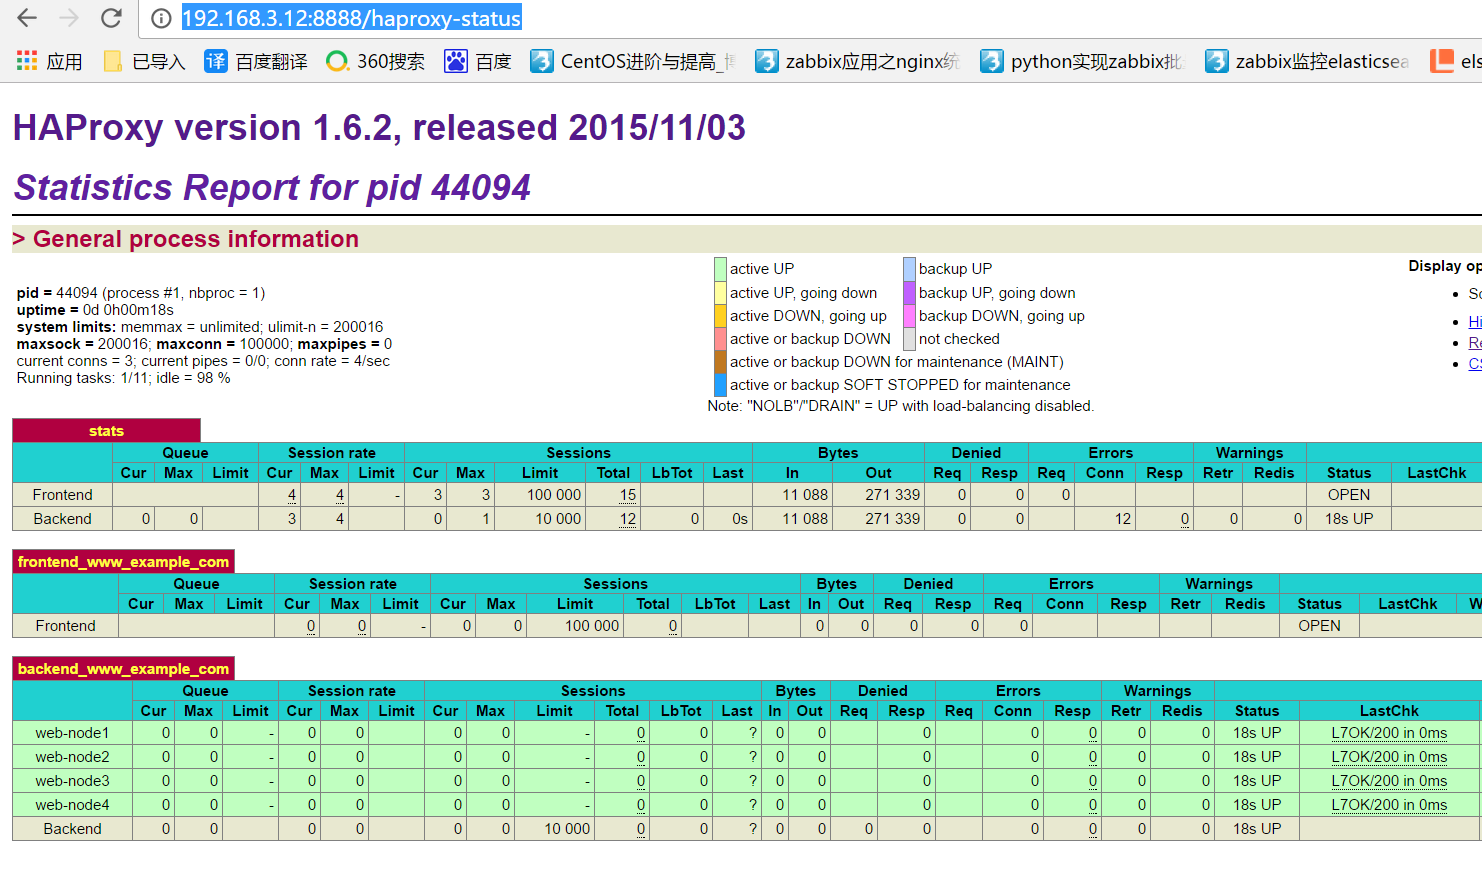
# salt '*' state.highstate
通过访问haproxy的管理界面可以看到成功添加 http://192.168.3.12:8888/haproxy-status
可以看到pillar的选项,如果不能看到需要修改/etc/salt/master (pillar_opts: False)
# salt '*' pillar.items
结果
node2.chinasoft.com:

----------

backend_www_chinasoft_com:

----------

web-node1:

192.168.3.12:8080

web-node2:

192.168.3.12:8080

web-node3:

192.168.3.12:8080

web-node4:

192.168.3.12:8080

zabbix-agent:

----------

Zabbix_Server:

192.168.3.13

mini1:

----------

backend_www_chinasoft_com:

----------

web-node1:

192.168.3.12:8080

web-node2:

192.168.3.12:8080

web-node3:

192.168.3.12:8080

web-node4:

192.168.3.12:8080

zabbix-agent:

----------

Zabbix_Server:

192.168.3.13
编写脚本实现自动添加haproxy后端服务器
# vim auto_add_haproxynode.sh

#!/bin/bash

MAIN_ADD_HOST=$1

create_host(){

echo 'create host ok'

}

deploy_service(){

ADD_HOST_PORT='8080'

}

deploy_code(){

echo 'deploy code ok'

}

service_check(){

STATUS=$(curl -s --head http://"$ADD_HOST":"$ADD_HOST_PORT"/ |grep "200 OK")

if [ -n "$STATUS" ];then

echo 'status check ok'

else

echo 'status check not ok'

exit

fi

}

etcd_key(){

ADD_HOST=$1

curl http://192.168.3.12:2379/v2/keys/salt/haproxy/backend_www_chinasoft_com/$ADD_HOST -XPUT -d value="192.168.3.19:${ADD_HOST_PORT}"

}

sync_state(){

salt '*' state.sls cluster.haproxy-outside env=prod

}

main(){

create_host;

deploy_service;

deploy_code;

etcd_key $MAIN_ADD_HOST;

sync_state;

}

main $1
执行脚本,可以看到成功添加
# ./auto_add_haproxynode.sh web-node18
Saltstack自动化扩容的更多相关文章
- saltstack自动化运维系列11基于etcd的saltstack的自动化扩容
saltstack自动化运维系列11基于etcd的saltstack的自动化扩容 自动化运维-基于etcd加saltstack的自动化扩容# tar -xf etcd-v2.2.1-linux-amd ...
- 基于saltstack自动化部署高可用kubernetes集群
SaltStack自动化部署HA-Kubernetes 本项目在GitHub上,会不定期更新,大家也可以提交ISSUE,地址为:https://github.com/skymyyang/salt-k8 ...
- 七天学会SALTSTACK自动化运维 (3)
七天学会SALTSTACK自动化运维 (3) 导读 SLS TOP.SLS MINION选择器 SLS文件的编译 总结 参考链接 导读 SLS SLS (aka SaLt State file) 是 ...
- 七天学会SALTSTACK自动化运维 (2)
七天学会SALTSTACK自动化运维 (2) 导读 Grains Pillar 总结 参考链接 导读 上一篇主要介绍了安装和基本的使用方法,但是我认为如果理解了相关概念的话,使用会更加顺手,因为毕竟每 ...
- Saltstack自动化操作记录(2)-配置使用 【转】
之前梳理了Saltstack自动化操作记录(1)-环境部署,下面说说saltstack配置及模块使用: 为了试验效果,再追加一台被控制端minion机器192.168.1.118需要在master控制 ...
- Saltstack自动化操作记录(1)-环境部署【转】
早期运维工作中用过稍微复杂的Puppet,下面介绍下更为简单实用的Saltstack自动化运维的使用. Saltstack知多少Saltstack是一种全新的基础设施管理方式,是一个服务器基础架构集中 ...
- Saltstack自动化操作记录(2)-配置使用
之前梳理了Saltstack自动化操作记录(1)-环境部署,下面说说saltstack配置及模块使用: 为了试验效果,再追加一台被控制端minion机器192.168.1.118需要在master控制 ...
- Saltstack自动化操作记录(1)-环境部署
早期运维工作中用过稍微复杂的Puppet,下面介绍下更为简单实用的Saltstack自动化运维的使用. Saltstack知多少Saltstack是一种全新的基础设施管理方式,是一个服务器基础架构集中 ...
- saltstack自动化运维系列⑩SaltStack二次开发初探
saltstack自动化运维系列⑩SaltStack二次开发初探 1.当salt运行在公网或者网络环境较差的条件下,需要配置timeout时间vim /etc/salt/master timeout: ...
随机推荐
- 2021年企业bi工具推荐
数据时代,商业智能工具对于企业了解复杂的大数据非常重要. 我们研究整理了国内外几十个商业智能BI工具,主要就其在功能.性能.价格.体验.安全等方面进行评测,希望帮助企业更好的进行BI产品选型. 一.t ...
- 【c# 操作符】- nameof用法
最重要的是nameof不会影响性能! nameof有什么用?主要用解决 类成员名做参数替代成员们的字符串做参数,如下: using System; namespace csharp6 { intern ...
- 【C#基础概念】vs2019 代码段
打开记事本,输入下面代码,然后把文件后缀改为.snippet .然后通过vs2019 工具>代码段管理导入. <?xml version="1.0" encoding= ...
- 【windows 访问控制】六、安全标识符(SID Security Identifiers)
安全标识符(SID Security Identifiers) SID是用来标识安全主体.就是给安全主体一个唯一的ID.用户层面通过用户账户名识别,程序和资源之间通过SID识别. 什么是安全标识符? ...
- Oracle导出/导入数据方法--两种方法(pde格式/dmp格式)
转至:https://www.cnblogs.com/houbxblogs/articles/13365557.html?ivk_sa=1024320u 1.导出数据方法一(pde格式) 工具→ 导出 ...
- 60天shell脚本计划-11/12-渐入佳境
--作者:飞翔的小胖猪 --创建时间:2021年3月18日 --修改时间:2021年3月22日 说明 每日上传更新一个shell脚本,周期为60天.如有需求的读者可根据自己实际情况选用合适的脚本,也可 ...
- RadioButtton
activity_radio_button.xml <?xml version="1.0" encoding="utf-8"?> <Relat ...
- Qt:输出为CSV文件时汉字乱码
参考 (18条消息) QT5写csv文件,文件打开后中文显示乱码的问题解决_yanzi150207348的博客-CSDN博客 解决方法 1.在文件开头写一段: #if _MSC_VER >= 1 ...
- pyinstaller打包exe文件,运行时一闪而过
pyinstaller打包exe文件出现命令窗口一闪而过 原因:exe运行过程中出错了,解决这些错误就可以了 解决方法: 通过 cd path >> xxx.exe 在命令行中运行exe文 ...
- JZ-059-按之字形顺序打印二叉树
按之字形顺序打印二叉树 题目描述 请实现一个函数按照之字形打印二叉树,即第一行按照从左到右的顺序打印,第二层按照从右至左的顺序打印,第三行按照从左到右的顺序打印,其他行以此类推. 题目链接: 按之字形 ...