第三周作业-N67044-张铭扬
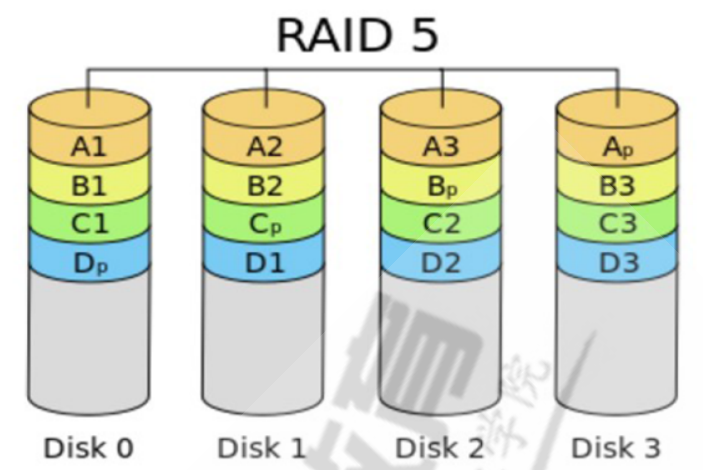
1. 图文并茂说明raid0,raid1, raid10, raid01, raid5等原理。
“RAID”是指独立硬盘冗余阵列(RAID, Redundant Array of Independent Disks),简称磁盘阵列。它是利用虚拟化存储技术把多个硬盘组合起来,成为一个或多个硬盘阵列组,目的为提升性能或数据冗余,或是两者同时提升。
RAID有多种级别,级别不同表示磁盘组织在一起的工作方式有所不同。
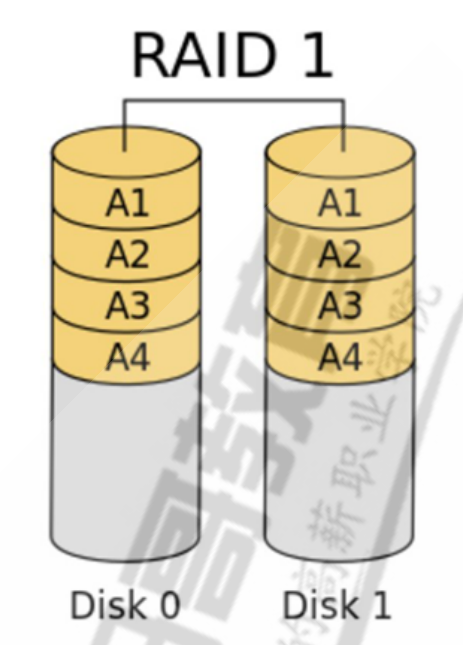
2)RAID-1:RAID-1也称为镜像,是有两组以上的N个磁盘组成的,它将数据完全一致的写入工作磁盘和镜像磁盘中,互为备份。在一些多线程操作系统中能有很好的读取速度,在一些多线程操作系统中能有很好的读取速度,理论上读取速度等于硬盘数量的倍数,与RAID 0相同。但磁盘的容量没有提升,只有50%的利用率。
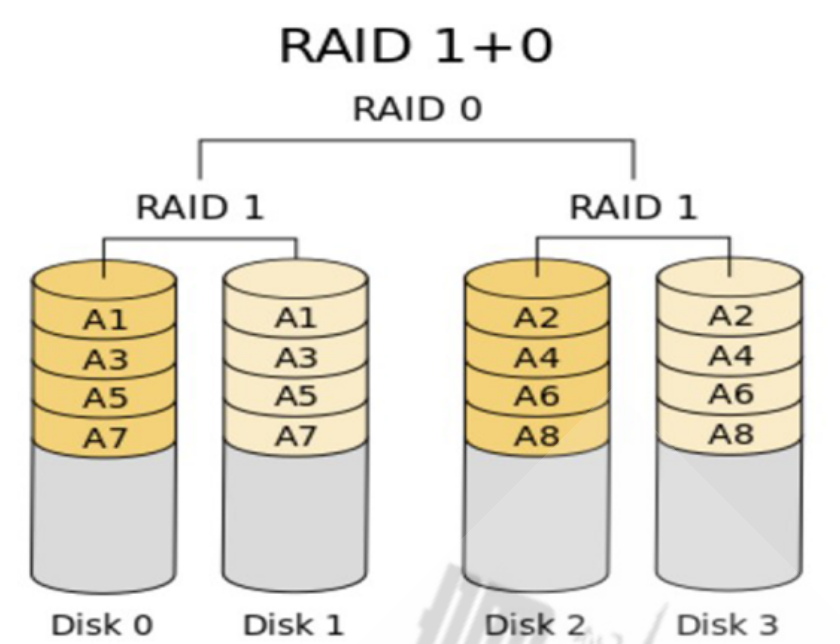
3)RAID-10:RAID-10是一种组合等级,是由多个RAID-1组合成为一个RAID-O,先做镜像再作条带化。由于该组合等级是先用RAID-1模式,所以磁盘利用率还是50%,但是读和写的性能都有提升,并且每组镜像能坏一块因磁盘的容错率。
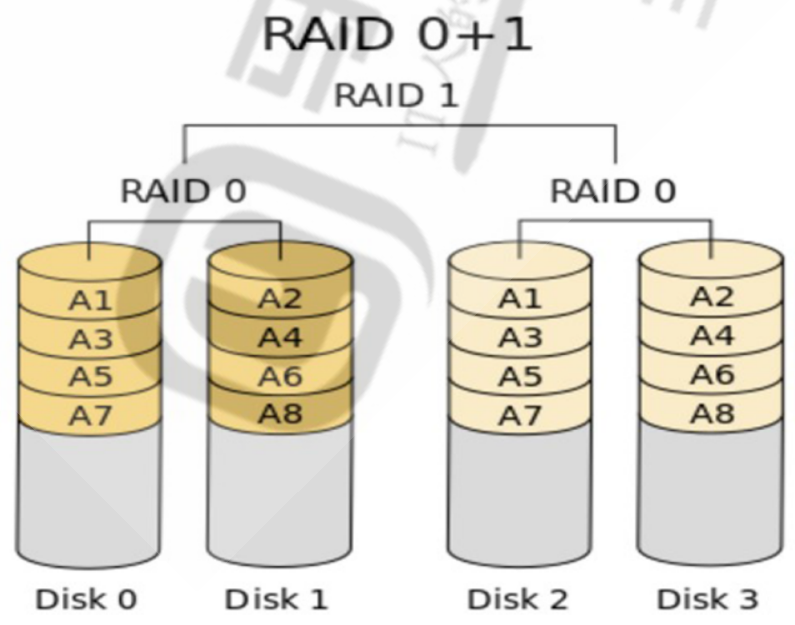
4)RAID-01:RAID-01与RAID-10相反,它是由多块磁盘先组成RAID-0,再组合成RAID-1。在相同的配置下,RAID-01比RAID-10具有更好的容错率。
5)RAID-5:RAID-5是最常见的的RAID等级,它有多块数据盘异或运算值存于校验盘中,对于数据和校验数据,它们的写操作可以同时发生在完全不同的磁盘上。该等级至少3块硬盘才可以实现 。
2. 创建一个至少有两个PV组成的大小为20G的名为testvg的VG,要求PE大小为16M,而后在卷组中创建大小为5G的逻辑卷testlv;挂载至/users目录
1)创建PV
 1 [root@centos8 dev]# lsblk

 2 NAME        MAJ:MIN RM  SIZE RO TYPE MOUNTPOINT

 3 sr0          11:0    1 10.1G  0 rom

 4 nvme0n1     259:0    0  200G  0 disk

 5 ├─nvme0n1p1 259:1    0  100G  0 part /

 6 ├─nvme0n1p2 259:2    0   50G  0 part /data

 7 ├─nvme0n1p3 259:3    0    2G  0 part [SWAP]

 8 ├─nvme0n1p4 259:4    0    1K  0 part

 9 └─nvme0n1p5 259:5    0    1G  0 part /boot

10 nvme0n2     259:6    0   20G  0 disk

11 nvme0n3     259:7    0   10G  0 disk

12 [root@centos8 dev]# pvcreate /dev/nvme0n2

13   Physical volume "/dev/nvme0n2" successfully created.

14 [root@centos8 dev]# pvcreate /dev/nvme0n3

15   Physical volume "/dev/nvme0n3" successfully created.
2)创建VG
[root@centos8 dev]# vgcreate -s 16M testvg /dev/nvme0n2 /dev/nvme0n3

  Volume group "testvg" successfully created

[root@centos8 dev]# vgs

  VG     #PV #LV #SN Attr   VSize   VFree

  testvg   2   0   0 wz--n- <29.97g <29.97g

[root@centos8 dev]# vgdisplay

  --- Volume group ---

  VG Name               testvg

  System ID

  Format                lvm2

  Metadata Areas        2

  Metadata Sequence No  1

  VG Access             read/write

  VG Status             resizable

  MAX LV                0

  Cur LV                0

  Open LV               0

  Max PV                0

  Cur PV                2

  Act PV                2

  VG Size               <29.97 GiB

  PE Size               16.00 MiB

  Total PE              1918

  Alloc PE / Size       0 / 0

  Free  PE / Size       1918 / <29.97 GiB

  VG UUID               1185ZS-uqRT-1GVR-ybCm-Ae4P-3Q99-fBeUv2
3)创建LV
[root@centos8 dev]# vgcreate -s 16M testvg /dev/nvme0n2 /dev/nvme0n3

  Volume group "testvg" successfully created

[root@centos8 dev]# vgs

  VG     #PV #LV #SN Attr   VSize   VFree

  testvg   2   0   0 wz--n- <29.97g <29.97g

[root@centos8 dev]# vgdisplay

  --- Volume group ---

  VG Name               testvg

  System ID

  Format                lvm2

  Metadata Areas        2

  Metadata Sequence No  1

  VG Access             read/write

  VG Status             resizable

  MAX LV                0

  Cur LV                0

  Open LV               0

  Max PV                0

  Cur PV                2

  Act PV                2

  VG Size               <29.97 GiB

  PE Size               16.00 MiB

  Total PE              1918

  Alloc PE / Size       0 / 0

  Free  PE / Size       1918 / <29.97 GiB

  VG UUID               1185ZS-uqRT-1GVR-ybCm-Ae4P-3Q99-fBeUv2

[root@centos8 dev]# lvcreate -L 5G -n testlv textvg

  Volume group "textvg" not found

  Cannot process volume group textvg

[root@centos8 dev]# lvcreate -L 5G -n testlv testvg

  Logical volume "testlv" created.

[root@centos8 dev]# lvs

  LV     VG     Attr       LSize Pool Origin Data%  Meta%  Move Log Cpy%Sync Convert

  testlv testvg -wi-a----- 5.00g

[root@centos8 dev]# lvdisplay

  --- Logical volume ---

  LV Path                /dev/testvg/testlv

  LV Name                testlv

  VG Name                testvg

  LV UUID                2IYLSm-tPIH-zuTi-4LhB-3Vgj-Plo1-PNdrsp

  LV Write Access        read/write

  LV Creation host, time centos8.zhang.org, 2022-07-03 18:04:45 +0800

  LV Status              available

  # open                 0

  LV Size                5.00 GiB

  Current LE             320

  Segments               1

  Allocation             inherit

  Read ahead sectors     auto

  - currently set to     8192

  Block device           253:0
4)挂载
[root@centos8 dev]# mkfs.ext4 /dev/testvg/testlv

mke2fs 1.45.6 (20-Mar-2020)

Creating filesystem with 1310720 4k blocks and 327680 inodes

Filesystem UUID: 9e81c723-a325-4a4e-8883-f05d56e1fd7c

Superblock backups stored on blocks:

    32768, 98304, 163840, 229376, 294912, 819200, 884736

Allocating group tables: done

Writing inode tables: done

Creating journal (16384 blocks): done

Writing superblocks and filesystem accounting information: done

[root@centos8 dev]# mkdir /users

[root@centos8 ~]# mount /dev/testvg/testlv /users

[root@centos8 ~]# lsblk

NAME            MAJ:MIN RM  SIZE RO TYPE MOUNTPOINT

sr0              11:0    1 10.1G  0 rom

nvme0n1         259:0    0  200G  0 disk

├─nvme0n1p1     259:1    0  100G  0 part /

├─nvme0n1p2     259:2    0   50G  0 part /data

├─nvme0n1p3     259:3    0    2G  0 part [SWAP]

├─nvme0n1p4     259:4    0    1K  0 part

└─nvme0n1p5     259:5    0    1G  0 part /boot

nvme0n2         259:6    0   20G  0 disk

└─testvg-testlv 253:0    0    5G  0 lvm  /users

nvme0n3         259:7    0   10G  0 disk
3. 新建用户archlinux,要求其家目录为/users/archlinux,而后su切换至archlinux用户,复制/etc/pam.d/目录至自己的家目录。
[root@centos8 ~]# useradd -d /users/archlinux archlinux

[root@centos8 ~]# id archlinux

uid=1001(archlinux) gid=1001(archlinux) groups=1001(archlinux)

[root@centos8 ~]# su archlinux

[archlinux@centos8 root]$ echo $HOME

/users/archlinux

[archlinux@centos8 etc]$ cp -rp /etc/pam.d/ $HOME
4. 扩展testlv至7G,要求archlinux用户的文件不能丢失
[root@centos8 ~]# lvextend -L 7G /dev/testvg/testlv

  Size of logical volume testvg/testlv changed from 5.00 GiB (320 extents) to 7.00 GiB (448 extents).

  Logical volume testvg/testlv successfully resized.

[root@centos8 ~]# resize2fs /dev/testvg/testlv

resize2fs 1.45.6 (20-Mar-2020)

Filesystem at /dev/testvg/testlv is mounted on /users; on-line resizing required

old_desc_blocks = 1, new_desc_blocks = 1

The filesystem on /dev/testvg/testlv is now 1835008 (4k) blocks long.

[root@centos8 ~]# lsblk

NAME            MAJ:MIN RM  SIZE RO TYPE MOUNTPOINT

sr0              11:0    1 10.1G  0 rom

nvme0n1         259:0    0  200G  0 disk

├─nvme0n1p1     259:1    0  100G  0 part /

├─nvme0n1p2     259:2    0   50G  0 part /data

├─nvme0n1p3     259:3    0    2G  0 part [SWAP]

├─nvme0n1p4     259:4    0    1K  0 part

└─nvme0n1p5     259:5    0    1G  0 part /boot

nvme0n2         259:6    0   20G  0 disk

└─testvg-testlv 253:0    0    7G  0 lvm  /users

nvme0n3         259:7    0   10G  0 disk

[root@centos8 ~]# ll /users/archlinux/pam.d/

total 120

-rw-r--r-- 1 archlinux archlinux 272 May 11  2019 atd

-rw-r--r-- 1 archlinux archlinux 192 Jul 21  2021 chfn

-rw-r--r-- 1 archlinux archlinux 192 Jul 21  2021 chsh

-rw-r--r-- 1 archlinux archlinux 728 Sep  9  2021 cockpit

-rw-r--r-- 1 archlinux archlinux 232 May  7  2021 config-util

-rw-r--r-- 1 archlinux archlinux 328 Nov  9  2019 crond

-r--r--r-- 1 archlinux archlinux 146 May 19  2021 cups

lrwxrwxrwx 1 archlinux archlinux  32 Jun 25 14:21 fingerprint-auth -> /etc/authselect/fingerprint-auth

-rw-r--r-- 1 archlinux archlinux 622 Mar 30  2021 gdm-autologin

-rw-r--r-- 1 archlinux archlinux 561 Mar 30  2021 gdm-fingerprint

-rw-r--r-- 1 archlinux archlinux 307 Mar 30  2021 gdm-launch-environment

-rw-r--r-- 1 archlinux archlinux 787 Mar 30  2021 gdm-password

-rw-r--r-- 1 archlinux archlinux 800 Mar 30  2021 gdm-pin

-rw-r--r-- 1 archlinux archlinux 553 Mar 30  2021 gdm-smartcard

-rw-r--r-- 1 archlinux archlinux 715 Jul 21  2021 login

-rw-r--r-- 1 archlinux archlinux 154 May  7  2021 other

-rw-r--r-- 1 archlinux archlinux 168 Apr  7  2020 passwd

lrwxrwxrwx 1 archlinux archlinux  29 Jun 25 14:21 password-auth -> /etc/authselect/password-auth

-rw-r--r-- 1 archlinux archlinux 155 Jun  2  2021 polkit-1

lrwxrwxrwx 1 archlinux archlinux  25 Jun 25 14:21 postlogin -> /etc/authselect/postlogin

-rw-r--r-- 1 archlinux archlinux 640 Jul 21  2021 remote

-rw-r--r-- 1 archlinux archlinux 143 Jul 21  2021 runuser

-rw-r--r-- 1 archlinux archlinux 138 Jul 21  2021 runuser-l

lrwxrwxrwx 1 archlinux archlinux  30 Jun 25 14:21 smartcard-auth -> /etc/authselect/smartcard-auth

-rw-r--r-- 1 archlinux archlinux 727 Jul 13  2021 sshd

-rw-r--r-- 1 archlinux archlinux 214 Aug 10  2021 sssd-shadowutils

-rw-r--r-- 1 archlinux archlinux 566 Jul 21  2021 su

-rw-r--r-- 1 archlinux archlinux 154 Oct 25  2021 sudo

-rw-r--r-- 1 archlinux archlinux 178 Oct 25  2021 sudo-i

-rw-r--r-- 1 archlinux archlinux 137 Jul 21  2021 su-l

lrwxrwxrwx 1 archlinux archlinux  27 Jun 25 14:21 system-auth -> /etc/authselect/system-auth

-rw-r--r-- 1 archlinux archlinux 248 Oct  5  2021 systemd-user

-rw-r--r-- 1 archlinux archlinux  84 Jul 21  2020 vlock

-rw-r--r-- 1 archlinux archlinux 159 May 27  2021 vmtoolsd

-rw-r--r-- 1 archlinux archlinux 163 Jun 11  2021 xserver
5. 收缩testlv至3G,要求archlinux用户的文件不能丢失
缩减有数据损坏的风险,建议先备份再缩减,xfs文件系统不支持缩减
1)备份
[root@centos8 data]# tar -cvf /data/user.tar /users/

tar: Removing leading `/' from member names

/users/

/users/archlinux/

/users/archlinux/.mozilla/

/users/archlinux/.mozilla/plugins/

/users/archlinux/.mozilla/extensions/

/users/archlinux/.bash_profile

/users/archlinux/.bashrc

/users/archlinux/.bash_logout

/users/archlinux/pam.d/

/users/archlinux/pam.d/chfn

/users/archlinux/pam.d/gdm-autologin

/users/archlinux/pam.d/gdm-launch-environment

/users/archlinux/pam.d/password-auth

/users/archlinux/pam.d/config-util

/users/archlinux/pam.d/other

/users/archlinux/pam.d/atd

/users/archlinux/pam.d/runuser

/users/archlinux/pam.d/xserver

/users/archlinux/pam.d/cups

/users/archlinux/pam.d/passwd

/users/archlinux/pam.d/postlogin

/users/archlinux/pam.d/sssd-shadowutils

/users/archlinux/pam.d/gdm-password

/users/archlinux/pam.d/gdm-smartcard

/users/archlinux/pam.d/fingerprint-auth

/users/archlinux/pam.d/su-l

/users/archlinux/pam.d/system-auth

/users/archlinux/pam.d/systemd-user

/users/archlinux/pam.d/chsh

/users/archlinux/pam.d/vmtoolsd

/users/archlinux/pam.d/polkit-1

/users/archlinux/pam.d/su

/users/archlinux/pam.d/smartcard-auth

/users/archlinux/pam.d/sshd

/users/archlinux/pam.d/login

/users/archlinux/pam.d/vlock

/users/archlinux/pam.d/sudo-i

/users/archlinux/pam.d/sudo

/users/archlinux/pam.d/gdm-pin

/users/archlinux/pam.d/remote

/users/archlinux/pam.d/cockpit

/users/archlinux/pam.d/runuser-l

/users/archlinux/pam.d/crond

/users/archlinux/pam.d/gdm-fingerprint

/users/lost+found/

[root@centos8 data]# ll

total 52

-rw-r--r-- 1 root root 51200 Jul  3 18:47 user.tar
2)缩减
[root@centos8 data]# blkid /dev/testvg/testlv

/dev/testvg/testlv: UUID="9e81c723-a325-4a4e-8883-f05d56e1fd7c" BLOCK_SIZE="4096" TYPE="ext4"

[root@centos8 data]# lvs

  LV     VG     Attr       LSize Pool Origin Data%  Meta%  Move Log Cpy%Sync Convert

  testlv testvg -wi-ao---- 7.00g

[root@centos8 data]# df

Filesystem                1K-blocks    Used Available Use% Mounted on

devtmpfs                     970016       0    970016   0% /dev

tmpfs                        998404       0    998404   0% /dev/shm

tmpfs                        998404    9692    988712   1% /run

tmpfs                        998404       0    998404   0% /sys/fs/cgroup

/dev/nvme0n1p1            104806400 5418152  99388248   6% /

/dev/nvme0n1p2             52403200  398452  52004748   1% /data

/dev/nvme0n1p5               999320  193944    736564  21% /boot

tmpfs                        199680      24    199656   1% /run/user/0

/dev/mapper/testvg-testlv   7159288   23180   6763212   1% /users


[root@centos8 data]# umount /users

[root@centos8 data]# resize2fs /dev/testvg/testlv 3G

resize2fs 1.45.6 (20-Mar-2020)

Please run 'e2fsck -f /dev/testvg/testlv' first.

[root@centos8 data]# fsck -f /dev/testvg/testlv

fsck from util-linux 2.32.1

e2fsck 1.45.6 (20-Mar-2020)

Pass 1: Checking inodes, blocks, and sizes

Pass 2: Checking directory structure

Pass 3: Checking directory connectivity

Pass 4: Checking reference counts

Pass 5: Checking group summary information

/dev/mapper/testvg-testlv: 54/458752 files (0.0% non-contiguous), 50981/1835008 blocks

[root@centos8 data]# resize2fs /dev/testvg/testlv 3G

resize2fs 1.45.6 (20-Mar-2020)

Resizing the filesystem on /dev/testvg/testlv to 786432 (4k) blocks.

The filesystem on /dev/testvg/testlv is now 786432 (4k) blocks long.

[root@centos8 data]# lvs

  LV     VG     Attr       LSize Pool Origin Data%  Meta%  Move Log Cpy%Sync Convert

  testlv testvg -wi-a----- 7.00g

[root@centos8 data]# lvs

  LV     VG     Attr       LSize Pool Origin Data%  Meta%  Move Log Cpy%Sync Convert

  testlv testvg -wi-a----- 7.00g

[root@centos8 data]# df

Filesystem     1K-blocks    Used Available Use% Mounted on

devtmpfs          970016       0    970016   0% /dev

tmpfs             998404       0    998404   0% /dev/shm

tmpfs             998404    9692    988712   1% /run

tmpfs             998404       0    998404   0% /sys/fs/cgroup

/dev/nvme0n1p1 104806400 5418152  99388248   6% /

/dev/nvme0n1p2  52403200  398452  52004748   1% /data

/dev/nvme0n1p5    999320  193944    736564  21% /boot

tmpfs             199680      24    199656   1% /run/user/0

[root@centos8 data]# mount -a

[root@centos8 data]# df

Filesystem     1K-blocks    Used Available Use% Mounted on

devtmpfs          970016       0    970016   0% /dev

tmpfs             998404       0    998404   0% /dev/shm

tmpfs             998404    9692    988712   1% /run

tmpfs             998404       0    998404   0% /sys/fs/cgroup

/dev/nvme0n1p1 104806400 5418152  99388248   6% /

/dev/nvme0n1p2  52403200  398452  52004748   1% /data

/dev/nvme0n1p5    999320  193944    736564  21% /boot

tmpfs             199680      24    199656   1% /run/user/0

[root@centos8 data]# df -h

Filesystem      Size  Used Avail Use% Mounted on

devtmpfs        948M     0  948M   0% /dev

tmpfs           976M     0  976M   0% /dev/shm

tmpfs           976M  9.5M  966M   1% /run

tmpfs           976M     0  976M   0% /sys/fs/cgroup

/dev/nvme0n1p1  100G  5.2G   95G   6% /

/dev/nvme0n1p2   50G  390M   50G   1% /data

/dev/nvme0n1p5  976M  190M  720M  21% /boot

tmpfs           195M   24K  195M   1% /run/user/0


[root@centos8 data]# lvreduce -L 3G /dev/testvg/testlv

  WARNING: Reducing active logical volume to 3.00 GiB.

  THIS MAY DESTROY YOUR DATA (filesystem etc.)

Do you really want to reduce testvg/testlv? [y/n]: y

  Size of logical volume testvg/testlv changed from 7.00 GiB (448 extents) to 3.00 GiB (192 extents).

  Logical volume testvg/testlv successfully resized.

[root@centos8 data]# mount -a

[root@centos8 data]# lvs

  LV     VG     Attr       LSize Pool Origin Data%  Meta%  Move Log Cpy%Sync Convert

  testlv testvg -wi-a----- 3.00g
6. 对testlv创建快照,并尝试基于快照备份数据,验正快照的功能
[root@centos8 ~]# lvcreate -l 64 -s -n testlv-snapshot /dev/testvg/testlv

  Logical volume "testlv-snapshot" created.

[root@centos8 ~]# lvs

  LV              VG     Attr       LSize Pool Origin Data%  Meta%  Move Log Cpy%Sync Convert

  testlv          testvg owi-aos--- 3.00g

  testlv-snapshot testvg swi-a-s--- 1.00g      testlv 0.01

[root@centos8 ~]# mkdir -p /mnt/snap

[root@centos8 testvg]# mount /dev/testvg/testlv-snapshot /mnt/snap

[root@centos8 ~]#rm -rf /users/archlinux/pam.d

[root@centos8 ~]# umount /dev/testvg/testlv-snapshot

[root@centos8 ~]# umount /dev/testvg/testlv

[root@centos8 ~]# lvconvert --merge /dev/testvg/testlv-snapshot

  Merging of volume testvg/testlv-snapshot started.

  testvg/testlv: Merged: 90.88%

  testvg/testlv: Merged: 100.00%

[root@centos8 ~]#ll -d /users/archlinux/pam.d/

drwxr-xr-x. 2 archlinux archlinux 4096 6 Jul  3 18:13 /users/archlinux/pam.d/
7. 创建10G的RAID1,要求CHUNK为128K,文件系统为ext4,有一个空闲盘,开机可自动挂载至/backup目录
[root@centos8 ~]# mdadm -C /dev/md0 -a yes -l 1 -n 2 -x 1 -c 128 /dev/nvme0n2 /dev/nvme0n3

[root@centos8 ~]# mkfs.ext4 /dev/md0

[root@centos8 ~]#vim /etc/fstab

/dev/md0   /backup    ext4    defaults   0    0
8. 创建一个可用空间为10G的RAID10设备,要求CHUNK为256K,文件系统为ext4,开机可自动挂载至/mydata目录
[root@centos8 ~]# ll /dev/nvme*

crw------- 1 root root 244, 0 Jul  3 20:15 /dev/nvme0

brw-rw---- 1 root disk 259, 0 Jul  3 20:15 /dev/nvme0n1

brw-rw---- 1 root disk 259, 1 Jul  3 20:15 /dev/nvme0n1p1

brw-rw---- 1 root disk 259, 2 Jul  3 20:15 /dev/nvme0n1p2

brw-rw---- 1 root disk 259, 3 Jul  3 20:15 /dev/nvme0n1p3

brw-rw---- 1 root disk 259, 4 Jul  3 20:15 /dev/nvme0n1p4

brw-rw---- 1 root disk 259, 5 Jul  3 20:15 /dev/nvme0n1p5

brw-rw---- 1 root disk 259, 6 Jul  3 20:15 /dev/nvme0n2

brw-rw---- 1 root disk 259, 7 Jul  3 20:15 /dev/nvme0n3

brw-rw---- 1 root disk 259, 8 Jul  3 20:15 /dev/nvme0n4

brw-rw---- 1 root disk 259, 9 Jul  3 20:15 /dev/nvme0n5

[root@centos8 ~]# mdadm -C /dev/md1 -a yes -l 10 -n4 -c 256K /dev/nvme0n{2,3,4,5}

mdadm: Defaulting to version 1.2 metadata

mdadm: array /dev/md1 started.

[root@centos8 ~]# mdadm -D /dev/md1

/dev/md1:

           Version : 1.2

     Creation Time : Sun Jul  3 20:17:41 2022

        Raid Level : raid10

        Array Size : 20953088 (19.98 GiB 21.46 GB)

     Used Dev Size : 10476544 (9.99 GiB 10.73 GB)

      Raid Devices : 4

     Total Devices : 4

       Persistence : Superblock is persistent

       Update Time : Sun Jul  3 20:19:06 2022

             State : clean, resyncing

    Active Devices : 4

   Working Devices : 4

    Failed Devices : 0

     Spare Devices : 0

            Layout : near=2

        Chunk Size : 256K

Consistency Policy : resync

     Resync Status : 82% complete

              Name : centos8.zhang.org:1  (local to host centos8.zhang.org)

              UUID : 5f349416:9f5df39f:dbce464e:13485475

            Events : 13

    Number   Major   Minor   RaidDevice State

       0     259        6        0      active sync set-A   /dev/nvme0n2

       1     259        7        1      active sync set-B   /dev/nvme0n3

       2     259        8        2      active sync set-A   /dev/nvme0n4

       3     259        9        3      active sync set-B   /dev/nvme0n5

[root@centos8 ~]# mkfs.ext4 /dev/md1

mke2fs 1.45.6 (20-Mar-2020)

Creating filesystem with 5238272 4k blocks and 1310720 inodes

Filesystem UUID: 681578dc-b3eb-42d9-829a-383d2f2e5f9a

Superblock backups stored on blocks:

    32768, 98304, 163840, 229376, 294912, 819200, 884736, 1605632, 2654208,

    4096000

Allocating group tables: done

Writing inode tables: done

Creating journal (32768 blocks): done

Writing superblocks and filesystem accounting information: done

[root@centos8 ~]# mkdir /mydata

[root@centos8 ~]# vim /etc/fstab

[root@centos8 ~]# cat /etc/fstab

#

# /etc/fstab

# Created by anaconda on Sat Jun 25 06:16:01 2022

#

# Accessible filesystems, by reference, are maintained under '/dev/disk/'.

# See man pages fstab(5), findfs(8), mount(8) and/or blkid(8) for more info.

#

# After editing this file, run 'systemctl daemon-reload' to update systemd

# units generated from this file.

#

UUID=ddca8445-2ae2-433f-8e7e-e336d725d975 /                       xfs     defaults        0 0

UUID=59b71875-aa14-4840-9e31-fbc8bac5f783 /boot                   ext4    defaults        1 2

UUID=983eef86-2784-448d-821d-62a4682e6196 /data                   xfs     defaults        0 0

UUID=3b11b9c7-e4e6-4745-9f32-1a4263e79903 none                    swap    defaults        0 0

/dev/md1                                 /mydata                 ext4    defaults        0 0

[root@centos8 ~]# mount -a

[root@centos8 ~]# df -h

Filesystem      Size  Used Avail Use% Mounted on

devtmpfs        948M     0  948M   0% /dev

tmpfs           976M     0  976M   0% /dev/shm

tmpfs           976M  9.4M  966M   1% /run

tmpfs           976M     0  976M   0% /sys/fs/cgroup

/dev/nvme0n1p1  100G  5.2G   95G   6% /

/dev/nvme0n1p2   50G  390M   50G   1% /data

/dev/nvme0n1p5  976M  190M  720M  21% /boot

tmpfs           195M   12K  195M   1% /run/user/42

tmpfs           195M     0  195M   0% /run/user/0

/dev/md1         20G   45M   19G   1% /mydata
9. 静态配置网卡IP,centos/ubuntu实现
1)centos
[root@centos8 network-scripts]# vim ifcfg-ens160

[root@centos8 network-scripts]# cat ifcfg-ens160

BOOTPROTO=static

IPADDR=10.0.0.150

PREFIX=24

GETWAY=10.0.0.2

DNS1=10.0.0.2

DNS2=180.76.76.76

NAME=ens160

DEVICE=ens160

ONBOOT=yes
2)Ubuntu
root@ubuntu18:/etc/netplan# cat eth0.yaml

# This file describes the network interfaces available on your system

# For more information, see netplan(5).

network:

  version: 2

  renderer: networkd

  ethernets:

    eth0:

      addresses: [10.0.0.151/24]

      gateway4: 10.0.0.2
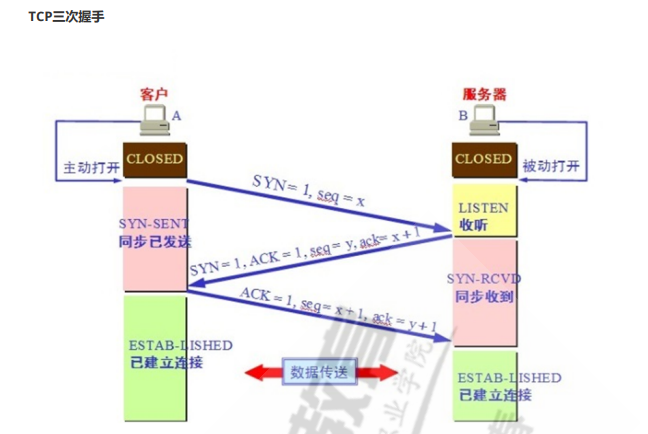
10. 图文并茂解释TCP/IP 3次握手4次断开
三次握手:
1、第一次握手:客户端给服务器发送一个SYN报文。
2、第二次握手:服务器收到 SYN 报文之后,会应答一个 SYN+ACK 报文。
3、第三次握手:客户端收到 SYN+ACK 报文之后,会回应一个 ACK 报文。
4、服务器收到 ACK 报文之后,三次握手建立完成。
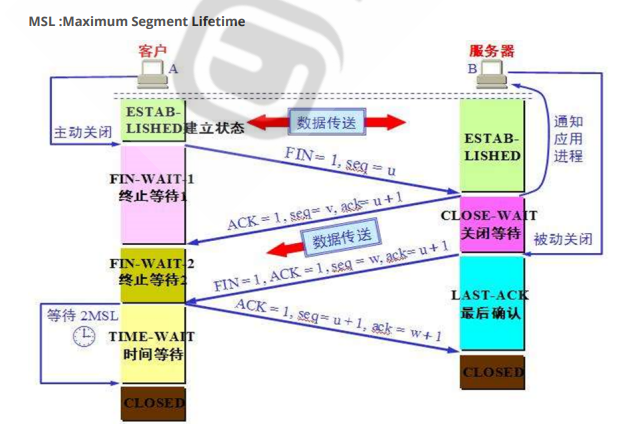
四次挥手:
1:客户端进程发出断开连接指令,这将导致客户端的TCP程序创建一个特殊的TCP报文段,发送到服务器。这个报文段的FIN字段被置为1,表示这是一条断开连接的报文;
2:服务器接收到客户端发来的断开连接报文,向客户端回送这个报文的确认报文(ACK字段为1),告诉服务器已经接收到FIN报文,并允许断开连接;
3:服务器发送完确认报文后,服务器的TCP程序创建一条自己的断开连接报文,此报文的FIN字段被置为1,然后发往客户端;
4:客户端接收到服务器发来的FIN报文段,则产生一条确认报文(ACK为1),发送给服务器,告知服务器已经接收到了它的断开报文。服务器接收到这条ACK报文段后,释放TCP连接相关的资源(缓存和变量),而客户端等待一段时间后(半分钟、一分钟或两分钟),也释放处于客户端的缓存和变量;
11. 网卡绑定bond0的实现
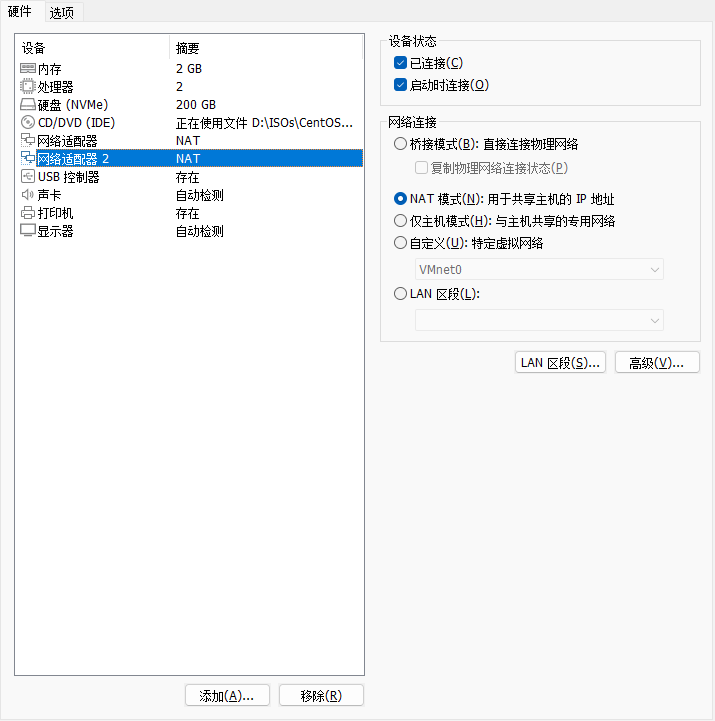
1)添加网卡
[root@centos8 ~]# ip a

1: lo: <LOOPBACK,UP,LOWER_UP> mtu 65536 qdisc noqueue state UNKNOWN group default qlen 1000

    link/loopback 00:00:00:00:00:00 brd 00:00:00:00:00:00

    inet 127.0.0.1/8 scope host lo

       valid_lft forever preferred_lft forever

    inet6 ::1/128 scope host

       valid_lft forever preferred_lft forever

2: ens160: <BROADCAST,MULTICAST,UP,LOWER_UP> mtu 1500 qdisc mq state UP group default qlen 1000

    link/ether 00:0c:29:4b:2f:c7 brd ff:ff:ff:ff:ff:ff

    inet 10.0.0.150/24 brd 10.0.0.255 scope global dynamic noprefixroute ens160

       valid_lft 1783sec preferred_lft 1783sec

    inet6 fe80::20c:29ff:fe4b:2fc7/64 scope link noprefixroute

       valid_lft forever preferred_lft forever

3: virbr0: <NO-CARRIER,BROADCAST,MULTICAST,UP> mtu 1500 qdisc noqueue state DOWN group default qlen 1000

    link/ether 52:54:00:5e:de:71 brd ff:ff:ff:ff:ff:ff

    inet 192.168.122.1/24 brd 192.168.122.255 scope global noprefixroute virbr0

       valid_lft forever preferred_lft forever

4: virbr0-nic: <BROADCAST,MULTICAST> mtu 1500 qdisc fq_codel state DOWN group default qlen 1000

    link/ether 52:54:00:5e:de:71 brd ff:ff:ff:ff:ff:ff

5: ens224: <BROADCAST,MULTICAST,UP,LOWER_UP> mtu 1500 qdisc mq state UP group default qlen 1000

    link/ether 00:0c:29:4b:2f:d1 brd ff:ff:ff:ff:ff:ff
2)创建bond0
root@centos8 ~]# nmcli connection add con-name mybond0 ifname bond0 type bond mode active-backup ipv4.method manual ipv4.addresses 10.0.0.100/24

Connection 'mybond0' (72eb289b-ca00-44c6-a989-40a245afea63) successfully added.

[root@centos8 ~]# cd /etc/sysconfig/network-scripts

[root@centos8 network-scripts]# ls

ifcfg-ens160  ifcfg-mybond0

[root@centos8 network-scripts]# cat ifcfg-mybond0

BONDING_OPTS=mode=active-backup

TYPE=Bond

BONDING_MASTER=yes

PROXY_METHOD=none

BROWSER_ONLY=no

BOOTPROTO=none

IPADDR=10.0.0.100

PREFIX=24

DEFROUTE=yes

IPV4_FAILURE_FATAL=no

IPV6INIT=yes

IPV6_AUTOCONF=yes

IPV6_DEFROUTE=yes

IPV6_FAILURE_FATAL=no

IPV6_ADDR_GEN_MODE=stable-privacy

NAME=mybond0

UUID=72eb289b-ca00-44c6-a989-40a245afea63

DEVICE=bond0

ONBOOT=yes
3)网卡添加到bond0中
[root@centos8 network-scripts]# nmcli con add type bond-slave ifname ens160 master bond0

Connection 'bond-slave-ens160' (606b0ff4-6b58-4767-b605-2ac1d9bb1c61) successfully added.

[root@centos8 network-scripts]# nmcli con add type bond-slave ifname ens224 master bond0

Connection 'bond-slave-ens224' (f02329a9-a2e8-4381-8334-f831c84a17ec) successfully added.

root@centos8 network-scripts]# nmcli connection

NAME               UUID                                  TYPE      DEVICE

ens160             6105387e-245b-434c-ae2d-188e8f6086e7  ethernet  ens160

mybond0            72eb289b-ca00-44c6-a989-40a245afea63  bond      bond0

virbr0             db0a8536-2dc9-48fb-8542-fe6ba80331fd  bridge    virbr0

bond-slave-ens224  f02329a9-a2e8-4381-8334-f831c84a17ec  ethernet  ens224

bond-slave-ens160  606b0ff4-6b58-4767-b605-2ac1d9bb1c61  ethernet  --
12. 实现免密登陆脚本, expect登陆远程主机,将生成的密钥写入到目标主机, expect测试远程登陆。
1)通过shift读取脚本参数
2)通过select来选择功能.例如功能有
- 安装mysql
- 安装apache
- 免密钥登陆主机
当前我们只实现免密钥登陆主机
3)通过函数封装每个功能
4)将免密钥登陆的过程可以重复进行, while 循环实现重复,需要有退出过程。当用户输入exit时,退出免密钥功能。
5)支持输入一批主机免密钥,使用数组 实现
 1 #!/bin/bash

 2 ssh() {

 3         while true;do

 4                 read -p "Enter your ip and password" ip password

 5                         if [ "$ip" = "exit" ];then

 6                                 exit

 7                         fi

 8 expect << EOF

 9 set timeout 15

10 spawn ssh-keygen -t rsa

11 expect {

12         "/root/.ssh/id_rsa)"{ send "\r";exp_continue}

13         "(y/n)?"{ send "y\n";exp_continue}

14         "passphrase):"{ send "\r";exp_continue}

15         "again:"{ send "\r";exp_continue}

16 }

17 spawn ssh-copy-id root@$ip

18 expect {

19         "yes/no"{ send "yes\n";exp_continue }

20         "password"{ send "$password\n"}

21  }

22 expect eof

23 EOF

24 done

25  }

26

27

28 PS3="Please select a function(1-5)"

29 select MENU in 安装sql 安装apache 免密钥登录主机 输入一批主机免密钥 退出;do

30 case $REPLY in

31 1)

32         echo "安装sql";;

33 2)

34         echo "安装apache";;

35 3)

36         ssh;;

37 4)

38         echo "输入一批主机免密钥";;

39 5)

40         echo "exit"

41         break;;

42 "week3.sh" 43L, 774C
第三周作业-N67044-张铭扬的更多相关文章
- JAVA第三周作业(从键盘输入若干数求和)
JAVA第三周作业(从键盘输入若干数求和) 在新的一周,我学习了JAVA的IO编程.下面的代码实现了从键盘输入若干数求和的目标.import java.util.Scanner; public cla ...
- 第三周作业、实时操作系统µC/OS介绍及其它内容
作业要求 见<实时控制软件设计>第三周作业 1 阅读笔记--µC/OS 1.1 基本介绍 µC/OS是由Micrium公司研发的实时操作系统,以µC/OS-II或µC/OS-III为内核, ...
- 2018-2019-1 20189221《Linux内核原理与分析》第三周作业
2018-2019-1 20189221<Linux内核原理与分析>第三周作业 实验二 完成一个简单的时间片轮转多道程序内核代码 实验过程 在实验楼中编译内核 编写mymain.c函数和m ...
- 2017-2018-2 1723《程序设计与数据结构》第三周作业 & 实验一 总结
作业地址 第三周作业:https://edu.cnblogs.com/campus/besti/CS-IMIS-1723/homework/1667 提交情况如图: 实验一:https://edu.c ...
- 第三周作业(一)VS安装及单元测试练习
第三周作业(一) 需求:练习教科书第22~25页单元测试练习,要求自行安装Visual Studio开发平台,版本至少在2010以上,要求把程序安装过程和练习过程写到博客上,越详细越好,要图文并茂,没 ...
- 2017-2018-1 JaWorld 第三周作业
2017-2018-1 JaWorld 第三周作业 团队展示 队员学号 队名 团队项目描述 队员风采 团队的特色 团队合照 团队初步合作 前两周的反思与总结 需要改进的地方 团队选题 *采访老师或有开 ...
- 2017-2018-1 JAVA实验站 第三周作业
2017-2018-1 JAVA实验站 第三周作业 团队展示 队名 JAVA实验站 拟作的团队项目描述 (2048)增加其他模式,使得2048更加丰富多彩 团队的首次合照 团队的特色描述 团队内部很团 ...
- 2017-2018-1 20179205《Linux内核原理与设计》第三周作业
<Linux内核原理与分析>第三周作业 教材学习总结 第三章 进程管理 进程是Unix操作系统抽象概念中最基本的一种,是正在执行的程序代码的实时结果:线程,是在进程中活动的对象.而Linu ...
- 第三周作业-课本&&视频学习
<网络攻防技术与实践>第三周作业 Part I 寻找自己留在互联网上的足迹并消除隐私 1.1 google/baidu搜索自己的qq号 搜索结果如图,搜到的有用信息其实就是图上这么几条,能 ...
- 2019-2020-1 20199329《Linux内核原理与分析》第三周作业
<Linux内核原理与分析>第三周作业 一.上周问题总结: 第二周头脑风暴完成较慢 虚拟机libc配置错误 书本知识使用不够熟练 二.本周学习内容: 1.实验楼环境虚拟一个x86的CPU硬 ...
随机推荐
- vue实现移动端左右菜单双向联动效果
话不多说,上demo <template> <div id="app"> <header>左右列表双向联动</header> < ...
- MongoDB从入门到实战之MongoDB快速入门
前言 上一章节主要概述了MongoDB的优劣势.应用场景和发展史.这一章节将快速的概述一下MongoDB的基本概念,带领大家快速入门MongoDB这个文档型的NoSQL数据库. MongoDB从入门到 ...
- ArcObjects SDK开发 024开发的技术和技巧
1.基本技术 开发方面.会使用C#开发语言和Visual Studio开发工具.会使用WinForm或者WPF开发. 理论知识方面.了解GIS的相关概念,例如矢量数据,栅格数据,空间参考.比例尺等概念 ...
- 记录Typescript的学习调试笔记(比 javascript更具面向对象,强类型检查,静态字段,适合现代的大团队分工与管理风格).
1.)先来一段Typescript的环境安装. 安装nodejs ,下载地址:https://nodejs.org/en/download/ //(node-v12.1 ...
- [OpenCV实战]13 OpenCV中使用Mask R-CNN进行对象检测和实例分割
目录 1 背景介绍 1.1 什么是图像分割和实例分割 1.2 Mask-RCNN原理 2 Mask-RCNN在OpenCV中的使用 2.1 模型下载 2.2 模型初始化 2.3 模型加载 2.4 输出 ...
- ONNX模型分析与使用
本文大部分内容为对 ONNX 官方资料的总结和翻译,部分知识点参考网上质量高的博客. 一,ONNX 概述 深度学习算法大多通过计算数据流图来完成神经网络的深度学习过程. 一些框架(例如CNTK,Caf ...
- node设置下载源
// 设置镜像源 npm config set registry https://registry.npm.taobao.org // 查看当前源 npm config get registry
- python进阶之路5之流程控制(垃圾回收机制)
垃圾回收机制 """ 有一些语言,内存空间的申请和释放都需要程序员自己写代码才可以完成 但是python却不需要 通过垃圾回收机制自动管理 ""&qu ...
- 可持久化栈学习笔记 | 题解 P6182 [USACO10OPEN]Time Travel S
简要题意 你需要维护一个栈,有 \(n\) 个操作,支持: 给定一个 \(x\),将 \(x\) 加入栈. 将一个元素出栈. 给定一个 \(x\),将当前栈回退到 第 \(x\) 操作前. 每一次操作 ...
- Hugging Face - 推理(Inference)解决方案
每天,开发人员和组织都在使用 Hugging Face 平台上托管的模型,将想法变成概念验证(proof-of-concept)的 demo,再将 demo 变成生产级的应用. Transformer ...
